Operator Management
If your business has multiple employees who use the payment terminal, you can require each operator to identify themselves before completing a transaction. Additionally, you can require each operator to enter a password before they can complete an operation; this ensures that no unauthorized individuals can use the terminal.
Operator Identification
Operator Identification & Password

Managing terminal operators involves enabling or disabling the use of operators, creating, editing, or deleting users, choosing whether to require operator passwords, and choosing the operator designation (clerk, driver, or server) on the terminal. Operator management procedures include:
Enable Terminal Operators
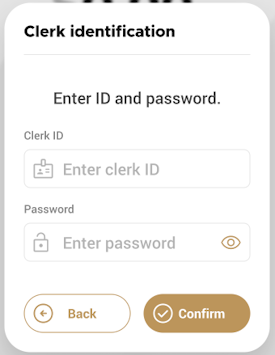
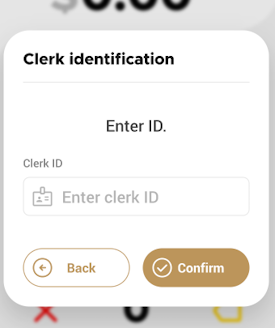
By default, any number of operators can operate the terminal, but you can require individual operators to identify themselves. When enabled, the terminal requires individual operators to enter their identification number prior to completing a transaction.
NOTE: When you enable terminal operators, any sale transaction will require the terminal operator to identify themselves and, if required, enter their password before the Total Sale screen appears.
To enable terminal operators:
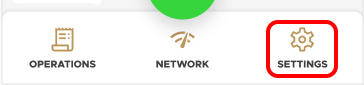
From the main screen, touch Settings.
Enter the merchant password and touch Confirm.
Scroll to the Configure application section.
Touch Application options.
Scroll to the Clerk section.
Toggle the Clerk / Operators switch to the right.
If you have more than one terminal, repeat steps 1 to 6 for each additional terminal where you want operators to identify themselves.
Set Operator Designation
You can configure your payment terminal to the specific type of business and situation it is used in. This enables the terminal to refer to the operator in a way that is appropriate to the business situation and is particularly helpful when you have multiple operators configured for the terminal.
By default, the terminal refers to an operator as "clerk", but the terminal allows for 3 operator designations:
Clerk for a retail business
Driver for delivery or transportation
Server for restaurants
To set the terminal operator's designation:
From the main screen, touch Settings.
Enter the merchant password and touch Confirm.
Scroll to the Configure application section.
Touch Application options.
Scroll to the Clerk section.
Touch Clerk label.
In the Clerk label screen, touch the desired designation that corresponds to your business: Clerk, Driver, or Server.
If you have more than one terminal, repeat steps 1 to 7 for each additional terminal where you want to set the operator's designation.
Create an Operator
When you enable the use of terminal operators, you need to add at least one operator to the terminal. You must also set a password for any operator you create, whether you intend to require operator password verification or not.
NOTE: If you use more than one terminal, you will need to create the same operator(s) with the same password(s) on each terminal.
When you create an operator, you assign a numerical identifier and a name, but the operators only input the id number when processing transactions.
To create a terminal operator:
From the main screen, touch Settings.
Enter the merchant password and touch Confirm.
Scroll to the Configure application section.
Touch Application options.
Scroll to the Clerk section.
Touch Clerk management. The Clerk management screen appears, listing any existing operators.
Touch the Create clerk button; the Create clerk screen appears.

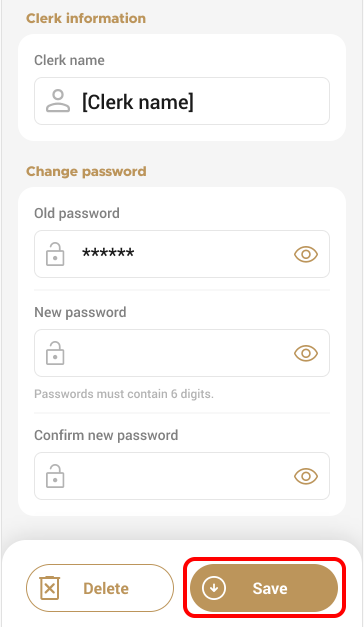
In the Clerk information section, enter a clerk identifier in the Clerk ID field. The clerk identifier must be a number, with a maximum of 15 digits.
Enter the clerk name in the Clerk name field. The clerk name can be alphanumeric (letters and numbers), with a maximum of 15 characters.
Scroll to the Password section and enter a numeric password for the new operator in the New password field. Keep in mind the password requirements when setting the operator's password.
Re-enter the operator's password in the Confirm new password field.
Click the Create clerk button. If the passwords do not match, a message appears and the operator is not created. Re-enter the password; if needed, touch the Show password icon to ensure the passwords match.

After creating the new operator, the Clerk management screen appears with the new operator listed.
If you have more than one terminal, repeat steps 1 to 12 for each additional terminal where you want to create operators.
Change Operator Name
When you create an operator, you assign a unique numeric ID as well as a name. If required, you can change the name without modifying any other parameter. If you have a new employee and you want to maintain the unique ID, you can change the name for the new employee using the operator ID.
NOTE: If you use more than one terminal, you will need to change the same operator name on each terminal.
To change a terminal operator name:
From the main screen, touch Settings.
Enter the merchant password and touch Confirm.
Scroll to the Configure application section.
Touch Application options.
Scroll to the Clerk section.
Touch Clerk management. The Clerk management screen appears, listing any existing operators.

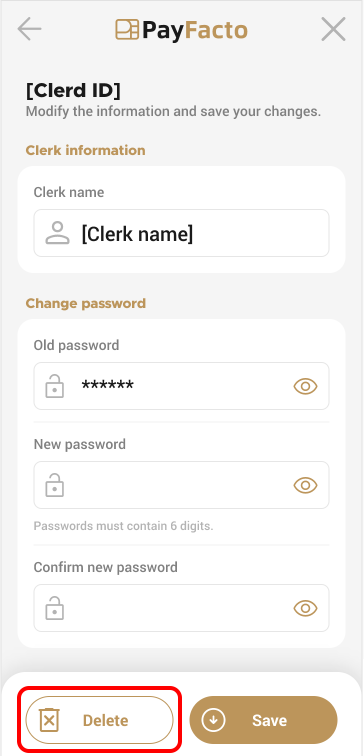
Locate the operator whose name you want to change and click the Edit icon.

Scroll to the Clerk information section and enter the new clerk name in the Clerk name field. The clerk name can be alphanumeric (letters and numbers), with a maximum of 15 characters.
In the Change password section, enter the current operator password in the Old password field. The password requirement prevents unauthorized changes to operator profiles.
Touch the Save button; the new operator name is saved and the Clerk management screen appears.
NOTE: If the password you enter is incorrect, a message appears and the terminal remains on the operator's configuration screen. Re-enter the password; if needed, touch the Show password icon to ensure you entered the correct password.
If you have more than one terminal, repeat steps 1 to 10 for each additional terminal where you want to change the operator's name.
Change Operator Password
When you create an operator, you assign them a unique password. In the event that the operator has forgotten their password, or as part of a regular security hygiene program, you can change the quickly password.
NOTE: If you use more than one terminal, you will need to change the same operator password on each terminal.
To change a terminal operator password:
From the main screen, touch Settings.
Enter the merchant password and touch Confirm.
Scroll to the Configure application section.
Touch Application options.
Scroll to the Clerk section.
Touch Clerk management. The Clerk management screen appears, listing any existing operators.
Locate the operator whose password you want to change and click the Edit icon.
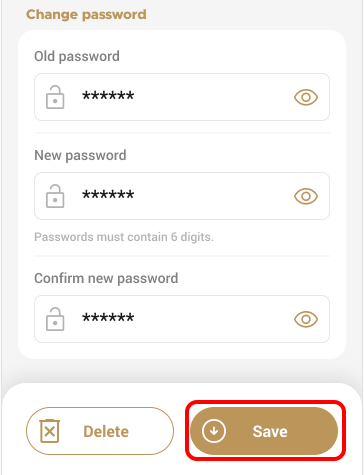
On the operator's configuration page, scroll to the Change password section and enter the current operator password in the Old password field.
Enter a new 6-digit numeric password for the operator in the New password field. Keep in mind the password requirements when setting the operator's new password.
Re-enter the new password in the Confirm new password field.
Touch the Save button; the new password is saved and the Clerk management screen appears.
NOTE: If the current password is incorrect or you enter the new password incorrectly when confirming, a message appears and the terminal remains on the operator's configuration screen. Re-enter the password(s); if needed, touch the Show password icon to ensure you entered the correct password.
If you have more than one terminal, repeat steps 1 to 11 for each additional terminal where you want to change the operator's password.
Require Operator Password Input
In addition to requiring terminal operators to identify themselves, you can require that they enter a password as an additional method of preventing unauthorized use of the terminal.

TIP: You should consider whether you will require clerks to use a password when creating terminal operators. If you forget the operator passwords before enforcing their use, you will have to use the Merchant or Admin passwords to change the operator passwords or delete the operators and start over.
To enable operator password input before completing a transaction:
From the main screen, touch Settings.
Enter the merchant password and touch Confirm.
Scroll to the Configure application section.
Touch Application options.
Scroll to the Clerk section.
Toggle the Password input switch to the right.
If you have more than one terminal, repeat steps 1 to 6 for each additional terminal where you want to require operator password input.
Disable Operator Password Input
If operators identifying themselves and entering a password slows down the speed at which transactions are processed, you can easily disable the password input requirement, requiring only that operators identify themselves.
To disable operator password input before completing a transaction:
From the main screen, touch Settings.
Enter the merchant password and touch Confirm.
Scroll to the Configure application section.
Touch Application options.
Scroll to the Clerk section.
Toggle the Password input switch to the left.
If you have more than one terminal, repeat steps 1 to 6 for each additional terminal where you want to disable operator password input.
Deleting Operators
You may want to remove the requirement for operators to identify themselves. There are two (2) ways to remove operator identification from the terminal:
NOTE: If you use more than one terminal, you will need to remove the operator(s) from each terminal.
Disable Terminal Operators
If you choose to disable operator identification, any operators you have previously configured (including their passwords) will remain stored on the terminal.
To disable terminal operators:
From the main screen, touch Settings.
Enter the merchant password and touch Confirm.
Scroll to the Configure application section.
Touch Application options.
Scroll to the Clerk section.
Toggle the Clerk / Operators switch to the left.
If you have more than one terminal, repeat steps 1 to 6 for each additional terminal where you want to disable operators identification.
Delete an Operator
Deleting a single operator only removes that operator and its associated password from the terminal. All other operators configured on the terminal will remain operational.
NOTE: If you use more than one terminal, you will need to delete the same operator(s) on each terminal.
To delete an individual terminal operator:
From the main screen, touch Settings.
Enter the merchant password and touch Confirm.
Scroll to the Configure application section.
Touch Application options.
Scroll to the Clerk section.
Touch Clerk management. The Clerk management screen appears, listing any existing operators.
Locate the operator to delete and click the Edit icon.
On the operator's configuration page, enter the current operator password in the Old password field. The password requirement prevents operators from being deleted accidentally.
NOTE: If you've forgotten the operator password, you can use the Merchant or Admin password as an override, as explained in the Understanding Password Hierarchy procedure.
Touch the Delete button.
After deleting the operator, the Clerk management screen appears listing the remaining operator(s).
If you have more than one terminal, repeat steps 1 to 9 for each additional terminal where you want to delete an operator.
Last updated
Was this helpful?