Printing
This section will explain how to enable and configure the various printing options for the Freebees app.
If your payment terminal does not have an integrated printer, the printing options will not be available, and the Printer section of the app settings will display whether a printer is available or not by displaying Yes or No for the Printer available function, as shown in the example below:

Topics covered in this section include:
Enable or Disable Printing
If your payment terminal has an integrated printer, you can choose whether to print transaction receipts or not. If you disable printing, customer will have no physical record of their purchase and they will be unable to request a refund without the confirmation code that is printed on the receipt by default.
To enable or disable printing of transaction receipts:
On the main page, touch the ADMIN button at the bottom of the screen.

In the Printer section, toggle the Printer enabled button to On. Printing options appear below the toggle button.

To disable printing, toggle the Printer enabled button to Off.
NOTE: When you disable printing, the app hides all printing options but their settings are retained the next time you enable printing on the terminal.
Configure Printing Options
When you enable printing of transaction receipts, you need to configure the different options from the menus that appear when you toggle Printer enabled to On.
To configure the printing options for transaction receipts:
On the main page, touch the ADMIN button at the bottom of the screen.

In the Printer section, toggle the different options to On or Off, depending on your business needs.

The available printing options are:
Print balance: When enabled, prints the remaining card balance on the transaction receipt.
Print merchant coupon: When enabled, prints the merchant copy of the transaction receipt.
Print customer coupon: When enabled, prints the customer's copy of the transaction receipt.
IMPORTANT! If you disable this function, the customer will not have any physical proof or the confirmation code of their transaction.
Print errors: When enabled, prints any error message related to the transaction.
Quality: Select the print quality for the transaction receipts. The options are:
Low: Lightest printout, prints faster.
Standard: Normal printout setting and speed.
High: Darkest printing, prints slower.
Enable or Disable Header Printing
When you enable printing, the Freebees app can print additional information at the top of each transaction receipt. Although this uses more paper, it allows you to display your merchant name, address, and two additional lines of text.
To enable or disable header printing on transaction receipts:
On the main page, touch the ADMIN button at the bottom of the screen.

In the Printer section, toggle the Header enabled button to On. Header text field options appear below the toggle button.

To disable header printing, toggle the Header enabled button to Off.
Configure Header Text
When you enable the printing of header text on your transaction receipts, you can include up to 5 lines of text with a maximum of 40 characters per line.
TIP: You should prepare your message on a piece of paper in advance, to ensure that you have the correct number of characters per line.
To configure the header text for your transaction receipts:
On the main page, touch the ADMIN button at the bottom of the screen.

Scroll to the Printer section; below the Header enabled toggle button, touch Merchant name, enter your text in the field, and touch OK.

Touch Merchant address 1, enter your text in the field, and touch OK.

If necessary, touch Merchant address 2, enter your text in the field, and touch OK.
If necessary, touch Extra line #1, enter your text in the field, and touch OK.
TIP: You can use the Extra Line #1 and Extra line #2 to display additional information about your business, including telephone number, business hours, and more.

If necessary, touch Extra line #2, enter your text in the field, and touch OK.
Enable or Disable Footer Printing
When you enable printing, the Freebees app can print additional information at the bottom of each transaction receipt. Although this uses more paper, it allows you to display up to four additional lines of text that can include operating hours, website address, telephone number, and more.
To enable or disable footer printing on transaction receipts:
On the main page, touch the ADMIN button at the bottom of the screen.

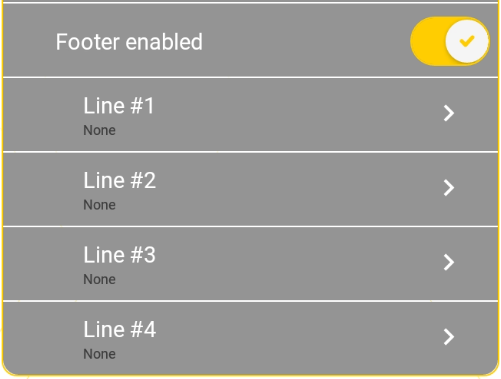
In the Printer section, toggle the Footer enabled button to On. Footer text field options appear below the toggle button.

To disable footer printing, toggle the Footer enabled button to Off.
Configure Footer Text
When you enable the printing of footer text on your transaction receipts, you can include up to 4 lines of text with a maximum of 40 characters per line.
TIP: You should prepare your message on a piece of paper in advance, to ensure that you have the correct number of characters per line.
To configure the footer text for your transaction receipts:
On the main page, touch the ADMIN button at the bottom of the screen.

Scroll to the Printer section; below the Footer enabled toggle button, touch Line #1 and enter your footer text in the field and touch OK.

Repeat step 2 for each additional line of footer text you wish to add, by touching Line #2, Line #3, and Line #4 the text you enter for these fields will appear on all the transaction receipts.
Last updated
Was this helpful?

