> For the complete documentation index, see [llms.txt](https://docs.payfacto.com/payfacto-knowledge/llms.txt). Markdown versions of documentation pages are available by appending `.md` to page URLs; this page is available as [Markdown](https://docs.payfacto.com/payfacto-knowledge/canada-doc-center/terminals/mobile/pax-a920-pro/terminal-overview.md).
# Terminal Overview
## Terminal Overview
### Introduction
The PAX A920 Pro mobile payment terminal is perfect for most applications, whether retail, bar/restaurant, or delivery/transportation. This setup guide describes the following topics:
* [Terminal Hardware](#terminal-hardware)
* Initial terminal configuration
* [Charging the Terminal](broken://pages/L385boH9Yf8mPu5SGK5E#charging-the-terminal)
* [Installing the Printer Paper](broken://pages/L385boH9Yf8mPu5SGK5E#installing-the-printer-paper)
* [Configuring the Terminal Network Connections](broken://pages/L385boH9Yf8mPu5SGK5E#configuring-the-terminal-network-connections)
* [Installing the SIM Card](broken://pages/L385boH9Yf8mPu5SGK5E#installing-the-sim-card)
* [Configuring the Terminal Wi-Fi Connection](broken://pages/L385boH9Yf8mPu5SGK5E#configuring-the-terminal-wi-fi-connection)
* [Configuring the Terminal Display Language](broken://pages/L385boH9Yf8mPu5SGK5E#configuring-the-terminal-display-language)
* Activating the terminal
* [Terminal Activation](broken://pages/1Q41NUtcl1KNTMi8Vrmi#terminal-activation)
* [Activate Terminal](broken://pages/1Q41NUtcl1KNTMi8Vrmi#activate-terminal)
* [Set Passwords](broken://pages/1Q41NUtcl1KNTMi8Vrmi#set-passwords)
* Working with the terminal
* [Powering the Terminal On or Off](broken://pages/ni3Oc8jWyUyX1Sg4ojxz#powering-the-terminal-on-or-off)
* [Terminal Input Options](broken://pages/ni3Oc8jWyUyX1Sg4ojxz#terminal-input-options)
* [Card Payment Options](broken://pages/ni3Oc8jWyUyX1Sg4ojxz#card-payment-options)
* [Replacing the Printer Paper](broken://pages/ni3Oc8jWyUyX1Sg4ojxz#replacing-the-printer-paper)
***
### A920 Pro Terminal Overview
This document will introduce you to your payment terminal as well as guide you through the process of preparing and configuring it in order to quickly begin processing payments.
\
Your PAX A920 Pro payment processing terminal comes with the following:
| - Payment terminal
- Roll of printer paper
- AC power outlet
- USB to USB Type-C charging cable
|  |
| --------------------------------------------------------------------------------------------------------------------------------- | ---------------------------------------------------------------------------------------------------------------------------- |
You may also have an optional charger and external printer included, but this document addresses the most basic delivery configuration.
***
### Terminal Hardware
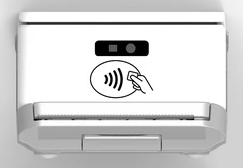
The following illustrations show the location of the main terminal features and hardware:
| 1. Magnetic stripe reader
2. Color touchscreen
3. Chip card reader
4. Scanner button
| 5. Volume control button
6. USB Type-C charging port
7. Power button
8. Scanner
9. Contactless payment reader
| 10. Printer
11. Printer latch
12. Rear camera
13. Battery cover
14. Battery cover latch
|
| ----------------------------------------------------------------------------------------------------------------------------- | ------------------------------------------------------------------------------------------------------------------------------------------------------------------------------------------------------------------------------------------------------------------------ | ------------------------------------------------------------------------------------------------------------------------- |
|  | 

|  |