LogoLogo
FrançaisPayFacto homepageContact us
Canada Doc Center
Canada Doc Center
  • TERMINALS
    • Mobile
      • PAX A920
        • Terminal Overview
        • Terminal Setup and Configuration
        • Terminal Activation
        • Terminal Usage
      • PAX A920 Pro
        • Terminal Overview
        • Initial Terminal Configuration
        • Terminal Activation
        • Working with the Terminal
      • A920 / A920 Pro Accessories
        • PAX A920 - A920 Pro Terminal Charging Base Installation Guide
          • Charging Base Overview
          • Charging Base Installation
          • Using the Charging Base
        • PAX A920 Multi-Terminal (5) Charging Base Installation Guide
          • Charging Base Overview
          • Charging Base Installation
          • Using the Charging Base
    • Countertop
      • PAX A80
        • A80 Spec
        • A80 Setup Guide
          • Introduction
          • A80 Terminal Overview
            • Overview
            • Terminal Hardware
            • A80 Communication Ports
          • Terminal Setup and Configuration
            • Installing the Printer Paper
            • Connect the Terminal Cables
            • Configuring the Terminal Display Language
            • Configuring the Terminal Network Connections
            • Configuring the Terminal Ethernet Connection
            • Configuring the Terminal Wi-Fi Connection
          • Terminal Activation
            • Overview
            • Activate Terminal
            • Set Passwords
          • Working with the Terminal
            • Powering the Terminal On or Off
            • Terminal Input Options
            • Replacing the Printer Paper
            • Card Payment Options
        • Accessories
          • Introduction
          • Installing the T Bracket
          • Cable Installation
      • Pax A35 CA
        • Introduction
          • A35 Terminal Overview
          • Terminal Hardware
          • A35 Communication Ports
        • Terminal Setup and Configuration
          • Connect the Multi-Function Cable
          • Power On the Terminal
          • Configure the Terminal Display Language
          • Configuring the Terminal Network Connections
          • Configuring the Terminal Ethernet Connection
          • Configuring the Terminal Wi-Fi Connection
        • Terminal Activation
          • Overview
          • Activate Terminal
          • Set Passwords
        • Terminal Usage
          • Powering the Terminal On or Off
          • Terminal Input Options
          • Card Payment Options
    • Unattended
      • PAX IM30 (Canada Only)
        • Terminal Overview
        • Terminal Setup and Configuration
        • Terminal Activation
        • Terminal Installation and Maintenance
        • Terminal Usage
  • APPLICATIONS
    • Secure Payment
      • Terminal Activation User Guide
      • App to App Module User Guide
        • App to App Application
          • Configuration Settings
          • Transaction Management
          • Configure Tipping Options
          • Configure Cashback Options
          • Configure Printing Options
          • Configure Password Options
          • Help and Training Tools
        • Tasks and How-tos
          • Transaction Workflow
          • Switch to Standalone Mode
          • Gift Card Transactions
      • Gateway Module User Guide
        • Overview - Gateway Module
        • Gateway Application
          • Configuration Settings
          • Connection Settings
          • Transaction Management
          • Configure Tipping Options
          • Configure Cashback Options
          • Configure Printing Options
          • Configure Password Options
          • Help and Training Tools
        • Tasks and How-Tos
          • Full Transaction Workflow
          • Switch to Standalone Mode/Switch Back
          • GiftCard Transactions
      • Payment Standalone Mode
        • Payment Module
        • Transactions
          • Card Sale No Tip/With Tip
          • Debit Sale With Cashback
          • Pre-Authorization/Increment/Completion
          • Reimbursing a Sale
          • Credit Account Verification
          • Force Post
          • Cash Sale
          • Search for a Transaction
          • Process a Settlement
          • Manual Transactions
          • Gift Card Transactions
        • Tipping
        • Cashback
        • Operator Management
        • Passwords
        • Printing Options
        • Terminal Configuration
          • Display language and Theme settings
          • Select Accepted Card Type
          • Application Exit Password
          • Automatic Invoice Numbering
          • Confirmation Screen on Void or Pre-authorization Completion
          • Customer Payment Method Selection
          • Auto Start Secure Payment
          • Terminal Reboot
          • Contactless Transactions
          • Automatic Report Printing
          • Test Network Connection
          • Download Terminal Configuration
        • Reporting
        • Help and Training Tools
      • Application SecurePay Module
        • Overview
        • Requirements
        • STPI Secure Installation
        • Maitre'D Configuration
          • Electronic Funds Transfer Setup
          • Assign a Payment Terminal
          • Main Media Type for SecurePay
          • Media Type mappings
          • Generic Media Type mapping
          • Employee Configurations
        • SecurePay Application
          • Configuration Settings
          • Accessing Configuration Settings
          • Connection Settings
          • Duplicate Transaction Options
          • Table Search Options
          • Split Calculation Options
          • Select POS Type
          • Transaction Management
            • Transaction Management
            • Search for a Transaction
            • Print Detailed Transaction Report
            • Print Batch Summary Report
          • Configure Tipping Options
            • Tipping and Cashback
            • Tipping
            • Cashback
          • Configure Printing Options
            • Enable Transaction Receipt Printing
            • Enable Merchant Transaction Receipt
            • Select Printout Contrast Level
            • Select Which Transactions to Print
            • Reprint a Transaction Receipt
            • Enable Personalized Message on Receipt Footer
            • Configure Personalized Footer Message
            • Edit or Delete Personalized Footer Message
            • Disable Personalized Message on Receipt Footer
            • Disable Merchant Transaction Receipt
            • Disable Transaction Receipt Printing
          • Configure Password Options
            • Passwords
            • Understanding Password Hierarchy
            • Password Requirements
            • Incorrect Password Entries
            • Forgotten Passwords
            • Change Administrator Password
            • Change Merchant Password
            • Password Protection for Functions and Transactions
            • Reimbursement Passwords
            • Sales Transaction Passwords
            • Application Exit Password
          • Help and Training Tools
            • Training Mode
            • Enable Training Mode
            • Disable Training Mode
            • Getting Support
            • Exiting the Application
            • About Secure Payment
        • Payment Process
          • Payment process initiated by the POS
          • Working with Tips
          • Gift Card Transactions
        • Troubleshooting
      • Application SecureTable Module
        • Overview
        • Requirements
        • STPI Secure Installation
          • Installation Process Overview
          • Install Microsoft .NET Framework 3.5 SP1
          • Install Java for Windows
          • Install the STPISecure Client software
          • Activate the STPI Secure License
          • Start the STPI Client for the first time
          • Configure the STPI Client as a Service
        • Maitre'D Configuration
          • Maitre'D Electronic Funds Transfer Module Setup
          • Media Type mappings for SecureTable or SecurePay
          • Generic Media Type mapping for SecureTable or SecurePay
        • SecureTable Application
          • Configuration Settings
          • Accessing Configuration Settings
          • Connection Settings
          • Duplicate Transaction Options
          • Table Search Options
          • Split Calculation Options
          • Select POS Type
          • Transaction Management
            • Transaction Management
            • Search for a Transaction
            • Print Detailed Transaction Report
            • Print Batch Summary Report
          • Configure Tipping Options
            • Tipping and Cashback
            • Tipping
            • Cashback
          • Configure Printing Options
            • Printing Options
            • Enable Transaction Receipt Printing
            • Enable Merchant Transaction Receipt
            • Select Printout Contrast Level
            • Select Which Transactions to Print
            • Reprint a Transaction Receipt
            • Enable Personalized Message on Receipt Footer
            • Configure Personalized Footer Message
            • Edit or Delete Personalized Footer Message
            • Disable Personalized Message on Receipt Footer
            • Disable Merchant Transaction Receipt
            • Disable Transaction Receipt Printing
          • Configure Password Options
            • Passwords
            • Understanding Password Hierarchy
            • Password Requirements
            • Incorrect Password Entries
            • Forgotten Passwords
            • Change Administrator Password
            • Change Merchant Password
            • Password Protection for Functions and Transactions
            • Reimbursement Passwords
            • Sales Transaction Passwords
            • Application Exit Password
          • Help and Training Tools
            • Training Mode
            • Enable Training Mode
            • Disable Training Mode
            • Getting Support
            • Exiting the Application
            • About Secure Payment
        • Payment Process
          • SecureTable Full Transaction Workflow
          • Working with Tips
          • Voids
          • Gift Card Transactions
            • Supported Gift Card Transactions
            • Gift Card Processing Workflow
            • Processing a Sale with Gift Cards
            • Processing a Refund with Gift Cards
        • Tasks and How-tos
          • Task: Add an APN to your Android Payment Terminal
          • Task: Configure Port Forwarding
          • Switch to Standalone Mode
          • Switch Back from Standalone Payment Mode
        • Troubleshooting
          • Microsoft .NET Framework 3.5 is missing
          • Java is missing
    • Payfacto Gift Powered By Freebees
      • Installation and Configuration
      • Standalone Operation
      • Semi-Integrated Operation
      • Integrated Operation
      • Application Management
      • Loyalty and Reward Configuration
      • Gift Card Configuration
      • Card Reader Configuration
      • Application Security
      • Printing
    • PayFacto Gift - DataCandy
      • Introduction
      • Transactions
      • Application Configuration
      • Operator Management
      • Printing
        • Configuring Transaction Printing Options
        • Additional Printing Options
        • Add Personalized Receipt Header
        • Add Personalized Receipt Footer
        • Edit Personalized Messages
        • Deleting Personalized Messages
      • Passwords
        • Understanding Passwords
        • Incorrect Password Entries
        • Forgotten Passwords
        • Change an Operator's Password
        • Change the Administrator Password
        • Password Protection for Transactions
        • Require Password for Manual Gift Card Entry
      • Reporting
  • GENERAL INFORMATION
    • Chargebacks
      • Chargeback Flow
      • Visa Dispute Response Codes (Visa, 2018)
      • Mastercard Dispute Response Codes (Mastercard, 2022)
      • Glossary – Chargebacks
      • Chargebacks FAQ’s
    • Protection Against Fraud
    • Card Brand Network Fee Updates
  • TRAINING
    • Merchant Portal
Powered by GitBook
On this page
  • Installing the Multi-Terminal Charging Base
  • Installing Terminal Silicone Sleeves

Was this helpful?

Export as PDF
  1. TERMINALS
  2. Mobile
  3. A920 / A920 Pro Accessories
  4. PAX A920 Multi-Terminal (5) Charging Base Installation Guide

Charging Base Installation

PreviousCharging Base OverviewNextUsing the Charging Base

Last updated 1 year ago

Was this helpful?

LogoLogo

Legals

  • Terms & conditions

© 2024 PayFacto, Inc. All rights reserved.

Installing the Multi-Terminal Charging Base

Before you install and connect the multi-terminal charging base, make sure that the desired location is within reach of an AC outlet and that there is enough space to for the charging base and the terminals when connected.

To install the multi-terminal charging base:

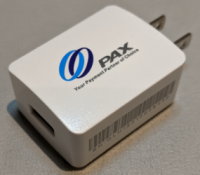
  1. Collect the original AC power adapters that were shipped with your PAX A920 or A920 Pro terminals (maximum of 5 per multi-terminal charging base).
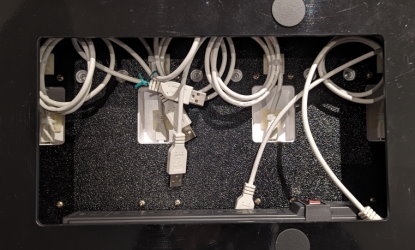
  1. Turn the multi-terminal charging base over to access the opening on the bottom.

  2. Remove any twist ties that secure the charging cables together. Do not remove any of the nylon zip ties as each cable should be long enough to reach an outlet on the power bar.
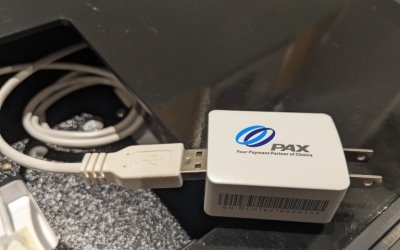
  1. Working one cable at a time, connect the cable’s USB plug into the AC adapter’s USB port.
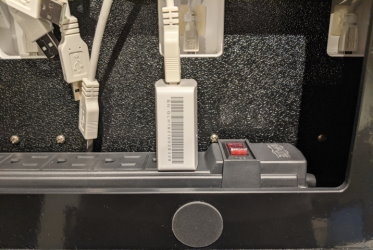
  1. Plug the adapter into an outlet on the power bar.
  1. Repeat steps 4 and 5 for each additional charging cable.

  2. After you connect all 5 cables to the power bar, plug in the power bar's cable to an available AC outlet.

  3. If it is not already, switch the power bar's power button to the On/RESETposition; the switch lights up with a red indicator and the LEDs at the bottom edge of the charging bases light up.
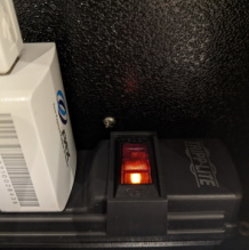
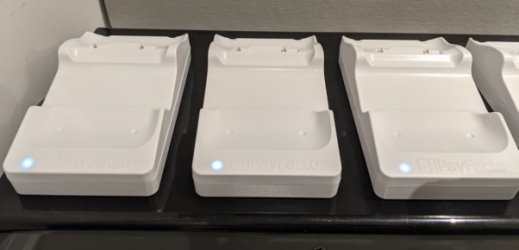
  1. Turn the multi-terminal charging base over to place it securely in its desired location. The base is ready to begin charging your terminals.

IMPORTANT! To minimize the risk of short-circuits and reduce the risk of fire, DO NOT connect any additional devices to the charging base's power bar.


Installing Terminal Silicone Sleeves

To protect your PAX A920 or A920 Pro terminals from minor impact damage, you should install the silicone sleeves provided with the multi-terminal charging base as the charging bases are designed specifically for terminals with the sleeve.

To install the silicone sleeve:

  1. Insert the top of the terminal into the sleeve's printer protection until the sleeve fits snugly onto the terminal’s top.

  2. Pull the bottom of the sleeve over the bottom edge of the terminal.

  3. Repeat for every terminal you intend to place on the charging bases.

NOTE: To add or change a SIM card, you need to remove the sleeve from the terminal.