> For the complete documentation index, see [llms.txt](https://docs.payfacto.com/payfacto-knowledge/llms.txt). Markdown versions of documentation pages are available by appending `.md` to page URLs; this page is available as [Markdown](https://docs.payfacto.com/payfacto-knowledge/canada-doc-center/terminals/mobile/pax-a920-pro/initial-terminal-configuration.md).
# Initial Terminal Configuration
## Initial Terminal Configuration
### Charging the Terminal
After you remove the terminal and accessories from the box, you need to charge the terminal before you can use it. The pre-installed battery has a protective cover on the contacts to prevent the possibility of a short circuit during transport.
\
**To charge the terminal:**
1. Turn the terminal over.
2. On the back of the terminal at the bottom, slide the battery cover locking switch to the right.
3. Lift the battery cover off the terminal. You should notice a plastic tab at the top of the battery.
\

4. Lift the battery from the terminal and remove the plastic tab.
5. Re-install the battery and push on the bottom of the battery to seat it correctly.
6. Re-install the battery cover on the terminal and slide the lock switch to the lock position on the left and turn the terminal over.

7. Insert the USB cable in the AC outlet and connect the outlet to an AC plug.
8. Insert the USB Type-C connector in the terminal’s charging port, located on the left side, below the **Volume control** button. The terminal begins charging.
{% hint style="info" %}
NOTE: The terminal’s charging port may have a protective cover; you will need to remove it before inserting the USB Type-C connector.
{% endhint %}
***
### Installing the Printer Paper
If the supplied roll of printer paper was not already installed in the terminal when you received it, you will need to install it before you can print any transaction receipts.
{% hint style="success" %}
TIP: This procedure also applies to replacing a roll of printer paper.
{% endhint %}
#### **To install the printer paper:**
1. On the back of the terminal near the top, lift the lever to unlock and open the printer cover.
{% hint style="info" %}
NOTE: The printer cover opens on a hinge, it does not come off the terminal.
{% endhint %}
2. The paper tray contains an illustration of how to install the roll of paper.
\
\
Place the roll of printer paper in the paper tray, leaving about 2 inches (5 cm) of paper beyond the printer's cutter.
{% hint style="warning" %}
IMPORTANT! Make sure the paper unrolls from the back of the roll, otherwise the printer will be unable to print the transaction receipt.
{% endhint %}
3. Close the printer cover until it snaps into place and remove any excess paper.
***
### Configuring the Terminal Network Connections
The terminal requires a network connection to communicate with the payment processor server to process transactions.
The PAX A920 Pro is a mobile payment terminal that can connect to mobile (LTE) and wireless (Wi-Fi) networks.
Mobile network access is required for delivery and transportation use, but it can also serve as a backup connection if your Wi-Fi network reception is unreliable in certain areas.
* [Installing the SIM Card](https://documentation.payfacto.com/Terminals/A920Pro/CA-EN/Terminal_Setup_and_Configuration/Installing_the_SIM_Card.htm)
* [Configuring the Terminal Wi-Fi Connection](https://documentation.payfacto.com/Terminals/A920Pro/CA-EN/Terminal_Setup_and_Configuration/Configuring_the_Terminal_Wi-Fi_Connection.htm)
***
### Installing the SIM Card
If you plan to use your terminal outside of your usual wi-fi network, you need to install the mobile SIM card, provided by PayFacto or your mobile communications provider. The SIM card will connect you to a mobile network, allowing you to process payments anywhere the terminal has reception. Mobile network access can also serve as a backup connection if your wi-fi network reception is unreliable in certain areas. The terminal uses the **micro-SIM** card size.

{% hint style="info" %}
NOTE: If you plan to use your terminal only on your wi-fi network, you can skip this procedure and proceed directly to [Configuring the Terminal Wi-Fi Connection](https://documentation.payfacto.com/Terminals/A920Pro/CA-EN/Terminal_Setup_and_Configuration/Configuring_the_Terminal_Wi-Fi_Connection.htm).
{% endhint %}
#### **To install the mobile SIM card:**
1. Make sure the terminal is powered off and turn the terminal over.
2. On the back of the terminal at the bottom, slide the battery cover locking switch to the right.
3. Lift the battery cover off the terminal.
4. Lift the battery from the terminal to remove and set aside.
5. The terminal has illustrations for the different cards it can accept. Insert your SIM card in the space identified as **SIM1** so the diagonal corner is facing the top left side.
{% hint style="warning" %}
IMPORTANT! The SIM card goes into the lower space and should not require great force to insert.
{% endhint %}

6. Re-install the battery and push on the bottom of the battery to seat it correctly.
7. Re-install the battery cover on the terminal and slide the lock switch to the lock position on the left.
\

8. Power on the terminal by pressing and holding the **Power** button for 3 seconds.
The terminal should identify the SIM card and configure the mobile network settings automatically.
***
### Configuring the Terminal Wi-Fi Connection
This section explains how to turn Wi-Fi on and connect to your network.
#### **To connect to your wireless network:**
1. On the terminal’s main screen, touch the **Settings** icon.  2. On the *Settings* screen, touch the **Please Input Password** field and use the keypad to type the password: either **pax9876@@** or **9876**.
3. Touch the checkmark icon on the keypad when you are done and touch **OK**.
2. On the *Settings* screen, touch the **Please Input Password** field and use the keypad to type the password: either **pax9876@@** or **9876**.
3. Touch the checkmark icon on the keypad when you are done and touch **OK**.  4. On the *Settings* page, touch **Network & Internet**.
5. On the *Network & Internet* page, touch **Wi-Fi**.
6. On the *Wi-Fi* page, if **Wi-Fi** is **Off**, touch the toggle to turn it on. If **Wi-Fi** is already on, a list of available networks appears.
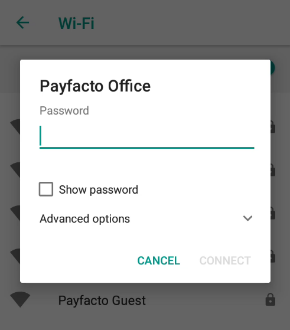
7. From the list of available networks, touch the name of the network you want to connect to.
8. Enter the password for the selected network and touch **CONNECT**.
{% hint style="success" %}
TIP: You can touch **Show password** before typing to ensure you are entering the password correctly.
{% endhint %}
9. After the terminal displays **Connected** for the selected network, touch the **Back** icon to return to the *Network & Internet* page. 
***
### Configuring the Terminal Display Language
By default, the terminal displays all information in English. This procedure explains how to change the terminal’s display language if necessary.
{% hint style="warning" %}
IMPORTANT! Selecting a different language changes all text that appears on the terminal.
{% endhint %}
#### **To change the terminal display language:**
1. On the terminal’s main screen, touch the **Settings** icon.
2. On the *Settings* screen, touch the **Please Input Password** field and use the keypad to type the password: either **pax9876@@** or **9876**.
3. Touch the checkmark icon on the keypad when you are done and touch **OK**.
4. On the *Settings* page, scroll to the bottom and touch **System**.
5. On the *System* page, touch **Languages & input**.
6. On the Languages & input page, touch **Languages**.
7. On the *Language preferences* page, touch **Add a language**.
8. On the *Add a language* page, scroll to and touch the desired language.
{% hint style="info" %}
NOTE: If the language has localized variants, select the appropriate regional option for your country.
{% endhint %}
9. If the selected language does not appear automatically, you can drag the language to the top of the list, as shown below:
\

4. On the *Settings* page, touch **Network & Internet**.
5. On the *Network & Internet* page, touch **Wi-Fi**.
6. On the *Wi-Fi* page, if **Wi-Fi** is **Off**, touch the toggle to turn it on. If **Wi-Fi** is already on, a list of available networks appears.
7. From the list of available networks, touch the name of the network you want to connect to.
8. Enter the password for the selected network and touch **CONNECT**.
{% hint style="success" %}
TIP: You can touch **Show password** before typing to ensure you are entering the password correctly.
{% endhint %}

9. After the terminal displays **Connected** for the selected network, touch the **Back** icon to return to the *Network & Internet* page. 
***
### Configuring the Terminal Display Language
By default, the terminal displays all information in English. This procedure explains how to change the terminal’s display language if necessary.
{% hint style="warning" %}
IMPORTANT! Selecting a different language changes all text that appears on the terminal.
{% endhint %}
#### **To change the terminal display language:**
1. On the terminal’s main screen, touch the **Settings** icon.
2. On the *Settings* screen, touch the **Please Input Password** field and use the keypad to type the password: either **pax9876@@** or **9876**.
3. Touch the checkmark icon on the keypad when you are done and touch **OK**.
4. On the *Settings* page, scroll to the bottom and touch **System**.
5. On the *System* page, touch **Languages & input**.
6. On the Languages & input page, touch **Languages**.
7. On the *Language preferences* page, touch **Add a language**.
8. On the *Add a language* page, scroll to and touch the desired language.
{% hint style="info" %}
NOTE: If the language has localized variants, select the appropriate regional option for your country.
{% endhint %}
9. If the selected language does not appear automatically, you can drag the language to the top of the list, as shown below:
\
