> For the complete documentation index, see [llms.txt](https://docs.payfacto.com/payfacto-knowledge/llms.txt). Markdown versions of documentation pages are available by appending `.md` to page URLs; this page is available as [Markdown](https://docs.payfacto.com/payfacto-knowledge/canada-doc-center/applications/secure-payment/application-securepay-module/securepay-application/configure-printing-options.md).
# Configure Printing Options
## Configure Printing Options
### Printing Options
If your terminal has a built-in printer, or connects to an external printer, there are several printing options you can configure that determine when a transaction receipt gets printed, as well as the receipt's appearance.
If your terminal is equipped with a printer, you can adjust the printer settings to suit your business needs. The available printing options are:
* [Enable Transaction Receipt Printing](/payfacto-knowledge/canada-doc-center/applications/secure-payment/application-securepay-module/securepay-application/configure-printing-options/enable-transaction-receipt-printing.md)
* [Enable Merchant Transaction Receipt](https://documentation.payfacto.com/SecurePayment/SecurePay/UG/CA-EN/SecurePay-Table/Configuration/Application_Configuration/Printing/Enable_Merchant_Transaction_Receipt.htm)
* [Select Printout Contrast Level](https://documentation.payfacto.com/SecurePayment/SecurePay/UG/CA-EN/SecurePay-Table/Configuration/Application_Configuration/Printing/Select_Printout_Contrast_Level.htm)
* [Select Which Transactions to Print](https://documentation.payfacto.com/SecurePayment/SecurePay/UG/CA-EN/SecurePay-Table/Configuration/Application_Configuration/Printing/Select_Which_Transactions_to_Print.htm)
* [Reprint a Transaction Receipt](https://documentation.payfacto.com/SecurePayment/SecurePay/UG/CA-EN/SecurePay-Table/Configuration/Application_Configuration/Printing/Reprint_a_Transaction_Receipt.htm)
* [Enable Personalized Message on Receipt Footer](https://documentation.payfacto.com/SecurePayment/SecurePay/UG/CA-EN/SecurePay-Table/Configuration/Application_Configuration/Printing/Enable_Personalized_Message_on_Receipt_Footer.htm)
* [Configure Personalized Footer Message](https://documentation.payfacto.com/SecurePayment/SecurePay/UG/CA-EN/SecurePay-Table/Configuration/Application_Configuration/Printing/Configure_Personalized_Footer_Message.htm)
* [Edit or Delete Personalized Footer Message](https://documentation.payfacto.com/SecurePayment/SecurePay/UG/CA-EN/SecurePay-Table/Configuration/Application_Configuration/Printing/Edit_or_Delete_Personalized_Footer_Message.htm)
* [Disable Personalized Message on Receipt Footer](https://documentation.payfacto.com/SecurePayment/SecurePay/UG/CA-EN/SecurePay-Table/Configuration/Application_Configuration/Printing/Disable_Personalized_Message_on_Receipt_Footer.htm)
* [Disable Merchant Transaction Receipt](https://documentation.payfacto.com/SecurePayment/SecurePay/UG/CA-EN/SecurePay-Table/Configuration/Application_Configuration/Printing/Disable_Merchant_Transaction_Receipt.htm)
* [Disable Transaction Receipt Printing](https://documentation.payfacto.com/SecurePayment/SecurePay/UG/CA-EN/SecurePay-Table/Configuration/Application_Configuration/Printing/Disable_Transaction_Receipt_Printing.htm)
***
### Enable Transaction Receipt Printing
If your terminal is equipped with (or connects to) a printer, you can print transaction receipts after the transaction is confirmed. By default, the Secure Payment application's payment module enables the printing on transaction receipts, but you can adjust the setting if needed.
{% hint style="info" %}
NOTE: If you do not enable the printing of transaction receipts and provide no other method for a customer to receive proof of their transaction, reimbursements will be more difficult to process.
{% endhint %}
#### **To enable transaction receipt printing:**
1. From the main screen, touch the **Menu** button.\

2. Enter the merchant password and touch **Confirm**.
3. In the **Configure application** section, touch **Printer options**.\

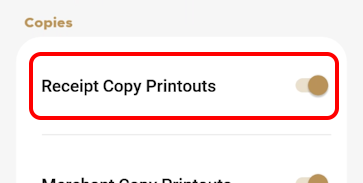
4. In the **Copies** section, slide the **Receipt Copy Printouts** toggle switch to the right if it isn't already enabled.\
5. If you have more than one terminal, repeat steps **1** to **4** for each additional terminal where you want to enable transaction receipt printing.
***
### Enable Merchant Transaction Receipt
When you enable the printing of transaction receipts, the customer receipt is always available to print, but you can choose whether to print the merchant copy or not. Printing the merchant copy for each transaction allows you to reconcile your individual transactions with the batch processing and the transaction reports.
{% hint style="info" %}
NOTE: Printing the transaction receipts for the customer AND merchant will consume more printer paper.
{% endhint %}
#### **To enable the printing of the merchant copy of the transaction receipt:**
1. From the main screen, touch the **Menu** button.\

2. Enter the merchant password and touch **Confirm**.
3. In the **Configure application** section, touch **Printer options**.\

4. In the **Copies** section, slide the **Merchant Copy Printouts** toggle switch to the right if it isn't already enabled. \

5. If you have more than one terminal, repeat steps **1** to **4** for each additional terminal where you want to enable the printing of the merchant copy of the transaction receipt.
***
### Select Printout Contrast Level
The payment terminals use thermal paper to print the transaction receipts. You can adjust the level of contrast for the transaction receipts if they are difficult to read. If you have a mobile or portable payment terminal, the contrast level can affect battery usage.
The following table shows examples of each printout contrast level:
Pale
Lightest printout (lowest contrast), prints faster and uses less battery
Normal
Default printout setting, average printing speed and battery use
Dark
Darkest printing (highest contrast), prints slower and uses more battery
#### **To select the transaction receipt contrast level:**
1. From the main screen, touch the **Menu** button.\

2. Enter the merchant password and touch **Confirm**.
3. In the **Configure application** section, touch **Printer options**.\

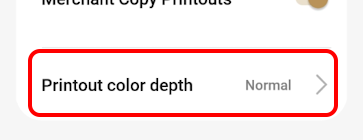
4. In the **Copies** section, touch **Printout color depth**.\
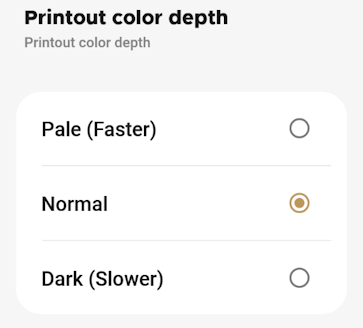
5. On the *Printout color depth* screen, touch the desired contrast level: **Pale**, **Normal**, or **Dark**.\
6. If you have more than one terminal, repeat steps **1** to **5** for each additional terminal where you want to set the printout contrast level.
***
### Select Which Transactions to Print
In addition to printing receipts for sales transactions, you can print receipts for some non-sales transactions, including:
* Declined credit transactions
* Void transactions
* Completed transactions
* Force post transactions
{% hint style="warning" %}
IMPORTANT! If you disable printing for any of these operations, the customer will have no physical evidence of these transactions.
{% endhint %}
In addition to the transactions listed above, you can enable or disable the following printer settings:
* **Bar code**: Prints a barcode on the transaction receipt that identifies the individual transaction; helpful when using a terminal equipped with a scanner when performing refund or void transactions
* **Total line on pre-authorization receipts**: Adds a total line to the transaction receipt that prints when a pre-authorization is confirmed (usually paired with the tip line)
* **Tip line on pre-authorization receipts**: Adds a tip line to the transaction receipt that prints when a pre-authorization is confirmed
* **Cashback print Signature line**: Adds a signature line for cashback transactions for customers to sign as proof that they received the requested cashback amount
* **Reverse on declined**: Prints the transaction result in white on a dark background for declined transactions\


#### **To enable or disable transaction printing and printing options:**
1. From the main screen, touch the **Menu** button.\

2. Enter the merchant password and touch **Confirm**.
3. In the **Configure application** section, touch **Printer options**.\

4. In the **Printing receipts** section, enable each desired function by sliding the toggle switch to the right or disable functions by sliding the toggle switch to the left.
**Enabled Disabled**
 
5. If you have more than one terminal, repeat steps **1** to **4** for each additional terminal where you want to set which transactions will print a transaction receipt.
***
### Reprint a Transaction Receipt
If a transaction receipt is lost or damaged, you can print a duplicate copy of the receipt.
#### **To reprint a transaction receipt:**
1. From the main screen, touch the **Menu** button.\

2. Enter the merchant password and touch **Confirm**.
3. In the **Transaction management** section, touch **Transaction History**.\

4. Scroll to or search for the desired transaction to reprint.
{% hint style="info" %}
NOTE: Because all of a merchant's transactions processed on all terminals are saved immediately to the server, the list of transactions may be quite long. For more information on searching for a transaction, refer to the [*Search for a Transaction*](https://documentation.payfacto.com/SecurePayment/SecurePay/UG/CA-EN/SecurePay-Table/Configuration/Transaction_Management/Search_for_a_Transaction.htm) procedure.
{% endhint %}
* Touch the desired transaction to display the details.
* Touch **Reprint**.\

* In the *Reprint* screen, touch the button for the transaction receipt you want to reprint:
* **Merchant copy**
* **Customer copy**
* **Both copies**
\
The terminal prints the selected duplicate copy(ies) of the transaction receipt.
{% hint style="info" %}
NOTE: If you have more than one terminal and your merchant profile is configured to display only transactions processed on individual terminals, you may need to repeat this procedure if you are unsure of which terminal issued the original transaction receipt.
{% endhint %}
***
### Enable Personalized Message on Receipt Footer
You can add a personalized message at the bottom of every printed transaction receipt. Your message can include business hours, social media coordinates, and more. Your message can contain up to 4 lines with 48 characters (including spaces) per line.
{% hint style="success" %}
TIP: You should prepare your message on a piece of paper in advance, to ensure that you have the correct number of characters per line.
{% endhint %}
#### **To enable a personalized message at the bottom of your transaction receipts:**
1. From the main screen, touch the **Menu** button.\

2. Enter the merchant password and touch **Confirm**.
3. In the **Configure application** section, touch **Printer options**.\

4. Scroll to the bottom of the screen to find the **Footer** section and touch **Print footer**.\

5. On the *Footer option* screen, slide the **Print footer** toggle switch to the right.\

6. If you have more than one terminal, repeat steps **1** to **5** for each additional terminal where you want to enable a personalized message on the bottom of the transaction receipts.
***
### Configure Personalized Footer Message
When you enable printing a personalized message on your transaction receipt footers, you need to configure the message by entering it on one of the four (4) available lines on the receipt footer. \

{% hint style="success" %}
TIP: When preparing your message, consider any languages your customers might speak and configure your personalized message to meet all possible languages. Don't forget to check your message for spelling mistakes!
{% endhint %}
#### **To configure a personalized message at the bottom of your transaction receipts:**
1. From the main screen, touch the **Menu** button.\

2. Enter the merchant password and touch **Confirm**.
3. In the **Configure application** section, touch **Printer options**.\

4. Scroll to the bottom of the screen to find the **Footer** section and touch **Print footer**.\

5. On the *Footer option* screen, delete the text in the **Footer no. 1** field and enter the first line of your custom message.\

6. Repeat step **5** for each additional line you want to use for your personalized message, using the **Footer no. 2**, **Footer no. 3**, and **Footer no. 4** fields.
7. If you have more than one terminal, repeat steps **1** to **6** for each additional terminal where you want to configure the personalized message at the bottom of the transaction receipts.
***
### Edit or Delete Personalized Footer Message