> For the complete documentation index, see [llms.txt](https://docs.payfacto.com/payfacto-knowledge/llms.txt). Markdown versions of documentation pages are available by appending `.md` to page URLs; this page is available as [Markdown](https://docs.payfacto.com/payfacto-knowledge/veloce-pos/veloce/point-of-sales-control/sales-items/item-screens.md).
# Item Screens
Item screens are containers for your Sales Items. They are the basis of how Sales Items will be structured at the POS.
Very often, the item screen's descriptions will be similar to divisions that were created earlier. However, they are not to be confused as their function is not the same. The general idea is to use item screens to group sales items by theme.
#### Examples :
* Starters
* Soups
* Salads
* Burgers
* Sandwiches
* Choice of sauce
* Choice of cook type
* Choice of sides
### How to create item screens
1. Login to the Veloce Back-Office.

2. Start the Point of Sale Control module.

3. Click on the *Menu* shortcut. (You can also use the Sales menu and select the Sales Items... option.)

4. The list of Item Screens appears.
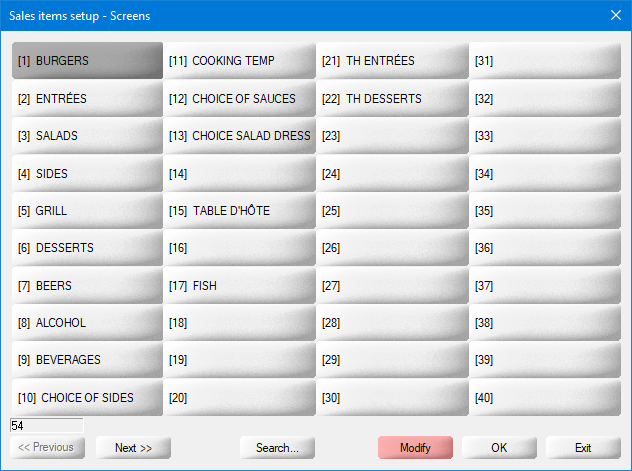

Click on an existing Item Screen to add sales items to it.

Click on an empty placeholder to create a new Item Screen.
 
Use the << Previous and Next >> buttons to navigate between screens. 100 Item Screens placeholders are available.
 Click Search... to bring up a searchable list of all sales items within all Item Screens.
.png) While the Modify button is red, clicking an existing Item Screen will open it up and allow you to add sales items to it.
.png)
Clicking the red Modify button will change its color to green. While the Modify button is green, clicking an existing Item Screen will allow you to change its properties, like its description and various other options.

Click OK to modify the selected Item Screen.

Click Exit to close the Item Screens list.
5. Click an empty placeholder to create a new Item Screen:

***
### Configuration Tab
#### Description
Type the description of the Item Screen as it will be displayed on the POS screen.
#### Second Name
Type an alternate description for multi-language setups.
#### Non-apparent characters
...
#### Shift Reference
...
***
### Options
#### Persisting (stay there)
Enable this option to override the Return to Group functionality, setup in employee function. With this option enabled, the screen will remain visible after ordering an item, even if the Return to Group option is enabled in the employee function. With this option disabled, the screen would disappear immediately after ordering an item from it.
### Restricted Access
Enable this option to restrict access to this screen to managers.
#### Alphabetic Sort
Enable this option to sort the sales items alphabetically on this screen. If this option is disabled, sales items will be sorted by item number.
#### Linked to next screen
Enable this option to combine this item screen with the next one in the Item Screen list, doubling the screen's capacity from 40 to 80 items.
***
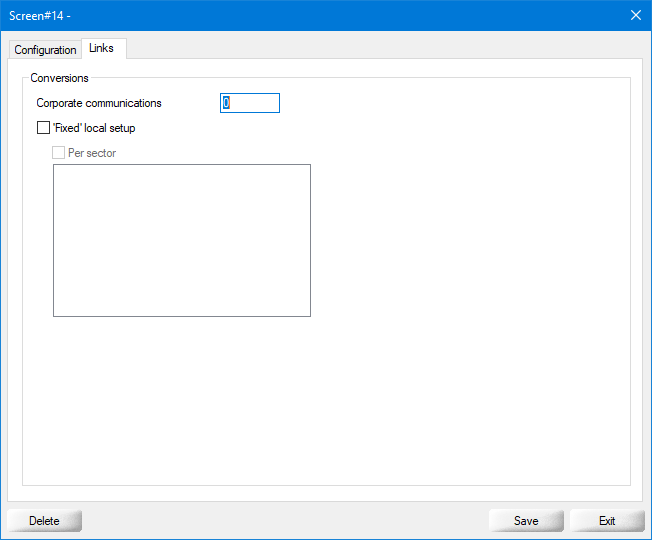
### Links Tab
***
### Conversions
#### Corporate Communications
...
#### 'Fixed' local setup
...
#### Per Sector
...

Click the Delete button to remove this Item Screen and all the items it contains.

Click the Save button to save changes and exit.

Click the Exit button to close this window without saving changes.
Create as many Items Screens as required for your menu.
While the Modify button is red, clicking an existing Item Screen will open it up and allow you to add sales items to it.
.png)
Clicking the red Modify button will change its color to green. While the Modify button is green, clicking an existing Item Screen will allow you to change its properties, like its description and various other options.

Click OK to modify the selected Item Screen.

Click Exit to close the Item Screens list.
5. Click an empty placeholder to create a new Item Screen:

***
### Configuration Tab
#### Description
Type the description of the Item Screen as it will be displayed on the POS screen.
#### Second Name
Type an alternate description for multi-language setups.
#### Non-apparent characters
...
#### Shift Reference
...
***
### Options
#### Persisting (stay there)
Enable this option to override the Return to Group functionality, setup in employee function. With this option enabled, the screen will remain visible after ordering an item, even if the Return to Group option is enabled in the employee function. With this option disabled, the screen would disappear immediately after ordering an item from it.
### Restricted Access
Enable this option to restrict access to this screen to managers.
#### Alphabetic Sort
Enable this option to sort the sales items alphabetically on this screen. If this option is disabled, sales items will be sorted by item number.
#### Linked to next screen
Enable this option to combine this item screen with the next one in the Item Screen list, doubling the screen's capacity from 40 to 80 items.
***
### Links Tab

***
### Conversions
#### Corporate Communications
...
#### 'Fixed' local setup
...
#### Per Sector
...

Click the Delete button to remove this Item Screen and all the items it contains.

Click the Save button to save changes and exit.

Click the Exit button to close this window without saving changes.
Create as many Items Screens as required for your menu.