LogoLogo
FrançaisPayFacto homepageContact us
Veloce POS
Veloce POS
  • Veloce
    • About Veloce
    • Introduction
    • Hardware and Software Requirements
      • Hardware Requirements
      • Tablets
      • Network Requirements (Wired)
      • Network Requirements (Wi-Fi)
      • Network Layout
      • Operating System Requirements
      • Unsupported Operating Systems
    • Installation & Initial Setup
      • Before Installing Veloce
      • Configure your Windows Network Profile
      • Download Veloce Files
      • Install the Veloce Back-Office
      • Share the Veloce Back-Office folder
      • Veloce Shortcuts Installation
      • Veloce First Start and License Activation
      • Veloce Server First Start and Windows Defender Firewall Configuration
    • Veloce Back-Office
      • Introduction
        • Veloce First Login
        • Basic Navigation
        • Veloce Back-Office Overview
      • Back-Office User Accounts
        • Create Back-Office User Accounts
        • Login to the Veloce Back-Office
    • Setup / Utilities
      • Setup / Utilities Overview
      • Configure Languages
      • Add a third language profile in Veloce
      • Price Levels
      • Currency Options
      • Date & Time
      • Taking Backups
      • Restoring Backups
    • Point of Sales Control
      • Taxes
        • Taxes Overview
        • Tax Categories
      • B.C. Soda Tax
        • B.C. Soda Tax Overview
        • B.C. Soda Tax Configuration
        • B.C. Soda Tax Examples
        • Example #1: Simple item
        • Example #2: Combo with unlisted soda
        • Example #3: Combo with listed soda
      • Modes
      • Big Divisions
      • Divisions
        • Divisions - Configuration
        • Divisions - Price per Quantity
        • Divisions - Discounts
        • Divisions - Redistributed Tips
        • Divisions - Links
        • Divisions - General Ledger
        • Divisions - Taxes
      • Sales Items
        • Item Screens
        • Create Sales Items
        • Sales Item Setup - Configuration
        • Sales Item Setup - Item Types
        • Sales Item Setup - Ordering Options
        • Sales Item Setup - Links
        • Sales Item Setup - Options
        • Sales Item Setup - Availability / Schedule
        • Sales Item Setup - Delivery
        • Sales Item Setup - Preparation
        • Sales Item Setup - Variations
        • Sales Item Setup - Included Items
        • Sales Item Setup - POS Inventory
        • Sales Item Setup - Bar Interface
        • Sales Item Setup - Recipe
        • Sales Item Setup - Forced Modes
        • Sales Item Setup - Taxes
      • Groups and Keys
        • Group Configuration
        • Button Configuration
        • Button Functions
        • Button Functions - Detailed List
      • Payment Modes
    • Electronic Funds Transfer (EFT)
      • About Electronic Funds Transfer (EFT)
      • Overview of PayFacto solutions offered with Veloce
      • Payment Modes for EFT
        • Introduction
        • Generic Credit/Debit Payment Mode
        • Interac Debit Payment Mode
        • Credit Card Payment Modes
      • Veloce Mobile Application
        • Introduction and Prerequisites
        • Veloce Back-Office Setup
          • EFT Module Setup
          • Departments Setup (POS Control)
          • Workstation Setup in the Point of Sale Control module
          • System Configuration Setup
          • Finalize Configuration
        • Payment Terminal Setup
          • PayFacto Payment Application
          • Veloce POS Application Installation
          • Veloce POS Application Configuration
          • Veloce POS Application - Connection
    • PayFacto Verified Printers for MEV-WEB
  • Velmix LQ 232-IP
    • Safety Guidelines
    • Introduction to the Velmix LQ 232-IP
    • Included Materials
    • Connexions
    • Installation
    • Velmix LQ 232-IP Controller
    • Installing Bottle Stoppers
    • Sealing Bottles
    • Pouring a Product
    • Cleaning the Stoppers
    • Pairing the Velmix LQ IP to the POS
Powered by GitBook
LogoLogo

Legals

  • Terms & conditions

© 2024 PayFacto, Inc. All rights reserved.

On this page
  • Introduction
  • Prerequisites
  • Printer configuration

Was this helpful?

Export as PDF
  1. Veloce
  2. Electronic Funds Transfer (EFT)
  3. Veloce Mobile Application

Introduction and Prerequisites

Introduction

The following articles in this section will allow you to configure the Veloce back-office and the Veloce application for Android such that card payments will be accepted with electronic funds transfer (EFT).


Prerequisites

  • Android-based payment terminals, such as PAX A920 or A920 Pro, A80, etc.

  • PayFacto Payment application.

  • API Key loaded on each wireless payment terminal. (Not required for counter-top terminals)

  • Wi-Fi coverage for wireless terminals.

  • available Ethernet jack for tethered counter top terminals.

  • Internet access for all terminals.

  • Fixed IP address on the Veloce Back-Office PC. (either through Windows network settings or via DHCP assignment)

  • Electronic Funds Transfer module on the Veloce license.

Printer configuration

Many PAX terminals are equipped with built-in printers. These printers are mostly meant to print transaction records for card payments. However, these printers can also be used to print guest checks directly.

If you wish to use the built-in printers in this way, you will need to configure a physical printer for each terminal, from the Setup/Utilities module in the Veloce Back-Office.

Here is an example of the required parameters for the physical printer of a PAX A920 android payment terminal:
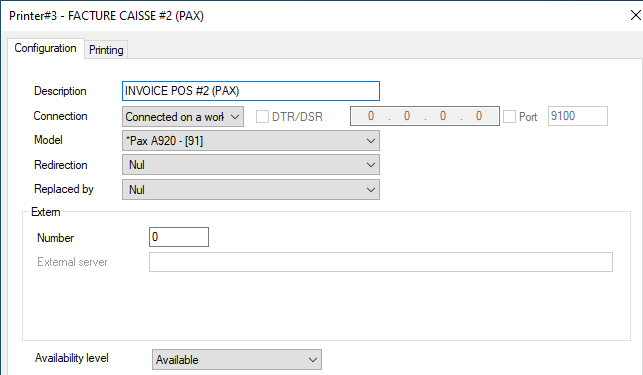
IMPORTANT! In the Canadian province of Québec, guest checks / invoices need to be routed through a Sales Recording Module (SRM). Therefore, printers built into payment terminals cannot be used to print these documents. They can, however, be used to print card transaction records or credit card vouchers.

PreviousVeloce Mobile Application NextVeloce Back-Office Setup

Last updated 1 year ago

Was this helpful?

Printer setup