LogoLogo
FrançaisPayFacto homepageContact us
Veloce POS
Veloce POS
  • Veloce
    • About Veloce
    • Introduction
    • Hardware and Software Requirements
      • Hardware Requirements
      • Tablets
      • Network Requirements (Wired)
      • Network Requirements (Wi-Fi)
      • Network Layout
      • Operating System Requirements
      • Unsupported Operating Systems
    • Installation & Initial Setup
      • Before Installing Veloce
      • Configure your Windows Network Profile
      • Download Veloce Files
      • Install the Veloce Back-Office
      • Share the Veloce Back-Office folder
      • Veloce Shortcuts Installation
      • Veloce First Start and License Activation
      • Veloce Server First Start and Windows Defender Firewall Configuration
    • Veloce Back-Office
      • Introduction
        • Veloce First Login
        • Basic Navigation
        • Veloce Back-Office Overview
      • Back-Office User Accounts
        • Create Back-Office User Accounts
        • Login to the Veloce Back-Office
    • Setup / Utilities
      • Setup / Utilities Overview
      • Configure Languages
      • Add a third language profile in Veloce
      • Price Levels
      • Currency Options
      • Date & Time
      • Taking Backups
      • Restoring Backups
    • Point of Sales Control
      • Taxes
        • Taxes Overview
        • Tax Categories
      • B.C. Soda Tax
        • B.C. Soda Tax Overview
        • B.C. Soda Tax Configuration
        • B.C. Soda Tax Examples
        • Example #1: Simple item
        • Example #2: Combo with unlisted soda
        • Example #3: Combo with listed soda
      • Modes
      • Big Divisions
      • Divisions
        • Divisions - Configuration
        • Divisions - Price per Quantity
        • Divisions - Discounts
        • Divisions - Redistributed Tips
        • Divisions - Links
        • Divisions - General Ledger
        • Divisions - Taxes
      • Sales Items
        • Item Screens
        • Create Sales Items
        • Sales Item Setup - Configuration
        • Sales Item Setup - Item Types
        • Sales Item Setup - Ordering Options
        • Sales Item Setup - Links
        • Sales Item Setup - Options
        • Sales Item Setup - Availability / Schedule
        • Sales Item Setup - Delivery
        • Sales Item Setup - Preparation
        • Sales Item Setup - Variations
        • Sales Item Setup - Included Items
        • Sales Item Setup - POS Inventory
        • Sales Item Setup - Bar Interface
        • Sales Item Setup - Recipe
        • Sales Item Setup - Forced Modes
        • Sales Item Setup - Taxes
      • Groups and Keys
        • Group Configuration
        • Button Configuration
        • Button Functions
        • Button Functions - Detailed List
      • Payment Modes
    • Electronic Funds Transfer (EFT)
      • About Electronic Funds Transfer (EFT)
      • Overview of PayFacto solutions offered with Veloce
      • Payment Modes for EFT
        • Introduction
        • Generic Credit/Debit Payment Mode
        • Interac Debit Payment Mode
        • Credit Card Payment Modes
      • Veloce Mobile Application
        • Introduction and Prerequisites
        • Veloce Back-Office Setup
          • EFT Module Setup
          • Departments Setup (POS Control)
          • Workstation Setup in the Point of Sale Control module
          • System Configuration Setup
          • Finalize Configuration
        • Payment Terminal Setup
          • PayFacto Payment Application
          • Veloce POS Application Installation
          • Veloce POS Application Configuration
          • Veloce POS Application - Connection
    • PayFacto Verified Printers for MEV-WEB
  • Velmix LQ 232-IP
    • Safety Guidelines
    • Introduction to the Velmix LQ 232-IP
    • Included Materials
    • Connexions
    • Installation
    • Velmix LQ 232-IP Controller
    • Installing Bottle Stoppers
    • Sealing Bottles
    • Pouring a Product
    • Cleaning the Stoppers
    • Pairing the Velmix LQ IP to the POS
Powered by GitBook
LogoLogo

Legals

  • Terms & conditions

© 2024 PayFacto, Inc. All rights reserved.

On this page
  • Description / Function
  • Alcohol Product
  • Color
  • Beat The Clock
  • Misc.
  • Price per quantity
  • Prices

Was this helpful?

Export as PDF
  1. Veloce
  2. Point of Sales Control
  3. Sales Items

Sales Item Setup - Configuration

PreviousCreate Sales ItemsNextSales Item Setup - Item Types

Last updated 1 year ago

Was this helpful?

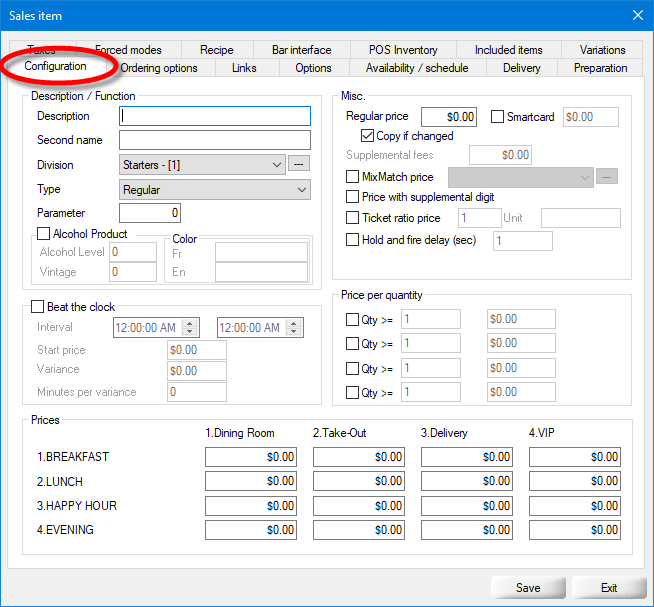
This section contains basic sales items configuration options. For a sales item to be functional, it needs to have at least a description, a division, a type and a Regular price.

Sales Item Setup - Configuration

Description / Function

Description

Type the name of the sales item. This name will be displayed on the POS screen, on guest checks and in reports.

Second Name

Type an alternate description for this sales item. In multi-language setups, this alternate description can be used on the POS screen or on guest checks.

Division

From the drop-down list, select the division that this item belongs to.

Type

From the drop-down list, select the type of item being created. For a basic sales item, select Regular.

Parameter

...


Alcohol Product

...

Alcohol Level

...

Vintage

...


Color

...

FR

...

EN

...


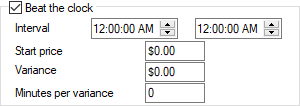
Beat The Clock

Enable this option to use "Beat the Clock" promotions, where an item price starts at a discounted price and then steadily increases as time goes on. This is designed to encourage customers to purchase this item before the price increases, hence "Beat the Clock".

Interval

Select the start time and end time of the Beat the Clock promotion.

Start Price

Set the price of the item at the start of the Beat the Clock promotion. The start price is normally heavily discounted compared to the regular sale price.

Variance

Select by how much the item's price will increase at each Beat the Clock interval. For instance, if you enter $1.00 in this field, the price would increase by $1.00 at every interval defined in the Minutes per Variance field, until the end of the promotion is reached. The Variance and Minutes per Variance are typically calculated so the price of the item near the end of the promotion is close to its regular sale price.

Minutes per variance

Select how long, in minutes, each Beat the Clock interval lasts. For instance, if you enter 30 in this field, the price will increase by the amount set in the Variance field every half-hour.


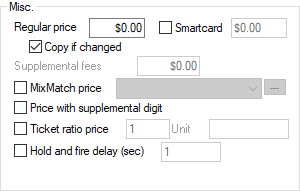
Misc.

Regular Price

Configure the regular sale price of this item.

Smartcard

...

Copy if changed

Enable this option to copy the regular price to all modes and price levels displayed in the Prices section. Disable this option to configure custom prices for each mode and price level.

Supplemental Fees

...

MixMatch Price

...

Price with supplemental Digit

...

Ticket ratio price

...

Unit

...

Hold and Fire Delay (sec)

Enter how long, in seconds, the item should be held before being printed on requisition (kitchen) printers or kitchen monitors. Use this feature to synchronize the preparation time of items.


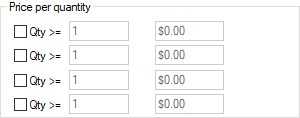
Price per quantity

Use this section to set different item prices based on the quantity ordered. For instance, donuts can have a price when sold individually, a discounted price when 6 or more are sold, and an even better price when 12 or more are sold together.

Qty >=

Enable the checkbox next to each line to activate it. Enter the quantity of items to be ordered for the special price to apply, and type the discounted price in the field to the right. The discounted price will apply if the quantity of items ordered is equal or greater than the value entered in the Qty field.


Prices

This section contains modes arranged by lines and price levels arranged in columns. Custom prices can be configured for each mode / price level combination, for a total of 16 possible combinations.

Modes

The 4 modes are arranged in 4 lines. Modes are configured in the Point of Sale Control module > Invoice Menu > Modes... Make sure that the Copy if changed option is disabled if you want to configure custom prices. If the Copy if changed option is enabled, modes will all receive the price configured in the Regular Price field.

Price Levels

The 4 Price Levels are arranged in 4 columns. Price Levels are configured in the Setup / Utilities Module > System Config > Configuration. Make sure that the Copy if changed option is disabled if you want to configure custom prices. If the Copy if changed option is enabled, Price Levels will all receive the price configured in the Regular Price field.

Please go through each of the following topics to learn more about all the options contained in each tab of the sales items setup:

Related Topics

NOTE: For a complete list of available item types, see

Sales Item Setup - Configuration (Alcohol Product)
Sales Item Setup - Configuration (Beat the clock)
Sales Item Setup - Configuration (Misc.)
Sales Item Setup - Configuration (Price per quantity)
Sales Item Setup - Configuration (Prices)

Sales Item Setup - Item Types
Sales Item Setup - Configuration
Sales Item Setup - Item Types
Sales Item Setup - Ordering Options
Sales Item Setup - Links
Sales Item Setup - Options
Sales Item Setup - Availability - Schedule
Sales Item Setup - Delivery
Sales Item Setup - Preparation
Sales Item Setup - Variations
Sales Item Setup - Included Items
Sales Item Setup - POS Inventory
Sales Item Setup - Bar Interface
Sales Item Setup - Recipe
Sales Item Setup - Forced Modes
Sales Item Setup - Taxes