LogoLogo
FrançaisPayFacto homepageContact us
Veloce POS
Veloce POS
  • Veloce
    • About Veloce
    • Introduction
    • Hardware and Software Requirements
      • Hardware Requirements
      • Tablets
      • Network Requirements (Wired)
      • Network Requirements (Wi-Fi)
      • Network Layout
      • Operating System Requirements
      • Unsupported Operating Systems
    • Installation & Initial Setup
      • Before Installing Veloce
      • Configure your Windows Network Profile
      • Download Veloce Files
      • Install the Veloce Back-Office
      • Share the Veloce Back-Office folder
      • Veloce Shortcuts Installation
      • Veloce First Start and License Activation
      • Veloce Server First Start and Windows Defender Firewall Configuration
    • Veloce Back-Office
      • Introduction
        • Veloce First Login
        • Basic Navigation
        • Veloce Back-Office Overview
      • Back-Office User Accounts
        • Create Back-Office User Accounts
        • Login to the Veloce Back-Office
    • Setup / Utilities
      • Setup / Utilities Overview
      • Configure Languages
      • Add a third language profile in Veloce
      • Price Levels
      • Currency Options
      • Date & Time
      • Taking Backups
      • Restoring Backups
    • Point of Sales Control
      • Taxes
        • Taxes Overview
        • Tax Categories
      • B.C. Soda Tax
        • B.C. Soda Tax Overview
        • B.C. Soda Tax Configuration
        • B.C. Soda Tax Examples
        • Example #1: Simple item
        • Example #2: Combo with unlisted soda
        • Example #3: Combo with listed soda
      • Modes
      • Big Divisions
      • Divisions
        • Divisions - Configuration
        • Divisions - Price per Quantity
        • Divisions - Discounts
        • Divisions - Redistributed Tips
        • Divisions - Links
        • Divisions - General Ledger
        • Divisions - Taxes
      • Sales Items
        • Item Screens
        • Create Sales Items
        • Sales Item Setup - Configuration
        • Sales Item Setup - Item Types
        • Sales Item Setup - Ordering Options
        • Sales Item Setup - Links
        • Sales Item Setup - Options
        • Sales Item Setup - Availability / Schedule
        • Sales Item Setup - Delivery
        • Sales Item Setup - Preparation
        • Sales Item Setup - Variations
        • Sales Item Setup - Included Items
        • Sales Item Setup - POS Inventory
        • Sales Item Setup - Bar Interface
        • Sales Item Setup - Recipe
        • Sales Item Setup - Forced Modes
        • Sales Item Setup - Taxes
      • Groups and Keys
        • Group Configuration
        • Button Configuration
        • Button Functions
        • Button Functions - Detailed List
      • Payment Modes
    • Electronic Funds Transfer (EFT)
      • About Electronic Funds Transfer (EFT)
      • Overview of PayFacto solutions offered with Veloce
      • Payment Modes for EFT
        • Introduction
        • Generic Credit/Debit Payment Mode
        • Interac Debit Payment Mode
        • Credit Card Payment Modes
      • Veloce Mobile Application
        • Introduction and Prerequisites
        • Veloce Back-Office Setup
          • EFT Module Setup
          • Departments Setup (POS Control)
          • Workstation Setup in the Point of Sale Control module
          • System Configuration Setup
          • Finalize Configuration
        • Payment Terminal Setup
          • PayFacto Payment Application
          • Veloce POS Application Installation
          • Veloce POS Application Configuration
          • Veloce POS Application - Connection
    • PayFacto Verified Printers for MEV-WEB
  • Velmix LQ 232-IP
    • Safety Guidelines
    • Introduction to the Velmix LQ 232-IP
    • Included Materials
    • Connexions
    • Installation
    • Velmix LQ 232-IP Controller
    • Installing Bottle Stoppers
    • Sealing Bottles
    • Pouring a Product
    • Cleaning the Stoppers
    • Pairing the Velmix LQ IP to the POS
Powered by GitBook
LogoLogo

Legals

  • Terms & conditions

© 2024 PayFacto, Inc. All rights reserved.

On this page

Was this helpful?

Export as PDF
  1. Veloce
  2. Electronic Funds Transfer (EFT)
  3. Veloce Mobile Application
  4. Veloce Back-Office Setup

Workstation Setup in the Point of Sale Control module

PreviousDepartments Setup (POS Control)NextSystem Configuration Setup

Last updated 1 year ago

Was this helpful?

Workstation Setup in the Point of Sale Control module

The instructions below explains how to configure workstation settings from the Point of Sale Control module, in order to use a PAX terminal as a POS workstation as well as a payment terminal.

IMPORTANT! Some of the configurations explained in this article requires the user to login with a special "Super-User" password. If you do not know what your "Super-User" password is, please contact PayFacto technical support or your local reseller for assistance.

  1. Login to the Veloce Back-Office with a Super-User password.

Veloce Back-Office Icon
  1. Start the Point of Sale Control module.

  1. Click on the Workstation menu and select the Workstation's Setup... option.

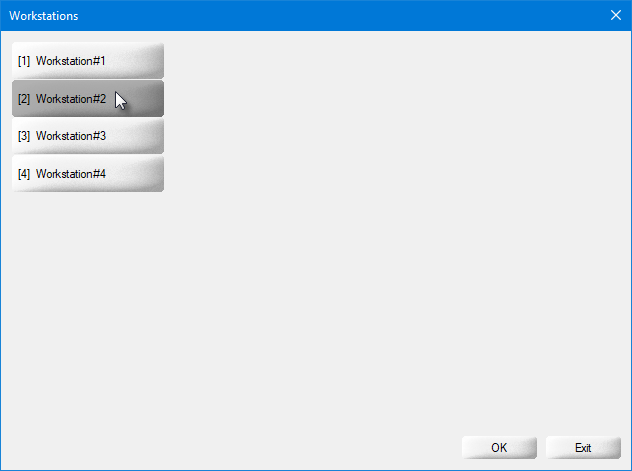
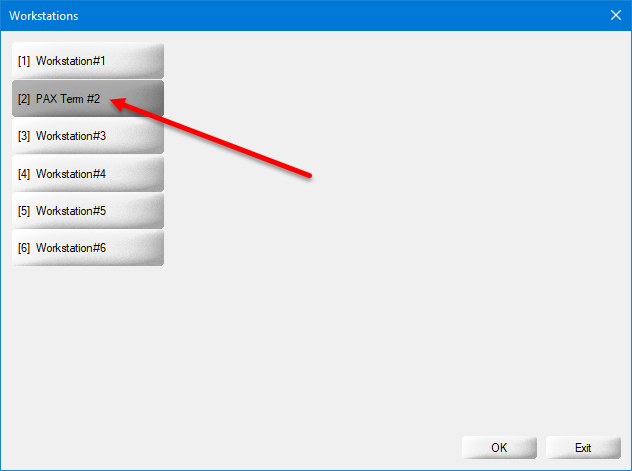
  1. The list of available workstations will appear. Select the workstation number you wish to configure as a payment terminal.

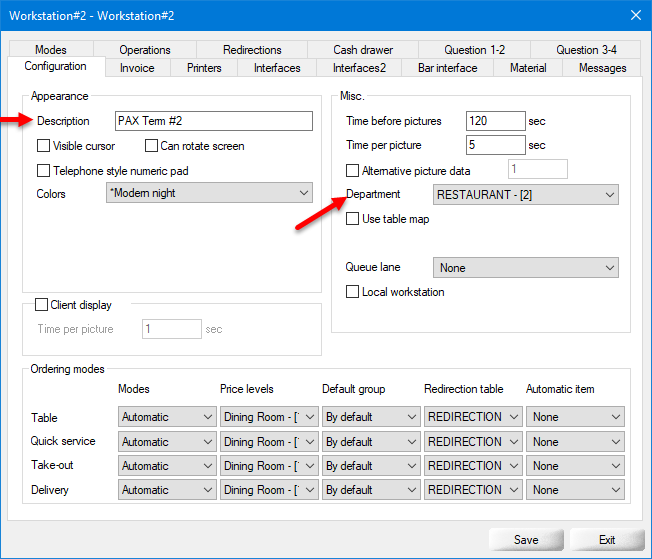
  1. The workstation's configuration opens on the Configuration tab:

Description

Type a meaningful name for the workstation being configured.

Department

From the drop-down list, select the department in which this workstation will be used.

Configure the remaining options according to the merchant's needs and preferences.

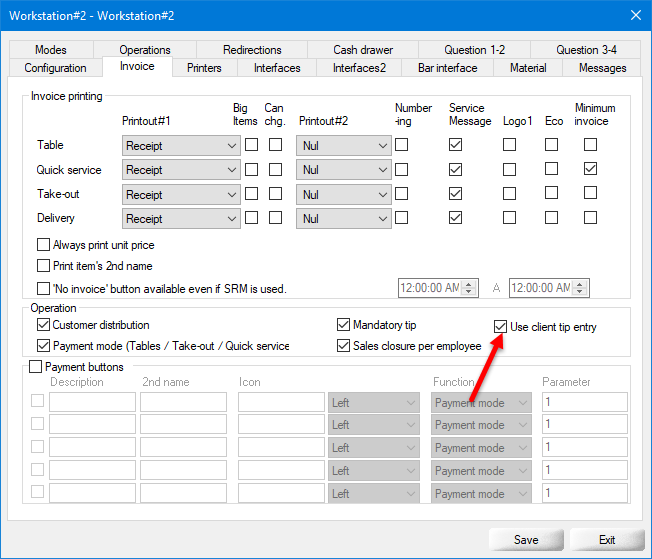
  1. Click on the Invoice tab:

Use client tip entry

Enable this option to use Veloce's tip entry mechanics, which allows the customer to manipulate the payment terminal to decide tip entry. Disable this option for retail/no tip environments.

Configure the remaining options according to the merchant's needs and preferences.

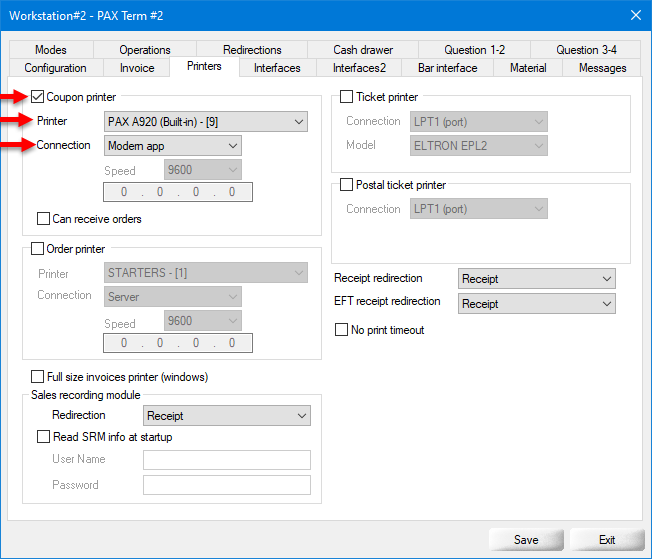
  1. Click on the Printers tab:

Coupon printer

Enable this option to configure the built-in printer on PAX payment terminals and allow it to print transaction records and other documents.

Printer

From the drop-down list, select the appropriate physical printer. (This is configured in Setup / Utilities > Configuration > Printers...)

Connection

From the drop-down list, select Modern app.

Configure the remaining options according to the merchant's needs and preferences.

IMPORTANT! Merchants in the bar and restaurant industry in the province of Québec need to route guest checks, invoices and receipts through the Québec Sales Recording Module (SRM). For these merchants, the PAX terminal's built-in printer can only be used for EFT transaction records and other non-prescribed documents.

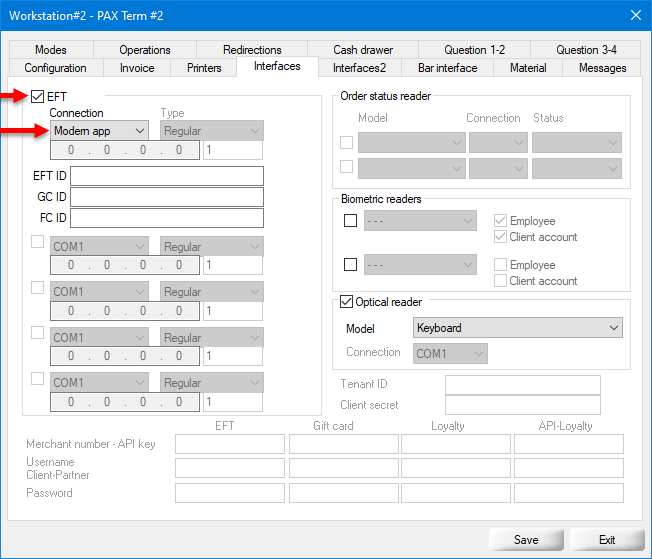
  1. Click on the Interfaces tab:

EFT

Enable this option to allow the Veloce POS app to call up the payment app on the PAX terminal.

Connection

From the drop-down list, select Modern app.

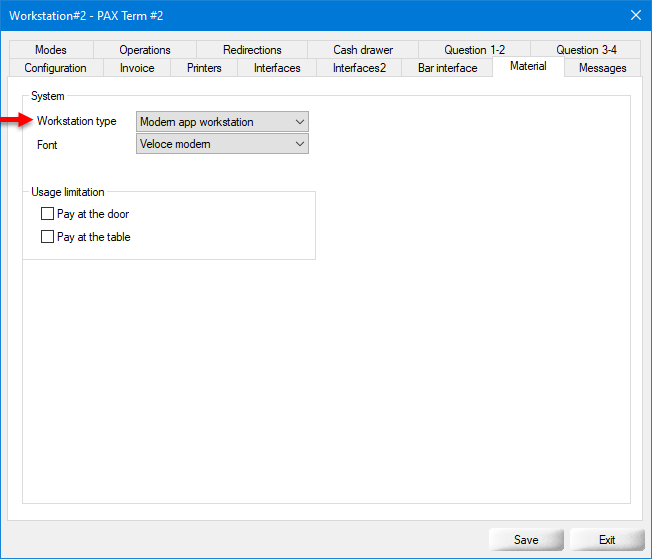
  1. Click on the Material tab:

Workstation type

From the drop-down list, select Modern app workstation.

Font

From the drop-down list, select the desired font.

Usage limitation

Pay at the door

Enable this option to limit the use of this payment terminal to Pay-at-the-door (delivery) operations.

Pay at the table

Enable this option to limit the use of this payment terminal to Pay-at-the-Table operations.

  1. Click the Save button to save you changes and close the configuration screen. This will take you back to the workstation's list, where you can see the updated workstation's name.

  1. Click Exit to close this screen and return to the POS Control module.

Repeat these steps for any additional payment terminal you may have.

Related Topics

Point of Sale Control Icon
POS Control - Workstation menu
Workstations List
Workstation Options - Configuration tab
Workstation Options - Invoice tab
Workstation Options - Printers tab
Workstation Options - Interfaces tab
Workstation Options - Material tab
Workstation's list - Updated

EFT Module Setup
Departments Setup (POS Control)
Workstation Setup (POS Control)
System Configuration Setup
Finalize Configuration