LogoLogo
FrançaisPayFacto homepageContact us
Veloce POS
Veloce POS
  • Veloce
    • About Veloce
    • Introduction
    • Hardware and Software Requirements
      • Hardware Requirements
      • Tablets
      • Network Requirements (Wired)
      • Network Requirements (Wi-Fi)
      • Network Layout
      • Operating System Requirements
      • Unsupported Operating Systems
    • Installation & Initial Setup
      • Before Installing Veloce
      • Configure your Windows Network Profile
      • Download Veloce Files
      • Install the Veloce Back-Office
      • Share the Veloce Back-Office folder
      • Veloce Shortcuts Installation
      • Veloce First Start and License Activation
      • Veloce Server First Start and Windows Defender Firewall Configuration
    • Veloce Back-Office
      • Introduction
        • Veloce First Login
        • Basic Navigation
        • Veloce Back-Office Overview
      • Back-Office User Accounts
        • Create Back-Office User Accounts
        • Login to the Veloce Back-Office
    • Setup / Utilities
      • Setup / Utilities Overview
      • Configure Languages
      • Add a third language profile in Veloce
      • Price Levels
      • Currency Options
      • Date & Time
      • Taking Backups
      • Restoring Backups
    • Point of Sales Control
      • Taxes
        • Taxes Overview
        • Tax Categories
      • B.C. Soda Tax
        • B.C. Soda Tax Overview
        • B.C. Soda Tax Configuration
        • B.C. Soda Tax Examples
        • Example #1: Simple item
        • Example #2: Combo with unlisted soda
        • Example #3: Combo with listed soda
      • Modes
      • Big Divisions
      • Divisions
        • Divisions - Configuration
        • Divisions - Price per Quantity
        • Divisions - Discounts
        • Divisions - Redistributed Tips
        • Divisions - Links
        • Divisions - General Ledger
        • Divisions - Taxes
      • Sales Items
        • Item Screens
        • Create Sales Items
        • Sales Item Setup - Configuration
        • Sales Item Setup - Item Types
        • Sales Item Setup - Ordering Options
        • Sales Item Setup - Links
        • Sales Item Setup - Options
        • Sales Item Setup - Availability / Schedule
        • Sales Item Setup - Delivery
        • Sales Item Setup - Preparation
        • Sales Item Setup - Variations
        • Sales Item Setup - Included Items
        • Sales Item Setup - POS Inventory
        • Sales Item Setup - Bar Interface
        • Sales Item Setup - Recipe
        • Sales Item Setup - Forced Modes
        • Sales Item Setup - Taxes
      • Groups and Keys
        • Group Configuration
        • Button Configuration
        • Button Functions
        • Button Functions - Detailed List
      • Payment Modes
    • Electronic Funds Transfer (EFT)
      • About Electronic Funds Transfer (EFT)
      • Overview of PayFacto solutions offered with Veloce
      • Payment Modes for EFT
        • Introduction
        • Generic Credit/Debit Payment Mode
        • Interac Debit Payment Mode
        • Credit Card Payment Modes
      • Veloce Mobile Application
        • Introduction and Prerequisites
        • Veloce Back-Office Setup
          • EFT Module Setup
          • Departments Setup (POS Control)
          • Workstation Setup in the Point of Sale Control module
          • System Configuration Setup
          • Finalize Configuration
        • Payment Terminal Setup
          • PayFacto Payment Application
          • Veloce POS Application Installation
          • Veloce POS Application Configuration
          • Veloce POS Application - Connection
    • PayFacto Verified Printers for MEV-WEB
  • Velmix LQ 232-IP
    • Safety Guidelines
    • Introduction to the Velmix LQ 232-IP
    • Included Materials
    • Connexions
    • Installation
    • Velmix LQ 232-IP Controller
    • Installing Bottle Stoppers
    • Sealing Bottles
    • Pouring a Product
    • Cleaning the Stoppers
    • Pairing the Velmix LQ IP to the POS
Powered by GitBook
LogoLogo

Legals

  • Terms & conditions

© 2024 PayFacto, Inc. All rights reserved.

On this page
  • Finalize Configuration
  • Overview
  • Step 1 - Stop the Veloce Back-Office server
  • Step 2 - Create workstation data
  • Step 3 - Start the Veloce server

Was this helpful?

Export as PDF
  1. Veloce
  2. Electronic Funds Transfer (EFT)
  3. Veloce Mobile Application
  4. Veloce Back-Office Setup

Finalize Configuration

PreviousSystem Configuration SetupNextPayment Terminal Setup

Last updated 1 year ago

Was this helpful?

Finalize Configuration

This article explains how to make sure that any configuration change that was made is applied correctly and immediately to your Veloce system.

This procedure should be carried out whenever major configuration changes were made, or when changing any system-wide settings, such as those found in the Setup / Utilities module.


Overview

This procedure involves 3 simple steps:

  1. Stop the Veloce Back-office server.

  2. Create workstation data

  3. Restart the Veloce Back-office server.


Step 1 - Stop the Veloce Back-Office server

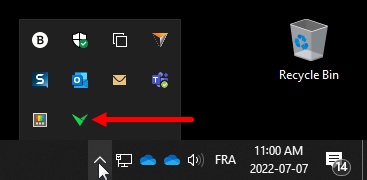
  1. From the Windows desktop, click the up-arrow in the Windows notification area (Near the clock). Locate the green Veloce server icon.

    Windows notification area
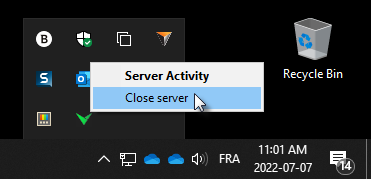
  2. Right-click the green Veloce server icon, then left-click on the Close server option.

    Veloce Icon - Close Server
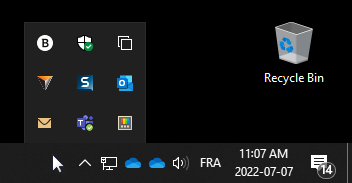
  3. The Veloce server will stop and the icon will disappear from the notification area.

    Windows notification area - without Veloce

The Veloce server is now stopped.


Step 2 - Create workstation data

  1. Login to the Veloce Back-Office

  2. Open the Setup / Utilities module

  3. Click the Tools menu and select the Workstation data... option.

  4. The Create workstation data window appears.

    • Select the Every workstation radio button.

    • Activate the Create if not existing checkbox.

    • Click OK.

  5. Some progress bars will be displayed. Depending on your system's performance, this may flash by so quickly that you may not see it.

Once the progress bars have disappeared, proceed to the next step.


Step 3 - Start the Veloce server

  1. Login to the Veloce Back-Office

  2. Open the Setup / Utilities module

  3. Click the Server menu and select the Start/Stop the server... option.

  4. A VelBO prompt will be displayed. Click Yes to start the Veloce server.

  5. The Veloce icon will appear in the Windows notification area. The icon may flash between red and green for a few seconds, but will eventually settle on green.

  6. The Veloce server is now up-and-running.

This completes the procedure. From this point, all the system-wide changes have been applied, and all changes to workstation configurations have also been applied.

Related Topics

Veloce Back-Office Icon
Setup - Utilities Icon
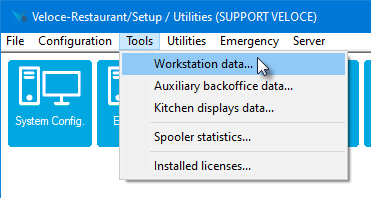
Setup-Utilities - Tools menu
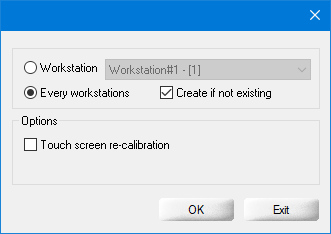
Create workstation data
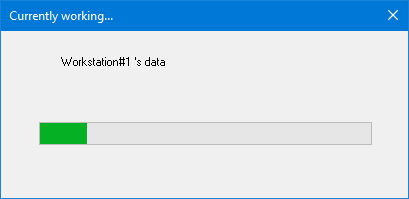
Create workstation data progress
Veloce Back-Office Icon
Setup - Utilities Icon
Setup-Utilities - Server menu
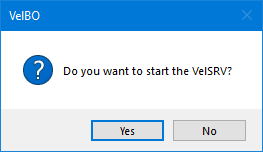
Start server prompt
Windows notification area - Server started

EFT Module Setup
Departments Setup (POS Control)
Workstation Setup (POS Control)
System Configuration Setup
Finalize Configuration