Operator Management
Gift cards are an easy method for restaurants to encourage guests to return. If your business employs wait staff that access the payment terminal, you can require each server to identify themselves and enter a password before completing a transaction; this ensures that no unauthorized individuals can use the terminal. The Gift PayFacto application refers to terminal operators as waiters. Operator management procedures include:
Enable Operators
By default, any number of servers can operate the terminal, but you can require individual servers to identify themselves. When enabled, the terminal requires that individual servers enter their identification number and password prior to completing a transaction.
IMPORTANT: When you enable the use of waiters, you must add at least one waiter before you can process a transaction.
To enable waiters:
Touch the Action button on the main screen.

Touch Settings.

Enter the Admin password and touch OK.
In the General section, touch the Enable waiters toggle button to enable (to the right) the identification of terminal operators.

Touch the Back icon to return to the main screen.

Add an Operator
When you enable the use of waiters, you need to add at least one waiter to the terminal. If you enable waiters on the terminal, but don’t configure at least one waiter, the terminal will not allow you to process a transaction.
NOTE: If your business uses more than one payment terminal for gift cards, make sure to:
* Activate the Enable waiters function on each terminal separately.
* Configure the waiter identification credentials (numbers and passwords) on each terminal separately.
To add a waiter:
Touch the Action button on the main screen.

Touch Settings.

Enter the Admin password and touch OK.
In the General section, touch the Waiters Management.

Tap the Add New Waiter button.

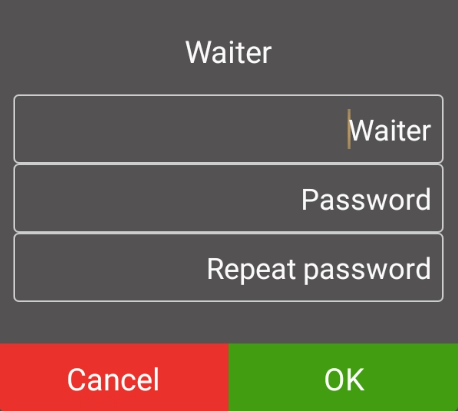
Enter the waiter’s unique identification number in the Waiter field; numbers can range from 1 to 999.
Touch the Password field and enter the waiter’s password.
NOTE: Passwords are numeric (numbers only) and between 4 and 6 characters in length.
Touch the Repeat password field and re-enter the password to confirm.

Touch OK. The new clerk ID appears in a list.

Repeat steps 5 to 9 for each additional waiter you want to create.
Touch the Back icon to return to the main screen.

TIP: If a waiter forgets their password, you can use the Administrator password as a workaround.
Change an Operator's Password
It is simple to change a waiter’s password. You may need to change a password if an employee is assigned another employee’s number, or you may want to change passwords on a recurring basis for terminal security.
NOTE: If your business uses more than one payment terminal for gift cards, make sure to change the waiter password on each terminal.
To change a waiter’s password:
Touch the Action button on the main screen.

Touch Settings.

Enter the Admin password and touch OK.
In the General section, touch the Waiters Management.

Locate the waiter whose password you want to change and touch the Edit (pencil) icon.

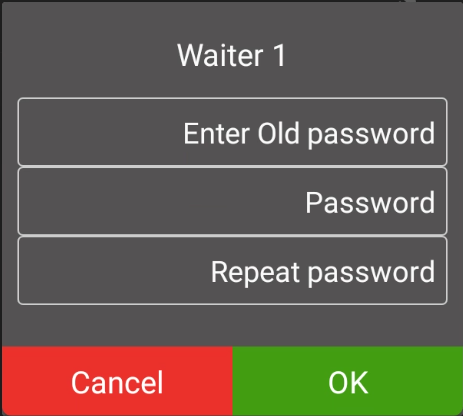
Enter the waiter’s current password in the Enter Old password field.
Touch the Password field and enter a new password that is 4 to 6 characters in length.
Touch the Repeat password field and re-enter the new password to confirm.

Touch OK.
Touch the Back icon to return to the main screen.

Deleting Operators
You may want to remove the requirement for waiters to identify themselves. There are 3 ways to remove waiters from the terminal:
IMPORTANT: If your business uses more than one terminal, you must disable or delete the waiter(s) from all terminals.
Disable Operators
If you choose to disable waiter identification, any waiters you have previously configured (including their passwords) will remain stored on the terminal but the terminal operators will not need to identify themselves before processing a gift card transaction.
To disable waiters:
Touch the Action button on the main screen.

Touch Settings.

Enter the Admin password and touch OK.
In the General section, touch the Enable waiters toggle button to disable (to the left) the identification of terminal operators.

Touch the Back icon to return to the main screen.

Delete Individual Operators
Deleting a single waiter only removes that clerk and the associated password from the terminal. All other waiters configured on the terminal remain operational.
To delete an individual waiter:
Touch the Action button on the main screen.

Touch Settings.

Enter the Admin password and touch OK.
In the General section, touch the Waiters Management.

Locate the waiter whose password you want to change and touch the Delete (trash can) icon.

Touch OK to confirm you want to delete the waiter.
Repeat steps 5 and 6 for each individual waiter you want to remove.
Touch the Back icon to return to the main screen.

Delete All Operators
If required, you can delete all existing waiters on the terminal at one time.
IMPORTANT: If you delete all waiters from the terminal, you must either disable waiter identification or add at least one new waiter before you can process any gift card transactions. Refer to the Disable Waiter Identification or Add a Waiter procedure for the appropriate information.
To delete all waiters on the terminal:
Touch the Action button on the main screen.

Touch Settings.

Enter the Admin password and touch OK.
In the General section, touch the Waiters Management.

Tap the Delete All Waiter button.

Touch OK to confirm you want to delete all the waiters from the terminal.
Touch the Back icon to return to the main screen.

Was this helpful?

