LogoLogo
FrançaisPayFacto homepageContact us
USA Docs Center
USA Docs Center
  • TERMINALS
    • Mobile
      • PAX A920
        • Terminal Overview
        • Terminal Setup and Configuration
        • Terminal Activation
        • Terminal Usage
      • PAX A920 Pro
        • Terminal Overview
        • Initial Terminal Configuration
        • Terminal Activation
        • Working with the Terminal
      • A920 / A920 Pro Accessories
        • PAX A920 - A920 Pro Terminal Charging Base Installation Guide
          • Charging Base Overview
          • Charging Base Installation
          • Using the Charging Base
        • PAX A920 Multi-Terminal (5) Charging Base Installation Guide
          • Charging Base Overview
          • Charging Base Installation
          • Using the Charging Base
    • Countertop
      • PAX A80
        • A80 Spec
        • A80 Setup Guide
          • Introduction
          • A80 Terminal Overview
            • Overview
            • Terminal Hardware
            • A80 Communication Ports
          • Terminal Setup and Configuration
            • Installing the Printer Paper
            • Connect the Terminal Cables
            • Configuring the Terminal Display Language
            • Configuring the Terminal Network Connections
            • Configuring the Terminal Ethernet Connection
            • Configuring the Terminal Wi-Fi Connection
          • Terminal Activation
            • Overview
            • Activate Terminal
            • Set Passwords
          • Working with the Terminal
            • Powering the Terminal On or Off
            • Terminal Input Options
            • Replacing the Printer Paper
            • Card Payment Options
        • Accessories
          • Introduction
          • Installing the T Bracket
          • Cable Installation
  • APPLICATIONS
    • SecurePay
      • Overview
      • Requirements
      • Use the STPI Secure Installer to install the RTI-SIPA plugin
        • Installation Process Overview
        • Install Microsoft .NET Framework 3.5 SP1
        • Install Java for Windows
        • Install the RTI-SIPA Plugin
      • Maitre'D Configuration
        • Electronic Funds Transfer Module Setup
        • Assign a Payment Terminal to POS Workstation
        • Main Media Type for SecurePay
        • Media Type Mappings for SecurePay
        • Generic Media Type Mapping For SecurePay
        • Employee Configurations
      • SecurePay Application
        • SecurePay Installation on Android Payment Terminals
        • SecurePay Application - Basic Navigation
        • SecurePay Application Configuration
        • SecurePay Functions
      • Payment Process
        • SecurePay Full Transaction Workflow
        • Working with Tips
      • Troubleshooting
    • SecureTable
      • SecureTable: Online User Manual
        • Overview
        • Requirements
        • STPI Secure Installation
          • Installation Process Overview
          • Install Microsoft .NET Framework 3.5 SP1
          • Install Java for Windows
          • Install the STPISecure Client software
          • Activate the STPI Secure License
          • Start the STPI Client for the first time
          • Configure the STPI Client as a Service
        • Maitre'D Configuration
          • Electronic Funds Transfer Module Setup
          • Media Type mappings for SecureTable or SecurePay
          • Generic Media Type mapping for SecureTable or SecurePay
        • SecureTable Application
          • SecureTable installation on Android Payment Terminals
          • SecureTable Application - Basic Navigation
          • SecureTable Application Configuration
          • SecureTable Functions
        • Payment Process
          • SecureTable Full Transaction Workflow
          • Working with Tips
          • Voids
        • Tasks-How To's
          • Task: Add an APN to your Android Payment Terminal
          • Task: Configure Port Forwarding
          • Task: Switch between Wifi and 4G/LTE
        • Troubleshooting
      • SecureTable Maitre'D Edition for TYRO
        • Introduction
        • Requirements
        • STPI Secure Installation
          • Install the STPISecure Client software
          • Activate the STPI Secure License
          • Start the STPI Client for the first time
          • Configure the STPI Client as a Service
        • Maitre'D Configuration
          • Electronic Funds Transfer (EFT) Interface setup
          • Media Type mappings for SecureTable
          • Generic Media Type mapping for SecureTable
        • SecureTable Application
          • SecureTable Installation on Android Payment Terminals
          • SecureTable Application - Basic Navigation
          • SecureTable Application Configuration
          • SecureTable Functions
        • Payment Process
          • General use of SecureTable to apply payments
          • Transaction workflow
          • Working with Tips
          • Voids
        • Tasks - How To's
          • Task: Add an APN to your Android Payment Terminal
          • Task: Configure Port Forwarding
          • Task: Switch between Wifi and 4G/LTE
        • Troubleshooting
          • Microsoft .NET Framework 3.5 is missing
          • Java is missing
    • PayFacto Gift - DataCandy
      • Introduction
      • Transactions
      • Application Configuration
      • Operator Management
      • Printing
        • Configuring Transaction Printing Options
        • Additional Printing Options
        • Add Personalized Receipt Header
        • Add Personalized Receipt Footer
        • Edit Personalized Messages
        • Deleting Personalized Messages
      • Passwords
        • Understanding Passwords
        • Incorrect Password Entries
        • Forgotten Passwords
        • Change an Operator's Password
        • Change the Administrator Password
        • Password Protection for Transactions
        • Require Password for Manual Gift Card Entry
      • Reporting
    • Broadpos Transit Payment Application (Us Only)
  • PROTECTION AGAINST FRAUD
Powered by GitBook
LogoLogo

Legals

  • Terms & conditions

© 2024 PayFacto, Inc. All rights reserved.

On this page
  • Task: Configure Port Forwarding
  • Corporate Networks
  • Do I need Port Forwarding and if so, why?
  • Information needed
  • Access your router's configuration page
  • Enable and Configure Port Forwarding

Was this helpful?

Export as PDF
  1. APPLICATIONS
  2. SecureTable
  3. SecureTable Maitre'D Edition for TYRO
  4. Tasks - How To's

Task: Configure Port Forwarding

Task: Configure Port Forwarding

In this task, we will configure Port Forwarding on a router/firewall device to allow SecureTable to communicate with the POS system through the STPI Client while delivery drivers are on their delivery routes. The device used in this tutorial is an Asus RT-AC66U B1 wireless router and firewall. While the exact settings and menus will differ between models and manufacturers, the general principles are the same.

Corporate Networks

If your restaurant's network is managed by a larger entity, such as a franchise head office or a network administrator, please communicate with them to inquire about setting up port forwarding. you can also provide your network administrator with the instructions below. They should be able to adapt them to your needs.


Do I need Port Forwarding and if so, why?

Port Forwarding is generally required when using SecureTable over mobile networks. If you don't use SecureTable over mobile networks, there is no need to configure port forwarding and you can skip this tutorial altogether. Also, some mobile carriers may offer special VPN access to your local network, which is a more secure alternative to port forwarding. Please inquire with your mobile carrier to see if they offer this option. If they do, Port Forwarding will not be required. SecureTable is used over mobile networks mostly by delivery drivers. However, mobile network connectivity is also useful to cover gaps in a restaurant's WiFi coverage. When SecureTable is used locally in the restaurant, payment terminals are able to communicate with the POS system through the STPI client directly over the local WiFi network. However, when drivers are out on the road, the payment terminals need to use mobile networks to access the Internet to authorize payments. Being on the "public" Internet, the payment terminal will not be able to communicate directly with the POS system to close the delivery orders. This is where Port Forwarding comes in. To connect to the POS system, the payment terminal needs to connect to the restaurant's router, which will then redirect the communication to the STPI Client via port forwarding. An analogy often used to describe this is finding the bathroom inside your house. For anyone currently inside the house, finding the bathroom should be quite easy. However, for someone currently outside of the house, they first need to know your home address, then someone from inside the house needs to let them in and show them the way to the bathroom. This is essentially what happens when a payment terminal running SecureTable is being used on the road.


Information needed

Before you begin the actual configuration, you need the following information:

• Your router's public IP address.

• Your router's private IP address.

• Your router's username and password to access its configuration utility.

• IP address and TCP port used by the STPI Secure Client.

Here are short instructions to find each piece of information:

Your router's public IP address

This is the IP address that is given to your router by your Internet Service Provider (ISP). It is called a "public" address because it is facing the public Internet. You can easily find what is your public IP address by visiting the following site:

ip4.me

IP4.me is a simple site that will display your public IP address without any ads or unneeded information.

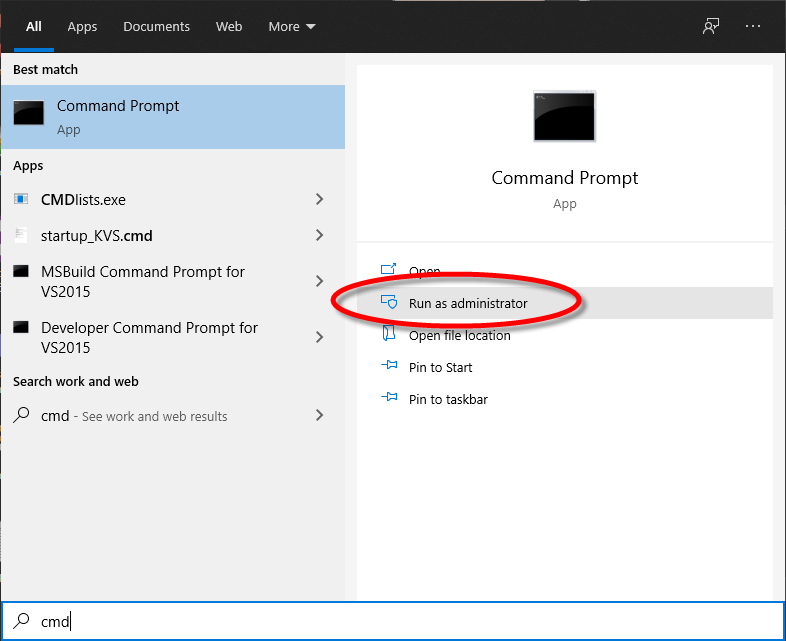
  1. Open a command prompt with administrative privileges. Do so by clicking the Windows Start menu and typing CMD. Then, select Run as Administrator under the Command Prompt app.
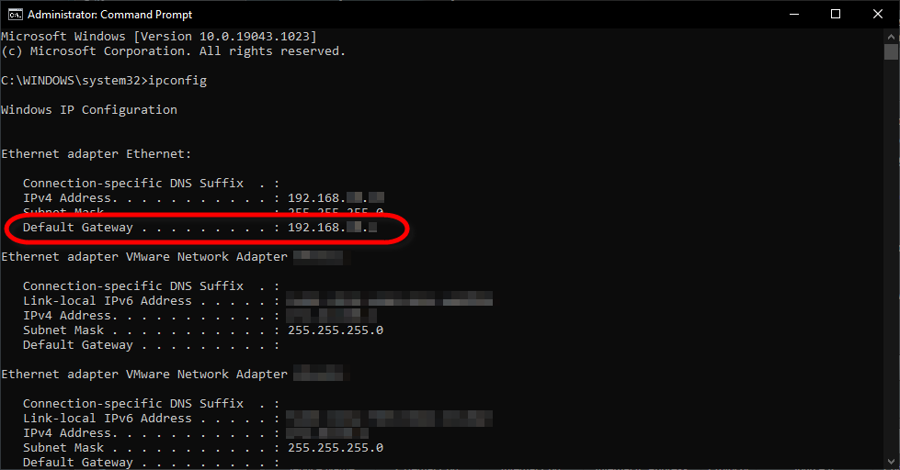
  1. In the command prompt window, type ipconfig and press the ENTER key.

  2. Look for the line that starts with Default Gateway, and take note of the IP address listed there. This is the private IP address of your router.
Your router's username and password

Every modern router has a configuration utility that is protected by a username and password. If you don't know what it is, either contact your network administrator or look for the default username and password in your device's documentation.

STPI Secure's IP address and TCP port number

This is the IP address of the PC where STPI Secure has been installed. The TCP port number is normally configured during the installation. The default recomme configured differently during the installation process.


Access your router's configuration page

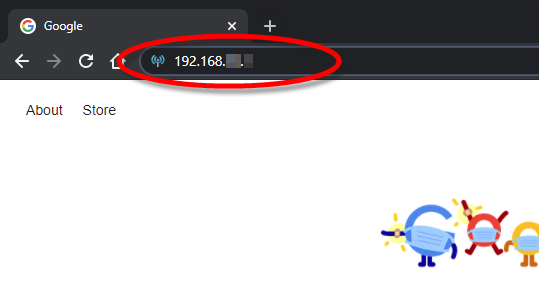
  1. From a PC connected to the local network, open your favorite browser (Google Chrome, Microsoft Edge, Firefox, etc.) and type your router's private IP address in the address bar. Press ENTER on your keyboard.
  1. The login screen for your router's configuration utility should be displayed. Type the username and password that will allow you to login to your device. This screen will differ depending on your device's manufacturer and model.
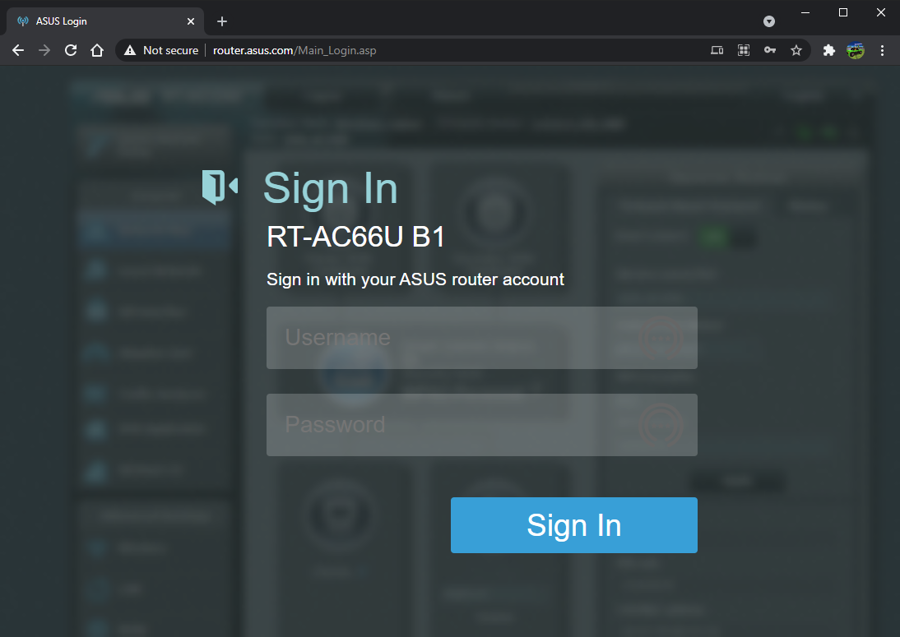
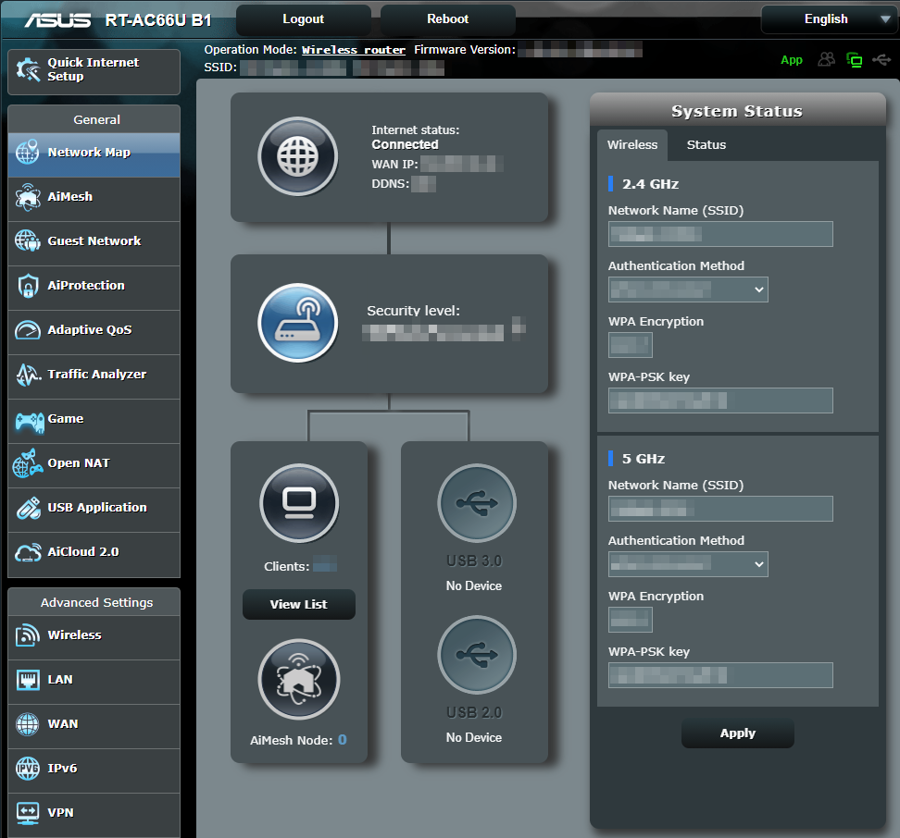
  1. Your router's main configuration screen should be displayed.

Enable and Configure Port Forwarding

  1. Look for Port Forwarding settings. This is typically found in WAN settings, under Advanced settings. Again, this will be different based on your device's manufacturer and model. Please consult your device's documentation if you can't find the appropriate settings.
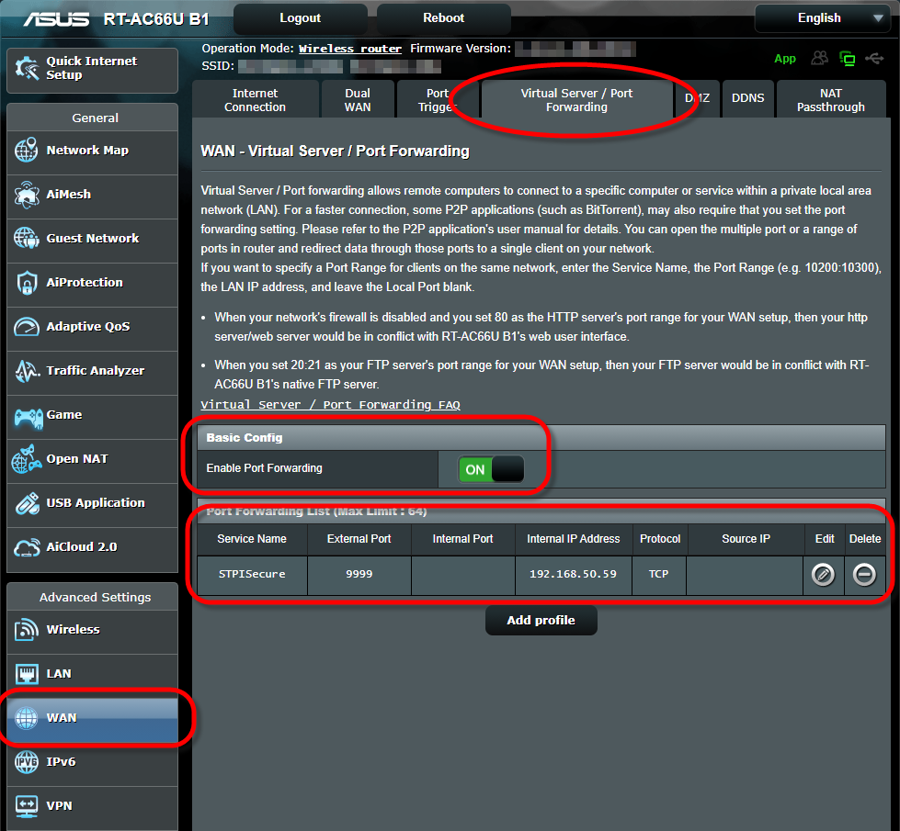
  1. Enable Port Forwarding.

  2. Add a port forwarding entry with the following parameters:

Service Name

STPISecure

External Port

TCP Port number used by STPISecure. Default: 9999

Internal Port

Leave blank.

Internal IP Address

IP address of the PC where STPI Secure was installed.

Protocol

TCP

Source IP

Leave blank.

4. Save your settings.

  1. Some router models may need to be rebooted. Please refer to your device's documentation to learn how to do this.

The task of configuring port forwarding on your router is now complete.

PreviousTask: Add an APN to your Android Payment TerminalNextTask: Switch between Wifi and 4G/LTE

Was this helpful?