Legals
Terms & conditions© 2024 PayFacto, Inc. All rights reserved.
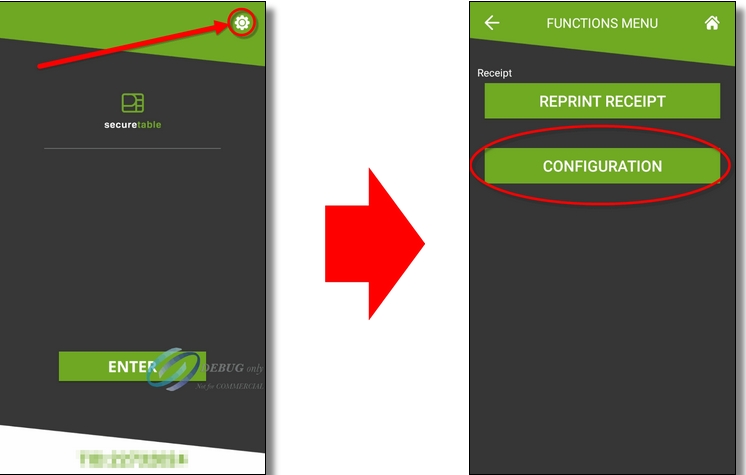
From the SecureTable home screen, touch the cog wheel icon ( ![]() ) at the top-right of the screen.
) at the top-right of the screen.
The FUNCTIONS menu will be displayed. Touch the CONFIGURATION button.
You will be prompted to enter a password before you can access settings. Enter the password and press the OK key.
The SETTINGS screen will be displayed.
NOTE: The default password after a new installation is 1234.
NOTE: Before configuring the IP address or URL, it is strongly recommended to start the STPI Client on the PC where it was installed, and make sure it is running properly. This will allow you to test the communication using the FIND STPI links found with some settings.
IP / URL toggle switch
By default, the toggle switch is set to IP, and the field is labeled STPI IP Address. By touching the toggle switch, the field will change to STPI URL Address.
The IP option is used to locate the STPISecure Client using an IP address, such as 192.168.xxx.xxx.
The URL option is used to locate the STPISecure Client using a Uniform Rersource Locator (URL), such as https://payfacto.com/.
STPI IP/URL Address for WiFi
Enter the IP address or URL of the PC or resource where the STPI Client is installed and running, when accessing it through the local WiFi network.
Find STPI
After entering the IP address or URL, touch this link to verify the communication between your payment terminal and the STPI Client.
Redundant Network
Enable this option to allow the SecureTable application to communicate over both WiFi and 4G/LTE mobile networks. By default, SecureTable will always try to use WiFi networks first, to avoid extra costs from using data over mobile networks. If the terminal is out of range of any known WiFi networks, SecureTable will automatically switch to 4G/LTE mobile network. Enabling this option will also unlock additional settings.
NOTE: A SIM card needs to be installed in the payment terminal to get access to 4G/LTE mobile networks. Also, this option will be hidden if no SIM card is detected.
Auto-connect to LTE
** This settings is only visible if Redundant Network is also enabled.
With this option enabled, SecureTable will offer the option to automatically switch from WiFi to 4G/LTE if unable to reach the POS system during a transaction. This switch will only happen if the application is actively trying to connect to the POS system. It will not happen while the application is idle.
If this option is disabled and there is a WiFi communication issue during a transaction, you will get a generic error message and you will need to manually switch to 4G/LTE and re-attempt the transaction.
STPI IP/URL Address for LTE
** This settings is only visible if Redundant Network is also enabled.
Enter the Public IP address or URL to access the STPI Client is installed and running, when accessing it through the 4G/LTE mobile network.
Find STPI
After entering the IP address or URL, touch this link to verify the communication between your payment terminal and the STPI Client.
NOTE: The STPI Client needs to be up-and-running. If you are using FIND STPI for 4G/LTE, Port Forwarding also needs to be configured on the router/firewall controlling the access to the local area network.
STPI Port Number
This field displays the current TCP port number used for communication with the STPI Client.
NOTE: This setting can only be modified from the Advanced Settings screen and is displayed here for information purposes only.
Advanced Settings
Touch this link to access the Advanced Settings screen.
Functions Menu
Touch this link to access the Functions Menu screen.
SAVE
Touch this button to save your changes and return to the home screen.
NOTE: On a brand-new installation, the application will not let you save your settings with an empty (blank) STPI Port Number. To prevent this issue, go to the Advanced Settings screen, configure the STPI Port Number, Save, and then go back to the basic settings screen to set the IP address or URL.
STPI Port Number
Default: 9999
This is the TCP port number used by STPI. Be sure that this TCP port is unblocked by your network administrator.
POS Type
Select 1 for Maitre’D, Veloce or any POS other than Micros or Squirrel.
Select 2 for Micros.
Select 3 for Squirrel.
Tip
Enable this option to have the SecureTable application prompt for tip entry. Disable this option to prevent tip entry. Disabling this option will also hide all the tip-related options below.
Tip Preset (Select percentages)
Configure preset tip percentages that the customer will see when prompted for tip. Up to 3 presets can be configured. If you do not wish to use all of them, presets that are set to 0% will not be displayed to the customer.
Tip Preset Text Size
Select the text size used to display preset tip percentages. Available choices are Normal, Medium and Large.
Tip Threshold
Enter the maximum allowed tip percentage. Any tip amount that exceeds this percentage will require the settings password to be entered. Setting the percentage to 0% disables the tip threshold validation.
Tip on Tax
Enable this option to calculate the tip percentage from the total check amount, including taxes. If this option is disabled, the tip amount will be calculated on the sub-total instead, which does not include taxes.
NOTE: For the Tip on Tax feature to have an effect, the POS system needs to send both the sub-total and check total as separate values to the STPIClient. If the POS system only sends the check total without the sub-total, this setting will have no effect. The percentage will be calculated on the check total sent by the POS, regardless of the status of this option.
Enable Confirmation
Enable this option to present a dedicated tip confirmation screen for the customer. If this option is disabled, the tip confirmation screen will be skipped when selecting a tip preset or the NO TIP option. If using custom $ or custom % with this option disabled, the tip amount, percentages and resulting totals will be updated in real-time as the customer types the numbers in, but no additional confirmation screen will be presented before the actual payment.
Setting Password
Configure the password used to access settings. This is also the password that will be requested if the customer enters a tip amount that exceeds the Tip Threshold.
Enable Search by Table Number
Enable this option to have the terminal prompt the server for a table number. This allows the SecureTable application to search for all available checks for a given table number.
Enable Search by Check Number
Enable this option to have the terminal prompt for a check number. This allows servers to enter a check number in order to directly access a check, instead of selecting the check from a list.
More Settings
Touch this link to view more advanced settings.
SAVE
Touch this button to save your changes and return to the home screen.
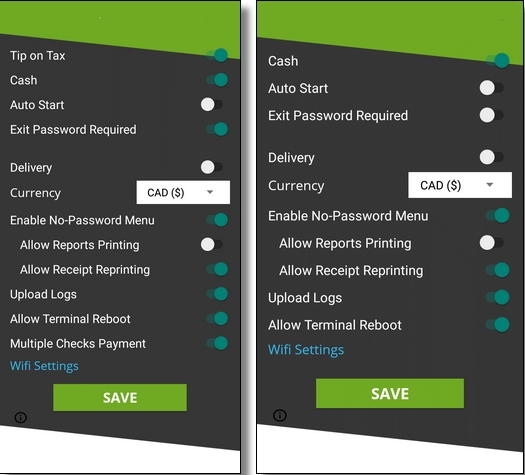
Cash
Enable this option to allow cash payments to be applied on checks from the SecureTable application.
Auto Start
Enable this option to have the SecureTable application start automatically when powering on the payment terminal.
Exit Password Required
With this option enabled, the SecureTable application will request the settings password before closing.
Delivery
Enable this option to use the SecureTable application in Delivery mode. With this option enabled, the payment terminal will display the delivery order numbers instead of table numbers.
Currency
Select the default currency for your region. Supported currencies are:
Canadian Dollar (CAD ($))
United States Dollar (USD ($))
United Kingdom Pound (GBP (£))
European Union Euro (EUR (€))
Australian Dollar (AUD ($))
Enable No-Password Menu
Enable this option to allow users to access a simplified version of the Functions menu without entering a password. This menu is accessed by touching the cog wheel icon ( ![]() ) at the top-right of the home screen. Enabling this option will also unlock access to the Allow Reports Printing and Allow Receipt Reprinting options below.
) at the top-right of the home screen. Enabling this option will also unlock access to the Allow Reports Printing and Allow Receipt Reprinting options below.
Allow Reports Printing
Enable this option to allow users to access and print the Detailed Report and Summary Report from the No-password menu. If this option is disabled, the reports can still be printed from the FUNCTIONS menu, which requires the settings password.
Allow Receipt Reprinting
Enable this option to activate the Reprint Receipt option in the No-password menu. If this option is disabled, the receipts can still be reprinted from the FUNCTIONS menu, which requires the settings password.
Upload Logs
Enable this option to upload the SecureTable application logs to the PayFacto Cloud services. It is recommended to leave this option enabled.
Allow Terminal Reboot
Enable this option to allow the terminal to reboot after an automatic batch settlement. It is recommended to leave this option enabled.
WiFi Settings
Use this shortcut to configure the payment terminal's WiFi settings.
SAVE
Touch this button to save your changes and return to the home screen.
NOTE: The payment terminal MUST be connected to your WiFi or Ethernet network and have internet access. Otherwise, payments cannot be processed and payment information cannot be transmitted to the POS system.
IMPORTANT! Be sure to touch the SAVE button to save your changes. Using any other button to exit from the settings screen will discard all changes.