LogoLogo
FrançaisPayFacto homepageContact us
UK Docs Center
UK Docs Center
  • TERMINALS
    • Mobile
      • PAX A920
        • Terminal Overview
        • Terminal Setup and Configuration
        • Terminal Activation
        • Terminal Usage
      • PAX A920 Pro
        • Terminal Overview
        • Initial Terminal Configuration
        • Terminal Activation
        • Working with the Terminal
      • A920 / A920 Pro Accessories
        • PAX A920 - A920 Pro Terminal Charging Base Installation Guide
          • Charging Base Overview
          • Charging Base Installation
          • Using the Charging Base
        • PAX A920 Multi-Terminal (5) Charging Base Installation Guide
          • Charging Base Overview
          • Charging Base Installation
          • Using the Charging Base
    • Countertop
      • PAX A80
        • A80 Spec
        • A80 Setup Guide
          • Introduction
          • A80 Terminal Overview
            • Overview
            • Terminal Hardware
            • A80 Communication Ports
          • Terminal Setup and Configuration
            • Installing the Printer Paper
            • Connect the Terminal Cables
            • Configuring the Terminal Display Language
            • Configuring the Terminal Network Connections
            • Configuring the Terminal Ethernet Connection
            • Configuring the Terminal Wi-Fi Connection
          • Terminal Activation
            • Overview
            • Activate Terminal
            • Set Passwords
          • Working with the Terminal
            • Powering the Terminal On or Off
            • Terminal Input Options
            • Replacing the Printer Paper
            • Card Payment Options
        • Accessories
          • Introduction
          • Installing the T Bracket
          • Cable Installation
  • APPLICATIONS
    • SecureTable
      • SecureTable: Online User Manual
        • Overview
        • Requirements
        • STPI Secure Installation
          • Installation Process Overview
          • Install Microsoft .NET Framework 3.5 SP1
          • Install Java for Windows
          • Install the STPISecure Client software
          • Activate the STPI Secure License
          • Start the STPI Client for the first time
          • Configure the STPI Client as a Service
        • Maitre'D Configuration
          • Electronic Funds Transfer Module Setup
          • Media Type mappings for SecureTable or SecurePay
          • Generic Media Type mapping for SecureTable or SecurePay
        • SecureTable Application
          • SecureTable installation on Android Payment Terminals
          • SecureTable Application - Basic Navigation
          • SecureTable Application Configuration
          • SecureTable Functions
        • Payment Process
          • SecureTable Full Transaction Workflow
          • Working with Tips
          • Voids
        • Tasks-How To's
          • Task: Add an APN to your Android Payment Terminal
          • Task: Configure Port Forwarding
          • Task: Switch between Wifi and 4G/LTE
        • Troubleshooting
      • SecureTable Maitre'D Edition for TYRO
        • Introduction
        • Requirements
        • STPI Secure Installation
          • Install the STPISecure Client software
          • Activate the STPI Secure License
          • Start the STPI Client for the first time
          • Configure the STPI Client as a Service
        • Maitre'D Configuration
          • Electronic Funds Transfer (EFT) Interface setup
          • Media Type mappings for SecureTable
          • Generic Media Type mapping for SecureTable
        • SecureTable Application
          • SecureTable Installation on Android Payment Terminals
          • SecureTable Application - Basic Navigation
          • SecureTable Application Configuration
          • SecureTable Functions
        • Payment Process
          • General use of SecureTable to apply payments
          • Transaction workflow
          • Working with Tips
          • Voids
        • Tasks - How To's
          • Task: Add an APN to your Android Payment Terminal
          • Task: Configure Port Forwarding
          • Task: Switch between Wifi and 4G/LTE
        • Troubleshooting
          • Microsoft .NET Framework 3.5 is missing
          • Java is missing
    • SecurePay
      • Overview
      • Requirements
      • Use the STPI Secure Installer to install the RTI-SIPA plugin
        • Installation Process Overview
        • Install Microsoft .NET Framework 3.5 SP1
        • Install Java for Windows
        • Install the RTI-SIPA Plugin
      • Maitre'D Configuration
        • Electronic Funds Transfer Module Setup
        • Assign a Payment Terminal to POS Workstation
        • Main Media Type for SecurePay
        • Media Type Mappings for SecurePay
        • Generic Media Type Mapping For SecurePay
        • Employee Configurations
      • SecurePay Application
        • SecurePay Installation on Android Payment Terminals
        • SecurePay Application - Basic Navigation
        • SecurePay Application Configuration
        • SecurePay Functions
      • Payment Process
        • SecurePay Full Transaction Workflow
        • Working with Tips
      • Troubleshooting
  • PROTECTION AGAINST FRAUD
Powered by GitBook
LogoLogo

Legals

  • Terms & conditions

© 2024 PayFacto, Inc. All rights reserved.

On this page
  • Task: Switch between Wifi and 4G/LTE
  • Prerequisites
  • Knowing Current Network Status
  • Manual Network Switching from Wifi to LTE
  • Manual Network Switching from LTE to Wifi
  • Automatic Network Switching during a transaction
  • Automatic Network Switching due to lost WiFi signal

Was this helpful?

Export as PDF
  1. APPLICATIONS
  2. SecureTable
  3. SecureTable Maitre'D Edition for TYRO
  4. Tasks - How To's

Task: Switch between Wifi and 4G/LTE

PreviousTask: Configure Port ForwardingNextTroubleshooting

Was this helpful?

Task: Switch between Wifi and 4G/LTE

The SecureTable application has the ability to use Wifi and mobile networks to communicate with your POS system. Switching from one network to the other generally occurs automatically and transparently, but there are situations where users may want to control how and when the application switches networks. One such example is if you have areas at the limit of the Wifi range. In such an area, the terminal may repeatedly switch between Wifi and mobile networks, causing connectivity issues. In this case, the user may want to force the application to use the mobile network all the time while in that area.


Prerequisites

Before using mobile networks with SecureTable, the following requirements need to be met:

• Use SecureTable version 4.67.6 or later.

• Use an Android payment terminal equipped with a SIM card. (The SIM card is provided by your preferred mobile network carrier.)

• Configure an APN on your Android terminal to allow Internet connectivity through mobile networks. You can learn how to configure an APN here: Task : Add an APN to Your Payment Terminal.

• Setup Port Forwarding on your router/firewall. A generic walkthrough is provided here: Task : Configure Port Forwarding

• Configure Redundant Network as described here: Configure Redundant Network options


Knowing Current Network Status

You can always tell which network SecureTable is currently using by looking at the icon in the upper-left corner of the home screen:

SecureTable operating on Wifi SecureTable operating on Mobile

Signal Strength

The icon also informs the user of the signal strength.

Excellent signal Good signal Fair signal Poor signal

No signal


Manual Network Switching from Wifi to LTE

By default, SecureTable will always try to connect to known Wifi networks to reduce fees related to data usage over mobile networks. However, it is possible to force SecureTable to use mobile networks. This is useful to cover blind spots in Wifi coverage or in areas at the limit of Wifi range, where the signal can be unstable.

  1. Touch the Wifi icon in the upper-left corner of the screen.

  1. Touch the LTE signal icon or the SWITCH TO LTE button.
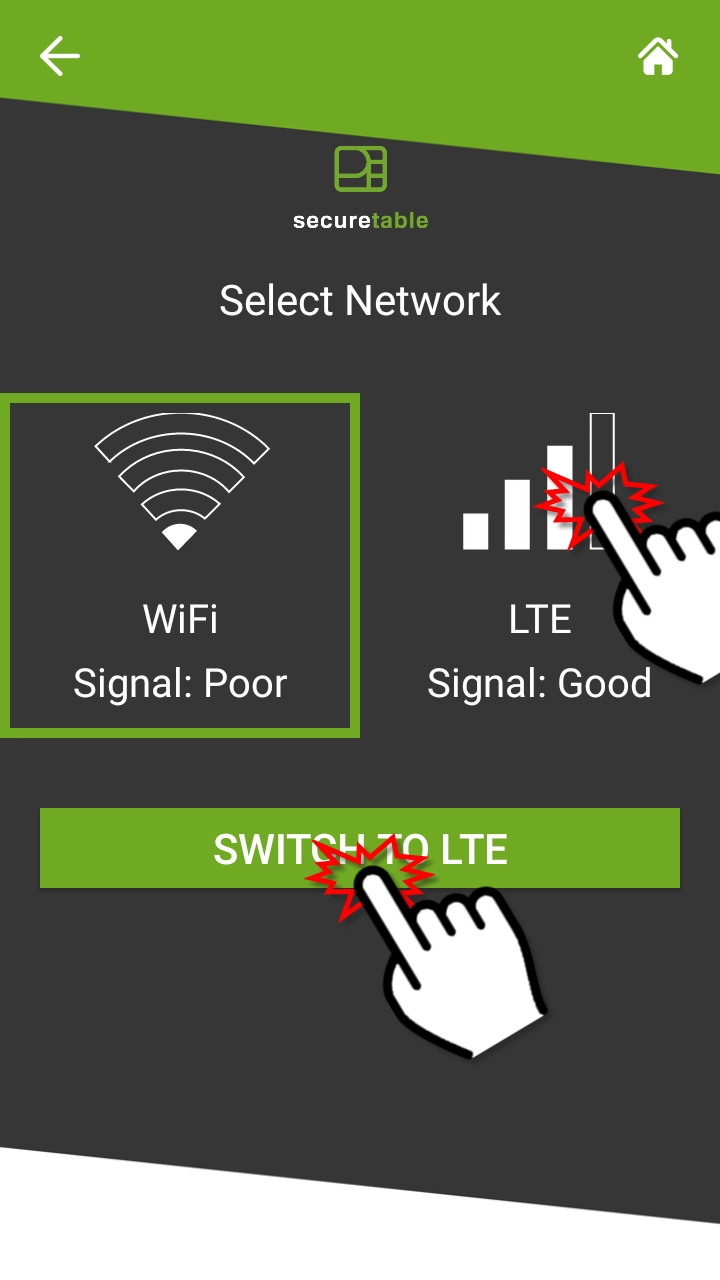
  1. A confirmation dialog will appear. Touch YES to switch to LTE.

IMPORTANT! After manually switching to LTE, SecureTable will not try to switch back to Wifi on its own. If you wish to use Wifi again, you will need to switch to Wifi manually.


Manual Network Switching from LTE to Wifi

  1. Touch the 4G/LTE icon in the upper-left corner of the screen.

  1. Touch the Wifi signal icon or the SWITCH TO WIFI button.
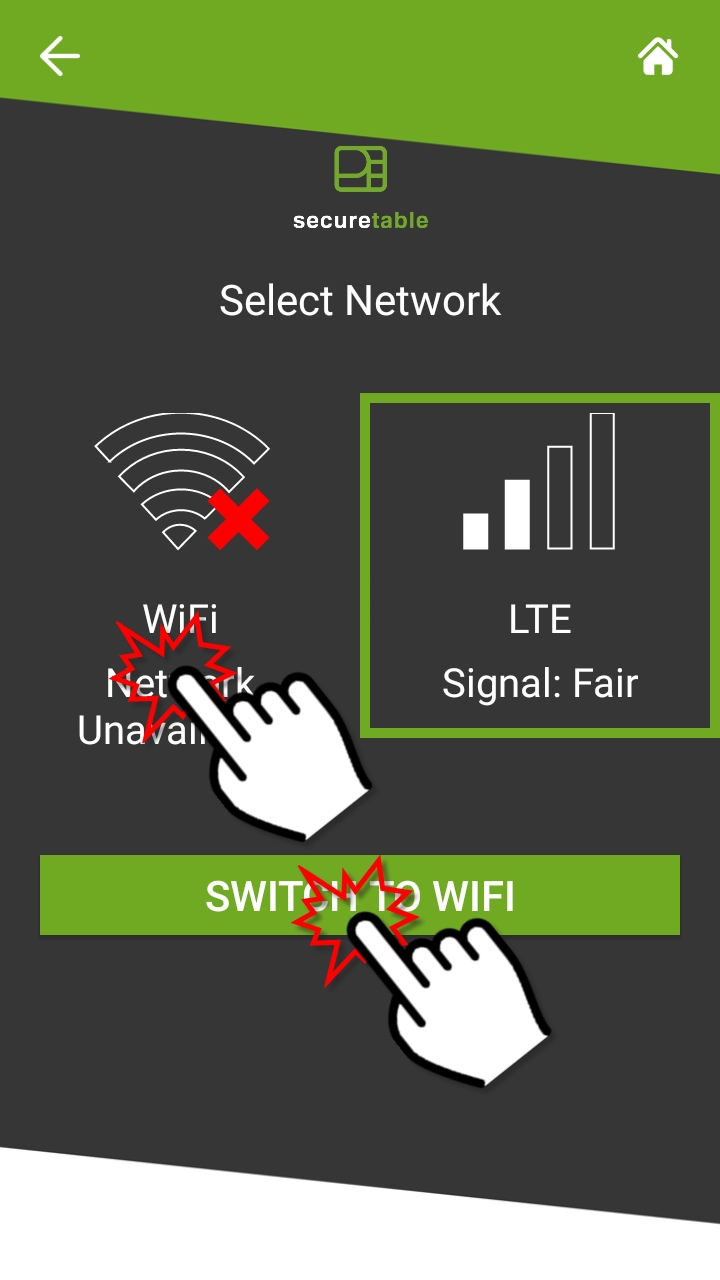
  1. A confirmation dialog will appear. Touch YES to switch to Wifi.

IMPORTANT! In the Select Network screen, the Wifi network appears as if it is unavailable. This is normal. This is because the Wifi antenna of the terminal was disabled during the manual switch to LTE. If the terminal is within Wifi range, switching back to Wifi will reactivate the antenna and reconnect to the network.


Automatic Network Switching during a transaction

When the option Auto-connect to LTE is enabled, SecureTable can attempt to connect to LTE in the event that the connection fails over Wifi. This failover feature will only occur during a transaction process. It will never happen when the SecureTable application is idle.

  1. Start a transaction as you normally would, by touching the ENTER button.

  1. Input your server number and touch OK.
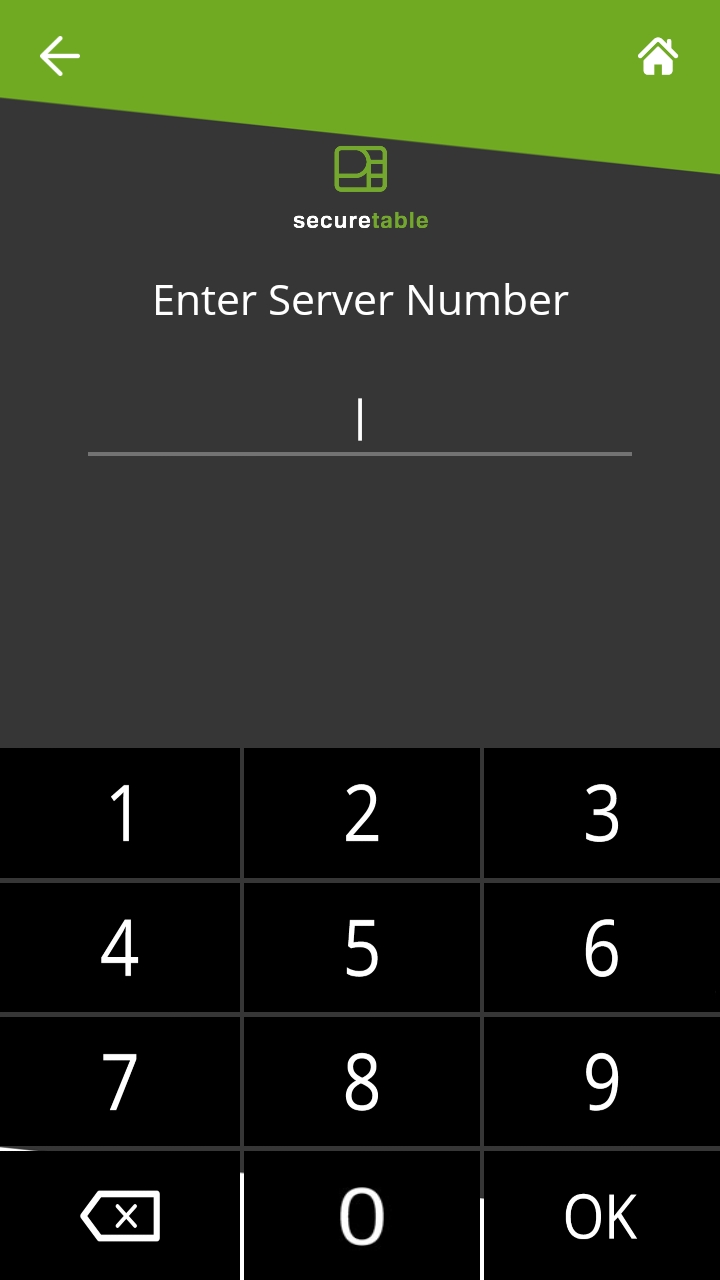
  1. If there is an issue with the Wifi connectivity, the terminal will remain on "Fetching tables" longer than usual.

  1. After a few seconds, an error message will appear: Unable to reach Wi-Fi network, connecting to LTE. Touch YES to connect to LTE.
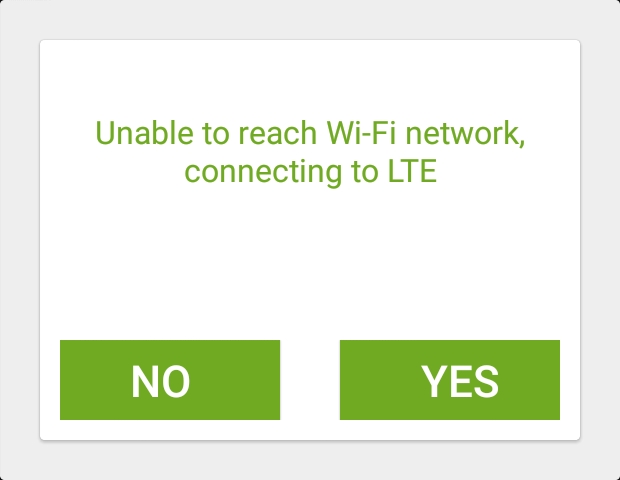
  1. The transaction process will resume over LTE.

IMPORTANT! After this type automatic switch to LTE, SecureTable will not try to switch back to Wifi on its own. If you wish to use Wifi again, you will need to switch to Wifi manually.


Automatic Network Switching due to lost WiFi signal

When WiFi signal is lost, SecureTable will automatically switch to Mobile networks, regardless of the status of the Auto-connect to LTE option. This happens without user intervention, as soon as the WiFi signal is lost. When the terminal is brought back within WiFi range, SecureTable will automatically switch back to the WiFi network.

  1. The terminal is brought to the limit of Wifi coverage.

  1. WiFi signal is lost.

  1. SecureTable automatically switches to 4G/LTE mobile network.