LogoLogo
FrançaisPayFacto homepageContact us
UK Docs Center
UK Docs Center
  • TERMINALS
    • Mobile
      • PAX A920
        • Terminal Overview
        • Terminal Setup and Configuration
        • Terminal Activation
        • Terminal Usage
      • PAX A920 Pro
        • Terminal Overview
        • Initial Terminal Configuration
        • Terminal Activation
        • Working with the Terminal
      • A920 / A920 Pro Accessories
        • PAX A920 - A920 Pro Terminal Charging Base Installation Guide
          • Charging Base Overview
          • Charging Base Installation
          • Using the Charging Base
        • PAX A920 Multi-Terminal (5) Charging Base Installation Guide
          • Charging Base Overview
          • Charging Base Installation
          • Using the Charging Base
    • Countertop
      • PAX A80
        • A80 Spec
        • A80 Setup Guide
          • Introduction
          • A80 Terminal Overview
            • Overview
            • Terminal Hardware
            • A80 Communication Ports
          • Terminal Setup and Configuration
            • Installing the Printer Paper
            • Connect the Terminal Cables
            • Configuring the Terminal Display Language
            • Configuring the Terminal Network Connections
            • Configuring the Terminal Ethernet Connection
            • Configuring the Terminal Wi-Fi Connection
          • Terminal Activation
            • Overview
            • Activate Terminal
            • Set Passwords
          • Working with the Terminal
            • Powering the Terminal On or Off
            • Terminal Input Options
            • Replacing the Printer Paper
            • Card Payment Options
        • Accessories
          • Introduction
          • Installing the T Bracket
          • Cable Installation
  • APPLICATIONS
    • SecureTable
      • SecureTable: Online User Manual
        • Overview
        • Requirements
        • STPI Secure Installation
          • Installation Process Overview
          • Install Microsoft .NET Framework 3.5 SP1
          • Install Java for Windows
          • Install the STPISecure Client software
          • Activate the STPI Secure License
          • Start the STPI Client for the first time
          • Configure the STPI Client as a Service
        • Maitre'D Configuration
          • Electronic Funds Transfer Module Setup
          • Media Type mappings for SecureTable or SecurePay
          • Generic Media Type mapping for SecureTable or SecurePay
        • SecureTable Application
          • SecureTable installation on Android Payment Terminals
          • SecureTable Application - Basic Navigation
          • SecureTable Application Configuration
          • SecureTable Functions
        • Payment Process
          • SecureTable Full Transaction Workflow
          • Working with Tips
          • Voids
        • Tasks-How To's
          • Task: Add an APN to your Android Payment Terminal
          • Task: Configure Port Forwarding
          • Task: Switch between Wifi and 4G/LTE
        • Troubleshooting
      • SecureTable Maitre'D Edition for TYRO
        • Introduction
        • Requirements
        • STPI Secure Installation
          • Install the STPISecure Client software
          • Activate the STPI Secure License
          • Start the STPI Client for the first time
          • Configure the STPI Client as a Service
        • Maitre'D Configuration
          • Electronic Funds Transfer (EFT) Interface setup
          • Media Type mappings for SecureTable
          • Generic Media Type mapping for SecureTable
        • SecureTable Application
          • SecureTable Installation on Android Payment Terminals
          • SecureTable Application - Basic Navigation
          • SecureTable Application Configuration
          • SecureTable Functions
        • Payment Process
          • General use of SecureTable to apply payments
          • Transaction workflow
          • Working with Tips
          • Voids
        • Tasks - How To's
          • Task: Add an APN to your Android Payment Terminal
          • Task: Configure Port Forwarding
          • Task: Switch between Wifi and 4G/LTE
        • Troubleshooting
          • Microsoft .NET Framework 3.5 is missing
          • Java is missing
    • SecurePay
      • Overview
      • Requirements
      • Use the STPI Secure Installer to install the RTI-SIPA plugin
        • Installation Process Overview
        • Install Microsoft .NET Framework 3.5 SP1
        • Install Java for Windows
        • Install the RTI-SIPA Plugin
      • Maitre'D Configuration
        • Electronic Funds Transfer Module Setup
        • Assign a Payment Terminal to POS Workstation
        • Main Media Type for SecurePay
        • Media Type Mappings for SecurePay
        • Generic Media Type Mapping For SecurePay
        • Employee Configurations
      • SecurePay Application
        • SecurePay Installation on Android Payment Terminals
        • SecurePay Application - Basic Navigation
        • SecurePay Application Configuration
        • SecurePay Functions
      • Payment Process
        • SecurePay Full Transaction Workflow
        • Working with Tips
      • Troubleshooting
  • PROTECTION AGAINST FRAUD
Powered by GitBook
LogoLogo

Legals

  • Terms & conditions

© 2024 PayFacto, Inc. All rights reserved.

On this page
  • Assign a Payment Terminal to POS Workstation
  • Procedure

Was this helpful?

Export as PDF
  1. APPLICATIONS
  2. SecurePay
  3. Maitre'D Configuration

Assign a Payment Terminal to POS Workstation

PreviousElectronic Funds Transfer Module SetupNextMain Media Type for SecurePay

Was this helpful?

Assign a Payment Terminal to POS Workstation

Each payment terminal using SecurePay needs to be assigned to a POS Workstation. Note that each POS workstation can only drive one payment terminal, therefore the number of payment terminals using SecurePay shouldn't exceed the number of POS workstations.

The following procedure is required to assign a specific payment terminal to a specific POS workstation in Maitre'D.


Procedure

  1. Logon to the Maitre’D Back-Office with appropriate credentials. (Distributor or System Owner)

  1. Start the Point of Sale Control Module.

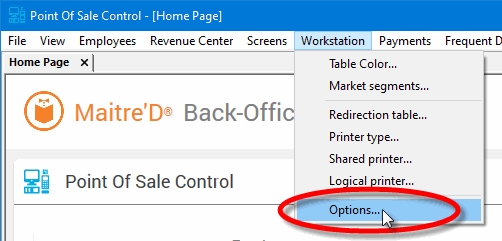
  1. Click the Workstation menu, and select Options...

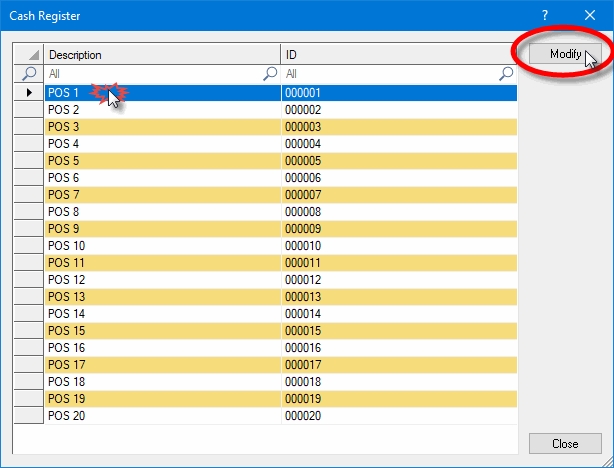
  1. The list of available POS workstations will appear. Select the POS Workstation to which you want to assign a payment terminal and click Modify.

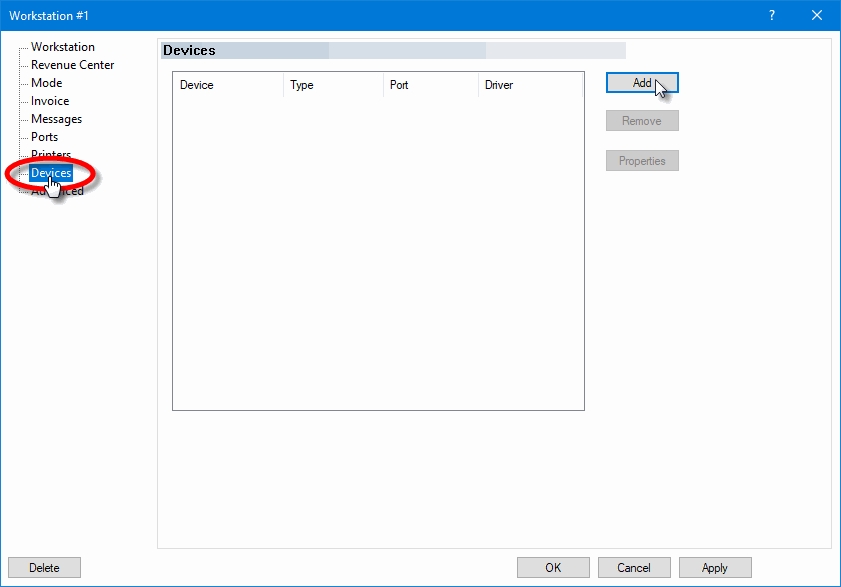
  1. The POS workstation's options will appear. Click the Devices branch on the left of the window, then click the Add button to start adding a new device.

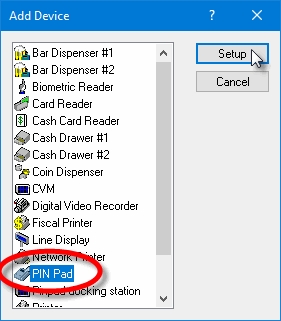
  1. In the Add Device dialog, select PIN Pad and click the Setup button.

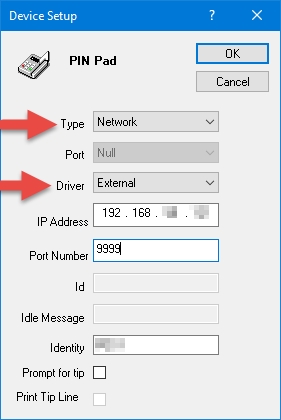
  1. Setup the device as follows:

Type

Select Network from the drop-down list.

Port

This setting is disabled and cannot be configured. Ignore it.

Driver

Select External from the drop-down list.

IP Address

Enter the IP address of the payment terminal.

Port Number

Enter the TCP port number used by the payment terminal. The default value for SecurePay is 9999.

ID

This setting is disabled and cannot be configured. Ignore it.

Idle Message

This setting is disabled and cannot be configured. Ignore it.

Identity

Enter the payment terminal's identity, which is supplied by the payment processor. This is also referred to as Terminal ID or TID.

Prompt for tip

This option has no effect with SecurePay payment termimals, as it will be overridden by the configuration of the SecurePay application installed on the payment terminal.

Print Tip Line

This setting is disabled and cannot be configured. Ignore it.

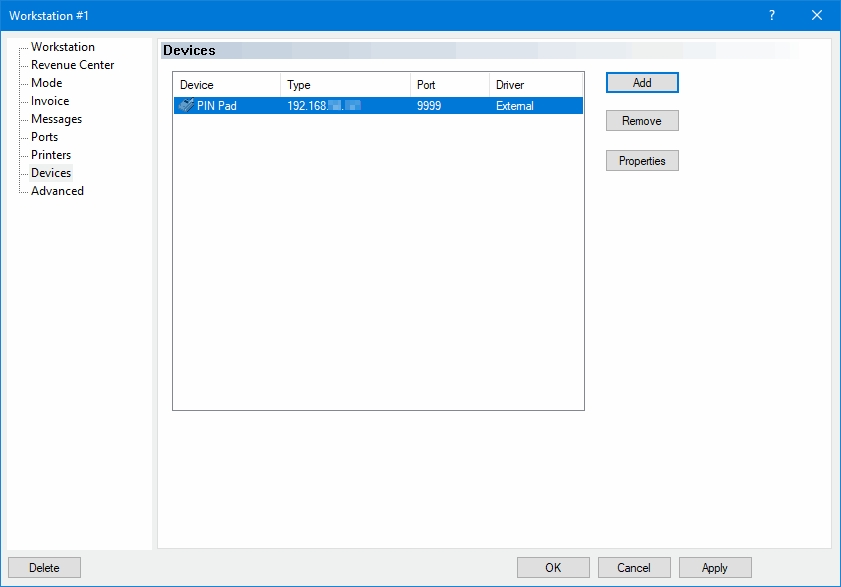
  1. Click OK on the Device Setup dialog to save your changes. The new device will appear in the list:

  1. Click OK to save changes to the workstation setup and close this window.

  2. Close the POS workstation list, or select another POS workstation and repeat steps 4 to 9 to configure more payment terminals.

Make sure that each payment terminal using SecurePay is assigned to a POS workstation.

Screenshot - Workstation Options Menu
Screenshot - Workstations List
Screenshot - Workstation Options device list
Screenshot - Add Device dialog
Screenshot - PIN Pad config
Screenshot - Workstation Options device list Filled