LogoLogo
FrançaisPayFacto homepageContact us
UK Docs Center
UK Docs Center
  • TERMINALS
    • Mobile
      • PAX A920
        • Terminal Overview
        • Terminal Setup and Configuration
        • Terminal Activation
        • Terminal Usage
      • PAX A920 Pro
        • Terminal Overview
        • Initial Terminal Configuration
        • Terminal Activation
        • Working with the Terminal
      • A920 / A920 Pro Accessories
        • PAX A920 - A920 Pro Terminal Charging Base Installation Guide
          • Charging Base Overview
          • Charging Base Installation
          • Using the Charging Base
        • PAX A920 Multi-Terminal (5) Charging Base Installation Guide
          • Charging Base Overview
          • Charging Base Installation
          • Using the Charging Base
    • Countertop
      • PAX A80
        • A80 Spec
        • A80 Setup Guide
          • Introduction
          • A80 Terminal Overview
            • Overview
            • Terminal Hardware
            • A80 Communication Ports
          • Terminal Setup and Configuration
            • Installing the Printer Paper
            • Connect the Terminal Cables
            • Configuring the Terminal Display Language
            • Configuring the Terminal Network Connections
            • Configuring the Terminal Ethernet Connection
            • Configuring the Terminal Wi-Fi Connection
          • Terminal Activation
            • Overview
            • Activate Terminal
            • Set Passwords
          • Working with the Terminal
            • Powering the Terminal On or Off
            • Terminal Input Options
            • Replacing the Printer Paper
            • Card Payment Options
        • Accessories
          • Introduction
          • Installing the T Bracket
          • Cable Installation
  • APPLICATIONS
    • SecureTable
      • SecureTable: Online User Manual
        • Overview
        • Requirements
        • STPI Secure Installation
          • Installation Process Overview
          • Install Microsoft .NET Framework 3.5 SP1
          • Install Java for Windows
          • Install the STPISecure Client software
          • Activate the STPI Secure License
          • Start the STPI Client for the first time
          • Configure the STPI Client as a Service
        • Maitre'D Configuration
          • Electronic Funds Transfer Module Setup
          • Media Type mappings for SecureTable or SecurePay
          • Generic Media Type mapping for SecureTable or SecurePay
        • SecureTable Application
          • SecureTable installation on Android Payment Terminals
          • SecureTable Application - Basic Navigation
          • SecureTable Application Configuration
          • SecureTable Functions
        • Payment Process
          • SecureTable Full Transaction Workflow
          • Working with Tips
          • Voids
        • Tasks-How To's
          • Task: Add an APN to your Android Payment Terminal
          • Task: Configure Port Forwarding
          • Task: Switch between Wifi and 4G/LTE
        • Troubleshooting
      • SecureTable Maitre'D Edition for TYRO
        • Introduction
        • Requirements
        • STPI Secure Installation
          • Install the STPISecure Client software
          • Activate the STPI Secure License
          • Start the STPI Client for the first time
          • Configure the STPI Client as a Service
        • Maitre'D Configuration
          • Electronic Funds Transfer (EFT) Interface setup
          • Media Type mappings for SecureTable
          • Generic Media Type mapping for SecureTable
        • SecureTable Application
          • SecureTable Installation on Android Payment Terminals
          • SecureTable Application - Basic Navigation
          • SecureTable Application Configuration
          • SecureTable Functions
        • Payment Process
          • General use of SecureTable to apply payments
          • Transaction workflow
          • Working with Tips
          • Voids
        • Tasks - How To's
          • Task: Add an APN to your Android Payment Terminal
          • Task: Configure Port Forwarding
          • Task: Switch between Wifi and 4G/LTE
        • Troubleshooting
          • Microsoft .NET Framework 3.5 is missing
          • Java is missing
    • SecurePay
      • Overview
      • Requirements
      • Use the STPI Secure Installer to install the RTI-SIPA plugin
        • Installation Process Overview
        • Install Microsoft .NET Framework 3.5 SP1
        • Install Java for Windows
        • Install the RTI-SIPA Plugin
      • Maitre'D Configuration
        • Electronic Funds Transfer Module Setup
        • Assign a Payment Terminal to POS Workstation
        • Main Media Type for SecurePay
        • Media Type Mappings for SecurePay
        • Generic Media Type Mapping For SecurePay
        • Employee Configurations
      • SecurePay Application
        • SecurePay Installation on Android Payment Terminals
        • SecurePay Application - Basic Navigation
        • SecurePay Application Configuration
        • SecurePay Functions
      • Payment Process
        • SecurePay Full Transaction Workflow
        • Working with Tips
      • Troubleshooting
  • PROTECTION AGAINST FRAUD
Powered by GitBook
LogoLogo

Legals

  • Terms & conditions

© 2024 PayFacto, Inc. All rights reserved.

On this page
  • STPI Secure Shortcuts
  • Setup the shortcut to run with Administrative privileges
  • Make the STPIClient start automatically as Windows starts
  • Start the STPI Client application manually
  • Stopping the STPI Client application

Was this helpful?

Export as PDF
  1. APPLICATIONS
  2. SecureTable
  3. SecureTable: Online User Manual
  4. STPI Secure Installation

Start the STPI Client for the first time

PreviousActivate the STPI Secure LicenseNextConfigure the STPI Client as a Service

Was this helpful?

IMPORTANT! Before attempting to start the STPI Secure client, a license needs to be installed. Otherwise, the STPI Secure Client will attempt to start and immediately shutdown.


STPI Secure Shortcuts

After the STPISecure installation process, a folder called STPI Shortcuts was created on your Windows Desktop. This folder contains the shortcut that will be used to start the STPI Client software.


Setup the shortcut to run with Administrative privileges

To run correctly, the STPI Secure Client needs to run with Windows Administrative privileges. To achieve this:

  1. From the Windows desktop, open the folder called STPI Shortcuts by double-clicking on it.

STPI Shortcuts Folder
  1. Two shortcuts allow you to start the STPI Client. You can use either STPIClient (Hidden) or STPIClient. Select the shortcut which better meets your desired use case:

STPIClient

This shortcut makes the STPI Client run with the command prompt window visible on the screen. This takes up space on the screen and on the Windows taskbar, but allows you to see all the operations going through the STPI Client in real-time.

STPIClient (Hidden)

This shortcut allows the STPI Client to run with the command prompt window hidden from view. This frees up space on the screen and Windows taskbar, but the operations going through the STPI Client are not visible.

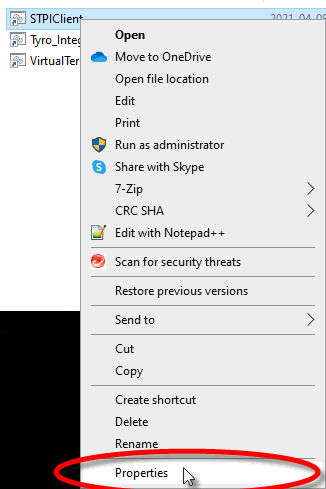
  1. Right-click the shortcut called STPIClient or STPIClient (Hidden), and select the Properties option.

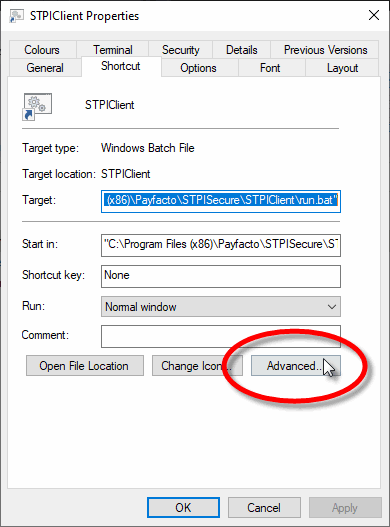
  1. The STPIClient or STPIClient (Hidden) shortcut's properties page opens to the Shortcut tab. Click the Advanced... button.

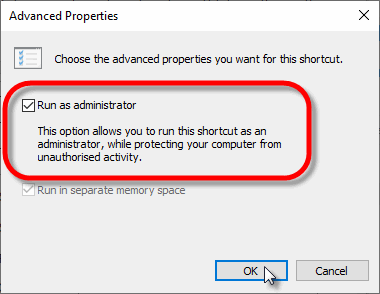
  1. Activate the Run as administrator checkbox and click OK.

  1. You will be back to the STPIClient (or STPIClient (Hidden)) shortcut's properties page. Click OK to close it.

With this setup, the STPI Secure client will always start with administrative privileges whenever you use this shortcut.


Make the STPIClient start automatically as Windows starts

You can add a copy of the STPIClient or STPIClient (Hidden) shortcut to the Windows startup folder to force the STPI client to start automatically as Windows starts. Here is the procedure to follow with Windows 10:

  1. Make sure that hidden files and folders are visible:

    a. From Windows explorer, click on the View menu and make sure that the Hidden Items option is selected from the Show/Hide section.

  1. Browse to the following folder:

C:\ProgramData\Microsoft\Windows\Start Menu\Programs\StartUp

  1. Copy the STPISecure or STPISecure (Hidden) shortcut to the StartUp folder.

NOTE: Be sure to apply the Run as administrator option as explained above, before copying the shortcut.

With this setup, the STPI Client application with automatically start itself if Windows is restarted.


Start the STPI Client application manually
  1. Double-click the STPIClient or STPISecure (Hidden) shortcut.

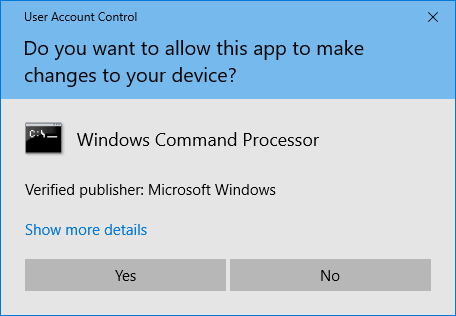
  2. you will see a UAC warning. Click Yes.

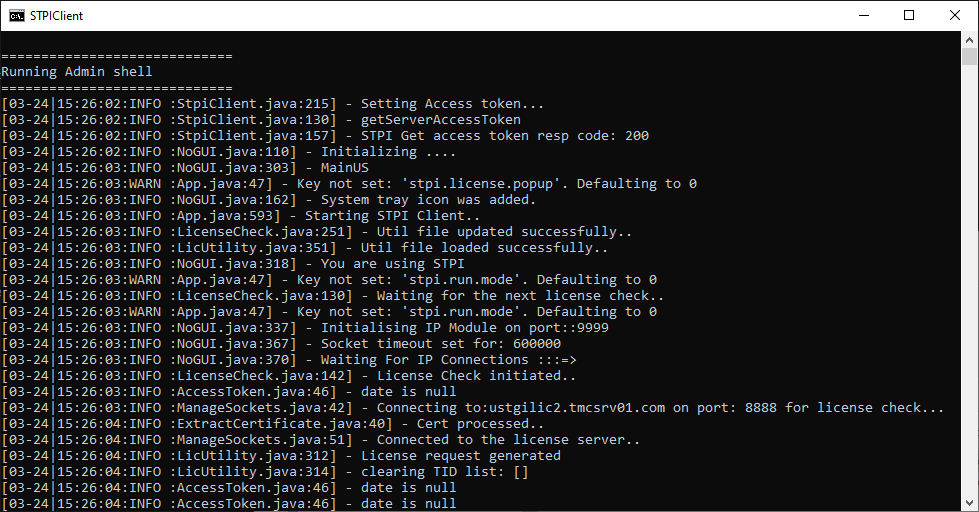
  1. If you selected the regular STPISecure shortcut, a command prompt window will appear, with the Running Admin shell header. You will see text scrolling on the window. If you used the STPISecure (Hidden) instead, you will not see this window and skip directly to the next step.

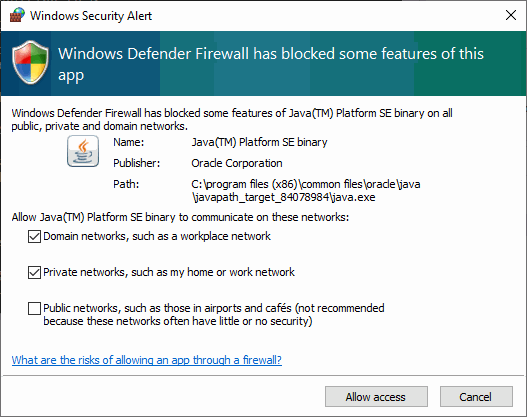
  1. The very first time the STPIClient starts, you will see a Windows Security Alert from the Windows Defender Firewall.

a. Enable the Domain networks, such as a workplace network option (available only if your PC is part of an Active Directory domain).

b. Enable the Private networks, such as my home or work network option.

c. Disable the Public networks option.

d. Click Allow access.

  1. If you selected the STPISecure shortcut, the command prompt window will remain on the screen. You may minimize it, but do not close it.

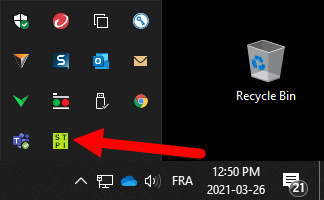
  2. An icon will also be added to the Windows system tray.


Stopping the STPI Client application

IMPORTANT! Stopping the STPI Client application will prevent payment terminals using SecureTable from processing transactions. Only stop the STPI Client for troubleshooting purposes.

Closing the command prompt window

If you are using the STPISecure shortcut, simply close the command prompt window by clicking the "X" in the upper-right corner.

Using the system tray icon

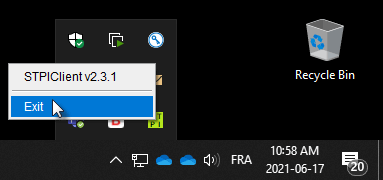
You can also right-click the STPI icon in the system tray and select the Exit option.

Congratulations!

The STPI Client software is now up-and-running on your system.

Right-click Properties on STPI Shortcut
Shortcut properties window
Advanced properties

IMPORTANT! If you intend to use the STPIClient as a service instead of running it as an application, please skip the rest of the instructions on this page and go directly to the guide.

Show Hidden Items
UAC - Windows Commande Processor
STPIClient Command Prompt
Windows Security Alert
Windows System Tray Icon
Screenshot command Prompt closing
System Tray Screenshot - Exit STPI Client
Configure the STPIClient as a Service