LogoLogo
FrançaisPayFacto homepageContact us
UK Docs Center
UK Docs Center
  • TERMINALS
    • Mobile
      • PAX A920
        • Terminal Overview
        • Terminal Setup and Configuration
        • Terminal Activation
        • Terminal Usage
      • PAX A920 Pro
        • Terminal Overview
        • Initial Terminal Configuration
        • Terminal Activation
        • Working with the Terminal
      • A920 / A920 Pro Accessories
        • PAX A920 - A920 Pro Terminal Charging Base Installation Guide
          • Charging Base Overview
          • Charging Base Installation
          • Using the Charging Base
        • PAX A920 Multi-Terminal (5) Charging Base Installation Guide
          • Charging Base Overview
          • Charging Base Installation
          • Using the Charging Base
    • Countertop
      • PAX A80
        • A80 Spec
        • A80 Setup Guide
          • Introduction
          • A80 Terminal Overview
            • Overview
            • Terminal Hardware
            • A80 Communication Ports
          • Terminal Setup and Configuration
            • Installing the Printer Paper
            • Connect the Terminal Cables
            • Configuring the Terminal Display Language
            • Configuring the Terminal Network Connections
            • Configuring the Terminal Ethernet Connection
            • Configuring the Terminal Wi-Fi Connection
          • Terminal Activation
            • Overview
            • Activate Terminal
            • Set Passwords
          • Working with the Terminal
            • Powering the Terminal On or Off
            • Terminal Input Options
            • Replacing the Printer Paper
            • Card Payment Options
        • Accessories
          • Introduction
          • Installing the T Bracket
          • Cable Installation
  • APPLICATIONS
    • SecureTable
      • SecureTable: Online User Manual
        • Overview
        • Requirements
        • STPI Secure Installation
          • Installation Process Overview
          • Install Microsoft .NET Framework 3.5 SP1
          • Install Java for Windows
          • Install the STPISecure Client software
          • Activate the STPI Secure License
          • Start the STPI Client for the first time
          • Configure the STPI Client as a Service
        • Maitre'D Configuration
          • Electronic Funds Transfer Module Setup
          • Media Type mappings for SecureTable or SecurePay
          • Generic Media Type mapping for SecureTable or SecurePay
        • SecureTable Application
          • SecureTable installation on Android Payment Terminals
          • SecureTable Application - Basic Navigation
          • SecureTable Application Configuration
          • SecureTable Functions
        • Payment Process
          • SecureTable Full Transaction Workflow
          • Working with Tips
          • Voids
        • Tasks-How To's
          • Task: Add an APN to your Android Payment Terminal
          • Task: Configure Port Forwarding
          • Task: Switch between Wifi and 4G/LTE
        • Troubleshooting
      • SecureTable Maitre'D Edition for TYRO
        • Introduction
        • Requirements
        • STPI Secure Installation
          • Install the STPISecure Client software
          • Activate the STPI Secure License
          • Start the STPI Client for the first time
          • Configure the STPI Client as a Service
        • Maitre'D Configuration
          • Electronic Funds Transfer (EFT) Interface setup
          • Media Type mappings for SecureTable
          • Generic Media Type mapping for SecureTable
        • SecureTable Application
          • SecureTable Installation on Android Payment Terminals
          • SecureTable Application - Basic Navigation
          • SecureTable Application Configuration
          • SecureTable Functions
        • Payment Process
          • General use of SecureTable to apply payments
          • Transaction workflow
          • Working with Tips
          • Voids
        • Tasks - How To's
          • Task: Add an APN to your Android Payment Terminal
          • Task: Configure Port Forwarding
          • Task: Switch between Wifi and 4G/LTE
        • Troubleshooting
          • Microsoft .NET Framework 3.5 is missing
          • Java is missing
    • SecurePay
      • Overview
      • Requirements
      • Use the STPI Secure Installer to install the RTI-SIPA plugin
        • Installation Process Overview
        • Install Microsoft .NET Framework 3.5 SP1
        • Install Java for Windows
        • Install the RTI-SIPA Plugin
      • Maitre'D Configuration
        • Electronic Funds Transfer Module Setup
        • Assign a Payment Terminal to POS Workstation
        • Main Media Type for SecurePay
        • Media Type Mappings for SecurePay
        • Generic Media Type Mapping For SecurePay
        • Employee Configurations
      • SecurePay Application
        • SecurePay Installation on Android Payment Terminals
        • SecurePay Application - Basic Navigation
        • SecurePay Application Configuration
        • SecurePay Functions
      • Payment Process
        • SecurePay Full Transaction Workflow
        • Working with Tips
      • Troubleshooting
  • PROTECTION AGAINST FRAUD
Powered by GitBook
LogoLogo

Legals

  • Terms & conditions

© 2024 PayFacto, Inc. All rights reserved.

On this page
  • Electronic Funds Transfer Module Setup
  • Verify the Maitre’D license
  • Electronic Funds Transfer (EFT) Interface setup

Was this helpful?

Export as PDF
  1. APPLICATIONS
  2. SecurePay
  3. Maitre'D Configuration

Electronic Funds Transfer Module Setup

PreviousMaitre'D ConfigurationNextAssign a Payment Terminal to POS Workstation

Was this helpful?

Electronic Funds Transfer Module Setup

Verify the Maitre’D license

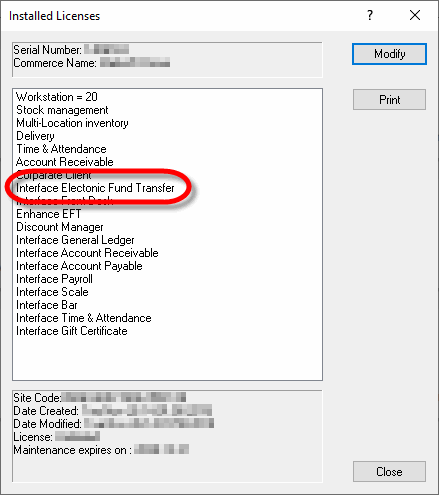
Make sure that the Maitre’D Electronic Funds Transfer Interface option is included on the Maitre’D license. To confirm this, simply logon to the Maitre’D Back-Office using appropriate credentials, click on the File menu and select the Licenses option.
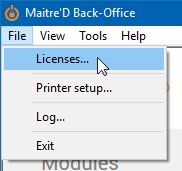
This will bring up the license’s properties. Only one option is required for SecurePay to operate properly:

  • Interface Electronic Fund Transfer.

If this option is missing, it will need to be purchased before you can use SecurePay. Please contact your local sales representative.


Electronic Funds Transfer (EFT) Interface setup

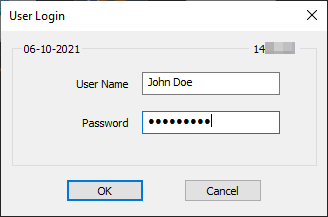
  1. Logon to the Maitre’D Back-Office with appropriate credentials. (Distributor or System Owner)

  1. Start the Electronic Funds Transfer Module.

  1. Click the View menu, and select Options…
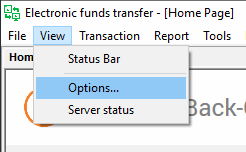
  1. The Configuration screen opens on the Interface branch.
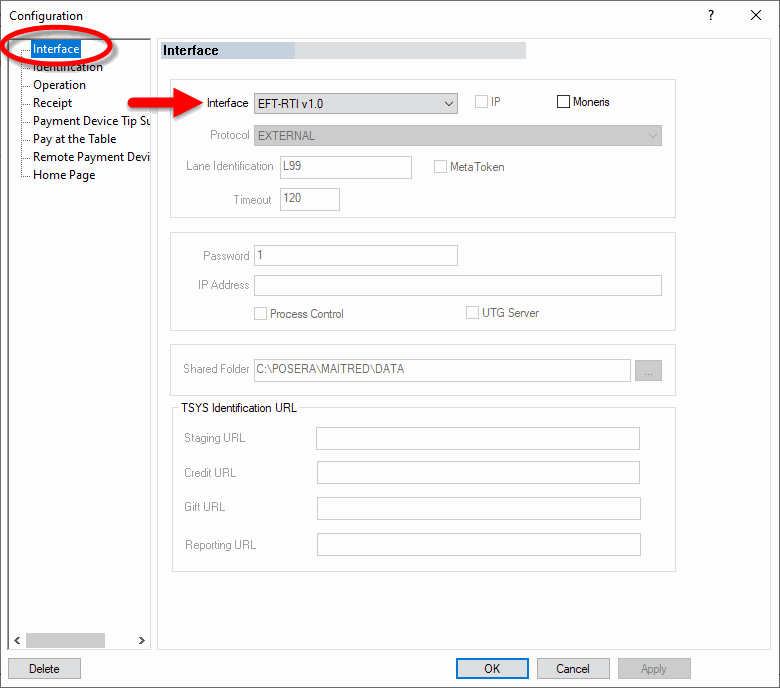
Interface

Select EFT-RTI v1.0 from the drop-down list.

Ignore the remainder of the settings on this page.

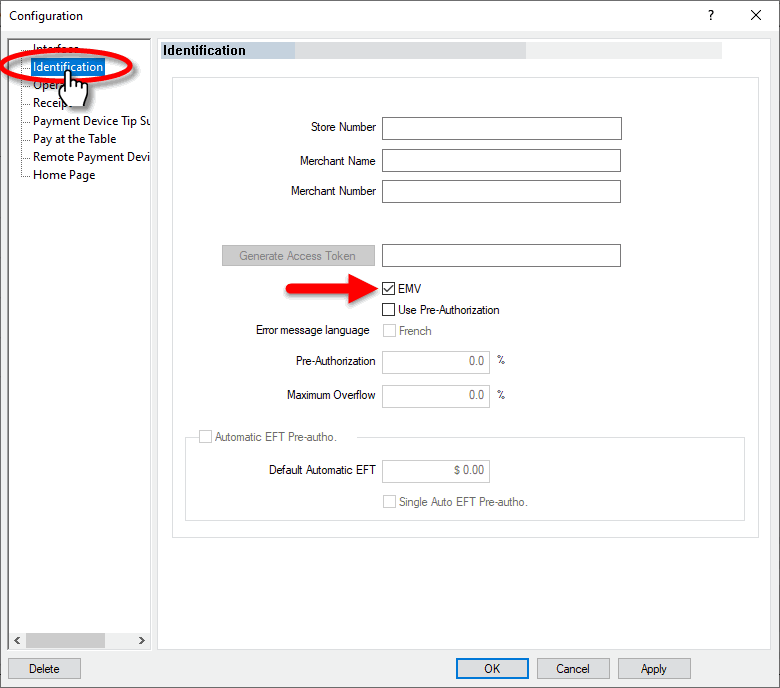
  1. Click on the Identification branch.

  • Store Number

    Leave this field blank.

    Merchant Name

    Leave this field blank.

    Merchant Number

    Leave this field blank.

    Generate Access Token

    Ignore this option.

    EMV

    Enable this option.

    Use Pre-Authorization

    Enable this option to enable pre-authorization options for bar tabs. This feature only works with select payment processors in the United States.

    Error Message Language

    This field is grayed out and cannot be used with SecurePay.

    Pre-Authorization %

    This field is grayed out and cannot be used with SecurePay.

    Maximum Overflow

    This field is grayed out and cannot be used with SecurePay.

    Automatic EFT Pre-Autho.

    This option will become available once the Use Pre-Authorization option is enabled. Enable this option to use bar tabs. This feature only works with select payment processors in the United States.

    Default Automatic EFT

    Enter the default amount to be used for authorization when opening a bar tab with a credit card. This amount is also used as an increment value if the total of items already ordered is higher than the default amount. For example, if the default value is $25.00, Maitre'D will increment the suggested amount by $25.00 slices, going from $25.00 to $50.00 and then to $75.00 and so on, as needed to cover the current amount of the running tab.

    Single Auto EFT Pre-Autho.

    Enable this option to modify and re-use the existing pre-athorization when the authorized amount is exceeded. Disabling this option will cause a new pre-authorization to be processed every time the authorized amount is exceeded, which requires the card to be re-swiped. Some payment processors don't allow existing pre-authorizations to be modified while others may explicitly require it, so please check with your processor whether you should enable or disable this option.

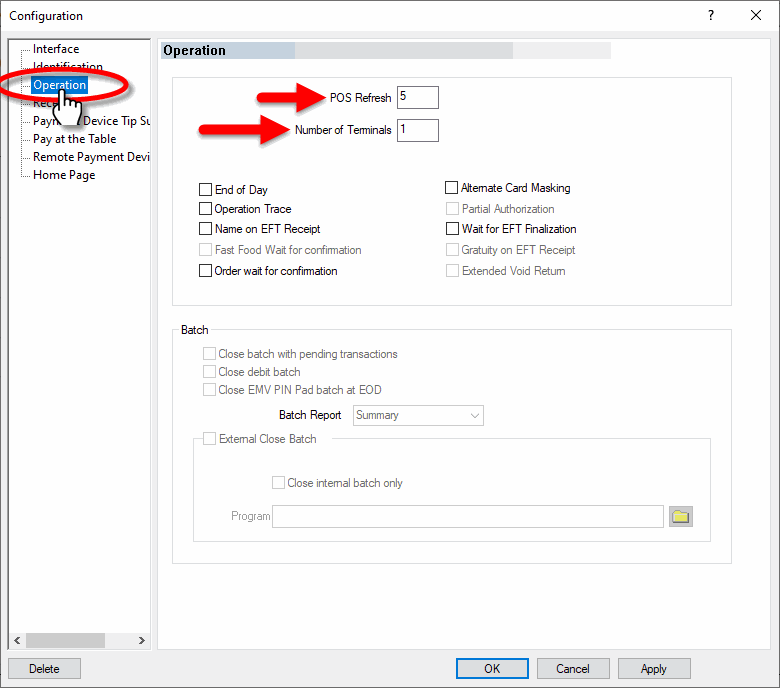
  1. Click on the Operation branch.

  • POS Refresh

    Set this value to 5.

    Number of terminals

    Set this value to the number of SecurePay terminals that will be in use.

    End of Day

    Disable this option.

    Operation Trace

    Disable this option.

    Name on EFT Receipt

    Disable this option.

    Order Wait for Confirmation

    Disable this option.

    Alternate Card Masking

    Disable this option.

    Wait for EFT Finalization

    Disable this option.

    Other options

    All the remaining options are grayed-out and cannot be changed. Ignore them.

  1. The settings from the Receipt, Payment Device Tip Suggestion, Pay at the Table, Remote Payment Device and Home Page branches don't have any effect on the operation of SecurePay. Please make sure not to change or remove any settings found in these pages, as these could affect the operation of other payment terminals operating with SecureTable.

  2. Click OK to save changes and close the options window.