Terminal Setup and Configuration
Prerequisite
Before beginning the terminal configuration process, make sure that the terminal is configured in the PAX Store. Creation of the PAX Store account is typically done as part of deployment prior to delivery to the merchant.
If the terminal is not configured in the PAX Store, you will be unable to complete the entire configuration process. Power down the terminal, contact PayFacto, and have the terminal serial number available.
Connect the Power Cable
Before you can connect the terminal to a vending device, you must connect the power cable, configure the network connections, and configure the software. To access the terminal’s configuration, you must first connect the power cable.
To connect the terminal power cable:
Turn the terminal over.
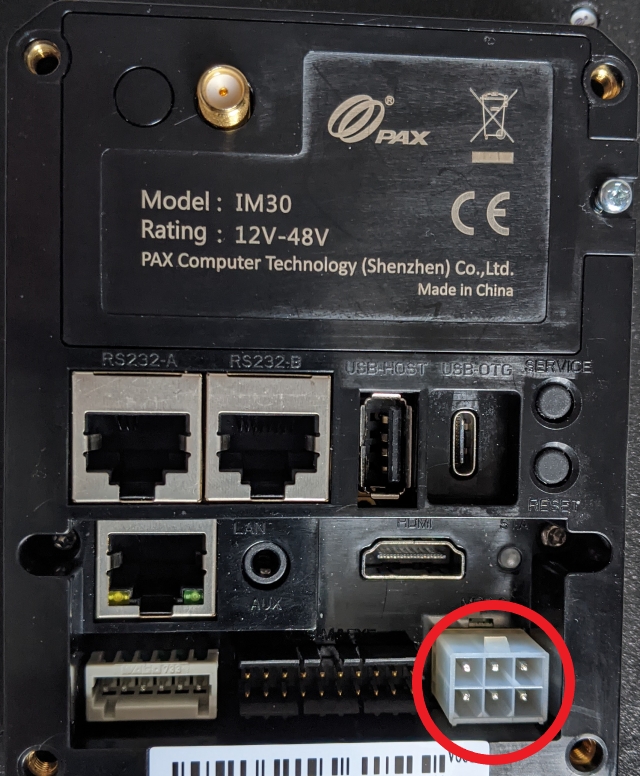
Insert the AC adapter’s MDB connector in the MDB-S port.

Plug the male end of the AC cord into the AC adapter and plug into an AC outlet.
The terminal powers on, Android starts, and displays the terminal’s main screen.
Power On the Terminal
The terminal does not have a dedicated power on/off button; it turns on automatically when you connect it to an AC power source and turns off when disconnected from a power source.
Configure the Terminal Display Language
By default, the terminal displays all information in English. This procedure explains how to change the terminal’s display language if necessary.
IMPORTANT! Selecting a different language changes all text that appears on the terminal.
To change the terminal display language:
Access the terminal's main screen by touching the Home icon.

On the terminal’s main screen, touch the Settings icon.

On the Settings screen, touch the Please Input Password field and use the keypad to type the password: either 9876 or pax9876@@.
Touch the checkmark icon on the keypad when you are done and touch OK.

On the Settings page, scroll to the Personal section and touch Languages & Input.
On the Languages & input page, touch Languages.
On the Language preferences page, touch Add a language.
On the Add a language page, scroll to and touch the desired language.
If the selected language does not appear automatically, you can drag the language to the top of the list.
Configuring the Terminal Network Connections
The IM30 unattended payment processing terminal requires network access to communicate with the payment server and process transactions. You can connect the terminal to mobile (LTE), wired (Ethernet), and wireless (Wi-Fi) networks.
You can connect the terminal to multiple network types if you want to ensure network redundancy. Click on the links above to learn how to configure the terminal to each network type.
Configuring the Terminal Wi-Fi Connection
This section explains how to turn Wi-Fi on and connect to your network.
To connect to your wireless network:
Access the terminal's main screen by touching the Home icon.

On the terminal’s main screen, touch the Settings icon.

On the Settings screen, touch the Please Input Password field and use the keypad to type the password: either 9876 or pax9876@@.
Touch the checkmark icon on the keypad when you are done and touch OK.

On the Settings page, in the Wireless & networks section, touch Wi-Fi.
If Wi-Fi is Off, touch the toggle to turn it on. If Wi-Fi is already on, a list of available networks appears.
From the list of available networks, touch the name of the network you want to connect to.
Enter the password for the selected network and touch CONNECT.
TIP: You can touch Show password before typing to ensure you are entering the password correctly.
After the terminal displays Connected for the selected network, touch the Back icon to return to the Settings page.

Configuring the Terminal Mobile Network Connection
If you plan to use the terminal without connecting to a Wi-Fi network, you need to install the mobile SIM card, provided by PayFacto or your mobile communications provider. The terminal uses the micro SIM card format. Configuring the mobile network consists of:
Installing the SIM Card
This section explains how to install the SIM card to enable mobile network access on the terminal.
To install the mobile SIM card:
Make sure the terminal is powered off and turn the terminal over.
On the back of the terminal in the middle, use a small Phillips screwdriver to loosen (turn left) the screw that secures the card slot module.

Lift the card slot module from the terminal.
Locate the SIM slot on the long side of the module.

Insert the SIM card as illustrated (clipped corner at the top right).

Re-install the card slot module and tighten (turn to the right) the screw using a small Phillips screwdriver to secure the module to the terminal.
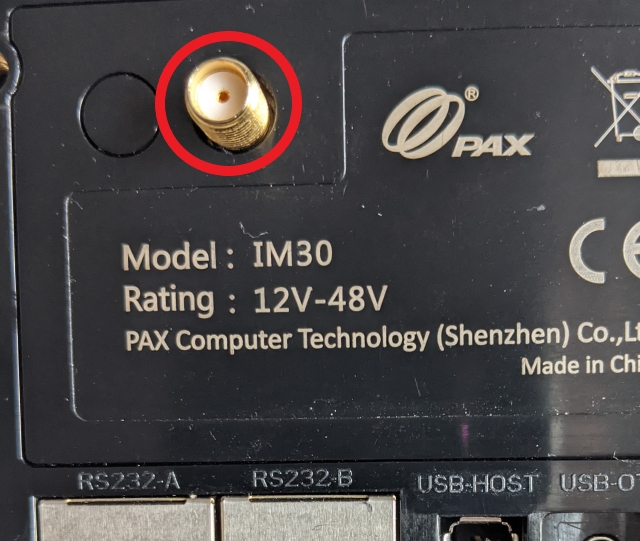
If necessary, attach the LTE antenna (sold separately) to the threaded connector on the card slot module.

Re-connect the power cable to power up the terminal.
Configuring the APN Information
When you receive a SIM card from PayFacto, you need to create and configure the Access Point Name (APN) information. The APN settings allow the terminal to connect to the PayFacto payment server.
If you obtained a SIM card from your mobile communications provider, the APN settings may configure themselves automatically; if they don't, you should contact your provider for the required APN settings.
To create and configure the APN information:
Access the terminal's main screen by touching the Home icon.

On the terminal’s main screen, touch the Settings icon.

On the Settings screen, touch the Please Input Password field and use the keypad to type the password: either 9876 or pax9876@@.
Touch the checkmark icon on the keypad when you are done and touch OK.

On the Settings page, in the Wireless & networks section, touch More.
On the Wireless & networks page, touch Cellular networks.
On the Cellular network settings page, touch Access Point Names.
Click the New APN icon to create a new access point.

On the Edit access point screen, use the following information to enter the required information in the appropriate fields (do not adjust the other fields):
Name: Telus
APN: m2m-east.telus.iot
Proxy: (leave blank)
Touch the menu icon and touch Save.

Configuring the Terminal Ethernet Connection
This section explains how to enable an Ethernet connection and connect to your network.
To connect to your Ethernet (wired) network:
Access the terminal's main screen by touching the Home icon.

On the terminal’s main screen, touch the Settings icon.

On the Settings screen, touch the Please Input Password field and use the keypad to type the password: either 9876 or pax9876@@.
Touch the checkmark icon on the keypad when you are done and touch OK.

On the Settings page, in the Wireless & networks section, touch Ethernet.
If Ethernet is Off, touch the toggle to turn it on.
After you toggle Ethernet to On (or if Ethernet is already on) and you connect an Ethernet cable to the terminal, the network settings should appear automatically.
Touch the Back icon to return to the Settings page.

Last updated
Was this helpful?

