It is not mandatory to configure a generic Payment mode. However, it is strongly recommended. Thanks to this configuration, the cashier does not need to ask the customer which type of card is being used for payment. This method automates the card detection process and avoids potential mistakes when selecting the card type manually.
The generic payment method is used to activate the payment terminal and start the EFT payment process.
Login to the Veloce Back-Office.
Start the Point of Sale Control module.
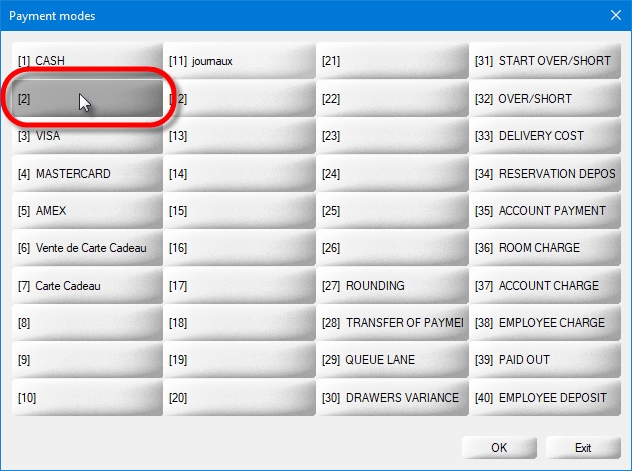
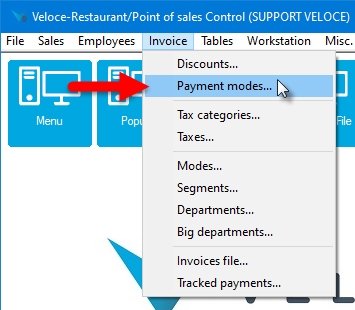
Select the Invoice menu and select the Payment modes... option.
Select an empty slot, ideally choosing the smallest slot number available.
The payment mode's properties will open on the Configuration tab. Settings highlighted with red arrows in the screenshot below need to be configured. Other settings are either optional or need to be left disabled.
Type a meaningful name for this payment mode, such as Debit/Credit or By Card.
Type an alternate name for this card, to be used in a second language.
Optionally, this setting can be used to assign an icon to the payment mode to make it stand out on the POS screen.
Select Tip from the drop-down list.
From the drop-down menu, select the Payment Mode into which the tips will be accumulated. For instance, if servers claim their tips from the cash in their respective floats, select CASH.
Leave both of these settings at 0.
Leave this option disabled.
Leave all the options in this section disabled. This is only used for foreign currency.
Leave all the options in this section disabled.
These settings are optional and can be configured according to the merchants needs or preferences.
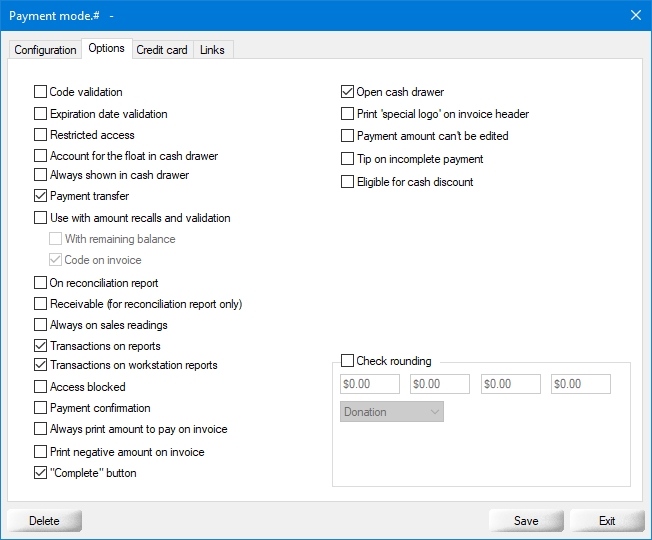
Click on the Options tab and configure these settings according to the merchant's needs and preferences.
Payment Transfer
Transactions on reports
Transactions on workstation reports
"Complete" button
Open cash drawer
Click on the Credit Card tab.
Activate this option to allow this payment mode to trigger the payment terminal.
DISABLE this option.
From the drop-down list, select None.
Everything else on this tab should be left disabled.
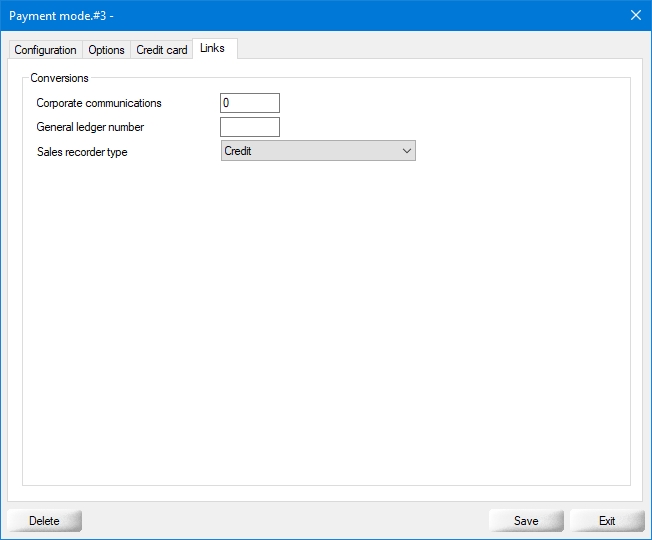
Click on the Links tab.
Configure this field only if you use Corporate communications.
Configure this field only if you use the accounting interface.
If you are located in the Canadian province of Québec, set this drop-down list to Other. Otherwise, simply ignore this setting.
Click the Save button to save you settings and return to the payment modes list. The newly created payment mode will appear in the list.
IMPORTANT! Once the generic payment mode is configured, you must configure a payment mode for each card brand accepted by the merchant. For example, if the client accepts Mastercard, Visa, American Express and Interac Debit, you must create and configure a payment mode for each card brand individually.
Related Topics
Once the generic payment mode is configured, you must configure a payment mode for each card brand accepted by the merchant. For example, if the merchant accepts Mastercard, Visa, American Express and Interac Debit, you must create and configure a payment mode for each card brand individually.
NOTE: Since the configuration for Interac Debit is unique, it has its own topic. If you need to configure payment modes for various credit card brands, please see Credit Card Payment Modes to learn more.
IMPORTANT! Before creating payment modes for the various card brands accepted by the merchant, the generic Credit/Debit payment mode must be created. Please see Generic Credit/Debit Payment Mode to learn how to configure it.
Login to the Veloce Back-Office.
Start the Point of Sale Control module.
Select the Invoice menu and select the Payment modes... option.
Select an empty slot, ideally choosing the smallest slot number available.
The payment mode's properties will open on the Configuration tab. Settings highlighted with red arrows in the screenshot below need to be configured. Other settings are either optional or need to be left disabled.
Type a meaningful name for this payment mode, such as INTERAC DEBIT.
Type an alternate name for this payment mode, to be used in a second language.
Optionally, this setting can be used to assign an icon to the payment mode to make it stand out on the POS screen.
Select Tip from the drop-down list.
From the drop-down menu, select the Payment Mode into which the tips will be accumulated. For instance, if servers claim their tips from the cash in their respective floats, select CASH.
Leave both of these settings at 0.
Leave this option disabled.
Leave all the options in this section disabled. This is only used for foreign currency.
Leave all the options in this section disabled.
These settings are optional and can be configured according to the merchants needs or preferences.
Click on the Options tab and configure these settings according to the merchant's needs and preferences.
Payment Transfer
Transactions on reports
Transactions on workstation reports
"Complete" button
Open cash drawer
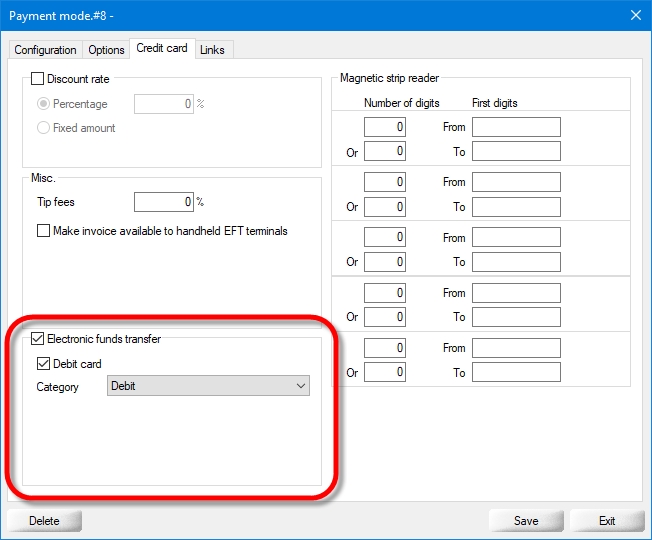
Click on the Credit Card tab.
Activate this option to allow this payment mode to trigger the payment terminal.
ENABLE this option.
From the drop-down list, select Debit.
Everything else on this tab should be left disabled.
Click on the Links tab.
Configure this field only if you use Corporate communications.
Configure this field only if you use the accounting interface.
If you are located in the Canadian province of Québec, set this drop-down list to Debit. Otherwise, simply ignore this setting.
Click the Save button to save you settings and return to the payment modes list. The newly created payment mode will appear in the list.
This concludes the setup instructions for the Interac Debit payment mode. If not done already, don't forget to create payment modes for each supported credit card brand, as described in the Credit Card Payment Modes topic.
Related Topics
For all EFT protocols, the payment modes must be correctly configured. The configuration is the same regardless of the protocol used. The different payment modes serve first and foremost to activate the payment terminal in order to take card payments, then, they compile the following statistics and data:
The type of card used; either a debit card, credit card or a banking card, such as Interac Debit.
The brand of the card used, such as Visa, Mastercard, AMEX, Discover, etc.
The sale amount.
The amount authorized for payment.
The tip amount, if any.
The last 4 digits of the card number.
Since the mandatory implementation of EMV (Europay, Mastercard, Visa) Standards around 2010, merchants have tried to limit card handling by cashiers/clerks as much as possible. This way, the payment cards remain in the customer's hands at all times, giving them a feeling of security and effectively limits the possibility of fraud by card skimming.
Since it is now difficult for the merchant to know in advance what kind and brand of card will be used for payment, Veloce uses the information returned by the terminals to know which card type and brand was used, along with other information about the payment.
Related Topics


Once the generic payment mode is configured, you must configure a payment mode for each card brand accepted by the merchant. For example, if the merchant accepts Mastercard, Visa, American Express and Interac Debit, you must create and configure a payment mode for each card brand individually.
NOTE: Since the configuration for Interac Debit differs from that of the credit cards, Interac Debit will be explained in its own separate topic. Please see Interac Debit Payment Mode to learn more.
IMPORTANT! Before creating payment modes for the various card brands accepted by the merchant, the generic Credit/Debit payment mode must be created. Please see Generic Credit/Debit Payment Mode to learn how to configure it.
Login to the Veloce Back-Office.
Start the Point of Sale Control module.
Select the Invoice menu and select the Payment modes... option.
Select an empty slot, ideally choosing the smallest slot number available.
The payment mode's properties will open on the Configuration tab. Settings highlighted with red arrows in the screenshot below need to be configured. Other settings are either optional or need to be left disabled.
Type a meaningful name for this payment mode. For credit card payment modes, this should be the card's brand name, such as VISA.
Type an alternate name for this payment mode, to be used in a second language.
Optionally, this setting can be used to assign an icon to the payment mode to make it stand out on the POS screen.
Select Tip from the drop-down list.
From the drop-down menu, select the Payment Mode into which the tips will be accumulated. For instance, if servers claim their tips from the cash in their respective floats, select CASH.
Leave both of these settings at 0.
Leave this option disabled.
Leave all the options in this section disabled. This is only used for foreign currency.
Leave all the options in this section disabled.
These settings are optional and can be configured according to the merchants needs or preferences.
Click on the Options tab and configure these settings according to the merchant's needs and preferences.
Payment Transfer
Transactions on reports
Transactions on workstation reports
"Complete" button
Open cash drawer
Click on the Credit Card tab.
Activate this option to allow this payment mode to trigger the payment terminal.
DISABLE this option.
From the drop-down list, select the card brnd name, such as Visa.
Everything else on this tab should be left disabled.
Click on the Links tab.
Configure this field only if you use Corporate communications.
Configure this field only if you use the accounting interface.
If you are located in the Canadian province of Québec, set this drop-down list to Credit. Otherwise, simply ignore this setting.
Click the Save button to save you settings and return to the payment modes list. The newly created payment mode will appear in the list.
Repeat these steps for every card brand that is accepted by the merchant. For instance, if the merchant accepts Visa, Mastercard, American Express and Discover, 4 unique credit card payment modes need to be created, one for each card brand.
This concludes the setup instructions for the credit card brands payment modes. If not done already, don't forget to create a payment mode for Interac Debit, as described in the Interac Debit Payment Mode topic.
Related Topics
Introduction
Generic Credit/Debit Payment Mode
Interac Debit Payment Mode
Credit Card Payment Modes