Electronic tablets can be used as mobile POS devices for table-side ordering. They can also be used as "queue-busting" devices in fast-food environments. The Veloce POS application supports Windows, iOS and Android devices. Here are specific requirements for each type of tablet:
iOS (iPad)
Requirement
OS Version
iOS version 9.0 or later
RAM
2 GB or more
Storage
32 GB or more
Android Tablets
Requirement
OS Version
Android version 5.0 (Lollipop) or later
RAM
2 GB or more
Storage
32 GB or more
Windows Tablets
Requirement
OS Version
Windows 10 / 11
RAM
2 GB or more (4 GB recommended)
Storage
64 GB or more
Network Requirements (Wired)
The following topic describes various requirements related to Internet access and local network connectivity required to operate your Veloce POS system and process payments with PayFacto efficiently.
Internet Connectivity
Internet connectivity is required to validate the Veloce license, download and install updates and process payments. The requirements listed below are for normal Veloce operation and payment processing only. If the merchant uses internet access for other purposes, such as providing internet access to guests, additional bandwidth will need to be factored in to accommodate those needs.
Internet Speed Requirements
Minimum
Recommended
Download
100 Mbit/s
>100 Mbit/s
Upload
10 Mbit/s
20 Mbit/s
Local Area Network (LAN) connectivity
The following devices each need to be connected to your local area network (LAN) via Ethernet adapters and cables:
Veloce Back-Office server
Veloce POS workstations
Kitchen Printers (some models)
Kitchen Monitors
Receipt Printers (some models)
Payment Terminals (some models)
Ethernet Speed Requirements
Minimum
Recommended
Speed
100 Mbit/s
1 Gbit/s
Cable Type
Cat 5e
Cat 6
Hardware and Software Requirements
Hardware Requirements
Network Requirements (Wired)
Network Requirements (Wi-Fi)
Network Layout
Operating System Requirements
Unsupported Operating Systems
Network Requirements (Wired)
Network Requirements (Wi-Fi)
Network Layout
Operating System Requirements
Unsupported Operating Systems
Tablets
Hardware Requirements
To facilitate reading and interpretation of hardware requirements, they are broken down in 3 tiers:
Minimum
The minimum requirement is the bare minimum that will allow Veloce to operate adequately, without any consideration for possible expansion or "future-proofing".
Recommended
The recommended hardware configuration should yield adequate performance in most situations and provide headroom for future expansion of the system.
Large Sites / High Volume
The hardware configuration for large sites should yield adequate performance in restaurants using 20 or more POS workstations. This requirement also applies to restaurants with high volume of orders where the number of POS workstations may not be as high as 20, but where the POS Workstations are in near-constant use.
For the Veloce Back-Office
Hardware
Minimum
Recommended
Large sites
Operating System
CPU
Intel Core i3 8100 series
or equivalent
For Veloce POS Workstations
Hardware
Minimum
Recommended
High Volume
Operating System
For Windows 11
In some cases, Windows 11 may have more stringent hardware requirements than Veloce. If you wish to use your POS system with Windows 11, these requirements need to be accounted for:
Component
Minimum
CPU
1 Gigahertz (GHZ) or faster, with 2 or more cores on a or System on a Chip (SoC).
While using Wi-Fi is not mandatory in of itself, many modern devices can only connect to the Veloce POS system trough Wi-Fi. Those include Android or Apple tablets, as well as some payment terminals.
To ensure stability and security with the Veloce POS system, certain requirements must be met when using Wi-Fi.
General Wi-Fi requirements
Requirements
Notes
SSID
Unique SSID for the POS system
The POS system needs to have its own SSID, which needs to be segregated from other services such as guest Wi-Fi access.
Encryption
WPA2 or better
Always use the latest and most secure encryption standard available, along with a strong passphrase.
Protocol
Wi-Fi 5 (802.11 ac) or better
Use recent access point hardware which supports the latest protocols. These devices are typically backwards-compatible with older clients (tablets phones, laptops, etc.)
Speed
Wi-Fi Access Point Coverage
Despite the claims of various manufacturers, an average Wi-Fi access point will efficiently cover approximately 2000 square feet, which corresponds to a floor measuring 40' x 50'. Many factors can affect coverage of access points, such as the thickness of walls, various obstacles like support columns, the presence of electrical equipment and wiring, as well as other communication devices which can create interference.
To estimate your needs in terms of Wireless Access Points, use the following rules:
Minimum one access point per floor.
Minimum one access point per outside space.
One access point per 2000 sq. ft. of floor space.
For example, if a restaurant has two floors and an outside patio, we already know that at least 3 access points will be required. (1 AP per floor and 1 AP per outside space)
Next, we need to account for the square footage:
3000 sq. ft. on the ground floor.
1000 sq. ft. on the second floor.
500 sq.ft. on an outside patio.
This means this restaurant would need a minimum of 4 access points:
2 access points to cover the ground floor, since that floor exceeds 2000 sq. ft.
1 access point to cover the second floor. (You need at least one access point per floor)
1 access point to cover the patio. (You need at least one access point per outside space)
Network Layout
Veloce can be installed using different network models depending on the specific needs of any business.
For instance, the Veloce Back-Office software and the POS software can both be installed on the same device for smaller establishments. For larger operations, the Back-Office can be installed on a separate PC located in a communication closet while dozens of POS workstations are installed throughout the building.
Here are a few examples of common configurations:
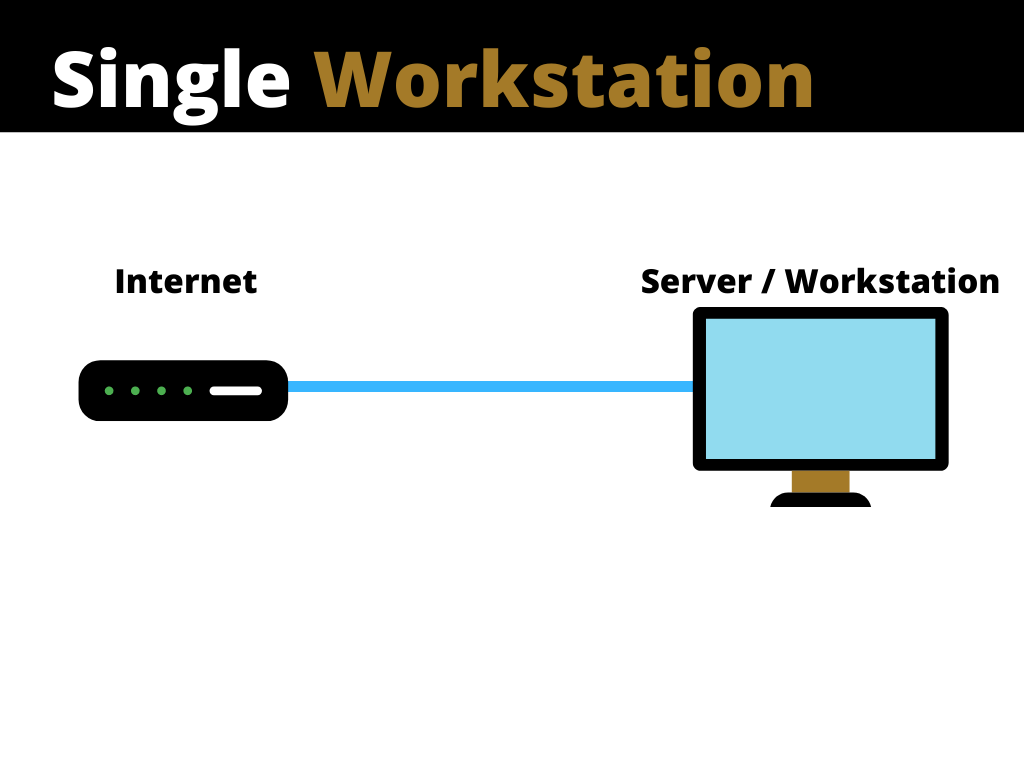
Single Workstation
This layout is used in small volume operations. The hardware used is generally a Windows 10 touchscreen workstation, but a generic Windows 10 PC with a mouse and keyboard may also be used. In this configuration, both the Veloce Back-Office and the POS sofware are installed on the same device, which reduces the system's footprint and saves space.
The workstation is generally connected to the Internet to benefit from online features, and nothing else is connected to it.
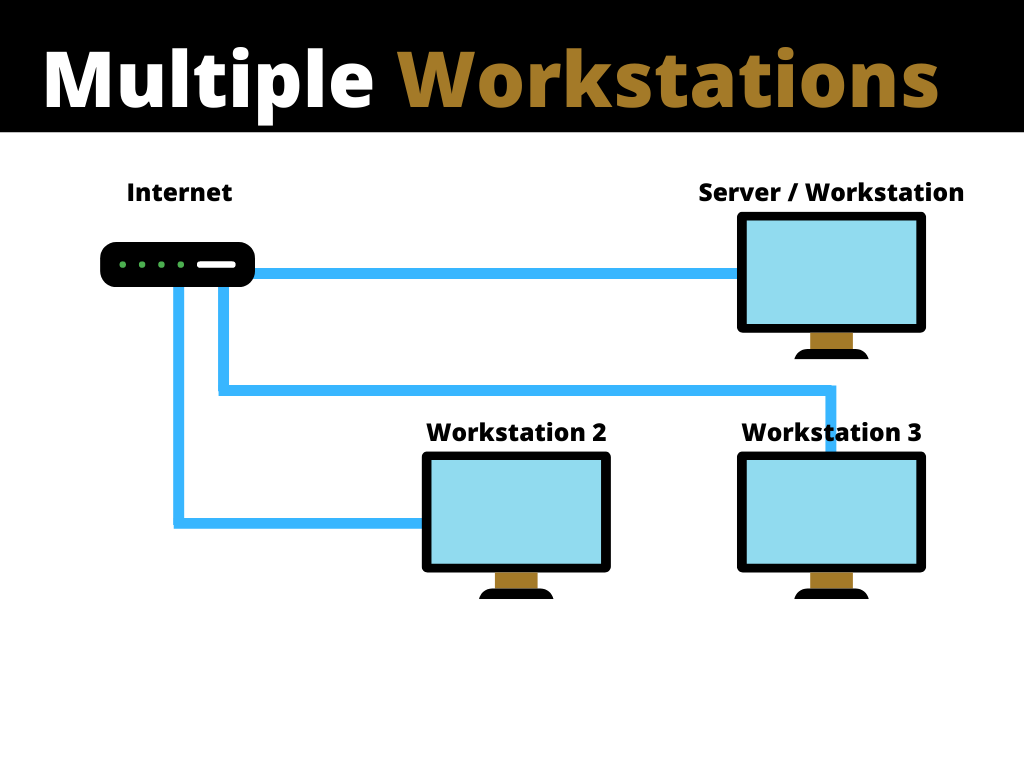
Multiple Workstations (Basic)
This is one of the most common layouts. This layout is very flexible, as it allows for additional workstations to be easily configured to follow an increase in the volume of operations.
In this layout, one of the workstations is also used as the Veloce Back-Office server, which avoids the use of a dedicated PC for that purpose, saving space and lowering hardware costs.
The other workstations are connected to the Back-Office server through a TCP/IP network, which is itself connected to the Internet.
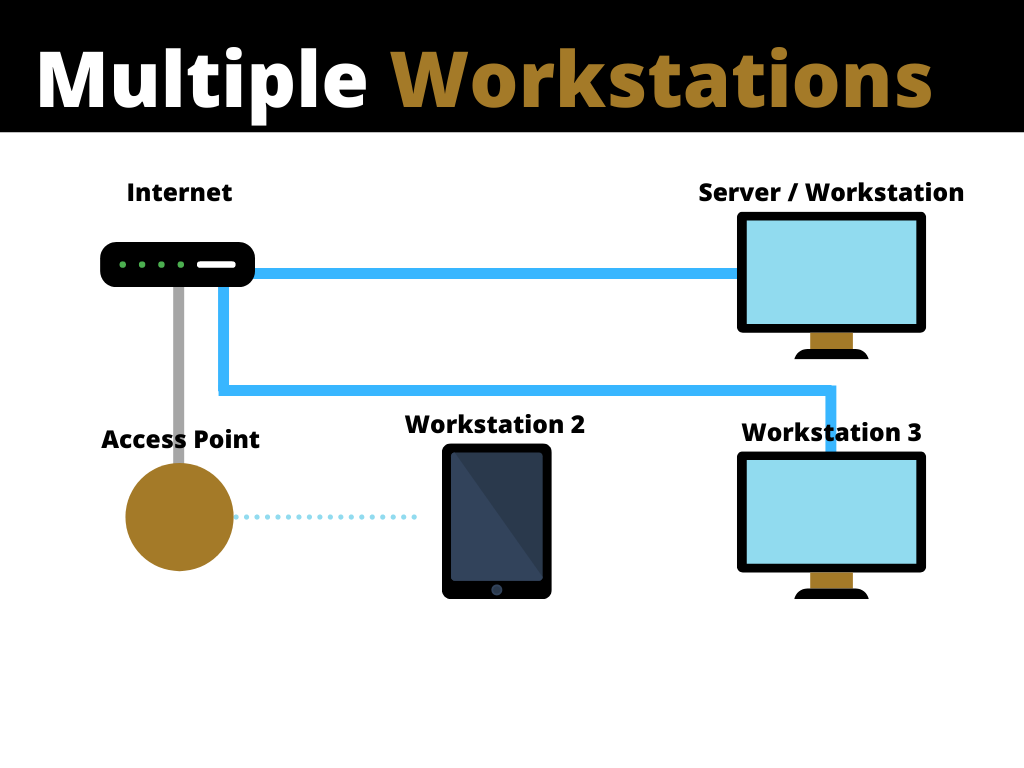
Multiple Workstations with WiFi
This network layout is very similar to the Multiple Workstations layout seen previously. Like its predecessor, it uses a Back-Office Server / Workstation combo and workstations are connected together with a TCP/IP network. On this one, however, a WiFi access point is added to provide connectivity to an Android or iOS tablet workstation. Note that for security reasons, this access point is dedicated to workstations only. WiFi Internet access for customers needs to be provided by a separate device or VLAN.
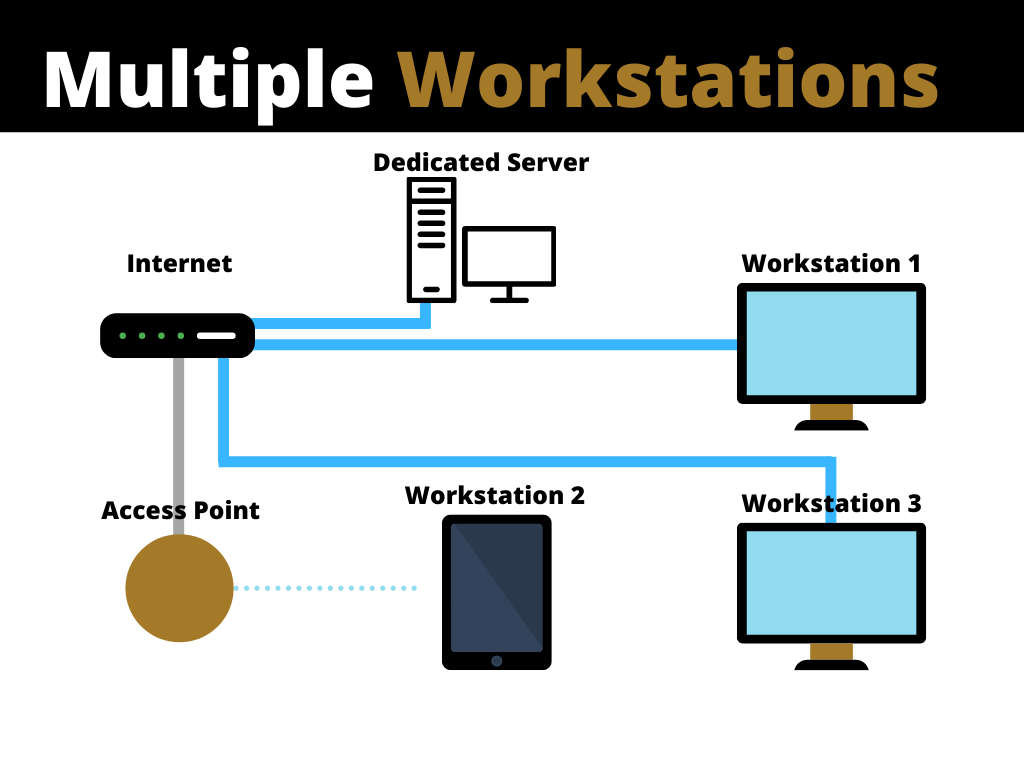
Multiple workstations with dedicated server
Again, this layout is very similar to the other two layouts with multiple workstations. The main difference here is the fact that a dedicated server is used instead of a Server / Workstation combo. The dedicated server can be a simple desktop PC installed in the manager's office or in a small communication closet. For large operations, a rackmount server in a server room can also be used for this purpose.
This layout is used when there is space available to accommodate the dedicated server and that the processing power provided by a Server / Workstation combo is insufficient to meet the needs of a larger operation with dozens of workstations.
This layout offers maximum flexibility. It is very easy to add more workstations as needed, and the performance loss incurred by adding more workstations is negligible.
100 Mbits/s or better
Wi-Fi 5 supports up to 6933 Mbits/s. Avoid using client devices which support less than 100 Mbits/s Wi-Fi speed.
Minimum signal strength
55 to 60 dBm
Use signal measuring devices to make sure the signal is strong enough to cover the area where Wi-Fi devices will be is use.
Veloce is designed for the Microsoft Windows environment and will operate on a 64-bit edition of Windows. This makes Veloce "hardware-agnostic", which means it will work on any hardware that can run Microsoft Windows, as long as it meets the minimum performance requirements of the operating system.
The table below lists all currently supported operating systems with their projected End-of-Life date issued by Microsoft.
IMPORTANT! Operating systems that have reached their End-of-Life are not listed here, as PayFacto cannot guarantee reliable operation with deprecated operating systems.
While some deprecated operating systems may still work with Veloce, they are no longer supported by Microsoft and therefore no longer receive security updates.
As such, deprecated operating systems represent a liability which may compromise the POS system's security.
Desktop Operating Systems
Patch levels for Desktop Operating Systems
In addition to the general End-of-Life date issued for Desktop operating systems, Microsoft also issues End-of-Life dates for specific patch levels. This is done by Microsoft to ensure that users keep their operating systems up-to-date.
Server-oriented Operating Systems
While a POS, Backup Server or Auxiliary Back-Office would work perfectly on a server-oriented operating system, PayFacto does not recommend doing so, unless your operations specifically require this.
Embedded and "Internet of Things" (IoT) Operating Systems
Enterprise Operating Systems
* Microsoft lists this date as the end of "Mainstream support" for this Windows version. Mainstream support is typically followed by an extended support period, however it is not listed on the Microsoft Lifecycle site for the time being.
Windows 11
Microsoft Windows 11 is the latest release of the Windows family of operating systems. It was released on October 5th, 2021. A full test suite has been run on PayFacto's POS products to ensure compatibility.
Windows 11 vs. Microsoft lifecycle
At this time, Microsoft has not issued official end-of-life (EOL) dates for the Windows 11 family of products. The only EOL dates available so far are for patch levels. These dates will be updated when Microsoft releases new feature updates for Windows 11.
Unsupported Operating Systems
End-of-Life products
Once a Microsoft operating system (OS) reaches the end of support, customers will no longer receive security updates. The OS may still work with programs and hardware after the sale or support of the operating system has been discontinued. However, the possibility increases that new programs and hardware will not be performant on an older OS. This frequently occurs because the manufacturers of new hardware and software make product-design decisions that take advantage of the increased functionality and features in newer operating systems. These manufacturers may decide to discontinue support of their products on older operating systems as appropriate.
For Veloce, this means that the POS system will continue to work after the end of support. However, as updates and features are added to Veloce after EOL, the possibility increases that new Veloce releases become incompatible with older operating systems. Furthermore, deprecated operating systems represent a liability which may compromise the entire POS system's security.
For more information, please see:
End-of-Life products vs. PCI-DSS
Any system using an unsupported or deprecated operating system automatically falls out of PCI-DSS compliance due to the inability of such systems to meet PCI-DSS Requirement 6.2.
PCI-DSS Requirement 6.2 states:
“Ensure that all system components and software are protected from known vulnerabilities by installing applicable vendor supplied security patches. Install critical security patches within one month of release.”
Unsupported products
Some operating systems are not supported by PayFacto even though they are still supported by Microsoft. These can be divided in two categories:
Failed products
Some operating systems never received wide market adoption, such that PayFacto never deemed necessary or profitable to perform any kind of testing on these products. While these operating systems may work with Veloce, PayFacto cannot provide any form of guarantee to that effect, as they were never tested. Such products include Microsoft Windows Vista (which is now also EOL) and Microsoft Windows 8 / 8.1.
Consumer products
Microsoft publishes a wide array of Windows editions targeted for home users, educational versions for schools and other specialized versions for niche users. These versions of windows are not supported due to the lack of certain key features, or because of the Microsoft End-User License Agreement (EULA), which may not cover commercial or industrial use cases.
Full list of Unsupported and End-of-Life Operating Systems
About Veloce
Veloce is a Point of Sale invoicing software which adapts to many business types such as restaurants, bars, microbreweries, cafeterias and retail outlets.
Veloce is not only a cash register. It is also a powerful inventory management tool, with functionalities such as accounts receivable, delivery management, employee time & attendance management, liquor control and table management. Veloce also offers integration with accounting and payroll systems, online ordering platforms, online table reservation, hotel room service and golf systems.
100% Efficient and profitable
Our POS software provides comprehensive management reports that are almost completely customizable, and even has a statistics and reports portal for profitability analysis. Efficiency and profitability are at the heart of every feature we develop.
Reliable, user-friendly and agile
Our management system is secure and thoughtfully designed, and can adapt to any sector. Thanks to the intuitive interface, staff are able to use it effectively after one training session. The easily accessible features mean that it’s quick to use, no matter how busy you are.
Compatible
As the most compatible POS software, it can be used with most of the POS equipment and peripherals on the market. Several solutions are integrated: Freebees, Hotello, Acomba, etc.
Contemporary and customizable design
A contemporary design that can be adapted to each individual situation: colors, size, left-handed, right-handed, etc.
Tailored and advanced
Veloce POS system is adapted for any device: smartphone, android, tablet and adapted to countertop.
Data security: a priority
Our POS software provides a reliable and seamless solution. Smooth operations and data security are priorities for Veloce.
Microsoft Windows 10 Pro
YES
YES
YES
Supported
October 14, 2025
Microsoft Windows 10 Pro for Workstations
YES
YES
YES
Supported
October 14, 2025
Microsoft Windows 11 Pro
YES
YES
YES
Supported
N/A
Microsoft Windows 11 Pro for Workstations
YES
YES
YES
Supported
N/A
Supported
October 10, 2024
Microsoft Windows 11 (Pro & Pro for Workstations), version 23H2
Supported
November 10,2026
Microsoft Windows 11 (Pro & Pro for Workstations), version 22H2
Supported
October 14, 2025
Microsoft Windows Server 2016
YES
NO*
NO*
Supported
January 11, 2027
Microsoft Windows Server 2019
YES
NO*
NO*
Supported
January 9, 2029
Microsoft Windows Server 2022
YES
NO*
NO*
Supported
October 14, 2031
Microsoft Windows 10 IoT Enterprise LTSB 2015
YES
YES
YES
Supported
October 13, 2025
Microsoft Windows 10 IoT Enterprise LTSB 2016
YES
YES
YES
Supported
October 12, 2026
Microsoft Windows 10 IoT Enterprise LTSC 2019
YES
YES
YES
Supported
January 8, 2029
Microsoft Windows 10 IoT Enterprise LTSC 2021
YES
YES
YES
Supported
January 12, 2032
Microsoft Windows 11 IoT Enterprise, version 21H2
YES
YES
YES
Supported
October 8, 2024
Microsoft Windows 10 Enterprise LTSB 2015
YES
YES
YES
Supported
October 13, 2025
Microsoft Windows 10 Enterprise LTSB 2016
YES
YES
YES
Supported
October 12, 2026
Microsoft Windows 10 Enterprise LTSC 2019
YES
YES
YES
Supported
January 8, 2029
Microsoft Windows 10 Enterprise LTSC 2021
YES
YES
YES
Supported
January 12, 2027*
Microsoft Windows 11 Enterprise, version 21H2
YES
YES
YES
Supported
October 8, 2024
Name
Suitable for:
Support Status
(PayFacto)
End-of-Life
(Microsoft)
Back-Office
POS
Backup / Auxiliary
Name
Support Status
(PayFacto)
End-of-Life
(Microsoft)
Microsoft Windows 10 (Pro & Pro for Workstations), version 22H2
Supported
October 14, 2025
Name
Suitable for:
Support Status
(PayFacto)
End-of-Life
(Microsoft)
Back-Office
POS
Backup / Auxiliary
Name
Suitable for:
Support Status
(PayFacto)
End-of-Life
(Microsoft)
Back-Office
POS
Backup / Auxiliary
Name
Suitable for:
Support Status
(PayFacto)
End-of-Life
(Microsoft)
Back-Office
POS
Backup / Auxiliary
Microsoft Windows 11 (Pro & Pro for Workstations), version 21H2
UNSUPPORTED
December 31, 2004
Microsoft Windows 98
UNSUPPORTED
July 11, 2006
Microsoft Windows 98 SE
UNSUPPORTED
July 11, 2006
Microsoft Windows Millenium Edition
UNSUPPORTED
July 11, 2006
Microsoft Windows 2000
UNSUPPORTED
July 13, 2010
Microsoft Windows XP (ALL EDITIONS)
UNSUPPORTED
April 8, 2014
Windows Embedded for Point of Service (WEPOS) 1.x SP3
This section describes how and where to download Veloce files to get started.
Veloce Base Configuration
With Veloce, it is possible to use pre-configured restaurant databases as a starting point for new restaurants. This is much more efficient than starting from scratch and will save a lot of time.
Localized Base Configs
Download the appropriate localized base configurations from the links below:
Veloce Updater
The latest Veloce version can be downloaded here:
If you need an older version, they can be downloaded from here:
Once all the necessary files are downloaded, copy them on removable media, such as a flash drive or portable hard drive. You may proceed to install Veloce.
Share the Veloce Back-Office folder
Follow this procedure to share the Veloce folder on the Veloce Back-Office PC. This needs to be done before the Veloce POS workstations and tablets can be used.
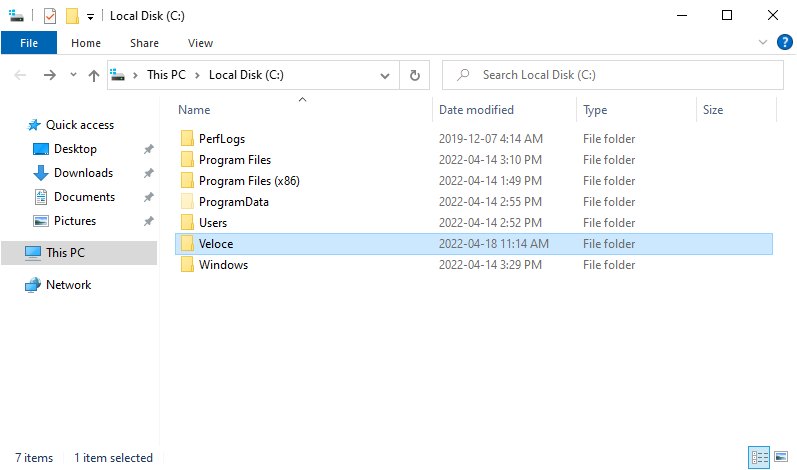
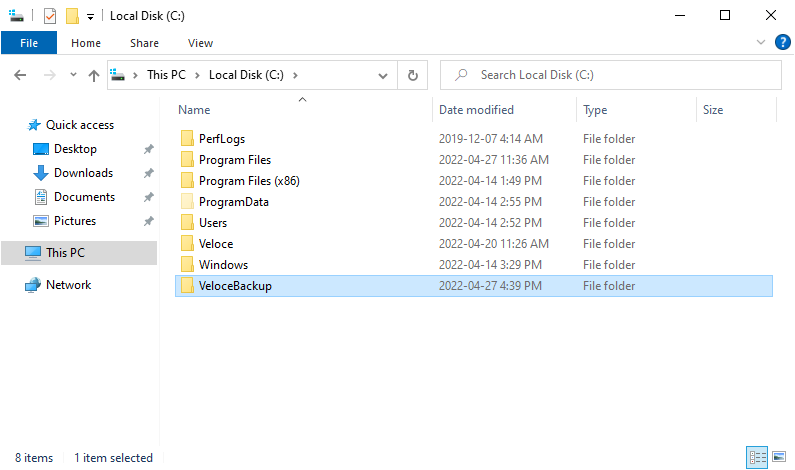
Using File Explorer, locate the Veloce folder, at the root of the C:\ drive.
Veloce Folder
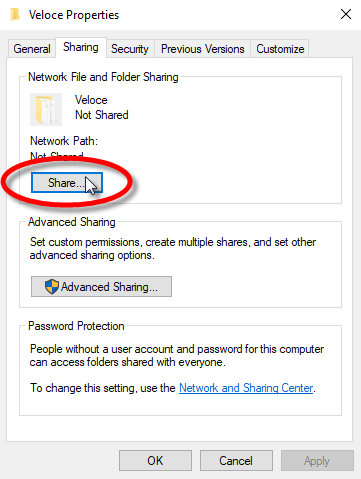
Right-Click the Veloce folder and select Properties.
Right-Click Properties
On the properties window, click the Sharing tab, then click the Share... button.
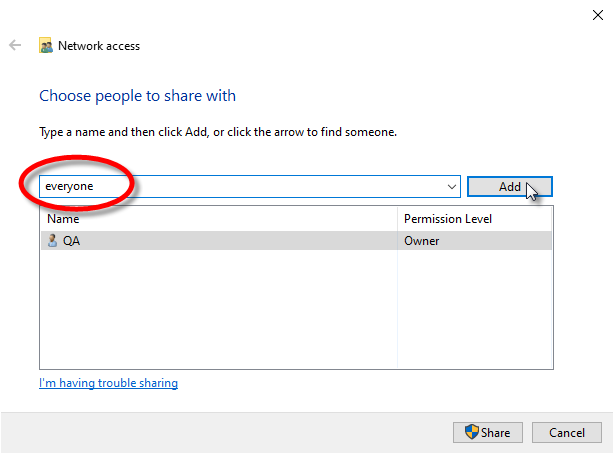
The Choose people to share with dialog opens. In the field provided, type the word "everyone" (without quotes) and click the Add button.
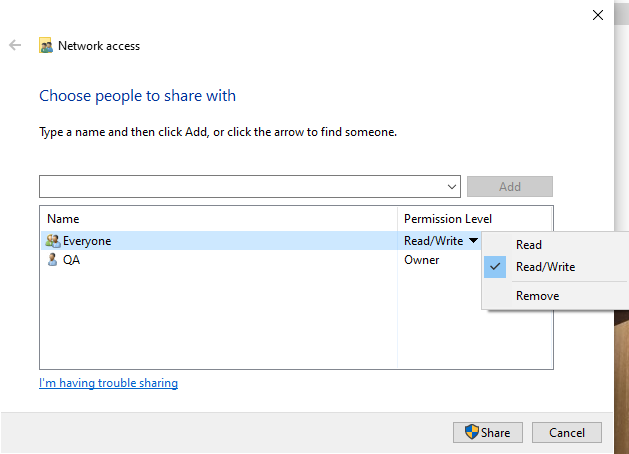
The "Everyone" built-in group will be added to the list. In the Permission Level column, click the down-arrow and select the Read/Write option, then click the Share button at the bottom of the window.
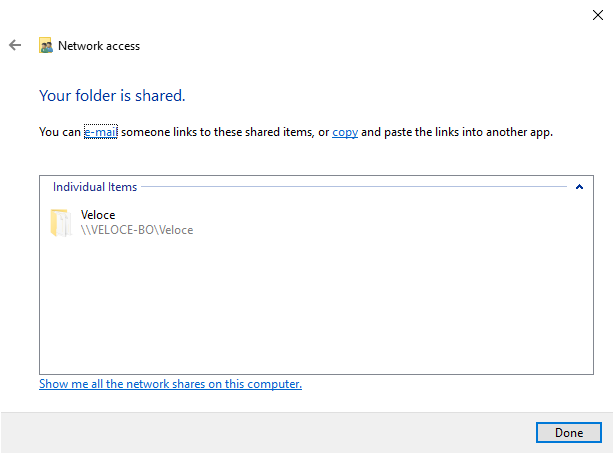
A confirmation dialog opens. Click Done.
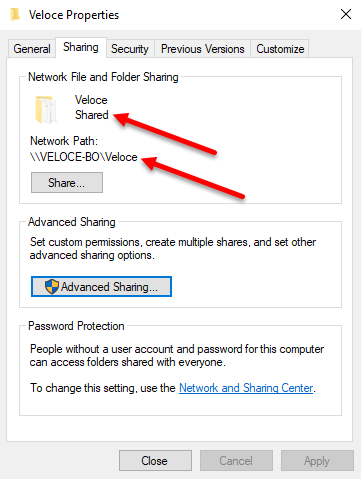
The properties window will now state that the Veloce folder is shared. The network path is also displayed. Click Close on the Veloce Properties window.
This section explains the detailed installation procedure for the Veloce Back-Office.
Before you begin
Before installing the Veloce Back-Office, be sure to download and save all the necessary files, as explained in the Download Veloce Files section.
Step 1: Extract Veloce Base Configuration
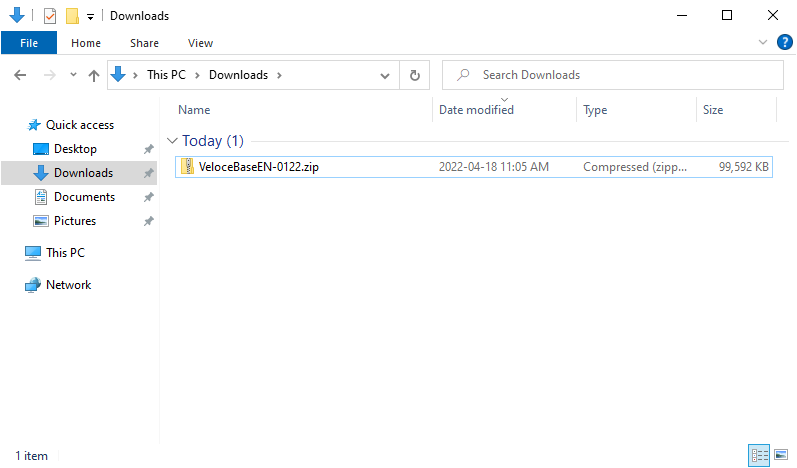
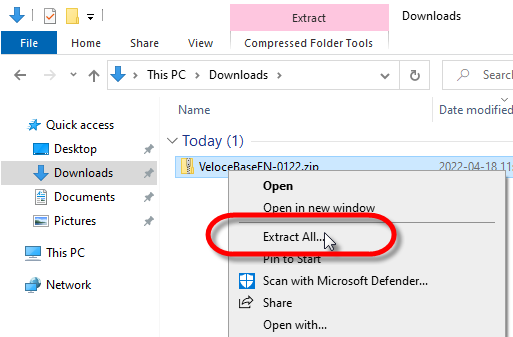
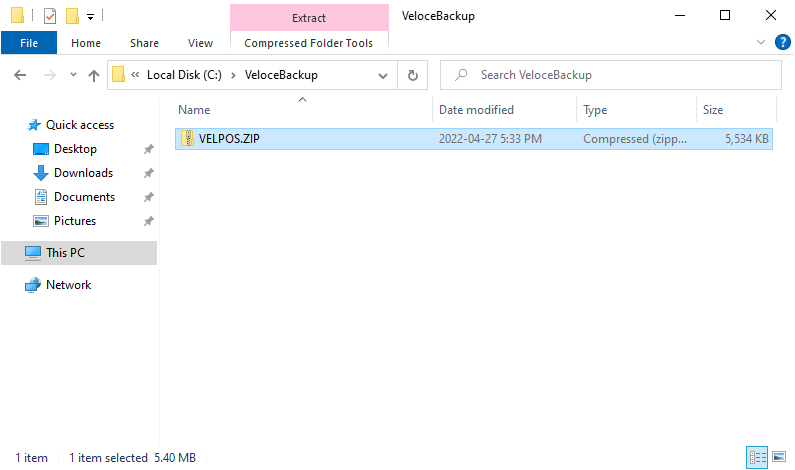
Locate the downloaded base configuration archive (*.zip file)
Right-click the archive and select the Extract All... option.
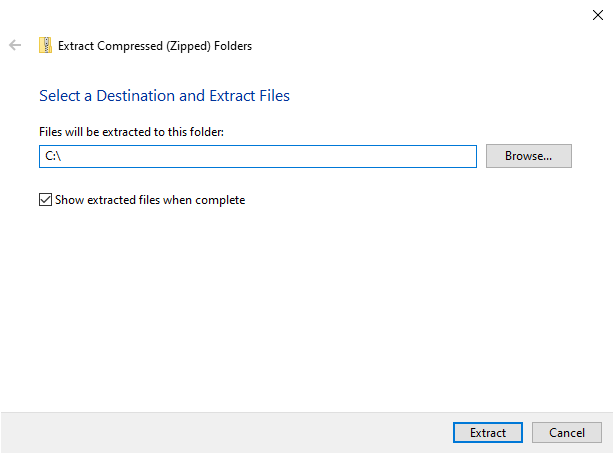
When asked for the destination of extracted files, select the root of the C:\ drive and click the Extract button.
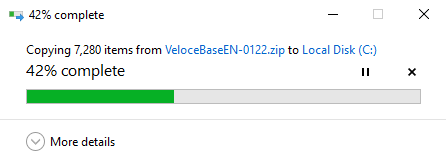
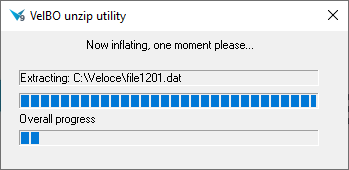
A progress bar will be displayed as files are being extracted.
Open File Explorer to the C:\ drive. The Veloce folder was created and contains all the files extracted from the archive.
Step 2: Run the Veloce Updater
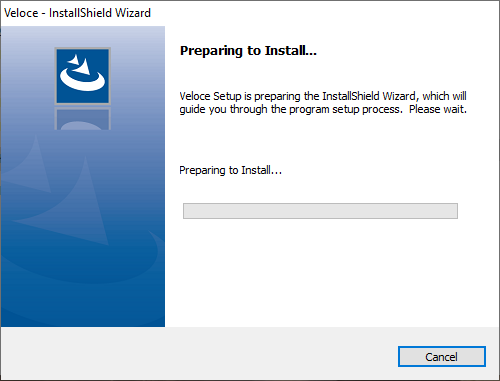
Locate the Veloce Updater file which was downloaded earlier. Double-click the file to start the InstallShield Wizard.
A UAC warning may be displayed. Click Yes.
The InstallShield Wizard will prepare the installation. This could take a few seconds.
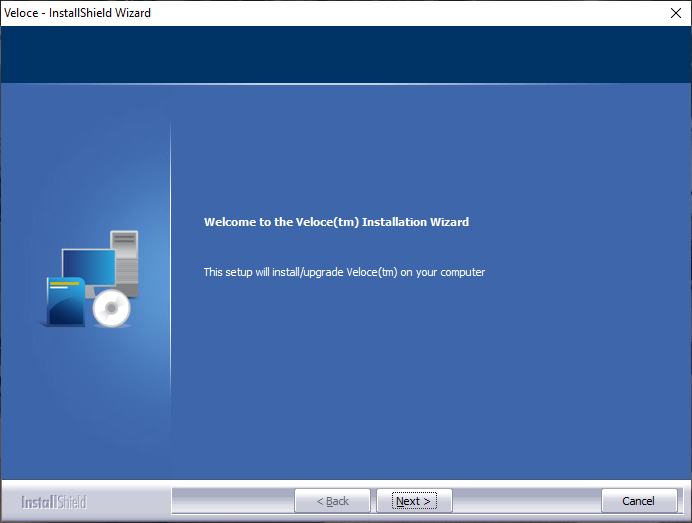
The Veloce Install/Upgrade welcome screen will be displayed. Click Next >.
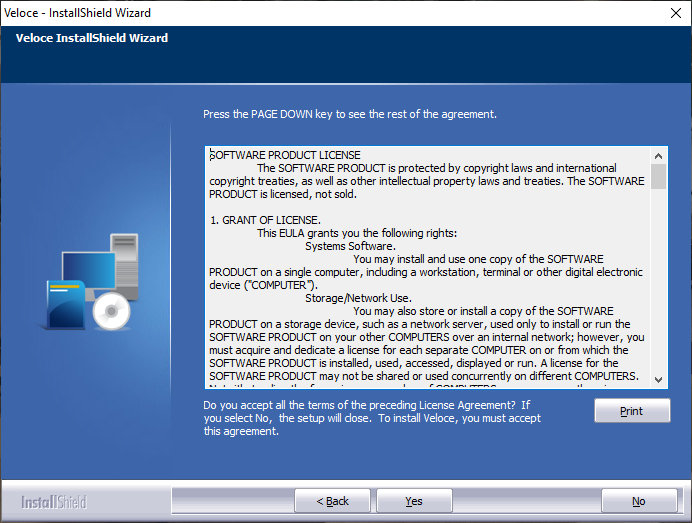
Please read the End User License Agreement (EULA). Click Yes to agree.
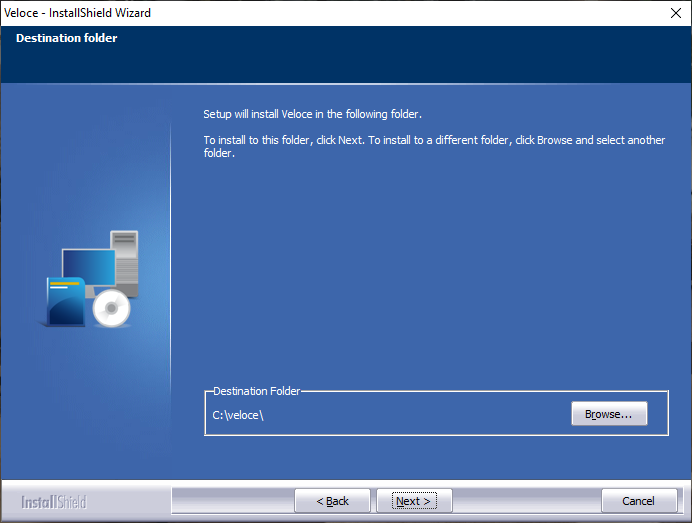
Select the destination folder. the default is C:\Veloce\. Click Next >.
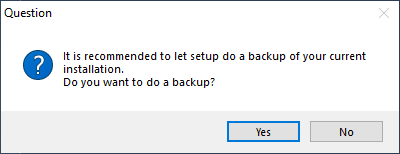
A prompt to create a backup of the current installation will be displayed.
If this is a brand new Veloce installation, click No.
If an existing Veloce installation is being upgraded, taking a backup is highly recommended.
Review the installation settings and click Next >.
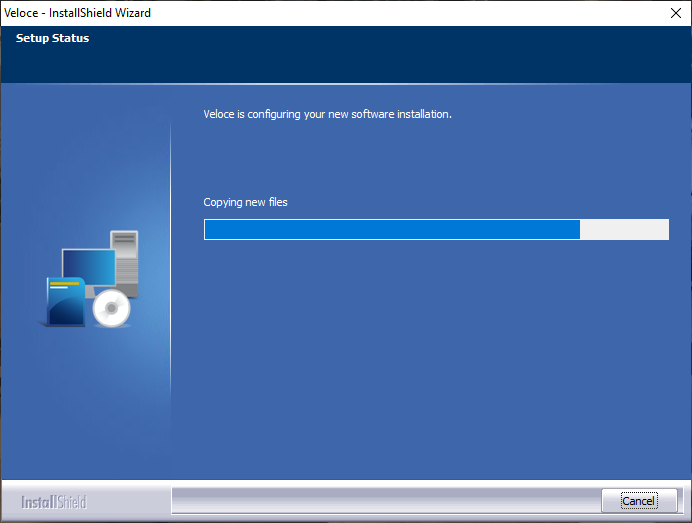
Veloce files will be copied or updated. This could take a few seconds or minutes depending on the system's speed.
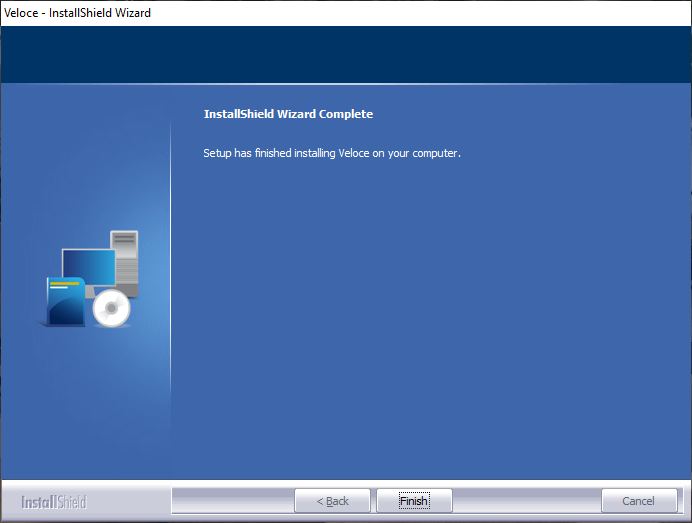
When the installation process completes, click the Finish button.
Veloce Back-Office in now installed. Before Veloce can be used, the Veloce folder needs to be shared, icons need to be created and the Veloce license needs to be activated.
Veloce Back-Office
Back-Office User Accounts
Setup / Utilities Overview
Setup / Utilities is a core module that is included with every Veloce license. It contains localization options to customize available languages, date and time formats and currency symbols. This module is also used to perform various daily operations, such as end-of-day and taking backups.
Here are a few tasks that are done from the Setup Utilities module:
Manage your Veloce license
Perform a manual End-of-Day
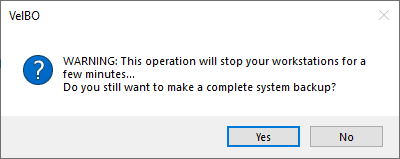
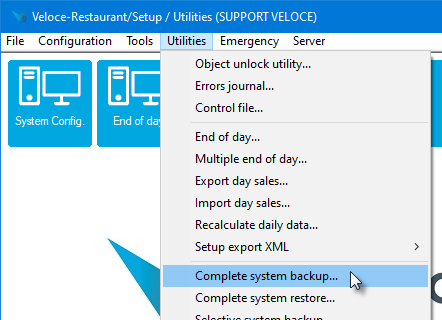
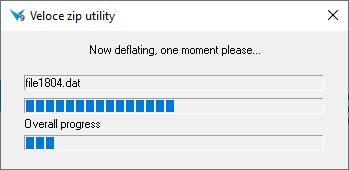
Take backups of your Veloce system
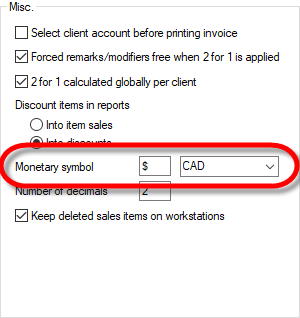
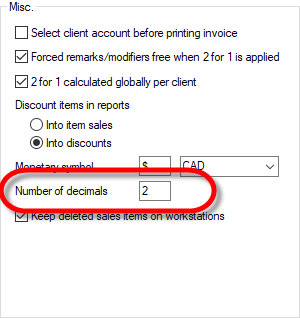
Configure your local currency (symbol and number of decimals)
Set date and time formats
Configure language profiles
Configure various hardware options
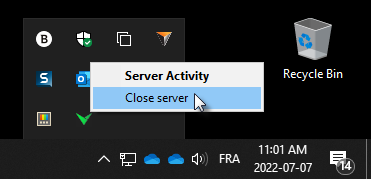
Start / Stop the Veloce Server
Consult the error journal
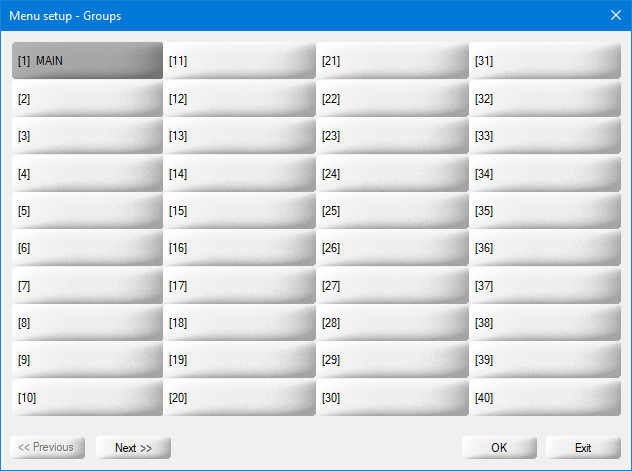
Configure the number of available menus
etc...
Many more tasks and options are managed from this module, which will be discussed in this chapter.
Divisions - Discounts
Division - Discounts Tab
Divisions - Price per Quantity
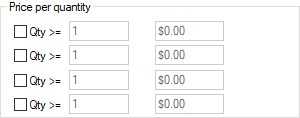
Division - Price per Quantity Tab
Item quantity
...
Total Sales Price
...
Unit price if quantity >=
...
Divisions - Redistributed Tips
Division - Redistributed Tips Tab
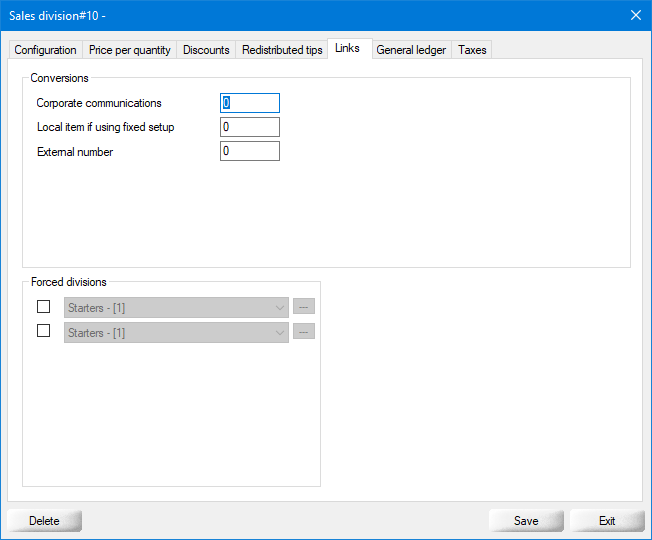
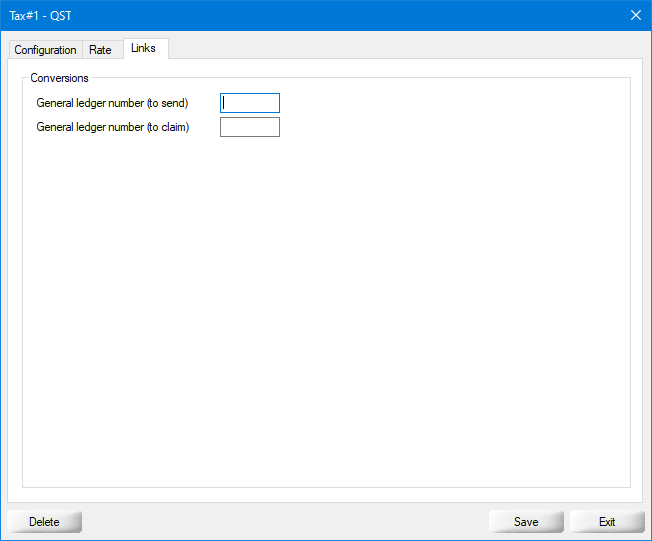
Divisions - Links
Division - Links Tab
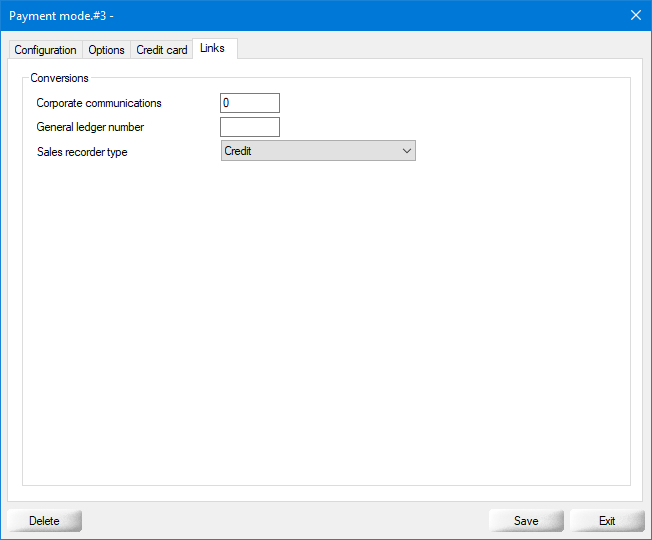
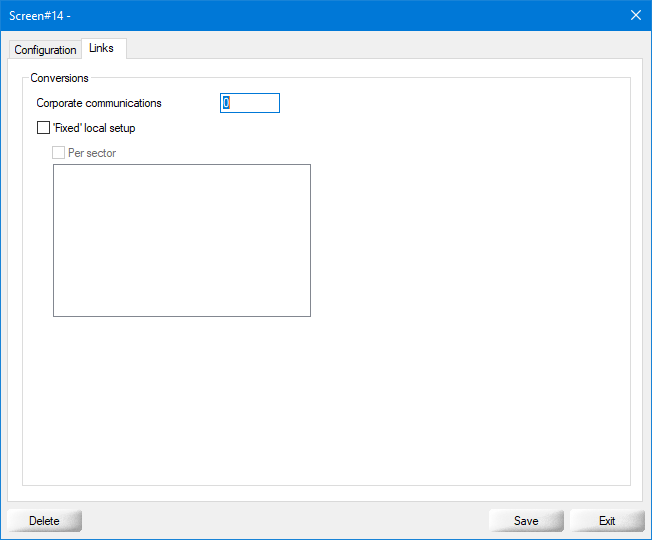
Conversions
Corporate communications
...
Local item if suing fixed setup
...
Enternal number
...
Forced divisions
...
Divisions - General Ledger
Division - General Ledger Tab
Divisions - Taxes
Division - Taxes Tab
Force item tax
...
Taxable amount item
...
Regular Price
...
Electronic Funds Transfer (EFT)
PayFacto Payment Application
PayFacto Payment Application
PayFacto payment terminals are typically shipped to the merchants with the necessary applications pre-installed and pre-configured.
For more information on the PayFacto Payment application, please review the associated online documentation:
World rights reserved. No part of this publication may be stored in a retrieval system, transmitted, or reproduced in any way, including but not limited to photocopy, photograph, magnetic, or other record, without the prior agreement and written permission of PayFacto Inc.
Configure your Windows Network Profile
The Network Profile feature was introduced with Windows Vista and was carried over to later versions of Microsoft Windows. In Windows 10, the default Network Profile settings will prevent Veloce from working correctly by disabling File & Printer sharing and forcing Password Protected Sharing. This topic explains how to configure these settings to allow Veloce to operate normally.
Change Network Profile from "Public" to "Private" or "Domain"
By default, on a new Windows 10 installation, your Network Profile will be set to "Public". This is the most secure setting, and is intended for use on public networks, such as public Wi-Fi provided at airports, coffee shops, etc. This setting will "hide" the PC from other devices on the network, which will cause issues with Veloce. This profile also hides settings that need to be enabled for Veloce to work correctly. This needs to be changed to either Private or Domain.
Introduction
Veloce First Login
Immediately after installing Veloce, there is only one default user in the system with no password.
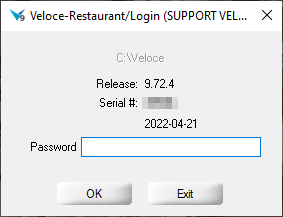
After double-clicking on the Veloce Back-Office icon on the Windows desktop, the Veloce login screen will be displayed:
At this point, don't enter any password and simply click OK to login with the default built-in user account.
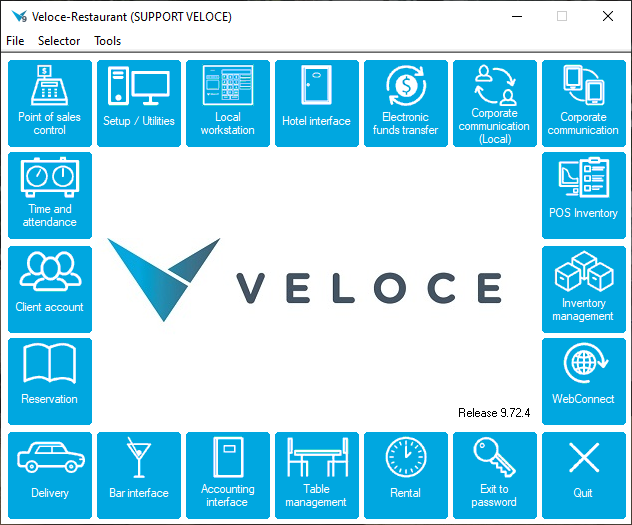
The Veloce Back-Office screen will be displayed, with all the modules that were purchased with the license.
Basic Navigation
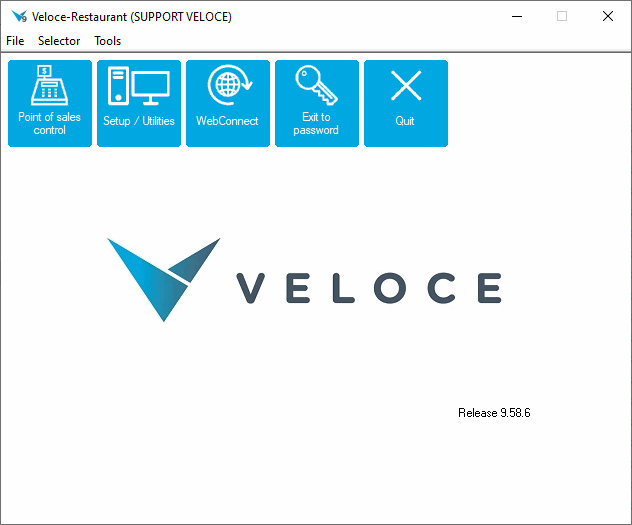
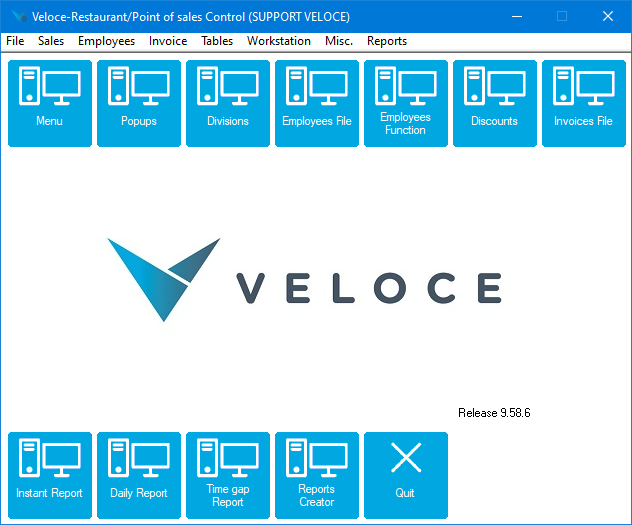
After logging in, the Main Back-Office is displayed. This is the main screen that allows access to all the Veloce features.
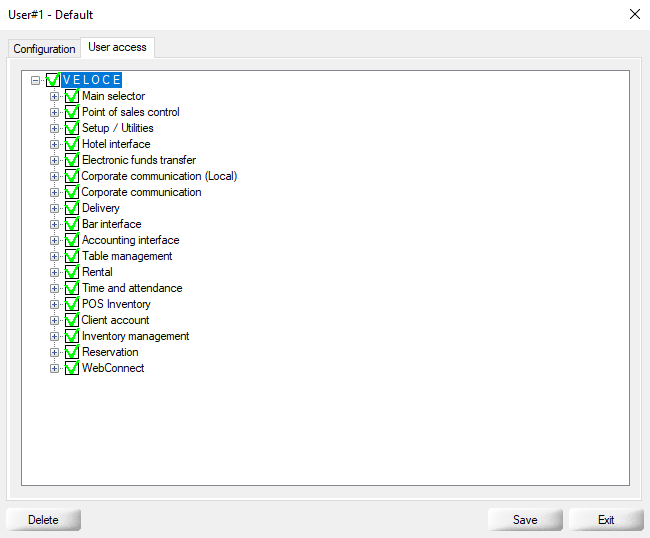
The blue icons around the Veloce logo are all the modules that are current available with the purchased license. In the image below, all modules are available. If a customer doesn't need all modules for their operation, only the modules they purchased would be displayed.
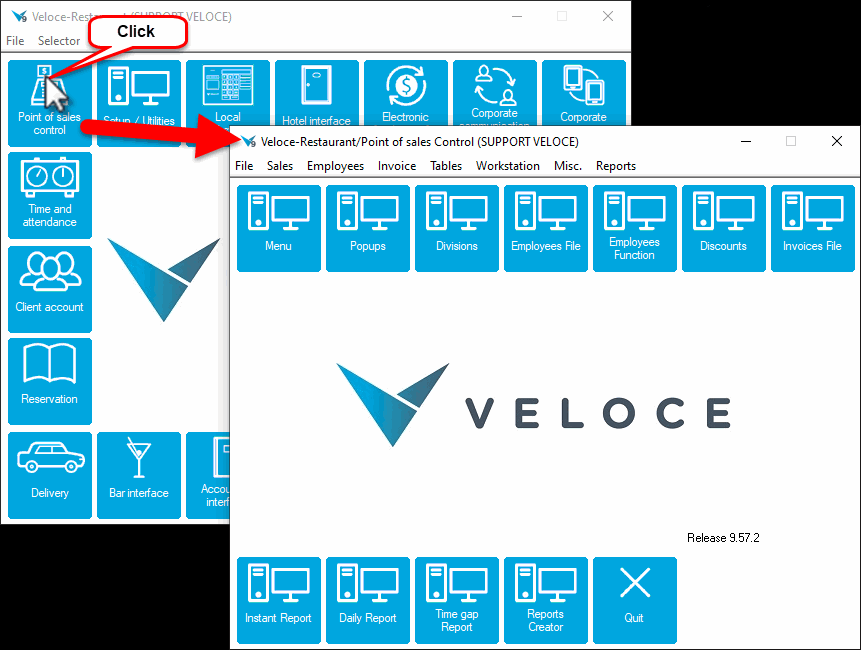
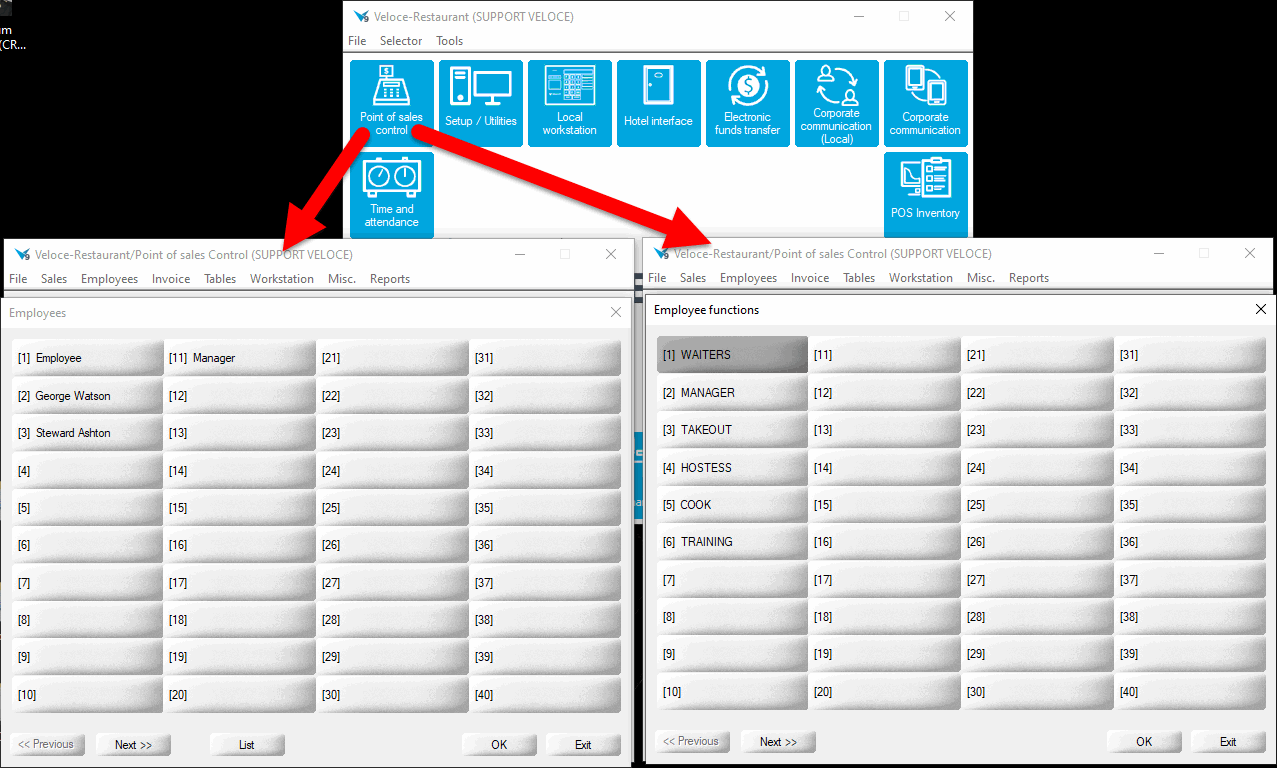
Opening modules
Clicking on a module icon opens the corresponding module in a separate window:
Login to the Veloce Back-Office
Veloce supports multiple user accounts so that employees can perform various tasks in the Back-Office without risking accidental and unwanted modifications to the Veloce menu.
Double-click on the Veloce Back-Office icon on your Windows desktop.
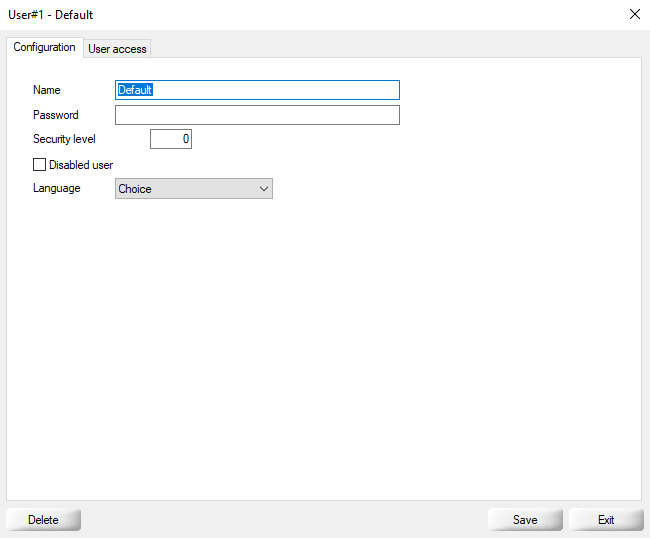
The login prompt will appear. Type your password in the Password field and click OK.
Setup / Utilities
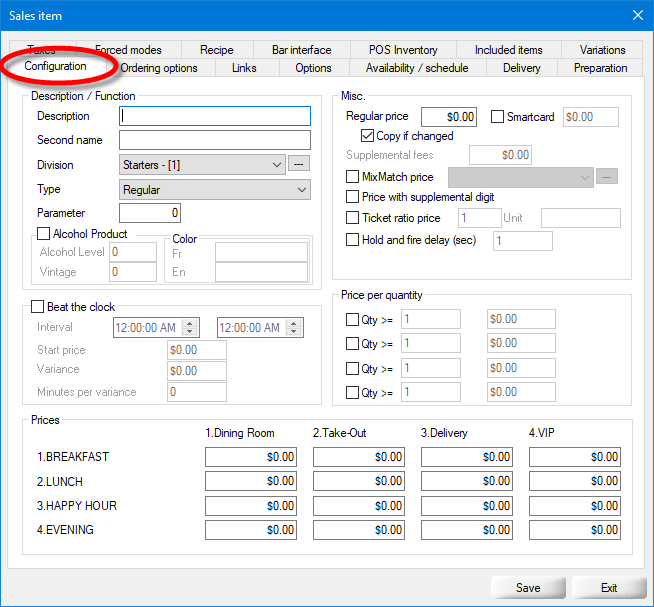
Price Levels
Price levels are useful to create a pricing structure for sales items. This allows merchants to sell the same item at different prices based on any criterion they may choose. For instance, any given item could have a different price based on whether the item is ordered at the Dining Room, from the Take-Out counter, through Delivery, or if the customer is a special VIP member.
Veloce supports up to 4 price levels. Price Levels can also be combined with modes to create an even more detailed price structure.
Setup Price Levels
Date & Time
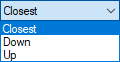
Time Format (12h / 24h)
Time format can only be changed between 12h and 24h formats. It cannot be further customized.
To select between 12h and 24h formats:
Login to the Veloce Back-Office.
Taxes Overview
Taxes are an important component of any POS system. Taxes need to be calculated accurately so that customers can be informed of the taxes they pay with their purchases. These calculations are also essential to the production of reports and payment of these taxes to the local fiscal authorities. Improperly configured taxes can incur heavy penalties for merchants, so special care needs to be given to the configuration of taxes.
Sequence for configuring taxes
When setting up taxes in Veloce, following a logical sequence will make the work easier. It will also avoid having to go back-and-forth between various configurations to achieve the desired result.
B.C. Soda Tax
Modes
Modes
Veloce allows each Sales Item to be configured in up to four modes. Each mode represents a time of day and can be given a name such as Breakfast, Lunch, Happy Hour etc.
By having four modes, restaurants can control which items will be available and displayed at any given time of the day on the POS workstations. Modes also allow different price levels to be set for a sales item based on the time of day.
Although optional, it is recommended to configure modes before creating sales items. This will allow prices for each mode to be configured during the initial sales item creation process, instead of having to go back on each sales item after the fact.
Big Divisions
Big divisions are the larger categories that are used for reporting purposes. Big divisions must exist before smaller divisions are created, as they will regroup those smaller divisions.
Examples :
Food
Sales Item Setup - Item Types
When creating sales items, each item is given a type. While the most common type used for pretty much any revenue item in Veloce is "Regular", other types are available for various usages, from remarks to discounts.
2 for 1 coupon
...
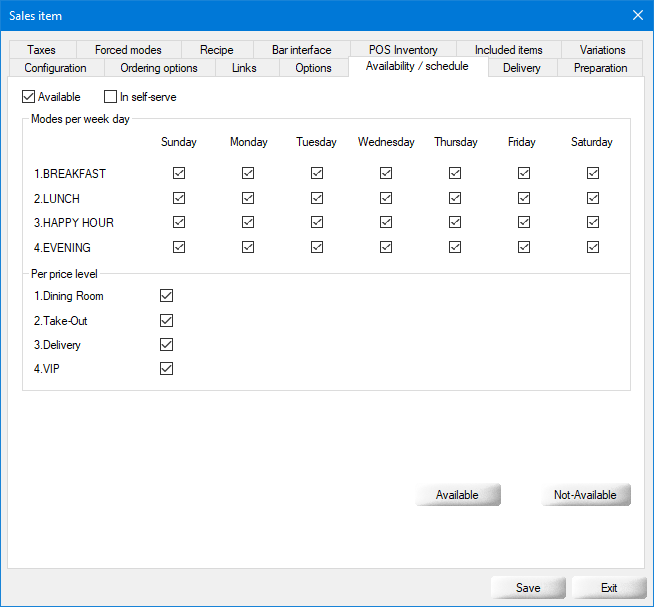
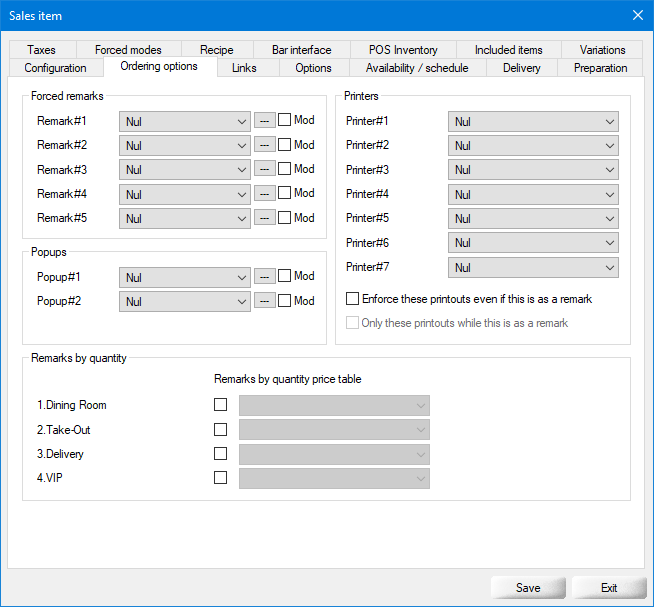
Sales Item Setup - Availability / Schedule
This section allows the item's daily availability to be configured for each mode and price level.
Available
Enable this option to make the item available. Disable this option to prevent the item from being ordered at the POS.
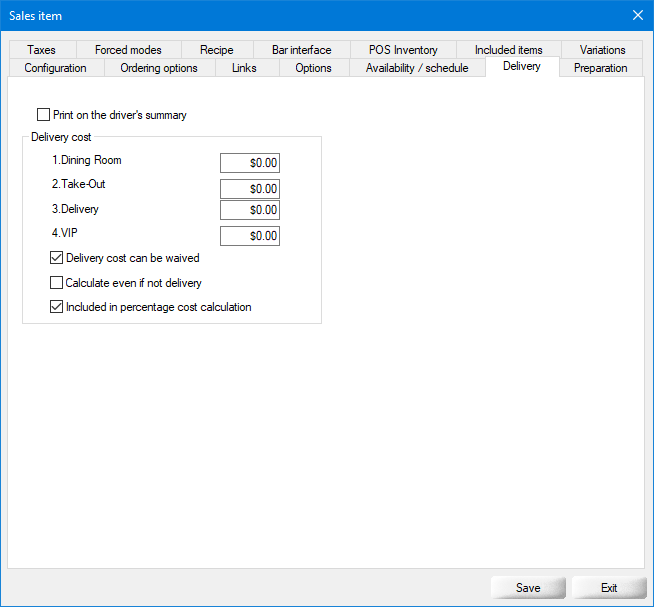
Sales Item Setup - Delivery
This section contains options that are specific to Delivery.
Print on the driver's summary
Enable this option to print the delivery cost information on the delivery driver's sumary.
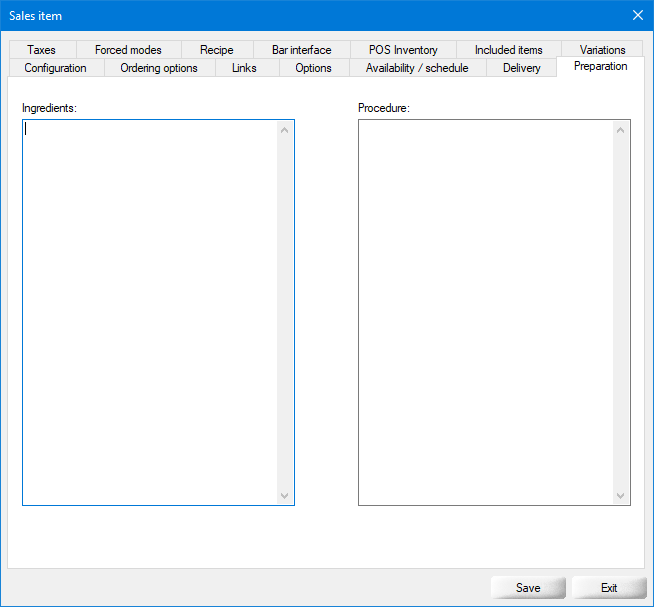
Sales Item Setup - Preparation
This section allows the item's preparation recipe to be written in free text. This is especially useful for cocktails or any other type of item that requires a specific setup. This information can be displayed at the POS.
Ingredients
Write down the ingredients and quantities that are required to prepare the item.
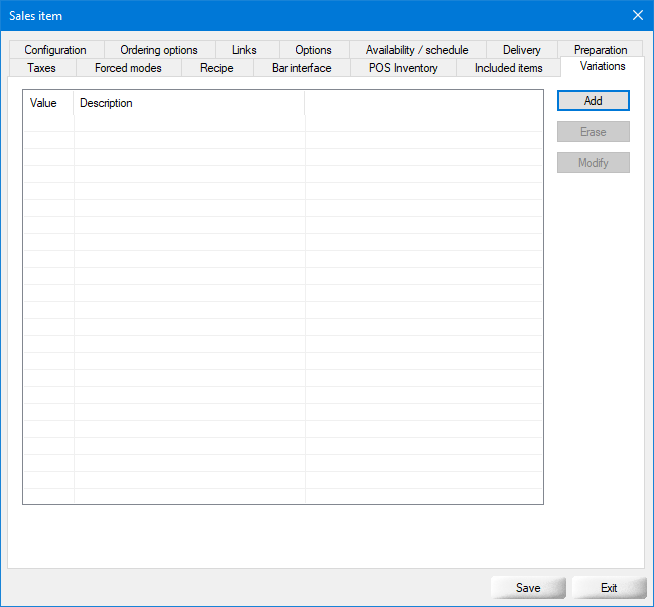
Sales Item Setup - Variations
Coming Soon
Coming Soon
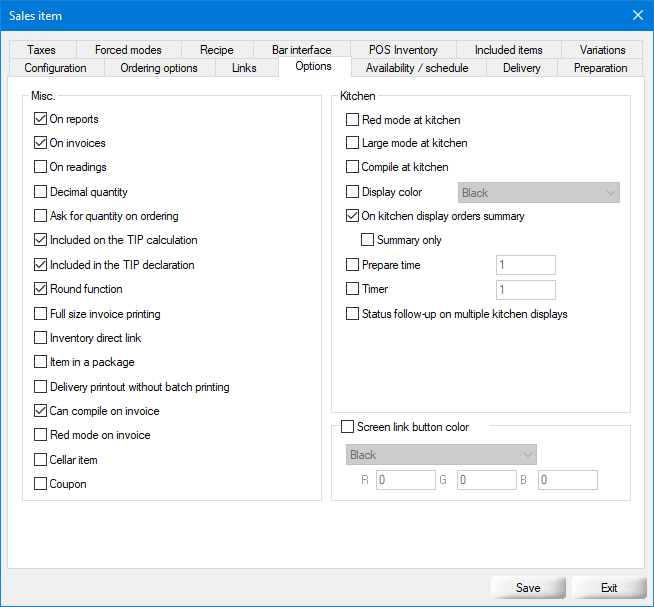
Please go through each of the following topics to learn more about all the options contained in each tab of the sales items setup:
Related Topics
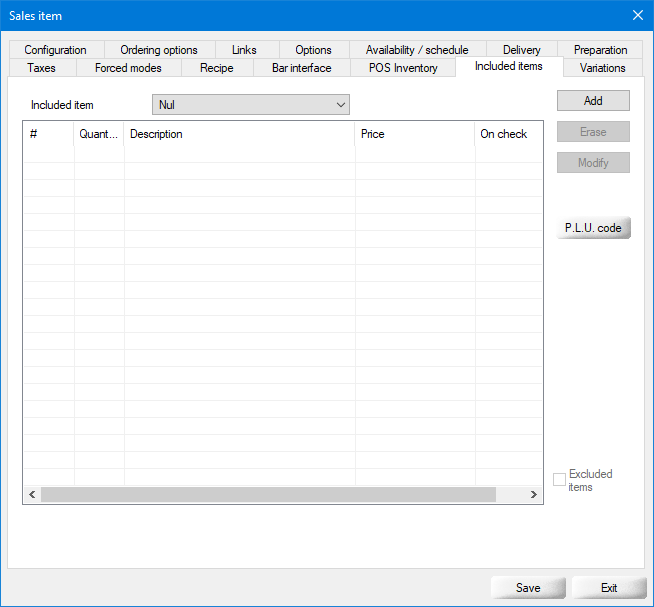
Sales Item Setup - Included Items
Coming Soon
Coming Soon
Please go through each of the following topics to learn more about all the options contained in each tab of the sales items setup:
Related Topics
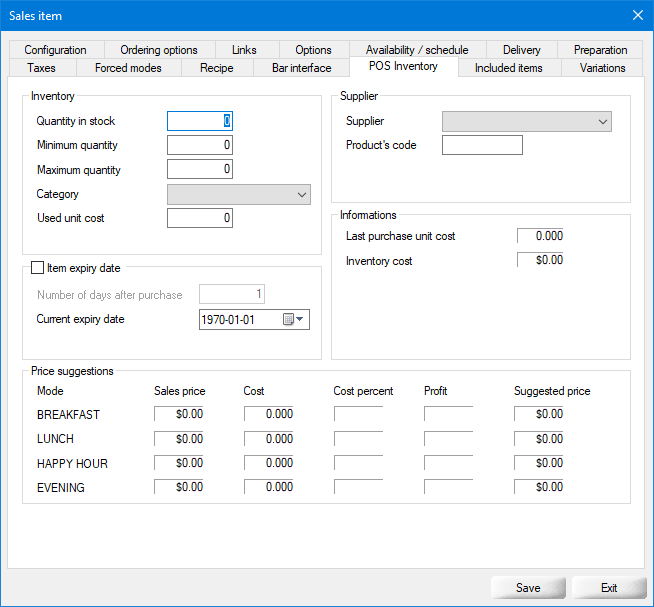
Sales Item Setup - POS Inventory
Coming Soon
Coming Soon
Please go through each of the following topics to learn more about all the options contained in each tab of the sales items setup:
Related Topics
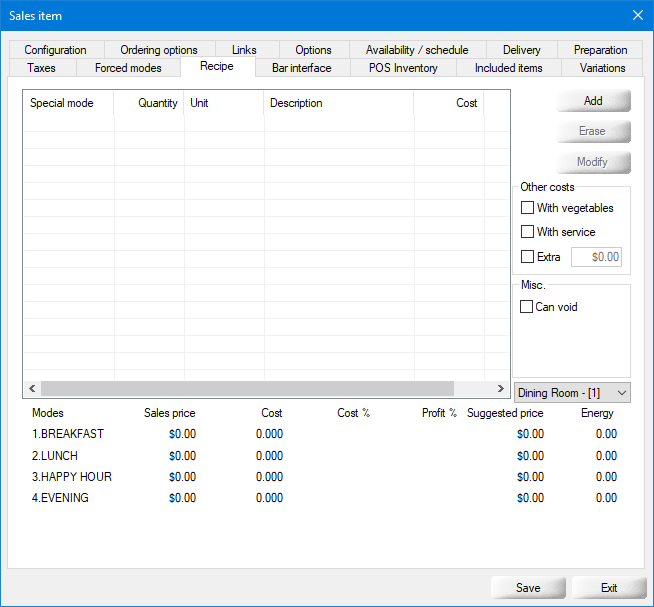
Sales Item Setup - Recipe
Coming Soon
Coming Soon
Please go through each of the following topics to learn more about all the options contained in each tab of the sales items setup:
Related Topics
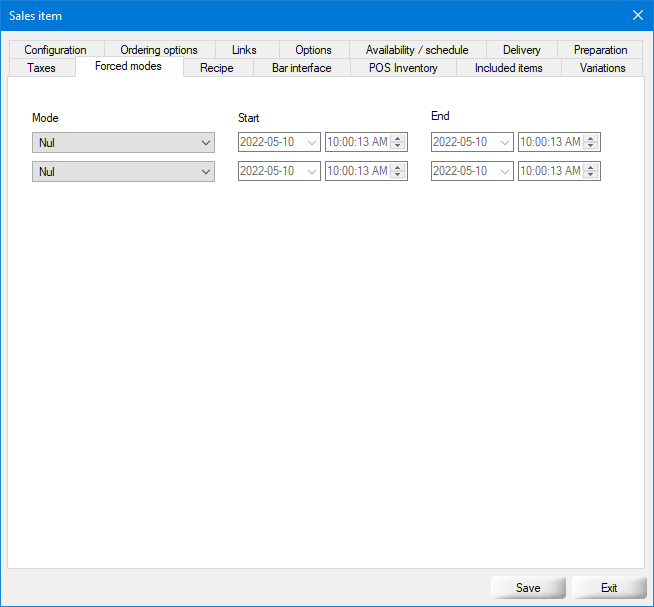
Sales Item Setup - Forced Modes
Coming Soon
Coming Soon
Please go through each of the following topics to learn more about all the options contained in each tab of the sales items setup:
Related Topics
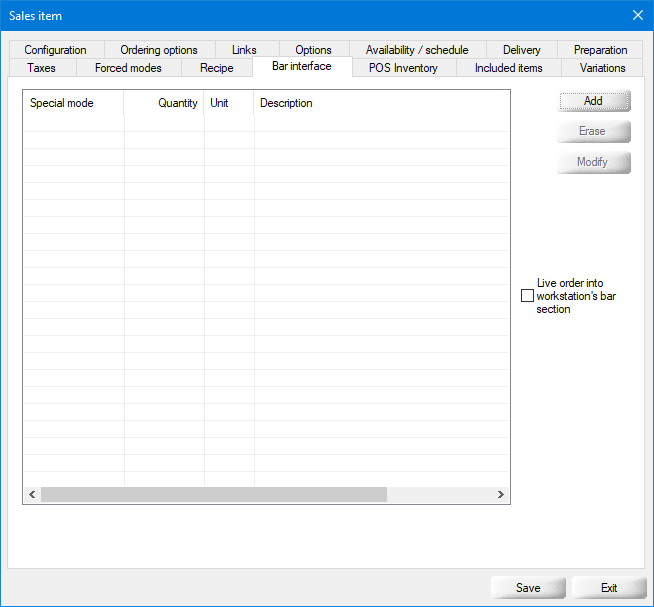
Sales Item Setup - Bar Interface
Coming Soon
Coming Soon
Please go through each of the following topics to learn more about all the options contained in each tab of the sales items setup:
Related Topics
Overview of PayFacto solutions offered with Veloce
Overview of PayFacto solutions offered with Veloce
With Veloce, it is possible to configure many different EFT providers operating in many different ways, according to how the Veloce system is being used. Here is an overview of the PayFacto solutions that can be used with Veloce.
Please note that this is only an overview of a few popular combinations of PayFacto solutions and Veloce. Many more combinations are possible, but may not necessarily be covered here.
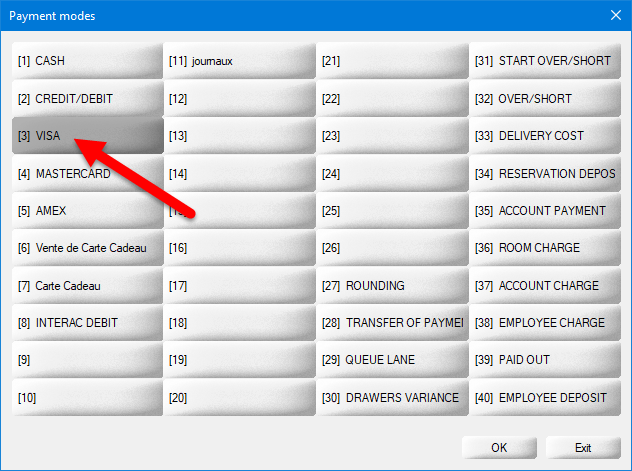
Payment Modes for EFT
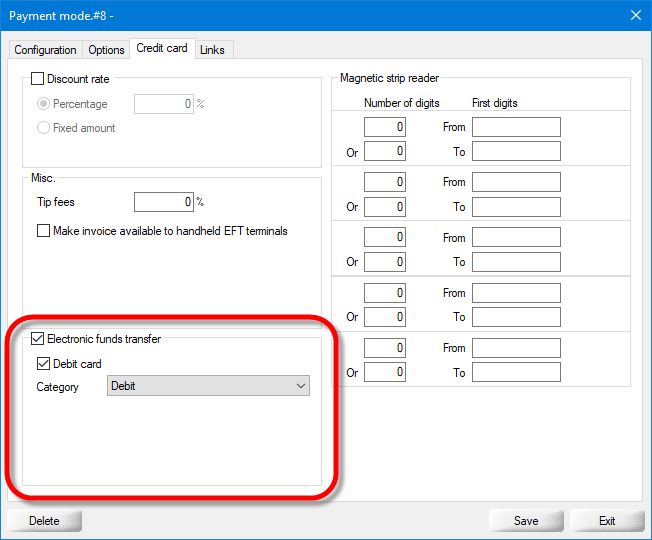
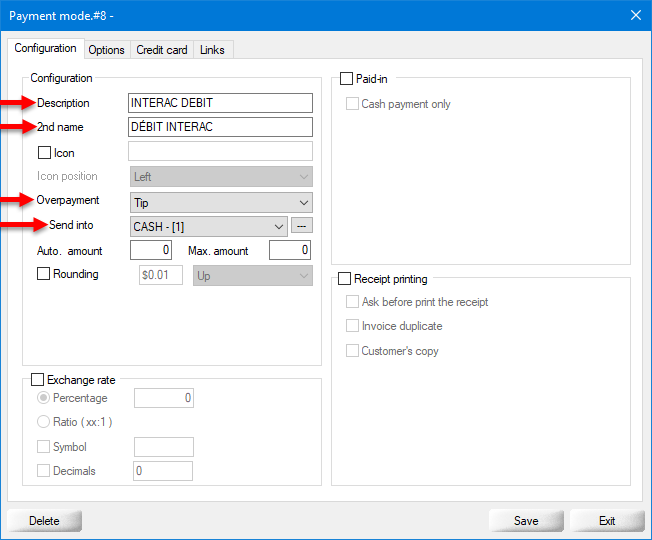
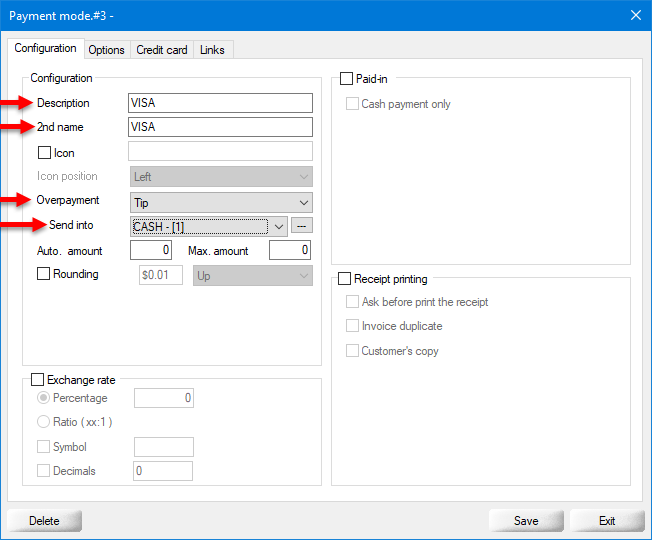
Introduction
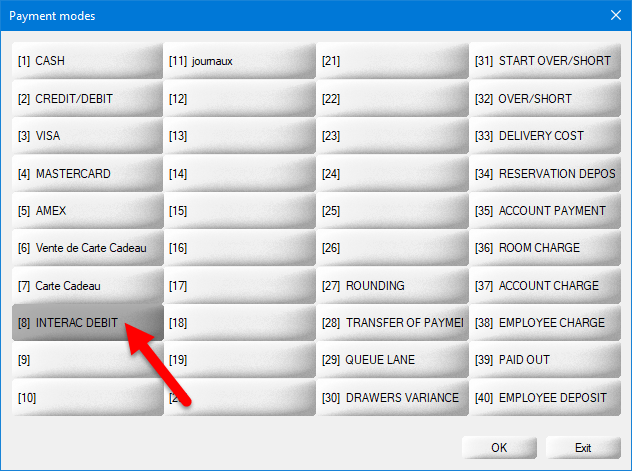
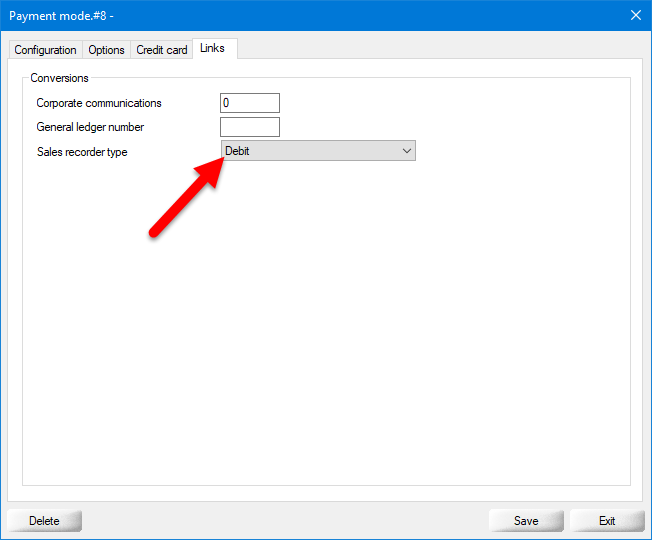
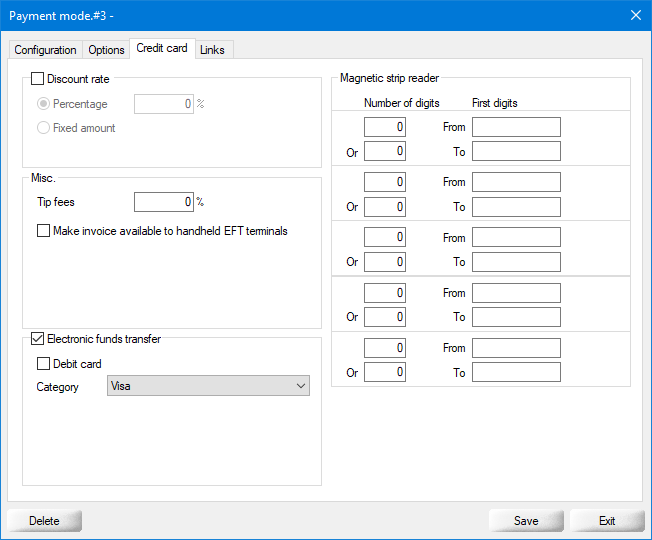
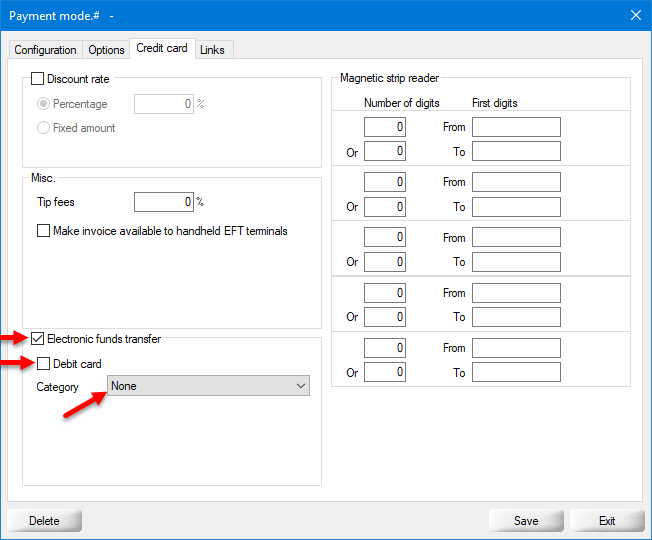
For all EFT protocols, the payment modes must be correctly configured. The configuration is the same regardless of the protocol used. The different payment modes serve first and foremost to activate the payment terminal in order to take card payments, then, they compile the following statistics and data:
The type of card used; either a debit card, credit card or a banking card, such as Interac Debit.
The brand of the card used, such as Visa, Mastercard, AMEX, Discover, etc.
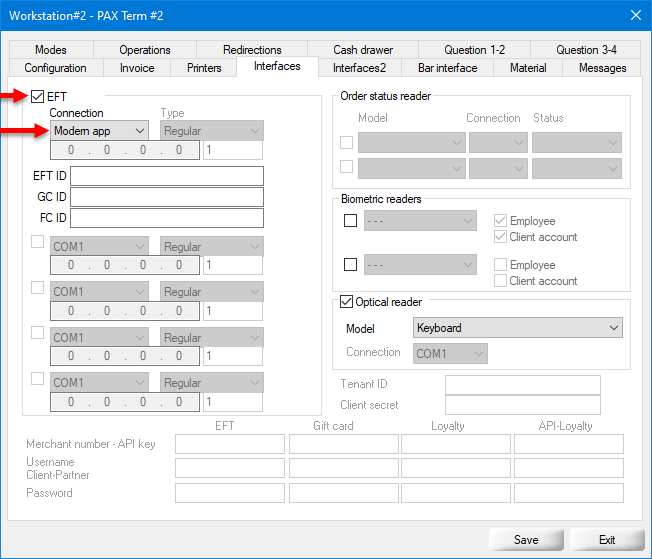
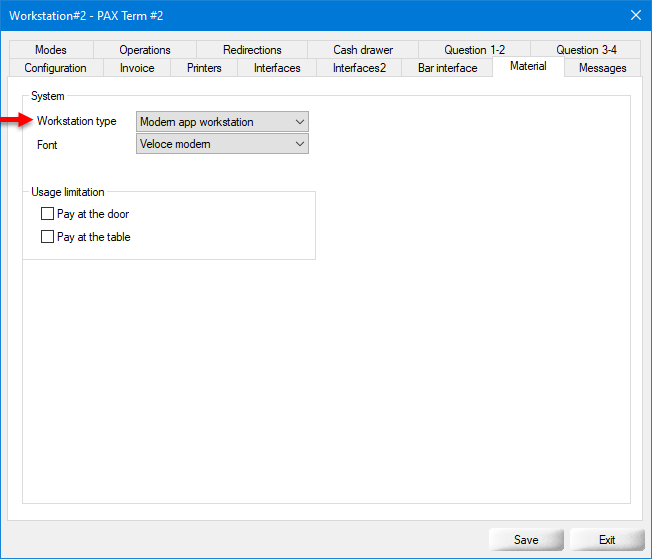
Installation & Initial Setup
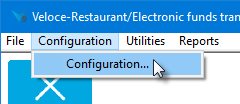
System Configuration Setup
In the Veloce Setup / Utilities module, some Modern workstation settings need to be setup:
Login to the Veloce Back-Office
Open the Setup/Utilities module
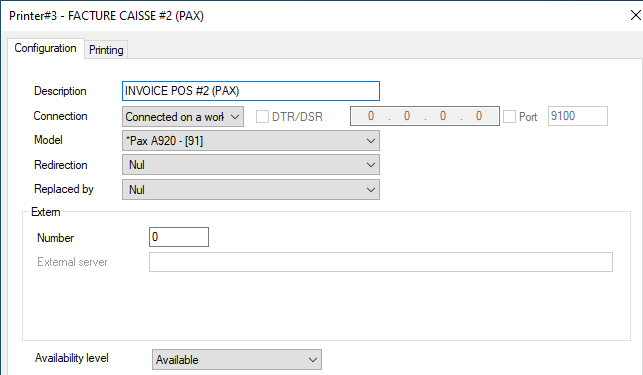
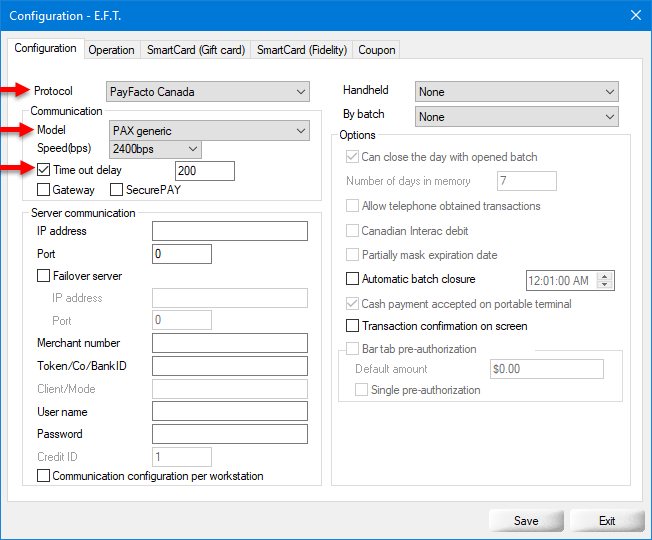
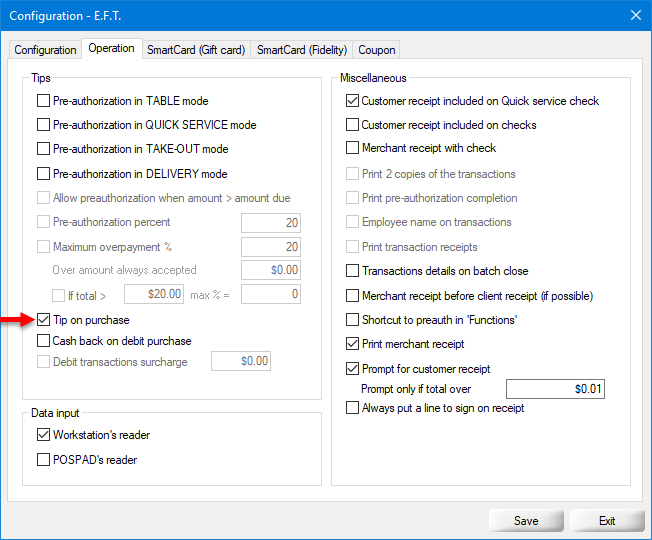
Payment Terminal Setup
Veloce Mobile Application
Trademarks
Veloce, the Veloce logo, VelPay and VelMix are trademarks or registered trademarks of PayFacto Inc. in Canada and other countries and may not be used without written permission from PayFacto Inc. Windows is a trademark or a registered trademark of Microsoft Corporation. All other trademarks are the property of their respective owners. PayFacto is not associated with any product or vendor mentioned in this document.
PayFacto Inc has made every effort to prepare this document, and the content is based upon the release of Veloce 9.69. Portions of the manuscript may be based upon pre-release versions supplied by software manufacturer(s). PayFacto Inc. makes no representation or warranties of any kind with regard to the completeness or accuracy of the contents herein and accepts no liability of any kind caused or alleged to be caused directly or indirectly from this document.
For general information on Veloce and other products and services from PayFacto Inc, please visit our website at https://payfacto.com.
Audience
The Veloce Online User Manual is intended primarily for restaurant owners and managers, but it is equally suited for corporate IT departments, Veloce resellers and restaurant employees. This manual provides general information on the use of the Veloce Software Suite and introduces the reader to the many features of Veloce. It can be used by first time users to familiarize themselves with the Veloce Software Suite, or by seasoned users who want to learn more on how to apply the powerful features of Veloce to streamline their business.
Conventions
The following symbols are used throughout this manual to highlight a special section and to introduce the reader to new features in Veloce.
TIP: This symbol indicates a tip on how to use Veloce more efficiently.
IMPORTANT! This symbol emphasizes an important section.
NOTE: This symbol emphasizes useful complimentary information.
This symbol indicates that an optional Veloce module or Interface is being explained.
Key Concepts and Terminology
Point of Sale or Point of Service (POS)
See also: Workstation, Cash Register, Till
The POS is the physical location where sales activities are recorded. With Veloce, the term "POS software" is used to refer to the software that is installed on the touchscreen workstation which provides the user interface used by restaurant employees to order items, record sales data, print guest checks and record payments. The POS software is generally installed on a workstation equipped with a touchscreen or an electronic tablet.
Server
See also: Back-Office
The computer where the Veloce Back-Office software is installed in generally referred to as the server. In the hospitality industry, the word "server" may also refer to employees serving food, so it is important to mind the context where the word is used.
Back-Office
This term litterally means "the office in the back", when referring to a restaurant or any other type of commerce. With Veloce, this term refers to the software that is installed on the Server, which would typically be located in the manager's office and used to manage the entire POS system in the environment in which it is installed. Of course, the Back-Office software can now be installed on almost any device part of the POS system, but that term carried along to designate the component used to manage the whole system.
End of Day
The End of Day is a process by which all daily sales operations are reconciled and compiled in order to make the resulting data presentable in daily, weekly, monthly, periodic and yearly reports. With Veloce, if an End of Day is accidentally skipped, reports are not affected. Transactions will follow the calendar date on which they were carried out once the End of Day is performed.
Fiscal Date, Fiscal Year
A fiscal year refers to the 12 month period which corresponds to the commerce's business activities for accounting and fiscal purposes. The fiscal year of a business does not necessarily correspond to a legal calendar year, and may straddle across two calendar years.
A fiscal day refers to the business that is recorded under a given day for accounting purposes, even if said business actually took place on a different legal day. This is common in bars closing in early morning hours, where business occurring after midnight is typically recorded under the previous day.
Calendar Date
Also known as the Legal Date, The calendar date is the actual date according to the Gregorian calendar. A legal year starts on January 1st and ends on December 31st. With Veloce, the calendar date is determined by the server, which is itself based on the operating system (Windows) settings.
Date change time
Legally, the date change occurs at midnight every night. However, for fiscal and accounting purposes, this may need to be changed. For instance, bars closing in early morning hours may want to record sales occurring after midnight under the previous fiscal day, so that reports make more sense and are easier to understand. For this reason, they would want to change their date change time to something like 05:00 AM for instance.
Workstation
Another term for Point of Sale. Sometimes, the terms "POS" and "Workstation" are combined as "POS Workstation" do designate the array of hardware and peripherals used to record sales activity at a given point of sale.
Cash Register
An older term that describes a device used to record sales activities and register payments. Sometimes used in the industry to refer to a point of sale. The terms "Cash" or "Register" are also sometimes used separately and have the same meaning in this context.
Till
Same as Cash Register, but more commonly heard in the UK or Australia. Seldom used in North America.
Types of Operations
Veloce offers 4 ordering modes which allows it to adapt to most environments found in the hospitality, bars and retail industries.
Quick Service (fast food)
Allows ordering and payment processing before items are handed to the customer. This mode it used in fast food restaurants, coffee shops with service at the counter, bars and retail outlets.
Take out
This mode allows order taking by phone or online and preparation of the items before the client shows up in store. Payment is processed once the client arrives and before items are handed to the customer.
Delivery
This mode allows order taking by phone or online. Preparation of the items can start immediately or according to a delivery time determined by the customer. Once ready, the order is transferred to a delivery driver who handles the delivery of the items to the customer. Payment is typically processed by the driver at the customer's doorstep.
Table Service
This mode is used by fine dining restaurants, where customers sit at a table while a server takes orders at the table side. The server carries dishes and drinks directly at the table. This mode allows for complete or partial order taking at the client's request. Dishes or drinks can be sent by intervals to the kitchen in order to synchronize preparation and improve the quality of service. The payment is generally processed after the consumption of the items, at the request of the customer.
The general steps are:
Research and understand local tax laws.
Create tax categories in Veloce.
Create taxes in Veloce.
Assign taxes to Sales Items or Divisions in Veloce.
1. Research and understand local tax laws
This is the first and most important step. Understanding the local tax regulation will ensure that taxes will be configured properly in Veloce. The Veloce tax calculation engine is powerful and flexible. To be able to select the appropriate options for your region, you first need to understand the regulation thoroughly. Here are some general guidelines:
Determine which taxes and rates are applicable
Some jurisdictions have federal taxes, provincial or state taxes, liquor taxes and even special taxes on sodas or sweetened beverages. Some areas apply taxes on food items, while others don't. Some areas have variable tax rates based on whether the food is consumed on-premises (dine-in) or off-premises (take-out).
Determine how taxes will be calculated
Taxes can be added to the price of an item (add-on tax) or can be included in the list price of the item (inclusive tax). It is also important to understand how rounding works. Most areas calculate rounding to the nearest cent ($0.01) while some simply truncate everything after the second decimal.
2. Create Tax Categories in Veloce
Once you understand how taxes work in your area, you need to determine how taxes will be grouped for reporting purposes. Taxes are grouped together using Tax Categories in Veloce. Every tax needs to belong to a tax category. Here are some common tax category examples:
Federal Tax
Provincial Tax
State Tax
Liquor Tax
Food Tax
3. Create taxes in Veloce
Create each tax in Veloce. Each tax will be assigned to a tax category and configured according to local tax laws.
4. Assign taxes to Sales Items or Divisions in Veloce
Each Sales Item and Division in Veloce can be configured with all available taxes. This provides maximum flexibility so that Veloce can be adapted to any tax regulation on all markets.
IMPORTANT! Taxes need to be created before any sales items. This will allow you to select relevant taxes during the sales items creation process, instead of having to go back on every single item after the fact. This is a huge time-saver when creating a new Veloce database.
2 for 1 item
...
Admission
...
By volume
...
Customer counter
...
Discount
...
Discount item
...
Hotel revenue center
...
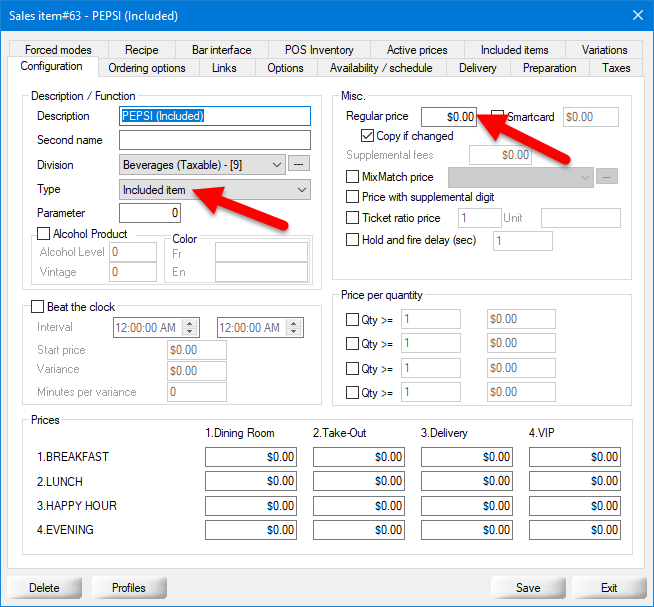
Included item
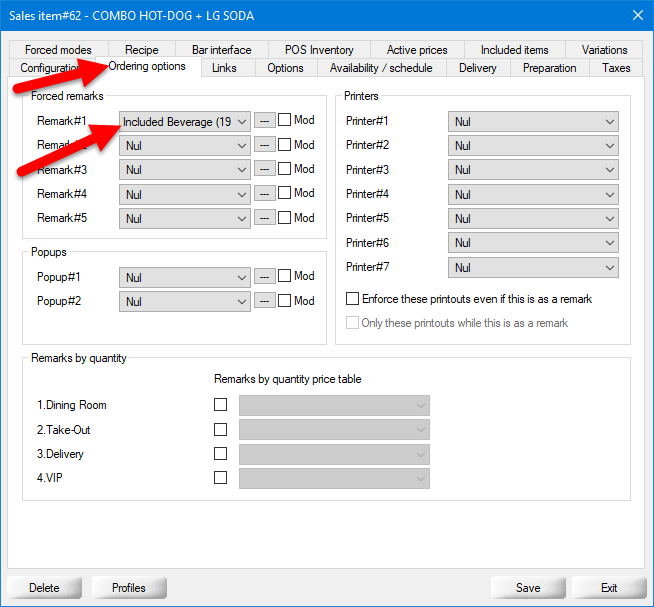
Select this item type for free items that are included with another item. This is useful to create combos, where the main item has a price and a choice of sides and a choice of drinks is offered.
Linked to client
...
Message
...
Message item
...
Misc. item
...
Misc. +Message
...
Misc. +Message item
...
Modifier
...
Negative misc.
...
Negative Paid-in
...
Negative scale
...
None
This is the default selection when creating a new item. This option can also be selected to disable an item without deleting it.
Paid-in
...
Perpetual
...
Perpetual remark
...
Quantity discount
...
Regular
Use this type for most revenue items which can be sold at the POS.
Remark
...
Remark by quantity
...
Scale
...
Shift item
...
Tare
...
Veloce mobile application - Mobile workstation
Introduction
Android based PayFacto terminals can be used as standalone workstations or as counter-top payment terminals. A Windows computer is still required to run the Veloce server. The most common use case is table service, enabling the staff to take orders and payments directly at the table side.
IMPORTANT! Outside of Québec, the terminal's printer can be used to print all receipts. Within Québec, a dedicated receipt printer is still required for SRM (Sales Recording Module) routing.
Requirements
Wireless Android based PayFacto terminal.
Veloce POS application installed on the terminal.
PayFacto Payment app installed on the terminal.
Wireless network coverage within the business area.
Secure Table Pay application - Remote payments
Introduction
Mostly used for Delivery, Secure Table Pay (STP) can also be used for table service. Given the availability and ease of installation of the Veloce application, it is rarely used for table service with Veloce. STP is a program that runs as a Windows service on a PC that also runs a Veloce workstation. It enables delivery drivers to recall a check from the terminal and process payments at the customer's doorstep. It is mostly used over mobile 4G/LTE networks by delivery drivers.
Requirements
Wireless Android based PayFacto terminal.
For delivery mode, a SIM card with a mobile data plan is required.
STP application installed on the terminal.
STPI license.
STP program installed on a Windows PC running a Veloce workstation.
The sale amount.
The amount authorized for payment.
The tip amount, if any.
The last 4 digits of the card number.
"EMV" Standards
Since the mandatory implementation of EMV (Europay, Mastercard, Visa) Standards around 2010, merchants have tried to limit card handling by cashiers/clerks as much as possible. This way, the payment cards remain in the customer's hands at all times, giving them a feeling of security and effectively limits the possibility of fraud by card skimming.
Since it is now difficult for the merchant to know in advance what kind and brand of card will be used for payment, Veloce uses the information returned by the terminals to know which card type and brand was used, along with other information about the payment.
Electronic Funds Transfer (EFT) refers to all payments that can be processed electronically using a computerized POS system like Veloce through an Internet connection. EFT is mostly meant for card payments, such as credit cards, debit cards and payments by banking cards, such as Interac Debit. Some types of gift cards are also processed by EFT, but those will be discussed in a dedicated article.
EFT Providers
In order to process card payments, the merchant needs to select a payment processing company and open an account. Such companies are also referred to as "processors" or "acquirers". Examples of such providers include PayFacto, Moneris, Global Payments, TSYS, etc.
The role of the payment processor is, of course, mainly to process card payment requests coming from merchants. Processors do all the "heavy lifting" in this department, like capturing sensitive payment card data and moving funds between the customer's accounts and the merchant's account. Many processors offer additional services such as integration to POS systems like Veloce, access to real-time reports, etc.
Of course, PayFacto has the advantage of being able to offer a complete end-to-end solution to its customers. A full-featured POS system and a complete line of payment services are available under the same roof.
Integration types
There are 3 main types of integrations for EFT solutions, regardless of the POS system in use.
Non-integrated (standalone)
The non-integrated or standalone mode, as its name suggests, does not communicate at all with the POS system. This is common for very small merchants who use a standard cash register to manage their sales. This is also common in remote areas where communication between the merchant and the payment processor is carried over standard phone lines.
When using a non-integrated solution with Veloce, the cashier needs to manually select the appropriate payment mode after asking the customer how they were going to pay. The amount of the sale and tip amounts also need to be entered manually in Veloce, and the daily reconciliation (making sure payments and sales balance) needs to be done by looking at the Veloce reports and the payment terminal's reports separately.
Semi-Integrated
The semi-integrated mode is the most common and is also the safest in terms of data protection. With a semi-integrated implementation, the POS system and the EFT provider only exchange non-sensitive information, such as transaction amounts, tip amounts, card brand used, etc. Sensitive data is never shared with the POS system, which makes it a less attractive target for hackers. Sensitive data includes credit card numbers and their expiration dates as well as the card's security code.
The use of a semi-integrated mode generally implies the use of dedicated payment terminals, which are often referred to as PIN Pads. However, some semi-integrated solutions allow for a portion of the POS software to be installed on the same physical device as the payment terminal, giving it the practical look & feel of a fully integrated solution. One such solution is the Veloce POS app, which can be installed on the PAX A920 payment terminal offered by PayFacto.
With Veloce, a semi-integrated solution allows for the automation or a large portion of the card payment process and limits the amount of input that has to be done manually by the cashier. All the data, such as the type of card used, the card brand used, the sale amount, amount authorized and tip amount are managed automatically and exchanged between Veloce and the payment terminal without intervention from the cashier. This eliminates many possibilities of input errors by the cashier and speeds up the payment process. Also, since sensitive data is always kept on the processor's side and never shared with Veloce, this greatly simplifies data security management on the Veloce side.
Fully Integrated
The full integration was very popular around the early 2000's. However, this type of solution became less popular owing to the ever growing challenges in data protection caused by the design of these solutions. With a fully integrated solution, the POS system effectively becomes a payment application, subject to PA-DSS and PCI-DSS data security standards, since sensitive information is managed directly by the POS system. This requires more stringent data security management, special employee training and sometimes incurs additional costs from card issuers and service providers. Very few merchants still use fully integrated solutions and most are being replaced with semi-integrated solutions.
Procedure
In the Windows Notification area, click on the Network Connection icon, then click on the network connection you wish to configure. (there could be more than one.)
This will bring up basic settings. Click on the Network connection (again).
The Network profile options will be displayed. Select either Private or Domain.
Domain or Private Network Profile, which one to select?
If your Veloce Main Back-Office PC is part of an Active Directory Domain, your Network Profile needs to be set to "Domain". If the PC is not on a domain, this option will not be available, therefore your Network Profile needs to be set to "Private".
If you believe that the PC should be using the Domain Network Profile but this option is not available, please ask your network administrator for advice.
Change Network Profile Options
Once the profile is set to either Private or Domain, some additional options need to be changed:
Just like before, in the Windows Notification area, click on the Network Connection icon, then click on the network connection you wish to configure. (there could be more than one.)
This will bring up basic settings. This time, click Change advanced sharing options.
Under the Private (or domain) profile, make sure that:
a. Turn on network discovery is selected.
b. Turn on file and printer sharing is selected.
Click on the down-arrow next to All Networks. This will display more options.
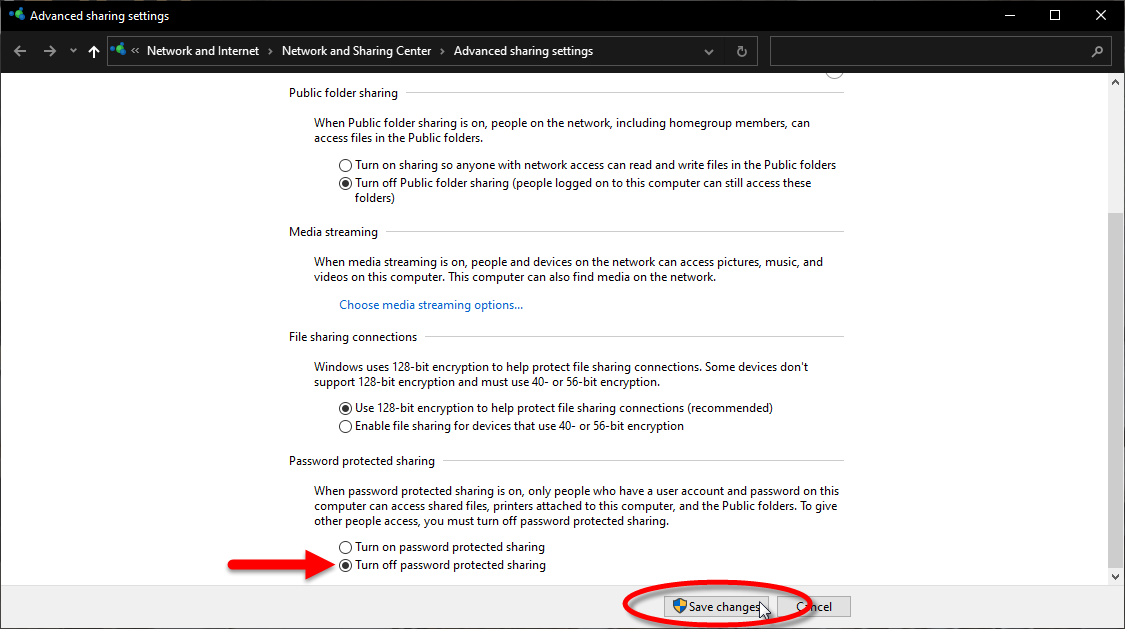
Scroll down to the Password Protected Sharing section and select Turn off password protected sharing.
Common Network Profile Options
Click Save changes.
This configuration needs to be done on the Main Back-Office PC, all Auxiliary Back-Office and Backup Server PCs, as well as on all Windows POS workstations.
Test Connectivity
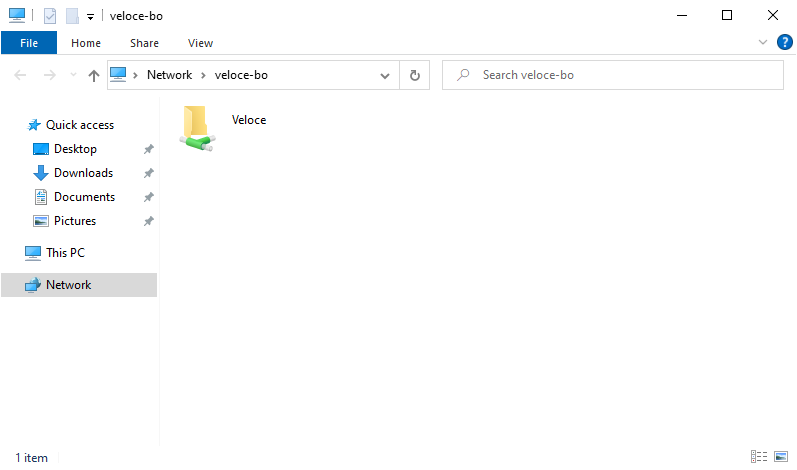
The connectivity between the Main Veloce Back-Office PC and other components of the Veloce network can easily be tested. For the example below, we are testing connectivity to a PC named "VELOCE-BO".
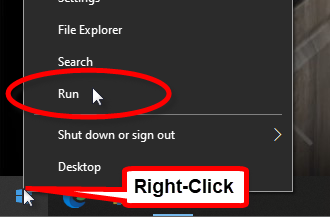
From any PC or POS on the Veloce network, right-click the Windows Start button and select Run...
Right-Click Windows Start Menu
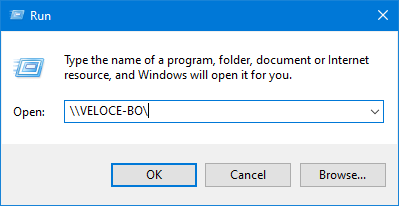
In the Run... box, type two back-slashes (\\) followed by the name of the PC you want to connect to. For example:
\\VELOCE-BO
Windows Run Dialog
Click OK.
a. If the Veloce Back-Office is already installed, you will see the Veloce shared folder on the PC named VELOCE-BO.
Remote PC with shared folder
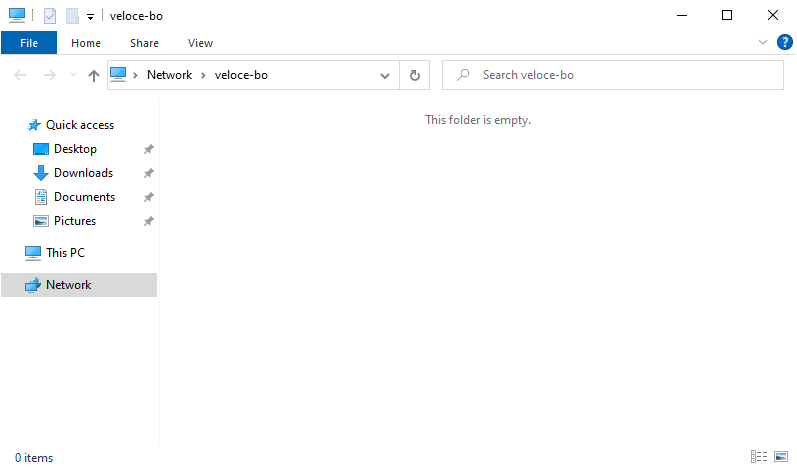
b. If the Veloce Back-Office is not yet installed or the Veloce folder is not shared properly, you will see an empty folder on the PC named VELOCE-BO.
Remote PC with empty folder
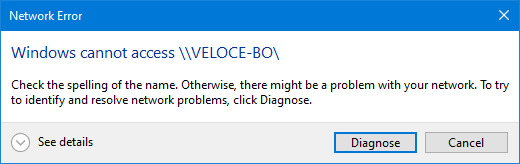
c. If the network settings are not configured properly, you will see an error message.
Error message accessing remote PC
The network settings now allow communication between all the components of the Veloce Network
IMPORTANT! It will be possible to login to the Veloce Back-Office without entering a password as long as no additional users are created. While this is convenient during the programming phase, this is by no means secure. Additional users should be created prior to deploying the system to a live site, and these should be protected by strong passwords.
Login Prompt Information
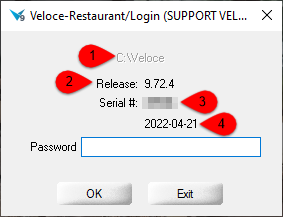
The Veloce login prompt provides useful information about the Veloce system even before logging in. This information is often requested by technical support specialist before they can access your license information or provide assistance.
Veloce login Screen - Highlight
The Veloce installation path.
The Veloce release version that is currently installed.
The serial number of the Veloce license currently installed.
The system date.
Veloce login screen
Veloce Back-Office
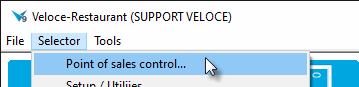
Opening Modules
The same result can be achieved by clicking the Selector menu and selecting the desired module name:
Selector Menu
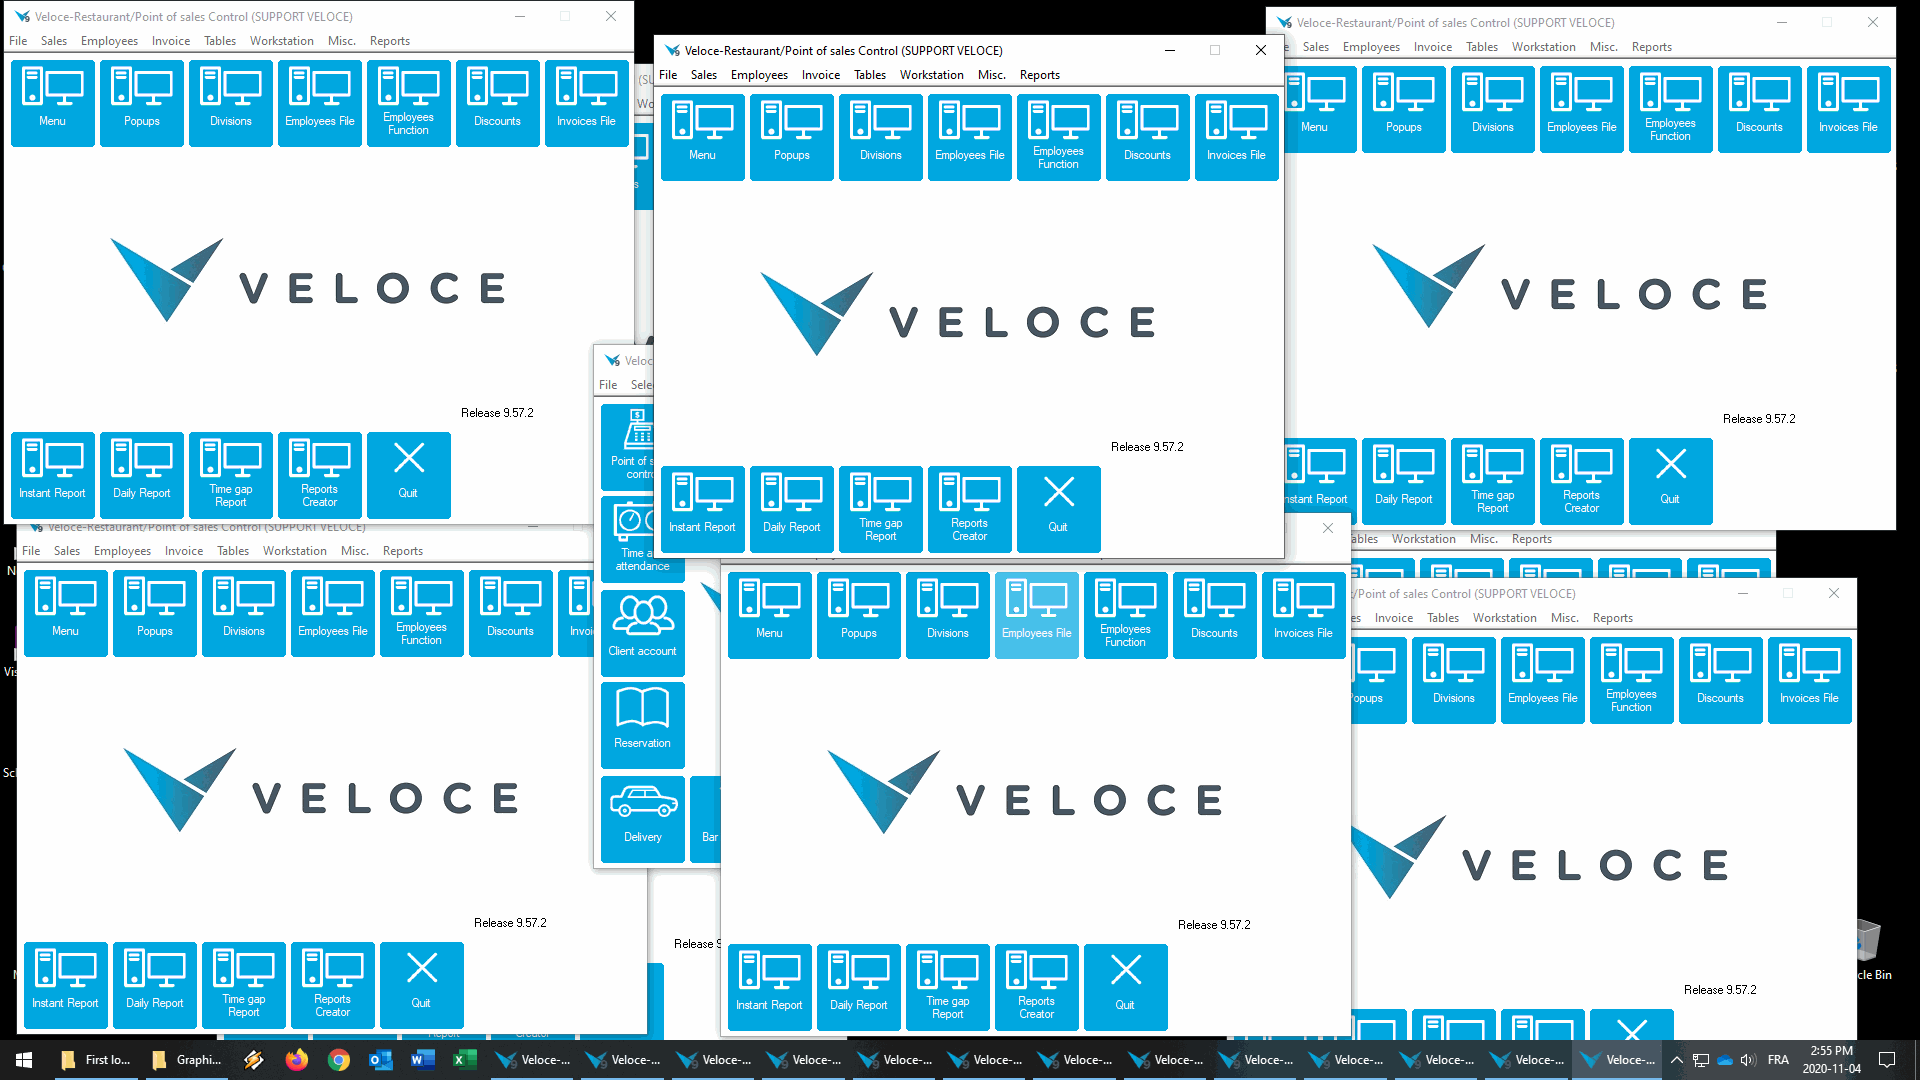
Multi-Instances
Each module can be opened in multiple instances. This is useful for working simultaneously on different elements within a module.
Opening modules in multiple instances
However, be careful as opening too many instances could become quite overwhelming:
Too many instances
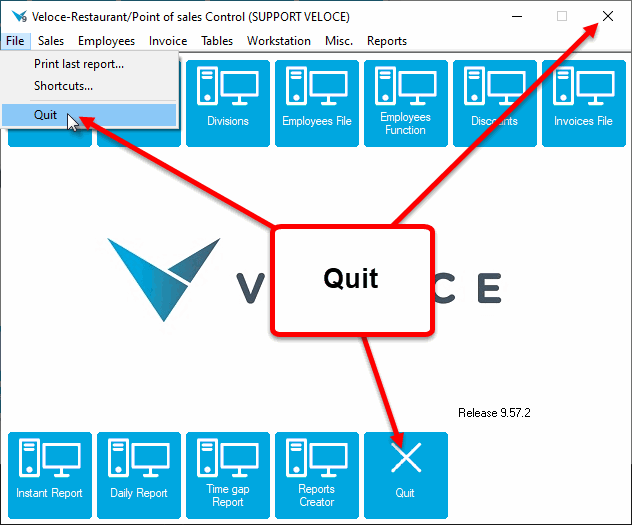
Closing modules or the Main Back-Office screen.
The main Back-Office as well as each module can be closed by clicking the blue Quit button, the "X" in the upper-right corner of the window, or using the File menu and selecting the Quit option.
Closing modules and Back-Office
IMPORTANT! Before closing the Main Back-Office, all other modules need to be closed. Otherwise, an error message will be displayed:
Exit to password
The Exit to password icon is used to close the Main Back-Office window and bring up the login screen, which allows another user to log in.
As with the regular "Quit" options, all other module windows need to be closed, otherwise an error message with be displayed.
Veloce Back-Office
NOTE: If no users were ever created (such as on a brand-new install), leave the Password field empty and click OK.
NOTE: Veloce relies strictly on the password to identify the users. This is why there is no user name field.
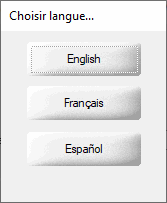
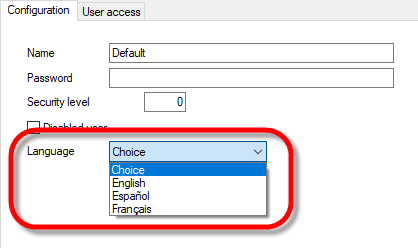
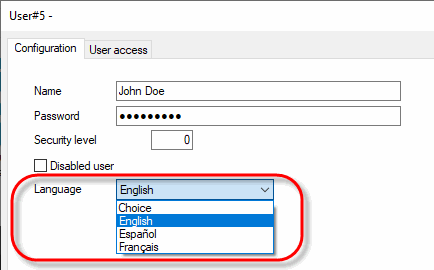
If your account is configured to select the display language, the language selection screen will appear. Click the desired language button.
Language Select Screen
NOTE: If your account is configured with a specific language profile, you will not see this screen.
The main Back-Office screen appears.
Veloce Main Back-Office Screen
You are now logged in to the Veloce Back-Office.
Veloce Back-Office Icon
Veloce Back-Office Login Screen
Login to the Veloce Back-Office
Veloce Back-Office Icon
Open the Setup/Utilities module
Setup - Utilities Icon
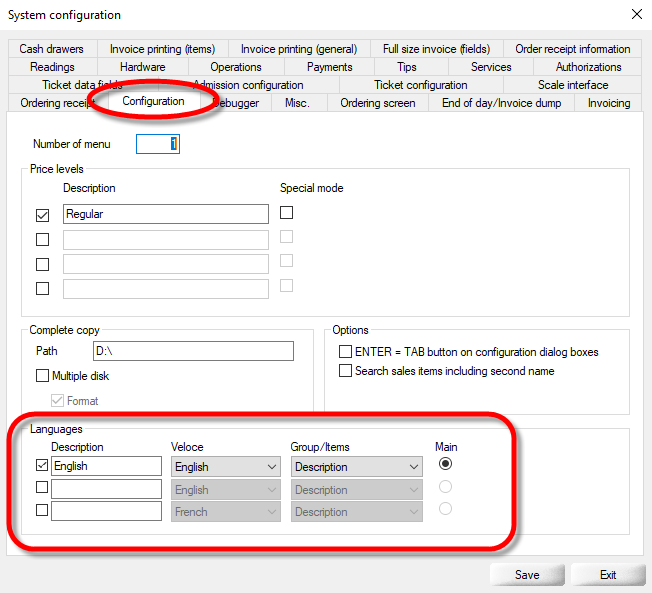
Click the System Config. link. (or use the Configuration > System Configuration... menu option)
System Config. Icon
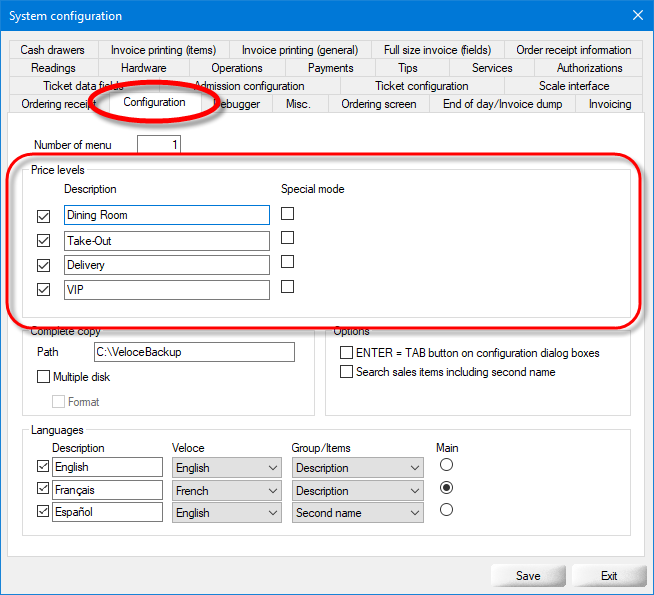
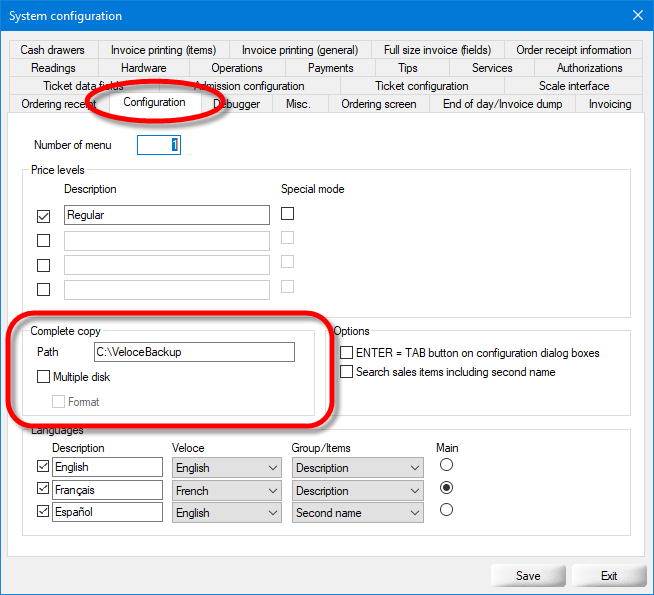
Click on the Configuration tab. The Price Levels are near the top of the window:
Price Levels
Price Levels
Checkbox
Enable the checkbox next to each price level to use it. If a price level is not needed, leave its checkbox blank.
Description
Type a meaningful description for each price level.
Special mode
...
Button - Save
Click the Save button to save changes and exit.
Button - Exit
Click the Exit button to close this window without saving changes.
The price levels will be displayed as headers in the Prices section, in the configuration screen of sales items.
Veloce Back-Office Icon
Start the Setup / Utilities module.
Setup - Utilities Module Icon
Click the System Config. link. (or use the Configuration > System Configuration menu item)
System Config. Link Icon
Click on the Misc. tab.
System Configuration - Misc.
Locate the Military Format Time checkbox, at the bottom of the Options section.
Military Time Format Option
Enable this option to select 24h format. Disable it to select 12h format.
Date Format
There are no date format settings in Veloce. the date format used at the POS and in reports is determined by Windows regional settings of the PC where the Veloce Server is installed.
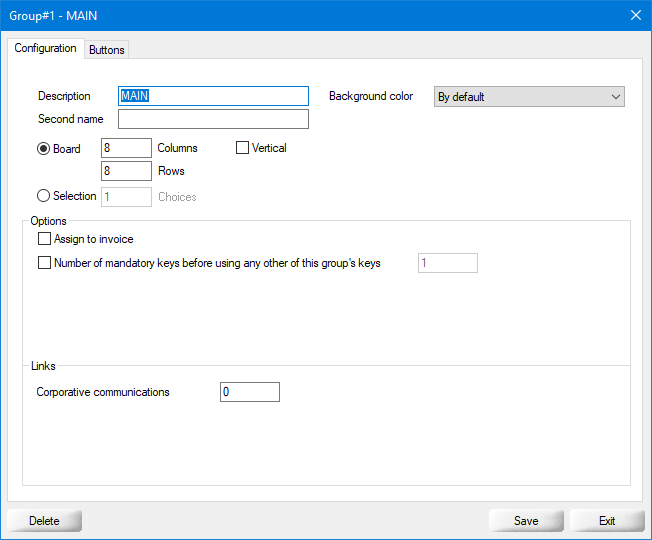
Configure modes
Login to the Veloce Back-Office.
Veloce Back-Office Icon
Start the Point of Sale Control module.
Point of Sale Control Icon
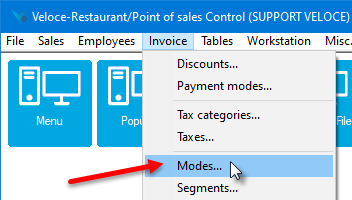
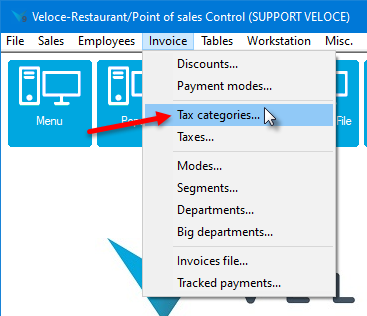
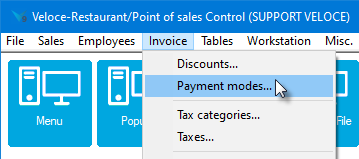
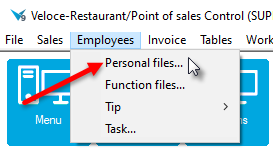
Click on the Invoice menu and select the Modes... option.
Invoice Menu - Modes...
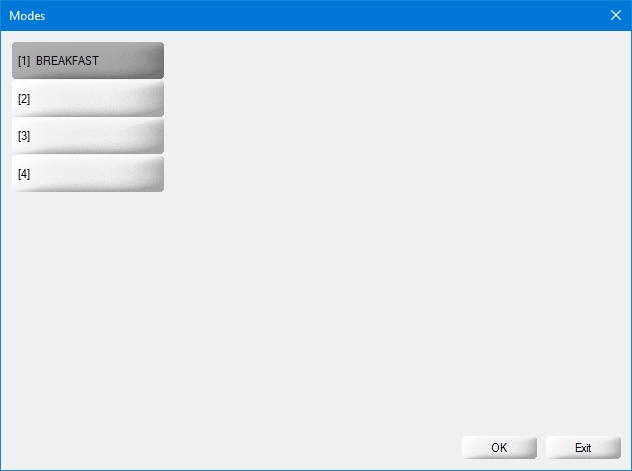
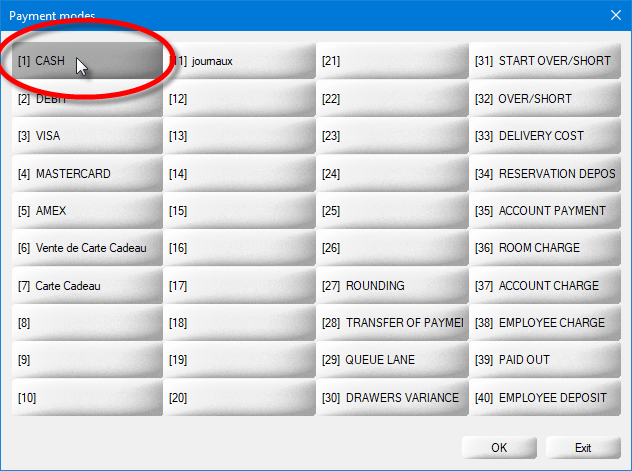
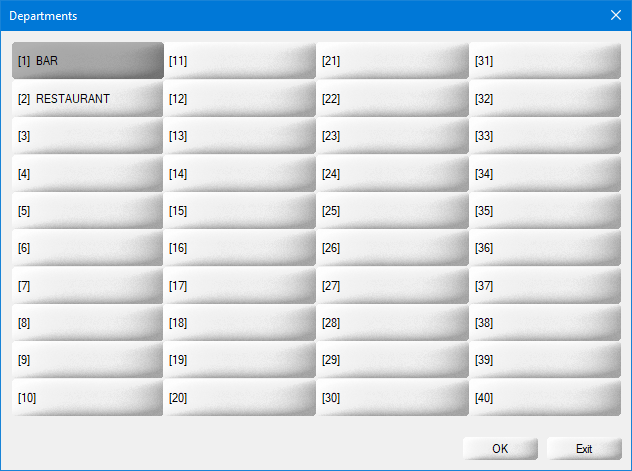
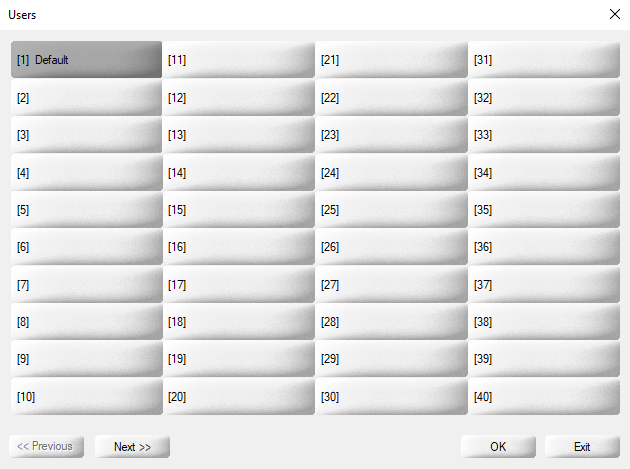
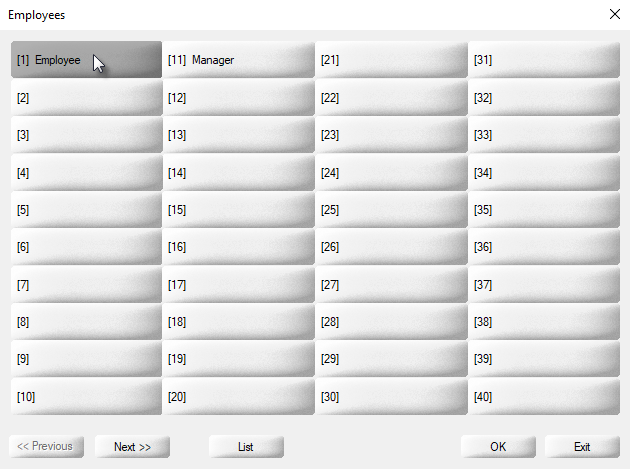
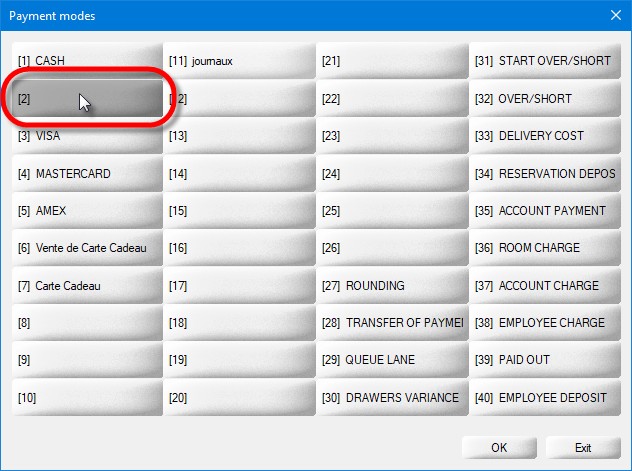
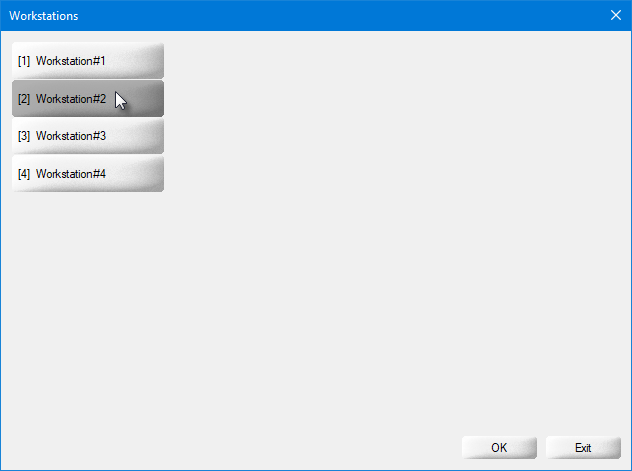
The list of modes is displayed. Click on an existing mode to edit its properties, or click an empty placeholder to create a new mode.
Modes List
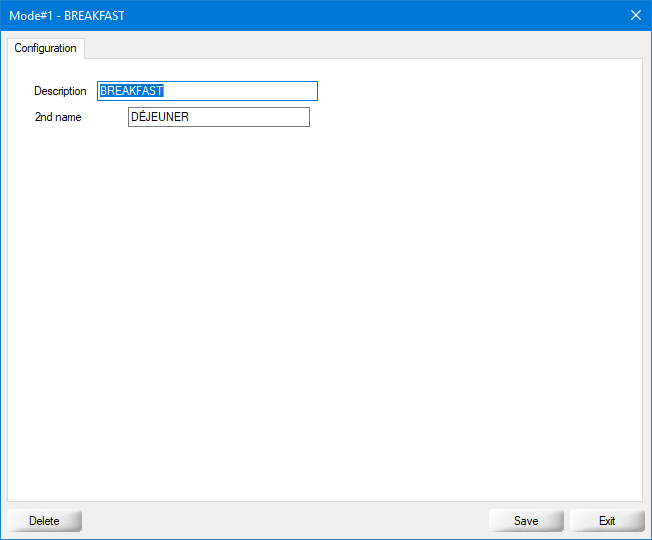
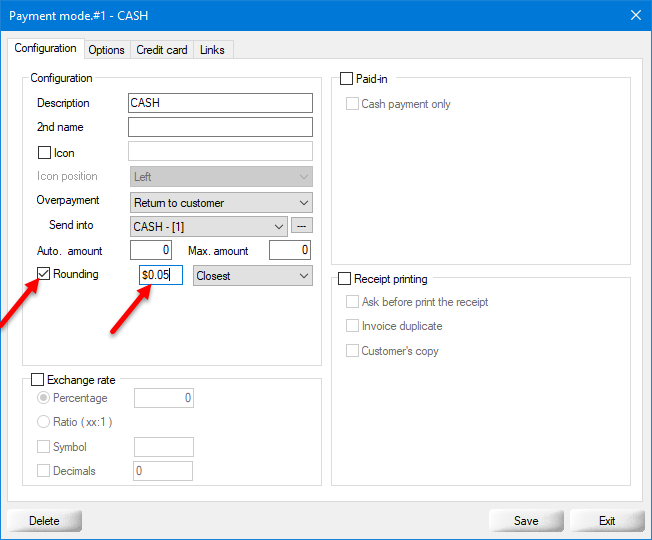
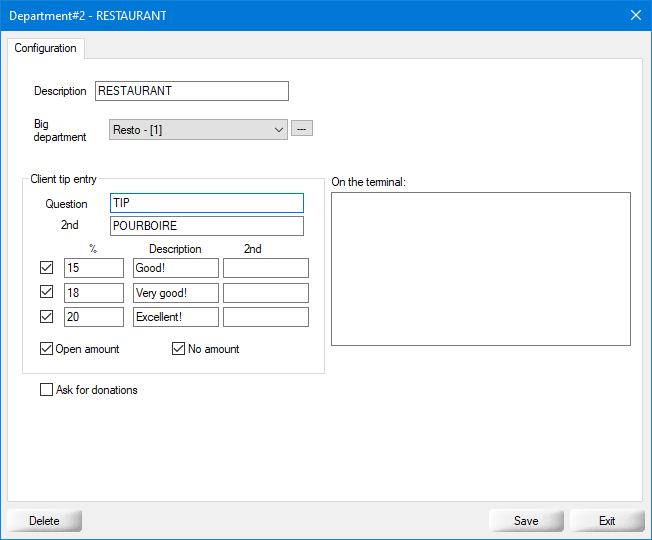
Configure the mode's properties:
Modes Config
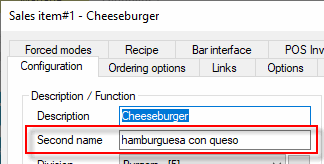
Description
Type a meaningful description for this mode. Various periods of the day are typically used for this purpose, such as Breakfast, Lunch, happy Hour and evening.
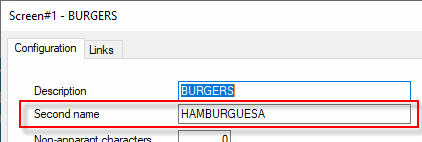
2nd Name
Type an alternate description for this mode. In multi-language setups, this would be the translation of the description.
Button - Delete
Click the Delete button to remove this Tax Category.
Button - Save
Click the Save button to save changes and exit.
Button - Exit
Click the Exit button to close this window without saving changes.
Repeat these steps to configure up to 4 modes.
Beverages
Alcohol
Modifiers
Since big divisions will later be sub-divided in divisions, it is important to keep them as generic as possible, as in the examples above. In a standard menu, it is rare to see more than 4 or 5 big divisions.
How to create Big divisions
Login to the Veloce Back-Office.
Veloce Back-Office Icon
Start the Point of Sale Control module.
Point of Sale Control Icon
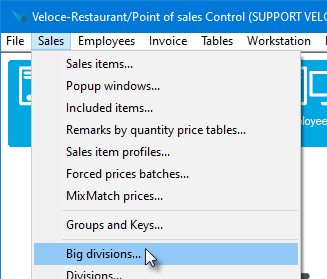
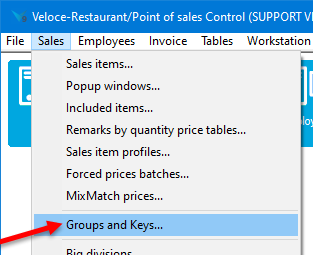
Click on the Sales menu and select the Big Divisions... option.
Menu - Sales
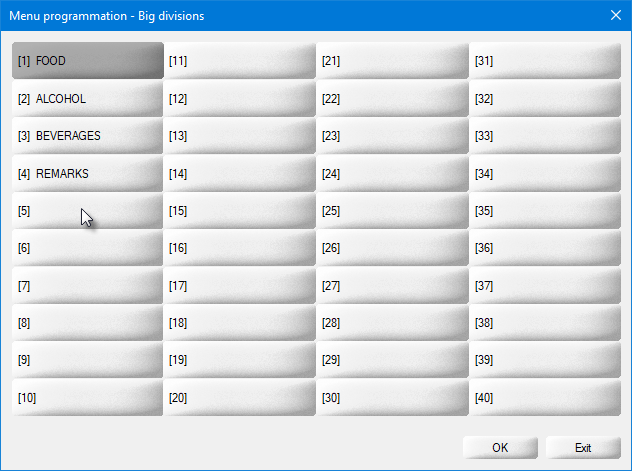
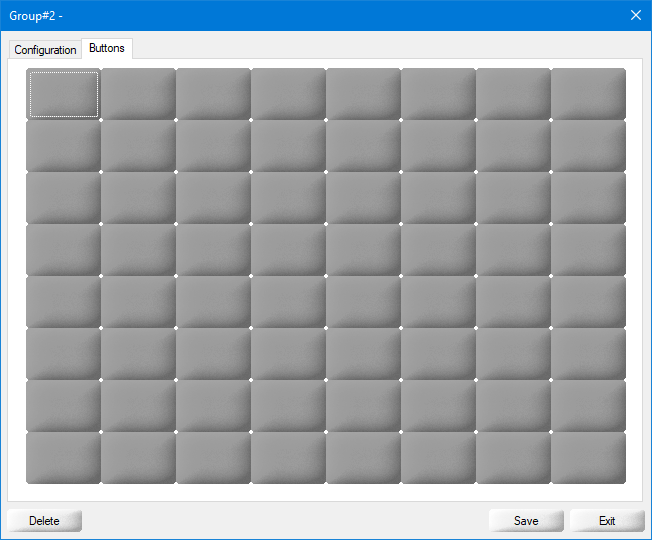
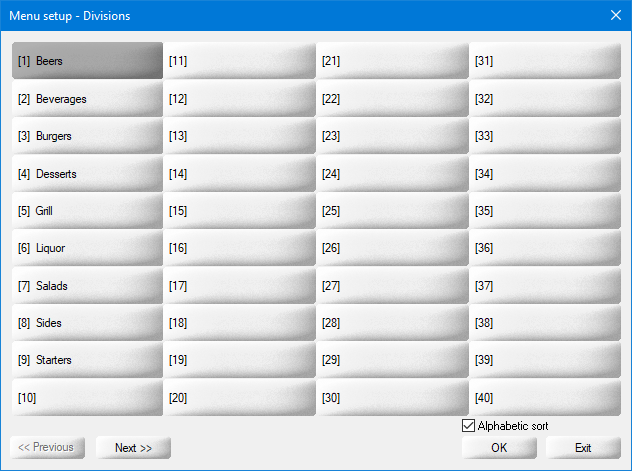
The list of Big Divisions appears. Click on an existing Big Division to modify it, or click on an empty space to create a new one.
Big Division List
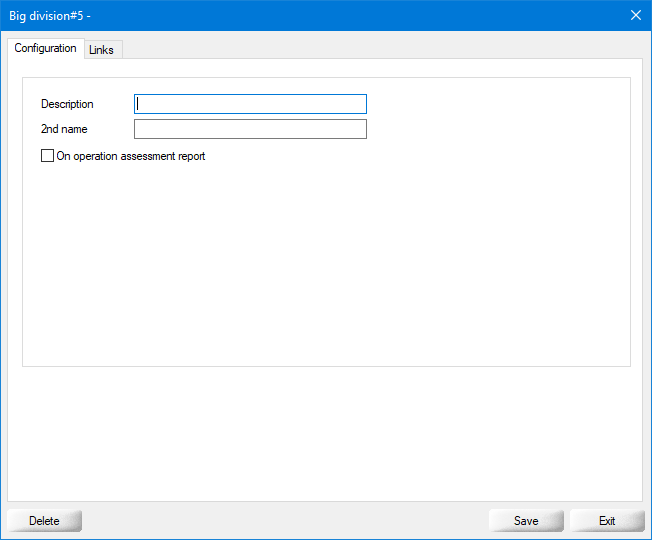
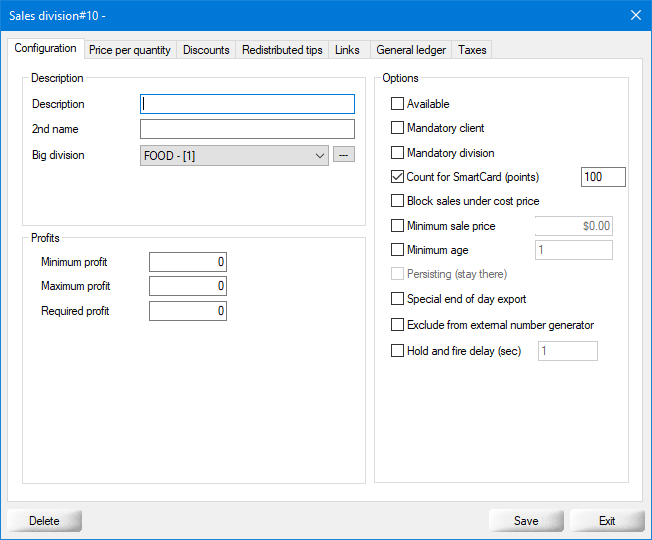
Configure the Big Division parameters:
Big Division Parameters
Description
Type a meaningful description for this Big Division
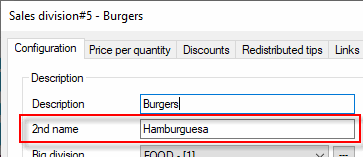
2nd Name
Type a secondary description for this Big Division. This is generally used as an alternate description in a different language for multi-language setups.
On operation assessment report
Enable this option to include this big division on the Operation Assessment report.
Button - Delete
Click the Delete button to remove this Big Division.
Button - Save
Click the Save button to save changes and exit.
Button - Exit
Click the Exit button to close this window without saving changes.
In self-serve
...
Modes per week day
Configure the availability of the item for each mode and for each day of the week. A tick in the box means that the item will be available for that mode for that day. An empty box means that the item will be unavailable.
Per price level
Select the price levels for which this item should be made available.
Available
Click this button to activate all the checkboxes at once and make the item available for all days/modes and all price levels.
Not-Available
Click this button to deactivate all the checkboxes at once and make the item unavailable for all days/modes and all price levels.
Please go through each of the following topics to learn more about all the options contained in each tab of the sales items setup:
Related Topics
Delivery Cost
Price levels
Enter a delivery cost for each price level.
Delivery cost can be waived
Enable this option to allow the delivery cost to be removed.
Calculate even if not delivery
Enable this option to force the delivery charge even if the item is not ordered in delivery mode.
Included in percentage cost calculation
...
Please go through each of the following topics to learn more about all the options contained in each tab of the sales items setup:
Click the System Config. link. (or use the Configuration > System Configuration... menu option)
System Config. Icon
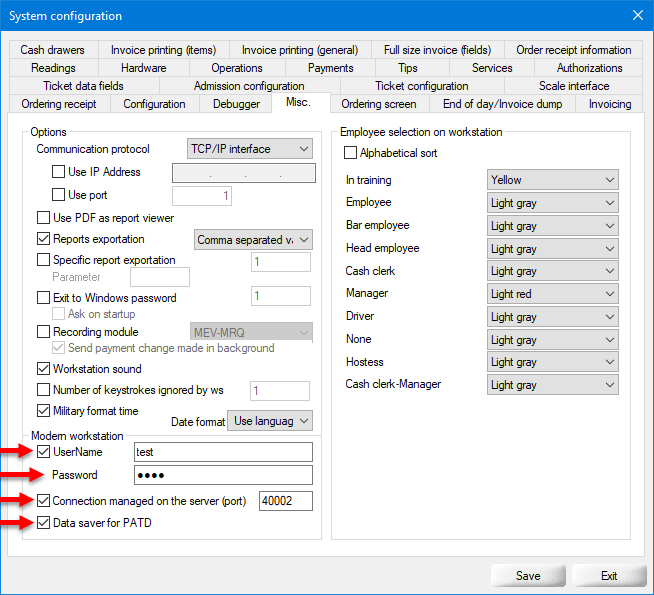
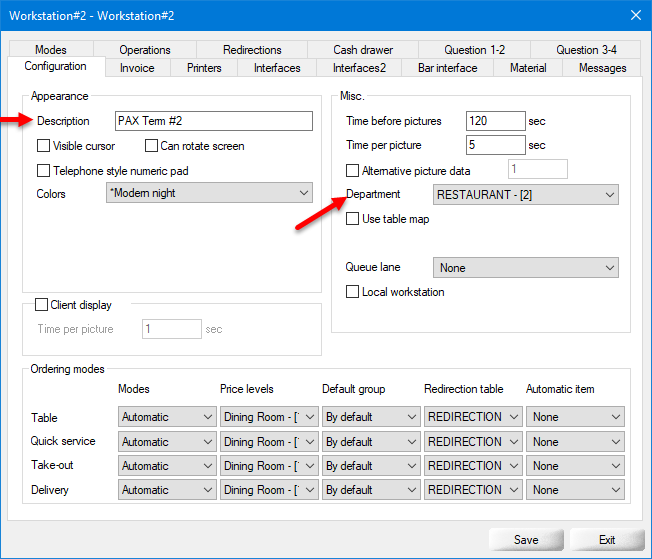
Click on the Misc. tab. The Modern workstation options are located at the bottom of that page.
System Configuration - Misc tab
Modern Workstation
Username
Activate the checkbox, then type the username you wish to use to connect the workstation running on the payment terminal to the veloce back-office.
Password
Type the password you wish to use along with the username created above.
Connection managed on the server (port)
Activate the checkbox and type the TCP port number to be used for communication between the payment terminal and the Veloce Back-office server. The default is 40000.
Data saver for PATD
Enable this option if Pay-At-The-Door functionalities are used.
Click the Save button to save the new settings and close this window.
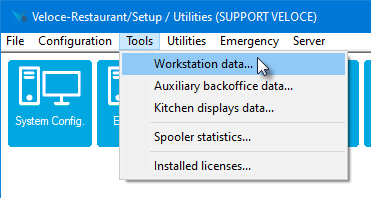
This completes the setup required in the System Configuration module. If all the other configuration steps are completed, now would be a good time to stop the Veloce server, create workstation data and restart the Veloce server.
Veloce Server First Start and Windows Defender Firewall Configuration
PayFacto Payment Application
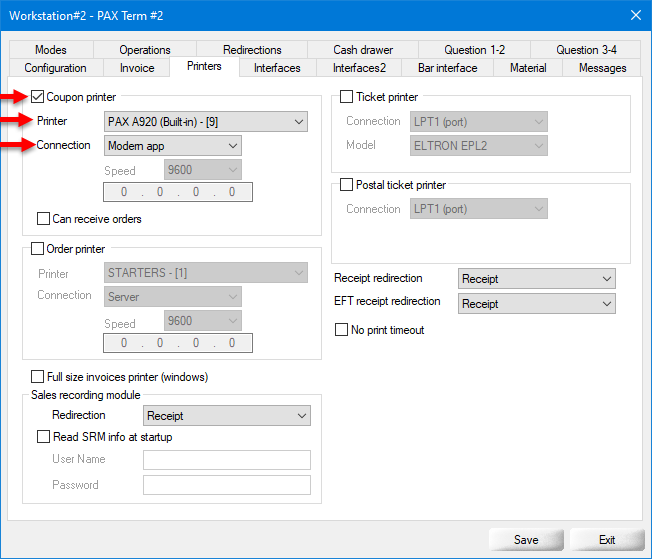
Veloce POS Application Installation
Veloce POS Application Configuration
Veloce POS Application - Connection
Veloce Shortcuts Installation
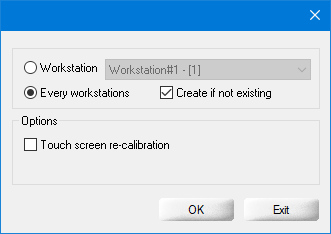
In order to facilitate access to the Veloce Back-Office software and quickly start the Veloce Server, shortcuts should be created on the Windows desktop.
Default Shortcuts
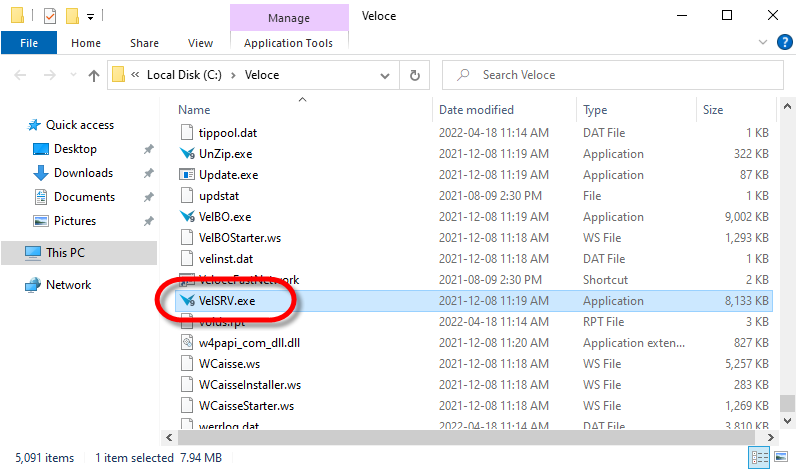
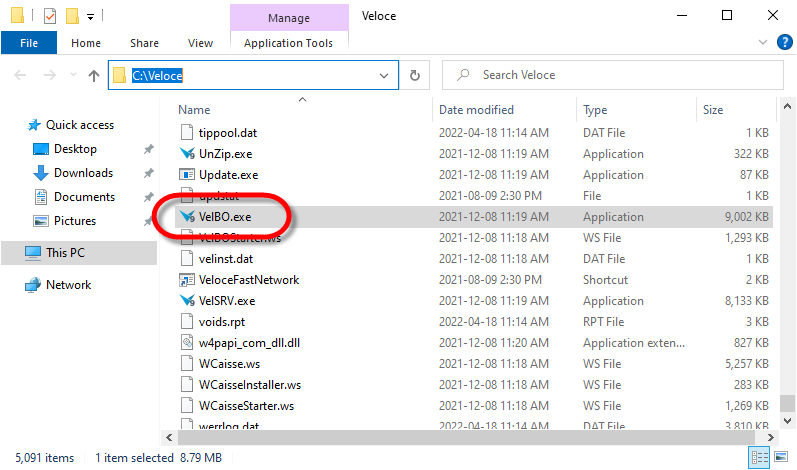
Open File Explorer and browse to the C:\Veloce\ folder.
Locate the VelBO.exe file.
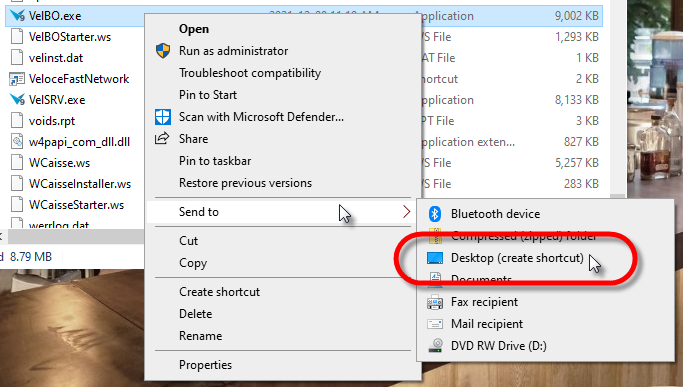
Right-Click VelBO.exe, point to Send to > and select the Desktop (Create Shortcut) option.
Repeat the same steps with the VelSRV.exe file.
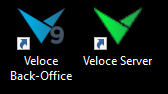
You should now have two shortcuts on the Windows Desktop:
Rename shortcuts
Rename the VelBO.exe shortcut to Veloce Back-Office.
Rename the VelSRV.exe shortcut to Veloce Server.
Replace the Veloce Server shortcut icon
In order to visually differentiate the Veloce Server shortcut from the Back-Office shortcut, its icon can be changed. This configuration is optional but strongly recommended.
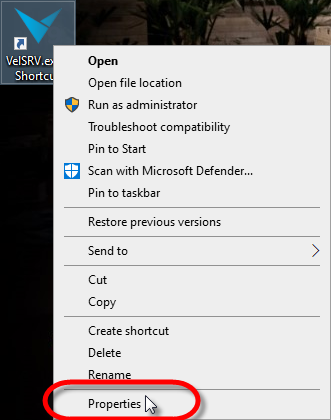
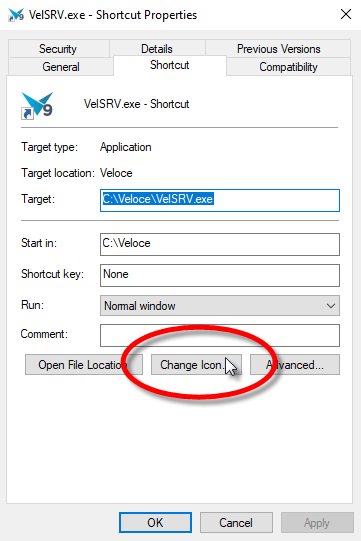
Right-Click the Veloce Server shortcut and select Properties.
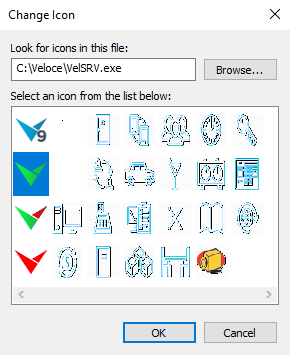
Select the Shortcut tab and click on the Change Icon... button.
Select the green Veloce logo and click OK.
Click Apply and then OK to save changes.
You should now have two shortcuts, similar to the image below:
Windows Startup
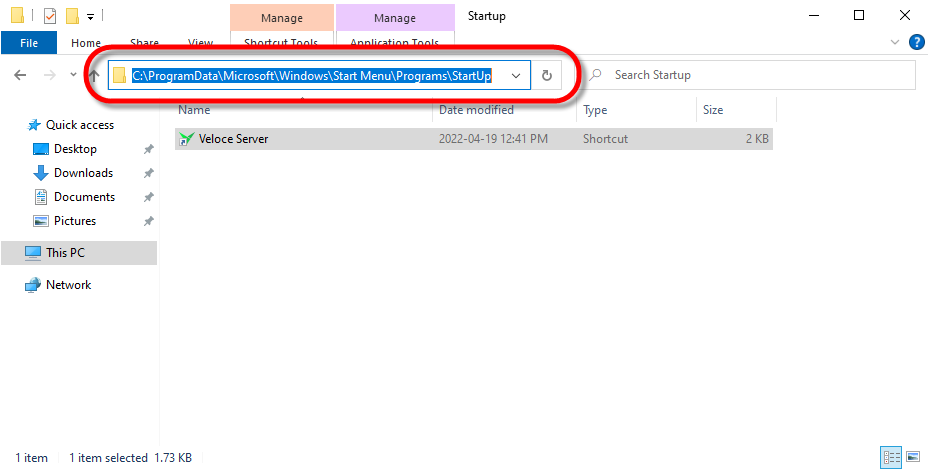
Make sure to copy the Veloce Server shortcut to the Windows Startup folder to ensure that the Veloce server automatically starts when Windows starts.
In Windows 10, the Startup folder can be found here:
NOTE: On a default English Windows 10 installation, the environment variable %allusersprofile% corresponds to C:\ProgramData\. Custom Windows installations, Windows 10 IoT or Windows 10 installations in other languages may use a different folder.
Your Veloce system is now ready for its first startup and license activation.
Veloce First Start and License Activation
Before your Veloce system can be used, the software needs to be activated using an activation key, which consists of a 4 to 6 digits Serial Number and a 16 to 20 digits Usage Key.
IMPORTANT! This information is provided with the purchase of a Veloce software license or during the creation of a Veloce reseller account. If you did not receive this information, please contact your sales representative at PayFacto. If you are a PayFacto employee, contact your manager to obtain a license.
Veloce Back-Office - First Start
Double-click on the Veloce Back-Office shortcut which was created earlier.
On the first start, the software will update itself and will search for an activation key.
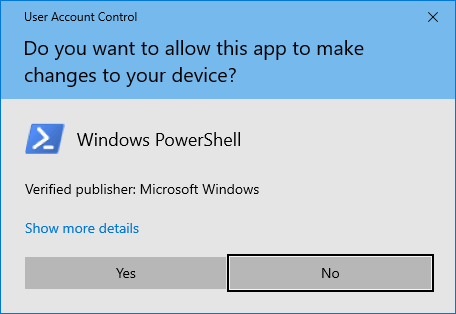
UAC prompts may also appear. Be sure to click Yes if you see these messages, otherwise Veloce will be setup as a Keyless Demo.
You will eventually see an INVALID LICENSE! error message. Click OK.
Once the login screen appears, it will also mention that your license is expired or invalid. Do not type anything in the Password field. Simply click OK.
A limited version of the Veloce Back-Office software will be displayed, with only a few basic functions.
Veloce License Activation
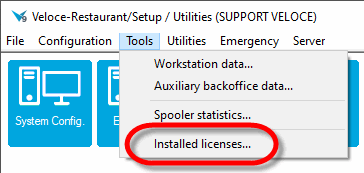
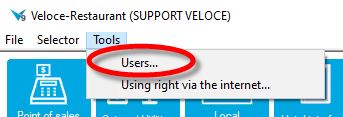
Click on Setup / Utilities.
Click on the Tools menu and select the Installed Licenses... option.
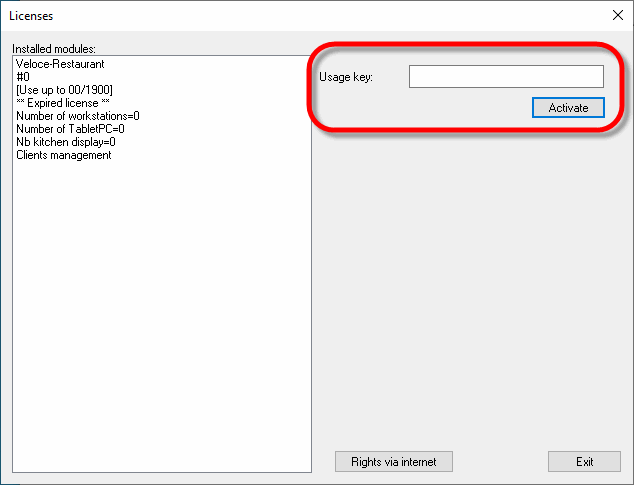
Before activation, the window is almost empty.
Type in (or copy/paste) the 16-20 digit Usage Key and click on the Activate button.
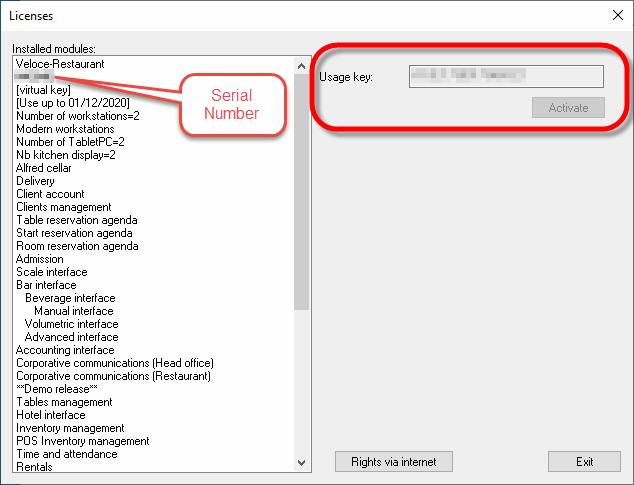
Once the license activation is completed, the Usage Key field will become grayed out. At the same time, the serial number and the list of installed modules will be populated.
IMPORTANT! Once the license is activated, any further modification or reactivation needs to be carried out using a distributor user account. If you don't have this type of account and require modifications or a reactivation of your license, please contact PayFacto technical support.
The Veloce Back-Office software is now activated.
The next step will be to start the Veloce server for the first time and add permissions in the Windows Defender Firewall.
Veloce Server First Start and Windows Defender Firewall Configuration
Before starting the Veloce Server, make sure that the Veloce license is activated.
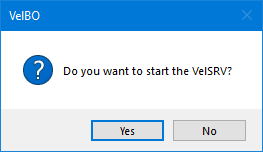
Veloce Server Startup
Now that the Veloce license is activated, the Veloce server can be started.
To start the Veloce server manually, simply double-click on the Veloce Server shortcut that was created previously.
Windows Defender Firewall
To protect the Veloce system and the data stored therein, a firewall must be installed and running on the Veloce system at all times. The following instructions are based on the Windows Defender Firewall, which is included for free and active by default on Windows 10.
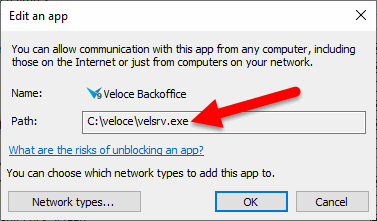
On the first start of the Veloce Server, an application will try accessing the internet and will be blocked by the firewall:
Veloce Backoffice - C:\Veloce\velsrv.exe
The following security warning will be displayed. Click on the Allow Access button. Once the authorization is granted, this message will no longer be displayed.
NOTE: Make sure to only activate the Private Network or Domains options. Access should always remain blocked for public networks. For security reasons, Veloce should never be used on a public network.
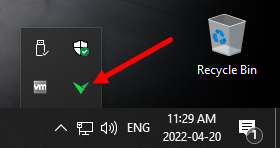
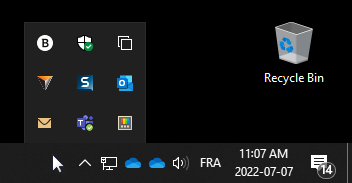
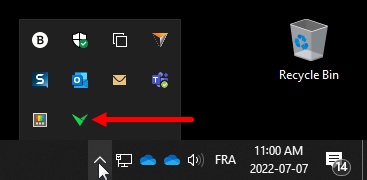
Windows 10 Notification area
Once the Veloce server is started, the green Veloce icon will appear in the Windows 10 notification area. During the server startup, it is normal to see the icon flicker between red and green. However, if the icon remains red and never goes solid green, it means that one of the previous configurations was not carried out correctly.
NOTE: If a copy of the Veloce Server shortcut was added to the Startup section of the Windows 10 start menu as explained in the previous articles, the Veloce server should automatically start every time Windows starts.
Windows Defender Firewall manual configuration
The configuration of the Windows Defender Firewall generally occurs in a semi-automated manner as explained above. However, for some Windows 10 systems operating in more secure environments, a fully manual configuration may be required to allow the Veloce applications to communicate through the firewall. Also, if the network eventually changes from a private network to a domain network with Active Directory, the firewall settings will need to be updated manually.
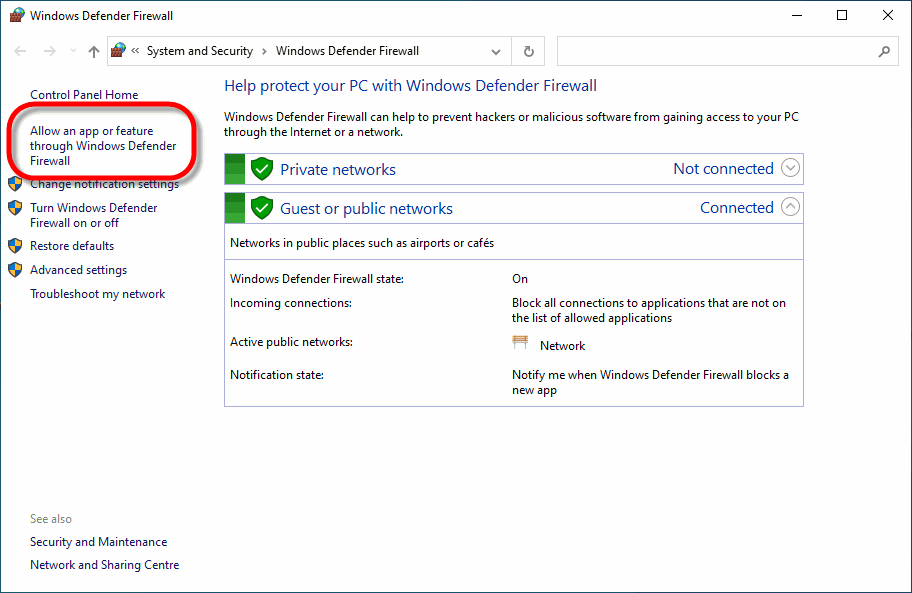
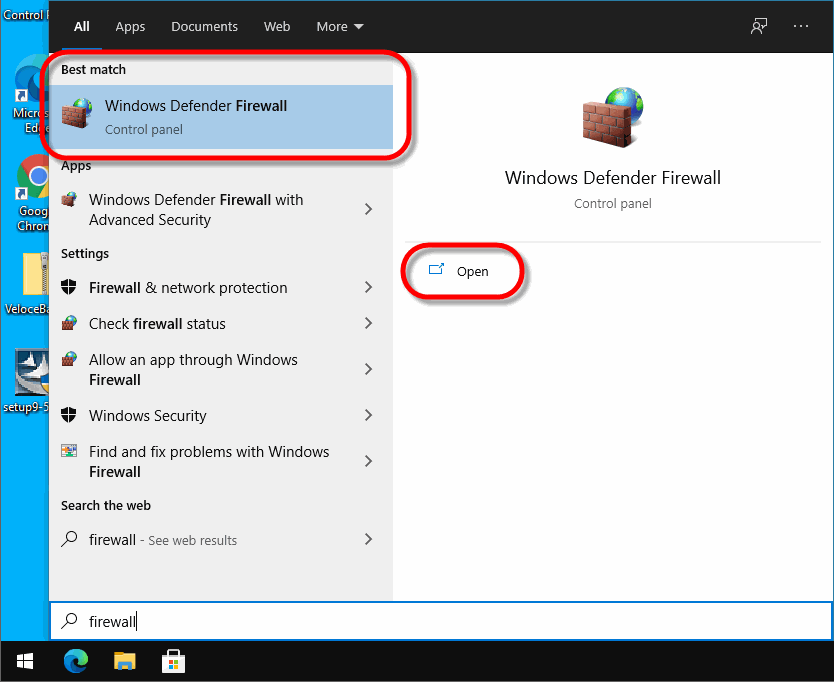
In the Windows 10 serach bar, type Firewall. The Windows Defender Firewall - Control Panel option should appear. Click Open.
The Windows Defender Firewall Control Panel window will appear. Click on Allow an app or feature through Windows Defender Firewall.
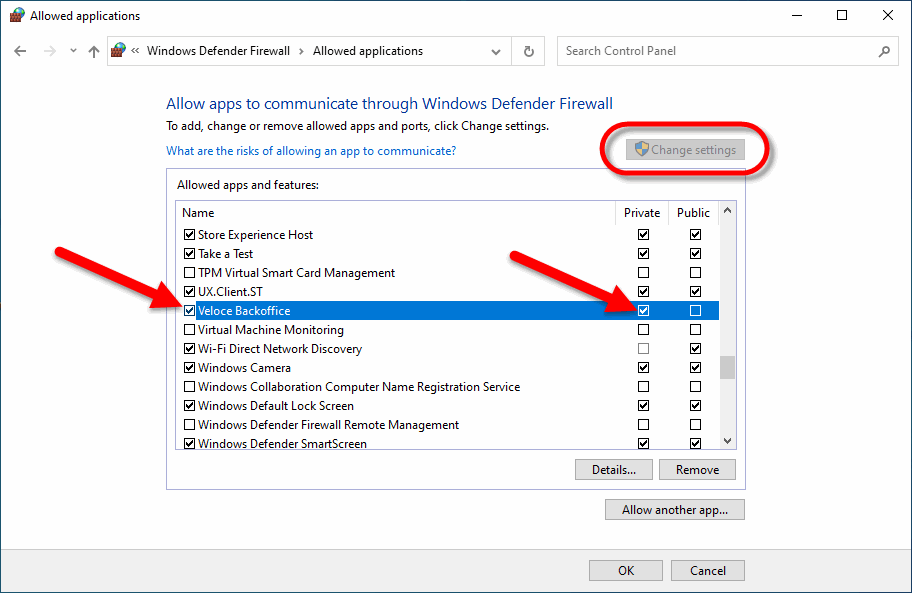
The list of authorized applications will appear. Click on Change Settings.
The list will then become editable. Scroll down the list to find Veloce Backoffice and make sure that the corresponding checkboxes in the Private and Domain columns are checked. For security reasons, never enable the checkbox in the Public column.
TIP: If Veloce Backoffice is not listed, you can manually add it by clicking the Allow another app... button and browsing for VelSrv.exe.
NOTE: The name displayed in this list is Veloce Backoffice, but it is indeed the Veloce Server, as indicated if you select the application and then click on the Details... button.
This completes the installation and first start of your Veloce system. Your system is now ready to be programmed.
Point of Sales Control
Point of Sales Control Overview
Point of Sales Control is a core module that is included with every Veloce license. It allows restaurants to manage day-to-day operations from one central location. This is also where most of the menu programming is done, from creating sales items to employee access.
Here are a few tasks that will be carried out from the Point of Sales Control Module:
Creating Sales Items
Creating Big Divisions, Divisions and Item Screens
Configuring taxes
Creating and managing promotions and discounts
Managing employees and employee functions
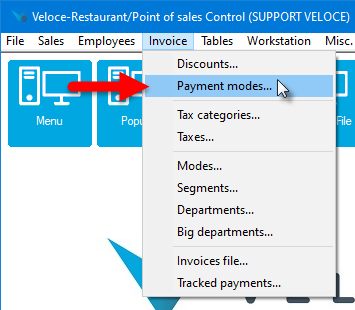
Managing payment modes
etc...
Tax Categories
Once you understand how taxes work in your area, you need to determine how taxes will be grouped for reporting purposes. Taxes are grouped together using Tax Categories in Veloce. Every tax needs to belong to a tax category. Here are some common tax category examples:
Federal Tax
Provincial Tax
State Tax
Liquor Tax
Food Tax
Create Tax Categories
A maximum of 5 Tax Categories can be created in Veloce:
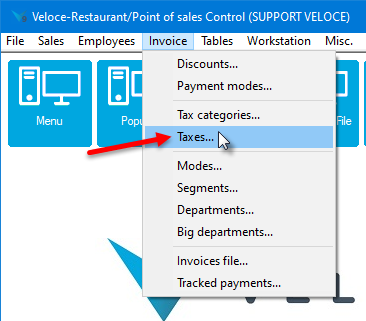
Login to the Veloce Back-Office.
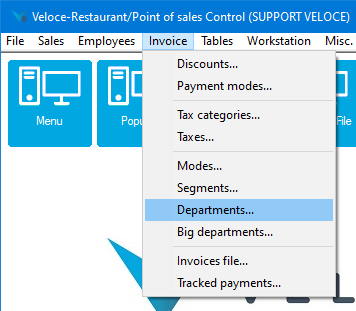
Start the Point of Sale Control module.
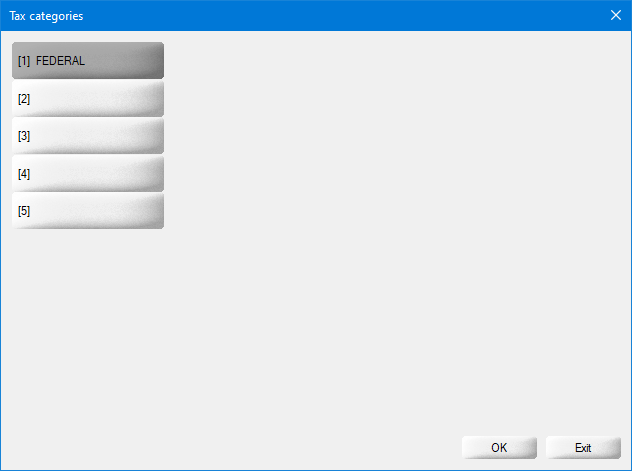
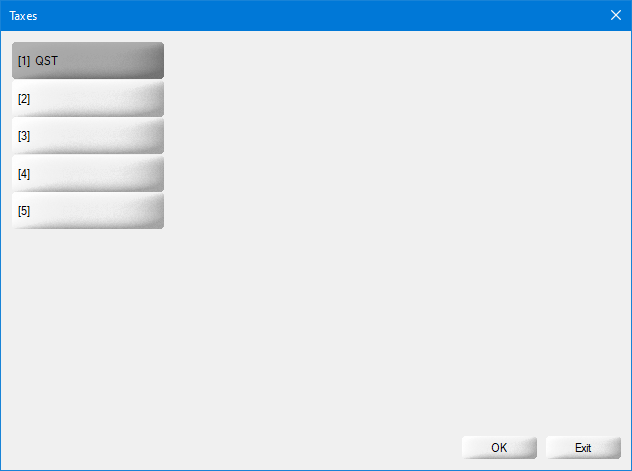
Click on the Invoice menu and select the Tax Categories... option.
The Tax Categories list appears. Click an existing category to modify it or click an empty placeholder to create a new one.
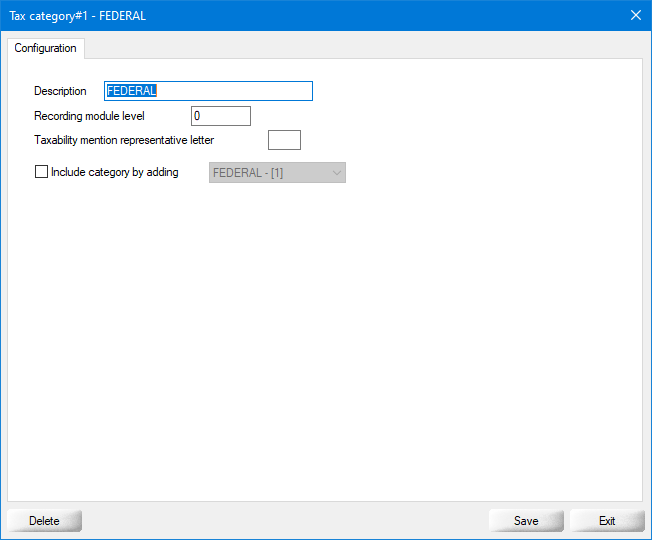
The Tax Category configuration screen appears.
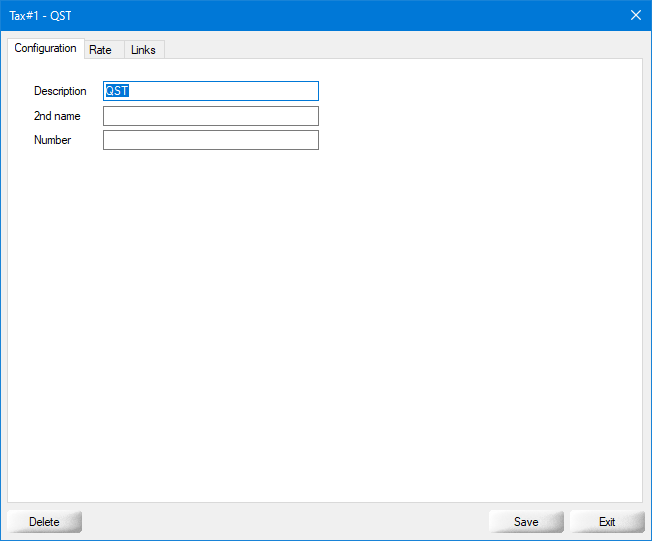
Description
Type a meaningful name for this tax category. It will be displayed in tax reports.
Recording Module Level
This is used with the Québec Sales Recording Module only. Type 1 for Federal Tax and 2 for Provincial Tax.
Taxability mention representative letter
Used for VelPOS only - This is the letter that will appear next to each item that will identify which tax applies.
Include category by adding
You can group two categories together by enabling this option and selecting another tax category from the drop-down list.
Click the Delete button to remove this Tax Category.
Click the Save button to save changes and exit.
Click the Exit button to close this window without saving changes.
Repeat these steps to create required categories.
NOTE: You can create up to 5 Tax Categories in Veloce.
B.C. Soda Tax Overview
Overview
Audience
This article is intended for all Veloce users, resellers and support technicians, doing business or providing technical support for users in the province of British Columbia (BC), Canada.
Requirements
Veloce Version:
Veloce POS 9.64 or later.
Tax Overview
Effective April 1, 2021, soda beverages will no longer qualify for the exemption for food products for human consumption. PST will apply to all retail sales of soda beverages at a rate of 7%.
If you sell soda beverages and are not already registered as a PST collector, you must register to collect and remit PST. Ensure your point of sale systems are updated to charge PST on soda beverages effective April 1, 2021.
What Are Soda Beverages?
Soda beverages are carbonated or effervescent beverages that have bubbles and fizz and contain any of the following:
Sugar
Natural occurring sweeteners
Added natural sweeteners (such as honey, molasses, maple syrup, fruit juice, stevia, etc.)
Artificial sweeteners (such as aspartame, sucralose, saccharin, etc.)
Carbonation or effervescence may be either naturally occurring in drinks (as in the case of fermented non-alcoholic beverages, such as kombucha) or injected after the beverage has been manufactured (e.g. with carbon dioxide or nitrogen).
Examples of Soda Beverages Include:
Soft drinks and soda pop
Sparkling fruit juices
Carbonated or nitrogenized energy drinks
Kombucha
Soda beverages also include:
Frozen sweetened beverages, such as Slurpees or Frosters, that have been carbonated or have other gases added to them, and
Sweetened effervescent beverages that have any of the following added to them:
frozen desserts, such as ice cream (e.g. ice cream floats)
NOTE: The information from this section was taken from Notice 2021-002, issued in February 2021 by British Columbia's Ministry of Finance. The original can be consulted here:
Learn more about British Columbia's Provincial Sales Tax (PST):
Read the Provincial Sales Tax Act:
Example #1: Simple item
This article explains how to create a simple soda item, which is taxable by the British Columbia Provincial Sales Tax (PST). This configuration applies to all items qualifying as "Sodas", but also to any other item and miscellaneous goods taxable by the PST, such as clothing, bottle openers and souvenirs (e.g. souvenir glasses or pens with your company name on them), etc.
Prerequisites:
Configure the British Columbia Provincial Sales Tax (PST) as detailed .
Configure the federal Goods and Services Tax (GST) as detailed .
Create an appropriate item screen as explained .
Configuration
Create Regular sales items for each soda type you sell, like Coke, Pepsi, Sprite, 7-up, Iced tea, Red Bull, Monster, etc. Follow the instructions and information provided in thearticle.
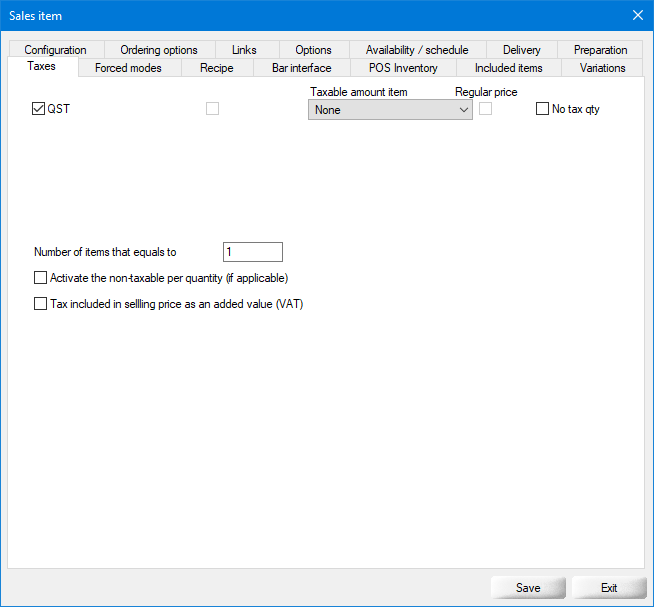
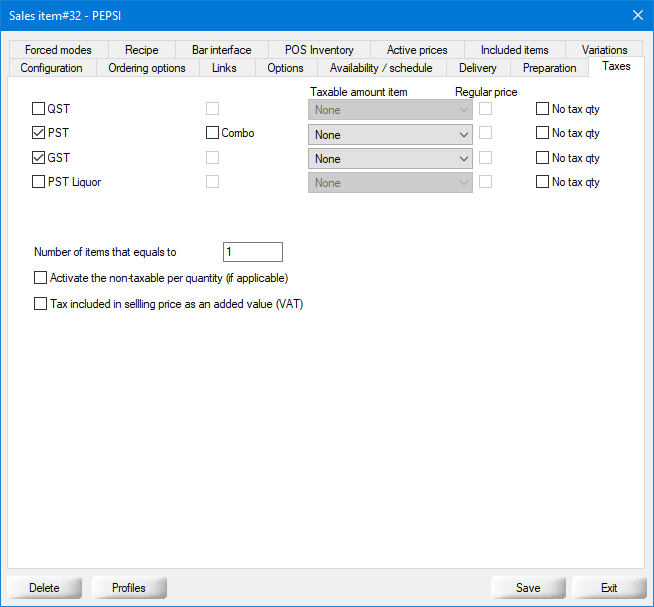
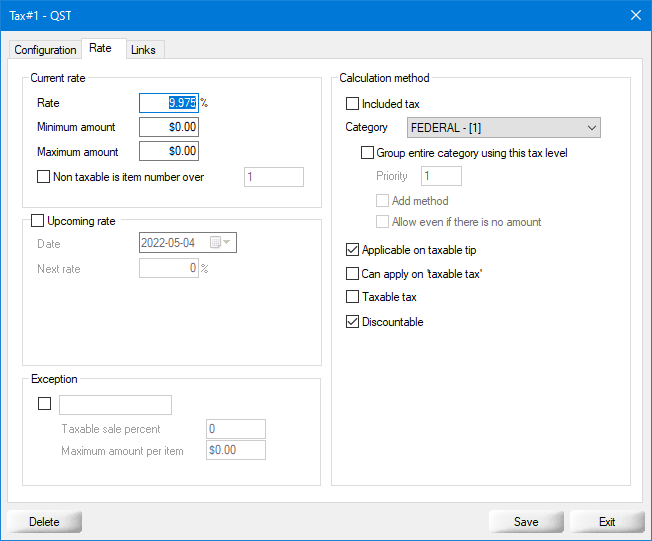
For each taxable item, configure the tax as follows:
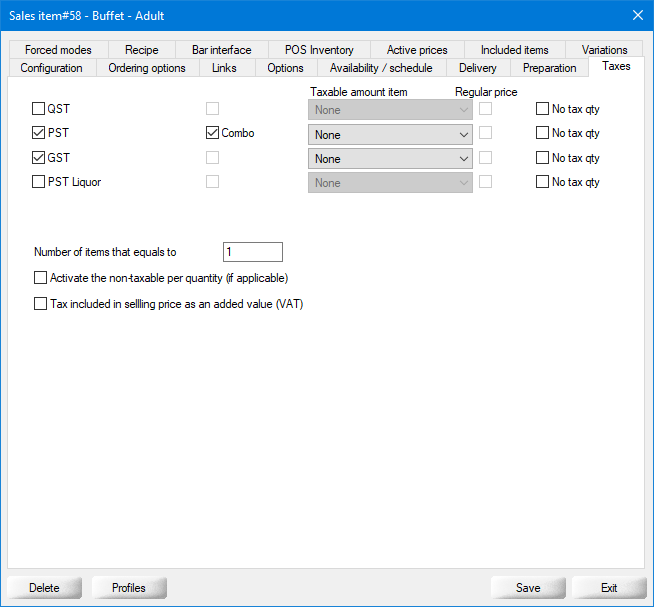
Tax selection
Enable the PST (Provincial sales tax at 7%) and GST (federal Goods and Services Tax at 5%) for all soda items.
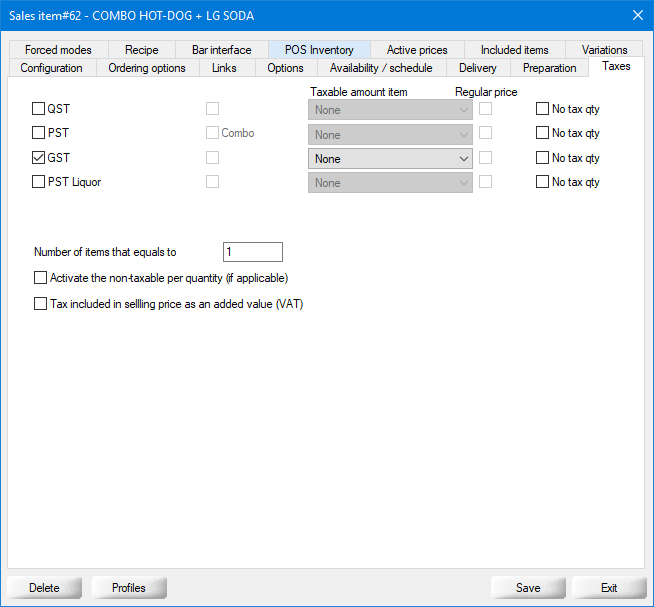
Exception (Combo)
Disable this option on all regular items that are not combos. This checkbox only becomes available when the Exception option is enabled in the tax configuration (POS Control > Invoice > Taxes... > [select a tax] > Rate tab > Exception). The text which appears here (Combo in the screenshot) is determined by the text field in the exception configuration.
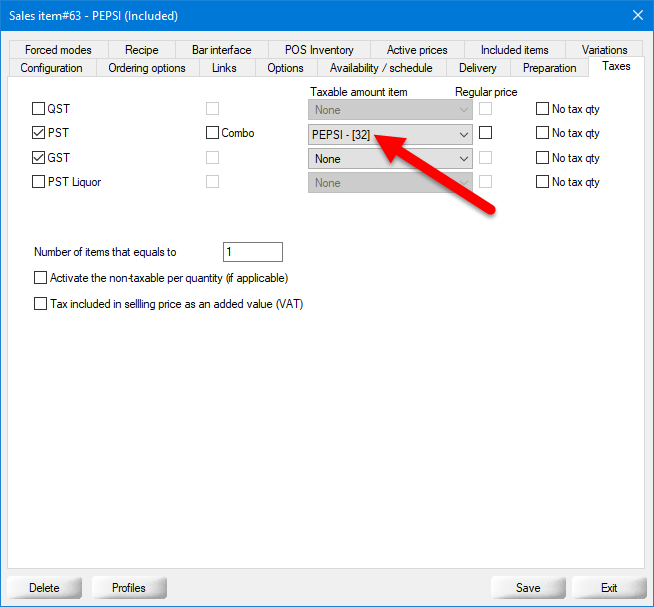
Taxable amount item
Leave this drop-down list to None for all taxes.
Regular price
This checkbox is grayed-out. Leave it disabled for all taxes.
No tax qty
Leave this option disabled for all taxes.
Save this configuration and repeat for all PST-taxable goods.
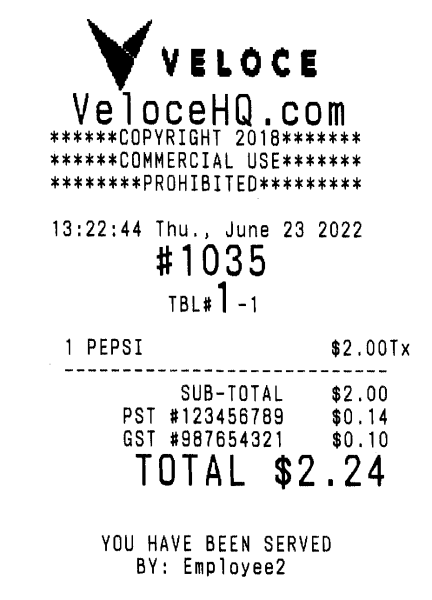
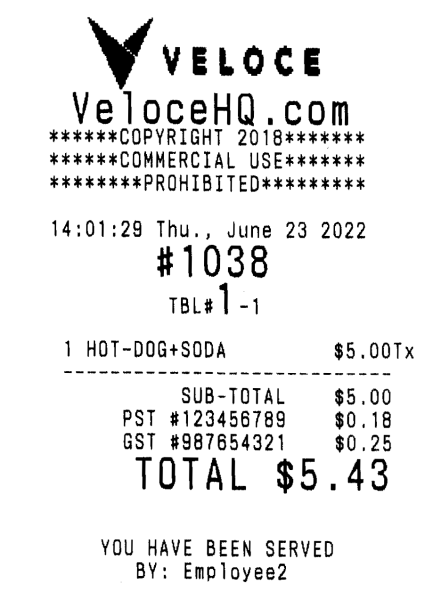
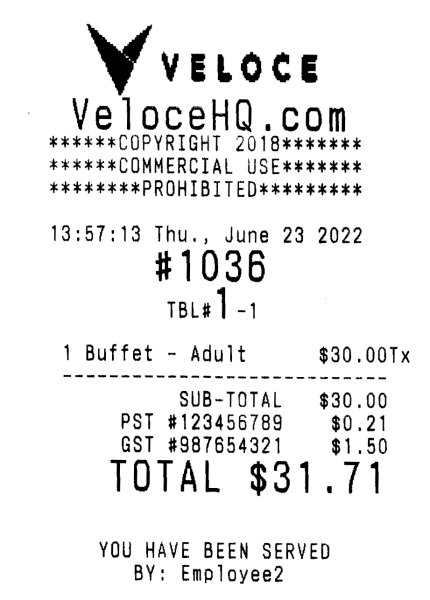
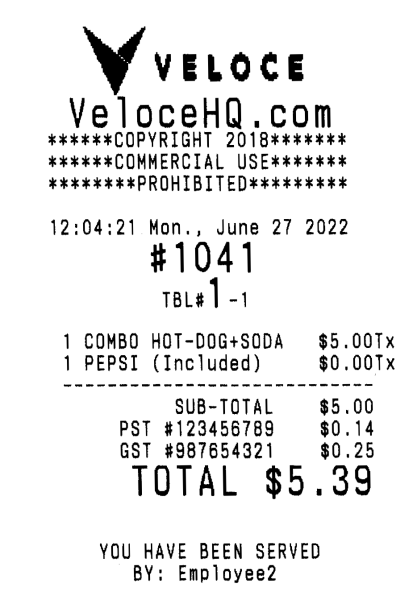
Result on the invoice
In this scenario, the 7% PST will be calculated on the price of the item, just like any other tax:
SUB-TOTAL: $2.00
PST: $0.14 ($2.00 * 0.07 = $0.14)
GST: $0.10 ($2.00 * 0.05 = $0.10)
TOTAL: $2.24
Sales Item Setup - Taxes
This section is where taxes are assigned to the sales item.
Taxes list
All the taxes configured in Point of sales control > Invoice > Taxes... will be displayed here. Select the tax(es) which apply to this item.
Taxable amount item
Use this drop-down list to select another item to determine the price used to calculate the tax. This is useful when you setup an item that is included with a combo at no additional charge, but which needs to be taxed. For instance, you sell a "Table d'Hôte" which includes a glass of wine. The glass of wine does not have its own price when included with the combo, but still needs to be taxed by a liquor tax. In the modifier or included item created for the wine, you would select the regular glass of wine, and the tax will be calculated on the normal price of the glass of wine when the combo is ordered.
Regular price
...
No tax qty
...
Number of items that equals to
...
Activate the non-taxable per quantity (if applicable)
Enable this option to apply the "Non taxable if item number over" rule to this item, as configured in the tax options.
Tax included in selling price as an added value (VAT)
Enable this option to calculate this tax as a Value Added Tax (VAT) where applicable.
Please go through each of the following topics to learn more about all the options contained in each tab of the sales items setup:
Related Topics
Group Configuration
When an existing group is selected or a new group is created in the Groups and Keys screen, its properties open on the Configuration tab.
Group Configuration window
Button - Delete
Click the Delete button to remove this group and all the buttons it contains.
Button - Save
Click the Save button to save changes and exit.
Button - Exit
Click the Exit button to close this window without saving changes.
Description
Type a meaningful name for this group.
Second Name
Type an alternate name for this group. On multi-language setup, this could be the direct translation of the description.
Background color
Select the background color to use. The option By default will use the default color of the selected workstation theme. Other colors can be selected from the drop-down list.
Board
Select this option to create a button grid with a custom number of rows and columns.
Column
Enter the number of columns to use on the POS screen.
Rows
Enter the number of rows to use on the POS screen.
Vertical
Select this option if the POS screen is used in portrait mode instead of landscape.
Selection
Select this option if this group is going to be used as a modifier selection screen allowing only a specific number of choices.
Choices
Enter the number of choices that will be allowed before the POS returns to the previous screen.
Options
Assign to invoice
...
Number of mandatory keys before using any other of this group's keys
...
Links
Corporative communication
...
Button grid
Click on the Buttons tab. This will display a grid of buttons arranged in the number of columns and rows defined in the Configuration screen. This functions as a preview of what the resulting POS screen will look like.
Related Topics
Before Installing Veloce
Prior to installing Veloce, the computer’s hard drive must be properly formatted and partitioned, and a compatible version of Microsoft Windows® needs to be installed. For instruction on formatting and partitioning the hard disk and installing Microsoft Windows®, please refer to Microsoft Windows® documentation or to the documentation provided by your computer's manufacturer.
This manual explains the installation for the Veloce software on the Microsoft Windows 10 operating system with Microsoft Network. Veloce can be installed on any networking system that uses or emulates the TCP/IP communication protocol. Please refer to the appropriate documentation for more information.
Install all available Windows Updates for your operating system
Your operating system needs to be kept up-to-date with all the latest updates. This will ensure that all critical and security-related updates are installed and will help maintain PCI-DSS compliance.
Enable Windows User Account Control (UAC)
Most recent Windows operating systems use a feature called User Account Control or UAC . This feature exists to improve the operating system's security by preventing some types of applications to run without the user's knowledge. Make sure that this feature is activated and set to the default (recommended) level before installing Veloce. Using UAC is required to maintain PCI-DSS compliance and to ensure basic safety of the system.
IMPORTANT! In Windows 10, disabling UAC through registry hacks or Group Policy Objects (GPOs) will cause some operating system features to stop working correctly, in addition to compromize the system's overall security. Also, installing any software in a “non-UAC” environment and re-enabling UAC afterwards WILL cause issues. For instance, automatic End of Day may not work, or you may be unable to start or stop the Veloce Back-Office server from the Server Control module. Other unforeseen and unwanted side effects may also occur.
Enable Windows Smart Screen
Starting with Windows 10, Windows Smart Screen is an integral part of the operating system. This feature is active by default and needs to remain active in order to ensure basic safety of the system and maintain PCI-DSS compliance.
Anti-Virus / Anti-Malware
Install a reputable anti-virus and anti-malware solution on the PC. The Anti-Virus / Anti-Malware solution needs to be fully operational at all times and maintained with the latest updates and virus definitions. It needs to be installed on the main Back-Office PC as well as all POS workstations, Auxiliary Back-Office and Backup Servers. PayFacto does not recommend any brand in particular. However, while Microsoft's Windows Defender solution is free, bundled with Windows and works in most cases, we do recommend using a reputable, independently branded and well reviewed product.
This is a critical component of the Veloce system’s security and a requirement for PCI-DSS compliance.
Firewall
In addition to the perimeter firewall which protects your network, a software firewall needs to be installed on the main Back-Office PC as well as all POS workstations, Auxiliary Back-Office and Backup Servers. The Windows Defender Firewall is adequate for most installations.
This is a critical component of the Veloce system’s security and a requirement for PCI-DSS compliance.
POS Workstations
POS Workstations are generally pre-configured with an appropriate version of Microsoft Windows. Like the Veloce Back-Office Server PC, make sure to:
Install all Windows Updates.
Ensure that UAC is enabled and set to the default level.
Ensure that Windows Smart Screen is enabled.
Install, update and maintain a reputable anti-virus / anti-malware solution.
TCP/IP network
Make sure that the TCP/IP network is properly configured so that the Veloce Back-Office Server PC and all POS workstations can communicate with each other.
IMPORTANT! With Windows 10, Network Discovery and File & Printer sharing are disabled by default. Password Protected Sharing is enabled. These default settings may prevent Veloce from working correctly. See how to correctly configure these settings in this topic:
Payment Modes
Cash Rounding
Many countries have withdrawn low denomination coins over the years. For instance, countries like Australia and Canada have withdrawn their one cent ($0.01) coins in 1992 and 2012 respectively, which means prices for items paid in cash need to be rounded to the nearest multiple of 5 cents ($0.05), which is currently the lowest denomination coin that has legal tender in these countries.
At the same time, most countries where low denomination coins were withdrawn still require non-cash transactions to be calculated to the nearest penny, introducing a dual calculation paradigm where the same item could be sold at different prices depending on whether the item is paid using cash or a payment card.
With Veloce, rounding is configured for each individual payment type. This allows Veloce to conform to any local regulation regarding rounding.
Here is an example of how to configure rounding to the nearest $0.05 increment, which would apply to cash payments in Canada and Australia:
Login to the Veloce Back-Office.
Start the Point of Sale Control module.
Click on the Invoice menu and select the Payment Modes... option.
Select the payment mode that is normally used for Cash.
Make sure that the Rounding check box is ticked and set the rounding value to $0.05.
The drop-down list next to the value is the rounding type. Select Closest to tell Veloce to round up or down to the nearest multiple of $0.05.
Save your changes.
Since non-cash transactions still need to be calculated to the nearest cent ($0.01) in both Canada and Australia, simply make sure that the Rounding checkbox is un-ticked for all payment modes other than cash.
Veloce Back-Office Setup
Introduction and Prerequisites
Introduction
The following articles in this section will allow you to configure the Veloce back-office and the Veloce application for Android such that card payments will be accepted with electronic funds transfer (EFT).
Prerequisites
Android-based payment terminals, such as PAX A920 or A920 Pro, A80, etc.
PayFacto Payment application.
API Key loaded on each wireless payment terminal. (Not required for counter-top terminals)
Wi-Fi coverage for wireless terminals.
Printer configuration
Many PAX terminals are equipped with built-in printers. These printers are mostly meant to print transaction records for card payments. However, these printers can also be used to print guest checks directly.
If you wish to use the built-in printers in this way, you will need to configure a physical printer for each terminal, from the Setup/Utilities module in the Veloce Back-Office.
Here is an example of the required parameters for the physical printer of a PAX A920 android payment terminal:
IMPORTANT! In the Canadian province of Québec, guest checks / invoices need to be routed through a Sales Recording Module (SRM). Therefore, printers built into payment terminals cannot be used to print these documents. They can, however, be used to print card transaction records or credit card vouchers.
Currency Options
Currency options include the monetary symbol to be used, the number of decimals, and applicable rounding options.
Monetary Symbol
To define the monetary symbol (£, $, €, ¥):
Restoring Backups
Some of the steps to restore from an earlier backup are very similar to taking a backup. For the purpose of this walkthrough, we assume that the backup file is being restored on a new system where nothing was previously configured.
STEP 1 - Create a backup folder
Simply create an empty folder anywhere on a local drive on your system. Use a meaningful name for the folder.
For example, C:\VeloceBackup will be used for these instructions.
Example #2: Combo with unlisted soda
This article explains how to create a combo item which contains a soda item, where the taxable soda item is not listed on the menu and not available for sale on its own. Here are a few common examples:
A "hamburger combo" meal which includes a large soda and a choice of sides.
A "pizza special" that comes with a 2-litre bottle of soda.
Sales Item Setup - Links
This section allows the sales item to be linked with other components, such as other item screens and counters.
Links
Button Configuration
Once the group configuration is completed, click on a button on the grid to bring up its configuration options:
Appearance
Groups and Keys
Groups and Keys
Groups are the color menus that the employees use at the POS screen to order sales items. Groups and keys will allow you to configure the color of your keys and their layout on the POS screen. There can be many different groups, for instance, Breakfast menu, Lunch menu, Evening Menu, Bar Menu, etc.
Keys are the actual cells or buttons within groups. Each key can be linked to another menu screen or a sales item. They are the physical buttons that the employees press to interect with the POS.
Departments Setup (POS Control)
Departments Setup (POS Control)
This article explains how to setup departments to trigger tip prompting on payment terminals.
Login to the Veloce Back-Office with a Super-User password.
available Ethernet jack for tethered counter top terminals.
Internet access for all terminals.
Fixed IP address on the Veloce Back-Office PC. (either through Windows network settings or via DHCP assignment)
Electronic Funds Transfer module on the Veloce license.
Printer setup
Login to the Veloce Back-Office.
Veloce Back-Office Icon
Start the Setup / Utilities module.
Setup - Utilities Module Icon
Click the System Config. link. (or use the Configuration > System Configuration menu item)
System Config. Link Icon
Click on the Invoicing tab.
Invoicing Tab
In the Misc. section of the Invoicing tab, locate the Monetary Symbol field. Type in whichever symbol is required.
Monetary Symbol Options
Also select the actual currency from the drop-down list to the right of the currency symbol:
BSD
Bahamian Dollar
CAD
Canadian Dollar
CUC
Cuban Convertible Peso
CUP
Cuban Peso
EUR
Euro
GBP
British Pound
USD
US Dollar
The monetary symbol defined here will appear at the POS, on printed invoices, readings and back-office reports.
Number of decimals
Veloce supports currencies with up to 2 decimal places. To define the number of decimals to use:
Login to the Veloce Back-Office.
Veloce Back-Office Icon
Start the Setup / Utilities module.
Setup - Utilities Module Icon
Click the System Config. link. (or use the Configuration > System Configuration menu item)
System Config. Link Icon
Click on the Invoicing tab.
Invoicing Tab
In the Misc. section of the Invoicing tab, locate the Number of Decimals field. Type any number between 0 and 2. (Japanese Yen and Chinese Yuan has 0 decimals while all North American and European currencies have 2 decimals.
Number of Decimals
IMPORTANT! Currencies requiring 3 or more decimals are not supported. This means that currencies like the Jordan and Tunisian Dinars cannot be used with Veloce.
STEP 2 - Copy files from removable media
Copy the file called VELPOS.ZIP in the folder that was created for that purpose.
Backup Folder - Archive Copied
STEP 3 - Configure the backup location
Login to the Veloce Back-Office.
Veloce Back-Office Icon
Start the Setup / Utilities module.
Setup - Utilities Module Icon
Click the System Config. link. (or use the Configuration > System Configuration menu item)
System Config. Link Icon
Click on the Configuration tab and locate the Complete Copy section.
Configuration Tab - Complete copy
In the Path field, type in the full path to the backup folder you create earlier, which was C:\VeloceBackup in our earlier example.
Complete Copy Options
Click the Save button to commit changes.
Save Button
STEP 4 - Restore the backup
Login to the Veloce Back-Office.
Veloce Back-Office Icon
Start the Setup / Utilities module.
Setup - Utilities Module Icon
Click the Utilities menu and select the Complete System Restore... option.
Utilities Menu
A warning will appear on the screen, explaining that your Veloce system will be unavailable while the restore process takes place. Also, any data that is currently in your Veloce system will be lost and replaced with data from the backup file.
Click Yes to proceed, and a progress bar will appear.
After the restoration process is complete, the Veloce Server will restart itself and the system will be in the exact same state as it was when the backup was originally taken.
Backup Folder
A buffet which includes access to a soda fountain.
The important element to remember for this specific configuration is that in all of these examples, the soda is not listed on the menu and therefore not available for purchase on its own.
Prerequisites:
Configure the British Columbia Provincial Sales Tax (PST) as detailed here.
Configure the federal Goods and Services Tax (GST) as detailed here.
Create an appropriate item screen as explained here.
Create Regular sales items for each type of combo. Follow the instructions and information provided in the Create Sales Items article.
For each combo item, configure the tax as follows:
Buffet with included soda - Tax configuration
Tax selection
Enable the PST (Provincial sales tax at 7%) and GST (federal Goods and Services Tax at 5%) for all combo items.
Exception (Combo)
Enable this option for the PST tax only, on all regular items that are combos, but only if they include a soda item which cannot be purchased on its own. This checkbox only becomes available when the Exception option is enabled in the tax configuration (POS Control > Invoice > Taxes... > [select a tax] > Rate tab > Exception). The text which appears here (Combo in the screenshot) is determined by the text field in the exception configuration.
Taxable amount item
Leave this drop-down list to None for all taxes.
Regular price
This checkbox is grayed-out. Leave it disabled for all taxes.
No tax qty
Leave this option disabled for all taxes.
Save this configuration and repeat for all combo items that include a soda item which cannot be purchased on its own.
NOTE: If the customer can replace the soda with a non-taxable beverage such as bottled water, you need to create a separate combo item and disable the PST for that item.
Result on the invoice
In this scenario, the 7% PST will be calculated on the lesser of:
50% of the total purchase price of the food or other good and beverage together, and;
$3
Item price $6.00 or more
If the item price is $6.00 or more, the "$3 rule" applies, and the PST is calculated on $3.00 as shown in the example below:
Buffet with included soda - Invoice > $6.00
SUB-TOTAL: $30.00
PST: $0.21 ($3.00 * 0.07 = $0.21)
GST: $1.50 ($30.00 * 0.05 = $1.50)
TOTAL: $31.71
Item price less than $6.00
If the item price is $5.99 or less, the "50% rule" applies, and the PST is calculated on 50% of the item's selling price as shown in the example below:
Combo with included soda - Invoice < $6.00
SUB-TOTAL: $5.00
PST: $0.18 (($5.00 / 2) * 0.07 = 0.175 = $0.18)
GST: $0.25 ($5.00 * 0.05 = $0.25)
TOTAL: $5.43
IMPORTANT! There is a known issue in Veloce which causes the "50% rule" not to apply if the price of the item is brought down below $6.00 through the application of a discount. For instance, if the item is priced at $10.00 and a 50% discount is applied, bringing the price down to $5.00, the tax will still be calculated on $3.00 instead of $2.50.
Select the order status for this item. Available options are Appetizer, Main course and Dessert. This will update the table status at the POS.
Next Screen
(Optional) Select the item screen that should automatically open once this item has been ordered.
Count down
(Optional) Select the Count down to be used for this item. Count downs are configured in Point of sales control > Sales > Count downs...
Service
(Optional) Select the Service to use when this item is ordred. Service are configured in Point of sales control > Sales > Services...
PLU Code / PLU Code#2
(Optional) Enter the Price Look Up (PLU) code for this item. This allows bar code scanners can be used to order items.
Compiling Group
...
Picture
This option allows the POS to display images of the items being ordered. To use this feature, copy your image files to C:\Veloce\WSDATA\WIN\ICONS\. Then, enter the name of the image file, without the file extension. For example, if the image is called "Steak.png", simply enter "Steak". This feature supports .png, .jpg and .bmp image formats.
Number of meal
Enter the number of meals that this item is worth, for reporting purposes. For instance, a small fries may be worth 0 meals, a steak may be worth one meal and a single jumbo pizza may be worth 4 meals.
Use serial numbers
Sales items may be linked to a serial number database. When this item is sold, the serial number will be requested. This allows sold or unsold items to be tracked by serial number.
Automatic attribution
Use this option to assign a serial number to this item during the sale process.
Creation not allowed
...
Serial number creation for item
...
Remark
...
Client Account
...
Conversions
...
External Invoicing
...
Corporate Communications
...
Report by PLU
...
Please go through each of the following topics to learn more about all the options contained in each tab of the sales items setup:
By default, the text on any button will be determined by the button's function. For instance, if the button calls an item screen, the item screen's description will be displayed on the button. You can override this by enabling the checkbox next to the Description field and typing a different description here.
2nd name
This option will become available if the description checkbox is enabled. Use the 2nd name field to override the alternate description of the element called by this button.
Style
From the drop-down list, select the visual style of the button
Selected
...
Text color
Select the desired text color from the drop-down list.
Color
Select the desired button color from the drop-down list. selecting the Custom option will give access to the R, G, B fields, which allows you to create your own colors by entering RGB values from 0 to 255 in each field.
Use an icon
Enable this option to add an icon to the button, then type the image file name in the text field, without the file extension. For instance, if the name of the image is "Steak.png", simply type "Steak". Icons are stored in C:\VELOCE\WSDATA\WIN\ICONS\. This feature supports .png, .jpg and .bmp image types.
Width extension
Buttons can be extended horizontally up to the maximum number of columns configured for the group. For example, if you enter 2 in this field, the button would become 2 columns wide.
Height
Buttons can be extended vertically up to the maximum number of rows configured for the group. For example, if you enter 2 in this field, the button would become 2 rows high.
Icon position
Select the icon's position on the button.
Opaque
Enable this option so that the icon will hide everything beneath it.
Font size
By default the font size will automatically adapt to the available space on the button. You can override this by enabling this option and setting a custom font size for the text displayed on the button.
Options
Available
Enable this option to make the key visible on the POS screen. Disable this option to hide this key.
Click on the Invoice menu and select the Departments... option.
Invoice menu
The list of departments will appear. Select the departments that will be used by the workstation and payment terminal.
Departments list
The department configuration screen appears. Configure according to the merchant's needs and preferences:
Department configuration screen
Description
Type a meaningful description for this department.
Big department
From the drop-down list, select the big department to which this department belongs.
Client tip entry
Question
The text entered here will be displayed at the very top of the payment terminal's screen during the tipping process.
2nd
If you have a second language profile, type the translation of the Question text.
Tip suggestions
The 3 lines with checkboxes can be used to display tip percentage suggestion presets to the customer. Activate only the lines you need, or none at all if you do not wish to use tip suggestions.
%
Type the suggested percentage, from 1 to 99. Note that the percentage will be calculated on the total sale amount, including taxes.
Description
This field is optional. You can type some text that will be displayed next to each percentage on the payment terminal.
2nd
If you have a second language profile, type the translation of the Description text.
Open amount
Enable this option to allow customers to enter a custom tip amount of they do not wish tu use the suggested percentage presets.
No amount
Enable this option to allow customers to exit the tipping screen without entering an amount.
Ask for donations
...
On the terminal
...
Click the Save button to save changes and return to the department list.
Click Exit on the department list to return to the Point of sale control module.
If the merchant has other departments tied to payment terminals, repeat these steps for other departments.
Different users may need to access the Veloce Back-Office for various reasons or to accomplish different tasks, such as:
Taking reports
Creating sales items or updating prices
Updating the menu
Performing maintenance, such as taking backups or do a manual End-of-Day
etc...
Users can be created with specific tasks in mind, so it is possible to limit what certain users can do to keep information secure and avoid users accidentally making unwanted changes to the Veloce menu.
To create a back-Office user:
Logon to the Veloce Back-Office with whichever user you already have. For a new Veloce installation that has no users, simply click OK on the login screen, without entering any password.
From the Main Back-Office screen, click the Tools menu and select the Users... option.
The list of users will be displayed.
Edit an existing user by clicking on its username, or click on an empty placeholder to create a new user.
Change the user's settings and click the Save button to commit changes.
Available user settings are detailed below:
Configuration Tab
The Configuration tab contains basic user account settings.
Name
Type the User Name for this Back-Office user.
Password
Back-office users are recognized by their passwords. Therefore, if you wish to use more than one user for the Back-Office, each user needs to have a different password. There are currently no restrictions on the structure of passwords in Veloce, but it is always recommended to stick with the following rules:
8 or more characters in length.
Use a mix of lower case and capital letters.
Include at least one number.
Include at least one special character, such as !/$%?&*()@#=+-_.
Security level
The security level relates to the Back-Office reports that this user will be able to run. Level 0 is the highest level, meaning that a user with access level of 0 will be able to run all reports with an access level value of 0 or above, which essentially means any and all reports. A user with an access level of "1" would be able to access all reports of level 1 or above, but would not be able to access level 0 reports, and so on.
Disabled User
Tick this checkbox to disable this user and prevent access to the back-office without deleting the account.
NOTE: When creating a new user from an empty placeholder, this checkbox is ticked by default. Be sure to un-check it if you want that user to be able to login.
Language
Available options: Choice, English, French (Depends on languages configured in Setup / Utilities > System Config. > Configuration)
Select the language of the Back-Office user interface for this user. Selecting the Choice option will present this user with all choices of available languages at every login.
User Access Tab
Veloce allows for user access to be customized to restrict access to certain functionalities to users. For instance, a user could be configured so that only access to reports is allowed.
As a general rule, users should be given access to functionalities based on business needs or "need to know". For example, managers or pay masters may need access to employee files, but regular employees should not.
By default on all new users, everything is enabled, as indicated by the green checkmarks.
At the root of the user access tree (shown above), you can remove access to entire modules by simply clicking on the corresponding checkbox. Doing so will replace the green checkmark with a red "X".
You can also drill-down each module by clicking the [+] sign next to each module name. you will notice that the elements under each module corresponds to the menus found in each module, and under that, you will find all the options from within these menus. This allows you to grant or revoke access to entire menus or specific elements within the menus.
When you're done, be sure to click the Save button at the bottom-right of the screen. This will close this user's profile and bring you back to the Back-Office user's list.
IMPORTANT! Be sure to keep at least one Back-Office user with access to everything. Otherwise, you could actually lock yourself out of important Veloce Back-Office features. You would then need to place a service call in order to resolve the issue and get your system unlocked.
Configure Languages
Supported Languages
Veloce supports two languages for its Back-Office User Interface and POS:
English (Canada)
French (Canada)
However, all elements which have free text descriptions also have a second name field which can be used as a third language at the POS. For instance, you could have the main POS interface in English, but have all item screens, items, divisions, etc, appear in Spanish for employees using the POS, while having the final invoice still print in English or French.
To configure languages in Veloce:
Login to the Veloce Back-Office.
Open the Setup/Utilities module
Click the System Config. link. (or use the Configuration > System Configuration... menu option)
Click on the Configuration tab. The language options are located at the bottom of that page.
By default, only English is configured, which also makes it the default (main) language.
Checkbox
Enable the language profile(s) that will be available throughout your system by ticking the corresponding checkbox to the left. At least one profile needs to be enabled.
Description
Type in the description you wish to use for this language. This description is used on the language selection screen at logon and when creating back-office users or POS employee files. For instance, you could decide to name the third profile "Español", which would show up in these various drop-down lists afterwards.
Veloce
Select the Veloce built-in language to use. Only French or English are available. This selection applies to the Veloce Back-Office user interface and the default POS user interface.
Group/Items
Select whether Veloce should display the default Description or the Second Name of groups and items when the corresponding language is active. Note that this only affects the point of sale and printed invoices. The back-office itself is not affected by this selection.
NOTE: The Second Name is actually an alternate description that can be given to any item, groups, divisions, big divisions, etc. By typing these alternate descriptions in a third language, you can effectively create a system that will partially work in that third language, although the main user interface will always remain in English or French.
Main
Select which language will be used by default throughout the system. For instance, if English is set as the main language, the point of sale's interface will be displayed in English by default, until an employee with a different language profile logs on. For the back-office, it means that the login screen would always be in English, although a user with a French language profile could still logon and use the Back-Office in French.
Additionally, this setting will determine whether your sales items will print on the guest check using the main description or the second name.
Language profiles for Back-Office users and POS Employees
The topics of Back-Office users and POS Employees will be covered more in depth later. However, it makes sense to touch on it right now, in order to make more sense of the Veloce language settings and the impact it will have on programming items later.
Back-Office Users
To select the default language of a Back-Office user:
Logon to the Veloce Main Back-Office.
Click on the Tools menu and select the Users... option.
Select a user from the list by simply clicking on it.
On the Configuration tab, you will see a Language drop-down list. Select the desired language from that list, or use the Choice option.
NOTE: Selecting a specific language will force that user to use the selected language. Using the Choice option will present the user with a list of available languages at every logon.
POS Employees
To select the default language of a POS employee:
Logon to the Veloce Main Back-Office.
Start the Point of Sale Control module by clicking the corresponding icon.
Click the Employees menu and select the Personal Files... option.
Select an employee file from the list by clicking on it.
On the Configuration tab, you will see a Language drop-down list. Select the desired language from that list and click the Save button.
Add a third language profile in Veloce
While Veloce provides full support for English and French only, it is possible to configure sales items, divisions, big divisions, screens, etc, with an alternate language. For instance, you could have second names in Spanish and have employees see that at the POS, while printing checks in English. here are detailed instructions for doing just that:
STEP 1 - Configure language profiles in Veloce:
Login to the Veloce Back-Office.
Open the Setup/Utilities module.
Click the System Config. link. (or use the Configuration > System Configuration... menu option)
Click on the Configuration tab.
Enable the third language profile by ticking the checkbox to the left.
Type a Description for this language profile. To setup Spanish, this should be named Español.
In the Veloce column, select English, so that all elements that cannot be translated to Spanish will be displayed in English (and not in French).
In the Group/Items column, select the Second Name option. this will cause employees using this language profile to see the second name when these elements are used at the POS.
Main
If you want your employees to see Spanish descriptions on the POS interface but the items printed on guest checks need to be in English, set the Main radio button to English.
If you want your employees to see Spanish descriptions on the POS interface and you also want items to be printed in Spanish on the guest check, set the Main radio button to Español.
STEP 2 - Back-Office Users
Select the most appropriate language profile for each back-Office user. Remember that it's really the setting in the "Veloce" drop-down box of each profile that will determine the language of the Back-office user interface. Any third-language option has no effect on the Back-Office whatsoever.
Login to the Veloce Main Back-Office.
From the Main Back-Office Window, click the Tools menu and select the Users... option.
Select a user account from the list.
In the Configuration tab, set the Language drop-down list to the desired language profile.
STEP 3 - POS Employees
Logon to the Veloce Main Back-Office.
Start the Point of Sale Control module by clicking the corresponding icon.
Click the Employees menu and select the Personal Files... option.
Select an employee file from the list by clicking on it.
On the Configuration tab, you will see a Language drop-down list. Select the Español option .
STEP 4 - Add Second Names
Most of the elements that have a free text description also have a free text "Second Name". These include but are not limited to:
Sales Items
Divisions
Big Divisions
Item Screens
STEP 5 - Test at the POS
Check out the results at the POS:
Logon with an English profile employee:
Logon with a Spanish profile employee:
Taking Backups
Taking backups at regular intervals is the best way to protect your Véloce system against data loss.
Veloce Cloud Backups
Veloce offers automated cloud backups, where a complete backup of the Veloce configuration and sales data is taken every day. While this solutions provides worry-free and hands-free backups for end-users, it may not cover all the needs of support technicians, professional services and Veloce distributors.
Manual Backups
You can take manual backups anytime, at various stages of the programming process. These backups can then be used as models to speed up the configuration process for other restaurants in the same chain or other restaurants with similar business models. They can also be used to present different programming options to customers.
Taking Backups
STEP 1 - Create a backup folder
Simply create an empty folder anywhere on a local drive on your system. Use a meaningful name for the folder.
For example, C:\VeloceBackup will be used for these instructions.
STEP 2 - Configure the backup location
Login to the Veloce Back-Office.
Start the Setup / Utilities module.
Click the System Config. link. (or use the Configuration > System Configuration menu item)
Click on the Configuration tab and locate the Complete Copy section.
In the Path field, type in the full path to the backup folder you create earlier, which was C:\VeloceBackup in our earlier example.
Click the Save button to commit changes.
Multiple disk
This is a remnant of a former era where backups that were considered "large" for the time could be fractioned among multiple high-density 1.44MB floppy disks. Use this option only if you have a floppy disk drive and consider using 1.44MB floppies as backups.
Format
This option becomes available if Multiple Disk is also selected. It tells Veloce to format your 1.44MB floppy before writing data to it, overwriting any previous data found on that disk.
STEP 3 - Take the backup
Login to the Veloce Back-Office.
Start the Setup / Utilities module.
Click the Utilities menu and select the Complete System Backup... option.
A warning will appear on the screen, explaining that your Veloce system will be unavailable while the backup process takes place.
Click Yes to proceed, and a progress bar will appear.
When the process finishes, you will have a file called VELPOS.ZIP in the folder selected for backups.
STEP 4 - Copy the backup files to removable media or storage service
A backup file stored on the same drive as your Veloce system is completely useless if that drive fails. Therefore, the backup file needs to be copied elsewhere. Removable drives that can be stored in a safe place or cloud backup services are suitable for this purpose.
It is strongly suggested to create a folder structure with the restaurant name and backup dates to store files. This will avoid accidentally overwriting other backups.
B.C. Soda Tax Examples
Examples of PST application on sodas
This article will cover some common scenarios that can be encountered when the PST is applied to soda beverages in British Columbia, and a brief overview of the required configuration.
British Columbia "Soda Tax" recap
Here is a quick recap of British Columbia's Provincial Sales Tax (PST) rules which applies to soda beverages. For complete and up-to-date documentation regarding taxes, please consult the official British Columbia government site at .
PST applies to all retail sales of soda beverages at a rate of 7%.
If you offer the beverage for sale without the food or other good, you charge PST on the lesser of:
the ordinary purchase price of that beverage, and;
Or
If you offer the beverage for sale only with the food or other good, the lesser of:
50% of the total purchase price of the food or other good and beverage together, and;
$3
Also, don't forget that almost all items sold in restaurants, including soft drinks, are also taxable by the federal Goods and Services Tax (GST) at a rate of 5%
IMPORTANT! While the new regulations are often referred to as "B.C. Soda Tax", it is important to understand that the government of British Columbia did not create a new tax specifically for sodas. Instead, the updated law simply extends the reach of the existing Provincial Sales Tax to soda beverages.
For your POS system, this means that you should not have a separate tax for sodas. You should use the PST at a rate of 7%.
Example #1
You offer an all-you-can-eat buffet with access to a soda fountain for $30.00. Access to the soda fountain is not sold separately and it is not listed on the menu, therefore it does not have its own price. The $3.00 / 50% rule applies: Since $3.00 is lesser than 50% of $30.00 ($15.00), the PST will be calculated on $3.00.
Configuration for Example #1
Configure a regular item called "Buffet - Adult" with a price of $30.00.
Assign the GST and PST as taxes for this item, and enable the exception option on the PST.
Example #2
You offer an all-you-can-eat buffet for $28.00. You offer access to a soda fountain for an additional $2.00, or the customer can use the water fountain, which is free. Because access to the soda fountain is listed separately on the menu, the PST is calculated on the sale price of $2.00 for this item.
Configuration for Example #2
Configure a Regular item called "Buffet - Adult" with a price of $28.00. Assign only the GST tax on this item.
Configure a Regular item called "Soda Fountain" with a price of $2.00. Assign both the GST and PST on this item.
Configure a Regular or Included item called "Water" with a price of $0.00. Don't assign any tax on this item (since it's free).
Example #3
You sell a hot-dog and large soda combo for $5.00. The soda is not listed on the menu and not sold on its own. The $3.00 / 50% rule applies: Because 50% of $5.00 ($2.50) is lesser than $3.00, the BC Soda Tax will be calculated on $2.50.
Configuration for Example #3
Configure a Regular item called "Hot-Dog + Soda Combo" with a price of $5.00.
Assign both the GST and PST on this item, and enable the exception option on the PST.
Configure a Modifier or Included item called "Soda - Included". Set the item's price to $0.00 and make this item part of a Soda/Soft Drink item screen.
Example #4
You sell a hot-dog and large soda combo for $5.00. The Hot-Dog on its own is $3.25 and the drink on its own is $2.25, which are both listed on the menu. In this instance, the BC Soda Tax will be calculated on the ordinary sale price of the soda, which is $2.25.
Configuration for Example #4
Configure all your soft drinks as Regular items, in a "Soft Drinks" item screen. Give them a price of $2.25 each. Assign both the GST and PST on these items.
Configure a Regular item called "Hot-Dog + Soda Combo" with a price of $5.00. Assign only the GST tax on this item.
Configure an Included Item called "Large Soda Included" with a price on $0.00. Assign both the GST and PST on this item.
Example #5
You sell a hot-dog and large soda combo for $5.00. The Hot-Dog on its own is $3.25 and the drink is $2.25, which are both listed on the menu. You have a special promotion which gives 75% off hot-dog combos that day, which brings the total price of the combo down to $1.25. In this instance, the PST will be calculated on the total price of the combo, which is now $1.25.
Configuration for Example #5
Use the same configuration as Example #4.
Create a 75% Off promotion which will apply on the Hot-Dog combo.
Example #3: Combo with listed soda
This article explains how to create a combo item which contains a soda item, where the taxable soda item is listed on the menu and available for sale on its own.
Prerequisites:
Configure the British Columbia Provincial Sales Tax (PST) as detailed here.
Configure the federal Goods and Services Tax (GST) as detailed .
Configure all your taxable soda items as described in .
Create an item screen that will contain "Included Item" versions of all your sodas. Give an appropriate name to this item screen, such as "Included beverages" for example. You may refer to the article to learn more about item screens.
Create an "Included Item" version of each of your sodas, with a price of $0.00. Follow the instructions and information provided in the article for more details.
Description
Type a meaningful description. It is also recommended to add a descriptor such as "(included)" to differentiate this item from its regular counterpart.
Type
Set the item's type to Included item.
Regular price
Set the item's price to $0.00, since this item will be included with the purchase of a combo.
For each included item, configure the taxes as follows:
Tax selection
Enable the PST (Provincial sales tax at 7%) and GST (federal Goods and Services Tax at 5%) for all soda Included items.
Exception (Combo)
Disable this option on all Included items. This checkbox only becomes available when the Exception option is enabled in the tax configuration (POS Control > Invoice > Taxes... > [select a tax] > Rate tab > Exception). The text which appears here (Combo in the screenshot) is determined by the text field in the exception configuration.
Taxable amount item
On the PST line, select the regular item that will be used to determine the price to use for the purpose of tax calculation. For example, if you are creating the "PEPSI (included)" item, select the "PEPSI" regular item. This will cause Veloce to use the ordinary selling price of the Pepsi ($2.00) to calculate the PST.
Regular price
This checkbox will become available once you select an item from the drop-down list. Leave it disabled for all taxes.
No tax qty
Leave this option disabled for all taxes.
Create Regular sales items for each type of combo. Follow the instructions and information provided in the article for more details.
For each combo item, go to the Ordering options tab and make sure to use Forced Remarks to call up the Included Beverages Item Screen:
For each combo item, configure the tax as follows:
Tax selection
Enable the GST (federal Goods and Services Tax at 5%) only.
Exception (Combo)
This option is grayed out and shall therefore remain disabled for all taxes.
Taxable amount item
Select None on each line.
Regular price
This option is grayed out and shall therefore remain disabled for all taxes.
No tax qty
Leave this option disabled for all taxes.
Save this configuration and repeat for all combo items.
Process at the POS
The employee logs on to the POS.
Employee orders a $5.00 combo item.
The list of included beverages automatically appears, as the combo calls the beverages item screen through a forced remark.
The employee selects a taxable beverage.
Result on the invoice
With this configuration, the PST is calculated on the ordinary selling price of the included taxable beverage, while the GST is calculated on the price of the combo:
SUB-TOTAL: $5.00
PST: $0.14 ($2.00 * 0.07 = $0.14)
GST: $0.25 ($5.00 * 0.05 = $0.25)
TOTAL: $5.39
hint
IMPORTANT! There is a known issue with Veloce which causes taxes to be calculated incorrectly if the price of the combo falls below the price of the soda item on its own. For instance, if you were to apply a 75% discount on a $5.00 combo, the price would fall to $1.25, which is lower than the price of the soda on its own. The same issue occurs if you create a combo with a base price lower than the price of the soda.
According to the BC tax law, if you offer the beverage for sale without the food or other good, you charge PST on the lesser of:
Divisions - Configuration
Definition
Divisions are sub-categories of Big Divisions and are are also used for reporting purposes. Divisions must be created before sales items can be created.
Examples :
Starters
Soups
Salads
Pasta
NOTE: Since Division are sub-categories within Big Divisions, these are more precise and numerous. It is common to see menus with 50 divisions or more. Up to 100 divisions can be created in Veloce.
How to create divisions
Login to the Veloce Back-Office.
Start the Point of Sale Control module.
Click on the Divisions shortcut. You can also use the Sales menu and select the Divisions... option.
The list of Divisions appears. Click on an existing Division to modify it, or click on an empty space to create a new one.
Use the << Previous and Next >> buttons to navigate between screens. 100 Division placeholders are available.
Click OK to modify the selected Division.
Click Exit to close the Divisions list.
Alphabetic Sort
By default, the list of Divisions is sorted by the numerical value of each division. Use the checkbox to sort the list alphabetically instead.
Configure the Division's parameters:
Description
Description
Type a meaningful description for this Division
2nd Name
Type a secondary description for this Division. This is generally used as an alternate description in a different language for multi-language setups.
Big Division
From the drop-down list, select the Big Division to which this Division belongs.
Options
Available
Enable this option to make this division available for sales. If left un-checked, all items from this division will be unavailable at the POS
Mandatory client
If enabled, a client account will need to be assigned to the transaction if an item of the division is on the invoice.
Mandatory division
If enabled, at least one (1) item of the division will have to be added on the invoice to complete it.
Count for SmartCard (points)
Used for the fidelity accumulation system.
Block sales under cost price
Prevent the sale below the cost price for all items in this division.
Minimum sale price
Set the minimum sale price for the items within this division.
Minimum age
Age of the customer will have to be confirmed (i.e.: Alcohol sales).
Persisting (stay there)
The list of division items will remain displayed even after ordering a first item instead of going back to the original menu page.
Special end of day export
Items from the division will be included in the special end of day export. (Used with third-party integration, i.e WISK)
Exclude from external number generator
Exclude the items to get an external number generated automatically
Hold and fire delay (sec)
The delay before the items are sent to the order printers, in seconds.
Taxes per Division
It is possible to assign taxes for each division. To do so, click on the Taxes tab and select the appropriate tax(es) which will apply to all items within this division.
Click the Delete button to remove this Division.
Click the Save button to save changes and exit.
Click the Exit button to close this window without saving changes.
Divisions
Definition
Divisions are sub-categories of Big Divisions and are are also used for reporting purposes. Divisions must be created before sales items can be created.
Examples :
Starters
Soups
Salads
NOTE: Since Division are sub-categories within Big Divisions, these are more precise and numerous. It is common to see menus with 50 divisions or more. Up to 100 divisions can be created in Veloce.
Sales Items
Item Screens
Item screens are containers for your Sales Items. They are the basis of how Sales Items will be structured at the POS.
Very often, the item screen's descriptions will be similar to divisions that were created earlier. However, they are not to be confused as their function is not the same. The general idea is to use item screens to group sales items by theme.
Examples :
Starters
Soups
Salads
Burgers
Sandwiches
Choice of sauce
Choice of cook type
Choice of sides
How to create item screens
Login to the Veloce Back-Office.
Start the Point of Sale Control module.
Click on the Menu shortcut. (You can also use the Sales menu and select the Sales Items... option.)
The list of Item Screens appears.
Click on an existing Item Screen to add sales items to it.
Click on an empty placeholder to create a new Item Screen.
Use the << Previous and Next >> buttons to navigate between screens. 100 Item Screens placeholders are available.
Click Search... to bring up a searchable list of all sales items within all Item Screens.
While the Modify button is red, clicking an existing Item Screen will open it up and allow you to add sales items to it.
Clicking the red Modify button will change its color to green. While the Modify button is green, clicking an existing Item Screen will allow you to change its properties, like its description and various other options.
Click OK to modify the selected Item Screen.
Click Exit to close the Item Screens list.
Click an empty placeholder to create a new Item Screen:
Configuration Tab
Description
Type the description of the Item Screen as it will be displayed on the POS screen.
Second Name
Type an alternate description for multi-language setups.
Non-apparent characters
...
Shift Reference
...
Options
Persisting (stay there)
Enable this option to override the Return to Group functionality, setup in employee function. With this option enabled, the screen will remain visible after ordering an item, even if the Return to Group option is enabled in the employee function. With this option disabled, the screen would disappear immediately after ordering an item from it.
Restricted Access
Enable this option to restrict access to this screen to managers.
Alphabetic Sort
Enable this option to sort the sales items alphabetically on this screen. If this option is disabled, sales items will be sorted by item number.
Linked to next screen
Enable this option to combine this item screen with the next one in the Item Screen list, doubling the screen's capacity from 40 to 80 items.
Links Tab
Conversions
Corporate Communications
...
'Fixed' local setup
...
Per Sector
...
Click the Delete button to remove this Item Screen and all the items it contains.
Click the Save button to save changes and exit.
Click the Exit button to close this window without saving changes.
Create as many Items Screens as required for your menu.
Create Sales Items
Sales Items
Sales items are the "Base units" of the Veloce system. Each item listed on the menu, each side dish, remarks or modifiers needs to have a corresponding sales item in Veloce.
Before you begin
Before creating Sales Items in Veloce, other elements need to be put in place:
(Optional)
(Optional)
The following instructions show how to create a basic sales item. Some of the available options will be discussed in more advanced topics.
Login to the Veloce Back-Office.
Start the Point of Sale Control module.
Click on the Menu shortcut. (You can also use the Sales menu and select the Sales Items... option.)
The list of Item Screens appears. Click on the Item Screen to which an item will be added. For instance, to add a new item in the SALADS Item Screen, click on the SALADS button.
The list of items appears. To add a new item, click an empty placeholder.
The blank Sales Item properties open on the Configuration tab:
Please go through each of the following topics to learn more about all the options contained in each tab of the sales items setup:
Related Topics
Sales Item Setup - Ordering Options
The options in this section will determine the behaviour of the POS system when this item is ordered.
Item Setup - Ordering Options
Forced Remarks
Forced remarks are used to assign an item screen to force the selection of an included item, such as a choice of sides, choice of a salad dressing or the cooking temperature for a steak.
Remark#1 - Remark#5
Click on the drop-down list to select the item screen to be used for each forced remark. To disable a forced remark, select Nul from the list. Up to 5 forced remarks can be assigned per item. Only one choice can be selected for each forced remark.
Mod
Leaving this option unchecked will make the choice mandatory. For instance, when ordering a steak, selecting a cooking temprature should be mandatory. Therefore, the Mod option would be left disabled. Enabling the Mod option will allow the user to exit the item screen without making a selection.
Popups
Popups are similar to forced remarks. The main difference is that Popups allows the user to select up to 10 modifiers from the list that will appear on the POS screen, while forced remarks only allow one. Also, instead of using existing item screens, Popups require purpose-built Popup Windows, which are created in Point of Sales Control > Sales > Popup Windows... Popups are commonly used for any item that can be customized by the customer, such as hamburgers, sandwiches, ice cream sundaes, etc.
Popup#1 - Popup#2
Click on the drop-down list to select the Popup Window to be used for each Popup. To disable a Popup, select Nul from the list. Up to 2 Popups can be assigned per item. Up to 10 choices can be selected for each Popup.
Mod
If this option is disabled, the Popup will automatically appear when the item is ordered and force the user to select at least one option from it. If this option is enabled, the popup will be called manually after ordering the item, and the user will be allowed to exit without making a selection.
Printers
This section is used to select where the item will print, on requisition printers or kitchen monitors. Before configuring this section, it is recommended to configure logical printers within redirection tables, in Point of sale control > Workstation > Redirection Tables...
Printer#1 - Printer#7
From the drop-down list, select to which logical printer this item will print. Up to 7 distinct printouts can be selected.
Enforce these printouts even if this is a remark
Enable this option so that remarks can be printed on a different printer than their parent item. Disable this option so that remarks print on the same printer as their parent item.
Only these printouts while this is a remark
This option will become available only if Enforce these printouts even if this is a remark is also enabled. Without enabling this option, items ordered as remarks will always print along with their parent items in addition to the printouts listed here. Enabling this option will force the remarks to print only on the printers selected here.
Remarks by Quantity
Remarks by quantity is used to offer different prices based on the ordered quantity of this item. To use this feature, Remarks by quantity price tables need to be created in Point of Sales Control > Sales > Remarks by quantity price tables...
Remarks by quantity price table
One Remarks by quantity price table can be selected for each price level. First, enable the checkbox next to the price level to be used, then select the appropriate Remarks by quantity price table from the drop-down list.
Please go through each of the following topics to learn more about all the options contained in each tab of the sales items setup:
Related Topics
Sales Item Setup - Options
This section contains various options to configure the general behaviour of the item.
Misc.
On reports
Enable this option so that this item is included in reports.
On invoices
Enable this option to have this item printed on invoices.
On readings
Enable this option to have this item included in readings.
Decimal quantity
...
Ask for quantity on ordering
Enable this option to display a numeric keypad on the POS screen when ordering this item.
Included on the tip calculation
...
Included on the tip declaration
...
Round function
Enable this option to include this item in the Round function. The Round function allows certain items to be quickly re-ordered, and is frequently used with alcoholic beverages.
Full size invoice printing
...
Inventory direct link
...
Item in a package
...
Delivery printout without batch printing
...
Can compile on invoice
When more than one of an item is ordered, enable this option to have the item compiled on the invoice. If this option is disabled, the same item could be listed multiple times on the invoice.
Red mode on invoice
Enable this option to print the item in red color on the invoice, if the invoice printer supports this feature.
Cellar item
...
Coupon
...
Kitchen
...
Red mode at kitchen
Enable this option to print the item in red color on the kitchen coupon, if the printer supports this feature.
Large mode at kitchen
Enable this option to print this item in large characters on kitchen printers.
Compile at kitchen
Enable this option to compile identical items on the kitchen coupon. If this option is disabled, identical items will be printed separately.
Display color
Select the color to be used to display or print this item. Works on kitchen monitors and on printers supporting this feature.
On kitchen display orders summary
...
Summary only
...
Prepare time
...
Timer
...
Status follow-up on multiple kitchen displays
...
Screen link button color
...
Please go through each of the following topics to learn more about all the options contained in each tab of the sales items setup:
Related Topics
Button Functions
Once the appearance of the button is configured, click on the Function tab to configure what the button will actually be doing:
Button function setup window
Function
Select the button's function from the drop-down list. The function determines what the button will be used for. A button can order an item directly, call item screens, print the guest check and many more options.
This field becomes vailable if the Auto. BAR order, Digit, Birth date (MMYY), External identifier assignation, No tax mode, Variance selector, functions are selected.
Items
This option becomes vailable when the Sales item function is selected.
From the drop-down list, select the sales item that will be ordered using this button.
Screens
This option becomes vailable when the Item screen function is selected.
Select the desired item screen from the drop-down list.
Divisions
This option becomes vailable when the Item division function is selected.
Select a division from the drop-down list.
Services
This option becomes vailable when the Service selection function is selected.
Select the desired service from the drop-down list.
Employees
This option becomes vailable when the Employee selection function is selected.
By default, a button which will allow the user to select an employee at the POS will be created.
If you enable the checkbox next to the drop-down list, you will be able to select a specific employee from the list. Using this button at the POS will automatically select that employee instead of bringing up the list of employees.
No password
This option becomes vailable when the Employee selection function is selected. This overrides the employee password requirement.
For items only
This option becomes vailable when the Employee selection function is selected. [...]
Groups
This option becomes vailable when the Group, Group jump or Group selection functions are selected.
Show in a button
This option becomes vailable when the Group jump function is selected. [...]
Modes
This option becomes vailable when the Mode selection function is selected.
Select the desired mode from the drop-down list.
Permanent
This option becomes vailable when the Mode selection function is selected.
Enable this option to make the mode change permanent. If this option is disabled, the mode will return to the default mode once the order process is completed.
Amount
This option becomes vailable when the Payment button function is selected. [...]
No invoice
This option becomes vailable when the Payment button function is selected.
Enable this option to prevent the printing of an invoice when using this button to apply a payment.
Payment Mode List
From the drop-down list, select the payment mode to use.
Start / Date
This option becomes vailable when the Reservation agenda link function is selected. [...]
Chg item price
This option becomes vailable when the Item price change function is selected. [...]
Regular price
This option becomes vailable when the Item price change function is selected. [...]
Price level
This option becomes vailable when the Price level change function is selected.
Selec the desired price level from the drop-down list.
Discounts
This option becomes vailable when the Discounts function is selected. [...]
Format
This option becomes vailable when the BAR interface Size function is selected. [...]
Unit
This option becomes vailable when the BAR interface Size, Bar status, function is selected. [...]
Percentage
This option becomes vailable when the Next item promo, Promo toggle mode, Promo + toggle mode, functions are selected.
Enter the discount percentage to apply.
Order mode
This option becomes vailable when the Jump to order mode function is selected.
Select the appropriate order mode from the drop-down list.
Automatic Send / Print
This option becomes vailable when the Jump to BAR interface function is selected. [...]
Show in button
This option becomes vailable when the Auto. BAR order, Show BAR interface, functions are selected. [...]
Activated by default
This option becomes vailable when the Printer status function is selected. [...]
Alternative section
This option becomes vailable when the Jump to BAR interface, Show BAR interface, functions are selected. [...]
2
This option becomes vailable when the Alternative section option is enabled. [...]
Related Topics
Generic Credit/Debit Payment Mode
It is not mandatory to configure a generic Payment mode. However, it is strongly recommended. Thanks to this configuration, the cashier does not need to ask the customer which type of card is being used for payment. This method automates the card detection process and avoids potential mistakes when selecting the card type manually.
The generic payment method is used to activate the payment terminal and start the EFT payment process.
Login to the Veloce Back-Office.
Veloce Back-Office Icon
Start the Point of Sale Control module.
Select the Invoice menu and select the Payment modes... option.
Select an empty slot, ideally choosing the smallest slot number available.
The payment mode's properties will open on the Configuration tab. Settings highlighted with red arrows in the screenshot below need to be configured. Other settings are either optional or need to be left disabled.
Description
Type a meaningful name for this payment mode, such as Debit/Credit or By Card.
2nd name
Type an alternate name for this card, to be used in a second language.
Icon / Icon position
Optionally, this setting can be used to assign an icon to the payment mode to make it stand out on the POS screen.
Overpayment
Select Tip from the drop-down list.
Send to
From the drop-down menu, select the Payment Mode into which the tips will be accumulated. For instance, if servers claim their tips from the cash in their respective floats, select CASH.
Auto. amount / Max. amount
Leave both of these settings at 0.
Rounding
Leave this option disabled.
Exchange rate
Leave all the options in this section disabled. This is only used for foreign currency.
Paid-in
Leave all the options in this section disabled.
Receipt Printing
These settings are optional and can be configured according to the merchants needs or preferences.
Click on the Options tab and configure these settings according to the merchant's needs and preferences.
Recommended options:
Payment Transfer
Transactions on reports
Transactions on workstation reports
"Complete" button
Click on the Credit Card tab.
Electronic funds transfer
Activate this option to allow this payment mode to trigger the payment terminal.
Debit card
DISABLE this option.
Category
From the drop-down list, select None.
Everything else on this tab should be left disabled.
Click on the Links tab.
Corporate communications
Configure this field only if you use Corporate communications.
General ledger number
Configure this field only if you use the accounting interface.
Sales recording type
If you are located in the Canadian province of Québec, set this drop-down list to Other. Otherwise, simply ignore this setting.
Click the Save button to save you settings and return to the payment modes list. The newly created payment mode will appear in the list.
IMPORTANT! Once the generic payment mode is configured, you must configure a payment mode for each card brand accepted by the merchant. For example, if the client accepts Mastercard, Visa, American Express and Interac Debit, you must create and configure a payment mode for each card brand individually.
Related Topics
Workstation Setup in the Point of Sale Control module
Workstation Setup in the Point of Sale Control module
The instructions below explains how to configure workstation settings from the Point of Sale Control module, in order to use a PAX terminal as a POS workstation as well as a payment terminal.
IMPORTANT! Some of the configurations explained in this article requires the user to login with a special "Super-User" password. If you do not know what your "Super-User" password is, please contact PayFacto technical support or your local reseller for assistance.
Login to the Veloce Back-Office with a Super-User password.
Start the Point of Sale Control module.
Click on the Workstation menu and select the Workstation's Setup... option.
The list of available workstations will appear. Select the workstation number you wish to configure as a payment terminal.
The workstation's configuration opens on the Configuration tab:
Description
Type a meaningful name for the workstation being configured.
Department
From the drop-down list, select the department in which this workstation will be used.
Configure the remaining options according to the merchant's needs and preferences.
Click on the Invoice tab:
Use client tip entry
Enable this option to use Veloce's tip entry mechanics, which allows the customer to manipulate the payment terminal to decide tip entry. Disable this option for retail/no tip environments.
Configure the remaining options according to the merchant's needs and preferences.
Click on the Printers tab:
Coupon printer
Enable this option to configure the built-in printer on PAX payment terminals and allow it to print transaction records and other documents.
Printer
From the drop-down list, select the appropriate physical printer. (This is configured in Setup / Utilities > Configuration > Printers...)
Connection
From the drop-down list, select Modern app.
Configure the remaining options according to the merchant's needs and preferences.
IMPORTANT! Merchants in the bar and restaurant industry in the province of Québec need to route guest checks, invoices and receipts through the Québec Sales Recording Module (SRM). For these merchants, the PAX terminal's built-in printer can only be used for EFT transaction records and other non-prescribed documents.
Click on the Interfaces tab:
EFT
Enable this option to allow the Veloce POS app to call up the payment app on the PAX terminal.
Connection
From the drop-down list, select Modern app.
Click on the Material tab:
Workstation type
From the drop-down list, select Modern app workstation.
Font
From the drop-down list, select the desired font.
Usage limitation
Pay at the door
Enable this option to limit the use of this payment terminal to Pay-at-the-door (delivery) operations.
Pay at the table
Enable this option to limit the use of this payment terminal to Pay-at-the-Table operations.
Click the Save button to save you changes and close the configuration screen. This will take you back to the workstation's list, where you can see the updated workstation's name.
Click Exit to close this screen and return to the POS Control module.
Repeat these steps for any additional payment terminal you may have.
Related Topics
Finalize Configuration
Finalize Configuration
This article explains how to make sure that any configuration change that was made is applied correctly and immediately to your Veloce system.
This procedure should be carried out whenever major configuration changes were made, or when changing any system-wide settings, such as those found in the Setup / Utilities module.
Overview
This procedure involves 3 simple steps:
Stop the Veloce Back-office server.
Create workstation data
Restart the Veloce Back-office server.
Step 1 - Stop the Veloce Back-Office server
From the Windows desktop, click the up-arrow in the Windows notification area (Near the clock). Locate the green Veloce server icon.
Right-click the green Veloce server icon, then left-click on the Close server option.
The Veloce server will stop and the icon will disappear from the notification area.
The Veloce server is now stopped.
Step 2 - Create workstation data
Login to the Veloce Back-Office
Open the Setup / Utilities module
Click the Tools menu and select the Workstation data... option.
Once the progress bars have disappeared, proceed to the next step.
Step 3 - Start the Veloce server
Login to the Veloce Back-Office
Open the Setup / Utilities module
Click the Server menu and select the Start/Stop the server... option.
This completes the procedure. From this point, all the system-wide changes have been applied, and all changes to workstation configurations have also been applied.
Related Topics
EFT Module Setup
This article describes how to configure the Veloce Electronic Funds Transfer (EFT) module to work with PayFacto payment solutions.
Login to the Veloce Back-Office.
Veloce Back-Office Icon
Start the Electronic Funds Transfer module.
EFT Icon
Click on the Configuration menu and select the Configuration... option.
The EFT configuration screen appears on the Configuration tab.
Protocol
Based on your location, select either PayFacto Canada, PayFacto USA or PayFacto WorldPay.
IMPORTANT! This should only be selected on legacy terminals using the PayFacto Gateway app. Please contact PayFacto technical support to inquire about upgrading to newer terminals with support for the PayFacto Payment app.
Select SecurePAY to use the SecureTable or SecurePAY android application instead of the Gateway app.
Click on the Operation tab.
Tip on purchase
Enable this option to allow customers to leave tip using the payment terminal.
Miscellaneous
Configure the options in this section according to the merchant's needs and preferences. The options in the screenshot above represent a common configuration.
Click the Save button to save your changes and close the EFT configuration window. You may now close the EFT module as well.
This concludes the required setup for the EFT module. Please proceed to the configuration of your workstation(s) in the POS Control module.
Related Topics
Veloce Back-Office Overview
The Main Back-Office desktop is the starting point for all tasks that can be carried out at the Veloce Back-Office PC. It gives you access to all the Veloce modules as well as tools to manage your license options and Back-Office users.
NOTE: The screenshot above displays all available modules. Modules that are not included with your license will not be displayed, so your own Veloce Back-Office desktop may look slightly different.
Taxes
Taxes
Before creating axes in Veloce, make sure that Tax Categories were created, as each tax created in Veloce needs to belong to a Tax Category.
Up to 5 taxes can be created in Veloce.
Sales Item Setup - Configuration
This section contains basic sales items configuration options. For a sales item to be functional, it needs to have at least a description, a division, a type and a Regular price.
Description / Function
Interac Debit Payment Mode
Interac Debit Payment Mode
Once the generic payment mode is configured, you must configure a payment mode for each card brand accepted by the merchant. For example, if the merchant accepts Mastercard, Visa, American Express and Interac Debit, you must create and configure a payment mode for each card brand individually.
Credit Card Payment Modes
Credit Card Payment Modes
Once the generic payment mode is configured, you must configure a payment mode for each card brand accepted by the merchant. For example, if the merchant accepts Mastercard, Visa, American Express and Interac Debit, you must create and configure a payment mode for each card brand individually.
NOTE: Since the configuration for Interac Debit differs from that of the credit cards, Interac Debit will be explained in its own separate topic. Please see
Item Screens
Create Sales Items
Sales Item Setup - Configuration
Sales Item Setup - Item Types
Sales Item Setup - Ordering Options
Sales Item Setup - Links
Sales Item Setup - Options
Sales Item Setup - Availability / Schedule
Sales Item Setup - Delivery
Sales Item Setup - Preparation
Sales Item Setup - Variations
Sales Item Setup - Included Items
Sales Item Setup - POS Inventory
Sales Item Setup - Bar Interface
Sales Item Setup - Recipe
Sales Item Setup - Forced Modes
Sales Item Setup - Taxes
the total purchase price of the other good and beverage together.
Link the Buffet - Adult item to the Soda Fountain and water items through a Forced Remark.
This will allow the server to select between "Soda Fountain" (pst-taxable) and "Water" (non-pst-taxable).
Link the Hot-Dog + Soda Combo item to the Soda - Included item through a Forced Remark.
To make sure to use the regular price of the soft drink for tax calculation, select a regular soft drink for PST in the Taxable amount item column.
Link the Hot-Dog + Soda Combo item to the Large Soda Included item through a Forced Remark.
Avoid any combination of adjacent keys on the keyboard, such as "Qwertyu8*".
Avoid using dictionary words where letters are simply replaced by similar characters such as "P@$$w0rd".
Tools Menu
Back-Office Users List
User options - Configuration Tab
User Access
Red X - disabled access
Drill-down modules
Popup Windows
Groups & Keys
Buttons
etc...
Veloce Back-Office Icon
Setup - Utilities Module Icon
System Config. Link Icon
Configuration Tab
Language Options
Veloce Back-Office Icon
Tools Menu
Back-Office Users List
Back-Office User Options
Veloce Back-Office Icon
Point of Sale Control Icon
Employees menu
Employees List
Employees Configuration Tab
Second Name - Screen
Second Name - Sales Items
Second Name - Division
POS - English
POS - Spanish
The employee prints the invoice and charges the customer.
The GST is calculated on the full price of the combo ($5.00).
The PST is calculated on the ordinary selling price of the soda beverage ($2.00).
the ordinary purchase price of that beverage, and
the total purchase price of the other good and beverage together.
In this instance, the problem is that Veloce keeps calculating the PST on the ordinary purchase price of the beverage, while it should calculate it on the price of the combo, because the price of the combo is lesser than the ordinary sale price.
Some progress bars will be displayed. Depending on your system's performance, this may flash by so quickly that you may not see it.
Create workstation data progress
A VelBO prompt will be displayed. Click Yes to start the Veloce server.
Start server prompt
The Veloce icon will appear in the Windows notification area. The icon may flash between red and green for a few seconds, but will eventually settle on green.
If you are using any PAX terminal, select PAX generic.
Speed(bps)
Ignore this setting. In legacy installs, this is used to determine the communication speed of serial payment terminals. This does not apply to Ethernet or Wi-Fi (Wireless) payment terminals.
Time out delay
Set this value to 200
Gateway / SecurePAY
Don't select anything if you want to use the Veloce POS app with the PayFacto Payment Application. (This is the recommended option.)
Select Gateway to use the Veloce POS app along with the PayFacto Gateway app.
Below is a short description of every module and option that can appear on the Veloce Main Back-Office Desktop. For more information on a specific module, please consult the documentation specific to that module.
Point of Sales Control
Point of Sales Control is a core module that is included with every Veloce license. It allows restaurants to manage day-to-day operations from one central location. This is also where most of the menu programming is done, from creating sales items to employee access.
Setup / Utilities
Setup / Utilities is a core module that is included with every Veloce license. This is where the Veloce license is managed, and also where general settings and localization options can be found. This module also contains various troubleshooting tools as well as the manual backup tool.
Local Workstation
The local workstation is not a module, but a shortcut used to launch a POS workstation locally, on the Veloce Back-Office server. The local workstation is often used on "all-in-one" systems where the Veloce Back-Office resides on POS hardware, or simply as an extra POS that can be used for other tasks, like for employees to punch in.
Hotel Interface
The Hotel Interface is an optional module which allows Veloce to communicate with various property management systems (PMS) like Hotello, Micros 4700 and others.
Electronic Funds Transfer
Electronic Funds Transfer is an optional module that allows Veloce to interface with various payment solution providers to process credit and debit card payments.
Corporate Communication (Local)
The Corporate Communication (Local) module is used by restaurants that are part of a chain or group to communicate with the chain's head-office.
Corporate Communication
The Corporate Communication module is used by a chain's head-office to receive sales data from restaurants that are part of the chain and also to broadcast menu changes or even entire menus.
POS Inventory
Coming Soon.
Inventory Management
Inventory Management is an optional module that allows restaurants to keep track of all the stock trough recipes linking ingredients to sales items.
Web Connect
Coming Soon.
Time and Attendance
Time and Attendance is an optional module that allows restaurants to manage employee's schedules, tasks, pay rates, punch-in, punch-out and break times.
Client Account
Client Account is an optional module that allows restaurants to manage their customer's accounts. Customers can charge meals to their account and restaurants can send statements to their customers.
Reservation
Reservation is an optional module which allows restaurants to manage table reservations locally.
Delivery
Delivery is an optional module which allows restaurants to configure the delivery system, including creating, modifying and deleting customers and street code records.
Bar Interface
The Bar Interface is an optional module which allows restaurants and bars to connect Veloce to various liquor control devices such as Berg, Auper and Azbar.
Accounting Interface
The Accounting Interface is an optional module that allows Veloce to interface with third-party accounting software such as Quickbooks and ACCPAC.
Table Management
Table Management is an optional module that allows restaurants to manage their floor plans, create sections and view the floor plan with a graphical representation.
Rental
Rental is an optional module which allows restaurants to manage time-based rental of equipment, such as pool tables or bowling alleys.
Exit to Password
Use this option to close all open modules and exit to the Veloce login prompt.
Quit
Use this option to exit from the Veloce Back-Office.
Creating Taxes
Login to the Veloce Back-Office.
Veloce Back-Office Icon
Start the Point of Sale Control module.
Point of Sale Control Icon
Click on the Invoice menu and select the Taxes... option.
Invoice Menu - Taxes...
The Tax list appears. Click an existing tax to modify it or click an empty placeholder to create a new one.
The selected tax opens on the Configuration Tab:
Description
Type the tax description as it will appear on guest checks, receipts and reports.
NOTE: In some markets, merchants are required to print their tax registration number(s) on guest checks and receipts. This is done so that customers can validate that the merchant is collecting and remitting sales taxes and is legally registered with local fiscal authorities.
Click on the Rate tab:
Tax - Rate
Current Rate
This section contains settings that are currently applicable.
Rate
Type in the percentage of tax to apply to taxable items. The rate can be anything from 0% to 100%, with a precision up to 5 decimal places.
Minimum Amount
Type in the minimum sales amount to reach for this tax to apply. If the sales amount is lower than the amount entered in this field, Veloce will not calculate taxes on this sale.
Maximum Amount
Type in the Maximum sales amount to reach for this tax to apply. If the sales amount is higher than the amount entered in this field, Veloce will not calculate taxes on this sale.
Non taxable if item number over
Use this option for items that are not taxable if purchased in specific quantities. For instance, if an item is taxable when purchased alone, but becomes non-taxable if 6 of the same item are purchased together. For this example, put 6 in the field.
Upcoming Rate
This section contains information on future tax parameters. Use this section if an upcoming tax modification is expected in the near future. This will ensure that the new parameters automatically come into effect at the prescribed date.
Date
Select the date at which the new tax parameters will become effective.
Next Rate
Type in the new percentage of tax that will apply to taxable items. The rate can be anything from 0% to 100%, with a precision up to 5 decimal places.
Exception
Enable this option for taxes with special application rules, such as British Columbia's Provincial Sales Tax applicable to soda beverages. In the text field next to the checkbox, type a meaningful name for the exception.
Taxable sale percent
Enter the percentage of the combo or main item price that will be used for the calculation of the BC Soda Beverage Tax.
NOTE: From April 1st, 2021, this value needs to be set at 50%.
Maximum amount per item
Enter the maximum amount that will be used as a base sale price for the calculation of the PST applicable to Soda Beverages in the Canadian province of British Columbia.
NOTE: From April 1st, 2021, this value needs to be set at $3.00.
Calculation Method
Included Tax
Select this option if the item prices includes all applicable taxes. For instance, if an item is sold for $10.00 including taxes, Veloce will make the necessary calculation to figure out the base item price and the correct amount for each applicable tax which will bring the total to $10.00.
Category
Select the Tax Category that this tax is part of.
Group entire category using this tax level
...
Priority
...
Add Method
...
Allow even if there is no amount
...
Applicable on taxable tip
Enable this option to apply this tax on tips and gratuity.
Can apply on 'taxable tax'
Enable this option if this tax can be applied on the tax amount from another tax.
Taxable Tax
Enable this option if the amount from this tax can be taxed by other taxes.
Discountable
Enable this option if taxes should be calculated after the application of discounts. For example, if and item is normally sold for $10.00, but has a 50% discount, the tax will be calculated on $5.00. If this option is disabled, the tax will be calculated on the original price of $10.00, regardless of any discounts.
Links Tab:
Conversions
Button - Delete
Click the Delete button to remove this Tax.
Button - Save
Click the Save button to save changes and exit.
Button - Exit
Click the Exit button to close this window without saving changes.
Repeat these steps to create all necessary taxes.
Description
Type the name of the sales item. This name will be displayed on the POS screen, on guest checks and in reports.
Second Name
Type an alternate description for this sales item. In multi-language setups, this alternate description can be used on the POS screen or on guest checks.
Division
From the drop-down list, select the division that this item belongs to.
Type
From the drop-down list, select the type of item being created. For a basic sales item, select Regular.
Enable this option to use "Beat the Clock" promotions, where an item price starts at a discounted price and then steadily increases as time goes on. This is designed to encourage customers to purchase this item before the price increases, hence "Beat the Clock".
Interval
Select the start time and end time of the Beat the Clock promotion.
Start Price
Set the price of the item at the start of the Beat the Clock promotion. The start price is normally heavily discounted compared to the regular sale price.
Variance
Select by how much the item's price will increase at each Beat the Clock interval. For instance, if you enter $1.00 in this field, the price would increase by $1.00 at every interval defined in the Minutes per Variance field, until the end of the promotion is reached. The Variance and Minutes per Variance are typically calculated so the price of the item near the end of the promotion is close to its regular sale price.
Minutes per variance
Select how long, in minutes, each Beat the Clock interval lasts. For instance, if you enter 30 in this field, the price will increase by the amount set in the Variance field every half-hour.
Misc.
Sales Item Setup - Configuration (Misc.)
Regular Price
Configure the regular sale price of this item.
Smartcard
...
Copy if changed
Enable this option to copy the regular price to all modes and price levels displayed in the Prices section. Disable this option to configure custom prices for each mode and price level.
Supplemental Fees
...
MixMatch Price
...
Price with supplemental Digit
...
Ticket ratio price
...
Unit
...
Hold and Fire Delay (sec)
Enter how long, in seconds, the item should be held before being printed on requisition (kitchen) printers or kitchen monitors. Use this feature to synchronize the preparation time of items.
Price per quantity
Sales Item Setup - Configuration (Price per quantity)
Use this section to set different item prices based on the quantity ordered. For instance, donuts can have a price when sold individually, a discounted price when 6 or more are sold, and an even better price when 12 or more are sold together.
Qty >=
Enable the checkbox next to each line to activate it. Enter the quantity of items to be ordered for the special price to apply, and type the discounted price in the field to the right. The discounted price will apply if the quantity of items ordered is equal or greater than the value entered in the Qty field.
Prices
Sales Item Setup - Configuration (Prices)
This section contains modes arranged by lines and price levels arranged in columns. Custom prices can be configured for each mode / price level combination, for a total of 16 possible combinations.
Modes
The 4 modes are arranged in 4 lines. Modes are configured in the Point of Sale Control module > Invoice Menu > Modes... Make sure that the Copy if changed option is disabled if you want to configure custom prices. If the Copy if changed option is enabled, modes will all receive the price configured in the Regular Price field.
Price Levels
The 4 Price Levels are arranged in 4 columns. Price Levels are configured in the Setup / Utilities Module > System Config > Configuration. Make sure that the Copy if changed option is disabled if you want to configure custom prices. If the Copy if changed option is enabled, Price Levels will all receive the price configured in the Regular Price field.
Please go through each of the following topics to learn more about all the options contained in each tab of the sales items setup:
NOTE: Since the configuration for Interac Debit is unique, it has its own topic. If you need to configure payment modes for various credit card brands, please see Credit Card Payment Modes to learn more.
IMPORTANT! Before creating payment modes for the various card brands accepted by the merchant, the generic Credit/Debit payment mode must be created. Please see Generic Credit/Debit Payment Mode to learn how to configure it.
Login to the Veloce Back-Office.
Veloce Back-Office Icon
Start the Point of Sale Control module.
Point of Sale Control Icon
Select the Invoice menu and select the Payment modes... option.
Invoice Menu - Payment Modes
Select an empty slot, ideally choosing the smallest slot number available.
Payment Modes List
The payment mode's properties will open on the Configuration tab. Settings highlighted with red arrows in the screenshot below need to be configured. Other settings are either optional or need to be left disabled.
Payment Mode - Configuration (INTERAC DEBIT)
Description
Type a meaningful name for this payment mode, such as INTERAC DEBIT.
2nd name
Type an alternate name for this payment mode, to be used in a second language.
Icon / Icon position
Optionally, this setting can be used to assign an icon to the payment mode to make it stand out on the POS screen.
Overpayment
Select Tip from the drop-down list.
Send to
From the drop-down menu, select the Payment Mode into which the tips will be accumulated. For instance, if servers claim their tips from the cash in their respective floats, select CASH.
Auto. amount / Max. amount
Leave both of these settings at 0.
Rounding
Leave this option disabled.
Exchange rate
Leave all the options in this section disabled. This is only used for foreign currency.
Paid-in
Leave all the options in this section disabled.
Receipt Printing
These settings are optional and can be configured according to the merchants needs or preferences.
Click on the Options tab and configure these settings according to the merchant's needs and preferences.
Payment Mode - Options (INTERAC DEBIT)
Recommended options:
Payment Transfer
Transactions on reports
Transactions on workstation reports
"Complete" button
Open cash drawer
Click on the Credit Card tab.
Payment Mode - Credit Card (INTERAC DEBIT)
Electronic funds transfer
Activate this option to allow this payment mode to trigger the payment terminal.
Debit card
ENABLE this option.
Category
From the drop-down list, select Debit.
Everything else on this tab should be left disabled.
Click on the Links tab.
Payment Mode - Links (INTERAC DEBIT)
Corporate communications
Configure this field only if you use Corporate communications.
General ledger number
Configure this field only if you use the accounting interface.
Sales recording type
If you are located in the Canadian province of Québec, set this drop-down list to Debit. Otherwise, simply ignore this setting.
Click the Save button to save you settings and return to the payment modes list. The newly created payment mode will appear in the list.
Payment Modes List - INTERAC DEBIT
This concludes the setup instructions for the Interac Debit payment mode. If not done already, don't forget to create payment modes for each supported credit card brand, as described in the Credit Card Payment Modes topic.
IMPORTANT! Before creating payment modes for the various card brands accepted by the merchant, the generic Credit/Debit payment mode must be created. Please see Generic Credit/Debit Payment Mode to learn how to configure it.
Login to the Veloce Back-Office.
Veloce Back-Office Icon
Start the Point of Sale Control module.
Point of Sale Control Icon
Select the Invoice menu and select the Payment modes... option.
Invoice Menu - Payment Modes
Select an empty slot, ideally choosing the smallest slot number available.
Payment Modes List
The payment mode's properties will open on the Configuration tab. Settings highlighted with red arrows in the screenshot below need to be configured. Other settings are either optional or need to be left disabled.
Payment Mode - Configuration (VISA)
Description
Type a meaningful name for this payment mode. For credit card payment modes, this should be the card's brand name, such as VISA.
2nd name
Type an alternate name for this payment mode, to be used in a second language.
Icon / Icon position
Optionally, this setting can be used to assign an icon to the payment mode to make it stand out on the POS screen.
Overpayment
Select Tip from the drop-down list.
Send to
From the drop-down menu, select the Payment Mode into which the tips will be accumulated. For instance, if servers claim their tips from the cash in their respective floats, select CASH.
Auto. amount / Max. amount
Leave both of these settings at 0.
Rounding
Leave this option disabled.
Exchange rate
Leave all the options in this section disabled. This is only used for foreign currency.
Paid-in
Leave all the options in this section disabled.
Receipt Printing
These settings are optional and can be configured according to the merchants needs or preferences.
Click on the Options tab and configure these settings according to the merchant's needs and preferences.
Payment Mode - Options (VISA)
Recommended options:
Payment Transfer
Transactions on reports
Transactions on workstation reports
"Complete" button
Open cash drawer
Click on the Credit Card tab.
Payment Mode - Credit Card (VISA)
Electronic funds transfer
Activate this option to allow this payment mode to trigger the payment terminal.
Debit card
DISABLE this option.
Category
From the drop-down list, select the card brnd name, such as Visa.
Everything else on this tab should be left disabled.
Click on the Links tab.
Payment Mode - Links (VISA)
Corporate communications
Configure this field only if you use Corporate communications.
General ledger number
Configure this field only if you use the accounting interface.
Sales recording type
If you are located in the Canadian province of Québec, set this drop-down list to Credit. Otherwise, simply ignore this setting.
Click the Save button to save you settings and return to the payment modes list. The newly created payment mode will appear in the list.
Payment Modes List - VISA
Repeat these steps for every card brand that is accepted by the merchant. For instance, if the merchant accepts Visa, Mastercard, American Express and Discover, 4 unique credit card payment modes need to be created, one for each card brand.
This concludes the setup instructions for the credit card brands payment modes. If not done already, don't forget to create a payment mode for Interac Debit, as described in the Interac Debit Payment Mode topic.
The button will display the entire selected group of keys.
Group jump
...
Group selection
...
Insert mode toggle
...
Item Division
This function creates a button that will display the contents of the selected division.
Item Price Change
...
Item Screen
This function creates a button that will display the contents of the selected Item Screen.
Item Search
...
Jump to BAR interface
...
Jump to order mode
...
Load order
...
Message display
...
Mode selection
...
Multiplier
...
Next item promo
...
No print
...
No tax mode
...
None
This button is disabled.
Open cash drawer
...
P.L.U.
...
Payment button
...
Payment transfer
...
Permanent price change
...
Place on hold
...
Pos inventory
...
Price level change
...
Print
...
Print last check
...
Printer status
...
Promo card balance
...
Promo mode toggle
...
Promo+mode toggle
...
Quick access running bill
...
Receipt button
...
Repeat
...
Reservation agenda link
...
Sales item
...
Save order
...
Select order tip
...
Service selection
...
Show BAR interface
...
Show current mode
...
Show current price level
...
Show current screen
...
Show price
...
Show Remark/Popup
It is recommended to assign this function to expanded buttons. This function will create an area where remarks and popups will be displayed.
Show Screen/Remark/Popup
It is recommended to assign this function to expanded buttons. This function will create an area where the contents of item screens, remarks, popups and item divisions will be displayed.
Type an alternate description to be used on guest checks and receipts.
Number
Type the tax identification or registration number, which will be printed on guest checks and receipts.
General ledger number (to send)
...
General ledger number (to claim)
...
Taxes Overview
Tax Categories
Taxes List
Tax - Configuration
Tax - Links
B.C. Soda Tax Configuration
This article explains the Veloce configuration required to comply with British Columbia's Provincial Sales Tax Act.
IMPORTANT! This article assumes that your Veloce POS system is already configured and fully functional. Use the information from this article to update your existing Veloce POS system to the new regulation.
Configuration sequence
Create / Configure Tax Categories as explained in the article.
Create / Configure Taxes as explained in the articles. You may also refer to the tables below for specific settings.
Assign taxes to sales items, as explained in article.
Suggested Tax Categories for Veloce
British Columbia has two tiers of sales taxes. The first tier is managed at the provincial level, which includes the provincial sales tax and liquor tax. The second tier is managed at the federal level, which includes the Goods & Services Tax (GST). Therefore, it is suggested to use two Tax Categories for Veloce:
Provincial Taxes
Federal Tax
Required Taxes in Veloce
Provincial Taxes:
Provincial Sales Tax (PST) - 7%
Provincial Sales tax (PST) for liquor - 10%
Federal Taxes:
Goods and Services Tax (GST) - 5%Detailed Tax Configurations
The following tables list all the options and settings for each tax. Refer to the article to learn how to create a new tax, and refer to the tables below for each individual setting.
Provincial Sales Tax (PST) - 7%
The provincial Sales Tax at a rate of 7% applies to sodas as explained in the article. However, if you also sell miscellaneous goods, such as clothing, bottle openers and souvenirs (e.g. souvenir glasses or pens with your company name on them), you also need to apply the 7% PST on these items. The PST may be used as an add-on tax or an inclusive tax.
Veloce Tax Settings for 7% PST
Tab / Section
Option / Field name
Configuration
Provincial Sales Tax (PST) for liquor - 10%
The provincial Sales Tax at a rate of 10% applies to all alcoholic beverages containing more than 1% of alcohol per volume, such as beer, spirits and liqueurs, wine, mixed drinks, etc.
Settings for 10% PST (Liquor tax)
Tab / Section
Option / Field name
Configuration
Goods and Services Tax (GST) - 5%
The federal Goods and Service Tax (GST) at a rate of 5% applies on all goods and services, including food, beverages, alcohol, clothing, souvenirs, etc. The GST may be used as an add-on tax or an inclusive tax.