Transaction workflow
Transaction workflow
The workflow will vary based on SecureTable's application settings. This section covers all possible configurations. Here are quick links to each step of the workflow:
Home Screen (Start)
2. Enter Server Number a. Enter Table Number (Optional) b. Enter Check Number (Optional)
Select Table
Select from multiple checks
Split Calculator a. Equal Split b. Unequal Split
Tip Calculation (with tip presets) a. Custom tip amount b. Custom tip percentage
Tip Confirmation
Payment (Card processing)
Payment posting to the POS
Home Screen
The transaction workflow always starts from the SecureTable home screen. To start, simply press the ENTER button.

Enter Server Number (mandatory)
Enter the Server, Clerk or employee number and press the OK button in the lower-right corner of the screen. The server number is mandatory to start a transaction. It will be used to filter the tables and checks, and only the tables or checks that are related to the server number entered will be available.
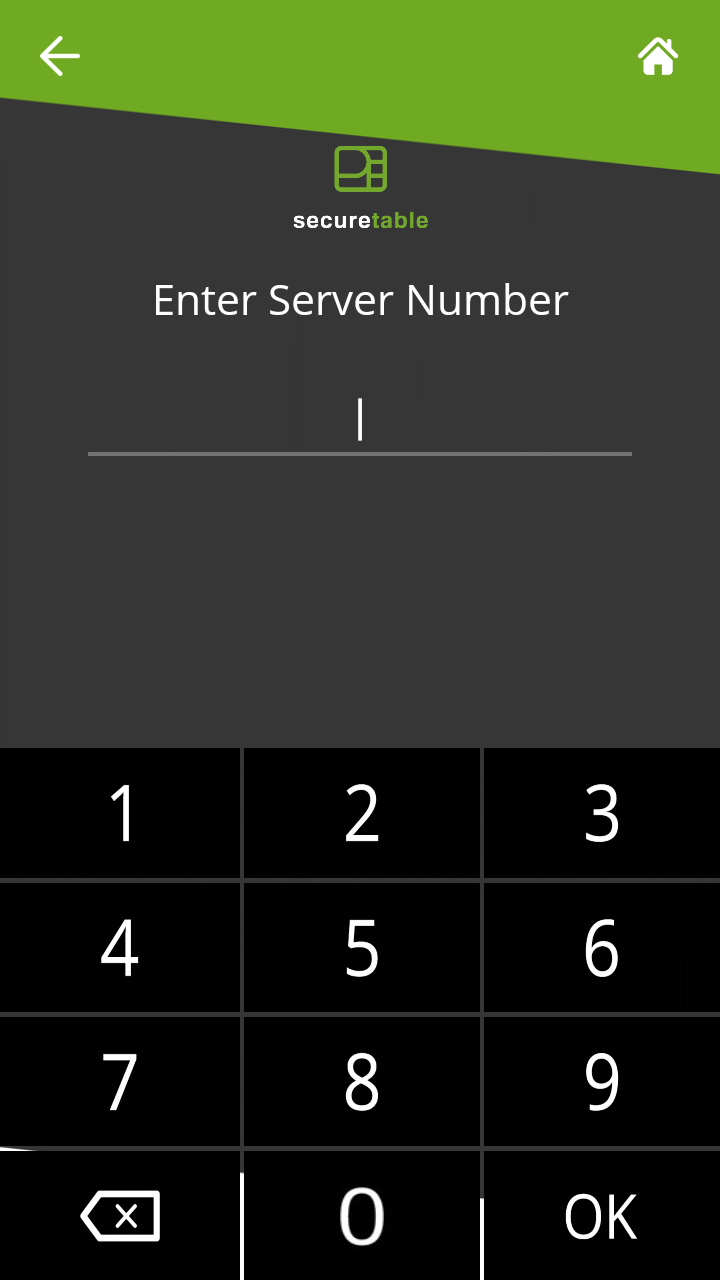
NOTE: On devices equipped with a physical keypad, the on-screen keypad will not be displayed. The physical keypad buttons will be used instead.
Enter Table Number (optional)
This screen will only be displayed if the Enable Search by Table Number option is enabled in the SecureTable application's settings.
The table number is used to further filter the checks that will be displayed. This is useful to display the full list of checks associated with a specific table.
To use it, enter the table number and press the OK button in the lower-right corner of the screen. To skip this step, simply press OK without entering a table number.
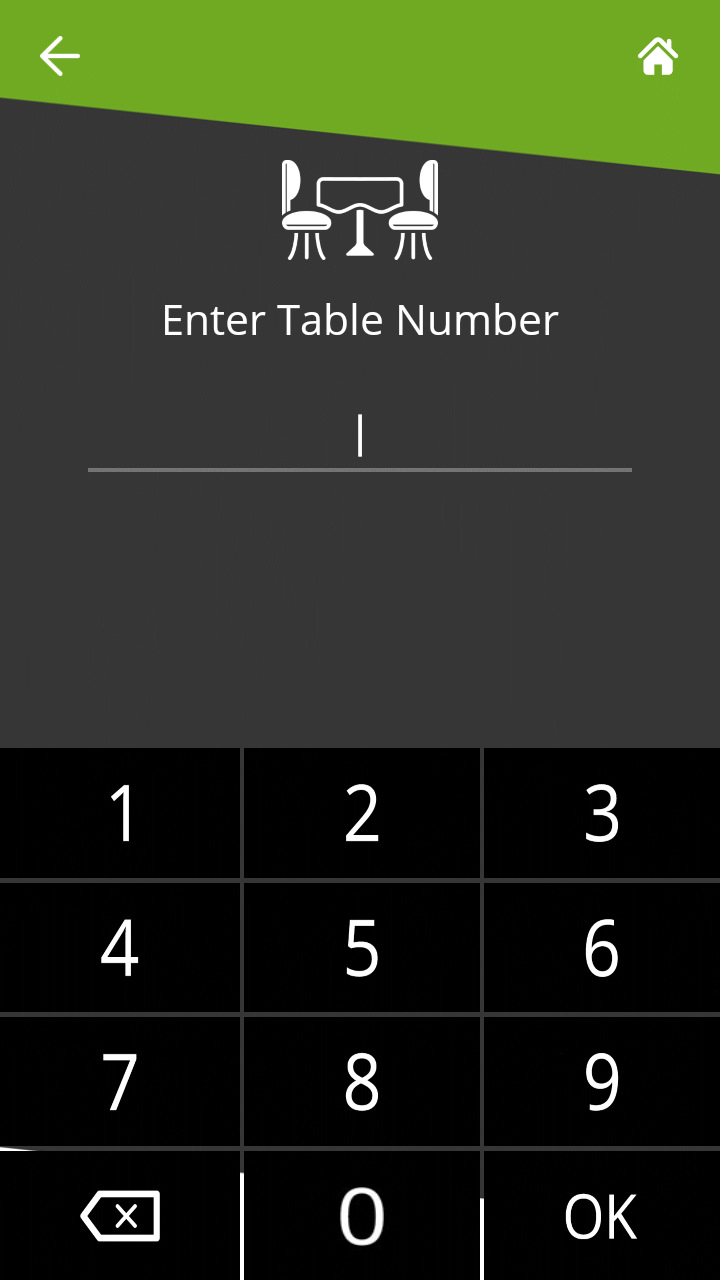
NOTE: On devices equipped with a physical keypad, the on-screen keypad will not be displayed. The physical keypad buttons will be used instead.
Enter Check Number (optional)
This screen will only be displayed if the Enable Search by Check Number option is enabled in the SecureTable application's settings. The check number is used to search for a specific check. This is useful when you have the check in hand and you just want to bring it up immediately on the SecureTable application. To use it, enter the check number and press the OK button in the lower-right corner of the screen. To skip this step, simply press OK without entering a check number.
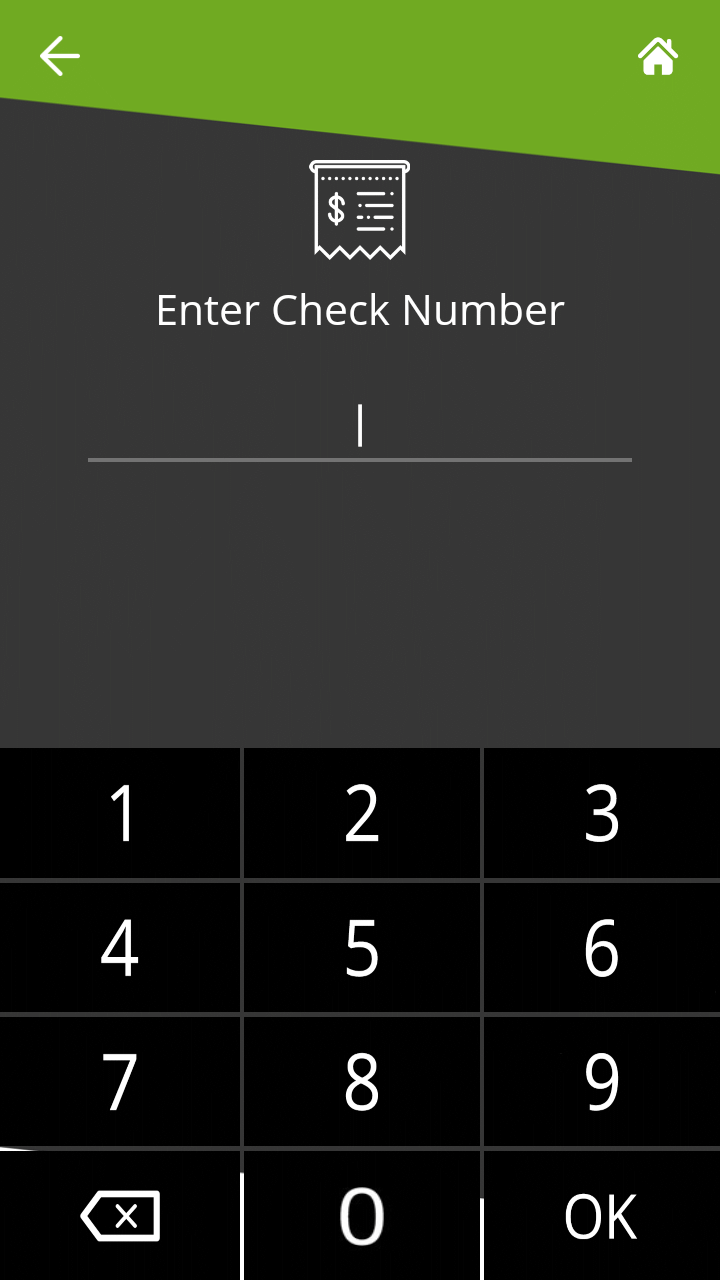
NOTE: On devices equipped with a physical keypad, the on-screen keypad will not be displayed. The physical keypad buttons will be used instead.
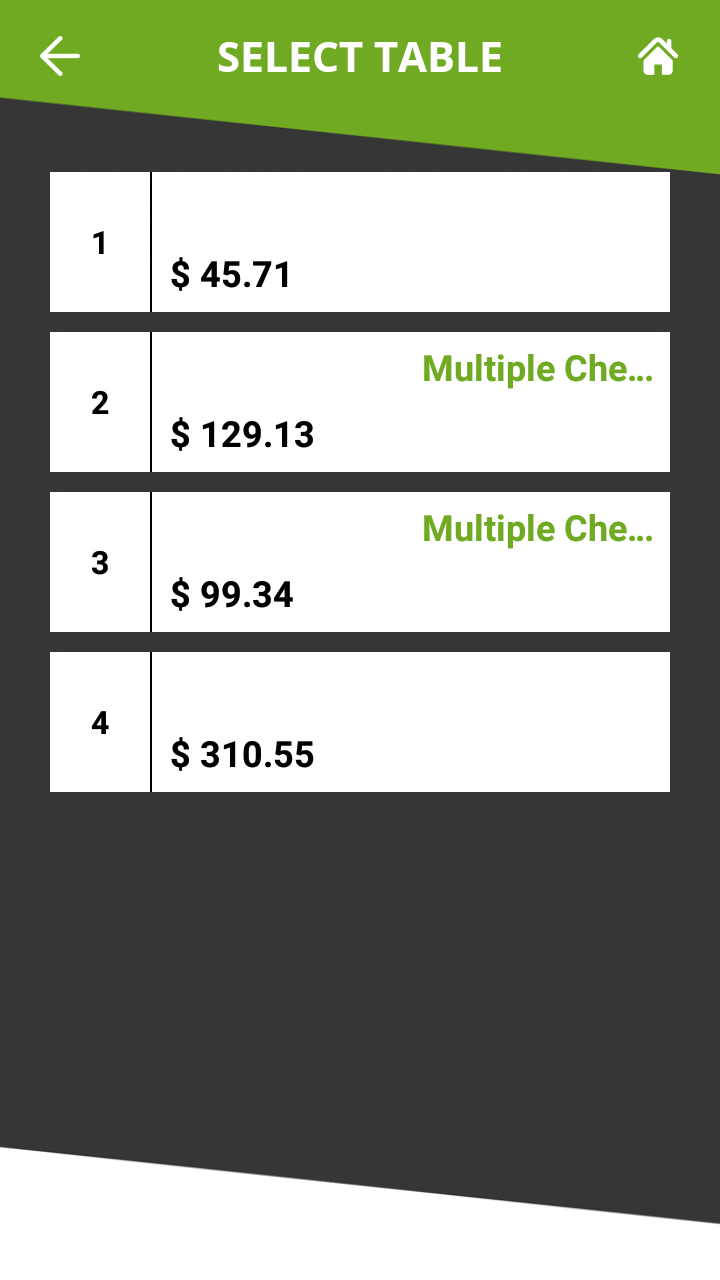
Select Table
This screen may look different or may not be displayed altogether, based on settings and previous choices made:
• A list of all tables containing printed checks will be displayed if both the Table Number and Check Number screens were skipped.
• A single table will be displayed if a valid table number was entered at the Table Number screen and the check number was skipped.
• This screen will be skipped altogether if a check number was entered at the Check Number screen. In this case, SecureTable will skip directly to the Split Calculator screen, further below.
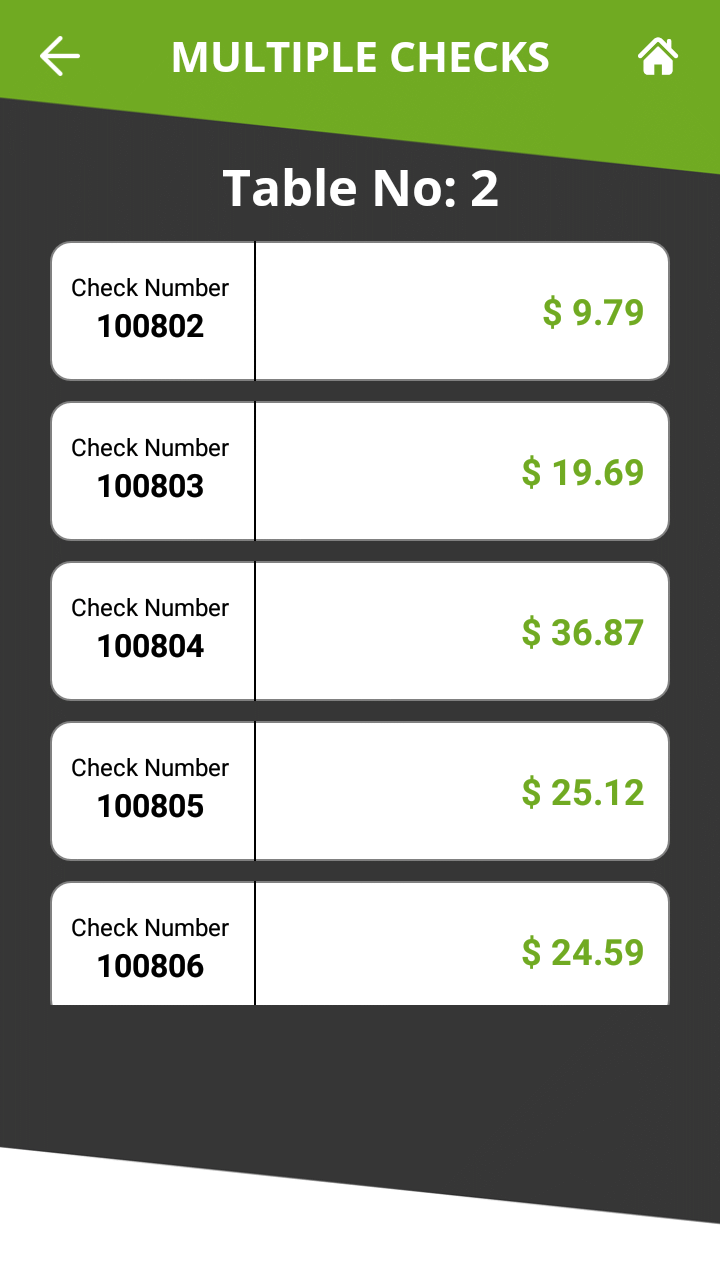
The table number is indicated to the left of each white box. Each box displays the total amount due for the entire table, and the green Multiple Checks text indicates that this table has more than one printed checks.
To select a table, simply touch the desired box.
Multiple Checks
When a table containing multiple printed checks is selected, the list of available checks is displayed. On a typical payment terminal screen, up to 5 checks can be displayed at once. If there are more than 5 checks, the list can be scrolled by swiping up and down the screen.
This screen will not be displayed if a table with a single check was selected, or if a check number was entered at the Check Number screen.
To select a check to be paid, simply touch the corresponding box on the screen.
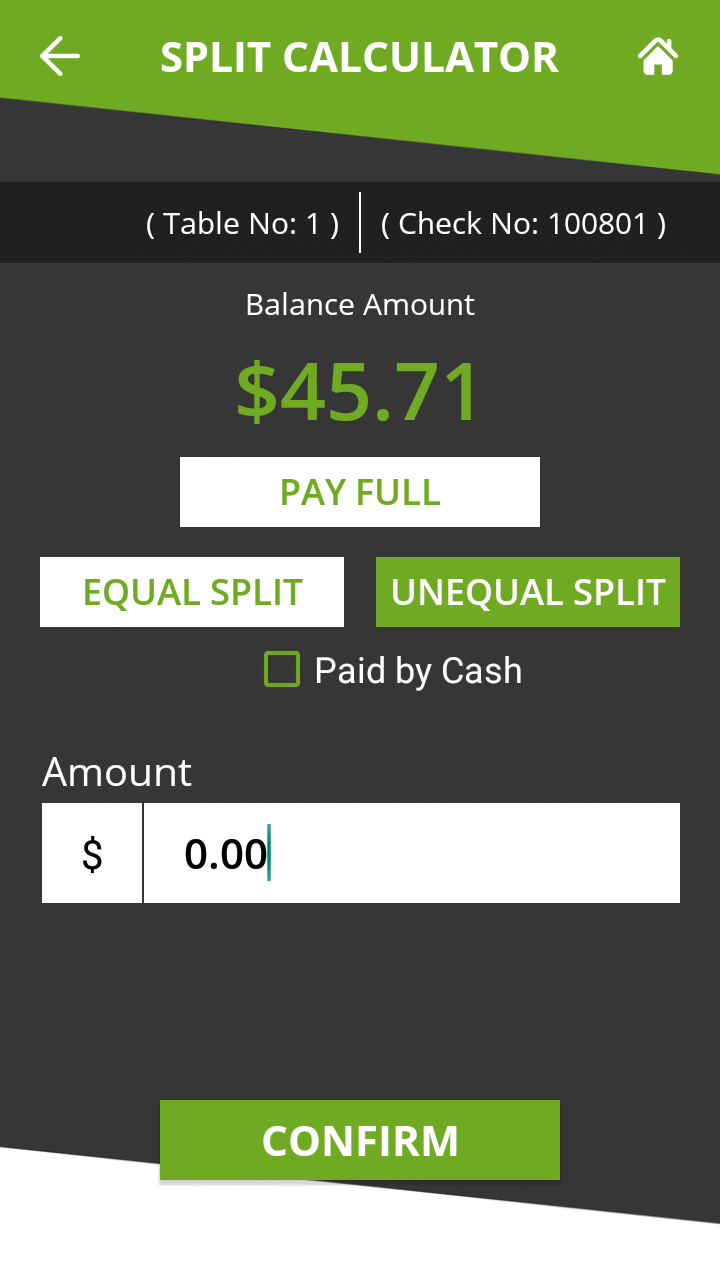
Split Calculator
The split calculator is the step where the server discusses with the customer about how the check will be paid. The following needs to be determined:
• Will the check be paid by cash or by card?
• Will the check be paid in full in one payment, or in multiple payments (split)?
• If the payment is to be split, will it be in equal or unequal amounts?
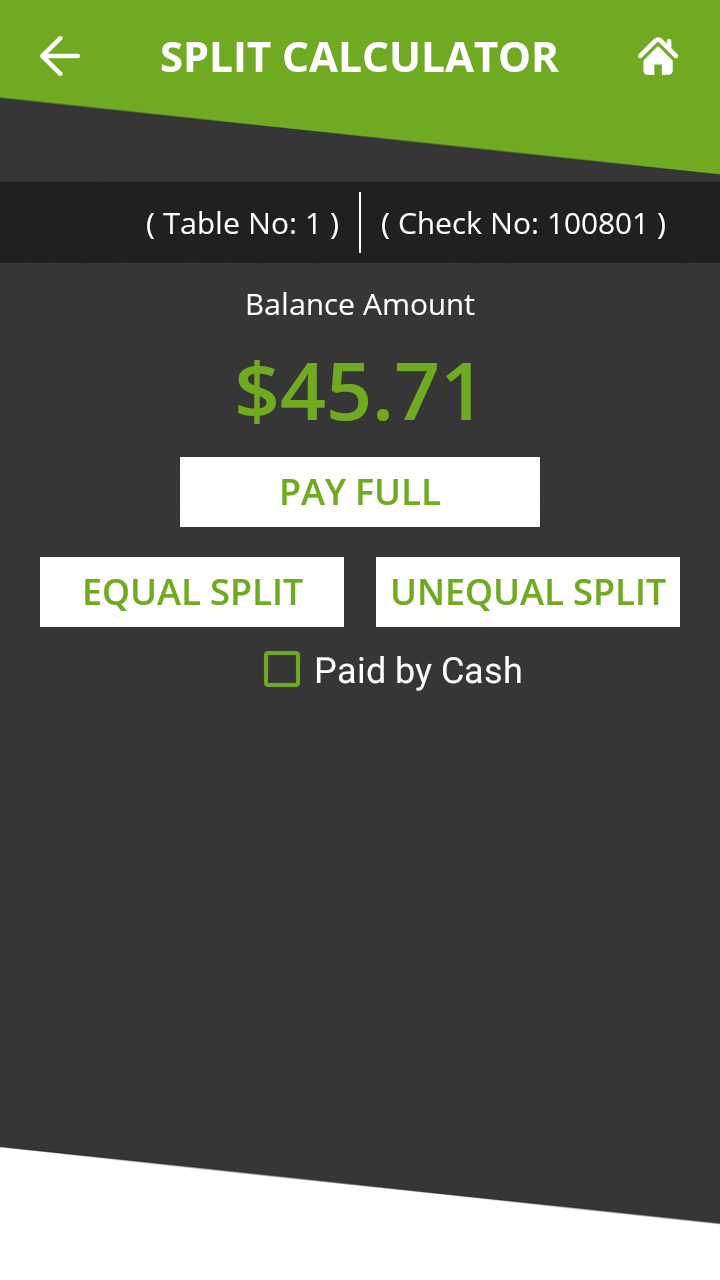
Paid by Cash
Enable this checkbox if the customer pays with cash. If the customer pays by card, leave this box unchecked.
PAY FULL
Touch this button to pay the check in full.
EQUAL SPLIT
Touch this button to split the check amount in up to 10 equal parts.
UNEQUAL SPLIT
Touch this button to split the check in unequal parts.
Split Calculator - Equal Split
Equal split is used to divide the total check amount in up to 10 equal parts. This is useful when there is a single printed check for 2 or more customers, and they want to split the expense among themselves. After touching the EQUAL SPLIT button, select the Number of Splits. The Per Split Amount will be updated
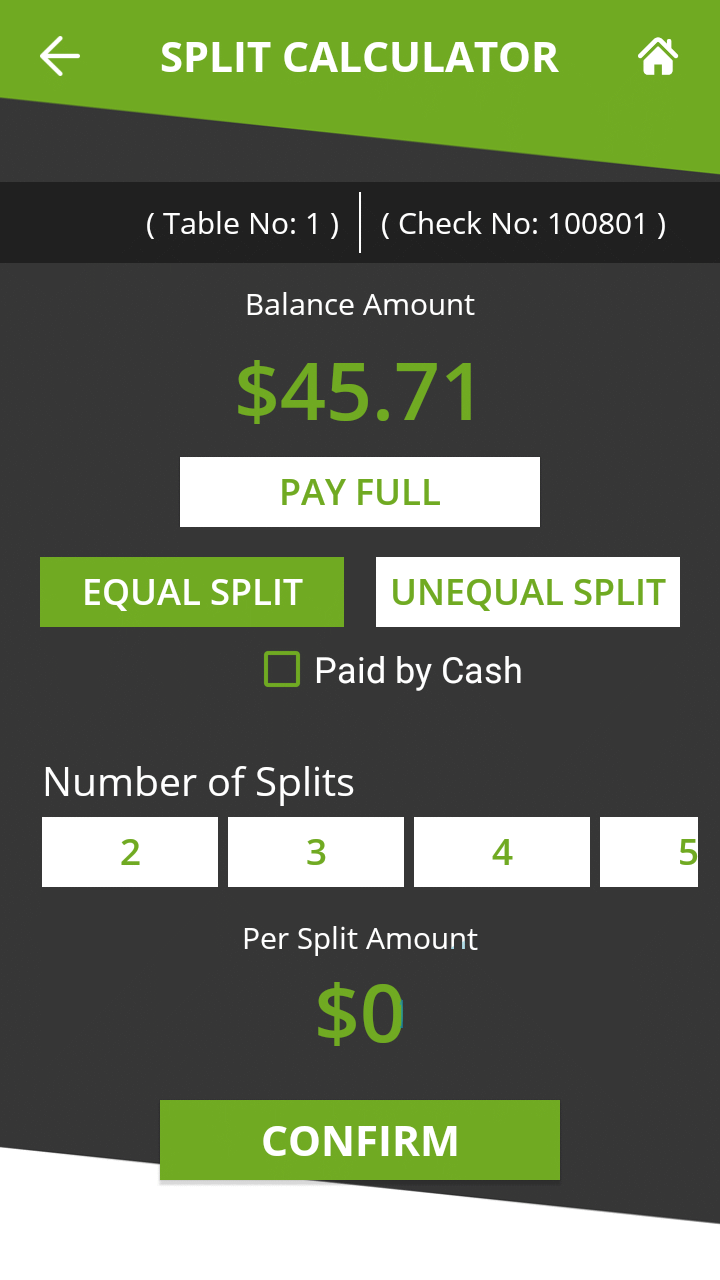
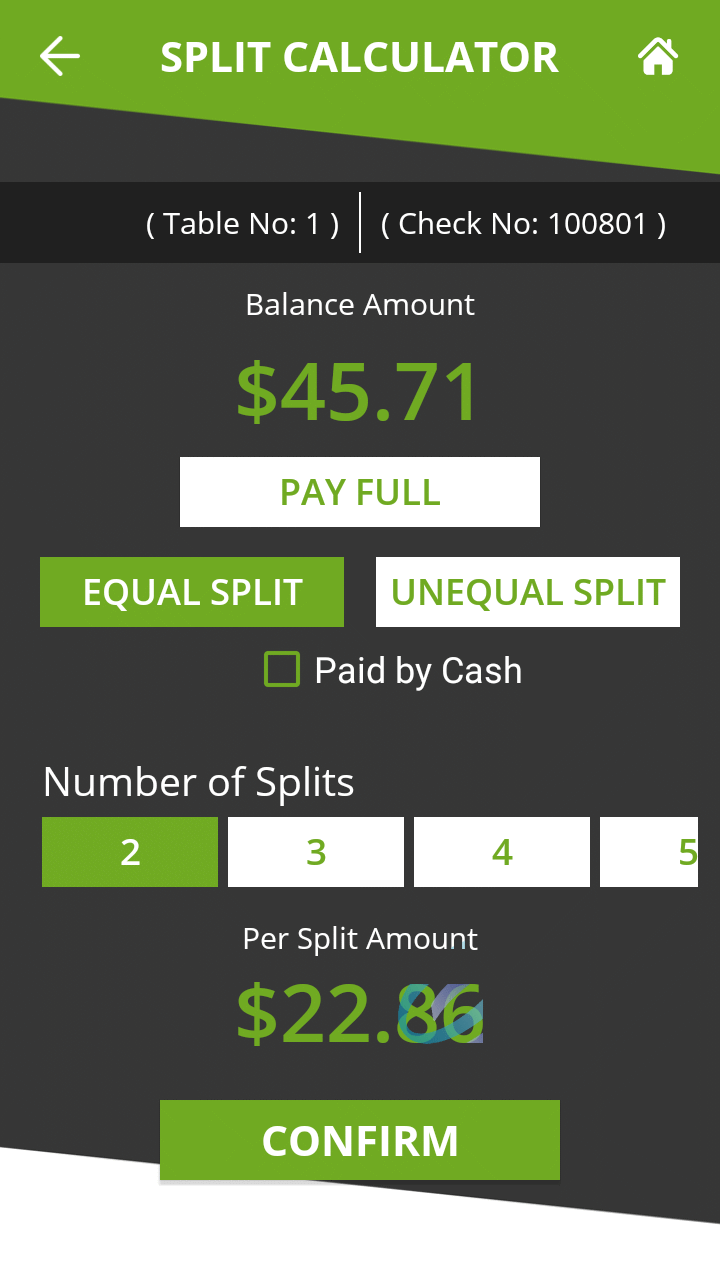
Touch the CONFIRM button to proceed with the first payment.
NOTE: If the amount is not equally divisible by the number of splits selected, there will be a difference of $0.01 between split amounts. In the screenshot above, dividing $45.71 by 2 creates the first split at $22.86 and the second one at $22.85.
Split Calculator - Unequal Split
The UNEQUAL SPLIT function is used to divide the check amount in unequal parts. This is useful if the in a single printed check which multiple customers wish to pay with various amounts.
After touching the UNEQUAL SPLIT button, touch the Amount field and enter the amount that the customer wishes to pay.

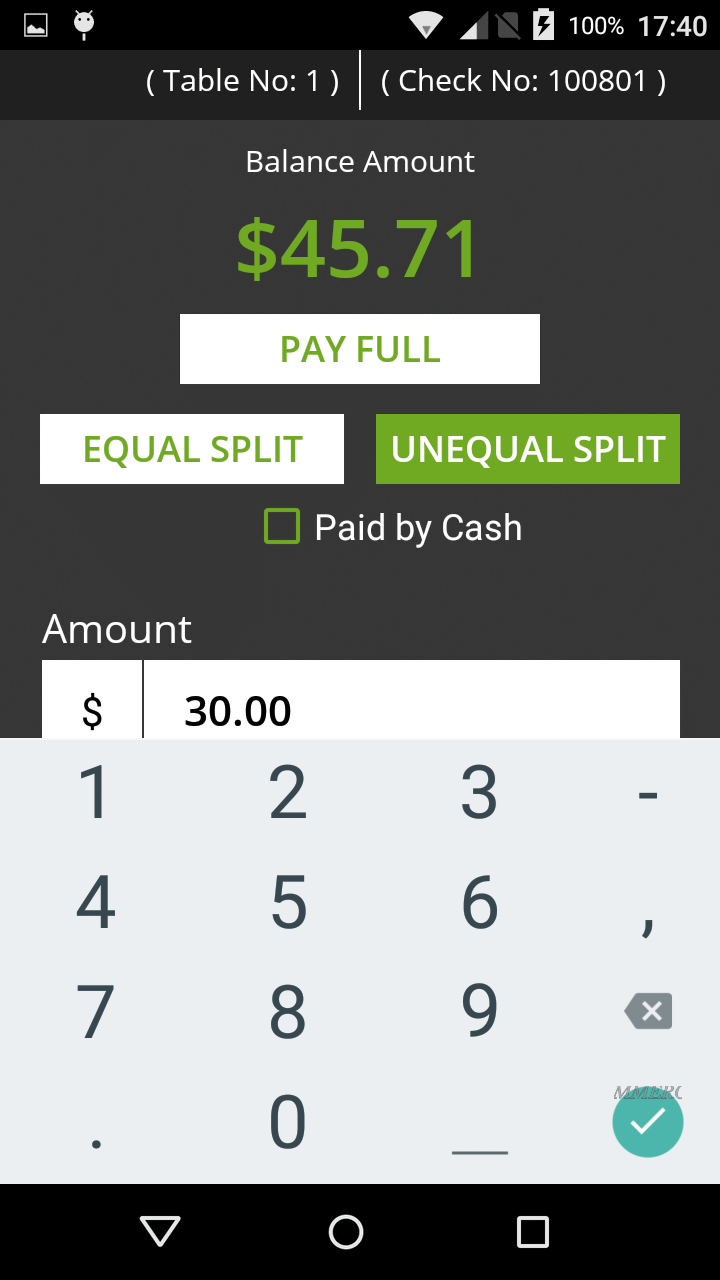

Touch the CONFIRM button to proceed with the first payment.
Tip Calculation
If the Tip option is enabled in the SecureTable application settings, the tip calculation screen will be displayed.
When the Tip calculation screen appears, the payment terminal needs to be handed to the customer. The customer has the following options:
• Select one of the pre-set percentages;
• Enter a custom dollar amount;
• Enter a custom percentage;
• Leave no tip at all.
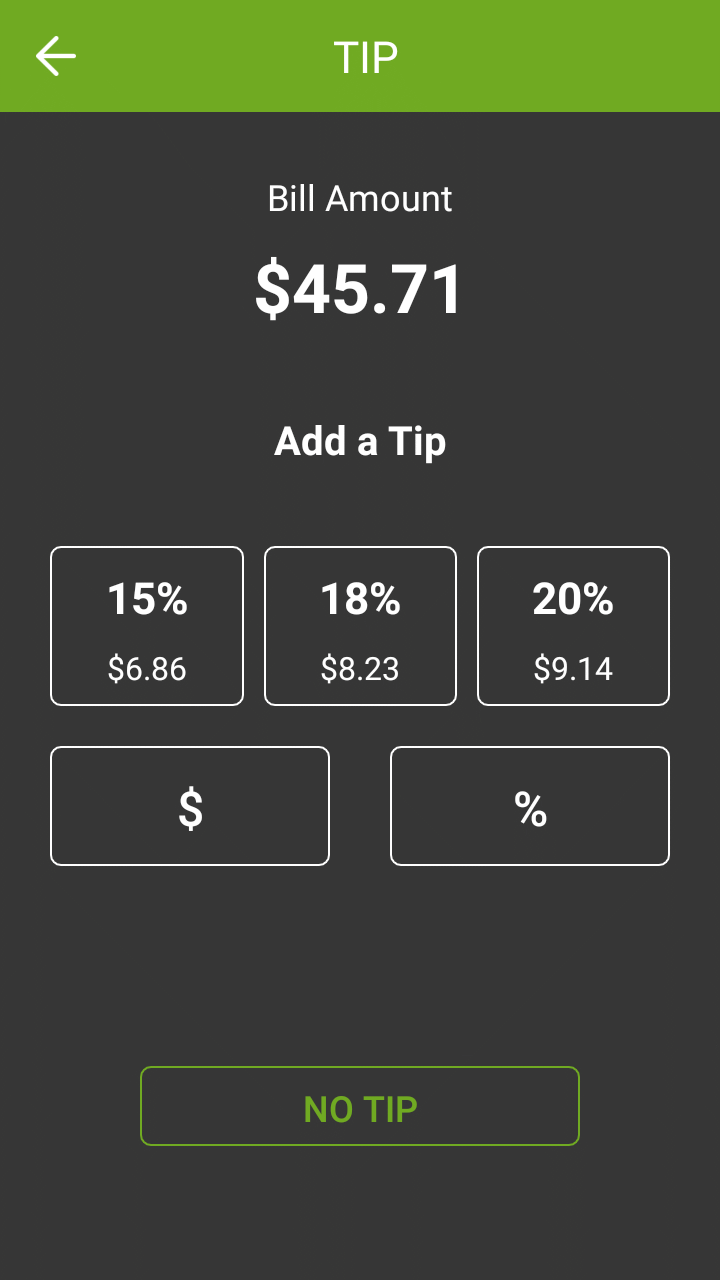
Bill Amount
This section shows the total amount to be paid.
Add a Tip
In this section, the tip presets configured in the Tip Preset Percentages in SecureTable's advanced settings are displayed. Each percentage box also indicates the corresponding dollar amount. Touching a preset automatically adds the stated tip amount to the transaction.
$
Touch the $ button to enter a custom dollar amount as tip instead of using a preset.
%
Touch the % button to enter a custom percentage of tip instead of using a preset.
NO TIP
Touch this button to skip the tip entry process altogether and leave no tip.
Custom tip amount
The screen below only appears if the customer touches the $ button to enter a custom tip amount.
The customer uses the provided keypad to enter a tip amount, which will make the green CONFIRM button available.
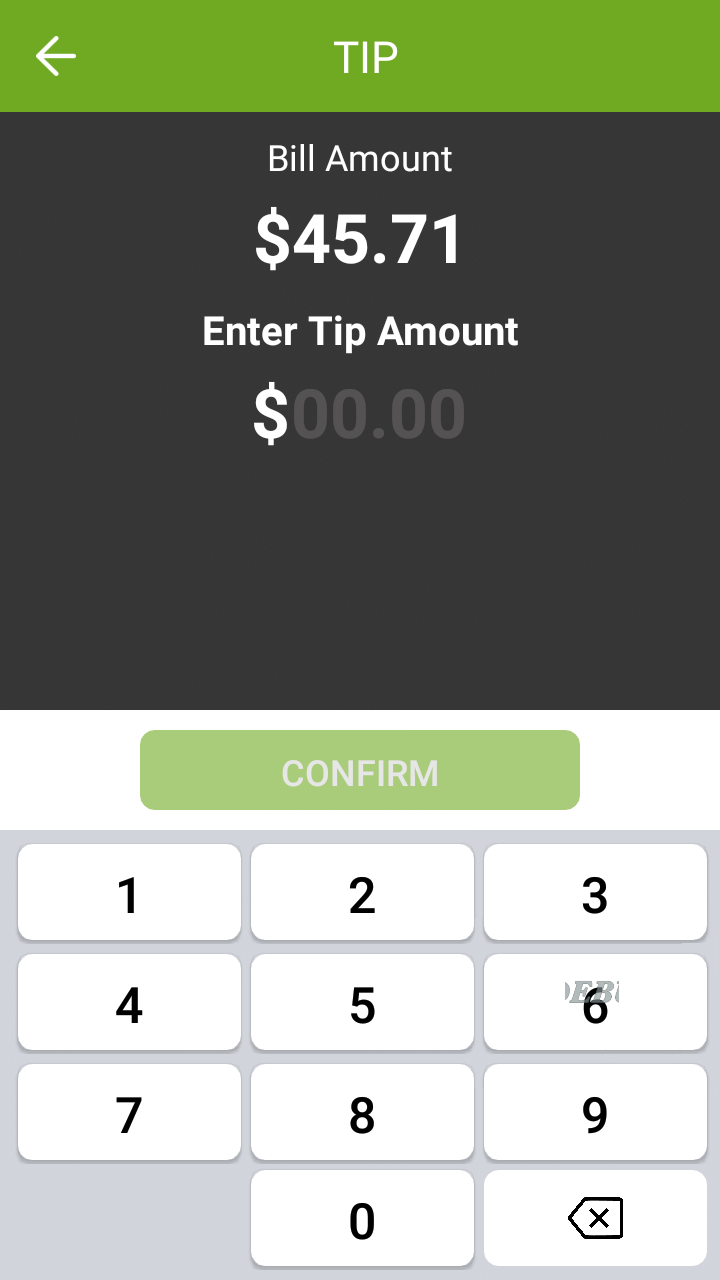
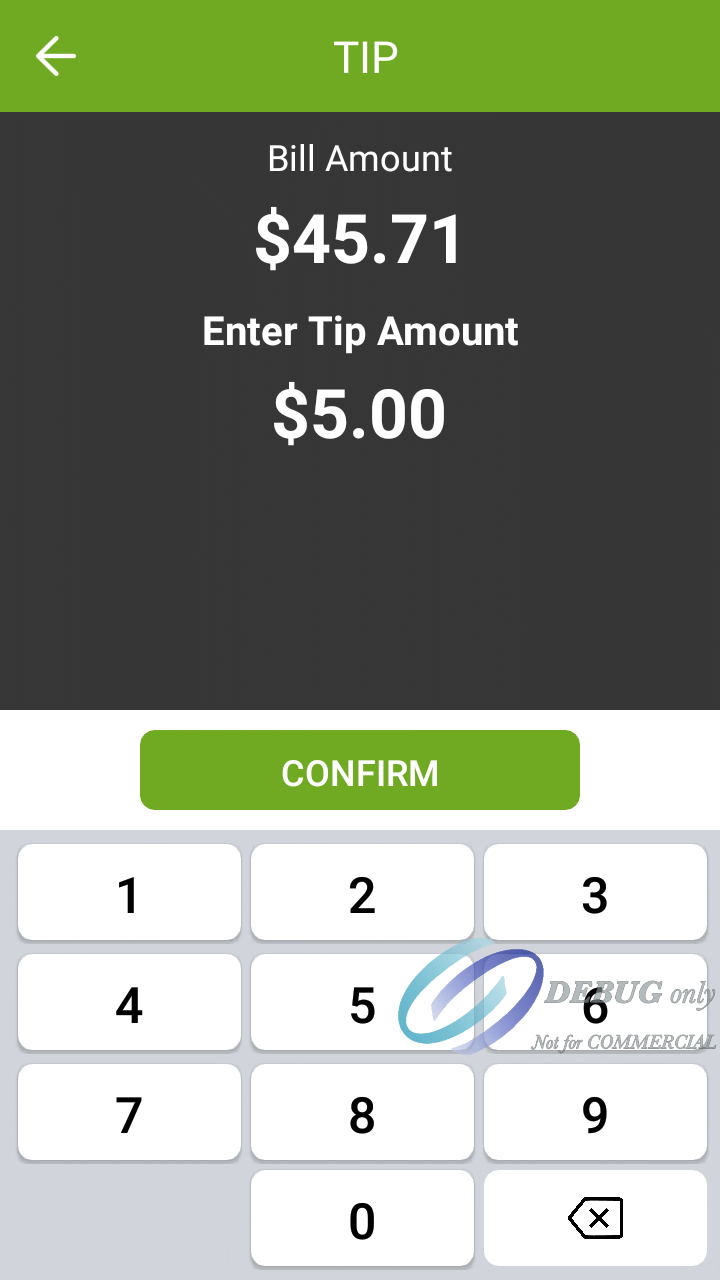

The customer can use the backspace key to correct typing mistakes. When ready, the customer presses the green CONFIRM button.
NOTE: On devices equipped with a physical keypad, the on-screen keypad will not be displayed. The physical keypad buttons will be used instead.
Custom tip percentage T
he screen below only appears if the customer touches the % button to enter a custom tip percentage. The customer uses the provided keypad to enter a tip percentage, which will make the green CONFIRM button available. Also note the Tip Amount value is updated in real-time as the customer types the percentage. This is provided so that the customer will immediately know exactly how much will be added to the check as tips, based on the percentage entered.Custom tip percentage The screen below only appears if the customer touches the % button to enter a custom tip percentage. The customer uses the provided keypad to enter a tip percentage, which will make the green CONFIRM button available.
Also note the Tip Amount value is updated in real-time as the customer types the percentage. This is provided so that the customer will immediately know exactly how much will be added to the check as tips, based on the percentage entered.
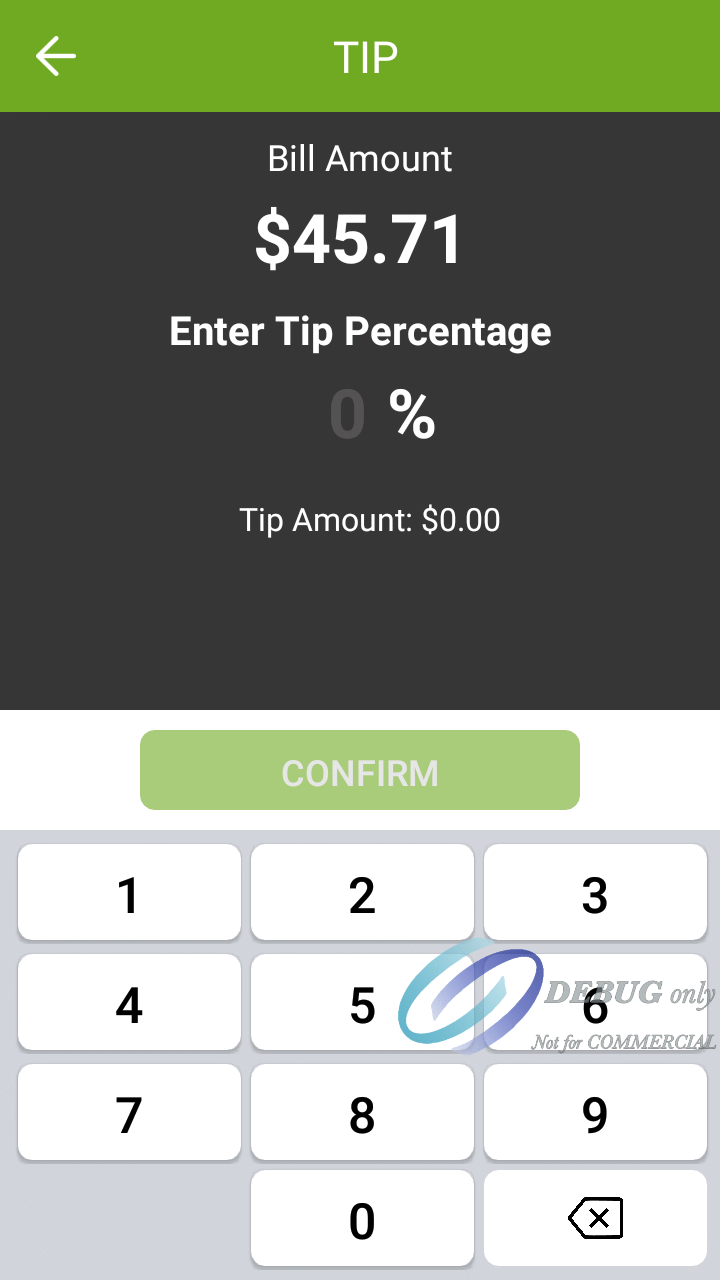
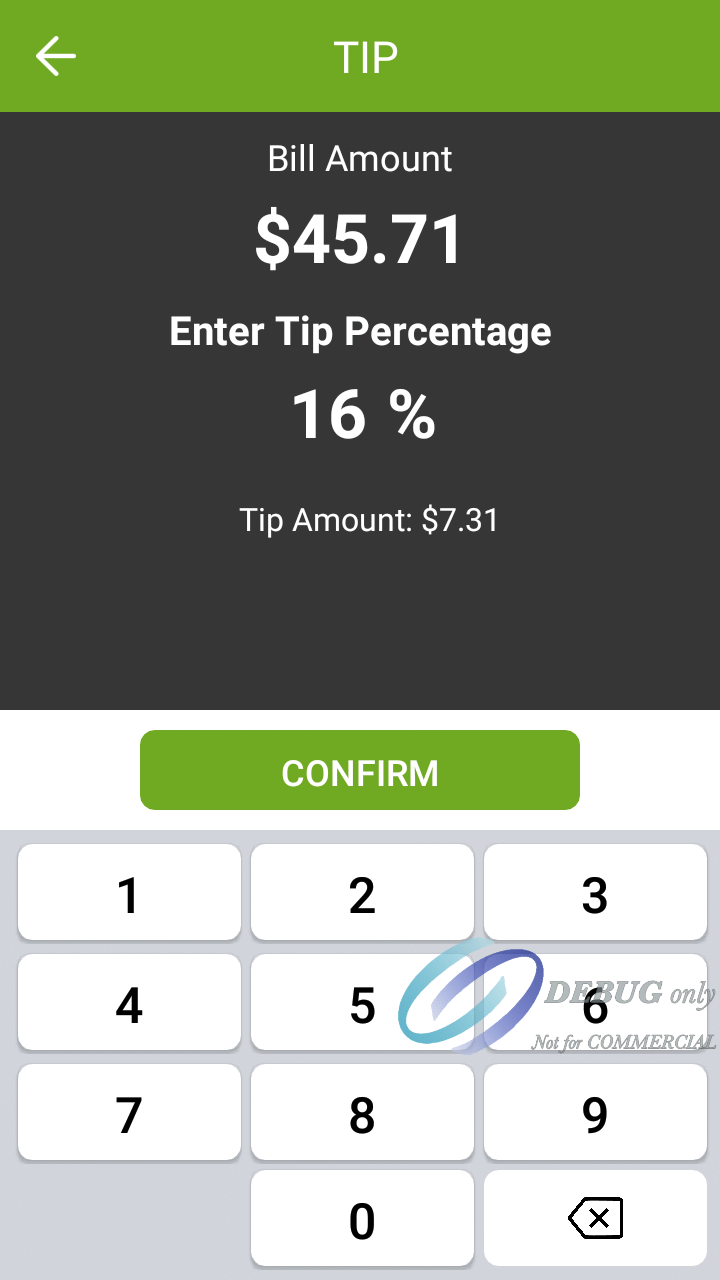

The customer can use the backspace key to correct typing mistakes. When ready, the customer presses the green CONFIRM button.
NOTE: On devices equipped with a physical keypad, the on-screen keypad will not be displayed. The physical keypad buttons will be used instead.
Tip Confirmation
If the Enable Confirmation option is enabled in the SecureTable application settings, the tip confirmation screen will appear. This is the last confirmation before the actual payment.
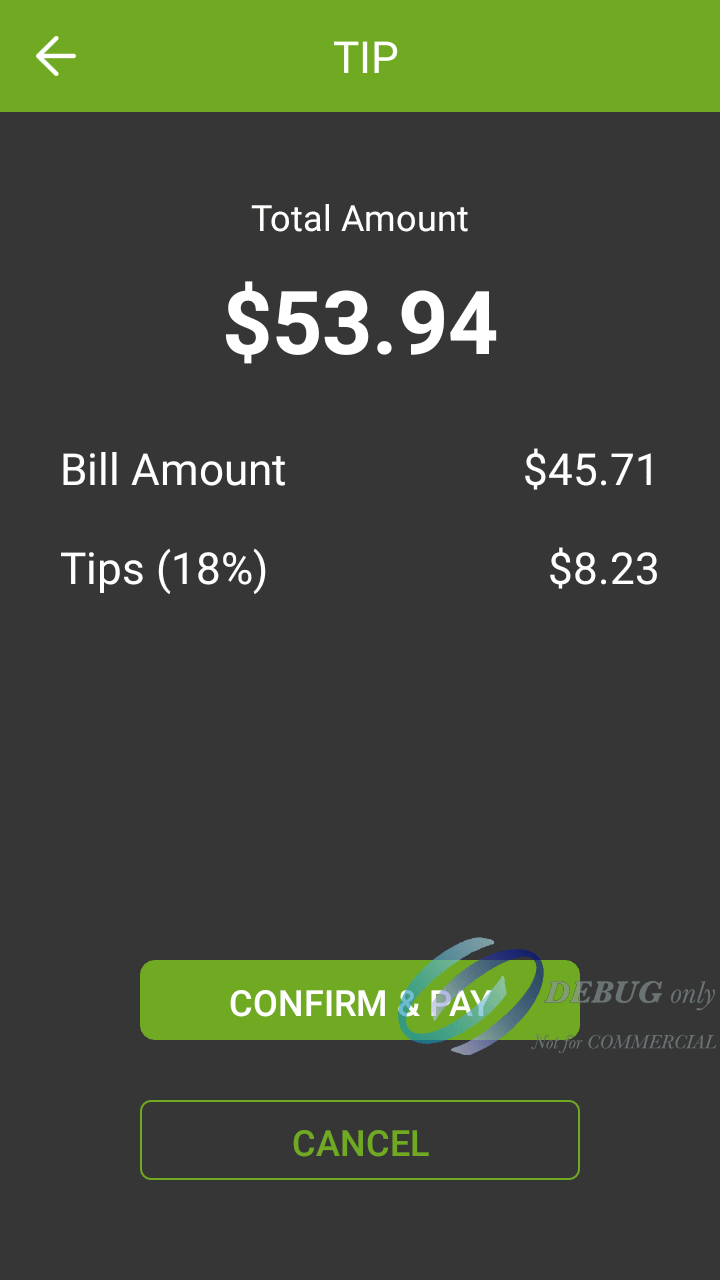
Total amount
This is the total amount to be paid, which is calculated from the check amount plus tip amount.
Bill Amount
This is the amount that was passed from the POS system. It is also known as the Check amount or Invoice amount, depending on the terminology used by the POS system.
Tips (__%)
This field displays the tip amount added. The percentage between parenthesis is calculated from the Bill amount vs. tip amount, and is always rounded to the nearest percentage point.
CONFIRM & PAY
Touch this button to proceed with the actual payment.
CANCEL
Touch this button to cancel the transaction and return to the home screen to start over. A confirmation screen will be displayed before actually cancelling the operation.
Payment
At this point, SecureTable will call the payment application installed on the payment terminal. The prompts that the customer will see will depend on the payment application used and the card type used. For more information on this specific part of the workflow, please consult your payment application's documentation.
PayFacto Payment Process
PayFacto User Guide PayFacto
Quick Reference Guide
BroadPOS Payment Process
BroadPOS Quick Reference Guide
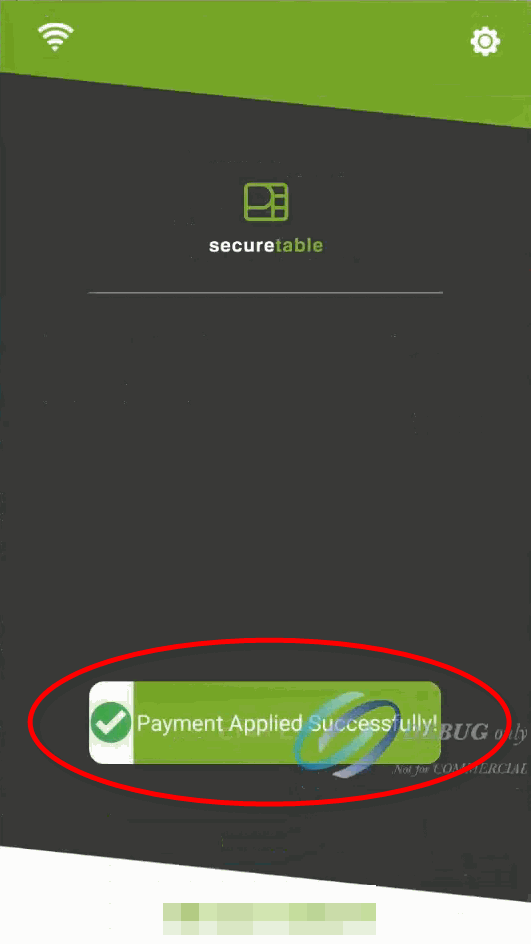
Payment posting to POS
After the payment has been authorized by the payment application, the payment data will be sent to the POS system. Note that only non-sensitive data is exchanged between SecureTable and the POS system.
The message Payment applied successfully! will be briefly displayed on the screen. Then, one of two things can happen:
Splits
If this was a payment resulting from a split, SecureTable will return to the Split Calculator to process the next payment.
Full payment / Last payment
If this was a full payment or the last payment of a series of splits, SecureTable will return to the home screen.

The payment workflow with SecureTable is now complete, and the application is ready to process the next payment.
Was this helpful?