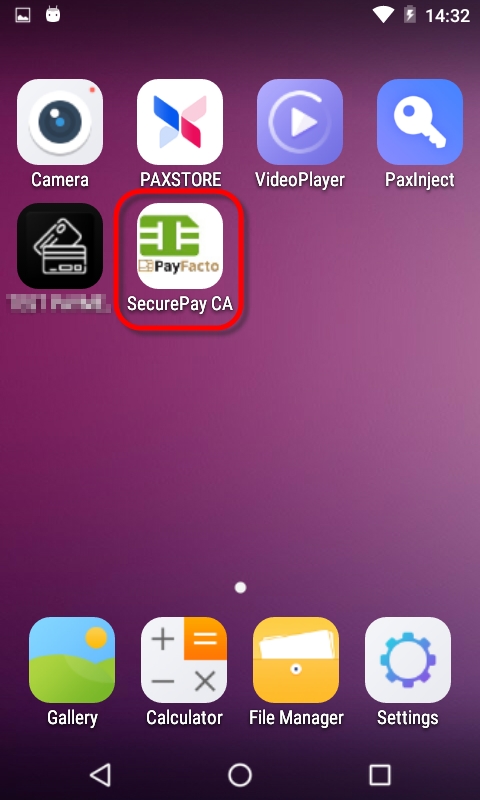
If the SecurePay application does not start automatically, simply touch the appropriate icon on the Android home screen. A splash screen will briefly be displayed, followed by the SecurePay home screen.
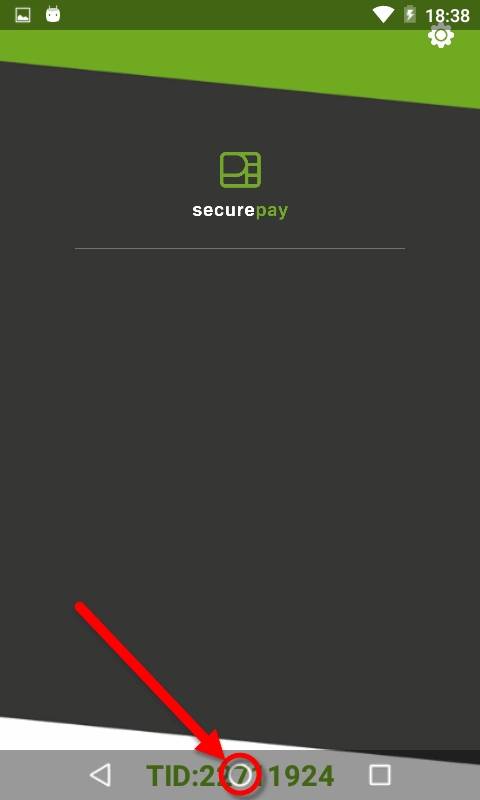
The Settings button is used to access SecurePay's configuration options. This icon appears in the top-right corner of the SecurePay home screen.
When available, the Home button will appear in the top-right corner of the screen. Use it to jump directly to the SecurePay home screen without saving changes.
Back
When available, the Back button will appear in the top-left corner of the screen. Use it to go back to the previous screen without saving changes.
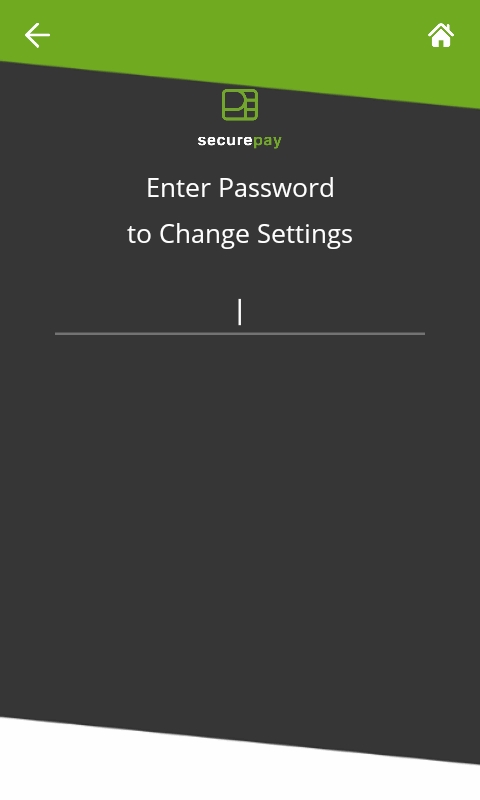
The SecurePay application settings are protected by a password. The default password on a new installation is 1234
To exit the SecurePay application, swipe the terminal's screen either from the top edge going down, or the bottom edge going up, then touch the Android Home (circle) button.
You will be prompted to enter a passcode to exit the application. Enter the passcode and touch the OK button.
From the SecurePay home screen, touch the cog wheel icon ( ) at the top-right of the screen.
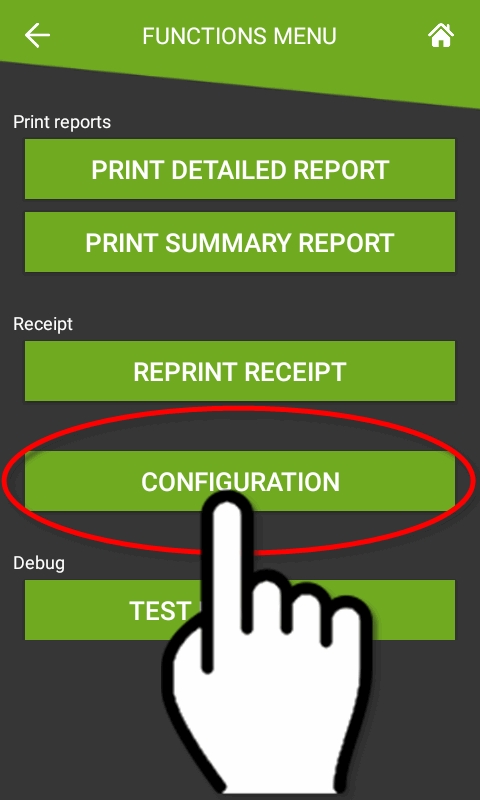
The FUNCTIONS menu will be displayed. Touch the CONFIGURATION button.
You will be prompted to enter a password before you can access settings. Enter the password and press the OK key.
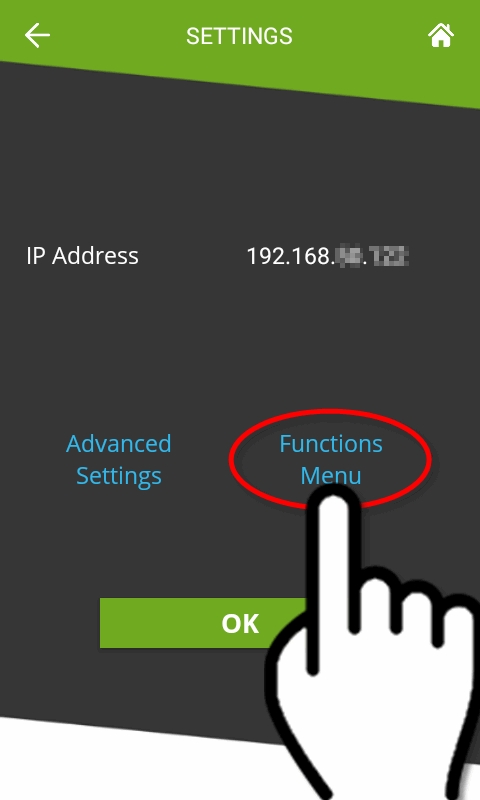
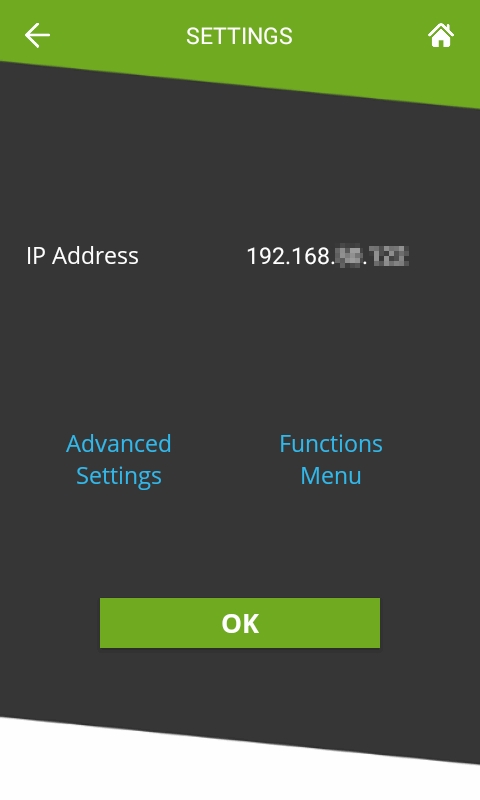
The SETTINGS screen will be displayed.
IP Address
This is the IP address currently assigned to the payment terminal.
Advanced Settings
Touch this link to access the Advanced Settings screen.
Functions Menu
Touch this link to access the Functions Menu screen.
OK
Touch this button to return to the home screen.
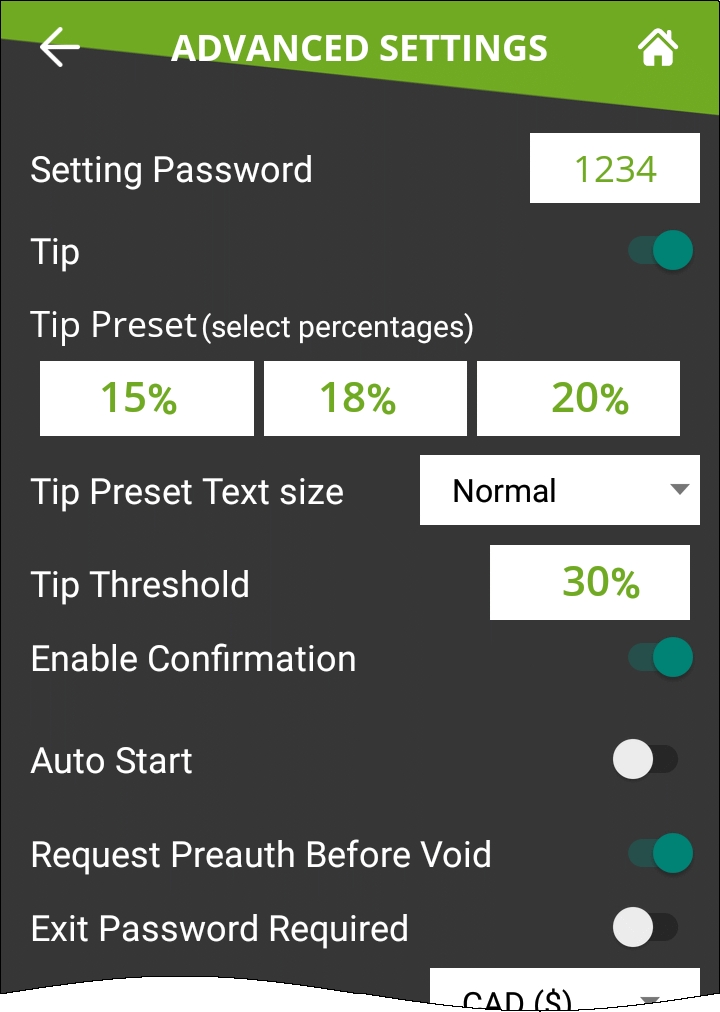
Setting Password
Configure the password used to access settings. This is also the password that will be requested if the customer enters a tip amount that exceeds the Tip Threshold.
Tip
Enable this option to have the SecurePay application prompt for tip entry. Disable this option to prevent tip entry. Disabling this option will also hide all the tip-related options below.
Configure preset tip percentages that the customer will see when prompted for tip. Up to 3 presets can be configured. If you do not wish to use all of them, presets that are set to 0% will not be displayed to the customer.
Tip Preset Text Size
Select the text size used to display preset tip percentages. Available choices are Normal, Medium and Large.
Tip Threshold
Enter the maximum allowed tip percentage. Any tip amount that exceeds this percentage will require the settings password to be entered. Setting the percentage to 0% disables the tip threshold validation.
Enable Confirmation
Enable this option to present a dedicated tip confirmation screen for the customer. If this option is disabled, the tip confirmation screen will be skipped when selecting a tip preset or the NO TIP option. If using custom $ or custom % with this option disabled, the tip amount, percentages and resulting totals will be updated in real-time as the customer types the numbers in, but no additional confirmation screen will be presented before the actual payment.
Auto Start
Enable this option to have the SecurePay application start automatically when powering on the payment terminal.
Request Preauth Before Void
This option is used to determine the behaviour of incremental preauthorizations for bar tabs, when the sale amount exceeds the original preauth amount.
When this option is enabled, a new preauth request will be processed before voiding the old one. The advantage is that the merchant will know for sure that the new preauth is approved before voiding the old one. However, there is a risk that the new preauth could be declined, due to the card's credit limit being exceeded, as both preauths will coexist until the original preauth is voided.
When this option is disabled, the original preauth will be voided before the request for the new preauth is made. With this method, the risk of getting a decline is somewhat lower, but still exists nonetheless. As the new preauth amount is generally higher than the original preauth amount, it could potentially exceed the card's credit limit.
Exit Password Required
With this option enabled, the SecurePay application will request the settings password before closing.
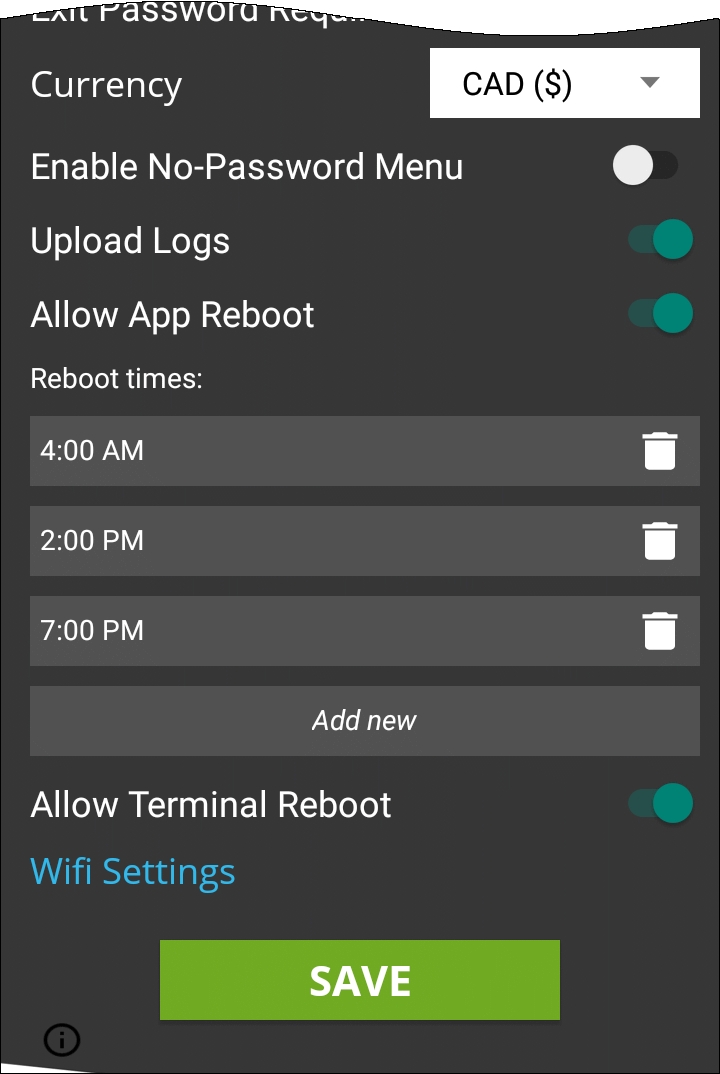
Currency
Select the default currency for your region. Supported currencies are:
Canadian Dollar (CAD ($))
United States Dollar (USD ($))
United Kingdom Pound (GBP (£))
European Union Euro (EUR (€))
Enable this option to allow users to access a simplified version of the Functions menu without entering a password. This menu is accessed by touching the cog wheel icon ( ) at the top-right of the home screen. Enabling this option will also unlock access to the Allow Reports Printing and Allow Receipt Reprinting options below.
Enable this option to allow users to access and print the Detailed Report and Summary Report from the No-password menu. If this option is disabled, the reports can still be printed from the FUNCTIONS menu, which requires the settings password.
Enable this option to activate the Reprint Receipt option in the No-password menu. If this option is disabled, the receipts can still be reprinted from the FUNCTIONS menu, which requires the settings password.
Upload Logs
Enable this option to upload the SecureTable application logs to the PayFacto Cloud services. It is recommended to leave this option enabled.
Allow App Reboot
Enable this option to allow the SecurePay application to restart itself. Note that this only re-initializes the application, and does not involve a full terminal reboot.
Reboot times
This is only visible if Allow App Reboot is enabled. By default, SecurePay is preconfigured with 3 reboot time entries.
You can edit existing entries by touching the time. A clock will appear which allows you to change the reboot time.
You can delete existing entries by touching the trash can icon to the right of each entry.
You can add more entries by touching the Add new button at the bottom of the list.
Allow Terminal Reboot
Enable this option to allow the terminal to reboot after an automatic batch settlement. It is recommended to leave this option enabled.
WiFi Settings
Use this shortcut to configure the payment terminal's WiFi settings.
SAVE
Touch this button to save your changes and return to the home screen.
IMPORTANT! Be sure to touch the SAVE button to save your changes. Using any other button to exit from the settings screen will discard all changes.
After the Retail Terminal Interface for Semi-Integrated Payment Application (RTI-SIPA) plugin has been installed, configured and running properly on the POS system's Back-Office and POS workstations, make sure that all payment terminals are properly configured so they can communicate with the POS system and the Internet. Android payment terminals are generally shipped with all the necessary applications pre-installed by PayFacto, including the latest version of SecurePay and the latest version of the Payment application. If the SecurePay application appears to be missing, install it using the instructions below.
The instructions below were created using the PAX A920 and PAX A80 Android-based Payment terminals and the PAX store. However, the instructions are the same for all Android-based payment terminals, such as other models offered by PAX, AMP terminals or Clover Flex. For brands other than PAX, the mechanism they use to install apps may look different, but the general principle should remain the same.
PAX A920 PAX A80
Before installing SecurePay on your payment terminal, please make sure that the appropriate payment application is installed and configured properly. You may also want to check out our documentation on the PAX A920, A920Pro or A80 terminals or any other Android-based terminal you may be using with SecurePay.
Link
Power-up your terminal, and make sure it is connected to the Internet.
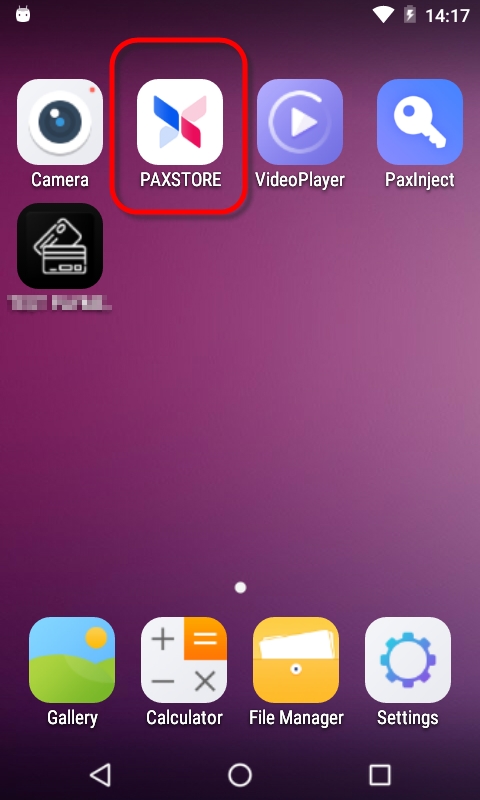
If any application start automatically, shut them down to reach the Android home screen.
From the Android home screen, start the PAXSTORE by touching the appropriate icon.
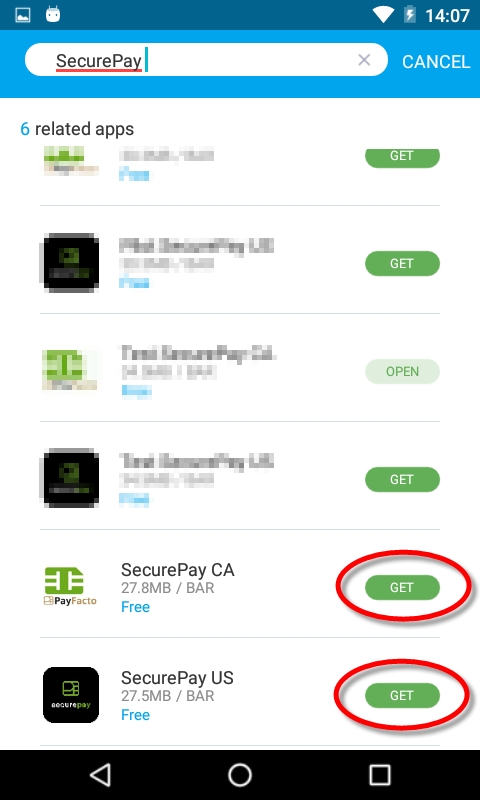
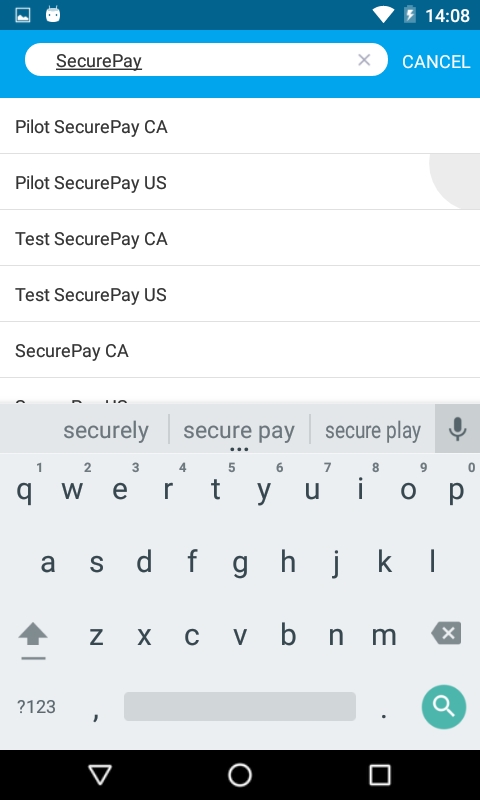
In the PAXSTORE (Application Marketplace), search for SecurePay.
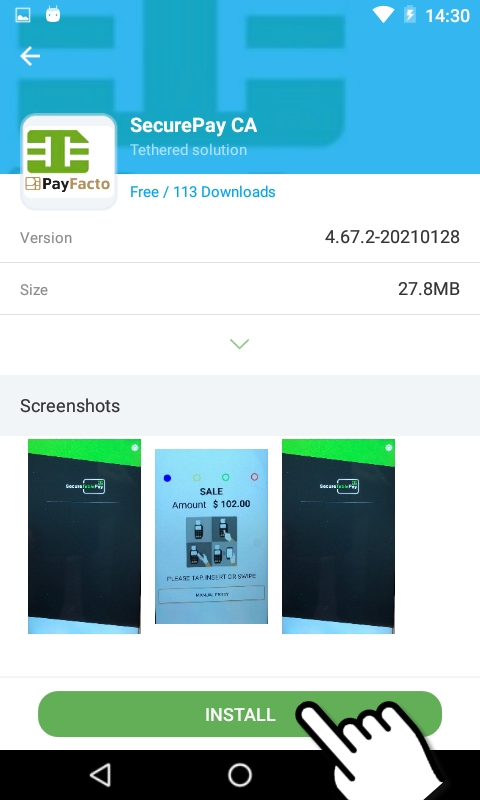
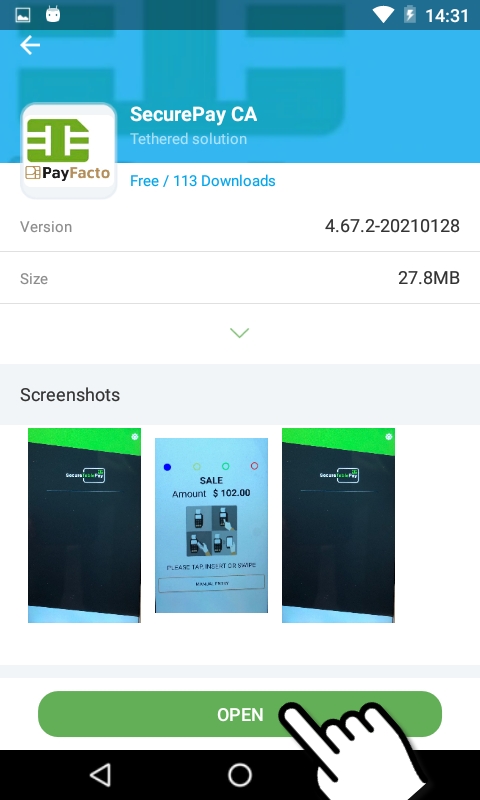
Locate the version which is appropriate for your region, and touch the GET button to start thedownload and installation process
.
The details of the application will be displayed. Then, to install the application:
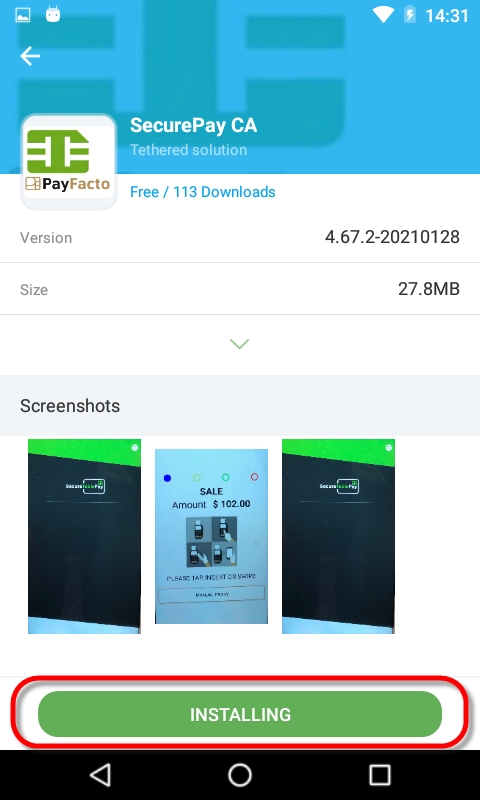
Touch GET
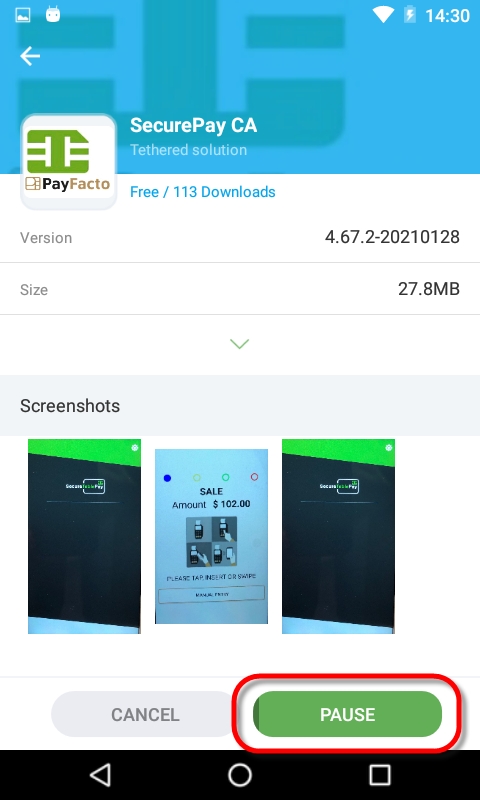
Download starts
Touch INSTALL
Installing
Touch OPEN
You can also use the Android Back button to return to the Android home screen and use the installed shortcut to start the application.
The installation of the SecurePay Android application is now complete.
Australian Dollar (AUD ($))


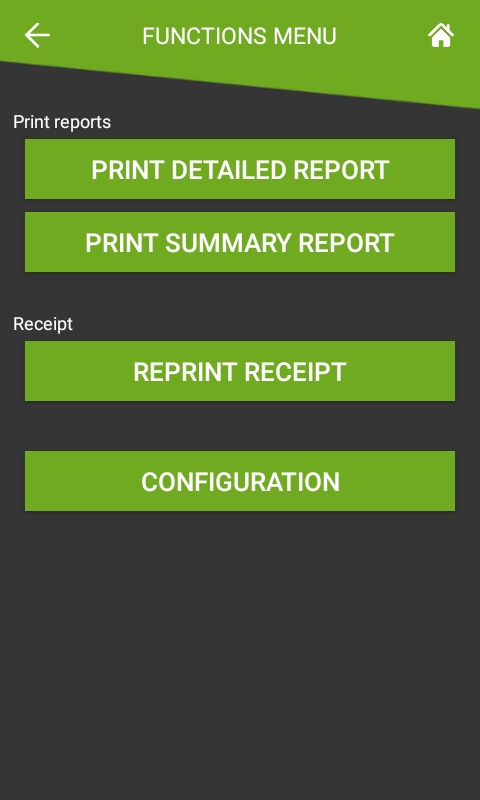
The No Password Menu is a simplified version of the Functions menu. It contains basic functions that are useful to employees, while manager functions remain hidden.
From the SecurePay home screen, touch the cog wheel icon ( ) at the top-right of the screen.
The FUNCTIONS menu will be displayed. The options available from this menu will vary based on your SecurePay application settings.
The Print Reports section will be displayed if the option is enabled in the SecurePay Application Settings.
PRINT DETAILED REPORT
This option prints a report with the details of every card payment processed at the terminal since the last batch closing.
PRINT SUMMARY REPORT
This option prints a report that shows a summary of sales, refunds, tips and grand total for each card brand.
The Receipt section will be displayed if the option is enabled in the SecurePay Application Settings.
REPRINT RECEIPT
This option allows receipts to to be reprinted based on invoice number, sequence number or the last transaction processed at the terminal.
CONFIGURATION
This option brings up the SecurePay application settings.
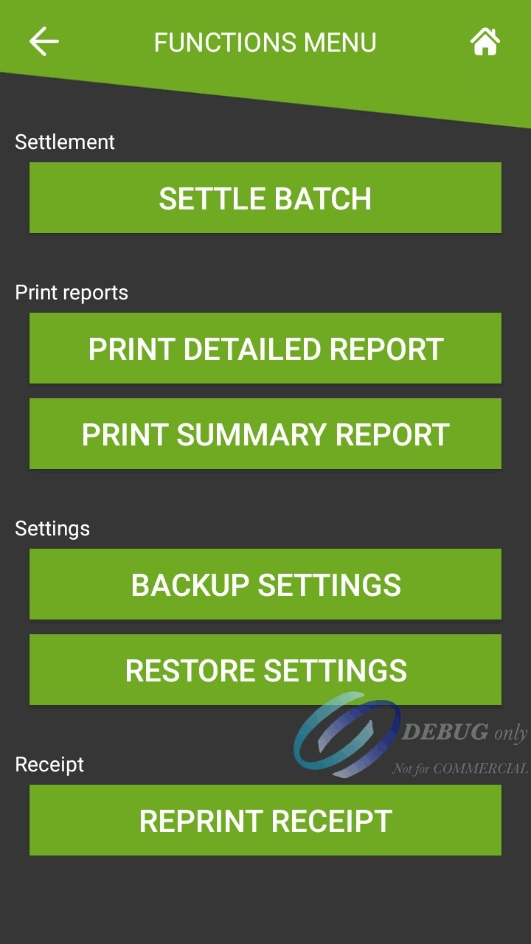
The full functions menu contains all the options from the No Password Menu, plus a few more administrative options. To access the full functions menu:
From the SecurePay home screen, touch the cog wheel icon ( ) at the top-right of the screen.
The FUNCTIONS menu (no password menu) will be displayed. Touch the CONFIGURATION option.
You will be prompted to enter a password before you can access settings. Enter the password and press the OK key.
The Functions menu will be displayed. Contrary to the No Password Menu discussed above, all the options shown below are always available, regardless of the status of the advanced settings.
SETTLE BATCH
This option will manually close the current batch.
IMPORTANT! Transactions that are part of a batch that is closed can no longer be voided, reprinted or otherwise modified.
This option prints a report with the details of every card payment processed at the terminal since the last batch closing.
PRINT SUMMARY REPORT
This option prints a report that shows a summary of sales, refunds, tips and grand total for each card brand.
BACKUP SETTINGS
This option will save all of the current settings to an S3 Bucket cloud location. Backing up the settings allows for quick recovery of the configuration in case the settings get reset to default after a major application update or Android update.
RESTORE SETTINGS
Use this option to restore saved settings. Using this option will override all settings with the ones found in the backup, except for the terminal ID.
This option allows receipts to to be reprinted based on invoice number, sequence number or the last transaction processed at the terminal.