Loading...
Loading...
Loading...
Loading...
Loading...
Loading...
Loading...
Loading...
Loading...
Loading...
Loading...
Loading...
Loading...
Loading...
Loading...
Loading...
Loading...
Loading...
Loading...
Loading...
Loading...
Loading...
Loading...
Loading...
Loading...
Loading...
Loading...
Loading...
Loading...
Loading...
Loading...
Loading...
Loading...
Loading...
Loading...
Loading...
Loading...
Loading...
Loading...
Loading...
Loading...
Loading...
Loading...
Loading...
Loading...
Loading...
Loading...
Loading...
Loading...
Topics is covered:
The Secure Payment application's SecureTable module has multiple configurable features and functions. The features and functions apply to all Secure Payment modules you may use, including standalone Payment, SecurePay, Gateway (GID), and Gift Cards.
For the SecureTable module, the feature you will most likely need to configure is tipping, but you can access the following configuration menus:
Application Configuration
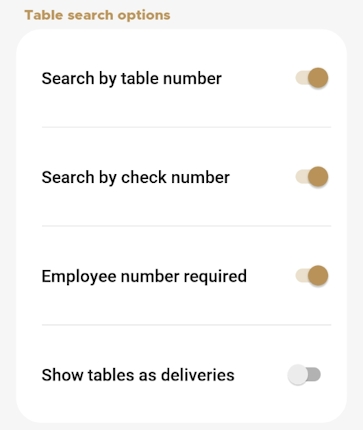
When using the SecureTable module, you terminal operators can search for the correct bill using multiple search parameters. The available search parameters include:
Search by table number: Use an assigned table number to find the bill(s) associated to the table.
Search by check number: Use a known check number to find the desired bill(s).
Employee number required: Use an operator's number to locate the desired bill(s).
Show tables as deliveries: Show assigned table numbers as delivery items for use with to-go or delivery orders.
From the main screen, touch the Menu button.
Enter the merchant password and touch Confirm.
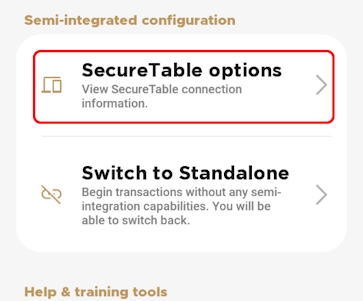
Scroll to the Semi-integrated configuration section and touch SecureTable options.
Scroll to the Table search options section.
Enable the desired table searching options by toggling the following switches to the right:
Search by table number
Search by check number
Employee number required
Show tables as deliveries
If you have more than one terminal, repeat steps 1 to 7 for each additional terminal where you want to configure the table searching options.
When using the SecureTable module, you can choose the terminal's behavior when a communication issue causes a transaction to appear a second time (a duplicate version). By default, the terminal reposts the transaction, but you can choose to disable the duplicate transaction on the terminal.
From the main screen, touch the Menu button.
Enter the merchant password and touch Confirm.
Scroll to the Semi-integrated configuration section and touch SecureTable options.
Scroll to the Duplicate transaction prevention section.
Touch the option you wish to use for the terminal:
Repost
Off
If you have more than one terminal, repeat steps 1 to 5 for each additional terminal to configure the terminal's behavior for duplicate transactions.
The SecureTable module allows you to view the connection settings to your POS system. You can also test the SecureTable module's connection to the STPI server if needed. The connection settings should not be modified unless specifically instructed to do so by PayFacto support. Changing the settings may affect the terminal's ability to communicate with the POS.
From the main screen, touch the Menu button.
Enter the merchant password and touch Confirm.
Scroll to the Semi-integrated configuration section and touch SecureTable options.
In the Connection section, review the information that appears.
STPI Connection Address: The address the terminal uses to connect to the STPI server (can be a URL or IP address).
Test STPI Connection: Touch this button to test the terminal's connection to the STPI server.
STPI Port Number: The port number the terminal uses when communicating with the STPI server.
If you have more than one terminal, repeat steps 1 to 4 for each additional terminal to review the terminal's connection settings.
When using the Secure Payment application, it is helpful to have a list of processed transactions to ensure your bookkeeping is aligned with your business' sales. The terminal can print transaction reports, allowing you to view either detailed or summary information on the transactions and transaction types in the current batch, if your business uses multiple terminals, you need to print reports on those terminals to view their reports.
Detailed reports display a list of every transaction in the current batch, including date, time, transaction type, payment method, invoice number, and amount. Summary reports group the transactions by card type, displaying the total sales, and the number of transactions.
The terminal’s printer (built-in or external) can print transaction reports for the current batch. For reconciliation purposes, you may want to print a report prior to the automated settlement, but it is not a requirement. Printing reports is meant to assist with your bookkeeping.
The available transaction reports are:
Additionally, you can search for individual transactions using the procedure.
When using the SecureTable module, servers can split the bill for a table in equal or unequal parts. By default, the SecurePayment module is configured to only split checks for card payments, but you can enable cash as an option when splitting checks.
From the main screen, touch the Menu button.
Enter the merchant password and touch Confirm.
Scroll to the Semi-integrated configuration section and touch SecureTable options.
Scroll to the Split calculator options section.
Enable the use of cash when calculating split checks by sliding the Cash toggle switch to the right or disable the cash option by sliding the toggle switch to the left.
If you have more than one terminal, repeat steps 1 to 5 for each additional terminal to configure the Cash option for split checks.
You can search for transactions on the terminal to view the details about one or more transactions. If you have multiple terminals operating under the same merchant ID (MID), all transactions from all terminals appear in the list with the most recent transaction at the top of the list. You can search for transactions in the current (open) batch as well as from previous batches.
NOTE: Because all of a merchant's transactions processed on all terminals are saved immediately to the server, the list of transactions may be quite long.
TIP: If you find it difficult to locate a specific transaction from an individual terminal, you may choose to restrict the search function to only display transactions performed on each individual terminal.
To restrict the transaction display to only those processed by the terminal, you must contact PayFacto support to request that your merchant profile displays only transactions processed on individual terminals by activating the Terminal Only Reports function. This will restrict transaction searching to individual terminals.
From the main screen, touch the Menu button.
Enter the merchant password and touch Confirm.
In the Transaction management section, touch Transaction History.
Touch the Search button.
Enter one or more of the following search criteria:
An invoice number in the Invoice number field
An authorization code in the Authorization code field
Touch the Time range field to select a date range for the desired transaction; touch Save to search using the selected date range
Touch the Search button. The terminal returns any transaction that meets the selected search criteria.
Touch the desired transaction to display the details.
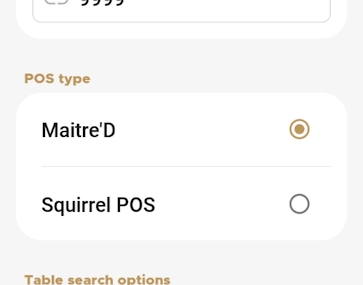
When working with the SecureTable module, you can select the POS type the terminal communicates with. You should not need to change the POS type if your system was working properly with its initial configuration, but you may need to make a change if you install a new POS or if directed by a PayFacto support agent.
IMPORTANT! If you change the POS type without ensuring that the back-office POS is configured to support the new type, the communication between your POS workstation(s) and the payment terminal may not function correctly.
From the main screen, touch the Menu button.
Enter the merchant password and touch Confirm.
Scroll to the Semi-integrated configuration section and touch SecureTable options.
Scroll to the POS type section and touch the name of the POS you want to use with the payment terminal; the available options are:
Maitre'D
Squirrel POS
If you have more than one terminal, repeat steps 1 to 4 for each additional terminal where you want to configure the POS type.
Disable table searching options by toggling the previously listed switches to the left.
You can configure your terminal to add a tip to the total sale. You can also configure cashback options for debit transactions (if supported). The topics covered in this section include:
Enabled
Disabled
The detailed report for the current batch of transactions lists each individual transaction’s details. You may want to print the detailed transaction in order to have a printed copy of the transactions prior to processing the the current batch. Printing a detailed report allows you to reconcile each transaction as part of your bookkeeping.
NOTE: Printing a detailed report can consume a large quantity of paper, depending on the number of transactions in the current batch.
From the main screen, touch the Menu button.
Enter the merchant password and touch Confirm.
In the Transaction management section, touch Reports.
In the Batch Details section, touch Print Batch Details. The terminal prints the Batch Details Report, listing all transaction details in the current batch for all terminal operators.
If you have more than one terminal, repeat steps 1 to 4 for each additional terminal where you want to print the detailed transaction report.
The summary report for the current batch of transactions allows you to see the totals for each payment method used, including sales, refunds, tips, cashbacks, and fees. You may want to print the summary report to reconcile transactions by payment type as part of your bookkeeping prior to processing the current batch.
From the main screen, touch the Menu button.
Enter the merchant password and touch Confirm.
In the Transaction management section, touch Transaction History.
In the Batch Summary section, touch Print Batch Summary. The terminal prints the Summary Details Report, listing all transactions in the current batch, grouped by card type for all terminal operators.
If you have more than one terminal, repeat steps 1 to 6 for each additional terminal where you want to print the summary transaction report.
If you want to offer your customers the ability to withdraw cash in addition to their purchase, you can do so for debit card transactions only. By default, cashback is disabled on the terminal.
From the main screen, touch the Menu button.
Enter the merchant password and touch Confirm.
Scroll to the Configure application section.
Touch Terminal options.
Scroll to the Cashback section.
Toggle the Cashback processing switch to the right.
If you have more than one terminal, repeat steps 1 to 6 for each additional terminal where you want to enable cashback.
When you enable cashback for a debit transaction, the terminal automatically displays three preset values (defaults are $20, $40, and $60) as options to the customer. The customer can touch one of the preset values or manually enter an amount for cashback.
NOTE: When you enable cashback, the terminal automatically adds an option for the customer to enter a custom amount.
From the main screen, touch the Menu button.
Enter the merchant password and touch Confirm.
Scroll to the Configure application section.
Touch Terminal options.
Scroll to the Cashback section.
If you have more than one terminal, repeat steps 1 to 6 for each additional terminal where you want to view the terminal's preset cashback amounts.
When you enable cashback for debit transactions, the terminal automatically offers preset cashback values to the customer. By default, the preset amounts are set to 20, 40, and 60, but you can easily change one or more of these values as needed.
From the main screen, touch the Menu button.
Enter the merchant password and touch Confirm.
Scroll to the Configure application section.
Touch Terminal options.
Scroll to the Cashback section.
Repeat step 7 for any additional cashback amount preset value you want to change.
If you have more than one terminal, repeat steps 1 to 8 for each additional terminal where you want to change a preset cashback amount.
NOTE: If you have multiple terminals, you should ensure that they are all configured to offer the same preset cashback amounts to avoid one terminal displaying different cashback amounts from the other terminal(s).
As a security measure, you can require customers receiving any cashback amount to confirm they received the cash by signing on the merchant copy of the transaction receipt. By default, this feature is disabled.
When you enable this function, the terminal prints a signature line on the transaction receipt where the customer can sign as proof that they received the requested cashback amount.
From the main screen, touch the Menu button.
Enter the merchant password and touch Confirm.
If you have more than one terminal, repeat steps 1 to 4 for each additional terminal where you want to set whether or not the terminal prints a signature line for cashback debit transactions.
By default, cashback is disabled on the terminal. If you've enabled cashback, you can easily disable the function if needed.
From the main screen, touch the Menu button.
Enter the merchant password and touch Confirm.
Scroll to the Configure application section.
Touch Terminal options.
Scroll to the Cashback section.
If you have more than one terminal, repeat steps 1 to 6 for each additional terminal where you want to disable cashback.
If your business includes the option to tip, you can enable tipping on the terminal, where the customer can add a tip value in addition to the sale. By default, tipping is disabled on the terminal.
NOTE: When you enable tipping on the terminal, customers can always enter a manual tip amount in dollars and cents, regardless of any preset percentage values.
From the main screen, touch the Menu button.
Enter the merchant password and touch Confirm.
Scroll to the Configure application section.
Touch Terminal options.
Scroll to the Tips section.
Toggle the Tip processing switch to the right.
If you have more than one terminal, repeat steps 1 to 6 for each additional terminal where you want to enable tipping.
When you enable tipping, the terminal automatically displays three preset percentages (default values are 15%, 18%, and 20%) as options to the customer. The customer can touch one of the preset values or manually enter an amount for the tip.
NOTE: If you want to allow your customers to enter a custom tip percentage, you must enable the manual tip percentage using the Enable Manual Tip Percentage procedure.
From the main screen, touch the Menu button.
Enter the merchant password and touch Confirm.
Scroll to the Configure application section.
Touch Terminal options.
Scroll to the Tips section.
If you have more than one terminal, repeat steps 1 to 6 for each additional terminal where you want to view the terminal's preset tip percentages.
When you enable tip processing, the terminal automatically offers preset percentage values to the customer. You can also offer the opportunity for customers to enter their own percentage value. By default, the manual tip percentage option is enabled on the terminal and applies automatically whenever you activate the tip processing option.
From the main screen, touch the Menu button.
Enter the merchant password and touch Confirm.
Scroll to the Configure application section.
Touch Terminal options.
Scroll to the Tips section.
If you have more than one terminal, repeat steps 1 to 6 for each additional terminal where you want enable a manual tip percentage.
When you enable tip processing, the terminal automatically offers preset percentage values to the customer. By default, the preset percentage values are set to 15, 18, and 20, but you can easily change one or more of these values as needed.
From the main screen, touch the Menu button.
Enter the merchant password and touch Confirm.
Scroll to the Configure application section.
Touch Terminal options.
Scroll to the Tips section.
Repeat step 7 for any additional percentage preset values you want to change.
If you have more than one terminal, repeat steps 1 to 8 for each additional terminal where you want to change the preset tip percentage values.
NOTE: If you have multiple terminals, you should ensure that they are all configured to offer the same preset tip percentages to avoid one terminal displaying different tip percentages from the other terminal(s).
When you enable tip processing, the terminal automatically offers preset percentage values to the customer. By default, the preset percentages use the Normal text size to display the values, but you can choose to use Large or Very Large text to suit your requirements, as shown in the following examples:
Normal
Large
Very Large
From the main screen, touch the Menu button.
Enter the merchant password and touch Confirm.
Scroll to the Configure application section.
Touch Terminal options.
Scroll to the Tips section.
If you have more than one terminal, repeat steps 1 to 7 for each additional terminal where you want to set preset tip percentage text size.
There can be situations where your customers may accidentally enter a manual tip percentage incorrectly and leave a larger tip than planned. By default, the terminal enables a tipping threshold that requires the Merchant password for any tip over 50% of the initial sale amount (for example, a $55 tip on a $100 bill). You can disable or adjust the threshold value if needed.
NOTE: The tip threshold feature is designed to protect the customer and the merchant by ensuring that the customer is aware of the generous tip they intend to leave, which prevents the possibility of a future chargeback.
From the main screen, touch the Menu button.
Enter the merchant password and touch Confirm.
Scroll to the Configure application section.
Touch Terminal options.
Scroll to the Tips section.
If you have more than one terminal, repeat steps 1 to 7 for each additional terminal where you want to enable the tipping threshold.
When you enable the tipping threshold, you can set a custom percentage as the value where the Merchant password is required. By default, the terminal set the threshold value at 50%, but you can adjust it if needed.
From the main screen, touch the Menu button.
Enter the merchant password and touch Confirm.
Scroll to the Configure application section.
Touch Terminal options.
Scroll to the Tips section.
If you have more than one terminal, repeat steps 1 to 7 for each additional terminal where you want to set the terminal's tipping threshold.
By default, the manual tip percentage option is enabled on the terminal and applies automatically whenever you activate the tip processing option; you can easily disable the function if needed.
From the main screen, touch the Menu button.
Enter the merchant password and touch Confirm.
Scroll to the Configure application section.
Touch Terminal options.
Scroll to the Tips section.
If you have more than one terminal, repeat steps 1 to 6 for each additional terminal where you want to disable manual tip percentage.
By default, tipping is disabled on the terminal. If you've enabled tip processing, you can easily disable the function if needed.
From the main screen, touch the Menu button.
Enter the merchant password and touch Confirm.
Scroll to the Configure application section.
Touch Terminal options.
Scroll to the Tips section.
If you have more than one terminal, repeat steps 1 to 6 for each additional terminal where you want to disable tipping.
If your terminal has a built-in printer, or connects to an external printer, there are several printing options you can configure that determine when a transaction receipt gets printed, as well as the receipt's appearance.
If your terminal is equipped with a printer, you can adjust the printer settings to suit your business needs. The available printing options are:
When you enable the printing of transaction receipts, the customer receipt is always available to print, but you can choose whether to print the merchant copy or not. Printing the merchant copy for each transaction allows you to reconcile your individual transactions with the batch processing and the transaction reports.
NOTE: Printing the transaction receipts for the customer AND merchant will consume more printer paper.
From the main screen, touch the Menu button.
Enter the merchant password and touch Confirm.
In the Configure application section, touch Printer options.
In the Copies section, slide the Merchant Copy Printouts toggle switch to the right if it isn't already enabled.
If you have more than one terminal, repeat steps 1 to 4 for each additional terminal where you want to enable the printing of the merchant copy of the transaction receipt.
In addition to printing receipts for sales transactions, you can print receipts for some non-sales transactions, including:
Declined credit transactions
Void transactions
Completed transactions
Force post transactions
IMPORTANT! If you disable printing for any of these operations, the customer will have no physical evidence of these transactions.
In addition to the transactions listed above, you can enable or disable the following printer settings:
Bar code: Prints a barcode on the transaction receipt that identifies the individual transaction; helpful when using a terminal equipped with a scanner when performing refund or void transactions
Total line on pre-authorization receipts: Adds a total line to the transaction receipt that prints when a pre-authorization is confirmed (usually paired with the tip line)
Tip line on pre-authorization receipts: Adds a tip line to the transaction receipt that prints when a pre-authorization is confirmed
Cashback print Signature line: Adds a signature line for cashback transactions for customers to sign as proof that they received the requested cashback amount
Reverse on declined: Prints the transaction result in white on a dark background for declined transactions
From the main screen, touch the Menu button.
Enter the merchant password and touch Confirm.
In the Printing receipts section, enable each desired function by sliding the toggle switch to the right or disable functions by sliding the toggle switch to the left.
If you have more than one terminal, repeat steps 1 to 4 for each additional terminal where you want to set which transactions will print a transaction receipt.
The payment terminals use thermal paper to print the transaction receipts. You can adjust the level of contrast for the transaction receipts if they are difficult to read. If you have a mobile or portable payment terminal, the contrast level can affect battery usage.
The following table shows examples of each printout contrast level:
From the main screen, touch the Menu button.
Enter the merchant password and touch Confirm.
In the Configure application section, touch Printer options.
In the Copies section, touch Printout color depth.
On the Printout color depth screen, touch the desired contrast level: Pale, Normal, or Dark.
If you have more than one terminal, repeat steps 1 to 5 for each additional terminal where you want to set the printout contrast level.
If your terminal is equipped with (or connects to) a printer, you can print transaction receipts after the transaction is confirmed. By default, the Secure Payment application's payment module enables the printing on transaction receipts, but you can adjust the setting if needed.
NOTE: If you do not enable the printing of transaction receipts and provide no other method for a customer to receive proof of their transaction, reimbursements will be more difficult to process.
From the main screen, touch the Menu button.
Enter the merchant password and touch Confirm.
In the Configure application section, touch Printer options.
In the Copies section, slide the Receipt Copy Printouts toggle switch to the right if it isn't already enabled.
If you have more than one terminal, repeat steps 1 to 4 for each additional terminal where you want to enable transaction receipt printing.
The Amount presets display the current values.
Touch Amount presets.
On the Cashback amount presets screen, touch the cashback preset field you want to change (Cashback preset no. 1, Cashback preset no. 2, or Cashback preset no. 3) and replace the current amount with a new value.
In the Configure application section, touch Printer options.
In the Printing receipts section, scroll to the Cashback print Signature Line and slide the toggle switch to the right. To disable the printing of the signature line on the transaction receipt, slide the toggle switch to the left.
Toggle the Cashback processing switch to the left.
The Percentage presets display the current values.
If it isn't already enabled, toggle the Manual percentage input switch to the right.
Touch Percentage presets.
On the Tip percentage presets screen, touch the tip preset field you want to change (Tip preset no. 1, Tip preset no. 2, or Tip preset no. 3) and replace the current percentage with a new value.
Touch Tip presets text size.
On the Tip presets text size screen, touch the text size you want to use (Normal, Large, or Very Large).
Touch Tip threshold.
On the Tip threshold screen, toggle the Tip threshold switch to the right.
Touch Tip threshold.
On the Tip threshold screen, change the percentage value in the Threshold field.
Toggle the Manual percentage input switch to the left.
Toggle the Tip processing switch to the left.
In the Configure application section, touch Printer options.
Tipping and Cashback
Tipping
Cashback
The Secure Payment application's payment module allows you to assign passwords to protect the terminal from unauthorized use. All terminal passwords are 6 numeric (numbers only) characters in length to provide security without slowing down the overall time it takes to process a transaction.
The terminal has 3 types of user passwords:
Administrator (Admin): Configured during initial terminal activation
Merchant: Configured during initial terminal activation
Operator: Configured when creating one or more terminal operators
For more information on specific password procedures, click any of the following links:
When setting passwords on your payment terminal, you must respect the following parameters:
Passwords must be 6 characters long
The Administrator and Merchant passwords cannot be the same (can’t match)
You cannot use the same digit 6 times consecutively (for example: 111111 or 777777)
You cannot use 6 consecutive numbers, either ascending or descending (for example: 123456 or 987654)
Enabled
Disabled
Pale
Normal
Dark
Lightest printout (lowest contrast), prints faster and uses less battery
Default printout setting, average printing speed and battery use
Darkest printing (highest contrast), prints slower and uses more battery
The topics covered in this section include:
If a transaction receipt is lost or damaged, you can print a duplicate copy of the receipt.
From the main screen, touch the Menu button.
Enter the merchant password and touch Confirm.
In the Transaction management section, touch Transaction History.
Scroll to or search for the desired transaction to reprint.
NOTE: Because all of a merchant's transactions processed on all terminals are saved immediately to the server, the list of transactions may be quite long. For more information on searching for a transaction, refer to the Search for a Transaction procedure.
Touch the desired transaction to display the details.
Touch Reprint.
In the Reprint screen, touch the button for the transaction receipt you want to reprint:
Merchant copy
Customer copy
Both copies
The terminal prints the selected duplicate copy(ies) of the transaction receipt.
NOTE: If you have more than one terminal and your merchant profile is configured to display only transactions processed on individual terminals, you may need to repeat this procedure if you are unsure of which terminal issued the original transaction receipt.
If you enabled a personalized message at the bottom of every printed transaction receipt, but you no longer want to use any message on the footer, you can easily disable footer message printing.
NOTE: When you disable the printing of a personalized message, the original message remains available for later use unless you delete the previously configured text from the footer lines.
From the main screen, touch the Menu button.
Enter the merchant password and touch Confirm.
In the Configure application section, touch Printer options.
Scroll to the bottom of the screen to find the Footer section and touch Print footer.
On the Footer option screen, slide the Print footer toggle switch to the left.
If you have more than one terminal, repeat steps 1 to 5 for each additional terminal where you want to disable personalized messages at the bottom of the transaction receipts.
If you previously enabled the printing of merchant transaction receipts and you no longer want or need them, you can quickly disable the function.
From the main screen, touch the Menu button.
Enter the merchant password and touch Confirm.
In the Configure application section, touch Printer options.
In the Copies section, slide the Merchant Copy Printouts toggle switch to the left.
If you have more than one terminal, repeat steps 1 to 4 for each additional terminal where you want to disable the printing of the merchant copy of the transaction receipts.
When you enable printing a personalized message on your transaction receipt footers, you need to configure the message by entering it on one of the four (4) available lines on the receipt footer.
TIP: When preparing your message, consider any languages your customers might speak and configure your personalized message to meet all possible languages. Don't forget to check your message for spelling mistakes!
From the main screen, touch the Menu button.
Enter the merchant password and touch Confirm.
In the Configure application section, touch Printer options.
Scroll to the bottom of the screen to find the Footer section and touch Print footer.
On the Footer option screen, delete the text in the Footer no. 1 field and enter the first line of your custom message.
Repeat step 5 for each additional line you want to use for your personalized message, using the Footer no. 2, Footer no. 3, and Footer no. 4 fields.
If you have more than one terminal, repeat steps 1 to 6 for each additional terminal where you want to configure the personalized message at the bottom of the transaction receipts.
When using a personalized message on your transaction receipt footers, you may want to change or delete some of the message. You can easily adjust the footer text whenever you need.
From the main screen, touch the Menu button.
Enter the merchant password and touch Confirm.
In the Configure application section, touch Printer options.
Scroll to the bottom of the screen to find the Footer section and touch Print footer. The Footer option screen appears.
To edit your message, adjust the text in the Footer no. 1, Footer no. 2, Footer no. 3, and/or Footer no. 4 fields as required, as shown in the following example:
If you want to delete your personalized message, delete the text in the Footer no. 1, Footer no. 2, Footer no. 3, and Footer no. 4 fields, as shown in the following example:
TIP: You can also remove the message from the receipt footers using the Disable Personalized Message on Receipt Footer procedure; it prevents the message from printing on the receipt, but remains available for later use if desired.
If you have more than one terminal, repeat steps 1 to 6 for each additional terminal where you want to change the personalized message at the bottom of the transaction receipts.
You can add a personalized message at the bottom of every printed transaction receipt. Your message can include business hours, social media coordinates, and more. Your message can contain up to 4 lines with 48 characters (including spaces) per line.
TIP: You should prepare your message on a piece of paper in advance, to ensure that you have the correct number of characters per line.
From the main screen, touch the Menu button.
Enter the merchant password and touch Confirm.
In the Configure application section, touch Printer options.
Scroll to the bottom of the screen to find the Footer section and touch Print footer.
On the Footer option screen, slide the Print footer toggle switch to the right.
If you have more than one terminal, repeat steps 1 to 5 for each additional terminal where you want to enable a personalized message on the bottom of the transaction receipts.
By default, the Secure Payment application's payment module enables the printing on transaction receipts, but you can disable the function if needed.
NOTE: If you disable the printing of transaction receipts without providing any other method for a customer to receive proof of their transaction, reimbursements will be more difficult to process.
From the main screen, touch the Menu button.
Enter the merchant password and touch Confirm.
In the Configure application section, touch Printer options.
In the Copies section, slide the Receipt Copy Printouts toggle switch to the left.
If you have more than one terminal, repeat steps 1 to 5 for each additional terminal where you want to disable the printing of transaction receipts.
If you enter a password incorrectly, the terminal displays an Access refused error message.
Touch the error message to return to the Password field and re-enter the required password.
If you are unable to remember the required password, you can use the Merchant or Administrator password, depending on which password you can't remember. Refer to or for more information on which passwords can "override" others.
As part of your original terminal activation, you set an Administrator password. The Administrator password provides access to advanced terminal functions and can also enable password-protected operations. You can change the Administrator password whenever you feel it necessary.
NOTE: Do not forget the new Administrator password; the only way to reset it is to contact PayFacto support.
From the main screen, touch the Menu button.
Enter the merchant password and touch Confirm.
Scroll to the Configure application section.
Touch Passwords.
Scroll to the Set passwords section.
Touch Administrators.
Enter the current Admin password in the Password field and touch Confirm.
Enter a new 6-digit numeric Admin password in the Password field. Keep in mind the when setting the new Admin password.
Re-enter the new password in the Confirm new password field.
Touch the Confirm button; the new Admin password is saved and the Passwords screen appears. If the passwords do not match, a message appears and the password is not changed. Re-enter the password; if needed, touch the Show password icon to ensure the passwords match.
If you have more than one terminal, repeat steps 1 to 10 for each additional terminal where you want to change the Admin password.
The terminal uses passwords for different user levels. The user levels follow a hierarchy, and a “higher” level password can enable a function (or override a password) for a “lower” level user.
For example, an operator can use the Merchant password to enable a password-protected sale, while an Administrator password can unlock functions that require a Merchant password.
The hierarchy of passwords is the following:
As part of your original terminal activation, you set a Merchant password. The Merchant password protects against unauthorized users performing certain operations. You can change the Merchant password whenever you feel it necessary.
NOTE: Do not forget the new Merchant password; the only way to reset it is to use the Admin password or to contact PayFacto support.
From the main screen, touch the Menu button.
Enter the merchant password and touch Confirm.
Scroll to the Configure application section.
Touch Passwords.
Scroll to the Set passwords section.
Touch Merchant.
Enter the Admin password in the Password field and touch Confirm. Requiring the Admin password prevents unauthorized changes to the Merchant password.
Enter a new 6-digit numeric Merchant password in the Password field. Keep in mind the when setting the new Merchant password.
Re-enter the new password in the Confirm new password field.
Touch the Confirm button; the new Merchant password is saved and the Passwords screen appears. If the passwords do not match, a message appears and the password is not changed. Re-enter the password; if needed, touch the Show password icon to ensure the passwords match.
If you have more than one terminal, repeat steps 1 to 10 for each additional terminal where you want to change the Merchant password.
Passwords
Understanding Password Hierarchy
Password Requirements
Incorrect Password Entries
Forgotten Passwords
Change Administrator Password
Change Merchant Password
Password Protection for Functions and Transactions
Reimbursement Passwords
Sales Transaction Passwords
Application Exit Password
Terminal user
Who can reset
What to do
Administrator
PayFacto Support
The Administrator password can only be reset with a Superuser password, which requires the assistance of Technical Support.
Refer to the Obtaining Support procedure.
Merchant
Administrator
A Merchant password can be reset using the Admin password.
Refer to the Change Merchant Password procedure.
Operator
Administrator or Merchant
Operator passwords can be reset using the Admin or Merchant password.
Refer to the Change Operator Password procedure.
User Level
Description
Administrator
Configured when you activated your terminal, the Administrator password can protect the terminal against unauthorized reimbursements in the Secure Payment application's payment module. You can use the Administrator password for any function that requires a Merchant or Operator password.
Merchant
Configured when you activated your terminal, the Merchant password protects the terminal from completing certain sales and reimbursement functions without authorization. You can use the Merchant password to complete a transaction when Operator identification requires a password to process a sale.
Operator
Assigned when creating one or more terminal operators. Can be enabled to protect unauthorized sales when paired with the associated operator ID.
For added security, you can require the Merchant password for certain functions or transactions before the operation can proceed. By default, this security measure is enabled for the following functions and transactions:
Reimbursements (refund and void)
Sales transactions (cash, force post, swipe)
By default, all of the operations listed above have password protection enabled. Reimbursement transactions are always password protected, but you can select if the transaction requires the Admin or Merchant password.
You can disable the password protection on certain sales transactions and exiting the Secure Payment application if desired, but that leaves the terminal vulnerable to unauthorized use where any person could perform those functions.
NOTE: To ensure the security of your transactions, it is strongly recommended that you enable the use of passwords for the selected functions.
The terminal has a training mode that allows users to process transactions in a simulated environment allowing them to learn and understand the terminal’s various functions. When in training mode, the terminal does not communicate with the server, and it functions even when the terminal has no network connection. The available options for training mode are:
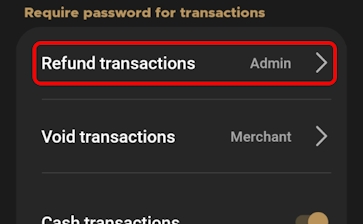
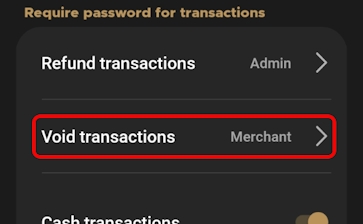
As a security measure, the Secure Payment application requires a password before processing reimbursement transactions. You can choose which password to require (Admin or Merchant) or you can disable passwords for reimbursements, depending on your preference. By default, refunds require the Admin password and voids require the Merchant password.
IMPORTANT! If you disable passwords for reimbursement transactions, anyone can process a refund or a void without supervisory or management knowledge or approval. To prevent possible fraudulent reimbursements, you should maintain password protection as part of the reimbursement process.
From the main screen, touch the Menu button.
Enter the merchant password and touch Confirm.
Scroll to the Configure application section.
Touch Passwords.
Scroll to the Require password for transactions section.
Touch Refund transactions; the Password on refunds screen appears.
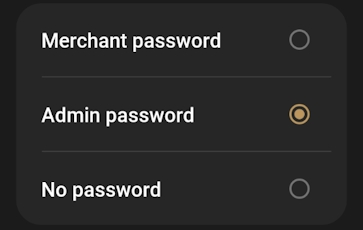
Select the desired password by touching Merchant or Admin or touch No password to disable password protection for refunds.
Touch the Back icon to return to the Passwords screen.
Touch Void transactions; the Password on voids screen appears.
Select the desired password by touching Merchant or Admin or touch No password to disable password protection for voids.
If you have more than one terminal, repeat steps 1 to 10 for each additional terminal where you want to set the required passwords for reimbursement transactions.
NOTE: If you disable password protection in either step 7 or 10, you can re-enable the password by using this procedure and selecting the desired password for each transaction type where you disabled the password.
By default, the Secure Payment application's payment module requires the Merchant password before you can exit. You can choose whether or not to require the Merchant password, depending on your preference.
NOTE: Be aware that if you disable this function, the Secure Payment application's payment module can be closed at any time by anyone, whether intended or not.
From the main screen, touch the Menu button.
Enter the merchant password and touch Confirm.
Scroll to the Configure application section.
Touch Terminal options.
Scroll to the General section.
Enable the use of the Merchant password before closing the payment module by toggling the Ask password on exit switch to the right.
Disable the use of the Merchant password before closing the payment module by toggling the Ask password on exit switch to the left.
If you have more than one terminal, repeat steps 1 to 7 for each additional terminal where you want to set whether or not to use the Merchant password before exiting the application.
By default, less commonly used sales transactions (cash sale, force post, and swiping the payment card) require the Merchant password before they can be processed. You can choose whether or not to require the Merchant password, depending on your preference.
From the main screen, touch the Menu button.
Enter the merchant password and touch Confirm.
Scroll to the Configure application section.
Touch Passwords.
Scroll to the Require password for transactions section.
Enable the use of the Merchant password by toggling the following switches to the right:
Force post
Cash
Swipe
Disable the use of the Merchant password by toggling the previously listed switches to the left.
If you have more than one terminal, repeat steps 1 to 7 for each additional terminal where you want to set password usage for sales transactions.
When you enable training mode, the terminal does not process any actual transactions and has no communication with any other device, everything occurs on the terminal.
IMPORTANT! It is possible to lock a card in training mode, as some security features are stored on the card’s chip. Be cautious if you are using an actual payment card even in training mode.
From the main screen, touch the Menu button.
Enter the merchant password and touch Confirm.
Scroll to the Help & training tools section.
Touch Training mode.
Toggle the Enable training mode switch to the right.
If you have more than one terminal, repeat steps 1 to 5 for each additional terminal where you want to enable training mode.
The About menu displays information about the terminal and the the installed software version. You may be asked by the PayFacto support team to reference this information, but none of the fields are editable.
From the main screen, touch the Menu button.
Enter the merchant password and touch Confirm.
Scroll to the Help & training tools section.
Touch About.
The About screen displays the following information:
App Version
Version Code
Device Model
Serial Number
When you enable training mode, the terminal is unable to process any transactions. To resume transaction processing, you need to disable training mode.
From the main screen, touch the Menu button.
Enter the merchant password and touch Confirm.
Scroll to the Help & training tools section.
Touch Training mode.
Toggle the Enable training mode switch to the left.
If you have more than one terminal, repeat steps 1 to 5 for each additional terminal where you want to disable training mode.
Should you need to leave the Secure Payment application, there are two methods available:
Using the Android Back button
Using the Exit menu from the Settings page
From the main screen, touch the Android system Back button, found on the bottom left third of the screen.
Enter the merchant password and touch Confirm.
From the main screen, touch the Menu button.
Enter the merchant password and touch Confirm.
Scroll to the Help & training tools section.
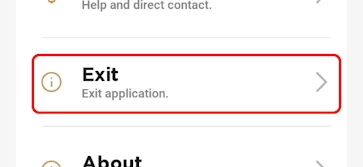
Touch Exit.
Touch the Confirm button to exit the application.
The Secure Payment application offers 24/7 customer and technical support.
From the main screen, touch the Menu button.
Enter the merchant password and touch Confirm.
Scroll to the Help & training tools section.
Touch Support.
The Support screen displays the available support options.
Training Mode
Enable Training Mode
Disable Training Mode
Getting Support
Exiting the Application
About Secure Payment

