Loading...
Loading...
Loading...
Loading...
Loading...
Loading...
Loading...
Loading...
Loading...
Loading...
Loading...
Loading...
Loading...
Loading...
Loading...
Loading...
Loading...
Loading...
Loading...
Loading...
Loading...
Loading...
Loading...
Loading...
Loading...
Loading...
Loading...
Loading...
Loading...
Loading...
Loading...
Loading...
Loading...
Loading...
Loading...
Loading...
Loading...
Loading...
Loading...
Loading...
Loading...
Loading...
Loading...
Loading...
Loading...
Loading...
Loading...
Loading...
Loading...
Loading...
Loading...
Loading...
Loading...
Loading...
Loading...
Loading...
Loading...
Loading...
Loading...
Loading...
Loading...
Loading...
Loading...
Loading...
Loading...
Loading...
Loading...
Loading...
Loading...
Loading...
Loading...
Loading...
Loading...
Loading...
Loading...
Loading...
Loading...
Loading...
Loading...
Loading...
Loading...
Loading...
Loading...
Loading...
Loading...
Loading...
Loading...
Loading...
Loading...
Loading...
Loading...
Loading...
Loading...
Loading...
Loading...
Loading...
Loading...
Loading...
Loading...
Loading...
This document explains how to install the charging base for the PAX A920 or A920 Pro terminal and included silicone sleeve. The charging base makes it easy to recharge the terminal without having to remove the silicone sleeve to ensure that the USB power connector is properly seated in the terminal’s charging port.
NOTE: The terminal must be fitted with the PayFacto-branded silicone sleeve for the best results. The PayFacto silicone sleeve displays the PayFacto logo on the back. You should not use the charging base for any terminal not protected by the silicone sleeve.
This document will introduce you to your payment terminal as well as guide you through the process of preparing and configuring your it in order to quickly begin processing payments.
Your PAX A920 payment processing terminal comes with the following:
Payment terminal
AC power outlet
Roll of printer paper
Charging cable
You may also have an optional charger and external printer included, but this document addresses the most basic delivery configuration.
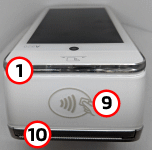
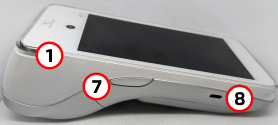
The following illustrations show the location of the main terminal features and hardware:
Magnetic stripe reader
Front-facing camera (not used)
Color touchscreen
Chip card reader
After you remove the terminal and accessories from the box, you need to charge the terminal before you can use it. The pre-installed battery has a protective cover on the contacts to prevent the possibility of a short circuit during transport.
Turn the terminal over.
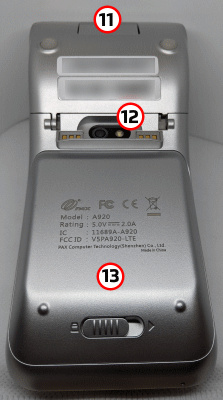
On the back of the terminal at the bottom, slide the battery cover locking switch to the right.
Lift the battery cover off the terminal. You should notice a plastic tab at the top of the battery.
Lift the battery from the terminal and remove the plastic tab.
Re-install the battery by sliding the thin segment into the terminal, near the charging connectors, and pushing on the bottom of the battery to seat it correctly.
Re-install the battery cover on the terminal and slide the lock switch to the lock position on the left and turn the terminal over.
Insert the USB cable in the AC outlet and connect the outlet to an AC plug.
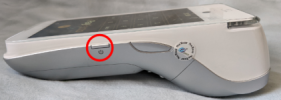
Insert the micro USB connector in the terminal’s charging port, located on the left side, below the Volume Down button. The terminal begins charging.
NOTE: The terminal’s charging port may have a protective cover; you will need to remove it before inserting the micro USB port.
If the supplied roll of printer paper was not already installed in the terminal when you received it, you will need to install it before you can print any transaction receipts.
TIP: This procedure also applies to replacing a roll of printer paper.
On the back of the terminal at the top, lift the lever to unlock and open the printer cover.
NOTE: The printer cover opens on a hinge, it does not come off the terminal.
The paper tray contains an illustration of how to install the roll of paper.
Place the roll of printer paper in the paper tray, leaving about 2 inches (5 cm) of paper beyond the printer's cutter.
IMPORTANT! Make sure the paper unrolls from the back of the roll, otherwise the printer will be unable to print the transaction receipt.
Close the printer cover until it snaps into place and remove any excess paper.
The terminal requires a network connection to communicate with the payment processor server to process transactions.
The PAX A920 is a mobile payment terminal that can connect to mobile (LTE) and wireless (Wi-Fi) networks.
Mobile network access is required for delivery and transportation use, but it can also serve as a backup connection if your Wi-Fi network reception is unreliable in certain areas.
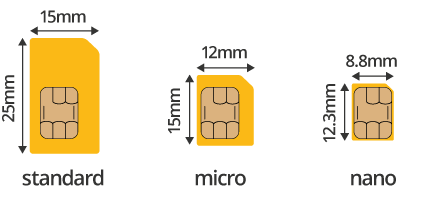
If you plan to use your terminal outside of your usual wi-fi network, you need to install the mobile SIM card, provided by PayFacto or your mobile communications provider. The SIM card will connect you to a mobile network, allowing you to process payments anywhere the terminal has reception. The terminal uses the regular (full) SIM card size.
NOTE: If you plan to use your terminal only on your wi-fi network, you can skip this procedure and proceed directly to Configuring the Terminal Wi-Fi Connection.
On the back of the terminal at the bottom, slide the battery cover locking switch to the right.
Lift the battery cover off the terminal.
Lift the battery from the terminal to remove and set aside.
The terminal has illustrations for the different cards it can accept. Insert your SIM card in the space identified as SIM1/SAM3 so the diagonal corner is facing the top right side.
IMPORTANT! The SIM card goes into the leftmost space and should not require great force to insert.
Re-install the battery by sliding the thin segment into the terminal, near the charging connectors, and pushing on the bottom of the battery to seat it correctly.
Re-install the battery cover on the terminal and slide the lock switch to the lock position on the left.
Power on the terminal by pressing and holding the Power button for 3 seconds.
The terminal should identify the SIM card and configure the mobile network settings automatically.
This section explains how to turn wi-fi on and connect to your network.
To connect to your wireless network:
On the terminal’s main screen, touch the Settings icon.
On the Settings screen, touch the Please Input Password field and use the keypad to type the password: either 9876 or pax9876@@.
Touch the checkmark icon on the keypad when you are done and touch OK.
In the Wireless & networks section, touch Wi-Fi.
If Wi-Fi is Off, touch the toggle to turn it on. If Wi-Fi is already on, a list of available networks appears.
From the list of available networks, touch the name of the network you want to connect to.
Enter the password for the selected network and touch CONNECT.
TIP: You can touch Show password before typing to ensure you are entering the password correctly.
After the terminal displays Connected for the selected network, touch the Back icon to return to the Settings screen.
Touch the Back icon again to return to the main screen.
By default, the terminal displays all information in English. This procedure explains how to change the terminal’s display language if necessary.
IMPORTANT! Selecting a different language changes all text that appears on the terminal.
To change the terminal display language:
On the terminal’s main screen, touch the Settings icon.
On the Settings screen, touch the Please Input Password field and use the keypad to type the password: either 9876 or pax9876@@.
Touch the checkmark icon on the keypad when you are done and touch OK.
Scroll to the Personal section and touch Language & input.
Touch Language.
Scroll to and touch the desired language.
Touch the Back icon twice to return to the main screen.
PayFacto uses a self-service terminal activation procedure designed to save time while also providing better security. The new activation procedure applies only to countertop and mobile PAX payment terminals using the Android operating system. The new procedure applies to:
All new merchants activating their terminals for the first time
Any existing merchants adding new payment terminals
Any existing merchants receiving replacement terminals
After you configure the terminal's network connection(s) and power on the terminal, the procedure comprises of 2 parts:
NOTE: If you have multiple new payment terminals, you need to perform the activation procedure on each terminal individually.
After configuring the terminal’s network connection, you need to start the PayFacto payment application to complete the remaining steps. Terminal activation requires you to input a One Time Passcode (OTP) that PayFacto sends to the email address or telephone number registered to your account.
IMPORTANT! To receive the OTP on your phone, your registered phone number must be able to receive text messages (SMS). If you cannot receive text messages, select the email option to get the OTP.
Touch the PAYMENT icon on the main screen. The Welcome To Your Payment Terminal screen appears.
NOTE: The terminal may need to download host and security parameters; this can take a few moments.
In the top right corner of the screen, your terminal ID (TID) appears; confirm that the number on the screen matches the TID on the label on the back of your terminal. The TID will not appear on your terminal screen after you complete the activation process.
IMPORTANT! If the TID does not match, call PayFacto immediately.
Touch anywhere on the screen to begin the activation process.
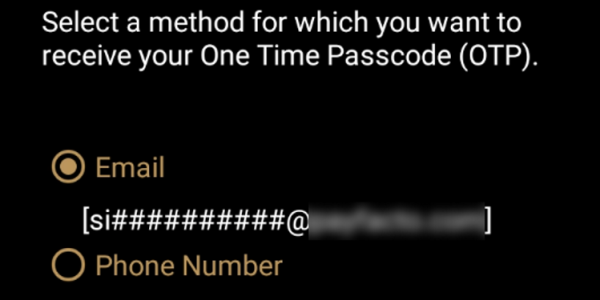
Touch the desired option to receive the OTP.
Phone Number
Touch the Send Code button.
IMPORTANT! The OTP code is valid for 15 minutes after you receive it. If you wait more than 15 minutes to enter the OTP, the terminal will display an error and you will have to request a new OTP.
If you select Email, look for a message from [email protected].
After you receive the 6-digit activation code, use the on-screen keypad to enter the code on the terminal screen.
If you enter the code incorrectly, a red exclamation appears to indicate that the code is incorrect.
Re-enter the code, or touch Resend Code to obtain a new OTP.
After you enter the OTP correctly, the payment application displays the Set Administrative Password screen to configure your terminal passwords.
To prevent unauthorized individuals from changing the terminal’s configuration, you need to set the Administrator and Merchant passwords. These passwords restrict access to certain functions on the terminal.
When setting your passwords, you must respect the following parameters:
Passwords must be 6 characters long
The Administrator and Merchant passwords cannot be the same (can’t match)
You cannot use the same digit 6 times consecutively (for example: 111111 or 777777)
You cannot use 6 consecutive numbers, either ascending or descending (for example: 123456 or 987654)
On the Set Administrative Password screen, use the on-screen keypad to enter a 6-digit password in the Admin Password field and touch the Next icon on the keypad.
On the Confirm Administrative Password screen, re-enter the password in the Admin Password field and touch the Next icon on the keypad.
On the Set Merchant Password screen, use the on-screen keypad to enter a 6-digit password in the Merchant Password field and touch the Next icon on the keypad.
On the Confirm Merchant Password screen, re-enter the password in the Merchant Password field and touch the Next icon on the keypad.
Your payment terminal is now ready for use.
To power the terminal on, press and hold the power key on the right side of the terminal for 2-3 seconds.
To power off the terminal:
Press and hold the power key on the right side of the terminal for 2-3 seconds.
Touch the Power off icon and then touch Power off again.
NOTE: Avoid allowing the terminal’s battery to run down to 0%. The terminal requires the battery to be at least at 8% capacity to process a transaction. It is strongly recommended that you charge the terminal overnight or during non-business hours.
Your terminal operators and your customers enter information and respond to prompts using the terminal’s touch screen. The application prompts you and your customers on the next action to perform.
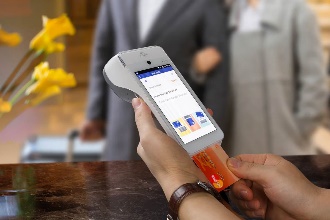
There are three (3) ways for a customer to use their payment card with the terminal:
Insert the chip card and enter a PIN
Swipe the card’s magnetic strip
Tap the card for contactless payment
The terminal uses 2 ¼” or 58mm thermal paper rolls to print transaction receipts.
On the back of the terminal at the top, lift the lever to unlock and open the printer cover.
NOTE: The printer cover opens on a hinge, it does not come off the terminal.
Place the roll of printer paper in the paper tray, leaving about 2 inches (5 cm) of paper beyond the printer's cutter.
IMPORTANT! Make sure the paper unrolls from the back of the roll, otherwise the printer will be unable to print the transaction receipt.
Close the printer cover until it snaps into place and remove any excess paper.
The PAX A920 Pro mobile payment terminal is perfect for most applications, whether retail, bar/restaurant, or delivery/transportation. This setup guide describes the following topics:
Initial terminal configuration
Charging the Terminal
Installing the Printer Paper
Activating the terminal
Working with the terminal
This document will introduce you to your payment terminal as well as guide you through the process of preparing and configuring it in order to quickly begin processing payments.
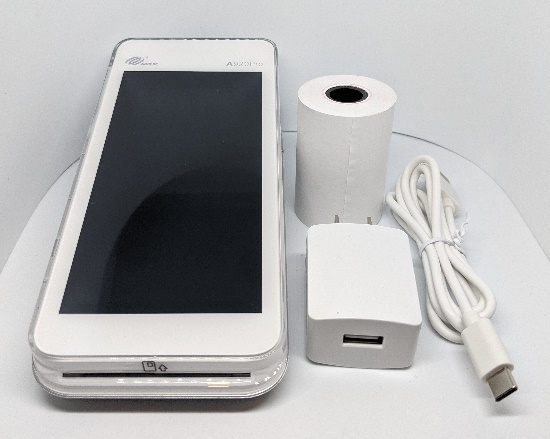
Your PAX A920 Pro payment processing terminal comes with the following:
Payment terminal
Roll of printer paper
AC power outlet
USB to USB Type-C charging cable
You may also have an optional charger and external printer included, but this document addresses the most basic delivery configuration.
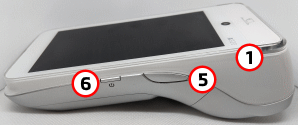
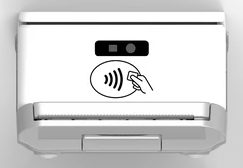
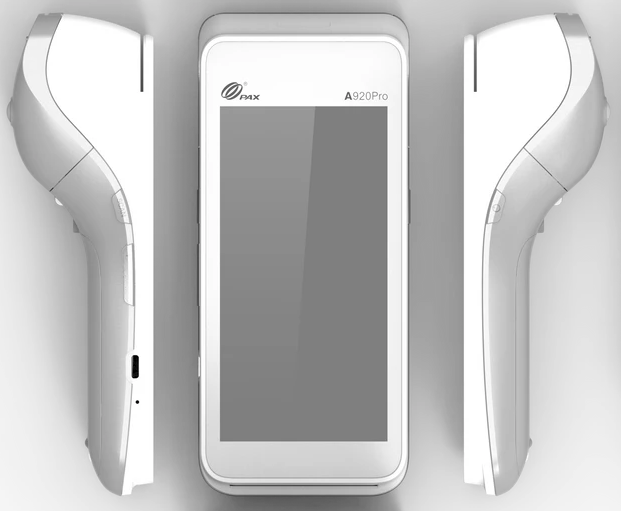
The following illustrations show the location of the main terminal features and hardware:
1. Magnetic stripe reader 2. Color touchscreen 3. Chip card reader 4. Scanner button
5. Volume control button 6. USB Type-C charging port 7. Power button 8. Scanner 9. Contactless payment reader
10. Printer 11. Printer latch 12. Rear camera 13. Battery cover 14. Battery cover latch
After you remove the terminal and accessories from the box, you need to charge the terminal before you can use it. The pre-installed battery has a protective cover on the contacts to prevent the possibility of a short circuit during transport.
To charge the terminal:
Turn the terminal over.
On the back of the terminal at the bottom, slide the battery cover locking switch to the right.
Lift the battery cover off the terminal. You should notice a plastic tab at the top of the battery.
Lift the battery from the terminal and remove the plastic tab.
Re-install the battery and push on the bottom of the battery to seat it correctly.
Re-install the battery cover on the terminal and slide the lock switch to the lock position on the left and turn the terminal over.
Insert the USB cable in the AC outlet and connect the outlet to an AC plug.
Insert the USB Type-C connector in the terminal’s charging port, located on the left side, below the Volume control button. The terminal begins charging.
NOTE: The terminal’s charging port may have a protective cover; you will need to remove it before inserting the USB Type-C connector.
If the supplied roll of printer paper was not already installed in the terminal when you received it, you will need to install it before you can print any transaction receipts.
TIP: This procedure also applies to replacing a roll of printer paper.
On the back of the terminal near the top, lift the lever to unlock and open the printer cover.
NOTE: The printer cover opens on a hinge, it does not come off the terminal.
The paper tray contains an illustration of how to install the roll of paper.
Place the roll of printer paper in the paper tray, leaving about 2 inches (5 cm) of paper beyond the printer's cutter.
IMPORTANT! Make sure the paper unrolls from the back of the roll, otherwise the printer will be unable to print the transaction receipt.
Close the printer cover until it snaps into place and remove any excess paper.
The terminal requires a network connection to communicate with the payment processor server to process transactions.
The PAX A920 Pro is a mobile payment terminal that can connect to mobile (LTE) and wireless (Wi-Fi) networks.
Mobile network access is required for delivery and transportation use, but it can also serve as a backup connection if your Wi-Fi network reception is unreliable in certain areas.
If you plan to use your terminal outside of your usual wi-fi network, you need to install the mobile SIM card, provided by PayFacto or your mobile communications provider. The SIM card will connect you to a mobile network, allowing you to process payments anywhere the terminal has reception. Mobile network access can also serve as a backup connection if your wi-fi network reception is unreliable in certain areas. The terminal uses the micro-SIM card size.
NOTE: If you plan to use your terminal only on your wi-fi network, you can skip this procedure and proceed directly to Configuring the Terminal Wi-Fi Connection.
Make sure the terminal is powered off and turn the terminal over.
On the back of the terminal at the bottom, slide the battery cover locking switch to the right.
Lift the battery cover off the terminal.
Lift the battery from the terminal to remove and set aside.
The terminal has illustrations for the different cards it can accept. Insert your SIM card in the space identified as SIM1 so the diagonal corner is facing the top left side.
IMPORTANT! The SIM card goes into the lower space and should not require great force to insert.
Re-install the battery and push on the bottom of the battery to seat it correctly.
Re-install the battery cover on the terminal and slide the lock switch to the lock position on the left.
Power on the terminal by pressing and holding the Power button for 3 seconds.
The terminal should identify the SIM card and configure the mobile network settings automatically.
This section explains how to turn Wi-Fi on and connect to your network.
On the terminal’s main screen, touch the Settings icon.
On the Settings screen, touch the Please Input Password field and use the keypad to type the password: either pax9876@@ or 9876.
Touch the checkmark icon on the keypad when you are done and touch OK.
On the Settings page, touch Network & Internet.
On the Network & Internet page, touch Wi-Fi.
On the Wi-Fi page, if Wi-Fi is Off, touch the toggle to turn it on. If Wi-Fi is already on, a list of available networks appears.
From the list of available networks, touch the name of the network you want to connect to.
Enter the password for the selected network and touch CONNECT.
TIP: You can touch Show password before typing to ensure you are entering the password correctly.
After the terminal displays Connected for the selected network, touch the Back icon to return to the Network & Internet page.
By default, the terminal displays all information in English. This procedure explains how to change the terminal’s display language if necessary.
IMPORTANT! Selecting a different language changes all text that appears on the terminal.
On the terminal’s main screen, touch the Settings icon.
On the Settings screen, touch the Please Input Password field and use the keypad to type the password: either pax9876@@ or 9876.
Touch the checkmark icon on the keypad when you are done and touch OK.
On the Settings page, scroll to the bottom and touch System.
On the System page, touch Languages & input.
On the Languages & input page, touch Languages.
On the Language preferences page, touch Add a language.
On the Add a language page, scroll to and touch the desired language.
NOTE: If the language has localized variants, select the appropriate regional option for your country.
If the selected language does not appear automatically, you can drag the language to the top of the list, as shown below:
PayFacto uses a self-service terminal activation procedure designed to save time while also providing better security. The new activation procedure applies only to countertop and mobile PAX payment terminals using the Android operating system. The new procedure applies to:
All new merchants activating their terminals for the first time
Any existing merchants adding new payment terminals
Any existing merchants receiving replacement terminals
After you configure the terminal's network connection(s) and power on the terminal, the procedure comprises of 2 parts:
NOTE: If you have multiple new payment terminals, you need to perform the activation procedure on each terminal individually.
After configuring the terminal’s network connection, you need to start the PayFacto payment application to complete the remaining steps. Terminal activation requires you to input a One Time Passcode (OTP) that PayFacto sends to the email address or telephone number registered to your account.
IMPORTANT! To receive the OTP on your phone, your registered phone number must be able to receive text messages (SMS). If you cannot receive text messages, select the email option to get the OTP.
Touch the PAYMENT icon on the main screen. The Welcome To Your Payment Terminal screen appears.
NOTE: The terminal may need to download host and security parameters; this can take a few moments.
In the top right corner of the screen, your terminal ID (TID) appears; confirm that the number on the screen matches the TID on the label on the back of your terminal. The TID will not appear on your terminal screen after you complete the activation process.
IMPORTANT! If the TID does not match, call PayFacto immediately.
Touch anywhere on the screen to begin the activation process.
Touch the desired option to receive the OTP.
Phone Number
Touch the Send Code button.
IMPORTANT! The OTP code is valid for 15 minutes after you receive it. If you wait more than 15 minutes to enter the OTP, the terminal will display an error and you will have to request a new OTP.
If you select Email, look for a message from [email protected].
After you receive the 6-digit activation code, use the on-screen keypad to enter the code on the terminal screen.
If you enter the code incorrectly, a red exclamation appears to indicate that the code is incorrect.
Re-enter the code, or touch Resend Code to obtain a new OTP.
After you enter the OTP correctly, the payment application displays the Set Administrative Password screen to configure your terminal passwords.
To prevent unauthorized individuals from changing the terminal’s configuration, you need to set the Administrator and Merchant passwords. These passwords restrict access to certain functions on the terminal.
When setting your passwords, you must respect the following parameters:
Passwords must be 6 characters long
The Administrator and Merchant passwords cannot be the same (can’t match)
You cannot use the same digit 6 times consecutively (for example: 111111 or 777777)
You cannot use 6 consecutive numbers, either ascending or descending (for example: 123456 or 987654)
On the Set Administrative Password screen, use the on-screen keypad to enter a 6-digit password in the Admin Password field and touch the Next icon on the keypad.
On the Confirm Administrative Password screen, re-enter the password in the Admin Password field and touch the Next icon on the keypad.
On the Set Merchant Password screen, use the on-screen keypad to enter a 6-digit password in the Merchant Password field and touch the Next icon on the keypad.
On the Confirm Merchant Password screen, re-enter the password in the Merchant Password field and touch the Next icon on the keypad.
Your payment terminal is now ready for use.
To power the terminal on, press and hold the power key on the right side of the terminal for 2-3 seconds.
To power off the terminal:
Press and hold the power key on the right side of the terminal for 2-3 seconds.
Touch the Power off icon and then touch Power off again.
NOTE: Avoid allowing the terminal’s battery to run down to 0%. The terminal requires the battery to be at least at 8% capacity to process a transaction. It is strongly recommended that you charge the terminal overnight or during non-business hours.
Your terminal operators and your customers enter information and respond to prompts using the terminal’s touch screen. The application prompts you and your customers on the next action to perform.
There are three (3) ways for a customer to use their payment card with the terminal:
Insert the chip card and enter a PIN
Swipe the card’s magnetic strip
Tap the card for contactless payment
The terminal uses 2 ¼” or 58mm thermal paper rolls to print transaction receipts.
On the back of the terminal at the top, lift the lever to unlock and open the printer cover.
NOTE: The printer cover opens on a hinge, it does not come off the terminal.
Place the roll of printer paper in the paper tray, leaving about 2 inches (5 cm) of paper beyond the printer's cutter.
IMPORTANT! Make sure the paper unrolls from the back of the roll, otherwise the printer will be unable to print the transaction receipt.
Close the printer cover until it snaps into place and remove any excess paper.
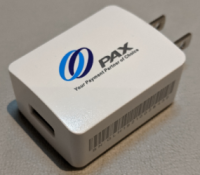
To ensure the best charging results, you must use the original AC power adapter that came with your PAX A920 or A920 Pro terminal. The AC power adapter should have the PAX logo printed on one side as shown below:
Your PAX A920 or A920 Pro terminal charging base includes the following components:
A920
Charging base
6-foot (180cm) USB to micro-USB cable
Protective silicone sleeve
A920 Pro
Charging base
5-foot (152cm) USB to USB Type-C cable
Protective silicone sleeve
Before you install and connect the charging base, make sure that the desired location is within reach of an AC outlet and that there is enough space to for the charging base and the terminal when connected.
Turn the charging base over and locate the USB connection port.
A920
A920 Pro
Insert the cable’s micro-USB (A920) or USB Type-C (A920 Pro) plug into the base’s connection port.
A920
A920 Pro
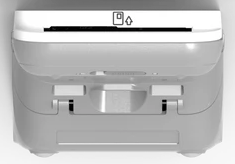
Secure the cable in the guide at the top of the charging base and turn the charging base over.
A920
A920 Pro
Connect the cable’s USB plug into the AC adapter’s USB port.
A920
A920 Pro
Plug the adapter into an AC outlet. The LED at the bottom edge of the base lights up.
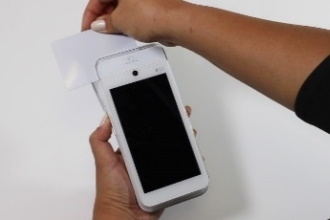
To protect your PAX A920 or A920 Pro terminal from minor impact damage, you should install the silicone sleeve provided with the terminal charging base as the charging base is designed specifically for terminals with the sleeve.
Insert the top of the terminal into the sleeve's printer protection until the sleeve fits snugly onto the terminal’s top.
Pull the bottom of the sleeve over the bottom edge of the terminal.
Repeat for any additional terminals you intend to place on the charging base.
NOTE: To add or change a SIM card, you need to remove the sleeve from the terminal.
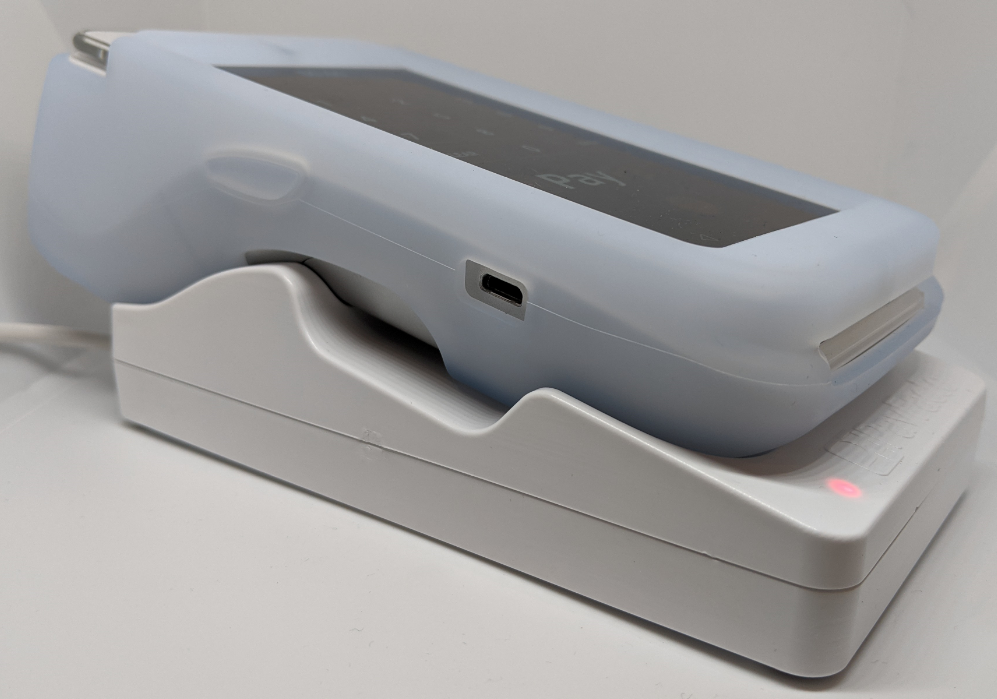
To use the charging base, you need only place the terminal(s) vertically on the base so the printer rests in the cradle at the top of the charging base.
NOTE: The charging base should only be used to charge your terminal(s); it is not designed to be a storage location for the terminal(s).
If the status light remains blue after you place the terminal on the base, the terminal is not seated correctly, and not connecting to the base’s gold charging contacts.
IMPORTANT! Do not slide a terminal onto the base, as it can damage the gold charging contacts. Always place the terminal onto the base vertically, as shown below
The LED at the bottom edge of the charging base indicates the terminal’s charging status:
LED Color
A920
A920 Pro
Blue: Charging base is plugged in, no terminal connected.
Red/Yellow: Terminal is charging.
To ensure the best charging results, you must use the original AC power adapter that came with your PAX A920 or A920 Pro terminals. The AC power adapter should have the PAX logo printed on one side as shown below:
Your multi-terminal charging base comes with the following:
Protective silicone sleeves (x5)
Multi-terminal charging base
The following images show the location of the main charging base components:
AC power cord
Multi-terminal charging bases (x5)
USB charging cables (x5)
Six (6) outlet power bar
Anti-slip rubber pads
Before you install and connect the multi-terminal charging base, make sure that the desired location is within reach of an AC outlet and that there is enough space to for the charging base and the terminals when connected.
Collect the original AC power adapters that were shipped with your PAX A920 or A920 Pro terminals (maximum of 5 per multi-terminal charging base).
Turn the multi-terminal charging base over to access the opening on the bottom.
Remove any twist ties that secure the charging cables together. Do not remove any of the nylon zip ties as each cable should be long enough to reach an outlet on the power bar.
Working one cable at a time, connect the cable’s USB plug into the AC adapter’s USB port.
Plug the adapter into an outlet on the power bar.
Repeat steps 4 and 5 for each additional charging cable.
After you connect all 5 cables to the power bar, plug in the power bar's cable to an available AC outlet.
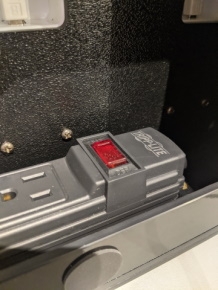
If it is not already, switch the power bar's power button to the On/RESETposition; the switch lights up with a red indicator and the LEDs at the bottom edge of the charging bases light up.
Turn the multi-terminal charging base over to place it securely in its desired location. The base is ready to begin charging your terminals.
IMPORTANT! To minimize the risk of short-circuits and reduce the risk of fire, DO NOT connect any additional devices to the charging base's power bar.
To protect your PAX A920 or A920 Pro terminals from minor impact damage, you should install the silicone sleeves provided with the multi-terminal charging base as the charging bases are designed specifically for terminals with the sleeve.
Insert the top of the terminal into the sleeve's printer protection until the sleeve fits snugly onto the terminal’s top.
Pull the bottom of the sleeve over the bottom edge of the terminal.
Repeat for every terminal you intend to place on the charging bases.
NOTE: To add or change a SIM card, you need to remove the sleeve from the terminal.
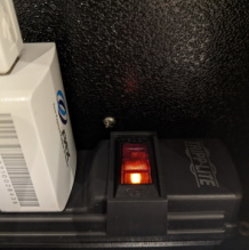
The multi-terminal charging base has a power switch on the attached power bar, shown below:
• To power on the terminal charging base, make sure the power cord is plugged into a grounded AC outlet and that the power switch is in the On/RESETposition; the switch lights up with a red indicator, as shown below:
• To power off the terminal charging base, you can either push the power switch to the OFF position or unplug the power cord from the grounded AC outlet.
To use the charging base, you need only place the terminal(s) vertically on the base so the printer rests in the cradle at the top of the charging base.
NOTE: The charging base should only be used to charge your terminal(s); it is not designed to be a storage location for the terminal(s).
If the status light remains blue after you place the terminal on the base, the terminal is not seated correctly, and not connecting to the base’s gold charging contacts.
IMPORTANT! Do not slide a terminal onto the base, as it can damage the gold charging contacts. Always place the terminal onto the base vertically, as shown below:
The LED at the bottom edge of the charging base indicates the terminal’s charging status:
LED Color
A920
A920 Pro
Blue: Charging base is plugged in, no terminal connected.
Red/Yellow: Terminal is charging.
The PAX A80 countertop payment terminal is perfect for retail and bar/restaurant applications. This setup guide describes the following topics:
Initial terminal configuration
Activating the terminal
Working with the terminal
Replacing the Printer Paper
Volume up button
Power button
Volume down button
Micro USB charging port
Contactless payment reader
Printer
Printer latch
Rear camera/scanner
Battery cover

Green: Terminal is fully charged.

Green: Terminal is fully charged.


The following illustrations show the location of the main terminal features and hardware:
Front-facing camera (not used)
Color touchscreen /Contactless payment reader
Physical keypad
Chip card reader
The terminal does not have a dedicated power on/off button; it turns on automatically when you connect it to an AC power source and turns off when disconnected from a power source.
After you connect the multi-function cable to the terminal and secure the back cover, turn the terminal over.
Insert the power cord’s male USB Type-C plug in the open (female) USB Type-C power connector on the multi-function cable.
Connect the cable’s USB plug into the AC adapter’s USB port.
Plug the adapter into an AC outlet. The terminal powers on automatically and makes a sound to indicate it is starting.
The Secure Payment application's App to app module has multiple configurable features and functions. The features and functions apply to all Secure Payment modules you may use, including standalone Payment, SecurePay, SecureTable, Gateway, and Gift Cards.
For the App to app module, the feature you will most likely need to configure is tipping (if that applies to your business), but you can access the following :
Application Configuration
Close (or exit from) the third party payment application.
If the App to app main screen does not appear automatically, touch the Secure Payment icon on the terminal's main screen.
From the App to app main screen, touch the menu icon at the top-left corner of the screen.
Enter the merchant password and touch the Confirm button. The Settings page appears.
When using the Secure Payment application, it is helpful to have a list of processed transactions to ensure your bookkeeping is aligned with your business' sales. The terminal can print transaction reports, allowing you to view either detailed or summary information on the transactions and transaction types in the current batch, if your business uses multiple terminals, you need to print reports on those terminals to view their reports.
Detailed reports display a list of every transaction in the current batch, including date, time, transaction type, payment method, invoice number, and amount. Summary reports group the transactions by card type, displaying the total sales, and the number of transactions.
The terminal’s printer (built-in or external) can print transaction reports for the current batch. For reconciliation purposes, you may want to print a report prior to the automated settlement, but it is not a requirement. Printing reports is meant to assist with your bookkeeping.
The available transaction reports are:
Additionally, you can search for individual transactions using the procedure.
You can search for transactions on the terminal to view the details about one or more transactions. If you have multiple terminals operating under the same merchant ID (MID), all transactions from all terminals appear in the list with the most recent transaction at the top of the list. You can search for transactions in the current (open) batch as well as from previous batches.
NOTE: Because all of a merchant's transactions processed on all terminals are saved immediately to the server, the list of transactions may be quite long.
TIP: If you find it difficult to locate a specific transaction from an individual terminal, you may choose to restrict the search function to only display transactions performed on each individual terminal.
To restrict the transaction display to only those processed by the terminal, you must contact PayFacto support to request that your merchant profile displays only transactions processed on individual terminals by activating the Terminal Only Reports function. This will restrict transaction searching to individual terminals.
From the main screen, touch the Menu button.
Enter the merchant password and touch Confirm.
In the Transaction management section, touch Transaction History.
Touch the Search button.
Enter one or more of the following search criteria:
An invoice number in the Invoice number field
The detailed report for the current batch of transactions lists each individual transaction’s details. You may want to print the detailed transaction in order to have a printed copy of the transactions prior to processing the the current batch. Printing a detailed report allows you to reconcile each transaction as part of your bookkeeping.
NOTE: Printing a detailed report can consume a large quantity of paper, depending on the number of transactions in the current batch.
From the main screen, touch the Menu button.
Enter the merchant password and touch Confirm.
In the Transaction management section, touch Reports.
In the Batch Details section, touch Print Batch Details. The terminal prints the Batch Details Report, listing all transaction details in the current batch for all terminal operators.
If you have more than one terminal, repeat steps 1 to 4 for each additional terminal where you want to print the detailed transaction report.
The summary report for the current batch of transactions allows you to see the totals for each payment method used, including sales, refunds, tips, cashbacks, and fees. You may want to print the summary report to reconcile transactions by payment type as part of your bookkeeping prior to processing the current batch.
From the main screen, touch the Menu button.
Enter the merchant password and touch Confirm.
In the Transaction management section, touch Transaction History.
In the Batch Summary section, touch Print Batch Summary. The terminal prints the Summary Details Report, listing all transactions in the current batch, grouped by card type for all terminal operators.
You can configure your terminal to add a tip to the total sale. You can also configure cashback options for debit transactions (if supported).
You can configure your terminal to add a tip to the total sale. You can also configure cashback options for debit transactions (if supported). The topics covered in this section include:
If your business includes the option to tip, you can enable tipping on the terminal, where the customer can add a tip value in addition to the sale. By default, tipping is disabled on the terminal.
NOTE: When you enable tipping on the terminal, customers can always enter a manual tip amount in dollars and cents, regardless of any preset percentage values.
From the main screen, touch the Menu button.
Enter the merchant password and touch Confirm.
Scroll to the Configure application section.
Touch Terminal options.
When you enable tipping, the terminal automatically displays three preset percentages (default values are 15%, 18%, and 20%) as options to the customer. The customer can touch one of the preset values or manually enter an amount for the tip.
NOTE: If you want to allow your customers to enter a custom tip percentage, you must enable the manual tip percentage using the procedure.
From the main screen, touch the Menu button.
Enter the merchant password and touch Confirm.
Scroll to the Configure application section.
Touch Terminal options.
When you enable tip processing, the terminal automatically offers preset percentage values to the customer. You can also offer the opportunity for customers to enter their own percentage value. By default, the manual tip percentage option is enabled on the terminal and applies automatically whenever you activate the tip processing option.
From the main screen, touch the Menu button.
Enter the merchant password and touch Confirm.
Scroll to the Configure application section.
Touch Terminal options.
When you enable tip processing, the terminal automatically offers preset percentage values to the customer. By default, the preset percentage values are set to 15, 18, and 20, but you can easily change one or more of these values as needed.
From the main screen, touch the Menu button.
Enter the merchant password and touch Confirm.
Scroll to the Configure application section.
Touch Terminal options.
NOTE: If you have multiple terminals, you should ensure that they are all configured to offer the same preset tip percentages to avoid one terminal displaying different tip percentages from the other terminal(s).
When you enable tip processing, the terminal automatically offers preset percentage values to the customer. By default, the preset percentages use the Normal text size to display the values, but you can choose to use Large or Very Large text to suit your requirements.
From the main screen, touch the Menu button.
Enter the merchant password and touch Confirm.
Scroll to the Configure application section.
Touch Terminal options.
There can be situations where your customers may accidentally enter a manual tip percentage incorrectly and leave a larger tip than planned. By default, the terminal enables a tipping threshold that requires the Merchant password for any tip over 50% of the initial sale amount (for example, a $55 tip on a $100 bill). You can disable or adjust the threshold value if needed.
NOTE: The tip threshold feature is designed to protect the customer and the merchant by ensuring that the customer is aware of the generous tip they intend to leave, which prevents the possibility of a future chargeback.
From the main screen, touch the Menu button.
Enter the merchant password and touch Confirm.
Scroll to the Configure application section.
Touch Terminal options.
When you enable the tipping threshold, you can set a custom percentage as the value where the Merchant password is required. By default, the terminal set the threshold value at 50%, but you can adjust it if needed.
From the main screen, touch the Menu button.
Enter the merchant password and touch Confirm.
Scroll to the Configure application section.
Touch Terminal options.
By default, the manual tip percentage option is enabled on the terminal and applies automatically whenever you activate the tip processing option; you can easily disable the function if needed.
From the main screen, touch the Menu button.
Enter the merchant password and touch Confirm.
Scroll to the Configure application section.
Touch Terminal options.
By default, tipping is disabled on the terminal. If you've enabled tip processing, you can easily disable the function if needed.
From the main screen, touch the Menu button.
Enter the merchant password and touch Confirm.
Scroll to the Configure application section.
Touch Terminal options.
If you want to offer your customers the ability to withdraw cash in addition to their purchase, you can do so for debit card transactions only. By default, cashback is disabled on the terminal.
From the main screen, touch the Menu button.
Enter the merchant password and touch Confirm.
Scroll to the Configure application section.
Touch Terminal options.
When you enable cashback for a debit transaction, the terminal automatically displays three preset values (defaults are $20, $40, and $60) as options to the customer. The customer can touch one of the preset values or manually enter an amount for cashback.
NOTE: When you enable cashback, the terminal automatically adds an option for the customer to enter a custom amount.
From the main screen, touch the Menu button.
Enter the merchant password and touch Confirm.
Scroll to the Configure application section.
Touch Terminal options.
When you enable cashback for debit transactions, the terminal automatically offers preset cashback values to the customer. By default, the preset amounts are set to 20, 40, and 60, but you can easily change one or more of these values as needed.
From the main screen, touch the Menu button.
Enter the merchant password and touch Confirm.
Scroll to the Configure application section.
NOTE: If you have multiple terminals, you should ensure that they are all configured to offer the same preset cashback amounts to avoid one terminal displaying different cashback amounts from the other terminal(s).
As a security measure, you can require customers receiving any cashback amount to confirm they received the cash by signing on the merchant copy of the transaction receipt. By default, this feature is disabled.
When you enable this function, the terminal prints a signature line on the transaction receipt where the customer can sign as proof that they received the requested cashback amount.
From the main screen, touch the Menu button.
Enter the merchant password and touch Confirm.
In the Configure application section, touch Printer options.
By default, cashback is disabled on the terminal. If you've enabled cashback, you can easily disable the function if needed.
From the main screen, touch the Menu button.
Enter the merchant password and touch Confirm.
Scroll to the Configure application section.
If your terminal has a built-in printer, or connects to an external printer, there are several printing options you can configure that determine when a transaction receipt gets printed, as well as the receipt's appearance.
If your terminal is equipped with a printer, you can adjust the printer settings to suit your business needs.
The available printing options are:
If your terminal is equipped with (or connects to) a printer, you can print transaction receipts after the transaction is confirmed. By default, the Secure Payment application's payment module enables the printing on transaction receipts, but you can adjust the setting if needed.
NOTE: If you do not enable the printing of transaction receipts and provide no other method for a customer to receive proof of their transaction, reimbursements will be more difficult to process.
From the main screen, touch the Menu button.
Enter the merchant password and touch Confirm.
In the Configure application section, touch Printer options.
In the Copies section, slide the Receipt Copy Printouts toggle switch to the right if it isn't already enabled.
When you enable the printing of transaction receipts, the customer receipt is always available to print, but you can choose whether to print the merchant copy or not. Printing the merchant copy for each transaction allows you to reconcile your individual transactions with the batch processing and the transaction reports.
NOTE: Printing the transaction receipts for the customer AND merchant will consume more printer paper.
From the main screen, touch the Menu button.
Enter the merchant password and touch Confirm.
In the Configure application section, touch Printer options.
In the Copies section, slide the Merchant Copy Printouts toggle switch to the right if it isn't already enabled.
The payment terminals use thermal paper to print the transaction receipts. You can adjust the level of contrast for the transaction receipts if they are difficult to read. If you have a mobile or portable payment terminal, the contrast level can affect battery usage.
The following table shows examples of each printout contrast level:
From the main screen, touch the Menu button.
Enter the merchant password and touch Confirm.
In the Configure application section, touch Printer options.
In the Copies section, touch Printout color depth.
In addition to printing receipts for sales transactions, you can print receipts for some non-sales transactions, including:
Declined credit transactions
Void transactions
Completed transactions
IMPORTANT! If you disable printing for any of these operations, the customer will have no physical evidence of these transactions.
In addition to the transactions listed above, you can enable or disable the following printer settings:
Bar code: Prints a barcode on the transaction receipt that identifies the individual transaction; helpful when using a terminal equipped with a scanner when performing refund or void transactions
Total line on pre-authorization receipts: Adds a total line to the transaction receipt that prints when a pre-authorization is confirmed (usually paired with the tip line)
Tip line on pre-authorization receipts: Adds a tip line to the transaction receipt that prints when a pre-authorization is confirmed
From the main screen, touch the Menu button.
Enter the merchant password and touch Confirm.
In the Configure application section, touch Printer options.
In the Printing receipts section, enable each desired function by sliding the toggle switch to the right or disable functions by sliding the toggle switch to the left.
If a transaction receipt is lost or damaged, you can print a duplicate copy of the receipt.
From the main screen, touch the Menu button.
Enter the merchant password and touch Confirm.
In the Transaction management section, touch Transaction History.
Scroll to or search for the desired transaction to reprint.
NOTE: Because all of a merchant's transactions processed on all terminals are saved immediately to the server, the list of transactions may be quite long. For more information on searching for a transaction, refer to the Search for a Transaction procedure.
Touch the desired transaction to display the details.
Touch Reprint.
In the Reprint screen, touch the button for the transaction receipt you want to reprint:
Merchant copy
Customer copy
Both copies
The terminal prints the selected duplicate copy(ies) of the transaction receipt.
NOTE: If you have more than one terminal and your merchant profile is configured to display only transactions processed on individual terminals, you may need to repeat this procedure if you are unsure of which terminal issued the original transaction receipt.
You can add a personalized message at the bottom of every printed transaction receipt. Your message can include business hours, social media coordinates, and more. Your message can contain up to 4 lines with 48 characters (including spaces) per line.
TIP: You should prepare your message on a piece of paper in advance, to ensure that you have the correct number of characters per line.
From the main screen, touch the Menu button.
Enter the merchant password and touch Confirm.
In the Configure application section, touch Printer options.
Scroll to the bottom of the screen to find the Footer section and touch Print footer.
When you enable printing a personalized message on your transaction receipt footers, you need to configure the message by entering it on one of the four (4) available lines on the receipt footer.
TIP: When preparing your message, consider any languages your customers might speak and configure your personalized message to meet all possible languages. Don't forget to check your message for spelling mistakes!
From the main screen, touch the Menu button.
Enter the merchant password and touch Confirm.
In the Configure application section, touch Printer options.
Scroll to the bottom of the screen to find the Footer section and touch Print footer.
When using a personalized message on your transaction receipt footers, you may want to change or delete some of the message. You can easily adjust the footer text whenever you need.
From the main screen, touch the Menu button.
Enter the merchant password and touch Confirm.
In the Configure application section, touch Printer options.
Scroll to the bottom of the screen to find the Footer section and touch Print footer. The Footer option screen appears.
TIP: You can also remove the message from the receipt footers using the procedure; it prevents the message from printing on the receipt, but remains available for later use if desired.
If you have more than one terminal, repeat steps 1 to 6 for each additional terminal where you want to change the personalized message at the bottom of the transaction receipts.
If you enabled a personalized message at the bottom of every printed transaction receipt, but you no longer want to use any message on the footer, you can easily disable footer message printing.
NOTE: When you disable the printing of a personalized message, the original message remains available for later use unless you delete the previously configured text from the footer lines
From the main screen, touch the Menu button.
Enter the merchant password and touch Confirm.
In the Configure application section, touch Printer options.
Scroll to the bottom of the screen to find the Footer section and touch Print footer.
If you previously enabled the printing of merchant transaction receipts and you no longer want or need them, you can quickly disable the function.
From the main screen, touch the Menu button.
Enter the merchant password and touch Confirm.
In the Configure application section, touch Printer options.
In the Copies section, slide the Merchant Copy Printouts toggle switch to the left.
By default, the Secure Payment application's payment module enables the printing on transaction receipts, but you can disable the function if needed.
NOTE: If you disable the printing of transaction receipts without providing any other method for a customer to receive proof of their transaction, reimbursements will be more difficult to process.
From the main screen, touch the Menu button.
Enter the merchant password and touch Confirm.
In the Configure application section, touch Printer options.
In the Copies section, slide the Receipt Copy Printouts toggle switch to the left.
The Secure Payment application's payment module allows you to assign passwords to protect the terminal from unauthorized use. All terminal passwords are 6 numeric (numbers only) characters in length to provide security without slowing down the overall time it takes to process a transaction.
The terminal has 3 types of user passwords:
Administrator (Admin): Configured during initial terminal activation
Merchant: Configured during initial terminal activation
Operator: Configured when creating one or more terminal operators
For more information on specific password procedures, click any of the following links:
The terminal uses passwords for different user levels. The user levels follow a hierarchy, and a “higher” level password can enable a function (or override a password) for a “lower” level user.
For example, an operator can use the Merchant password to enable a password-protected sale, while an Administrator password can unlock functions that require a Merchant password.
When setting passwords on your payment terminal, you must respect the following parameters:
Passwords must be 6 characters long
The Administrator and Merchant passwords cannot be the same (can’t match)
You cannot use the same digit 6 times consecutively (for example: 111111 or 777777)
If you enter a password incorrectly, the terminal displays an Access refused error message.
Touch the error message to return to the Password field and re-enter the required password.
If you are unable to remember the required password, you can use the Merchant or Administrator password, depending on which password you can't remember. Refer to or for more information on which passwords can "override" others.
If a user forgets a password, the password reset procedure depends on the terminal user profile. The following table explains who can reset which password and which procedure to use:
As part of your original terminal activation, you set an Administrator password. The Administrator password provides access to advanced terminal functions and can also enable password-protected operations. You can change the Administrator password whenever you feel it necessary.
NOTE: Do not forget the new Administrator password; the only way to reset it is to contact PayFacto support.
From the main screen, touch the Menu button.
Enter the merchant password and touch Confirm.
Scroll to the Configure application section.
Touch Passwords.
If you have more than one terminal, repeat steps 1 to 10 for each additional terminal where you want to change the Admin password.
As part of your original terminal activation, you set a Merchant password. The Merchant password protects against unauthorized users performing certain operations. You can change the Merchant password whenever you feel it necessary.
NOTE: Do not forget the new Merchant password; the only way to reset it is to use the Admin password or to contact PayFacto support.
From the main screen, touch the Menu button.
Enter the merchant password and touch Confirm.
Scroll to the Configure application section.
Touch Passwords.
If you have more than one terminal, repeat steps 1 to 10 for each additional terminal where you want to change the Merchant password.
For added security, you can require the Merchant password for certain functions or transactions before the operation can proceed. By default, this security measure is enabled for the following functions and transactions:
(refund and void)
(cash, force post, swipe)
By default, all of the operations listed above have password protection enabled. Reimbursement transactions are always password protected, but you can select if the transaction requires the Admin or Merchant password.
You can disable the password protection on certain sales transactions and exiting the Secure Payment application if desired, but that leaves the terminal vulnerable to unauthorized use where any person could perform those functions.
NOTE: To ensure the security of your transactions, it is strongly recommended that you enable the use of passwords for the selected functions.
As a security measure, the Secure Payment application requires a password before processing reimbursement transactions. You can choose which password to require (Admin or Merchant) or you can disable passwords for reimbursements, depending on your preference. By default, refunds require the Admin password and voids require the Merchant password.
IMPORTANT! If you disable passwords for reimbursement transactions, anyone can process a refund or a void without supervisory or management knowledge or approval. To prevent possible fraudulent reimbursements, you should maintain password protection as part of the reimbursement process.
From the main screen, touch the Menu button.
Enter the merchant password and touch Confirm.
Scroll to the Configure application section.
Touch Passwords.
Select the desired password by touching Merchant or Admin or touch No password to disable password protection for refunds.
Touch the Back icon to return to the Passwords screen.
Touch Void transactions; the Password on voids screen appears.
Select the desired password by touching Merchant or Admin or touch No password to disable password protection for voids.
If you have more than one terminal, repeat steps 1 to 10 for each additional terminal where you want to set the required passwords for reimbursement transactions.
NOTE: If you disable password protection in either step 7 or 10, you can re-enable the password by using this procedure and selecting the desired password for each transaction type where you disabled the password.
By default, less commonly used sales transactions (cash sale, force post, and swiping the payment card) require the Merchant password before they can be processed. You can choose whether or not to require the Merchant password, depending on your preference.
From the main screen, touch the Menu button.
Enter the merchant password and touch Confirm.
Scroll to the Configure application section.
Touch Passwords.
By default, the Secure Payment application's payment module requires the Merchant password before you can exit. You can choose whether or not to require the Merchant password, depending on your preference.
NOTE: Be aware that if you disable this function, the Secure Payment application's payment module can be closed at any time by anyone, whether intended or not.
From the main screen, touch the Menu button.
Enter the merchant password and touch Confirm.
Scroll to the Configure application section.
Touch Terminal options.
Disable the use of the Merchant password before closing the payment module by toggling the Ask password on exit switch to the left.
If you have more than one terminal, repeat steps 1 to 7 for each additional terminal where you want to set whether or not to use the Merchant password before exiting the application.
The Secure Payment application's payment module includes tools for training and user assistance. These include:
The terminal has a training mode that allows users to process transactions in a simulated environment allowing them to learn and understand the terminal’s various functions. When in training mode, the terminal does not communicate with the server, and it functions even when the terminal has no network connection. The available options for training mode are:
When you enable training mode, the terminal does not process any actual transactions and has no communication with any other device, everything occurs on the terminal.
IMPORTANT! It is possible to lock a card in training mode, as some security features are stored on the card’s chip. Be cautious if you are using an actual payment card even in training mode.
From the main screen, touch the Menu button.
Enter the merchant password and touch Confirm.
Scroll to the Help & training tools section.
Touch Training mode.
If you have more than one terminal, repeat steps 1 to 5 for each additional terminal where you want to enable training mode
When you enable training mode, the terminal is unable to process any transactions. To resume transaction processing, you need to disable training mode.
From the main screen, touch the Menu button.
Enter the merchant password and touch Confirm.
Scroll to the Help & training tools section.
Touch Training mode.
If you have more than one terminal, repeat steps 1 to 5 for each additional terminal where you want to disable training mode.
The Secure Payment application offers 24/7 customer and technical support.
From the main screen, touch the Menu button.
Enter the merchant password and touch Confirm.
Scroll to the Help & training tools section.
Touch Support.
Should you need to leave the Secure Payment application, there are two methods available:
Using the Android Back button
Using the Exit menu from the Settings page
From the main screen, touch the Android system Back button, found on the bottom left third of the screen.
Enter the merchant password and touch Confirm.
From the main screen, touch the Menu button.
Enter the merchant password and touch Confirm.
Scroll to the Help & training tools section.
Touch Exit.
Touch the Confirm button to exit the application.
The About menu displays information about the terminal and the the installed software version. You may be asked by the PayFacto support team to reference this information, but none of the fields are editable.
From the main screen, touch the Menu button.
Enter the merchant password and touch Confirm.
Scroll to the Help & training tools section.
Touch About.
Configuration Settings
Accessing Configuration Settings
Transaction Management
Configure Tipping Options
Configure Cashback Options
Configure Printing Options
Configure Password Options
Help and Training Tools

App Version
Version Code
Device Model
Serial Number


An authorization code in the Authorization code field
Touch the Time range field to select a date range for the desired transaction; touch Save to search using the selected date range
Touch the Search button. The terminal returns any transaction that meets the selected search criteria.
Touch the desired transaction to display the details.
If you have more than one terminal, repeat steps 1 to 6 for each additional terminal where you want to print the summary transaction report.


Toggle the Tip processing switch to the right.
If you have more than one terminal, repeat steps 1 to 6 for each additional terminal where you want to enable tipping.
The Percentage presets display the current values.
If you have more than one terminal, repeat steps 1 to 6 for each additional terminal where you want to view the terminal's preset tip percentages.
If it isn't already enabled, toggle the Manual percentage input switch to the right.
If you have more than one terminal, repeat steps 1 to 6 for each additional terminal where you want enable a manual tip percentage.
Touch Percentage presets.
On the Tip percentage presets screen, touch the tip preset field you want to change (Tip preset no. 1, Tip preset no. 2, or Tip preset no. 3) and replace the current percentage with a new value.
Repeat step 7 for any additional percentage preset values you want to change.
If you have more than one terminal, repeat steps 1 to 8 for each additional terminal where you want to change the preset tip percentage values.
Touch Tip presets text size.
On the Tip presets text size screen, touch the text size you want to use (Normal, Large, or Very Large).
If you have more than one terminal, repeat steps 1 to 7 for each additional terminal where you want to set preset tip percentage text size.
Touch Tip threshold.
On the Tip threshold screen, toggle the Tip threshold switch to the right.
If you have more than one terminal, repeat steps 1 to 7 for each additional terminal where you want to enable the tipping threshold.
Touch Tip threshold.
On the Tip threshold screen, change the percentage value in the Threshold field.
If you have more than one terminal, repeat steps 1 to 7 for each additional terminal where you want to set the terminal's tipping threshold.
Toggle the Manual percentage input switch to the left.
If you have more than one terminal, repeat steps 1 to 6 for each additional terminal where you want to disable manual tip percentage.
Toggle the Tip processing switch to the left.
If you have more than one terminal, repeat steps 1 to 6 for each additional terminal where you want to disable tipping.
Normal
Large
Very Large
Normal
Large
Very Large


Toggle the Cashback processing switch to the right.
If you have more than one terminal, repeat steps 1 to 6 for each additional terminal where you want to enable cashback.
The Amount presets display the current values.
If you have more than one terminal, repeat steps 1 to 6 for each additional terminal where you want to view the terminal's preset cashback amounts.
Touch Terminal options.
Scroll to the Cashback section.
Touch Amount presets.
On the Cashback amount presets screen, touch the cashback preset field you want to change (Cashback preset no. 1, Cashback preset no. 2, or Cashback preset no. 3) and replace the current amount with a new value.
Repeat step 7 for any additional cashback amount preset value you want to change.
If you have more than one terminal, repeat steps 1 to 8 for each additional terminal where you want to change a preset cashback amount
In the Printing receipts section, scroll to the Cashback print Signature Line and slide the toggle switch to the right.
To disable the printing of the signature line on the transaction receipt, slide the toggle switch to the left.
If you have more than one terminal, repeat steps 1 to 4 for each additional terminal where you want to set whether or not the terminal prints a signature line for cashback debit transactions.
Touch Terminal options.
Scroll to the Cashback section.
Toggle the Cashback processing switch to the left.
If you have more than one terminal, repeat steps 1 to 6 for each additional terminal where you want to disable cashback.


If you have more than one terminal, repeat steps 1 to 4 for each additional terminal where you want to enable transaction receipt printing.
If you have more than one terminal, repeat steps 1 to 4 for each additional terminal where you want to enable the printing of the merchant copy of the transaction receipt.
On the Printout color depth screen, touch the desired contrast level: Pale, Normal, or Dark.
If you have more than one terminal, repeat steps 1 to 5 for each additional terminal where you want to set the printout contrast level.
Cashback print Signature line: Adds a signature line for cashback transactions for customers to sign as proof that they received the requested cashback amount
Reverse on declined: Prints the transaction result in white on a dark background for declined transaction
Enabled
Disabled
If you have more than one terminal, repeat steps 1 to 4 for each additional terminal where you want to set which transactions will print a transaction receipt.
On the Footer option screen, slide the Print footer toggle switch to the right.
If you have more than one terminal, repeat steps 1 to 5 for each additional terminal where you want to enable a personalized message on the bottom of the transaction receipts.
On the Footer option screen, delete the text in the Footer no. 1 field and enter the first line of your custom message.
Repeat step 5 for each additional line you want to use for your personalized message, using the Footer no. 2, Footer no. 3, and Footer no. 4 fields.
If you have more than one terminal, repeat steps 1 to 6 for each additional terminal where you want to configure the personalized message at the bottom of the transaction receipts.
To edit your message, adjust the text in the Footer no. 1, Footer no. 2, Footer no. 3, and/or Footer no. 4 fields as required, as shown in the following example:
If you want to delete your personalized message, delete the text in the Footer no. 1, Footer no. 2, Footer no. 3, and Footer no. 4 fields, as shown in the following example:
On the Footer option screen, slide the Print footer toggle switch to the left.
If you have more than one terminal, repeat steps 1 to 5 for each additional terminal where you want to disable personalized messages at the bottom of the transaction receipts.
If you have more than one terminal, repeat steps 1 to 4 for each additional terminal where you want to disable the printing of the merchant copy of the transaction receipts.
If you have more than one terminal, repeat steps 1 to 5 for each additional terminal where you want to disable the printing of transaction receipts.
Pale
Normal
Dark
Lightest printout (lowest contrast), prints faster and uses less battery
Default printout setting, average printing speed and battery use
Darkest printing (highest contrast), prints slower and uses more battery


Operator
Administrator or Merchant
Operator passwords can be reset using the Admin or Merchant password.
Refer to the procedure.
Touch Administrators.
Enter the current Admin password in the Password field and touch Confirm.
Enter a new 6-digit numeric Admin password in the Password field. Keep in mind the password requirements when setting the new Admin password.
Re-enter the new password in the Confirm new password field.
Touch the Confirm button; the new Admin password is saved and the Passwords screen appears. If the passwords do not match, a message appears and the password is not changed. Re-enter the password; if needed, touch the Show password icon to ensure the passwords match.
Touch Merchant.
Enter the Admin password in the Password field and touch Confirm. Requiring the Admin password prevents unauthorized changes to the Merchant password.
Enter a new 6-digit numeric Merchant password in the Password field. Keep in mind the password requirements when setting the new Merchant password.
Re-enter the new password in the Confirm new password field.
Touch the Confirm button; the new Merchant password is saved and the Passwords screen appears. If the passwords do not match, a message appears and the password is not changed. Re-enter the password; if needed, touch the Show password icon to ensure the passwords match.
Touch Refund transactions; the Password on refunds screen appears.
Enable the use of the Merchant password by toggling the following switches to the right:
Force post
Cash
Swipe
Disable the use of the Merchant password by toggling the previously listed switches to the left.
If you have more than one terminal, repeat steps 1 to 7 for each additional terminal where you want to set password usage for sales transactions.
Enable the use of the Merchant password before closing the payment module by toggling the Ask password on exit switch to the right.
User Level
Description
Administrator
Configured when you activated your terminal, the Administrator password can protect the terminal against unauthorized reimbursements in the Secure Payment application's payment module. You can use the Administrator password for any function that requires a Merchant or Operator password.
Merchant
Configured when you activated your terminal, the Merchant password protects the terminal from completing certain sales and reimbursement functions without authorization. You can use the Merchant password to complete a transaction when Operator identification requires a password to process a sale.
Operator
Assigned when creating one or more terminal operators. Can be enabled to protect unauthorized sales when paired with the associated operator ID.
Terminal user
Who can reset
What to do
Administrator
PayFacto Support
The Administrator password can only be reset with a Superuser password, which requires the assistance of Technical Support.
Refer to the Obtaining Support procedure.
Merchant
Administrator


A Merchant password can be reset using the Admin password.
Refer to the procedure.
Magnetic stripe reader
3.5mm audio jack

This document will introduce you to your payment terminal as well as guide you through the process of preparing and configuring it in order to quickly begin processing payments.
Your PAX A80 payment processing terminal comes with the following:
Payment terminal
AC power adapter and terminal power cord (2 pieces)
RJ-11 (telephone) cable *
The RJ-11 cable is not used for terminal communication and may not be included with your terminal.


The following illustrations show the location of the main terminal features and hardware:
There are multiple communication ports on the back of the terminal with cable guides. The diagram on the back of the terminal shows where to connect the communication cables, in addition to AC power.
There are multiple connection ports on the back of the terminal. Countertop terminals generally require AC power and Ethernet connections.
Your configuration may also include a connection to a POS system or an additional PIN pad.
Use the diagram on the back of the terminal to determine where to connect the cables that apply to your configuration. The terminal’s connection ports are shown below:

PAX A80
Pax A35 CA


Contactless payment reader
Color touchscreen
Magnetic stripe reader
Physical keypad
Chip card reader
Cable guides
Ports diagram
Ethernet port
Power port

If the supplied roll of printer paper was not already installed in the terminal when you received it, you will need to install it before you can print any transaction receipts.
TIP: This procedure also applies to replacing a roll of printer paper.
On the back of the terminal at the top, lift the lever with the contactless logo to unlock and open the printer cover.
NOTE: The printer cover opens on a hinge, it does not come off the terminal.
Place the roll of printer paper in the paper tray, leaving about 2 inches (5 cm) of paper beyond the printer's cutter as shown in the following example:
IMPORTANT! Make sure the paper unrolls from the back of the roll, otherwise the printer will be unable to print the transaction receipt.
Close the printer cover until it snaps into place and remove any excess paper.
By default, the terminal displays all information in English. This procedure explains how to change the terminal’s display language if necessary.
IMPORTANT! Selecting a different language changes all text that appears on the terminal.
On the terminal’s main screen, touch the Settings icon.
On the Settings screen, touch the Please Input Password field and use the keypad to type the password: either 9876 or pax9876@@.
Touch the checkmark icon on the keypad when you are done and touch OK.
This section explains how to enable Ethernet and connect to your network.
Ensure your network cable is connected in the appropriate connector located on the back of the terminal and make sure the other end of the network cable is connected to a network jack or hub.
On the terminal’s main screen, touch the Settings icon.
On the Settings screen, touch the Please Input Password field and use the keypad to type the password: either 9876 or pax9876@@.
IMPORTANT! Changing the network connection parameters incorrectly will prevent the terminal from communicating with the payment processing server.
Touch the Back icon twice to return to the main screen.
PayFacto uses a self-service terminal activation procedure designed to save time while also providing better security. The new activation procedure applies only to countertop and mobile PAX payment terminals using the Android operating system. The new procedure applies to:
All new merchants activating their terminals for the first time
Any existing merchants adding new payment terminals
Any existing merchants receiving replacement terminals
After you configure the terminal's network connection(s) and power on the terminal, the procedure comprises of 2 parts:
NOTE: If you have multiple new payment terminals, you need to perform the activation procedure on each terminal individually.


To prevent unauthorized individuals from changing the terminal’s configuration, you need to set the Administrator and Merchant passwords. These passwords restrict access to certain functions on the terminal.
When setting your passwords, you must respect the following parameters:
Passwords must be 6 characters long


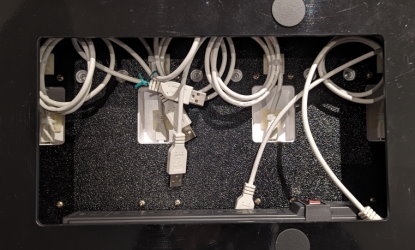
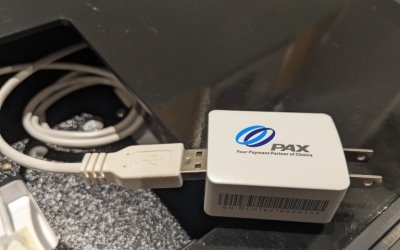
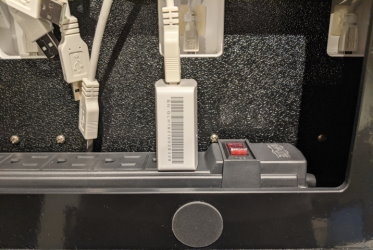
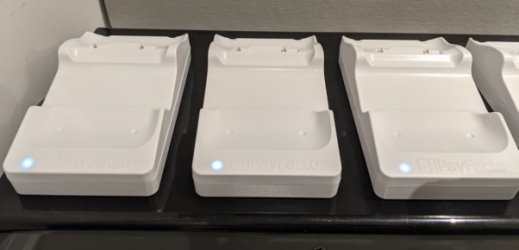
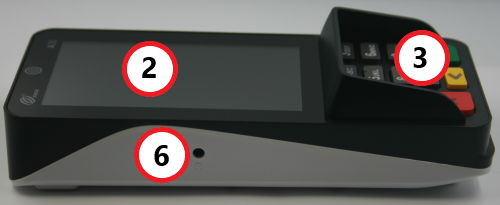
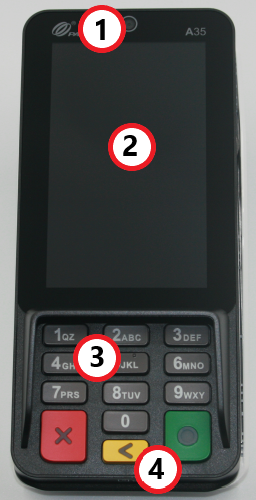
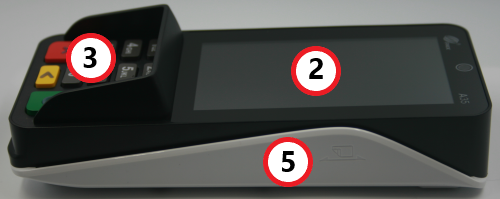
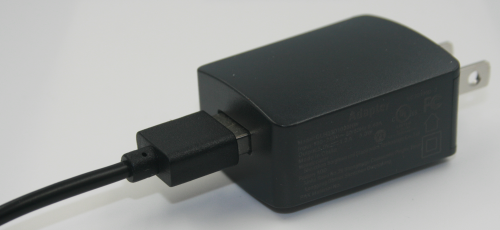
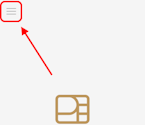
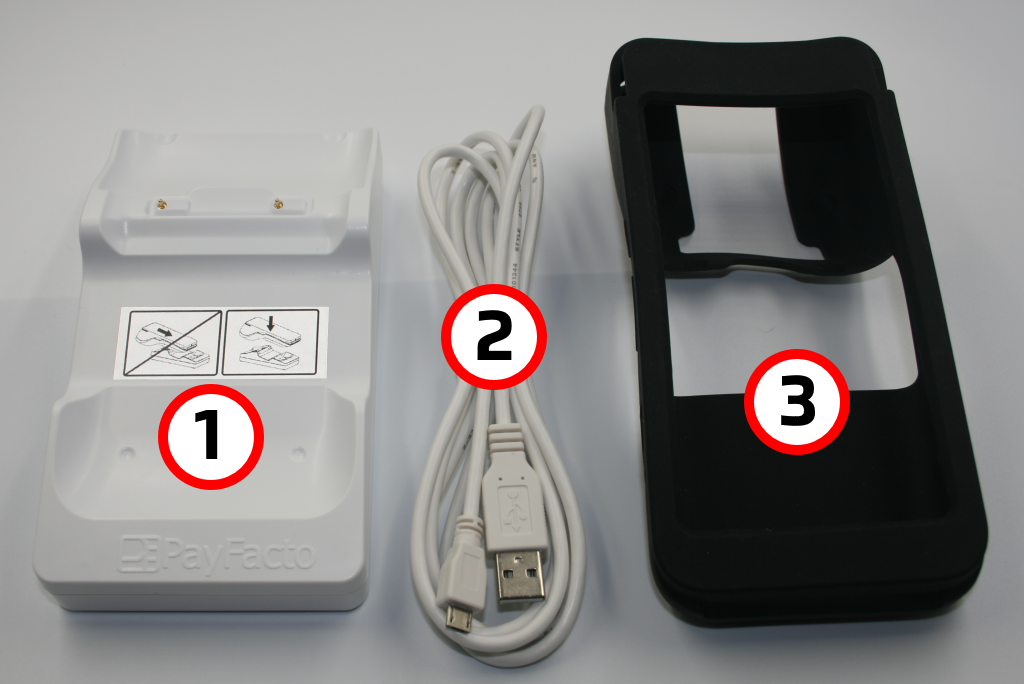
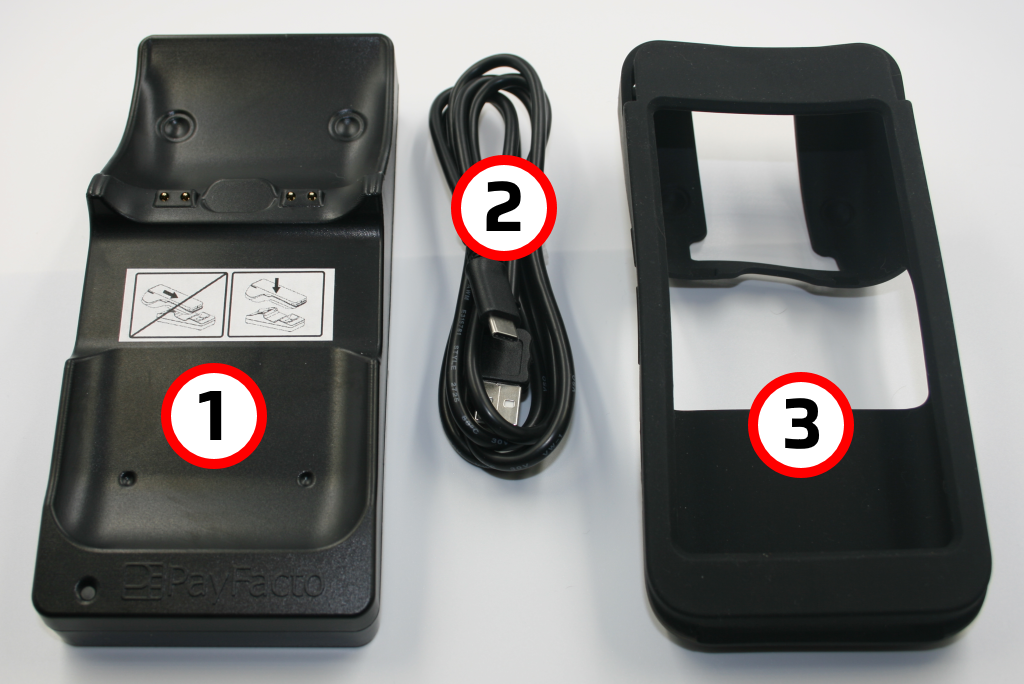
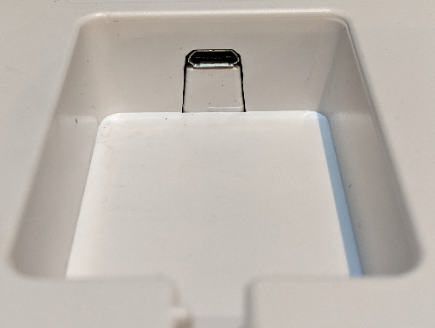
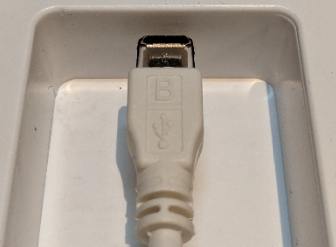
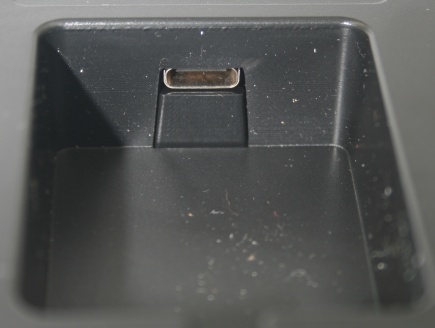
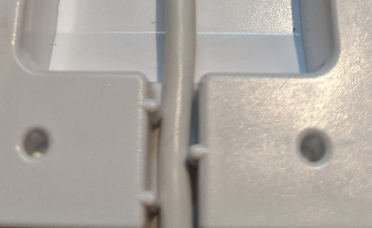
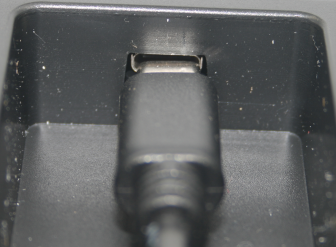
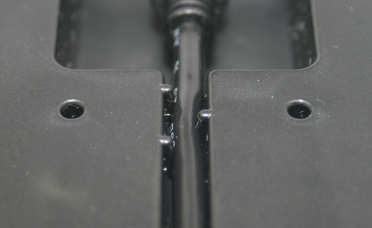
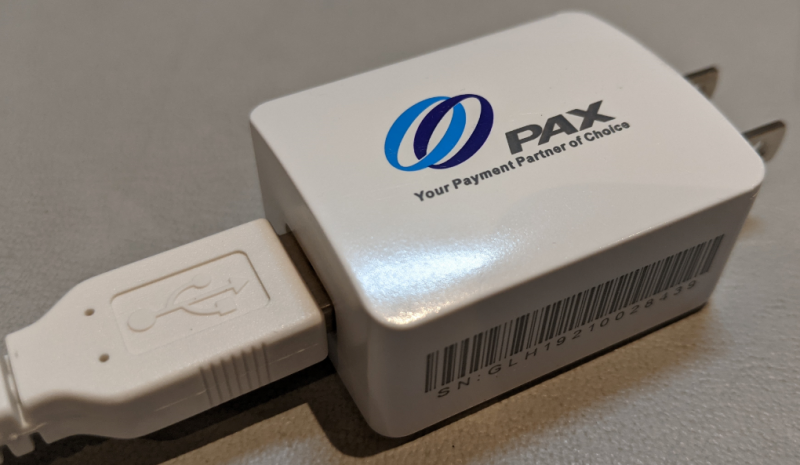
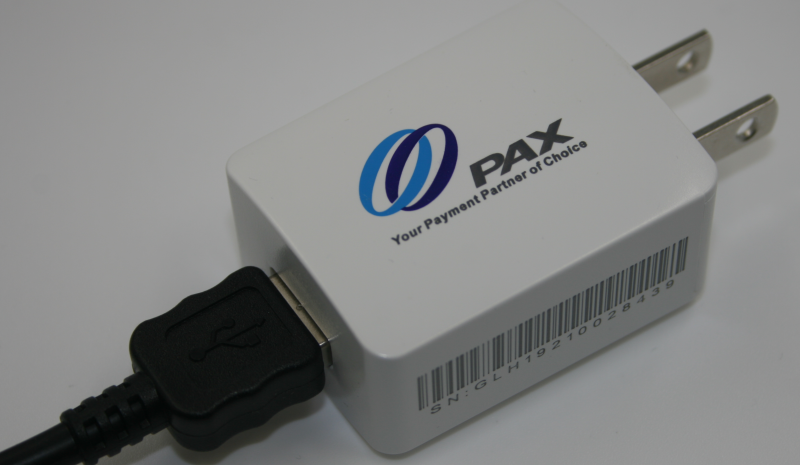
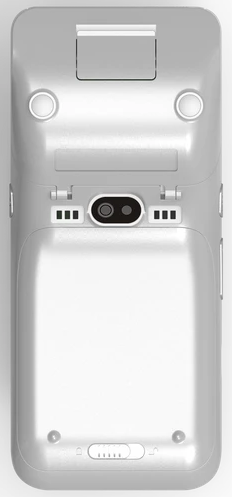

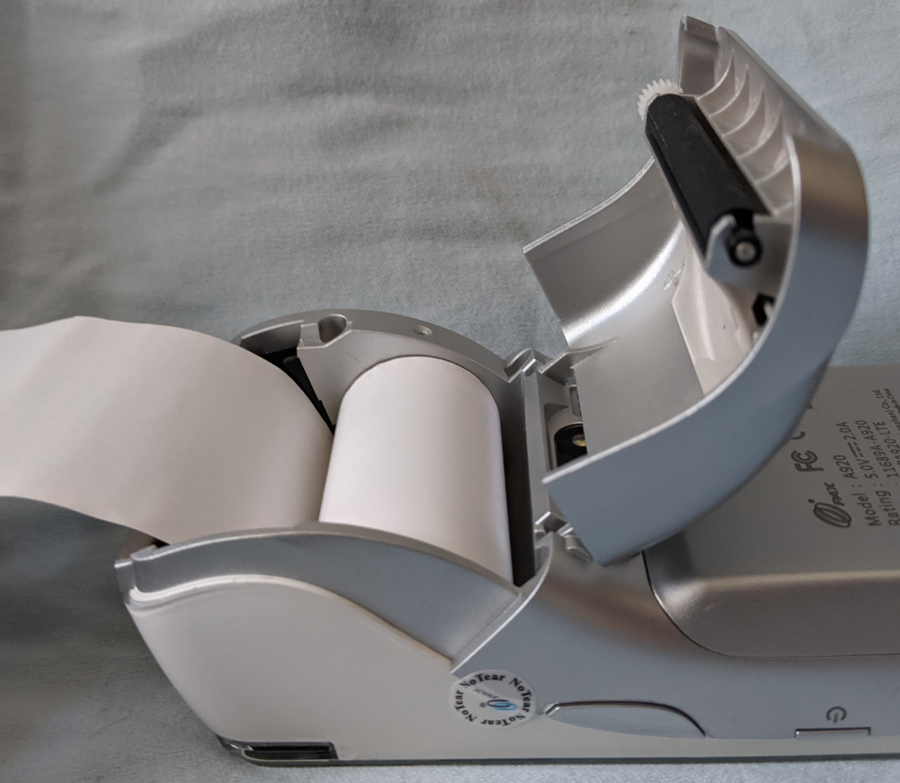
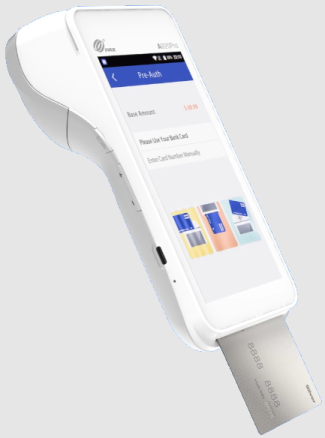
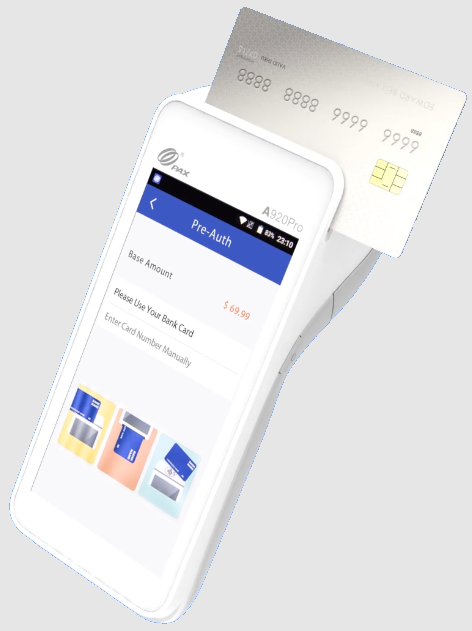
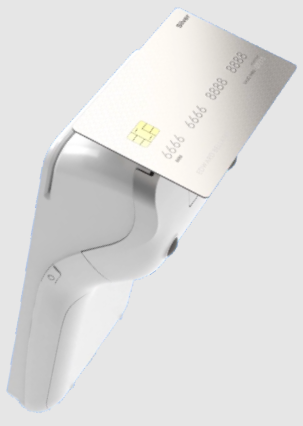
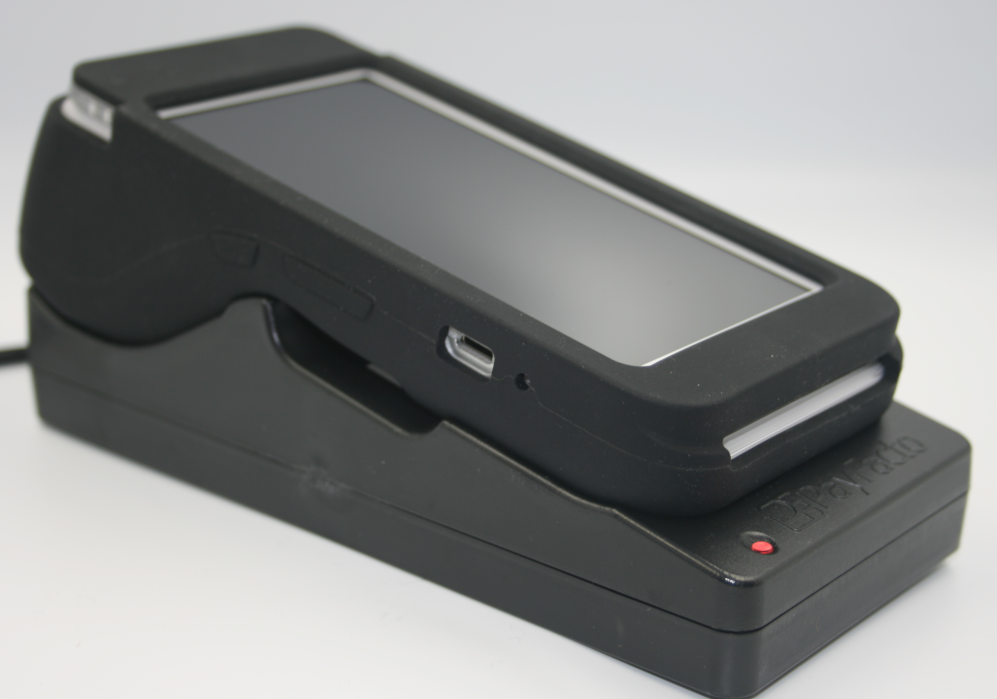


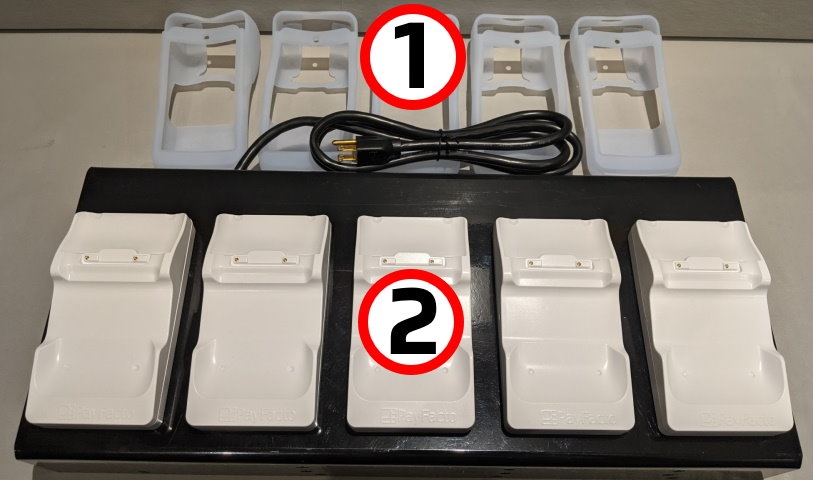
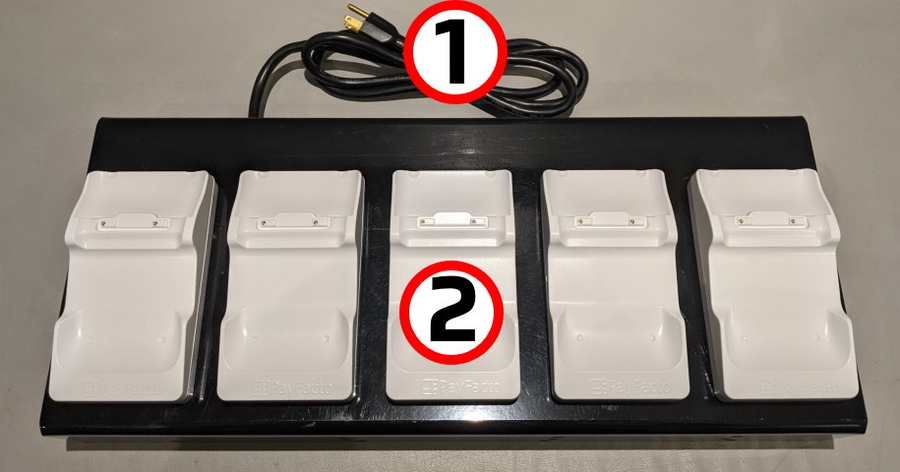
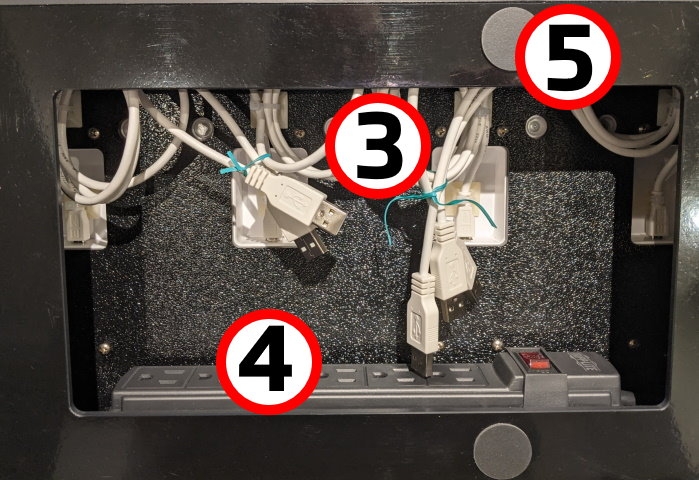


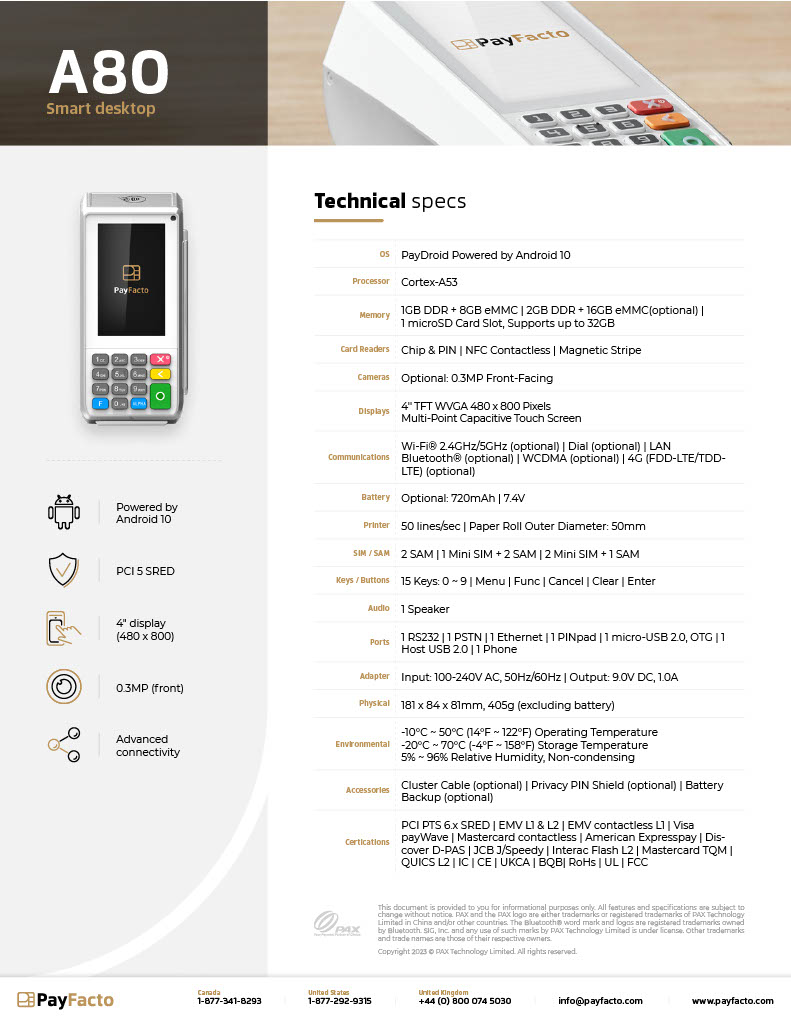
The terminal powers on automatically when you connect it to an AC power supply. To power off the terminal, disconnect the AC power supply.
IMPORTANT! Disconnecting the AC power immediately powers off the terminal and any transaction that was in progress is cancelled.
Scroll to the Personal section and touch Language & input.
Touch Language.
Scroll to and touch the desired language.
Touch the Back icon twice to return to the main screen.
Touch the checkmark icon on the keypad when you are done and touch OK.
In the Wireless & networks section, touch Ethernet.
If Ethernet is Off, touch the toggle to turn it on.
After you toggle Ethernet to On (or if Ethernet is already on), the connected network settings appear.
If necessary, you can change the network connection parameters manually by scrolling to the bottom and touching Ethernet Configuration to select and configure the Connection Type.
On the terminal’s main screen, touch the Settings icon.
On the Settings screen, touch the Please Input Password field and use the keypad to type the password: either 9876 or pax9876@@.
Touch the checkmark icon on the keypad when you are done and touch OK.
In the Wireless & networks section, touch Wi-Fi.
If Wi-Fi is Off, touch the toggle to turn it on. If Wi-Fi is already on, a list of available networks appears.
From the list of available networks, touch the name of the network you want to connect to.
Enter the password for the selected network and touch CONNECT.
TIP: You can touch Show password before typing to ensure you are entering the password correctly.
After the terminal displays Connected for the selected network, touch the Back icon to return to the Settings screen.
Touch the Back icon again to return to the main screen.
The Administrator and Merchant passwords cannot be the same (can’t match)
You cannot use the same digit 6 times consecutively (for example: 111111 or 777777)
You cannot use 6 consecutive numbers, either ascending or descending (for example: 123456 or 987654)
On the Set Administrative Password screen, use the on-screen keypad to enter a 6-digit password in the Admin Password field and touch the Next icon on the keypad.
On the Confirm Administrative Password screen, re-enter the password in the Admin Password field and touch the Next icon on the keypad.
On the Set Merchant Password screen, use the on-screen keypad to enter a 6-digit password in the Merchant Password field and touch the Next icon on the keypad.
On the Confirm Merchant Password screen, re-enter the password in the Merchant Password field and touch the Next icon on the keypad.
Your payment terminal is now ready for use.


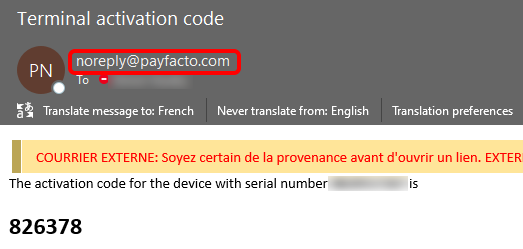
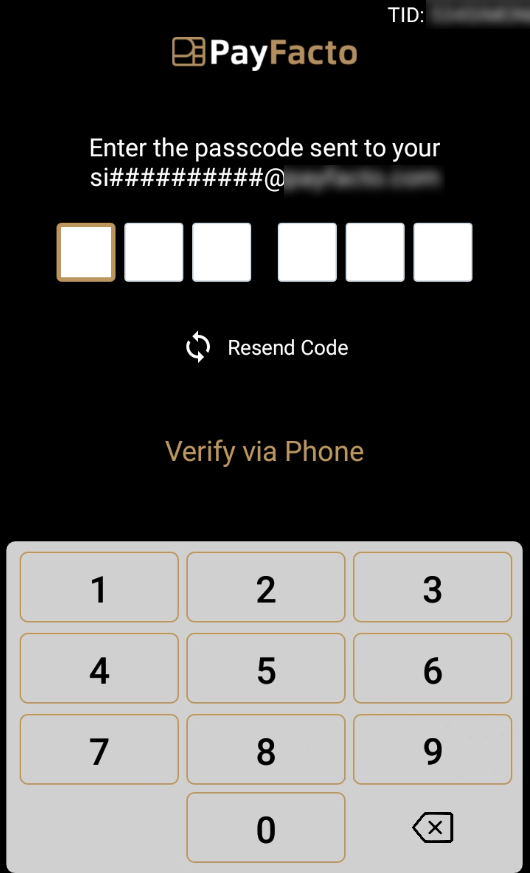

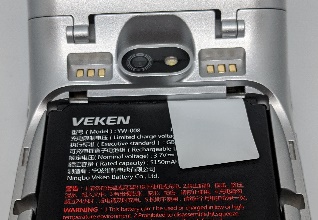
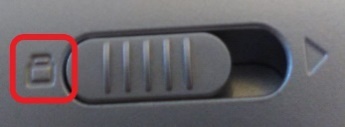

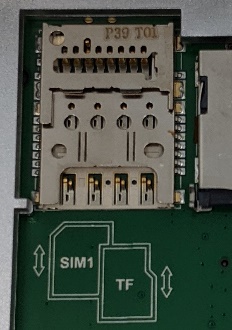
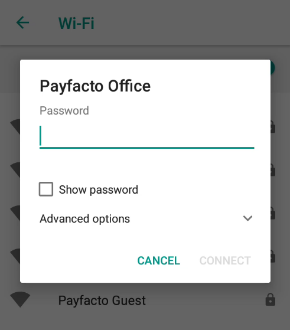


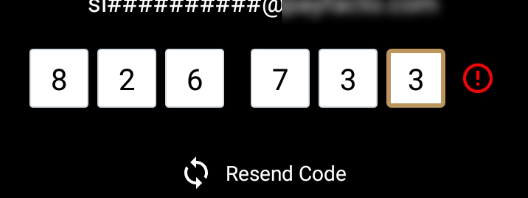


After configuring the terminal’s network connection, you need to start the PayFacto payment application to complete the remaining steps. Terminal activation requires you to input a One Time Passcode (OTP) that PayFacto sends to the email address or telephone number registered to your account.
IMPORTANT! To receive the OTP on your phone, your registered phone number must be able to receive text messages (SMS). If you cannot receive text messages, select the email option to get the OTP.
Touch the PAYMENT icon on the main screen. The Welcome To Your Payment Terminal screen appears.
NOTE: The terminal may need to download host and security parameters; this can take a few moments.
In the top right corner of the screen, your terminal ID (TID) appears; confirm that the number on the screen matches the TID on the label on the back of your terminal. The TID will not appear on your terminal screen after you complete the activation process.
IMPORTANT! If the TID does not match, call PayFacto immediately.
Touch anywhere on the screen to begin the activation process.
Touch the desired option to receive the OTP.
Phone Number
Touch the Send Code button.
IMPORTANT! The OTP code is valid for 15 minutes after you receive it. If you wait more than 15 minutes to enter the OTP, the terminal will display an error and you will have to request a new OTP.
If you select Email, look for a message from [email protected].
After you receive the 6-digit activation code, use the on-screen keypad to enter the code on the terminal screen.
If you enter the code incorrectly, a red exclamation appears to indicate that the code is incorrect.
Re-enter the code, or touch Resend Code to obtain a new OTP.
After you enter the OTP correctly, the payment application displays the Set Administrative Password screen to


The PAX A80 terminal offers an on-screen keypad as well as a physical keypad to enter transaction amounts. Your terminal operators and customers enter information and respond to prompts using either the terminal’s touch screen or physical keypad.
There are three (3) colored function keys on the physical keypad that you can use to confirm, correct, or cancel an operation:
This document will introduce you to your payment terminal as well as guide you through the process of preparing and configuring it in order to quickly begin processing payments.
Your PAX A35 payment processing terminal comes with the following:
There are multiple communication ports available through the multi-function cable. The cable allows you to connect the terminal to:
The terminal requires a network connection to communicate with the payment processor server to process transactions.
The PAX A35 is a countertop payment terminal that can connect to wired (Ethernet) and wireless (Wi-Fi) networks.
PayFacto uses a self-service terminal activation procedure designed to save time while also providing better security. The new activation procedure applies only to countertop and mobile PAX payment terminals using the Android operating system. The new procedure applies to:
All new merchants activating their terminals for the first time
Any existing merchants adding new payment terminals
The PAX A35 terminal offers an on-screen keypad as well as a physical keypad to enter transaction amounts. Your terminal operators and customers enter information and respond to prompts using either the terminal’s touch screen or physical keypad.
To enter an amount or a PIN, you can use either the on-screen or physical keypad.
There are three (3) colored function keys on the physical keypad that you can use to confirm, correct, or cancel an operation:
To confirm an entry, touch OK on the screen or press the green O key
There are three (3) ways for a customer to use their payment card with the terminal:
After you configure the terminal's network connection(s) and power on the terminal, the procedure comprises of 2 parts:
Activate the terminal with a One Time Passcode (OTP)
Set the Administrator and Merchant passwords
NOTE: If you have multiple new payment terminals, you need to perform the activation procedure on each terminal individually.
USB Type-C (female) power connector (for AC supplly)
Wired network using the Ethernet connector
Multi-function connector (USB Type-C male)


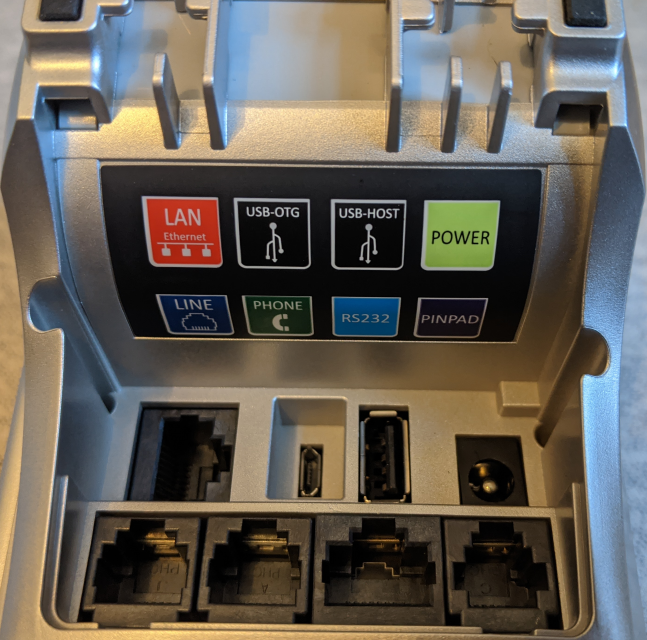
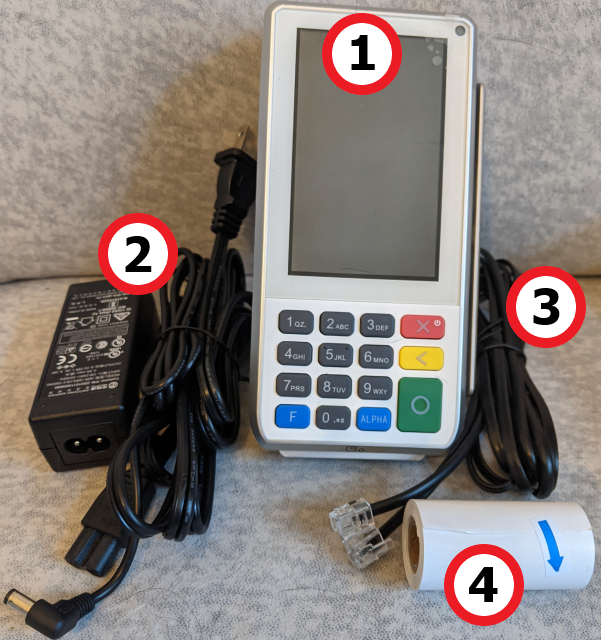
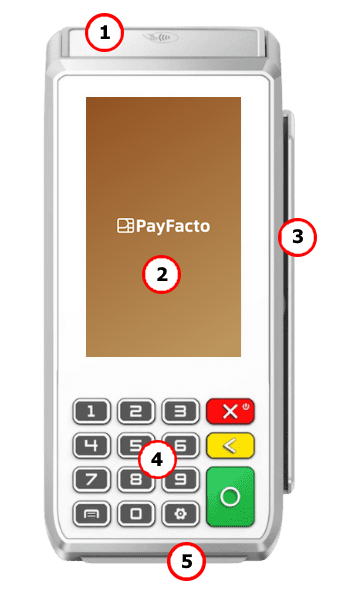

To correct an entry, touch BACK on the screen or press the yellow < key
To cancel a function, touch CLEAR on the screen or press the red X key
On the back of the terminal at the top, lift the lever with the contactless logo to unlock and open the printer cover.
NOTE: The printer cover opens on a hinge, it does not come off the terminal.
Place the roll of printer paper in the paper tray, leaving about 2 inches (5 cm) of paper beyond the printer's cutter as shown in the following example:
IMPORTANT! Make sure the paper unrolls from the back of the roll, otherwise the printer will be unable to print the transaction receipt.
Close the printer cover until it snaps into place and remove any excess paper.
Tap the card for contactless payment
Insert the chip card and enter a PIN
Swipe the card’s magnetic strip
To cancel a function, touch CLEAR on the screen or press the red X key
USB Type-C power cord
Back cover
AC power adapter
Payment terminal
Multi-function cable
Insert the chip card and enter a PIN
Swipe the card’s magnetic strip
Tap the card for contactless payment
This guide will explain how to install the cable attachment bracket for the PAX A80 terminal (part number AZP-310006) designed to prevent the accidental disconnection of cables from the terminal.
IMPORTANT! This cable attachment bracket is only for use with PAX A80 terminals used in countertop environments. It is not compatible with the A80 extension pole for drive-through applications.
The topics covered in this guide include:
Before you can install the cable attachment to the PAX A80 terminal, you must prepare the terminal by doing the following:
Power off the terminal by pressing and holding the red X key on the physical keypad.
Turn the terminal over and remove all cables from the terminal's communication ports.
The A80 cable attachment is anchored by a T bracket that keeps the attached cables from being accidentally disconnected .
With the terminal turned over, insert the T bracket into the guides on the underside of the A80 terminal.
Slide the T bracket up by pushing it from the bottom towards the top of the terminal.
To prevent the T bracket and cables from sliding off the terminal, you must next secure the T bracket to the terminal.
Place the short metal bracket at the top of the T bracket and insert the long screw at the opening near the top of the terminal.
When the end of the long screw comes out of the bottom of the T bracket, place the metal washer over the screw and then thread the thumb nut onto the end of the screw.
Using a Phillips head screwdriver, tighten the screw securely (but not excessively) into the thumb nut.
After you secure the T bracket to the terminal, you must insert the cables. This procedure explains how to install and secure the AC adapter and Ethernet cables; if you have additional cables, connect them to the appropriate port and use the same method to secure them in place.
Beginning with the AC adapter, inserting it in the terminal's cable guide on the left and connect the adapter to the Power port.
Insert the Ethernet cable in the terminal's cable guide on the right and connect it to the LAN port.
When the cables are properly seated in their ports, gently pull on the cables to remove any excess cable that is higher than the plane of the T bracket.
Place the 3-hole metal bracket over the cables, aligned with the screw holes in the T bracket and secure it in place using a Phillips head screwdriver to insert the two short screws.
Turn the terminal over and power on the terminal. The completed assembly should resemble the following:
The terminal uses a multi-function cable to provide access to the supported connections. Countertop terminals generally require AC power and Ethernet connections. Your configuration may also include a connection to a POS system.
On the back of the terminal at the top, use a #1 Phillips screwdriver to loosen the two screws securing the cover.
NOTE: You do not need to remove the screws from the cover; they are designed to remain attached.
Remove the cover from the back of the terminal and locate the USB Type-C plug between the slots for the MicroSD and SAM cards.
Insert the multi-function cable’s USB Type-C connector into the terminal’s corresponding plug.
After you connect the multi-function cable to the terminal, make sure that the strain relief sleeve is seated in the slot at the top of the terminal.
NOTE: You can move the strain relief sleeve along the multi-function cable to position it correctly.
Re-install the cover and tighten the two screws to complete the cable installation.
By default, the terminal displays all information in English. This procedure explains how to change the terminal’s display language if necessary.
IMPORTANT! Selecting a different language changes all text that appears on the terminal.
On the terminal’s main screen, touch the Settings icon.
On the Settings screen, touch the Please Input Password field and use the keypad to type the password: pax9876@@.
Touch the checkmark icon on the keypad when you are done and touch OK.
NOTE: If the language has localized variants, select the appropriate regional option for your country.
If the selected language does not appear automatically, you can drag the language to the top of the list, as shown below:
This section explains how to enable an Ethernet connection and connect to your network.
Ensure your network cable is connected in the red Ethernet adapter on the multi-function cable and make sure the other end of the network cable is connected to a network jack or hub.
On the terminal’s main screen, touch the Settings icon.
On the Settings screen, touch the Please Input Password field and use the keypad to type the password: or pax9876@@.
Touch the checkmark icon on the keypad when you are done and touch OK.
On the Settings page, touch Network & Internet.
On the Network & internet page, touch Ethernet.
If Ethernet is Off, touch the toggle to turn it on.
After you toggle Ethernet to On (or if Ethernet is already on), the connected network settings appear.
If necessary, you can change the network connection parameters manually by scrolling to the bottom and touching Ethernet Configuration to select and configure the Connection Type.
IMPORTANT! Changing the network connection parameters incorrectly will prevent the terminal from communicating with the payment processing server.
Touch the Back icon to return to the Network & Internet page.
This section explains how to turn Wi-Fi on and connect to your network.
On the terminal’s main screen, touch the Settings icon.
On the Settings screen, touch the Please Input Password field and use the keypad to type the password: pax9876@@.
Touch the checkmark icon on the keypad when you are done and touch OK.
On the Settings page, touch Network & Internet.
On the Network & Internet page, touch Wi-Fi.
If Wi-Fi is Off, touch the toggle to turn it on. If Wi-Fi is already on, a list of available networks appears.
From the list of available networks, touch the name of the network you want to connect to.
Enter the password for the selected network and touch CONNECT.
TIP: You can touch Show password before typing to ensure you are entering the password correctly.
After the terminal displays Connected for the selected network, touch the Back icon to return to the Network & Internet page.
To prevent unauthorized individuals from changing the terminal’s configuration, you need to set the Administrator and Merchant passwords. These passwords restrict access to certain functions on the terminal.
When setting your passwords, you must respect the following parameters:
Passwords must be 6 characters long
The Administrator and Merchant passwords cannot be the same (can’t match)
You cannot use the same digit 6 times consecutively (for example: 111111 or 777777)
You cannot use 6 consecutive numbers, either ascending or descending (for example: 123456 or 987654)
On the Set Administrative Password screen, use the on-screen keypad to enter a 6-digit password in the Admin Password field and touch the Next icon on the keypad.
On the Confirm Administrative Password screen, re-enter the password in the Admin Password field and touch the Next icon on the keypad.
On the Set Merchant Password screen, use the on-screen keypad to enter a 6-digit password in the Merchant Password
Your payment terminal is now ready for use.
The terminal powers on automatically when you connect it to a vending device’s MDB plug and the vending device is connected to an AC power supply. To power off the terminal, disconnect the MDB plug or the vending device’s AC power supply.
IMPORTANT! If you disconnect the AC power from the vending device, any transaction that was in progress is cancelled.
Your terminal operators and your customers enter information and respond to prompts using the terminal’s touch screen. The application prompts you and your customers on the next action to perform.
There are three (3) ways for a customer to use their payment card with the terminal:
The Secure Payment App to app module provides payment processing to merchants who use a non-PayFacto terminal payment application. The App to app module is different from the SecurePay, SecureTable, and Gateway modules as there is no communication between the Point of Sale (POS) system and the payment terminal.
Operation of the App to app module more closely resembles the Payment module in standalone mode. The merchant enters the amount of the sale on a third-party terminal application and then the App to app module receives the sale information and processes the sale using the PayFacto servers.
The interface of the third party terminal application used to enter the sale amount can be (and likely is) different from the Secure Payment interface. Any amount for tip, cashback, or fees (where applicable) is added using the Secure Payment interface, as is the prompt to present the card and the authorization server results.
Overview
This document addresses the configuration and use of the Secure Payment application's Gateway module. The Gateway module allows a Point of Sale (POS) system to communicate with a payment terminal to complete a sales transaction.
The typical information flow between the POS system and the payment terminal has the POS send the sale amount to the payment terminal. On the terminal, the customer confirms the sale amount and presents their card for reading. The terminal communicates with the authorization server and displays the result. The approved (or declined) transaction information is then communicated back to the POS system to conclude the transaction.
On the terminal, the customer can add a tip (or cashback where applicable) that is added to the sale amount; the updated amount is sent for authorization and the response (including any added tip, cashback, or surcharge) is returned to the POS system to conclude the transaction and print the transaction receipt. No payment card information is communicated from the terminal to the POS system.
The Gateway module is a universal middleware platform that provides an EMV-Compliant, Pay at the Counter (PATC) processing solution that can be connected to a POS (Point of Sale) system.
The Android-based Gateway module is a bi-directional interface which links the PayFacto payment application to a POS system. The Gateway module automates some operations which previously had to be carried out by the clerk, such as the entry of the sales amount and card brand selection. The Gateway module is especially well-suited to quick service environments and drive-through windows, with or without tip management.
The integration of the Gateway module with various POS systems allows the payment terminal to retrieve guest check data from the POS System. After the payment terminal processes a payment, the Gateway module sends the payment data back to the POS System for reporting purposes. Payment amounts, tip amounts and card brand used are all automatically transmitted to the POS system to allow for accurate reporting.
The Gateway module allows you to view the connection settings to your POS system. The connection settings should not be modified unless specifically instructed to do so by PayFacto support. Changing the settings may affect the terminal's ability to communicate with the POS.
From the main screen, touch the Menu button.
Enter the merchant password and touch Confirm.
Scroll to the Semi-integrated configuration section and touch Gateway settings.
In the Connection section, review the information that appears.
TPV Client: Read-only field, this lists the terminal's unique identifier (TID).
Connection address: Displays the URL to the authorization server. Do not change unless instructed to do so by PayFacto support.
Port: Read-only field, this lists the port the terminal uses to connect to the authorization server.
If you have more than one terminal, repeat steps 1 to 4 for each additional terminal to review the terminal's connection settings.
After configuring the terminal’s network connection, you need to start the PayFacto payment application to complete the remaining steps. Terminal activation requires you to input a One Time Passcode (OTP) that PayFacto sends to the email address or telephone number registered to your account.
IMPORTANT! To receive the OTP on your phone, your registered phone number must be able to receive text messages (SMS). If you cannot receive text messages, select the email option to get the OTP.
The Secure Payment application's Gateway module has multiple configurable features and functions. The features and functions apply to all Secure Payment modules you may use, including standalone Payment, SecurePay, SecureTable, and Gift Cards.
For the Gateway module, the feature you will most likely need to configure is tipping, but you can access the following configuration menus:
Switch Back from Standalone Payment Mode


Accessing Configuration Settings


Overview - Gateway Module
Gateway Application
Tasks and How-Tos


On the Settings page, scroll to the bottom and touch System.
On the System page, touch Languages & input.
On the Languages & input page, touch Languages.
On the Language preferences page, touch Add a language.
On the Add a language page, scroll to and touch the desired language.
On the Confirm Merchant Password screen, re-enter the password in the Merchant Password field and touch the Next icon on the keypad.
Touch the PAYMENT icon on the main screen. The Welcome To Your Payment Terminal screen appears.
NOTE: The terminal may need to download host and security parameters; this can take a few moments.
In the top right corner of the screen, your terminal ID (TID) appears; confirm that the number on the screen matches the TID on the label on the back of your terminal. The TID will not appear on your terminal screen after you complete the activation process.
IMPORTANT! If the TID does not match, call PayFacto immediately.
Touch anywhere on the screen to begin the activation process.
Touch the desired option to receive the OTP.
Phone Number
Touch the Send Code button
IMPORTANT! The OTP code is valid for 15 minutes after you receive it. If you wait more than 15 minutes to enter the OTP, the terminal will display an error and you will have to request a new OTP.
If you select Email, look for a message from [email protected].
After you receive the 6-digit activation code, use the on-screen keypad to enter the code on the terminal screen.
If you enter the code incorrectly, a red exclamation appears to indicate that the code is incorrect.
Re-enter the code, or touch Resend Code to obtain a new OTP.
After you enter the OTP correctly, the payment application displays the Set Administrative Password screen to configure your terminal passwords.
IMPORTANT! The IM30 contains anti-tampering features that disable the terminal if triggered. If the terminal requires maintenance, be sure to contact an experienced professional who can remove and repair the terminal without rendering it inoperable.
The following illustrations show the location of the main terminal features and hardware:
Front-facing camera (not used)
Color touchscreen / Contactless payment reader
Magnetic stripe reader
Chip card reader
There are multiple communication ports on the back of the terminal. The port you use depend on the type of vending device you are connecting the terminal to. At a minimum, you will need to connect the MDB-S connector to provide AC power to the terminal. All other connections will be situation-specific. The available communication ports include:
RS232-A
RS232-B
USB Host
USB OTG (Type-C)
NOTE: Some of the communication ports may be protected by a cover; remove the covers for the ports you require.
Payment terminal
Mounting bracket
USB Type-C cable
AC power cord
AC adapter with MDB connector
M4 screws & nuts
Close the third party payment application if it is still open.
If the App to app main screen does not appear, touch the Secure Payment icon on the terminal's main screen.
From the App to app main screen, touch the Menu button.
Enter the merchant password and touch Confirm.
Scroll to the Semi-integrated configuration section and touch Switch to Standalone.
The Settings page closes and the terminal displays the standalone payment module.
If you have more than one terminal, repeat steps 1 to 5 for each additional terminal where you want to switch the terminal to standalone payment mode.
If you switched from using the App to app module to Secure Payment's standalone payment mode, you need to switch back when the communication issue with the 3rd party payment application is resolved.
From the standalone payment main screen, touch the Settings button.
Enter the merchant password and touch Confirm.
Scroll to the Semi-integrated configuration section and touch Switch to app to app mode.
The terminal returns to the App to app main screen.
Start third party payment application.
If you have more than one terminal, repeat steps 1 to 4 for each additional terminal where you want to switch back from standalone payment mode.
Application Configuration
From the Gateway home screen, touch the menu icon at the top-left corner of the screen.
Enter the merchant password and touch the Confirm button. The Settings page appears.
Insert the chip card and enter a PIN
Swipe the card’s magnetic strip
Tap the card for contactless payment
This section describes the general transaction workflow and user experience when making a purchase with a merchant using the Secure Payment application's App to app module.
The merchant will calculate the total amount using a Point of Sale (POS) system or a cash register and enter the total amount on the payment terminal using the third-party application. The third-party application then communicates the total amount to the Secure Payment application's App to app module.
NOTE: Due to the variety of third-party payment applications, no image of this step in the workflow process is included in the documentation.
The next step in the process depends on the type of sale. If the merchant adds any surcharge for debit card transactions (for Canadian merchants only, excluding Quebec), the App to app module applies the associated surcharge to the total amount and requires the customer to confirm the total.
The following sections will describe the workflow without surcharges; the available sale types are:
After the merchant enters the amount on the third-party application, the Secure Payment App to app module displays the total sale amount, at which point the merchant hands the terminal to (or turns it towards) the customer.
The customer inserts, swipes, or taps their payment card.
The terminal displays a processing screen with the payment card brand logo.
After approving (or declining) the payment request, the terminal prints the merchant copy of the transaction receipt and the merchant touches Print receipt to print the customer copy or No receipt if the customer does not want their copy of the transaction receipt.
After the merchant enters the amount on the third-party application, the Secure Payment App to app module displays the Add a tip screen, at which point the merchant hands the terminal to (or turns it towards) the customer.
The customer selects one of the preset tip percentages, a custom dollar amount, or a custom percentage (if enabled) or they can touch the No tip button.
After the customer selects the tip amount, the Total Sale screen appears where the customer then inserts, swipes, or taps their payment card.
The terminal displays a processing screen with the payment card brand logo.
IMPORTANT! Cashback is only available for debit transactions where clients insert their card into the terminal and enter their PIN. If a client taps a contactless card, the cashback option will not appear.
After the merchant enters the amount on the third-party application, the Secure Payment App to app module displays the total sale amount, at which point the merchant hands the terminal to (or turns it towards) the customer. If the sale includes a tip, the terminal displays the Add a tip screen, where the customer selects the tip to add (or not) before inserting the card into the terminal's chip reader.
The customer selects the account to debit the sale amount from (Chequing or Savings).
The customer selects the amount for cashback.
The customer confirms the total amount (sale plus cashback).
PayFacto uses a self-service terminal activation procedure designed to save time while also providing better security. The new activation procedure applies only to PAX payment terminals using the Android operating system. The new procedure applies to:
All new merchants activating their terminals for the first time
Any existing merchants adding new payment terminals


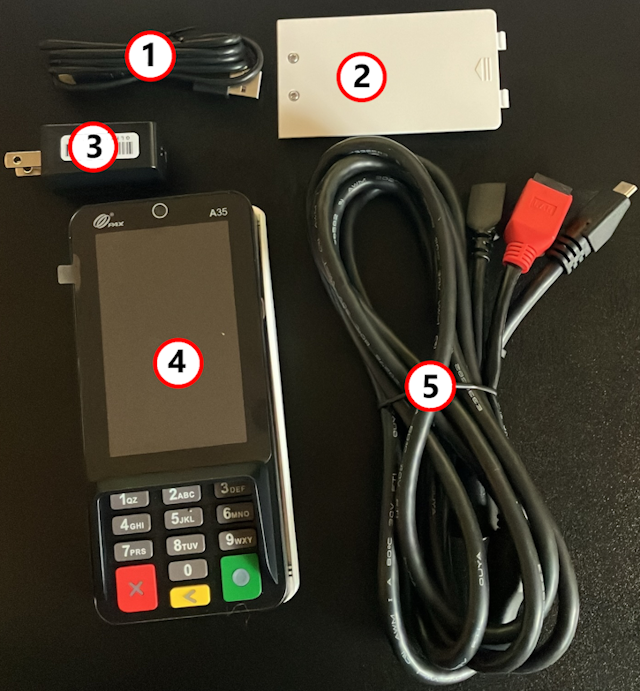
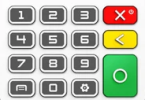
After approving (or declining) the payment request, the terminal prints the merchant copy of the transaction receipt and the merchant touches Print receipt to print the customer copy or No receipt if the customer does not want their copy of the transaction receipt.
The terminal displays a processing screen with the payment card brand logo.
After approving (or declining) the payment request, the terminal prints the merchant copy of the transaction receipt and the merchant touches Print receipt to print the customer copy or No receipt if the customer does not want their copy of the transaction receipt.

Barcode scanner (not used)
SIM card module
Communication ports
Ethernet
3.5mm Auxiliary audio
HDMI
Power-Digital I/O
MDB-M & EXE
MDB-S
After you configure the terminal's network connection(s) and power on the terminal, the procedure comprises of 2 parts:
NOTE: If you have multiple new payment terminals, you need to perform the activation procedure on each terminal individually.
After configuring the terminal’s network connection, you need to start the PayFacto payment application to complete the remaining steps. Terminal activation requires you to input a One Time Passcode (OTP) that PayFacto sends to the email address or telephone number registered to your account.
IMPORTANT! To receive the OTP on your phone, your registered phone number must be able to receive text messages (SMS). If you cannot receive text messages, select the email option to get the OTP.
To activate the payment terminal:
Touch the PAYMENT icon on the main screen. The Welcome To Your Payment Terminal screen appears.
NOTE: The terminal may need to download host and security parameters; this can take a few moments.
In the top right corner of the screen, your terminal ID (TID) appears; confirm that the number on the screen matches the TID on the label on the back of your terminal. The TID will not appear on your terminal screen after you complete the activation process.
IMPORTANT! If the TID does not match, call PayFacto immediately.
Touch anywhere on the screen to begin the activation process.
Touch the desired option to receive the OTP.
Phone Number
Touch the Send Code button.
IMPORTANT! The OTP code is valid for 15 minutes after you receive it. If you wait more than 15 minutes to enter the OTP, the terminal will display an error and you will have to request a new OTP.
If you select Email, look for a message from [email protected].
After you receive the 6-digit activation code, use the on-screen keypad to enter the code on the terminal screen.
If you enter the code incorrectly, a red exclamation appears to indicate that the code is incorrect.
Re-enter the code, or touch Resend Code to obtain a new OTP.
After you enter the OTP correctly, the payment application displays the Set Administrative Password screen to configure your terminal passwords.
To prevent unauthorized individuals from changing the terminal’s configuration, you need to set the Administrator and Merchant passwords. These passwords restrict access to certain functions on the terminal.
When setting your passwords, you must respect the following parameters:
Passwords must be 6 characters long
The Administrator and Merchant passwords cannot be the same (can’t match)
You cannot use the same digit 6 times consecutively (for example: 111111 or 777777)
You cannot use 6 consecutive numbers, either ascending or descending (for example: 123456 or 987654)
To set your Administrator and Merchant passwords:
On the Set Administrative Password screen, use the on-screen keypad to enter a 6-digit password in the Admin Password field and touch the Next icon on the keypad.
On the Confirm Administrative Password screen, re-enter the password in the Admin Password field and touch the Next icon on the keypad.
On the Set Merchant Password screen, use the on-screen keypad to enter a 6-digit password in the Merchant Password field and touch the Next icon on the keypad.
On the Confirm Merchant Password screen, re-enter the password in the Merchant Password field and touch the Next icon on the keypad.
Your payment terminal is now ready for use.
To confirm that the terminal is operating in unattended mode:
Close any open applications:
To close the PayFacto payment application, touch the Exit icon.
To close the Gateway PayFacto application, press and hold the Welcome / Bonjour text for five (5) seconds, enter the Merchant password, touch OK, and then touch Exit Application.
On the terminal’s main screen, touch the PayFacto icon to start the payment application.
Touch the Action button on the main screen.
Touch Settings.
Enter the Merchant password and touch OK.
Touch Host Options.
Touch Process parameters download.
Touch OK to confirm the host download.
After the download completes successfully, there are two possible results:
The application’s screen displays Welcome/Bonjour and Unattended terminal, indicating the terminal is correctly configured in unattended mode.
The application’s number pad appears, which indicates that the terminal is not configured for unattended mode.
Correctly Configured Unattended Mode
Incorrectly Configured Unattended Mode
Due to the many different vending devices available, this guide does not include specific physical installation instructions.
The following points are some general installation guidelines to consider:
Use the supplied M4 nuts to secure the mounting bracket’s outermost openings to M4 screws on the inside wall of the vending device.
Prior to fitting the terminal in the vending device, securely connect the vending device’s digital I/O and MDB cables to the appropriate ports on the rear of the terminal.
If you are using an Ethernet cable to connect the terminal to a network, ensure that the cable is properly seated in the port.
Secure the terminal to the mounting bracket using the supplied M4 screws.
Insert the AC adapter’s MDB connector in the MDB-S port.
If it does not start automatically after you connect the AC power, touch the Gateway PayFacto icon on the main screen to start the application.
Refer to the PAX IM30 Quick Setup Guide (included in the box with the terminal) for general precautions and operational specifications.
Although the IM30 unattended payment processing terminal is configured to receive updates automatically, you may need to perform some maintenance after you install the terminal to the vending device.
The primary maintenance tasks that may be required after initial installation include:
Changing or configuring network connections
Changing the terminal's language settings
To perform any of these tasks, you must:
Disconnect the power to the terminal; either by disconnecting the MDB-S connector from the back of the terminal or by disconnecting the AC adapter cord.
Disconnect any cables from the terminal.


PayFacto uses a self-service terminal activation procedure designed to save time while also providing better security. The activation procedure applies only to counter-top and mobile PAX payment terminals using the Android operating system.
The activation procedure applies to:
All new merchants activating their terminals for the first time
Any existing merchants adding new payment terminals
Any existing merchants receiving replacement terminals
After you configure the terminal's network connection(s) and power on the terminal, the activation procedure comprises of 2 parts:
NOTE: If you have multiple new payment terminals, you need to perform the activation procedure on each terminal individually.
After configuring the terminal’s network connection, you need to start the Secure Payment application to complete the remaining steps. Terminal activation requires that you input a One Time Passcode (OTP) that PayFacto sends to the email address or telephone number registered to your account.
IMPORTANT! To receive the OTP on your phone, your registered phone number must be able to receive text messages (SMS). If you cannot receive text messages, select the email option to get the OTP.
Touch the SECURE PAYMENT icon on the main screen. The Welcome to your payment terminal screen appears.
NOTE: The terminal may need to download host and security parameters; this can take a few moments.
Touch the Tap to continue button to begin the activation process.
Touch the desired option to receive the OTP.
Email Phone Number
Touch the Send Code button.
IMPORTANT! The OTP code is valid for 15 minutes after you receive it. If you wait more than 15 minutes to enter the OTP, the terminal will display an error and you will have to request a new OTP.
If you select Email, look for a message from [email protected].
After you receive the 6-digit activation code, use the on-screen keypad to enter the code on the Enter activation code screen and touch the Confirm & activate button.
If you enter the code incorrectly, the outline for the fields changes to red to indicate that the code is incorrect.
To prevent unauthorized individuals from changing the terminal’s configuration, you need to set the Administrator and Merchant passwords. These passwords restrict access to certain functions on the terminal.
When setting your passwords, you must respect the following parameters:
Passwords must be 6 characters long
The Administrator and Merchant passwords cannot be the same (can’t match)
You cannot use the same digit 6 times consecutively (for example: 111111 or 777777)
On the Set admin password screen, use the on-screen keypad to enter a 6-digit password in the Password field.
Re-enter the password in the Confirm new password field.
Touch the Confirm password button.
Your payment terminal is now activated and ready for use.
When using the Secure Payment application, it is helpful to have a list of processed transactions to ensure your bookkeeping is aligned with your business' sales. The terminal can print transaction reports, allowing you to view either detailed or summary information on the transactions and transaction types for the terminal's current batch; if your business uses multiple terminals, you need to print reports on those terminals to view their reports.
Detailed reports display a list of every transaction in the current batch, including date, time, transaction type, payment method, invoice number, and amount. Summary reports group the transactions by card type, displaying the total sales, and the number of transactions.
The terminal’s printer (built-in or external) can print transaction reports for the current batch. For reconciliation purposes, you may want to print a report prior to the automated settlement, but it is not a requirement. Printing reports is meant to assist with your bookkeeping.
The available transaction reports are:
You can search for transactions on the terminal to view the details about one or more transactions. If you have multiple terminals operating under the same merchant ID (MID), all transactions from all terminals appear in the list with the most recent transaction at the top of the list. You can search for transactions in the current (open) batch as well as from previous batches.
NOTE: Because all of a merchant's transactions processed on all terminals are saved immediately to the server, the list of transactions may be quite long.
TIP: If you find it difficult to locate a specific transaction from an individual terminal, you may choose to restrict the search function to only display transactions performed on each individual terminal.
To restrict the transaction display to only those processed by the terminal, you must contact PayFacto support to request that your merchant profile displays only transactions processed on individual terminals by activating the Terminal Only Reports function. This will restrict transaction searching to individual terminals.
From the main screen, touch the Menu button.
Enter the merchant password and touch Confirm.
In the Transaction management section, touch Transaction History.
Touch the Search button.
Enter one or more of the following search criteria:
An invoice number in the Invoice number field
The detailed report for the current batch of transactions lists each individual transaction’s details. You may want to print the detailed transaction in order to have a printed copy of the transactions prior to processing the the current batch. Printing a detailed report allows you to reconcile each transaction as part of your bookkeeping.
NOTE: Printing a detailed report can consume a large quantity of paper, depending on the number of transactions in the current batch.
From the main screen, touch the Menu button.
Enter the merchant password and touch Confirm.
In the Transaction management section, touch Reports.
In the Batch Details section, touch Print Batch Details. The terminal prints the Batch Details Report, listing all transaction details in the current batch for all terminal operators.
If you have more than one terminal, repeat steps 1 to 4 for each additional terminal where you want to print the detailed transaction report.
The summary report for the current batch of transactions allows you to see the totals for each payment method used, including sales, refunds, tips, cashbacks, and fees. You may want to print the summary report to reconcile transactions by payment type as part of your bookkeeping prior to processing the current batch.
From the main screen, touch the Menu button.
Enter the merchant password and touch Confirm.
In the Transaction management section, touch Transaction History.
In the Batch Summary section, touch Print Batch Summary. The terminal prints the Summary Details Report, listing all transactions in the current batch, grouped by card type for all terminal operators.
If you have more than one terminal, repeat steps 1 to 6 for each additional terminal where you want to print the summary transaction report.
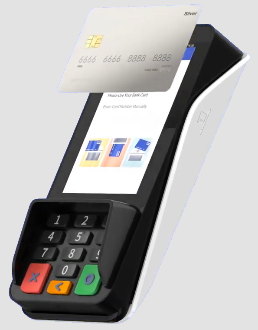
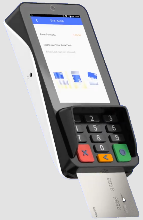
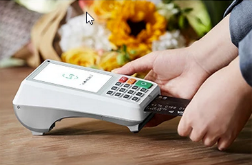
An authorization code in the Authorization code field
Touch the Time range field to select a date range for the desired transaction; touch Save to search using the selected date range
Touch the Search button. The terminal returns any transaction that meets the selected search criteria.
Touch the desired transaction to display the details.


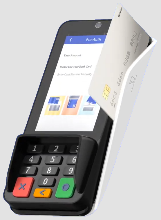
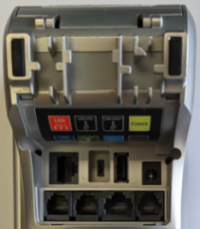
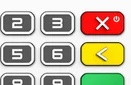
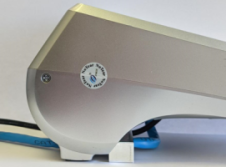
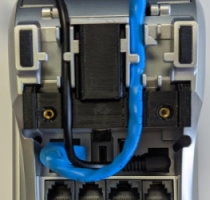
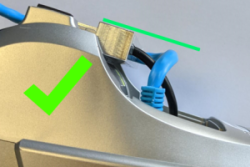
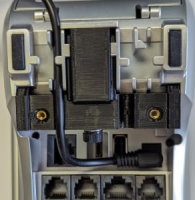
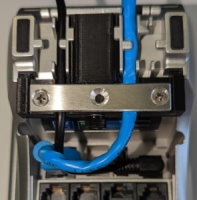
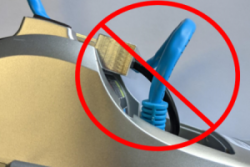
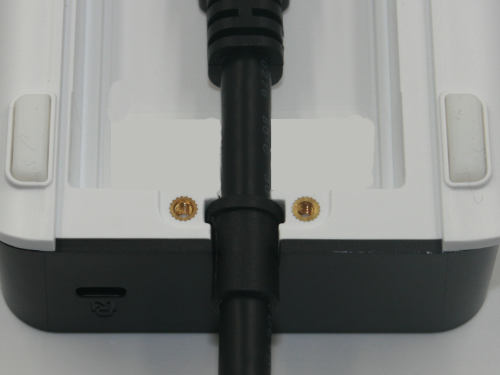
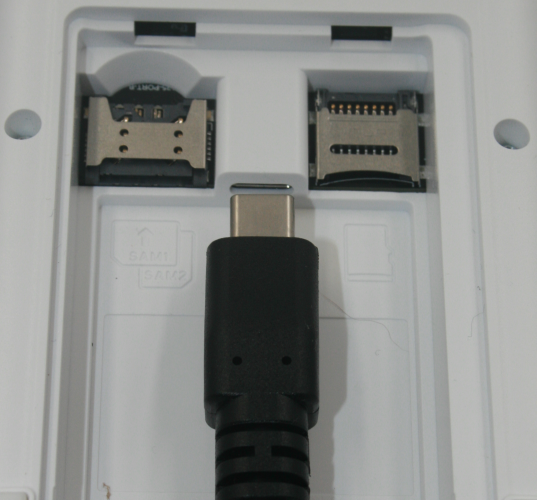
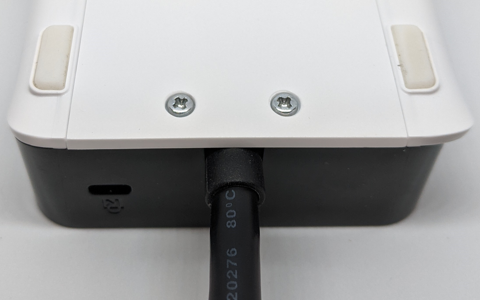
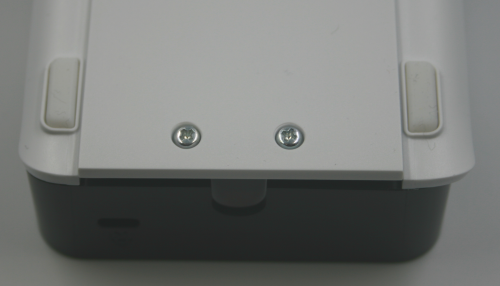
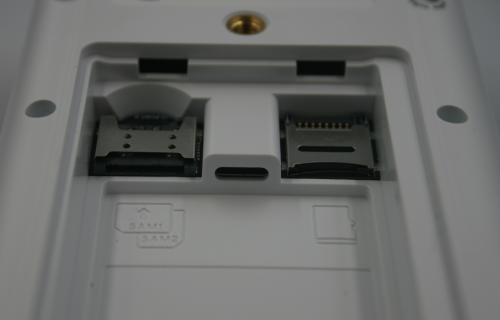


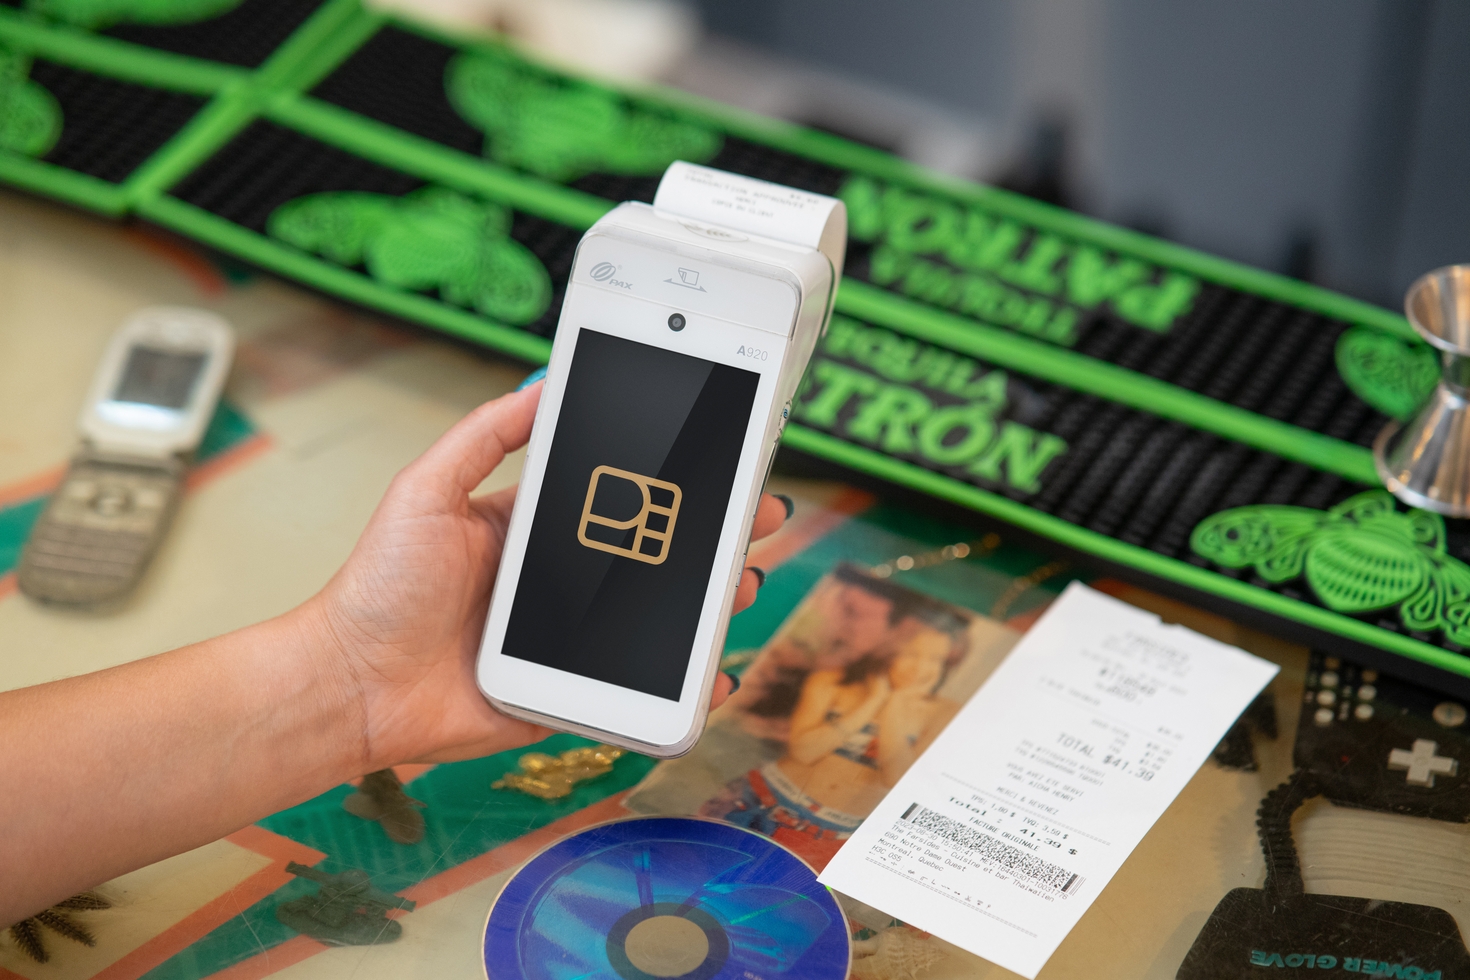
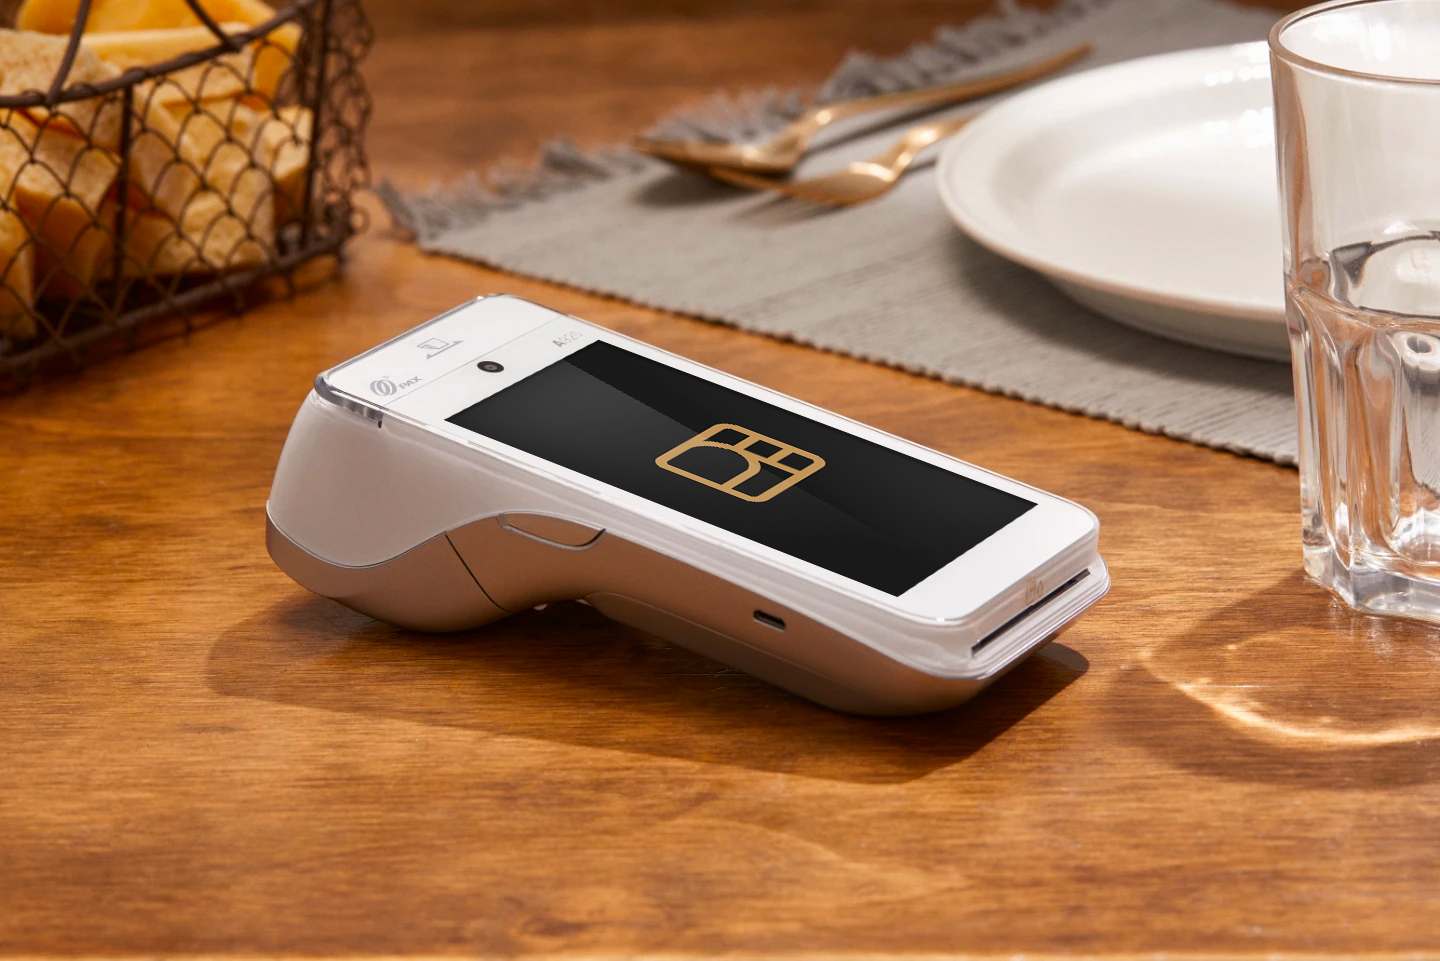

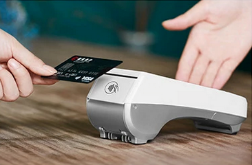
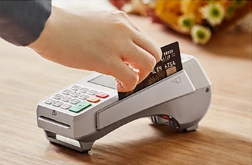
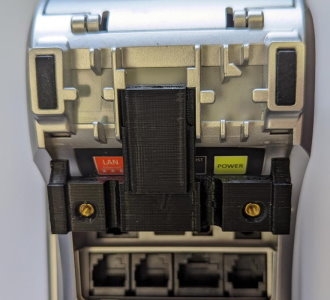
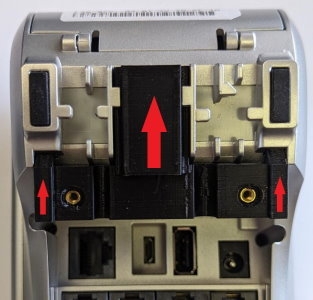
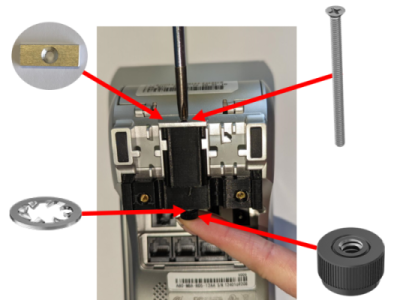


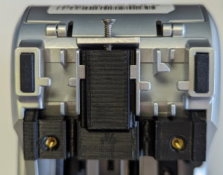

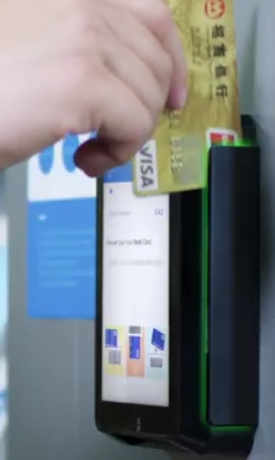
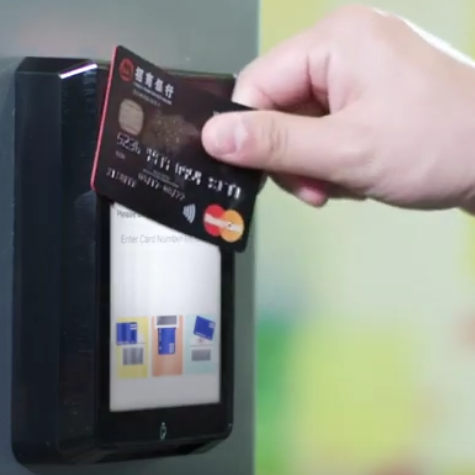
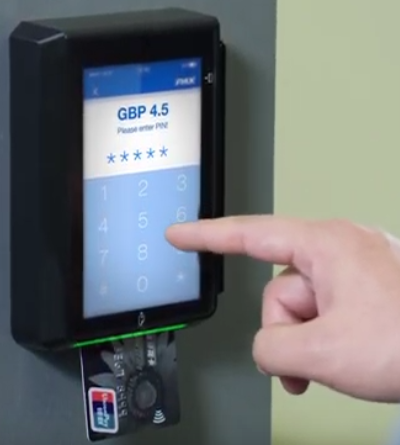
Re-enter the code and touch the Confirm & activate button, or touch Resend Code to obtain a new OTP.
After you enter the OTP successfully, the payment application displays the Set Admin Password screen to configure your terminal passwords.
On the Set merchant password screen, use the on-screen keypad to enter a 6-digit password in the Password field.
Re-enter the password in the Confirm new password field.
Touch the Confirm password button.


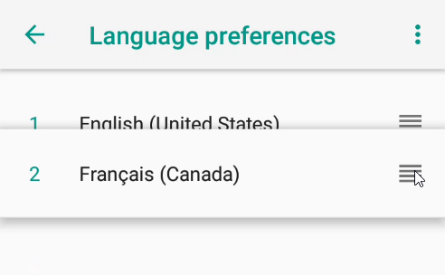
For more information on working with gift cards in the Secure Payment application, please refer to the following topics:
For more information on working with gift cards in the Secure Payment application, please refer to the following topics:
The Secure Payment application currently supports two types of gift card transactions: purchases and refunds. When making a purchase with a gift card, the Secure Payment application launches the appropriate gift card application (DataCandy of Freebees) to redeem the amount of the sale from the gift card's balance. When issuing a refund, the Secure Payment application launches the gift card application and increments the amount to be refunded onto the gift card's balance. Please refer to the following topics for how to process the supported gift card transactions:
Any other gift card transaction (activation, empty card, or checkign the balance) must be performed in the appropriate gift card application, according to the gift card application's user guide. For additional information on gift card transactions, please refer to the appropriate brand's documentation:
(online version)
(PDF version)
(online version)
When processing a transaction (sale or refund) using a gift card, the workflow a terminal operator will use depends on the Secure Payment module they are using.
If you are using Secure Payment's Gateway module, the gift card is recognized as soon as the operator swipes the card and the appropriate gift card application is launched (DataCandy or Freebees).
If you are using any other Secure Payment module (App to App, SecurePay, SecureTable, or Standalone Payment), the operator (or customer) must indicate that the card being used is a gift card by tapping the Gift card button.
If the terminal operator or customer do not tap the Gift card button before swiping the card, the terminal displays a screen asking if a gift card is being used.
When you tap the Gift card button or answer Yes to the gift card question, the Secure Payment application launches the appropriate gift card application (DataCandy or Freebees) to process the sale or refund. When the gift card transaction is complete, the terminal returns to the Secure Payment application.
A sales transaction paid for with a gift card is very similar to a regular sale paid for with a credit or debit card. The only difference is that you need to confirm that the card being used to pay is a gift card. The following procedure describes how to process a sale using a gift card.
Begin your sale as you would normally, based on the Secure Payment module you are using:
App to app: enter the sale amount on the 3rd party terminal application.
Gateway: enter the sale amount on the POS to initiate the Secure Payment application on the terminal.
If neither the operator nor customer touch the Gift card button before swiping the card, the terminal will present the following screen:
Tap Yes to continue the transaction using a gift card or No to return to the Total Sale screen to use a credit or debit card.
NOTE: If you are using the Gateway module, the gift card is recognized without requiring user input and the Secure Payment application automatically launches the appropriate gift card application.
The Secure Payment application then launches the required gift card processing application (DataCandy or Freebees) to complete the transaction and print the transaction receipt.
When the gift card sale is complete, the terminal leaves the gift card application and returns to the main Secure Payment application screen.
A refund for a transaction originally paid for with a gift card is very similar to a regular credit or debit card refund. The only difference is that you need to confirm that the card being used to pay is a gift card. The following procedure describes how to process a refund using a gift card.
Begin your refund as you would normally, based on the Secure Payment module you are using:
App to app: select the refund transaction and enter the refund amount on the 3rd party terminal application.
Gateway: enter the refund amount on the POS to initiate the Secure Payment application on the terminal.
If neither the operator nor customer touch the Gift card button before swiping the card, the terminal will present the following screen:
Tap Yes to continue the refund transaction.
NOTE: If you are using the Gateway module, the gift card is recognized without requiring user input and the Secure Payment application automatically launches the appropriate gift card application.
The Secure Payment application then launches the required gift card processing application (DataCandy or Freebees) to refund (increment) the sale amount to the gift card balance and print the transaction receipt.
When the gift card refund is complete, the terminal leaves the gift card application and returns to the main Secure Payment application screen.


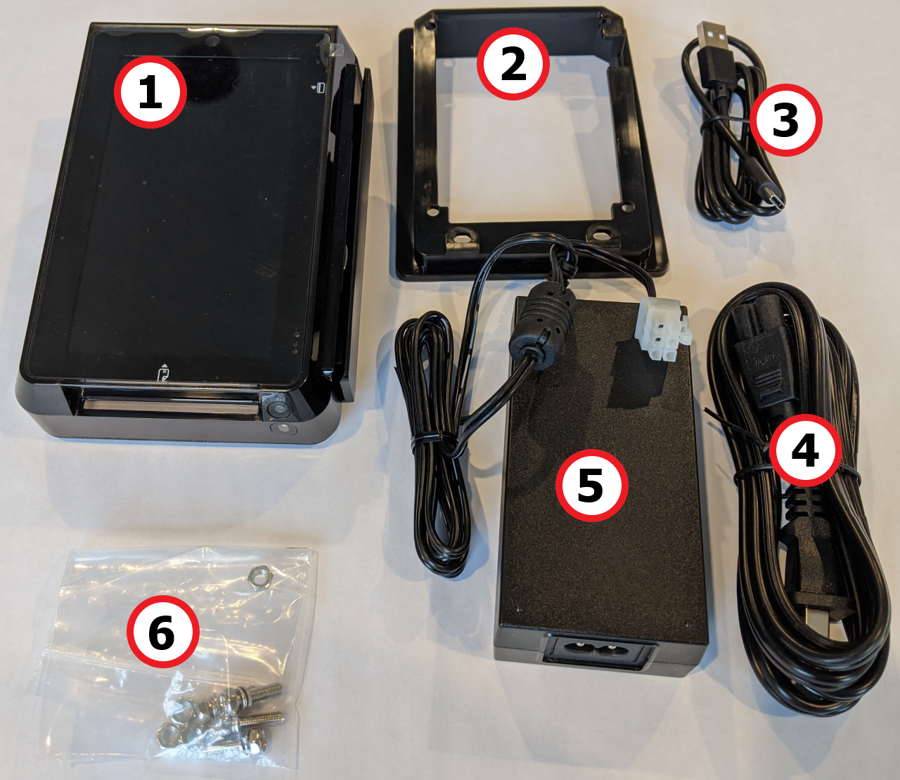
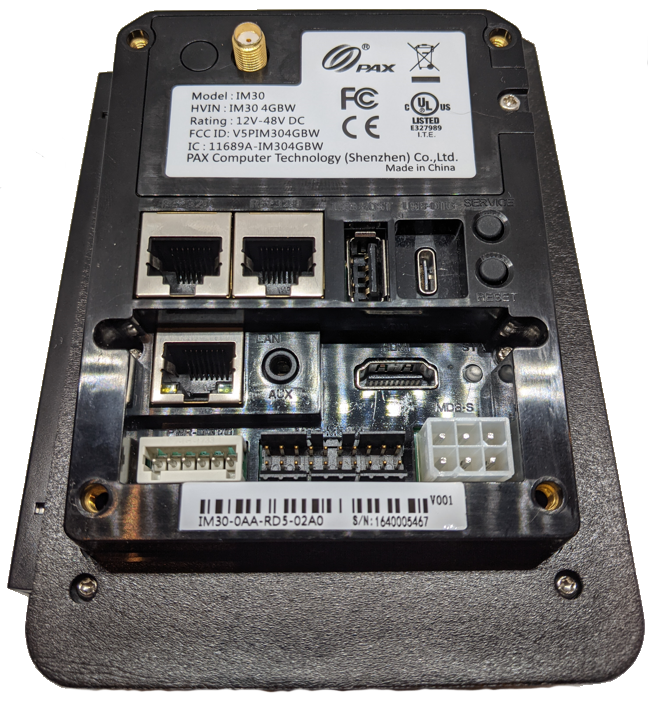
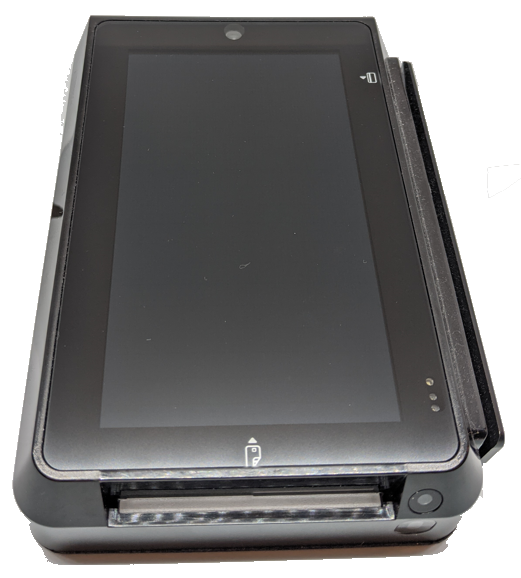


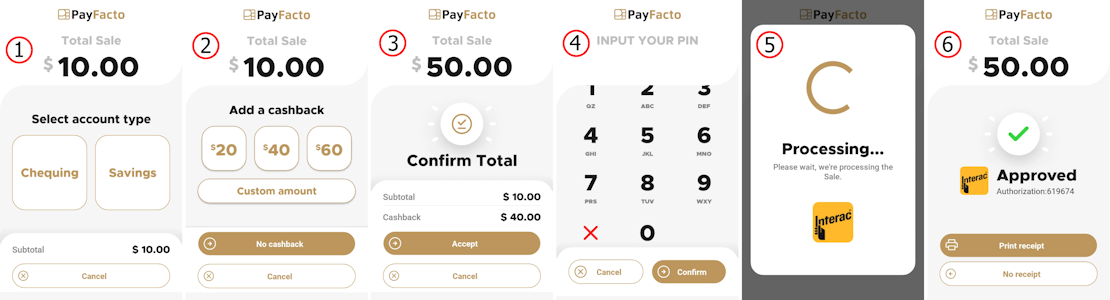
SecurePay: enter the sale on the POS to initiate the payment on the terminal.
SecureTable: enter the sale on the POS and then retrieve the bill when you've arrived at the table with the payment terminal.
Standalone payment: enter the sale amount on the terminal and touch OK.
On the Total Sale screen, touch the Gift card button; if the payment process includes a tip, select the tip and then touch the Gift card button on the Total Sale screen.
SecurePay: enter the refund on the POS to initiate the payment on the terminal.
SecureTable: enter the refund on the POS and then retrieve the bill when you've arrived at the table with the payment terminal.
Standalone payment: select the refund transaction from the Operations menu and enter the refund amount on the terminal and touch OK.
On the Refund screen, touch the Gift card button.
Sale without tip
Sale with tip


Before beginning the terminal configuration process, make sure that the terminal is configured in the PAX Store. Creation of the PAX Store account is typically done as part of deployment prior to delivery to the merchant.
If the terminal is not configured in the PAX Store, you will be unable to complete the entire configuration process. Power down the terminal, contact PayFacto, and have the terminal serial number available.
Before you can connect the terminal to a vending device, you must connect the power cable, configure the network connections, and configure the software. To access the terminal’s configuration, you must first connect the power cable.
To connect the terminal power cable:
Turn the terminal over.
Insert the AC adapter’s MDB connector in the MDB-S port.
NOTE: Although it can only fit one way, make sure the release tab is positioned towards the top of the terminal.
Plug the male end of the AC cord into the AC adapter and plug into an AC outlet.
The terminal powers on, Android starts, and displays the terminal’s main screen.
The terminal does not have a dedicated power on/off button; it turns on automatically when you connect it to an AC power source and turns off when disconnected from a power source.
By default, the terminal displays all information in English. This procedure explains how to change the terminal’s display language if necessary.
IMPORTANT! Selecting a different language changes all text that appears on the terminal.
To change the terminal display language:
Access the terminal's main screen by touching the Home icon.
On the terminal’s main screen, touch the Settings icon.
On the Settings screen, touch the Please Input Password field and use the keypad to type the password: either 9876 or pax9876@@.
NOTE: If the language has localized variants, select the appropriate regional option for your country.
If the selected language does not appear automatically, you can drag the language to the top of the list.
The IM30 unattended payment processing terminal requires network access to communicate with the payment server and process transactions. You can connect the terminal to mobile (LTE), wired (Ethernet), and wireless (Wi-Fi) networks.
You can connect the terminal to multiple network types if you want to ensure network redundancy. Click on the links above to learn how to configure the terminal to each network type.
This section explains how to turn Wi-Fi on and connect to your network.
To connect to your wireless network:
Access the terminal's main screen by touching the Home icon.
On the terminal’s main screen, touch the Settings icon.
On the Settings screen, touch the Please Input Password field and use the keypad to type the password: either 9876 or pax9876@@.
TIP: You can touch Show password before typing to ensure you are entering the password correctly.
After the terminal displays Connected for the selected network, touch the Back icon to return to the Settings page.
If you plan to use the terminal without connecting to a Wi-Fi network, you need to install the mobile SIM card, provided by PayFacto or your mobile communications provider. The terminal uses the micro SIM card format. Configuring the mobile network consists of:
This section explains how to install the SIM card to enable mobile network access on the terminal.
To install the mobile SIM card:
Make sure the terminal is powered off and turn the terminal over.
On the back of the terminal in the middle, use a small Phillips screwdriver to loosen (turn left) the screw that secures the card slot module.
Lift the card slot module from the terminal.
Locate the SIM slot on the long side of the module.
Insert the SIM card as illustrated (clipped corner at the top right).
Re-install the card slot module and tighten (turn to the right) the screw using a small Phillips screwdriver to secure the module to the terminal.
If necessary, attach the LTE antenna (sold separately) to the threaded connector on the card slot module.
Re- to power up the terminal.
When you receive a SIM card from PayFacto, you need to create and configure the Access Point Name (APN) information. The APN settings allow the terminal to connect to the PayFacto payment server.
If you obtained a SIM card from your mobile communications provider, the APN settings may configure themselves automatically; if they don't, you should contact your provider for the required APN settings.
To create and configure the APN information:
Access the terminal's main screen by touching the Home icon.
On the terminal’s main screen, touch the Settings icon.
On the Settings screen, touch the Please Input Password field and use the keypad to type the password: either 9876 or pax9876@@.
Name: Telus
APN: m2m-east.telus.iot
Proxy: (leave blank)
Touch the menu icon and touch Save.
This section explains how to enable an Ethernet connection and connect to your network.
To connect to your Ethernet (wired) network:
Access the terminal's main screen by touching the Home icon.
On the terminal’s main screen, touch the Settings icon.
On the Settings screen, touch the Please Input Password field and use the keypad to type the password: either 9876 or pax9876@@.
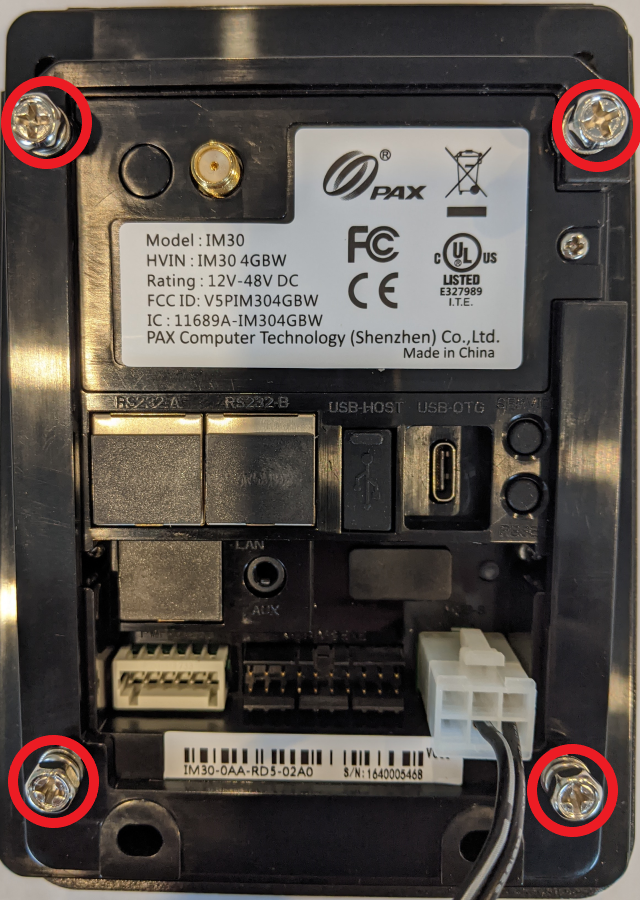
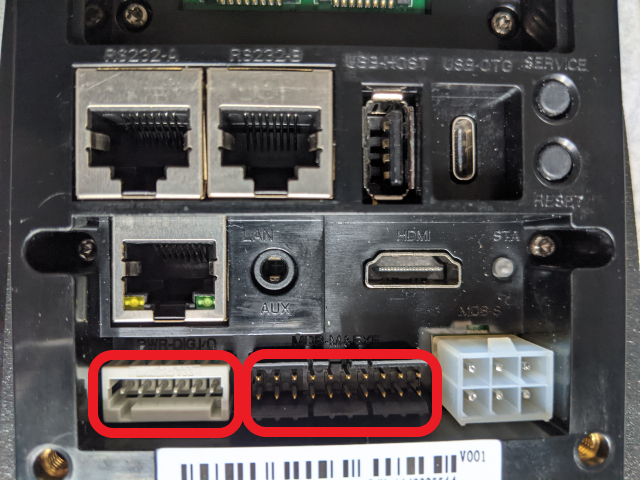
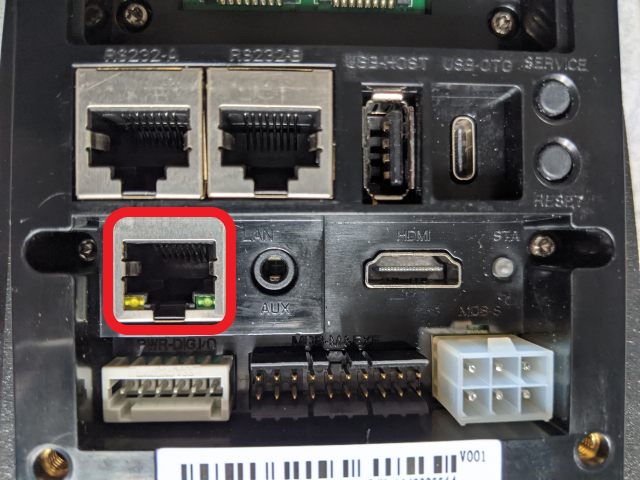
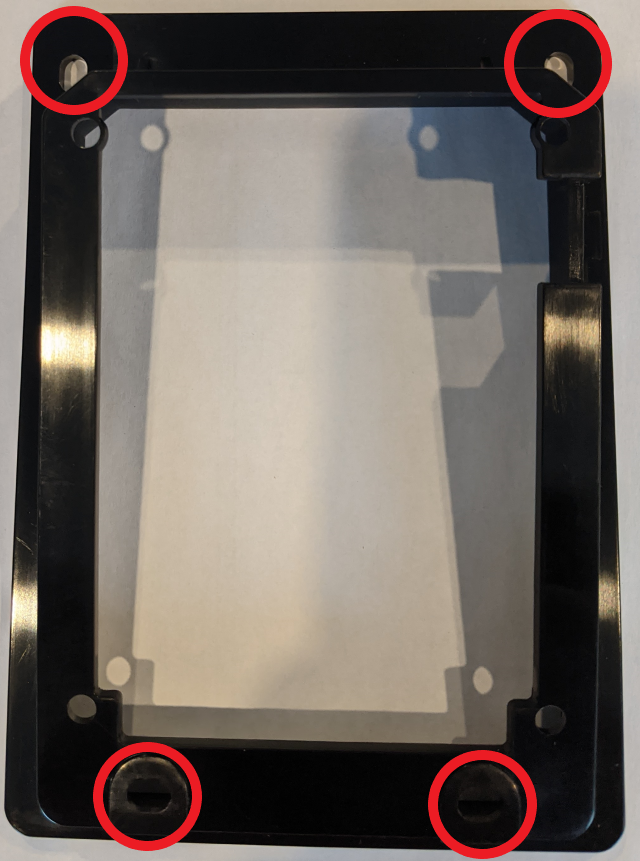


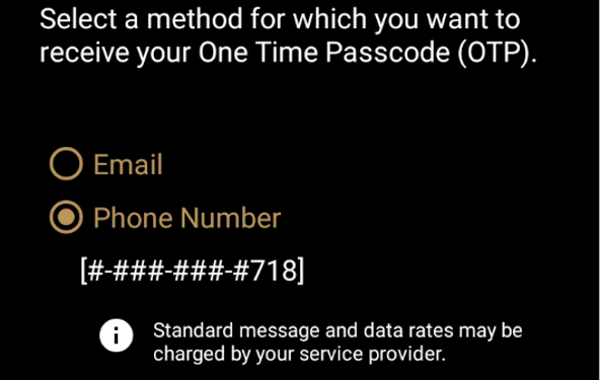
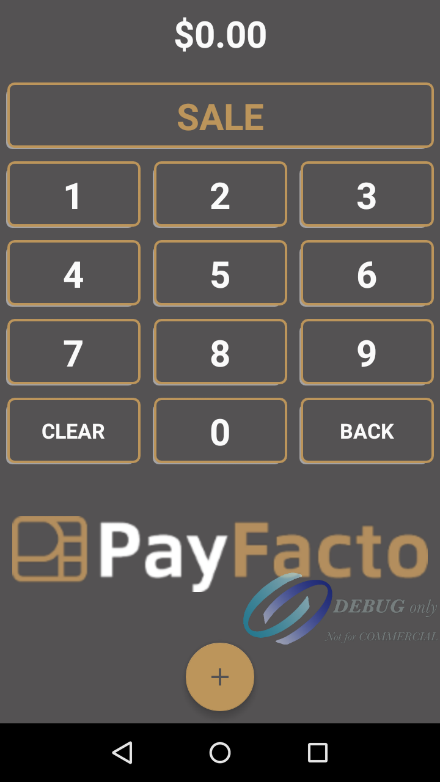

Touch the checkmark icon on the keypad when you are done and touch OK.
On the Settings page, scroll to the Personal section and touch Languages & Input.
On the Languages & input page, touch Languages.
On the Language preferences page, touch Add a language.
On the Add a language page, scroll to and touch the desired language.
Touch the checkmark icon on the keypad when you are done and touch OK.
On the Settings page, in the Wireless & networks section, touch Wi-Fi.
If Wi-Fi is Off, touch the toggle to turn it on. If Wi-Fi is already on, a list of available networks appears.
From the list of available networks, touch the name of the network you want to connect to.
Enter the password for the selected network and touch CONNECT.
Touch the checkmark icon on the keypad when you are done and touch OK.
On the Settings page, in the Wireless & networks section, touch More.
On the Wireless & networks page, touch Cellular networks.
On the Cellular network settings page, touch Access Point Names.
Click the New APN icon to create a new access point.
On the Edit access point screen, use the following information to enter the required information in the appropriate fields (do not adjust the other fields):
Touch the checkmark icon on the keypad when you are done and touch OK.
On the Settings page, in the Wireless & networks section, touch Ethernet.
If Ethernet is Off, touch the toggle to turn it on.
After you toggle Ethernet to On (or if Ethernet is already on) and you connect an Ethernet cable to the terminal, the network settings should appear automatically.
Touch the Back icon to return to the Settings page.

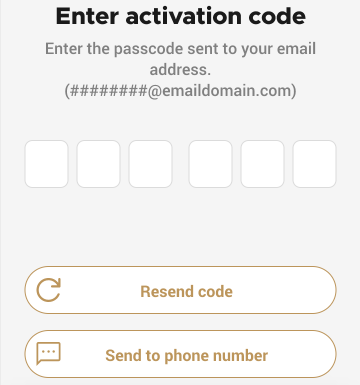
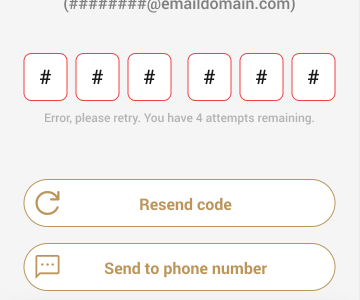


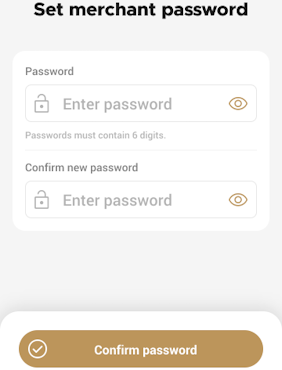

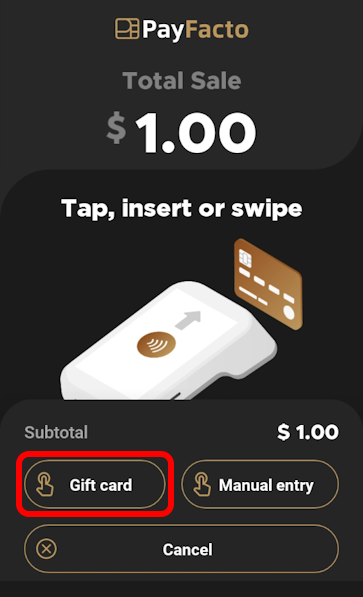
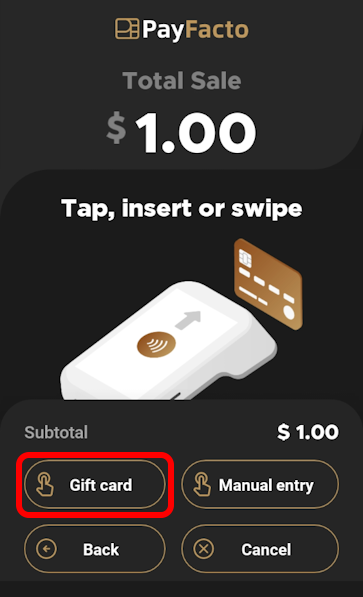
You can configure your terminal to add a tip to the total sale. You can also configure cashback options for debit transactions (if supported).
You can configure your terminal to add a tip to the total sale. You can also configure cashback options for debit transactions (if supported). The topics covered in this section include:
If your business includes the option to tip, you can enable tipping on the terminal, where the customer can add a tip value in addition to the sale. By default, tipping is disabled on the terminal.
NOTE: When you enable tipping on the terminal, customers can always enter a manual tip amount in dollars and cents, regardless of any preset percentage values.
From the main screen, touch the Menu button.
Enter the merchant password and touch Confirm.
Scroll to the Configure application section.
Touch Terminal options.
If you have more than one terminal, repeat steps 1 to 6 for each additional terminal where you want to enable tipping.
By default, tipping is disabled on the terminal. If you've enabled tip processing, you can easily disable the function if needed.
From the main screen, touch the Menu button.
Enter the merchant password and touch Confirm.
Scroll to the Configure application section.
Touch Terminal options.
If you have more than one terminal, repeat steps 1 to 6 for each additional terminal where you want to disable tipping.
When you enable tipping, the terminal automatically displays three preset percentages (default values are 15%, 18%, and 20%) as options to the customer. The customer can touch one of the preset values or manually enter an amount for the tip.
NOTE: If you want to allow your customers to enter a custom tip percentage, you must enable the manual tip percentage using the procedure.
From the main screen, touch the Menu button.
Enter the merchant password and touch Confirm.
Scroll to the Configure application section.
Touch Terminal options.
If you have more than one terminal, repeat steps 1 to 6 for each additional terminal where you want to view the terminal's preset tip percentages.
When you enable tip processing, the terminal automatically offers preset percentage values to the customer. You can also offer the opportunity for customers to enter their own percentage value. By default, the manual tip percentage option is enabled on the terminal and applies automatically whenever you activate the tip processing option.
From the main screen, touch the Menu button.
Enter the merchant password and touch Confirm.
Scroll to the Configure application section.
Touch Terminal options.
If you have more than one terminal, repeat steps 1 to 6 for each additional terminal where you want enable a manual tip percentage.
By default, the manual tip percentage option is enabled on the terminal and applies automatically whenever you activate the tip processing option; you can easily disable the function if needed.
From the main screen, touch the Menu button.
Enter the merchant password and touch Confirm.
Scroll to the Configure application section.
Touch Terminal options.
If you have more than one terminal, repeat steps 1 to 6 for each additional terminal where you want to disable manual tip percentage.
When you enable tip processing, the terminal automatically offers preset percentage values to the customer. By default, the preset percentage values are set to 15, 18, and 20, but you can easily change one or more of these values as needed.
From the main screen, touch the Menu button.
Enter the merchant password and touch Confirm.
Scroll to the Configure application section.
Touch Terminal options.
On the Tip percentage presets screen, touch the tip preset field you want to change (Tip preset no. 1, Tip preset no. 2, or Tip preset no. 3) and replace the current percentage with a new value.
Repeat step 7 for any additional percentage preset values you want to change.
If you have more than one terminal, repeat steps 1 to 8 for each additional terminal where you want to change the preset tip percentage values.
NOTE: If you have multiple terminals, you should ensure that they are all configured to offer the same preset tip percentages to avoid one terminal displaying different tip percentages from the other terminal(s).
When you enable tip processing, the terminal automatically offers preset percentage values to the customer. By default, the preset percentages use the Normal text size to display the values, but you can choose to use Large or Very Large text to suit your requirements, as shown in the following examples:
From the main screen, touch the Menu button.
Enter the merchant password and touch Confirm.
Scroll to the Configure application section.
Touch Terminal options.
On the Tip presets text size screen, touch the text size you want to use (Normal, Large, or Very Large).
If you have more than one terminal, repeat steps 1 to 7 for each additional terminal where you want to set preset tip percentage text size.
There can be situations where your customers may accidentally enter a manual tip amount or percentage incorrectly and leave a larger tip than planned. By default, the terminal enables a tipping threshold that requires the Merchant password for any custom tip (amount or percentage) that exceeds the threshold (the default threshold is 50%).
NOTE: The tip threshold feature is designed to protect the customer and the merchant by ensuring that the customer is aware of any generous tip they intend to leave, which prevents the possibility of a future chargeback.
If the customer leaves a custom tip that exceeds the threshold (for example, a $55 tip on a $100 bill), the terminal will request the Merchant password before the transaction can be completed. You can or the threshold value if needed.
IMPORTANT! Using the default threshold of 50% can incur delays in processing sales when you regularly have transactions for smaller amounts. For example, a $2.75 tip on a $5.25 sale represents a 52% tip and having to enter the Merchant password could affect the time required to process the transaction and create a delay for clients waiting to pay. Using the tipping threshold, and the percentage it is set to, should reflect the average sale amount so as to not add any unnecessary delays for the customer when paying.
From the main screen, touch the Menu button.
Enter the merchant password and touch Confirm.
Scroll to the Configure application section.
Touch Terminal options.
On the Tip threshold screen, toggle the Tip threshold switch to the right.
If you have more than one terminal, repeat steps 1 to 7 for each additional terminal where you want to enable the tipping threshold.
When you enable the tipping threshold, you can set a custom percentage as the value where the Merchant password is required. By default, the terminal set the threshold value at 50%, but you can adjust it if needed.
IMPORTANT! If you set the tipping threshold to 0%, any tip amount will require the Merchant password before you can complete the transaction.
From the main screen, touch the Menu button.
Enter the merchant password and touch Confirm.
Scroll to the Configure application section.
Touch Terminal options.
On the Tip threshold screen, change the percentage value in the Threshold field.
If you have more than one terminal, repeat steps 1 to 7 for each additional terminal where you want to set the terminal's tipping threshold.
Toggle the Tip processing switch to the right.
Toggle the Tip processing switch to the left.
The Percentage presets display the current values.
If it isn't already enabled, toggle the Manual percentage input switch to the right.
Toggle the Manual percentage input switch to the left.
Touch Percentage presets.
Touch Tip presets text size.
Touch Tip threshold.
Touch Tip threshold.
Normal
Large
Very Large