Loading...
Loading...
Loading...
Loading...
Loading...
Loading...
Loading...
Loading...
Loading...
The Secure Payment application currently supports two types of gift card transactions: purchases and refunds. When making a purchase with a gift card, the Secure Payment application launches the appropriate gift card application (DataCandy of Freebees) to redeem the amount of the sale from the gift card's balance. When issuing a refund, the Secure Payment application launches the gift card application and increments the amount to be refunded onto the gift card's balance. Please refer to the following topics for how to process the supported gift card transactions:
Any other gift card transaction (activation, empty card, or checkign the balance) must be performed in the appropriate gift card application, according to the gift card application's user guide. For additional information on gift card transactions, please refer to the appropriate brand's documentation:
SecureTable supports voids initiated by the POS system. To be able to use this feature, the POS system must support it as well.
The Void Sale operation consists in cancelling a sale transaction that was carried out in the current transaction batch. With this operation, the funds are returned to the customer.
IMPORTANT! Only transactions from the Current Batch can be voided. Transactions that belong to a closed batch cannot be voided. To refund a transaction belonging to a closed batch, see Refunds.
Initiate the void from the POS system. The POS system should tell you which Terminal ID was used in the original transaction, as well as the original check or invoice number. The information should be available either on-screen or on a printed coupon.
Locate the payment terminal with the appropriate Terminal ID (TID). On the SecureTable application, the terminal ID (TID) appears at the bottom of the home screen and consists of 8 digits.
Logon to SecureTable with your employee number. There is no need to enter a table or check number, so simply touch OK without entering anything if prompted for those.
If there are voids to be treated, you will see a section for Voids at the top of the list of tables and checks. Touch the Voids box, which will display the list of pending voids.
NOTE: If you don't see the Voids section, it means that no voids were initiated from the POS system, or your POS system does not support this feature with SecureTable
Locate the box that represents the transaction you wish to void and touch it. If multiple pending voids are listed, use the invoice (check) number or reference number to locate the one you wish to process. Touch the VOID button to initiate the process.
The payment application will display the transaction details. Verify that this is indeed the transaction you wish to void, then:
a. touch the CONFIRM button to proceed, or;
b. Touch the BACK button to return to SecureTable. (This will return to the SecureTable Home Screen.)
At this point, whether the customer will need to manipulate the payment terminal depends on the type of card used for the original payment.
a. For credit cards, no further manipulation is required and the void will be processed automatically.
b. For debit cards, hand the payment terminal to the customer. The customer will insert the original payment card and follow the prompts to process the void.
Once the process is completed, the terminal will return to the SecureTable home screen.
Being specifically designed for fine dining and delivery transactions, tip management is an integral part of SecureTable. This section focuses on the various options available in SecureTable to facilitate tip management.
Tip options are found in SecureTable's advanced settings. Here is a summary of available tip options:
Enable this option to have the SecureTable application prompt for tip entry. Disable this option to prevent tip entry. Disabling this option will also hide all the tip-related options below.
Configure preset tip percentages that the customer will see when prompted for tip. 3 presets can be configured. If you do not wish to use all of them, you can configure a preset to 0% which will hide that button from the customer.
Tip presets text size
Select the text size used to display preset tip percentages. Available choices are Normal, Large, and Very Large.
Tip Threshold
Enter the maximum allowed tip percentage. Any tip amount that exceeds this percentage will require the settings password to be entered. Setting the percentage to 0% disables the tip threshold validation.
Manual percentage input
Enable this option to have the SecureTable module add a button allowing the customer to enter a tip percentage manually.
Tip presets are used to simplify and speed up the tipping process by allowing customers to select between pre-configured tip percentages that are commonly used. Any percentage can be configured, but they need to be realistic for the market in which the terminal is used.
Up to 3 tip presets can be configured
Presets configured at 0% are not displayed
The space used by each preset button is automatically adjusted to fit the width of the screen, as demonstrated in screenshots below
The Tip Preset Text Size drop-down allows you to change the font size used to display percentages and amounts in each tip preset. The screenshots below illustrate each available size.
Very Large
The Tip Threshold is a control measure to prevent accidental over-tipping. If the tip amount exceeds the set threshold, SecureTable will request the administrator password before applying the tip.
IMPORTANT! Be sure to carefully evaluate how tips work in the establishment before setting this value. With low value items, the threshold percentage can be exceeded very quickly. For example, buying a water bottle for $2.00 and leaving $1.00 as a tip is already 50% in tip value.
A refund for a transaction originally paid for with a gift card is very similar to a regular credit or debit card refund. The only difference is that you need to confirm that the card being used to pay is a gift card. The following procedure describes how to process a refund using a gift card.
Begin your refund as you would normally, based on the Secure Payment module you are using:
App to app: select the refund transaction and enter the refund amount on the 3rd party terminal application.
Gateway: enter the refund amount on the POS to initiate the Secure Payment application on the terminal.
SecurePay: enter the refund on the POS to initiate the payment on the terminal.
SecureTable: enter the refund on the POS and then retrieve the bill when you've arrived at the table with the payment terminal.
Standalone payment: select the refund transaction from the Operations menu and enter the refund amount on the terminal and touch OK.
On the Refund screen, touch the Gift card button.
If neither the operator nor customer touch the Gift card button before swiping the card, the terminal will present the following screen:
Tap Yes to continue the refund transaction.
NOTE: If you are using the Gateway module, the gift card is recognized without requiring user input and the Secure Payment application automatically launches the appropriate gift card application.
The Secure Payment application then launches the required gift card processing application (DataCandy or Freebees) to refund (increment) the sale amount to the gift card balance and print the transaction receipt.
When the gift card refund is complete, the terminal leaves the gift card application and returns to the main Secure Payment application screen.
If your business uses gift cards as a payment option, your terminal includes an application to process gift card transactions. When working with Secure Payment, gift card transactions are supported when you identify that the payment method is a gift card or the terminal detects that the card used is not a credit or debit card.
For more information on working with gift cards in the Secure Payment application, please refer to the following topics:
0
Screenshot manager password
When processing a transaction (sale or refund) using a gift card, the workflow a terminal operator will use depends on the Secure Payment module they are using.
If you are using Secure Payment's Gateway module, the gift card is recognized as soon as the operator swipes the card and the appropriate gift card application is launched (DataCandy or Freebees).
If you are using any other Secure Payment module (App to App, SecurePay, SecureTable, or Standalone Payment), the operator (or customer) must indicate that the card being used is a gift card by tapping the Gift card button.
If the terminal operator or customer do not tap the Gift card button before swiping the card, the terminal displays a screen asking if a gift card is being used.
When you tap the Gift card button or answer Yes to the gift card question, the Secure Payment application launches the appropriate gift card application (DataCandy or Freebees) to process the sale or refund. When the gift card transaction is complete, the terminal returns to the Secure Payment application.
A sales transaction paid for with a gift card is very similar to a regular sale paid for with a credit or debit card. The only difference is that you need to confirm that the card being used to pay is a gift card. The following procedure describes how to process a sale using a gift card.
Begin your sale as you would normally, based on the Secure Payment module you are using:
App to app: enter the sale amount on the 3rd party terminal application.
Gateway: enter the sale amount on the POS to initiate the Secure Payment application on the terminal.
SecurePay: enter the sale on the POS to initiate the payment on the terminal.
SecureTable: enter the sale on the POS and then retrieve the bill when you've arrived at the table with the payment terminal.
Standalone payment: enter the sale amount on the terminal and touch OK.
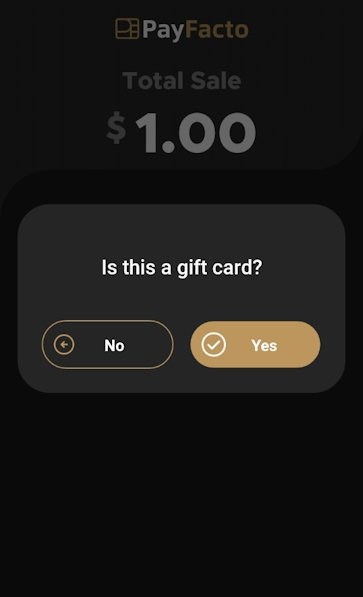
On the Total Sale screen, touch the Gift card button; if the payment process includes a tip, select the tip and then touch the Gift card button on the Total Sale screen.
Sale without tip
Sale with tip
If neither the operator nor customer touch the Gift card button before swiping the card, the terminal will present the following screen:
Tap Yes to continue the transaction using a gift card or No to return to the Total Sale screen to use a credit or debit card.
NOTE: If you are using the Gateway module, the gift card is recognized without requiring user input and the Secure Payment application automatically launches the appropriate gift card application.
The Secure Payment application then launches the required gift card processing application (DataCandy or Freebees) to complete the transaction and print the transaction receipt.
When the gift card sale is complete, the terminal leaves the gift card application and returns to the main Secure Payment application screen.
This section will cover the general workflow that users and customers will see when using the SecureTable module. The workflow will vary slightly based on the Secure Payment application's SecureTable module configuration. The workflow steps that are user-configurable are also optional and can be skipped during the transaction process. Those will be indicated as such below.
Before starting a transaction using a payment terminal with the SecureTable module, at least one check must be printed from the POS system. The SecureTable module can also work with split checks as well a tables with multiple checks. Open tables without printed checks cannot be accessed by the SecureTable module.
The workflow will vary based on the SecureTable module's application settings. This section covers all possible configurations. Here are quick links to each step of the workflow:
Home Screen (Start)
Tip Calculation (with tip presets)
Payment (Card processing)
The transaction workflow always starts from the SecureTable home screen. To start, simply press the ENTER button.
Enter the Server, Clerk or employee number and press the OK button in the lower-right corner of the screen. The server number is mandatory to start a transaction. It will be used to filter the tables and checks, and only the tables or checks that are related to the server number entered will be available.
NOTE: On devices equipped with a physical keypad, the on-screen keypad will not be displayed. The physical keypad buttons will be used instead.
This screen will only be displayed if the Enable Search by Table Number option is enabled in the SecureTable application's settings.
The table number is used to further filter the checks that will be displayed. This is useful to display the full list of checks associated with a specific table.
To use it, enter the table number and press the OK button in the lower-right corner of the screen. To skip this step, simply press OK without entering a table number.
NOTE: On devices equipped with a physical keypad, the on-screen keypad will not be displayed. The physical keypad buttons will be used instead.
This screen will only be displayed if the Enable Search by Check Number option is enabled in the SecureTable application's settings.
The check number is used to search for a specific check. This is useful when you have the check in hand and you just want to bring it up immediately on the SecureTable application.
To use it, enter the check number and press the OK button in the lower-right corner of the screen. To skip this step, simply press OK without entering a check number.
NOTE: On devices equipped with a physical keypad, the on-screen keypad will not be displayed. The physical keypad buttons will be used instead.
This screen may look different or may not be displayed altogether, based on settings and previous choices made:
A list of all tables containing printed checks will be displayed if both the Table Number and Check Number screens were skipped.
A single table will be displayed if a valid table number was entered at the Table Number screen and the check number was skipped.
This screen will be skipped altogether if a check number was entered at the Check Number screen. In this case, SecureTable will skip directly to the Split Calculator screen, further below.
The table number is indicated to the left of each white box. Each box displays the total amount due for the entire table, and the green Multiple Checks text indicates that this table has more than one printed checks.
To select a table, simply touch the desired box.
When a table containing multiple printed checks is selected, the list of available checks is displayed. On a typical payment terminal screen, up to 5 checks can be displayed at once. If there are more than 5 checks, the list can be scrolled by swiping up and down the screen.
This screen will not be displayed if a table with a single check was selected, or if a check number was entered at the Check Number screen.
To select a check to be paid, simply touch the corresponding box on the screen.
The split calculator is the step where the server discusses with the customer about how the check will be paid. The following needs to be determined:
Will the check be paid by cash or by card?
Will the check be paid in full in one payment, or in multiple payments (split)?
If the payment is to be split, will it be in equal or unequal amounts?
Paid by Cash
Enable this checkbox if the customer pays with cash. If the customer pays by card, leave this box unchecked.
PAY FULL
Touch this button to pay the check in full.
EQUAL SPLIT
Touch this button to split the check amount in up to 10 equal parts.
UNEQUAL SPLIT
Touch this button to split the check in unequal parts.
Equal split is used to divide the total check amount equally up to 10 equal parts. This is useful when there is a single printed check for 2 or more customers, and they want to split the expense among themselves.
After touching the EQUAL SPLIT button, the Number of Splits appears with the amount per split appearing below each split option.
Touch the CONFIRM button to proceed with each payment.
NOTE: If the amount is not equally divisible by the number of splits selected, there will be a difference of $0.01 between split amounts. In the screenshot above, dividing $53.24 by 5 creates 4 splits at $10.65 and the final split (5th) at $10.64.
The UNEQUAL SPLIT function is used to divide the check amount in unequal parts. This is useful if the in a single printed check which multiple customers wish to pay with various amounts.
After touching the UNEQUAL SPLIT button, touch the Amount field and enter the amount that the customer wishes to pay. Touch the CONFIRM button to proceed with the first payment. The remaining balance appears after the payment is complete.
If the Tip option is enabled in the SecureTable application settings, the tip calculation screen will appear.
When the Tip calculation screen appears, the payment terminal needs to be handed to the customer. The customer has the following options:
Select one of the pre-configured percentages
Enter a custom dollar amount
Enter a custom percentage
Leave no tip at all
Total sale
This section shows the total amount to be paid.
Add a Tip
In this section, the tip presets configured in the Tip Preset Percentages in SecureTable's settings appear. Each percentage box also indicates the corresponding dollar amount.
Touching a preset automatically adds the selected tip amount to the transaction.
Custom $
Touch the Custom $ button to enter a custom dollar amount as tip instead of using a preset.
Custom %
Touch the Custom % button to enter a custom percentage of tip instead of using a preset.
No tip
Touch this button to skip the tip entry process altogether and leave no tip.
The screen below only appears if the customer touches the $ button to enter a custom tip amount.
The customer uses the provided keypad to enter a tip amount, which will make the green CONFIRM button available.
The customer can use the backspace key to correct typing mistakes.
When ready, the customer presses the green CONFIRM button.
NOTE: On devices equipped with a physical keypad, the on-screen keypad will not be displayed. The physical keypad buttons will be used instead.
The screen below only appears if the customer touches the % button to enter a custom tip percentage.
The customer uses the provided keypad to enter a tip percentage, which will make the green CONFIRM button available.
Also note the Tip Amount value is updated in real-time as the customer types the percentage. This is provided so that the customer will immediately know exactly how much will be added to the check as tips, based on the percentage entered.
The customer can use the backspace key to correct typing mistakes.
When ready, the customer presses the green CONFIRM button.
NOTE: On devices equipped with a physical keypad, the on-screen keypad will not be displayed. The physical keypad buttons will be used instead.
At this point, SecureTable will call the payment application installed on the payment terminal. The prompts that the customer will see will depend on the payment application used and the card type used. For more information on this specific part of the workflow, please consult your payment application's documentation.
After the payment has been authorized by the payment application, the payment data will be sent to the POS system. Note that only non-sensitive data is exchanged between SecureTable and the POS system.
The message Payment applied successfully! will be briefly displayed on the screen.
Then, one of two things can happen:
Splits
If this was a payment resulting from a split, SecureTable will return to the Split Calculator to process the next payment.
Full payment / Last payment
If this was a full payment or the last payment of a series of splits, SecureTable will return to the home screen.
The payment workflow with SecureTable is now complete, and the application is ready to process the next payment.