Loading...
Loading...
Loading...
Loading...
Loading...
Loading...
Loading...
Loading...
Loading...
Loading...
Loading...
Loading...
Loading...
The Secure Payment application's App to app module has multiple configurable features and functions. The features and functions apply to all Secure Payment modules you may use, including standalone Payment, SecurePay, SecureTable, Gateway, and Gift Cards.
For the App to app module, the feature you will most likely need to configure is tipping (if that applies to your business), but you can access the following :
Application Configuration
Close (or exit from) the third party payment application.
If the App to app main screen does not appear automatically, touch the Secure Payment icon on the terminal's main screen.
From the App to app main screen, touch the menu icon at the top-left corner of the screen.
Enter the merchant password and touch the Confirm button. The Settings page appears.
The Secure Payment App to app module provides payment processing to merchants who use a non-PayFacto terminal payment application. The App to app module is different from the SecurePay, SecureTable, and Gateway modules as there is no communication between the Point of Sale (POS) system and the payment terminal.
Operation of the App to app module more closely resembles the Payment module in standalone mode. The merchant enters the amount of the sale on a third-party terminal application and then the App to app module receives the sale information and processes the sale using the PayFacto servers.
The interface of the third party terminal application used to enter the sale amount can be (and likely is) different from the Secure Payment interface. Any amount for tip, cashback, or fees (where applicable) is added using the Secure Payment interface, as is the prompt to present the card and the authorization server results.

Close the third party payment application if it is still open.
If the App to app main screen does not appear, touch the Secure Payment icon on the terminal's main screen.
From the App to app main screen, touch the Menu button.
Enter the merchant password and touch Confirm.
Scroll to the Semi-integrated configuration section and touch Switch to Standalone.
The Settings page closes and the terminal displays the standalone payment module.
If you have more than one terminal, repeat steps 1 to 5 for each additional terminal where you want to switch the terminal to standalone payment mode.
If you switched from using the App to app module to Secure Payment's standalone payment mode, you need to switch back when the communication issue with the 3rd party payment application is resolved.
From the standalone payment main screen, touch the Settings button.
Enter the merchant password and touch Confirm.
Scroll to the Semi-integrated configuration section and touch Switch to app to app mode.
The terminal returns to the App to app main screen.
Start third party payment application.
If you have more than one terminal, repeat steps 1 to 4 for each additional terminal where you want to switch back from standalone payment mode.
The topics covered in this page include:


When using the Secure Payment application, it is helpful to have a list of processed transactions to ensure your bookkeeping is aligned with your business' sales. The terminal can print transaction reports, allowing you to view either detailed or summary information on the transactions and transaction types in the current batch, if your business uses multiple terminals, you need to print reports on those terminals to view their reports.
Detailed reports display a list of every transaction in the current batch, including date, time, transaction type, payment method, invoice number, and amount. Summary reports group the transactions by card type, displaying the total sales, and the number of transactions.
The terminal’s printer (built-in or external) can print transaction reports for the current batch. For reconciliation purposes, you may want to print a report prior to the automated settlement, but it is not a requirement. Printing reports is meant to assist with your bookkeeping.
The available transaction reports are:
Additionally, you can search for individual transactions using the procedure.
You can search for transactions on the terminal to view the details about one or more transactions. If you have multiple terminals operating under the same merchant ID (MID), all transactions from all terminals appear in the list with the most recent transaction at the top of the list. You can search for transactions in the current (open) batch as well as from previous batches.
TIP: If you find it difficult to locate a specific transaction from an individual terminal, you may choose to restrict the search function to only display transactions performed on each individual terminal.
To restrict the transaction display to only those processed by the terminal, you must contact PayFacto support to request that your merchant profile displays only transactions processed on individual terminals by activating the Terminal Only Reports function. This will restrict transaction searching to individual terminals.
From the main screen, touch the Menu button.
Enter the merchant password and touch Confirm.
In the Transaction management section, touch Transaction History.
Touch the Search button.
Enter one or more of the following search criteria:
An invoice number in the Invoice number field
The detailed report for the current batch of transactions lists each individual transaction’s details. You may want to print the detailed transaction in order to have a printed copy of the transactions prior to processing the the current batch. Printing a detailed report allows you to reconcile each transaction as part of your bookkeeping.
From the main screen, touch the Menu button.
Enter the merchant password and touch Confirm.
In the Transaction management section, touch Reports.
In the Batch Details section, touch Print Batch Details. The terminal prints the Batch Details Report, listing all transaction details in the current batch for all terminal operators.
If you have more than one terminal, repeat steps 1 to 4 for each additional terminal where you want to print the detailed transaction report.
The summary report for the current batch of transactions allows you to see the totals for each payment method used, including sales, refunds, tips, cashbacks, and fees. You may want to print the summary report to reconcile transactions by payment type as part of your bookkeeping prior to processing the current batch.
From the main screen, touch the Menu button.
Enter the merchant password and touch Confirm.
In the Transaction management section, touch Transaction History.
In the Batch Summary section, touch Print Batch Summary. The terminal prints the Summary Details Report, listing all transactions in the current batch, grouped by card type for all terminal operators.
This section describes the general transaction workflow and user experience when making a purchase with a merchant using the Secure Payment application's App to app module.
The merchant will calculate the total amount using a Point of Sale (POS) system or a cash register and enter the total amount on the payment terminal using the third-party application. The third-party application then communicates the total amount to the Secure Payment application's App to app module.
Touch the Time range field to select a date range for the desired transaction; touch Save to search using the selected date range
Touch the Search button. The terminal returns any transaction that meets the selected search criteria.
Touch the desired transaction to display the details.


NOTE: Due to the variety of third-party payment applications, no image of this step in the workflow process is included in the documentation.
The next step in the process depends on the type of sale. If the merchant adds any surcharge for debit card transactions (for Canadian merchants only, excluding Quebec), the App to app module applies the associated surcharge to the total amount and requires the customer to confirm the total.
The following sections will describe the workflow without surcharges; the available sale types are:
After the merchant enters the amount on the third-party application, the Secure Payment App to app module displays the total sale amount, at which point the merchant hands the terminal to (or turns it towards) the customer.
The customer inserts, swipes, or taps their payment card.
The terminal displays a processing screen with the payment card brand logo.
After approving (or declining) the payment request, the terminal prints the merchant copy of the transaction receipt and the merchant touches Print receipt to print the customer copy or No receipt if the customer does not want their copy of the transaction receipt.
After the merchant enters the amount on the third-party application, the Secure Payment App to app module displays the Add a tip screen, at which point the merchant hands the terminal to (or turns it towards) the customer.
The customer selects one of the preset tip percentages, a custom dollar amount, or a custom percentage (if enabled) or they can touch the No tip button.
After the customer selects the tip amount, the Total Sale screen appears where the customer then inserts, swipes, or taps their payment card.
The terminal displays a processing screen with the payment card brand logo.
After approving (or declining) the payment request, the terminal prints the merchant copy of the transaction receipt and the merchant touches Print receipt to print the customer copy or No receipt if the customer does not want their copy of the transaction receipt.
IMPORTANT! Cashback is only available for debit transactions where clients insert their card into the terminal and enter their PIN. If a client taps a contactless card, the cashback option will not appear.
After the merchant enters the amount on the third-party application, the Secure Payment App to app module displays the total sale amount, at which point the merchant hands the terminal to (or turns it towards) the customer. If the sale includes a tip, the terminal displays the Add a tip screen, where the customer selects the tip to add (or not) before inserting the card into the terminal's chip reader.
The customer selects the account to debit the sale amount from (Chequing or Savings).
The customer selects the amount for cashback.
The customer confirms the total amount (sale plus cashback).
The customer enters their PIN and touches the Confirm button.
The terminal displays a processing screen with the payment card brand logo.
After approving (or declining) the payment request, the terminal prints the merchant copy of the transaction receipt and the merchant touches Print receipt to print the customer copy or No receipt if the customer does not want their copy of the transaction receipt.

If you want to offer your customers the ability to withdraw cash in addition to their purchase, you can do so for debit card transactions only. By default, cashback is disabled on the terminal.
From the main screen, touch the Menu button.
Enter the merchant password and touch Confirm.
Scroll to the Configure application section.
Touch Terminal options.
Scroll to the Cashback
When you enable cashback for a debit transaction, the terminal automatically displays three preset values (defaults are $20, $40, and $60) as options to the customer. The customer can touch one of the preset values or manually enter an amount for cashback.
From the main screen, touch the Menu button.
Enter the merchant password and touch Confirm.
Scroll to the Configure application section.
Touch Terminal options.
Scroll to the Cashback
When you enable cashback for debit transactions, the terminal automatically offers preset cashback values to the customer. By default, the preset amounts are set to 20, 40, and 60, but you can easily change one or more of these values as needed.
From the main screen, touch the Menu button.
Enter the merchant password and touch Confirm.
Scroll to the Configure application section.
As a security measure, you can require customers receiving any cashback amount to confirm they received the cash by signing on the merchant copy of the transaction receipt. By default, this feature is disabled.
When you enable this function, the terminal prints a signature line on the transaction receipt where the customer can sign as proof that they received the requested cashback amount.
From the main screen, touch the Menu button.
Enter the merchant password and touch Confirm.
In the Configure application section, touch Printer options.
By default, cashback is disabled on the terminal. If you've enabled cashback, you can easily disable the function if needed.
From the main screen, touch the Menu button.
Enter the merchant password and touch Confirm.
Scroll to the Configure application section.
The Secure Payment application's payment module includes tools for training and user assistance. These include:
Toggle the Cashback processing switch to the right.
If you have more than one terminal, repeat steps 1 to 6 for each additional terminal where you want to enable cashback.
The Amount presets display the current values.
If you have more than one terminal, repeat steps 1 to 6 for each additional terminal where you want to view the terminal's preset cashback amounts.
Scroll to the Cashback section.
Touch Amount presets.
On the Cashback amount presets screen, touch the cashback preset field you want to change (Cashback preset no. 1, Cashback preset no. 2, or Cashback preset no. 3) and replace the current amount with a new value.
Repeat step 7 for any additional cashback amount preset value you want to change.
If you have more than one terminal, repeat steps 1 to 8 for each additional terminal where you want to change a preset cashback amount
To disable the printing of the signature line on the transaction receipt, slide the toggle switch to the left.
If you have more than one terminal, repeat steps 1 to 4 for each additional terminal where you want to set whether or not the terminal prints a signature line for cashback debit transactions.
Scroll to the Cashback section.
Toggle the Cashback processing switch to the left.
If you have more than one terminal, repeat steps 1 to 6 for each additional terminal where you want to disable cashback.


The terminal has a training mode that allows users to process transactions in a simulated environment allowing them to learn and understand the terminal’s various functions. When in training mode, the terminal does not communicate with the server, and it functions even when the terminal has no network connection. The available options for training mode are:
When you enable training mode, the terminal does not process any actual transactions and has no communication with any other device, everything occurs on the terminal.
IMPORTANT! It is possible to lock a card in training mode, as some security features are stored on the card’s chip. Be cautious if you are using an actual payment card even in training mode.
From the main screen, touch the Menu button.
Enter the merchant password and touch Confirm.
Scroll to the Help & training tools section.
Touch Training mode.
Toggle the Enable training mode switch to the right.
If you have more than one terminal, repeat steps 1 to 5 for each additional terminal where you want to enable training mode
When you enable training mode, the terminal is unable to process any transactions. To resume transaction processing, you need to disable training mode.
From the main screen, touch the Menu button.
Enter the merchant password and touch Confirm.
Scroll to the Help & training tools section.
Touch Training mode.
Toggle the Enable training mode switch to the left.
If you have more than one terminal, repeat steps 1 to 5 for each additional terminal where you want to disable training mode.
The Secure Payment application offers 24/7 customer and technical support.
From the main screen, touch the Menu button.
Enter the merchant password and touch Confirm.
Scroll to the Help & training tools section.
Touch Support.
The Support screen displays the available support options.
Should you need to leave the Secure Payment application, there are two methods available:
Using the Android Back button
Using the Exit menu from the Settings page
From the main screen, touch the Android system Back button, found on the bottom left third of the screen.
Enter the merchant password and touch Confirm.
From the main screen, touch the Menu button.
Enter the merchant password and touch Confirm.
Scroll to the Help & training tools section.
Touch Exit.
Touch the Confirm button to exit the application.
The About menu displays information about the terminal and the the installed software version. You may be asked by the PayFacto support team to reference this information, but none of the fields are editable.
From the main screen, touch the Menu button.
Enter the merchant password and touch Confirm.
Scroll to the Help & training tools section.
Touch About.
The About screen displays the following information:
App Version
Version Code
Device Model
Serial Number
The Secure Payment application currently supports two types of gift card transactions: purchases and refunds. When making a purchase with a gift card, the Secure Payment application launches the appropriate gift card application (DataCandy of Freebees) to redeem the amount of the sale from the gift card's balance. When issuing a refund, the Secure Payment application launches the gift card application and increments the amount to be refunded onto the gift card's balance. Please refer to the following topics for how to process the supported gift card transactions:
Any other gift card transaction (activation, empty card, or checkign the balance) must be performed in the appropriate gift card application, according to the gift card application's user guide. For additional information on gift card transactions, please refer to the appropriate brand's documentation:
DataCandy Gift Card User Guide (online version)
DataCandy Gift Card User Guide (PDF version)
Freebees Gift Card User Guide (online version)
Freebees Gift Card User Guide (PDF version)
When processing a transaction (sale or refund) using a gift card, the workflow a terminal operator will use depends on the Secure Payment module they are using.
If you are using Secure Payment's Gateway module, the gift card is recognized as soon as the operator swipes the card and the appropriate gift card application is launched (DataCandy or Freebees).
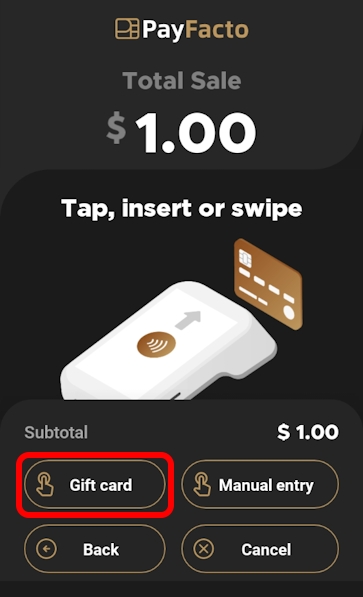
If you are using any other Secure Payment module (App to App, SecurePay, SecureTable, or Standalone Payment), the operator (or customer) must indicate that the card being used is a gift card by tapping the Gift card button.
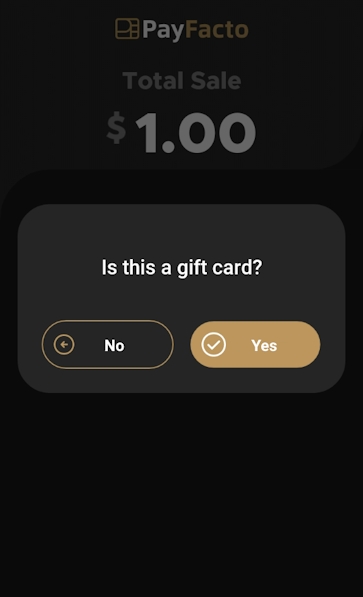
If the terminal operator or customer do not tap the Gift card button before swiping the card, the terminal displays a screen asking if a gift card is being used.
When you tap the Gift card button or answer Yes to the gift card question, the Secure Payment application launches the appropriate gift card application (DataCandy or Freebees) to process the sale or refund. When the gift card transaction is complete, the terminal returns to the Secure Payment application.
A sales transaction paid for with a gift card is very similar to a regular sale paid for with a credit or debit card. The only difference is that you need to confirm that the card being used to pay is a gift card. The following procedure describes how to process a sale using a gift card.
Begin your sale as you would normally, based on the Secure Payment module you are using:
App to app: enter the sale amount on the 3rd party terminal application.
Gateway: enter the sale amount on the POS to initiate the Secure Payment application on the terminal.
SecurePay: enter the sale on the POS to initiate the payment on the terminal.
SecureTable: enter the sale on the POS and then retrieve the bill when you've arrived at the table with the payment terminal.
Standalone payment: enter the sale amount on the terminal and touch OK.
On the Total Sale screen, touch the Gift card button; if the payment process includes a tip, select the tip and then touch the Gift card button on the Total Sale screen.
Sale without tip
Sale with tip
If neither the operator nor customer touch the Gift card button before swiping the card, the terminal will present the following screen:
Tap Yes to continue the transaction using a gift card or No to return to the Total Sale screen to use a credit or debit card.
The Secure Payment application then launches the required gift card processing application (DataCandy or Freebees) to complete the transaction and print the transaction receipt.
When the gift card sale is complete, the terminal leaves the gift card application and returns to the main Secure Payment application screen.
A refund for a transaction originally paid for with a gift card is very similar to a regular credit or debit card refund. The only difference is that you need to confirm that the card being used to pay is a gift card. The following procedure describes how to process a refund using a gift card.
Begin your refund as you would normally, based on the Secure Payment module you are using:
App to app: select the refund transaction and enter the refund amount on the 3rd party terminal application.
Gateway: enter the refund amount on the POS to initiate the Secure Payment application on the terminal.
SecurePay: enter the refund on the POS to initiate the payment on the terminal.
SecureTable: enter the refund on the POS and then retrieve the bill when you've arrived at the table with the payment terminal.
Standalone payment: select the refund transaction from the Operations menu and enter the refund amount on the terminal and touch OK.
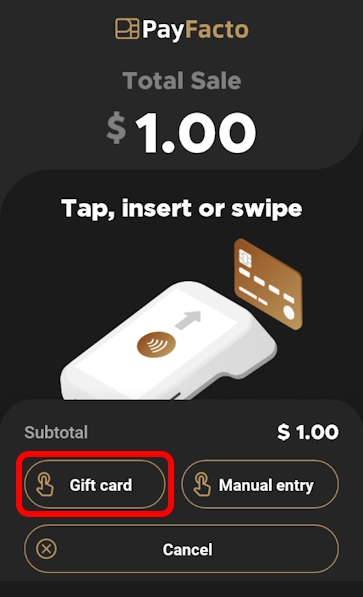
On the Refund screen, touch the Gift card button.
If neither the operator nor customer touch the Gift card button before swiping the card, the terminal will present the following screen:
Tap Yes to continue the refund transaction.
The Secure Payment application then launches the required gift card processing application (DataCandy or Freebees) to refund (increment) the sale amount to the gift card balance and print the transaction receipt.
When the gift card refund is complete, the terminal leaves the gift card application and returns to the main Secure Payment application screen.


You can configure your terminal to add a tip to the total sale. You can also configure cashback options for debit transactions (if supported).
You can configure your terminal to add a tip to the total sale. You can also configure cashback options for debit transactions (if supported). The topics covered in this section include:
If your business includes the option to tip, you can enable tipping on the terminal, where the customer can add a tip value in addition to the sale. By default, tipping is disabled on the terminal.
NOTE: When you enable tipping on the terminal, customers can always enter a manual tip amount in dollars and cents, regardless of any preset percentage values.
From the main screen, touch the Menu button.
Enter the merchant password and touch Confirm.
Scroll to the Configure application section.
Touch Terminal options.
Scroll to the Tips
When you enable tipping, the terminal automatically displays three preset percentages (default values are 15%, 18%, and 20%) as options to the customer. The customer can touch one of the preset values or manually enter an amount for the tip.
NOTE: If you want to allow your customers to enter a custom tip percentage, you must enable the manual tip percentage using the procedure.
From the main screen, touch the Menu button.
Enter the merchant password and touch Confirm.
Scroll to the Configure application section.
Touch Terminal options.
Scroll to the Tips section.
When you enable tip processing, the terminal automatically offers preset percentage values to the customer. You can also offer the opportunity for customers to enter their own percentage value. By default, the manual tip percentage option is enabled on the terminal and applies automatically whenever you activate the tip processing option.
From the main screen, touch the Menu button.
Enter the merchant password and touch Confirm.
Scroll to the Configure application section.
Touch Terminal options.
Scroll to the Tips section.
When you enable tip processing, the terminal automatically offers preset percentage values to the customer. By default, the preset percentage values are set to 15, 18, and 20, but you can easily change one or more of these values as needed.
From the main screen, touch the Menu button.
Enter the merchant password and touch Confirm.
Scroll to the Configure application section.
Touch Terminal options.
Scroll to the Tips
When you enable tip processing, the terminal automatically offers preset percentage values to the customer. By default, the preset percentages use the Normal text size to display the values, but you can choose to use Large or Very Large text to suit your requirements.
From the main screen, touch the Menu button.
Enter the merchant password and touch Confirm.
Scroll to the Configure application section.
Touch Terminal options.
Scroll to the Tips
There can be situations where your customers may accidentally enter a manual tip percentage incorrectly and leave a larger tip than planned. By default, the terminal enables a tipping threshold that requires the Merchant password for any tip over 50% of the initial sale amount (for example, a $55 tip on a $100 bill). You can disable or adjust the threshold value if needed.
From the main screen, touch the Menu button.
Enter the merchant password and touch Confirm.
Scroll to the Configure application section.
Touch Terminal options.
Scroll to the Tips
When you enable the tipping threshold, you can set a custom percentage as the value where the Merchant password is required. By default, the terminal set the threshold value at 50%, but you can adjust it if needed.
From the main screen, touch the Menu button.
Enter the merchant password and touch Confirm.
Scroll to the Configure application section.
Touch Terminal options.
Scroll to the Tips section.
By default, the manual tip percentage option is enabled on the terminal and applies automatically whenever you activate the tip processing option; you can easily disable the function if needed.
From the main screen, touch the Menu button.
Enter the merchant password and touch Confirm.
Scroll to the Configure application section.
Touch Terminal options.
Scroll to the Tips
By default, tipping is disabled on the terminal. If you've enabled tip processing, you can easily disable the function if needed.
From the main screen, touch the Menu button.
Enter the merchant password and touch Confirm.
Scroll to the Configure application section.
Touch Terminal options.
Scroll to the Tips
Toggle the Tip processing switch to the right.
If you have more than one terminal, repeat steps 1 to 6 for each additional terminal where you want to enable tipping.
The Percentage presets display the current values.
If you have more than one terminal, repeat steps 1 to 6 for each additional terminal where you want to view the terminal's preset tip percentages.
If it isn't already enabled, toggle the Manual percentage input switch to the right.
If you have more than one terminal, repeat steps 1 to 6 for each additional terminal where you want enable a manual tip percentage.
Touch Percentage presets.
On the Tip percentage presets screen, touch the tip preset field you want to change (Tip preset no. 1, Tip preset no. 2, or Tip preset no. 3) and replace the current percentage with a new value.
Repeat step 7 for any additional percentage preset values you want to change.
If you have more than one terminal, repeat steps 1 to 8 for each additional terminal where you want to change the preset tip percentage values.
Touch Tip presets text size.
On the Tip presets text size screen, touch the text size you want to use (Normal, Large, or Very Large).
If you have more than one terminal, repeat steps 1 to 7 for each additional terminal where you want to set preset tip percentage text size.
Touch Tip threshold.
On the Tip threshold screen, toggle the Tip threshold switch to the right.
If you have more than one terminal, repeat steps 1 to 7 for each additional terminal where you want to enable the tipping threshold.
Touch Tip threshold.
On the Tip threshold screen, change the percentage value in the Threshold field.
If you have more than one terminal, repeat steps 1 to 7 for each additional terminal where you want to set the terminal's tipping threshold.
Toggle the Manual percentage input switch to the left.
If you have more than one terminal, repeat steps 1 to 6 for each additional terminal where you want to disable manual tip percentage.
Toggle the Tip processing switch to the left.
If you have more than one terminal, repeat steps 1 to 6 for each additional terminal where you want to disable tipping.
Normal
Large
Very Large
Normal
Large
Very Large


If your terminal has a built-in printer, or connects to an external printer, there are several printing options you can configure that determine when a transaction receipt gets printed, as well as the receipt's appearance.
If your terminal is equipped with a printer, you can adjust the printer settings to suit your business needs.
The available printing options are:
If your terminal is equipped with (or connects to) a printer, you can print transaction receipts after the transaction is confirmed. By default, the Secure Payment application's payment module enables the printing on transaction receipts, but you can adjust the setting if needed.
From the main screen, touch the Menu button.
Enter the merchant password and touch Confirm.
In the Configure application section, touch Printer options.
In the Copies section, slide the Receipt Copy Printouts toggle switch to the right if it isn't already enabled.
When you enable the printing of transaction receipts, the customer receipt is always available to print, but you can choose whether to print the merchant copy or not. Printing the merchant copy for each transaction allows you to reconcile your individual transactions with the batch processing and the transaction reports.
From the main screen, touch the Menu button.
Enter the merchant password and touch Confirm.
In the Configure application section, touch Printer options.
In the Copies section, slide the Merchant Copy Printouts toggle switch to the right if it isn't already enabled.
The payment terminals use thermal paper to print the transaction receipts. You can adjust the level of contrast for the transaction receipts if they are difficult to read. If you have a mobile or portable payment terminal, the contrast level can affect battery usage.
The following table shows examples of each printout contrast level:
From the main screen, touch the Menu button.
Enter the merchant password and touch Confirm.
In the Configure application section, touch Printer options.
In the Copies section, touch Printout color depth.
In addition to printing receipts for sales transactions, you can print receipts for some non-sales transactions, including:
Declined credit transactions
Void transactions
Completed transactions
Force post transactions
IMPORTANT! If you disable printing for any of these operations, the customer will have no physical evidence of these transactions.
In addition to the transactions listed above, you can enable or disable the following printer settings:
Bar code: Prints a barcode on the transaction receipt that identifies the individual transaction; helpful when using a terminal equipped with a scanner when performing refund or void transactions
Total line on pre-authorization receipts: Adds a total line to the transaction receipt that prints when a pre-authorization is confirmed (usually paired with the tip line)
Tip line on pre-authorization receipts: Adds a tip line to the transaction receipt that prints when a pre-authorization is confirmed
From the main screen, touch the Menu button.
Enter the merchant password and touch Confirm.
In the Configure application section, touch Printer options.
In the Printing receipts section, enable each desired function by sliding the toggle switch to the right or disable functions by sliding the toggle switch to the left.
If a transaction receipt is lost or damaged, you can print a duplicate copy of the receipt.
From the main screen, touch the Menu button.
Enter the merchant password and touch Confirm.
In the Transaction management section, touch Transaction History.
Scroll to or search for the desired transaction to reprint.
Touch the desired transaction to display the details.
Touch Reprint.
In the Reprint screen, touch the button for the transaction receipt you want to reprint:
Merchant copy
Customer copy
Both copies
The terminal prints the selected duplicate copy(ies) of the transaction receipt.
You can add a personalized message at the bottom of every printed transaction receipt. Your message can include business hours, social media coordinates, and more. Your message can contain up to 4 lines with 48 characters (including spaces) per line.
TIP: You should prepare your message on a piece of paper in advance, to ensure that you have the correct number of characters per line.
From the main screen, touch the Menu button.
Enter the merchant password and touch Confirm.
In the Configure application section, touch Printer options.
Scroll to the bottom of the screen to find the Footer section and touch Print footer.
When you enable printing a personalized message on your transaction receipt footers, you need to configure the message by entering it on one of the four (4) available lines on the receipt footer.
TIP: When preparing your message, consider any languages your customers might speak and configure your personalized message to meet all possible languages. Don't forget to check your message for spelling mistakes!
From the main screen, touch the Menu button.
Enter the merchant password and touch Confirm.
In the Configure application section, touch Printer options.
Scroll to the bottom of the screen to find the Footer section and touch Print footer.
When using a personalized message on your transaction receipt footers, you may want to change or delete some of the message. You can easily adjust the footer text whenever you need.
From the main screen, touch the Menu button.
Enter the merchant password and touch Confirm.
In the Configure application section, touch Printer options.
Scroll to the bottom of the screen to find the Footer section and touch Print footer. The Footer option screen appears.
TIP: You can also remove the message from the receipt footers using the procedure; it prevents the message from printing on the receipt, but remains available for later use if desired.
If you have more than one terminal, repeat steps 1 to 6 for each additional terminal where you want to change the personalized message at the bottom of the transaction receipts.
If you enabled a personalized message at the bottom of every printed transaction receipt, but you no longer want to use any message on the footer, you can easily disable footer message printing.
From the main screen, touch the Menu button.
Enter the merchant password and touch Confirm.
In the Configure application section, touch Printer options.
Scroll to the bottom of the screen to find the Footer section and touch Print footer.
If you previously enabled the printing of merchant transaction receipts and you no longer want or need them, you can quickly disable the function.
From the main screen, touch the Menu button.
Enter the merchant password and touch Confirm.
In the Configure application section, touch Printer options.
In the Copies section, slide the Merchant Copy Printouts toggle switch to the left.
By default, the Secure Payment application's payment module enables the printing on transaction receipts, but you can disable the function if needed.
From the main screen, touch the Menu button.
Enter the merchant password and touch Confirm.
In the Configure application section, touch Printer options.
In the Copies section, slide the Receipt Copy Printouts toggle switch to the left.
The Secure Payment application's payment module allows you to assign passwords to protect the terminal from unauthorized use. All terminal passwords are 6 numeric (numbers only) characters in length to provide security without slowing down the overall time it takes to process a transaction.
The terminal has 3 types of user passwords:
Administrator (Admin): Configured during initial terminal activation
Merchant: Configured during initial terminal activation
Operator: Configured when creating one or more terminal operators
For more information on specific password procedures, click any of the following links:
The terminal uses passwords for different user levels. The user levels follow a hierarchy, and a “higher” level password can enable a function (or override a password) for a “lower” level user.
For example, an operator can use the Merchant password to enable a password-protected sale, while an Administrator password can unlock functions that require a Merchant password.
When setting passwords on your payment terminal, you must respect the following parameters:
Passwords must be 6 characters long
The Administrator and Merchant passwords cannot be the same (can’t match)
You cannot use the same digit 6 times consecutively (for example: 111111 or 777777)
You cannot use 6 consecutive numbers, either ascending or descending (for example: 123456 or 987654)
If you enter a password incorrectly, the terminal displays an Access refused error message.
Touch the error message to return to the Password field and re-enter the required password.
If you are unable to remember the required password, you can use the Merchant or Administrator password, depending on which password you can't remember. Refer to or for more information on which passwords can "override" others.
If a user forgets a password, the password reset procedure depends on the terminal user profile. The following table explains who can reset which password and which procedure to use:
As part of your original terminal activation, you set an Administrator password. The Administrator password provides access to advanced terminal functions and can also enable password-protected operations. You can change the Administrator password whenever you feel it necessary.
From the main screen, touch the Menu button.
Enter the merchant password and touch Confirm.
Scroll to the Configure application section.
Touch Passwords.
Scroll to the Set passwords
If you have more than one terminal, repeat steps 1 to 10 for each additional terminal where you want to change the Admin password.
As part of your original terminal activation, you set a Merchant password. The Merchant password protects against unauthorized users performing certain operations. You can change the Merchant password whenever you feel it necessary.
From the main screen, touch the Menu button.
Enter the merchant password and touch Confirm.
Scroll to the Configure application section.
Touch Passwords.
Scroll to the Set passwords
If you have more than one terminal, repeat steps 1 to 10 for each additional terminal where you want to change the Merchant password.
For added security, you can require the Merchant password for certain functions or transactions before the operation can proceed. By default, this security measure is enabled for the following functions and transactions:
(refund and void)
(cash, force post, swipe)
By default, all of the operations listed above have password protection enabled. Reimbursement transactions are always password protected, but you can select if the transaction requires the Admin or Merchant password.
You can disable the password protection on certain sales transactions and exiting the Secure Payment application if desired, but that leaves the terminal vulnerable to unauthorized use where any person could perform those functions.
As a security measure, the Secure Payment application requires a password before processing reimbursement transactions. You can choose which password to require (Admin or Merchant) or you can disable passwords for reimbursements, depending on your preference. By default, refunds require the Admin password and voids require the Merchant password.
IMPORTANT! If you disable passwords for reimbursement transactions, anyone can process a refund or a void without supervisory or management knowledge or approval. To prevent possible fraudulent reimbursements, you should maintain password protection as part of the reimbursement process.
From the main screen, touch the Menu button.
Enter the merchant password and touch Confirm.
Scroll to the Configure application section.
Touch Passwords.
Scroll to the Require password for transactions
Select the desired password by touching Merchant or Admin or touch No password to disable password protection for refunds.
Touch the Back icon to return to the Passwords screen.
Touch Void transactions; the Password on voids screen appears.
Select the desired password by touching Merchant or Admin or touch No password to disable password protection for voids.
If you have more than one terminal, repeat steps 1 to 10 for each additional terminal where you want to set the required passwords for reimbursement transactions.
By default, less commonly used sales transactions (cash sale, force post, and swiping the payment card) require the Merchant password before they can be processed. You can choose whether or not to require the Merchant password, depending on your preference.
From the main screen, touch the Menu button.
Enter the merchant password and touch Confirm.
Scroll to the Configure application section.
Touch Passwords.
Scroll to the Require password for transactions
By default, the Secure Payment application's payment module requires the Merchant password before you can exit. You can choose whether or not to require the Merchant password, depending on your preference.
From the main screen, touch the Menu button.
Enter the merchant password and touch Confirm.
Scroll to the Configure application section.
Touch Terminal options.
Scroll to the General
Disable the use of the Merchant password before closing the payment module by toggling the Ask password on exit switch to the left.
If you have more than one terminal, repeat steps 1 to 7 for each additional terminal where you want to set whether or not to use the Merchant password before exiting the application.

Touch Administrators.
Enter the current Admin password in the Password field and touch Confirm.
Enter a new 6-digit numeric Admin password in the Password field. Keep in mind the password requirements when setting the new Admin password.
Re-enter the new password in the Confirm new password field.
Touch the Confirm button; the new Admin password is saved and the Passwords screen appears. If the passwords do not match, a message appears and the password is not changed. Re-enter the password; if needed, touch the Show password icon to ensure the passwords match.
Touch Merchant.
Enter the Admin password in the Password field and touch Confirm. Requiring the Admin password prevents unauthorized changes to the Merchant password.
Enter a new 6-digit numeric Merchant password in the Password field. Keep in mind the password requirements when setting the new Merchant password.
Re-enter the new password in the Confirm new password field.
Touch the Confirm button; the new Merchant password is saved and the Passwords screen appears. If the passwords do not match, a message appears and the password is not changed. Re-enter the password; if needed, touch the Show password icon to ensure the passwords match.
Touch Refund transactions; the Password on refunds screen appears.
Enable the use of the Merchant password by toggling the following switches to the right:
Force post
Cash
Swipe
Disable the use of the Merchant password by toggling the previously listed switches to the left.
If you have more than one terminal, repeat steps 1 to 7 for each additional terminal where you want to set password usage for sales transactions.
Enable the use of the Merchant password before closing the payment module by toggling the Ask password on exit switch to the right.
User Level
Description
Administrator
Configured when you activated your terminal, the Administrator password can protect the terminal against unauthorized reimbursements in the Secure Payment application's payment module. You can use the Administrator password for any function that requires a Merchant or Operator password.
Merchant
Configured when you activated your terminal, the Merchant password protects the terminal from completing certain sales and reimbursement functions without authorization. You can use the Merchant password to complete a transaction when Operator identification requires a password to process a sale.
Operator
Assigned when creating one or more terminal operators. Can be enabled to protect unauthorized sales when paired with the associated operator ID.
Terminal user
Who can reset
What to do
Administrator
PayFacto Support
The Administrator password can only be reset with a Superuser password, which requires the assistance of Technical Support.
Refer to the Obtaining Support procedure.
Merchant
Administrator
A Merchant password can be reset using the Admin password.
Refer to the Change Merchant Password procedure.
Operator
Administrator or Merchant
Operator passwords can be reset using the Admin or Merchant password.
Refer to the procedure.


If you have more than one terminal, repeat steps 1 to 5 for each additional terminal where you want to set the printout contrast level.
Cashback print Signature line: Adds a signature line for cashback transactions for customers to sign as proof that they received the requested cashback amount
Reverse on declined: Prints the transaction result in white on a dark background for declined transaction
Disabled
If you have more than one terminal, repeat steps 1 to 4 for each additional terminal where you want to set which transactions will print a transaction receipt.
If you have more than one terminal, repeat steps 1 to 5 for each additional terminal where you want to enable a personalized message on the bottom of the transaction receipts.
Repeat step 5 for each additional line you want to use for your personalized message, using the Footer no. 2, Footer no. 3, and Footer no. 4 fields.
If you have more than one terminal, repeat steps 1 to 6 for each additional terminal where you want to configure the personalized message at the bottom of the transaction receipts.
If you want to delete your personalized message, delete the text in the Footer no. 1, Footer no. 2, Footer no. 3, and Footer no. 4 fields, as shown in the following example:
If you have more than one terminal, repeat steps 1 to 5 for each additional terminal where you want to disable personalized messages at the bottom of the transaction receipts.
Pale
Normal
Dark
Lightest printout (lowest contrast), prints faster and uses less battery
Default printout setting, average printing speed and battery use
Darkest printing (highest contrast), prints slower and uses more battery


Enabled


