The terminal requires a network connection to communicate with the payment processor server to process transactions.
The PAX A80 is a countertop payment terminal that can connect to wired (Ethernet) and wireless (Wi-Fi) networks.
On the terminal’s main screen, touch the Settings icon.
On the Settings screen, touch the Please Input Password field and use the keypad to type the password: either 9876 or pax9876@@.
Touch the checkmark icon on the keypad when you are done and touch OK.
Scroll to the Personal section and touch Language & input.
Touch Language.
Scroll to and touch the desired language.
Touch the Back icon twice to return to the main screen.
Installing the Printer Paper
Connect the Terminal Cables
Configuring the Terminal Display Language
Configuring the Terminal Network Connections
Configuring the Terminal Wi-Fi Connection
Configuring the Terminal Wi-Fi Connection
This section explains how to enable Ethernet and connect to your network.
Ensure your network cable is connected in the appropriate connector located on the back of the terminal and make sure the other end of the network cable is connected to a network jack or hub.
On the terminal’s main screen, touch the Settings icon.
On the Settings screen, touch the Please Input Password field and use the keypad to type the password: either 9876 or pax9876@@.
IMPORTANT! Changing the network connection parameters incorrectly will prevent the terminal from communicating with the payment processing server.
Touch the Back icon twice to return to the main screen.
In the Wireless & networks section, touch Ethernet.
If Ethernet is Off, touch the toggle to turn it on.
After you toggle Ethernet to On (or if Ethernet is already on), the connected network settings appear.
If necessary, you can change the network connection parameters manually by scrolling to the bottom and touching Ethernet Configuration to select and configure the Connection Type.
If the supplied roll of printer paper was not already installed in the terminal when you received it, you will need to install it before you can print any transaction receipts.
TIP: This procedure also applies to replacing a roll of printer paper.
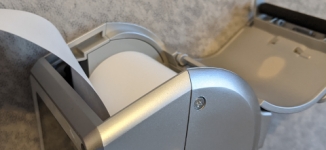
On the back of the terminal at the top, lift the lever with the contactless logo to unlock and open the printer cover.
Place the roll of printer paper in the paper tray, leaving about 2 inches (5 cm) of paper beyond the printer's cutter as shown in the following example:
IMPORTANT! Make sure the paper unrolls from the back of the roll, otherwise the printer will be unable to print the transaction receipt.
Close the printer cover until it snaps into place and remove any excess paper.
This section explains how to turn Wi-Fi on and connect to your network.
On the terminal’s main screen, touch the Settings icon.
On the Settings screen, touch the Please Input Password field and use the keypad to type the password: either 9876 or pax9876@@.
Touch the checkmark icon on the keypad when you are done and touch OK.
TIP: You can touch Show password before typing to ensure you are entering the password correctly.
After the terminal displays Connected for the selected network, touch the Back icon to return to the Settings screen.
Touch the Back icon again to return to the main screen.
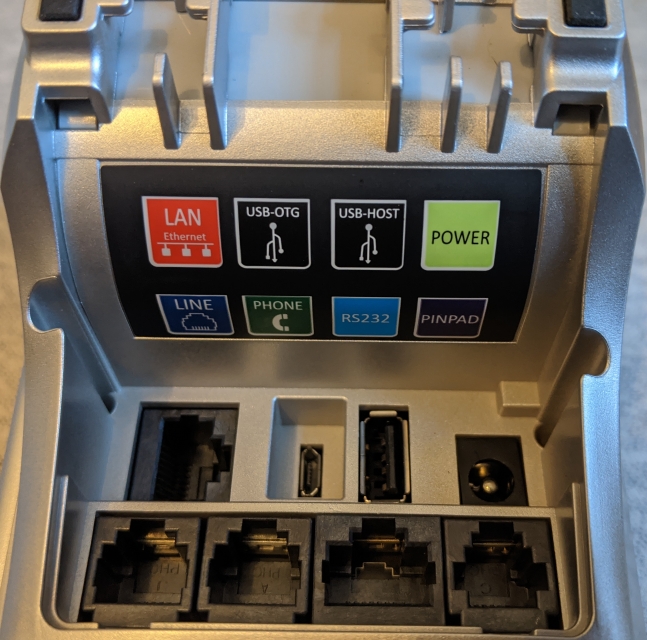
There are multiple connection ports on the back of the terminal. Countertop terminals generally require AC power and Ethernet connections.
Your configuration may also include a connection to a POS system or an additional PIN pad.
Use the diagram on the back of the terminal to determine where to connect the cables that apply to your configuration. The terminal’s connection ports are shown below:
If Wi-Fi is Off, touch the toggle to turn it on. If Wi-Fi is already on, a list of available networks appears.
From the list of available networks, touch the name of the network you want to connect to.
Enter the password for the selected network and touch CONNECT.