
Loading...
Loading...
Loading...
Loading...
Loading...
Loading...
Loading...
Loading...
Loading...
Loading...
Loading...
Loading...
Loading...
This article explains how to setup departments to trigger tip prompting on payment terminals.
Login to the Veloce Back-Office with a Super-User password.
Start the Point of Sale Control module.
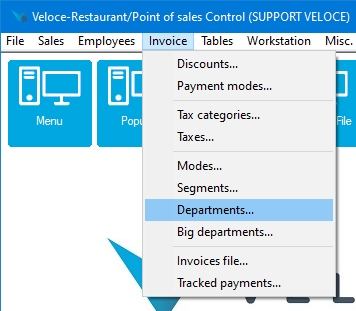
Click on the Invoice menu and select the Departments... option.
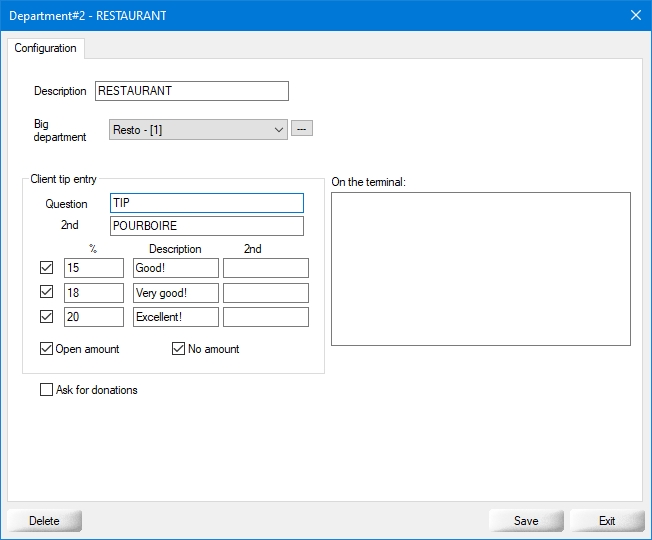
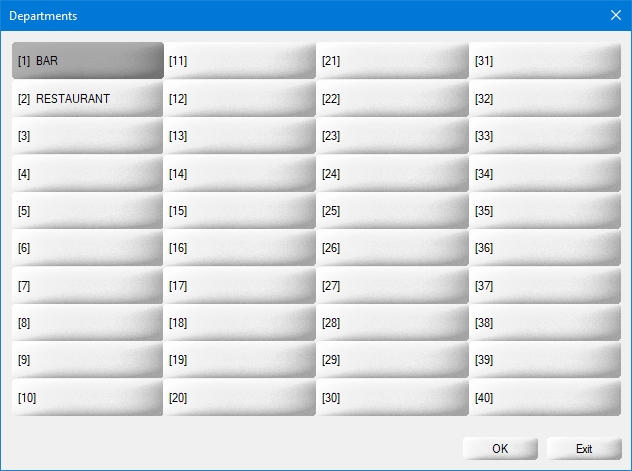
The list of departments will appear. Select the departments that will be used by the workstation and payment terminal.
The text entered here will be displayed at the very top of the payment terminal's screen during the tipping process.
If you have a second language profile, type the translation of the Question text.
The 3 lines with checkboxes can be used to display tip percentage suggestion presets to the customer. Activate only the lines you need, or none at all if you do not wish to use tip suggestions.
Type the suggested percentage, from 1 to 99. Note that the percentage will be calculated on the total sale amount, including taxes.
This field is optional. You can type some text that will be displayed next to each percentage on the payment terminal.
If you have a second language profile, type the translation of the Description text.
Enable this option to allow customers to enter a custom tip amount of they do not wish tu use the suggested percentage presets.
Enable this option to allow customers to exit the tipping screen without entering an amount.
...
...
Click the Save button to save changes and return to the department list.
Click Exit on the department list to return to the Point of sale control module.
If the merchant has other departments tied to payment terminals, repeat these steps for other departments.
Related Topics
Departments Setup (POS Control)
The following article explains how to install the Veloce POS application from the PAX Store.
Normally, PayFacto PAX payment terminals are shipped with all the required applications pre-installed. Also, PayFacto support staff have the ability to push all the necessary applications to any terminal remotely. If the Veloce POS application seems to be missing from a terminal, it is recommended that you contact PayFacto technical support to obtain missing applications.
Nevertheless, all of these applications can be installed from the PAXSTORE and configured manually from the terminal, should the need arise.
On the PayFacto PAX terminal, exit any running application so you can see the Android desktop.
Start the PAXSTORE.
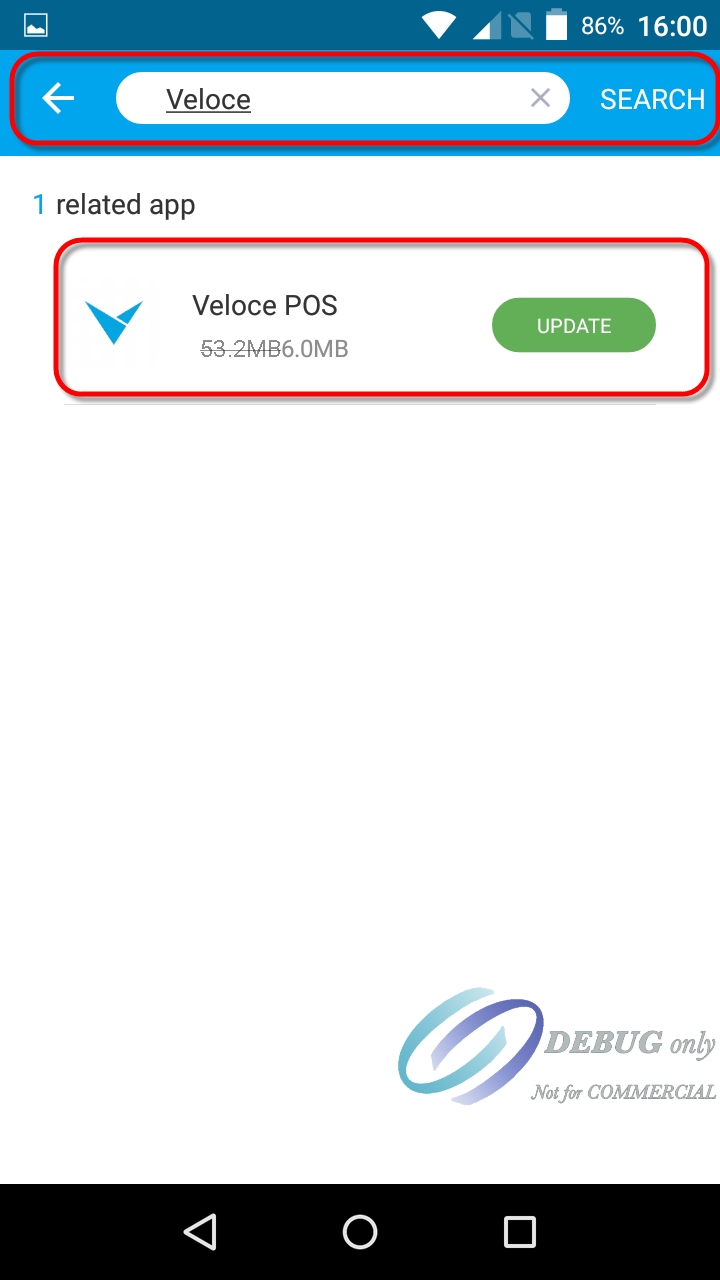
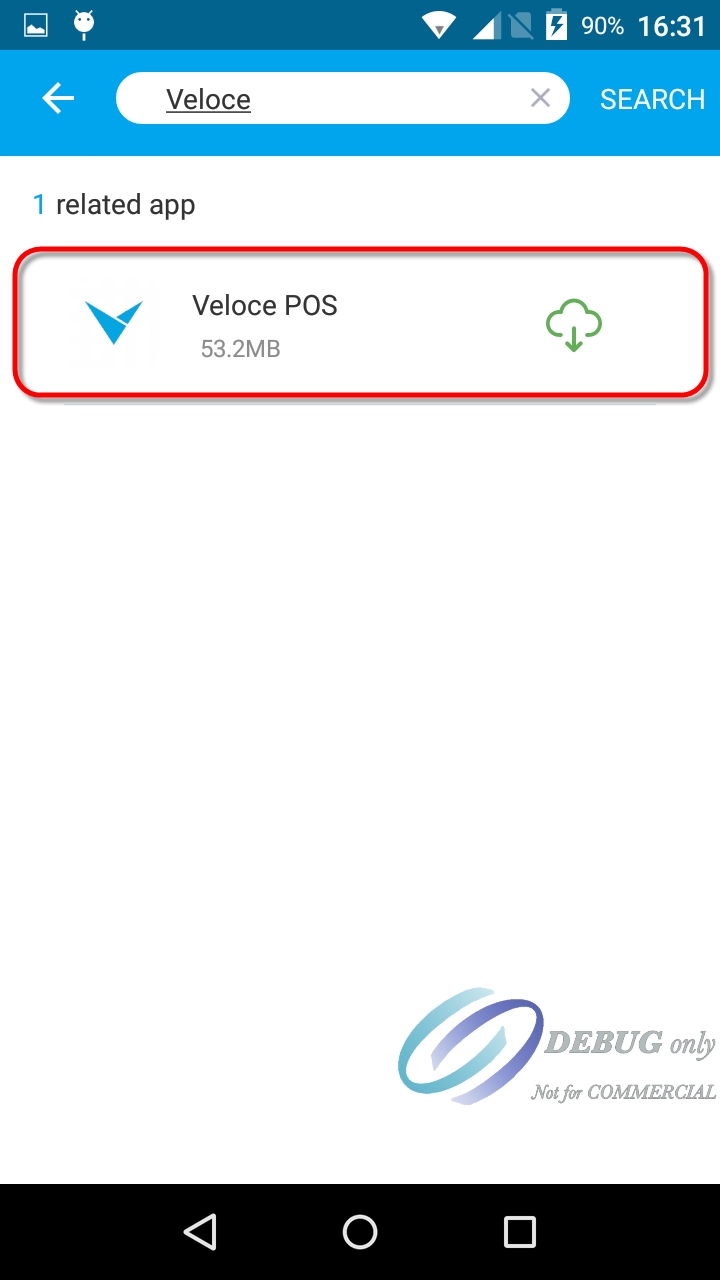
Search for Veloce.
Select the Veloce POS application and touch the Download icon. If the application is already installed,you will see an UPDATE button instead.
Once the installation is complete, the Veloce icon will appear on the Android Desktop.
Once the Veloce POS application is installed on the terminal, you may proceed to start it up and configure it.
Related Topics
Veloce POS Application - Installation
This article describes how to configure the Veloce Electronic Funds Transfer (EFT) module to work with PayFacto payment solutions.
Login to the Veloce Back-Office.
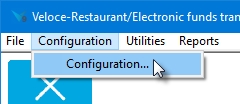
Start the Electronic Funds Transfer module.
Click on the Configuration menu and select the Configuration... option.
The EFT configuration screen appears on the Configuration tab.
Based on your location, select either PayFacto Canada, PayFacto USA or PayFacto WorldPay.
If you are using any PAX terminal, select PAX generic.
Ignore this setting. In legacy installs, this is used to determine the communication speed of serial payment terminals. This does not apply to Ethernet or Wi-Fi (Wireless) payment terminals.
Set this value to 200
Don't select anything if you want to use the Veloce POS app with the PayFacto Payment Application. (This is the recommended option.)
Select Gateway to use the Veloce POS app along with the PayFacto Gateway app.
IMPORTANT! This should only be selected on legacy terminals using the PayFacto Gateway app. Please contact PayFacto technical support to inquire about upgrading to newer terminals with support for the PayFacto Payment app.
Select SecurePAY to use the SecureTable or SecurePAY android application instead of the Gateway app.
Click on the Operation tab.
Enable this option to allow customers to leave tip using the payment terminal.
Configure the options in this section according to the merchant's needs and preferences. The options in the screenshot above represent a common configuration.
Click the Save button to save your changes and close the EFT configuration window. You may now close the EFT module as well.
This concludes the required setup for the EFT module. Please proceed to the configuration of your workstation(s) in the POS Control module.
Related Topics

The instructions below explains how to configure workstation settings from the Point of Sale Control module, in order to use a PAX terminal as a POS workstation as well as a payment terminal.
Login to the Veloce Back-Office with a Super-User password.
Start the Point of Sale Control module.
Click on the Workstation menu and select the Workstation's Setup... option.
The list of available workstations will appear. Select the workstation number you wish to configure as a payment terminal.
The workstation's configuration opens on the Configuration tab:
Type a meaningful name for the workstation being configured.
From the drop-down list, select the department in which this workstation will be used.
Configure the remaining options according to the merchant's needs and preferences.
Click on the Invoice tab:
Enable this option to use Veloce's tip entry mechanics, which allows the customer to manipulate the payment terminal to decide tip entry. Disable this option for retail/no tip environments.
Configure the remaining options according to the merchant's needs and preferences.
Click on the Printers tab:
Enable this option to configure the built-in printer on PAX payment terminals and allow it to print transaction records and other documents.
From the drop-down list, select the appropriate physical printer. (This is configured in Setup / Utilities > Configuration > Printers...)
From the drop-down list, select Modern app.
Configure the remaining options according to the merchant's needs and preferences.
IMPORTANT! Merchants in the bar and restaurant industry in the province of Québec need to route guest checks, invoices and receipts through the Québec Sales Recording Module (SRM). For these merchants, the PAX terminal's built-in printer can only be used for EFT transaction records and other non-prescribed documents.
Click on the Interfaces tab:
Enable this option to allow the Veloce POS app to call up the payment app on the PAX terminal.
From the drop-down list, select Modern app.
Click on the Material tab:
From the drop-down list, select Modern app workstation.
From the drop-down list, select the desired font.
Enable this option to limit the use of this payment terminal to Pay-at-the-door (delivery) operations.
Enable this option to limit the use of this payment terminal to Pay-at-the-Table operations.
Click the Save button to save you changes and close the configuration screen. This will take you back to the workstation's list, where you can see the updated workstation's name.
Click Exit to close this screen and return to the POS Control module.
Repeat these steps for any additional payment terminal you may have.
Related Topics
Departments Setup (POS Control)
In the Veloce Setup / Utilities module, some Modern workstation settings need to be setup:
Login to the Veloce Back-Office
Open the Setup/Utilities module
Click the System Config. link. (or use the Configuration > System Configuration... menu option)
Click on the Misc. tab. The Modern workstation options are located at the bottom of that page.
Activate the checkbox, then type the username you wish to use to connect the workstation running on the payment terminal to the veloce back-office.
Type the password you wish to use along with the username created above.
Activate the checkbox and type the TCP port number to be used for communication between the payment terminal and the Veloce Back-office server. The default is 40000.
Enable this option if Pay-At-The-Door functionalities are used.
Click the Save button to save the new settings and close this window.
This completes the setup required in the System Configuration module. If all the other configuration steps are completed, now would be a good time to stop the Veloce server, create workstation data and restart the Veloce server.
Related Topics
Departments Setup (POS Control)
The following articles in this section will allow you to configure the Veloce back-office and the Veloce application for Android such that card payments will be accepted with electronic funds transfer (EFT).
Android-based payment terminals, such as PAX A920 or A920 Pro, A80, etc.
PayFacto Payment application.
API Key loaded on each wireless payment terminal. (Not required for counter-top terminals)
Wi-Fi coverage for wireless terminals.
available Ethernet jack for tethered counter top terminals.
Internet access for all terminals.
Fixed IP address on the Veloce Back-Office PC. (either through Windows network settings or via DHCP assignment)
Electronic Funds Transfer module on the Veloce license.
Many PAX terminals are equipped with built-in printers. These printers are mostly meant to print transaction records for card payments. However, these printers can also be used to print guest checks directly.
If you wish to use the built-in printers in this way, you will need to configure a physical printer for each terminal, from the Setup/Utilities module in the Veloce Back-Office.
Here is an example of the required parameters for the physical printer of a PAX A920 android payment terminal:
IMPORTANT! In the Canadian province of Québec, guest checks / invoices need to be routed through a Sales Recording Module (SRM). Therefore, printers built into payment terminals cannot be used to print these documents. They can, however, be used to print card transaction records or credit card vouchers.
PayFacto payment terminals are typically shipped to the merchants with the necessary applications pre-installed and pre-configured.
For more information on the PayFacto Payment application, please review the associated online documentation:
If you need further assistance to download, install or configure the PayFacto Payment application, please contact PayFacto technical support.


This topic describes how to configure the Veloce POS application to use a PAX terminal as a workstation.
To start the Veloce POS application, touch its icon on the Android desktop. The app will start, and you will see a welcome screen with the message "Serial number not set".
Touch the cog wheel icon in the upper-right corner of the screen to access the application's settings.
The Veloce Application's settings will be displayed. The settings are divided in various sections, illustrated separately for clarity:
Workstation
Workstation
Select this option to use the payement terminal as a normal POS workstation as well as a payment device.
Client Display
Select this option if you are using a tablet as a customer-facing display or order confirmation screen.
Kitchen Display
Select this option if you are using a tablet as a kitchen display.
Terminal
Select this option to use the terminal as a payment device only.
Enter the workstation number to use for this workstation. This corresponds to the workstation number configured in Point of Sale Control > Workstation > Workstation's Setup.
Enter you Veloce license serial number.
Enable this option only if you are using the cloud-based Back-Office. If your Veloce Back-Office is installed on a PC on your local network, this option needs to be disabled.
Select between the various color schemes that will apply to the workstation.
Enable this option to have the Veloce POS application connect automatically to the Veloce Back-Office when the application is launched. If this option is left disabled, the workstation will not connect automatically to the Veloce Back-Office when the application is launched. Instead, you will need to press a "CONNECT" button to manually connect.
Enter the username to connect to the Veloce Back-Office, as configured in Setup / Utilities > Configuration > System Configuration... > Misc. > Modern Workstation > UserName.
Enter the password to connect to the Veloce Back-Office, as configured in Setup / Utilities > Configuration > System Configuration... > Misc. > Modern Workstation > Password.
In this field, type the IP address that the Veloce POS application should use to connect to the Veloce Back-Office. This is required only if your Veloce Back-Office PC has more than one Ethernet adapter or uses multiple virtual adapters, resulting in the same PC having multiple IP addresses.
Enable/Disable this option to turn the barcode scanner on or off.
Enable/Disable this option to turn the built-in printer on or off.
Enable this option to have the application stop printing and notify the user when a check/receipt needs to be torn from the built-in printer. If this option is disabled, the printer will briefly pause between each printout but will automatically resume printing without notifying the user.
Enable this option to use the terminal as a payment device.
Enable/Disable this option to turn the magnetic card reader on or off. This only affects non-payment cards, like employee cards. Even of this option is disabled, the magnetic card reader will still be usable as a fall-back reader for payments cards (debit and credit).
Enable/Disable this option to turn the Mifare reader (contactless reader) on or off. This only affects non-payment cards, like employee cards. Even of this option is disabled, contactless payment will still be available.
Enable or disable up to two scheduled automatic reboots. The reboot time can be set to 15 minutes increments.
Enable this option to automatically start the Veloce POS app when the terminal powers on.
Related Topics
Veloce POS Application - Installation
This article explains how to make sure that any configuration change that was made is applied correctly and immediately to your Veloce system.
This procedure should be carried out whenever major configuration changes were made, or when changing any system-wide settings, such as those found in the Setup / Utilities module.
This procedure involves 3 simple steps:
Stop the Veloce Back-office server.
Create workstation data
Restart the Veloce Back-office server.
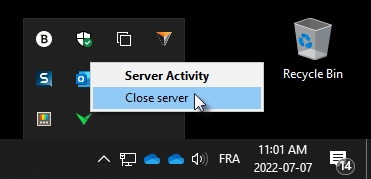
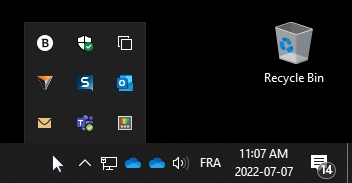
From the Windows desktop, click the up-arrow in the Windows notification area (Near the clock). Locate the green Veloce server icon.
Right-click the green Veloce server icon, then left-click on the Close server option.
The Veloce server will stop and the icon will disappear from the notification area.
The Veloce server is now stopped.
Login to the Veloce Back-Office
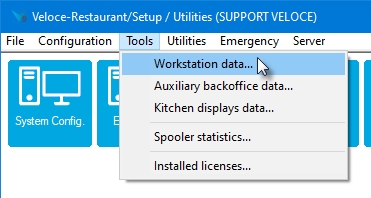
Open the Setup / Utilities module
Click the Tools menu and select the Workstation data... option.
The Create workstation data window appears.
Select the Every workstation radio button.
Activate the Create if not existing checkbox.
Click OK.
Some progress bars will be displayed. Depending on your system's performance, this may flash by so quickly that you may not see it.
Once the progress bars have disappeared, proceed to the next step.
Login to the Veloce Back-Office
Open the Setup / Utilities module
Click the Server menu and select the Start/Stop the server... option.
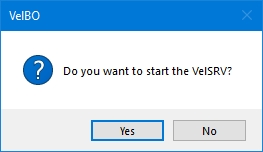
A VelBO prompt will be displayed. Click Yes to start the Veloce server.
The Veloce icon will appear in the Windows notification area. The icon may flash between red and green for a few seconds, but will eventually settle on green.
The Veloce server is now up-and-running.
This completes the procedure. From this point, all the system-wide changes have been applied, and all changes to workstation configurations have also been applied.
Related Topics


When the Veloce POS application is started, a startup splash screen is displayed while the application is loading. Then, the home screen displays connection information:
When you touch the CONNECT button, the connection information and the button will disappear. Then, the POS screen will be displayed:
The Veloce POS application is now ready to be used. Use it just like a regular POS workstation to order items, print checks and process payments.
Related Topics
Veloce POS Application - Installation


