Loading...
Loading...
Loading...
Loading...
Loading...
Loading...
Loading...
Loading...
Loading...
Loading...
Loading...
Loading...
Loading...
Loading...
Loading...
Loading...
Loading...
Loading...
Loading...
Loading...
Loading...
Loading...
Loading...
Loading...
Loading...
Loading...
Loading...
Loading...
Loading...
Loading...
Loading...
Loading...
Loading...
Loading...
Loading...
Loading...
Loading...
Loading...
Loading...
Loading...
Loading...
Loading...
Loading...
Loading...
Loading...
Loading...
Loading...
Loading...
Loading...
Loading...
Loading...
Loading...
Loading...
Loading...
Loading...
Loading...
Loading...
Loading...
Loading...
Loading...
Loading...
Loading...
Loading...
Loading...
Loading...
Loading...
Loading...
Loading...
Loading...
Loading...
Loading...
Loading...
Loading...
Loading...
Loading...
Loading...
Loading...
Loading...
Loading...
Loading...
Loading...
Loading...
Loading...
Loading...
Loading...
Loading...
Loading...
Loading...
Loading...
Loading...
Loading...
Loading...
Loading...
Loading...
Loading...
Loading...
Loading...
Loading...
Loading...
Loading...
This document explains how to install the charging base for the PAX A920 or A920 Pro terminal and included silicone sleeve. The charging base makes it easy to recharge the terminal without having to remove the silicone sleeve to ensure that the USB power connector is properly seated in the terminal’s charging port.
NOTE: The terminal must be fitted with the PayFacto-branded silicone sleeve for the best results. The PayFacto silicone sleeve displays the PayFacto logo on the back. You should not use the charging base for any terminal not protected by the silicone sleeve.
This document will introduce you to your payment terminal as well as guide you through the process of preparing and configuring it in order to quickly begin processing payments.
Your PAX A80 payment processing terminal comes with the following:
Payment terminal
AC power adapter and terminal power cord (2 pieces)
RJ-11 (telephone) cable *
The RJ-11 cable is not used for terminal communication and may not be included with your terminal.
The following illustrations show the location of the main terminal features and hardware:
Contactless payment reader
Color touchscreen
Magnetic stripe reader
Physical keypad
There are multiple communication ports on the back of the terminal with cable guides. The diagram on the back of the terminal shows where to connect the communication cables, in addition to AC power.
Cable guides
Ports diagram
Ethernet port
Power port
There are multiple connection ports on the back of the terminal. Countertop terminals generally require AC power and Ethernet connections.
Your configuration may also include a connection to a POS system or an additional PIN pad.
Use the diagram on the back of the terminal to determine where to connect the cables that apply to your configuration. The terminal’s connection ports are shown below:
PayFacto uses a self-service terminal activation procedure designed to save time while also providing better security. The new activation procedure applies only to countertop and mobile PAX payment terminals using the Android operating system. The new procedure applies to:
All new merchants activating their terminals for the first time
Any existing merchants adding new payment terminals
Any existing merchants receiving replacement terminals
After you configure the terminal's network connection(s) and power on the terminal, the procedure comprises of 2 parts:
NOTE: If you have multiple new payment terminals, you need to perform the activation procedure on each terminal individually.
The PAX A80 terminal offers an on-screen keypad as well as a physical keypad to enter transaction amounts. Your terminal operators and customers enter information and respond to prompts using either the terminal’s touch screen or physical keypad.
There are three (3) colored function keys on the physical keypad that you can use to confirm, correct, or cancel an operation:
To confirm an entry, touch OK on the screen or press the green O key
To correct an entry, touch BACK on the screen or press the yellow < key
To cancel a function, touch CLEAR on the screen or press the red X key
To prevent unauthorized individuals from changing the terminal’s configuration, you need to set the Administrator and Merchant passwords. These passwords restrict access to certain functions on the terminal.
When setting your passwords, you must respect the following parameters:
Passwords must be 6 characters long
This guide will explain how to install the cable attachment bracket for the PAX A80 terminal (part number AZP-310006) designed to prevent the accidental disconnection of cables from the terminal.
IMPORTANT! This cable attachment bracket is only for use with PAX A80 terminals used in countertop environments. It is not compatible with the A80 extension pole for drive-through applications.
PAX A80

PAX A920
PAX A920 Pro
A920 / A920 Pro Accessories


Maitre’D version 7.08.000.280 or later.
Maitre’D Electronic Funds Transfer Interface.
Maitre’D Enhanced EFT option.
Any supported Windows operating system with all latest updates.
Java SE Runtime Environment.
Microsoft .NET Framework 3.5.
STPI Client software (included with the STPISecure Installer)
NOTE: The TPI client is NOT required, thanks to the direct integration of SecureTable within the Maitre’D software.
SecureTable-Compatible Payment terminal(s)
1 Gbps (Gigabit) Ethernet (wired) network or better.
WiFi network (802.11 ac or better)
High-Speed Internet connectio
Chip card reader
You may also have an optional charger and external printer included, but this document addresses the most basic delivery configuration.
The following illustrations show the location of the main terminal features and hardware:
Magnetic stripe reader
Front-facing camera (not used)
Color touchscreen
Chip card reader
Payment terminal
AC power outlet
Roll of printer paper
Charging cable
Your PAX A920 or A920 Pro terminal charging base includes the following components:
A920
Charging base
6-foot (180cm) USB to micro-USB cable
Protective silicone sleeve
A920 Pro
Charging base
5-foot (152cm) USB to USB Type-C cable
Protective silicone sleeve
Your multi-terminal charging base comes with the following:
Protective silicone sleeves (x5)
Multi-terminal charging base
The following images show the location of the main charging base components:
AC power cord
Multi-terminal charging bases (x5)
USB charging cables (x5)
Six (6) outlet power bar
Anti-slip rubber pads
Initial terminal configuration
Activating the terminal
Working with the terminal
On the back of the terminal at the top, lift the lever with the contactless logo to unlock and open the printer cover.
NOTE: The printer cover opens on a hinge, it does not come off the terminal.
Place the roll of printer paper in the paper tray, leaving about 2 inches (5 cm) of paper beyond the printer's cutter as shown in the following example:
IMPORTANT! Make sure the paper unrolls from the back of the roll, otherwise the printer will be unable to print the transaction receipt.
Close the printer cover until it snaps into place and remove any excess paper.
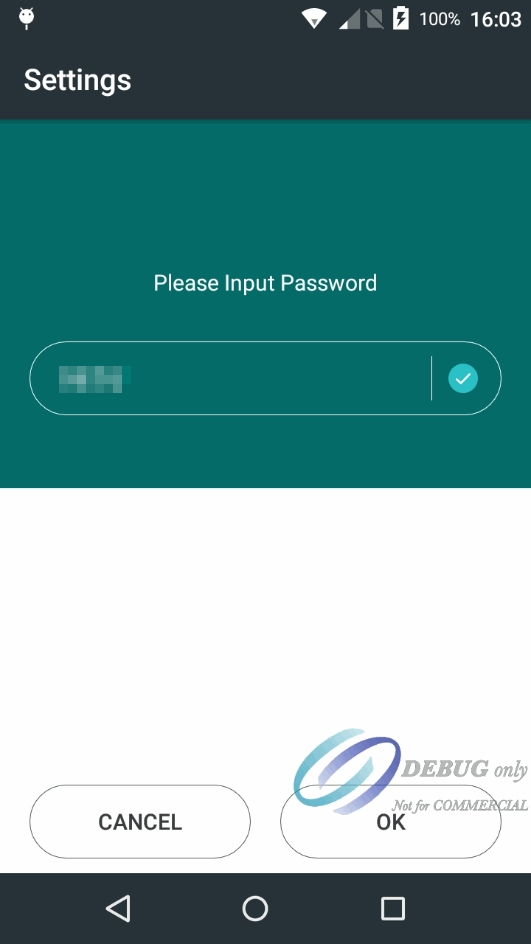
On the terminal’s main screen, touch the Settings icon.
On the Settings screen, touch the Please Input Password field and use the keypad to type the password: either 9876 or pax9876@@.
Touch the checkmark icon on the keypad when you are done and touch OK.
Scroll to the Personal section and touch Language & input.
Touch Language.
Scroll to and touch the desired language.
Touch the Back icon twice to return to the main screen.
Ensure your network cable is connected in the appropriate connector located on the back of the terminal and make sure the other end of the network cable is connected to a network jack or hub.
On the terminal’s main screen, touch the Settings icon.
On the Settings screen, touch the Please Input Password field and use the keypad to type the password: either 9876 or pax9876@@.
Touch the checkmark icon on the keypad when you are done and touch OK.
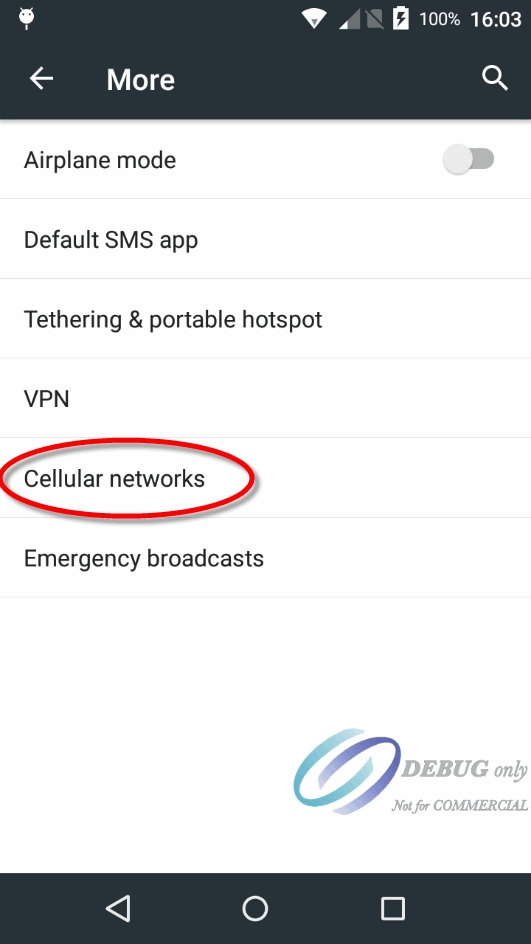
In the Wireless & networks section, touch Ethernet.
If Ethernet is Off, touch the toggle to turn it on.
After you toggle Ethernet to On (or if Ethernet is already on), the connected network settings appear.
If necessary, you can change the network connection parameters manually by scrolling to the bottom and touching Ethernet Configuration to select and configure the Connection Type.
IMPORTANT! Changing the network connection parameters incorrectly will prevent the terminal from communicating with the payment processing server.
Touch the Back icon twice to return to the main screen.
On the terminal’s main screen, touch the Settings icon.
On the Settings screen, touch the Please Input Password field and use the keypad to type the password: either 9876 or pax9876@@.
Touch the checkmark icon on the keypad when you are done and touch OK.
In the Wireless & networks section, touch Wi-Fi.
If Wi-Fi is Off, touch the toggle to turn it on. If Wi-Fi is already on, a list of available networks appears.
From the list of available networks, touch the name of the network you want to connect to.
Enter the password for the selected network and touch CONNECT.
TIP: You can touch Show password before typing to ensure you are entering the password correctly.
After the terminal displays Connected for the selected network, touch the Back icon to return to the Settings screen.
Touch the Back icon again to return to the main screen.
The Administrator and Merchant passwords cannot be the same (can’t match)
You cannot use the same digit 6 times consecutively (for example: 111111 or 777777)
You cannot use 6 consecutive numbers, either ascending or descending (for example: 123456 or 987654)
On the Set Administrative Password screen, use the on-screen keypad to enter a 6-digit password in the Admin Password field and touch the Next icon on the keypad.
On the Confirm Administrative Password screen, re-enter the password in the Admin Password field and touch the Next icon on the keypad.
On the Set Merchant Password screen, use the on-screen keypad to enter a 6-digit password in the Merchant Password field and touch the Next icon on the keypad.
On the Confirm Merchant Password screen, re-enter the password in the Merchant Password field and touch the Next icon on the keypad.
Your payment terminal is now ready for use.
Tap the card for contactless payment
Insert the chip card and enter a PIN
Swipe the card’s magnetic strip
The topics covered in this guide include:
Before you can install the cable attachment to the PAX A80 terminal, you must prepare the terminal by doing the following:
Power off the terminal by pressing and holding the red X key on the physical keypad.
Turn the terminal over and remove all cables from the terminal's communication ports.
To power the terminal on, press and hold the power key on the right side of the terminal for 2-3 seconds.
To power off the terminal:
Press and hold the power key on the right side of the terminal for 2-3 seconds.
Touch the Power off icon and then touch Power off again.
NOTE: Avoid allowing the terminal’s battery to run down to 0%. The terminal requires the battery to be at least at 8% capacity to process a transaction. It is strongly recommended that you charge the terminal overnight or during non-business hours.
Your terminal operators and your customers enter information and respond to prompts using the terminal’s touch screen. The application prompts you and your customers on the next action to perform.
There are three (3) ways for a customer to use their payment card with the terminal:
The terminal uses 2 ¼” or 58mm thermal paper rolls to print transaction receipts.
On the back of the terminal at the top, lift the lever to unlock and open the printer cover.
NOTE: The printer cover opens on a hinge, it does not come off the terminal.
Place the roll of printer paper in the paper tray, leaving about 2 inches (5 cm) of paper beyond the printer's cutter.
IMPORTANT! Make sure the paper unrolls from the back of the roll, otherwise the printer will be unable to print the transaction receipt.
Close the printer cover until it snaps into place and remove any excess paper.
Before you install and connect the charging base, make sure that the desired location is within reach of an AC outlet and that there is enough space to for the charging base and the terminal when connected.
Turn the charging base over and locate the USB connection port.
A920
A920 Pro
Insert the cable’s micro-USB (A920) or USB Type-C (A920 Pro) plug into the base’s connection port.
A920
A920 Pro
Secure the cable in the guide at the top of the charging base and turn the charging base over.
A920
A920 Pro
Connect the cable’s USB plug into the AC adapter’s USB port.
A920
A920 Pro
Plug the adapter into an AC outlet. The LED at the bottom edge of the base lights up.
To protect your PAX A920 or A920 Pro terminal from minor impact damage, you should install the silicone sleeve provided with the terminal charging base as the charging base is designed specifically for terminals with the sleeve.
Insert the top of the terminal into the sleeve's printer protection until the sleeve fits snugly onto the terminal’s top.
Pull the bottom of the sleeve over the bottom edge of the terminal.
Repeat for any additional terminals you intend to place on the charging base.
NOTE: To add or change a SIM card, you need to remove the sleeve from the terminal.
To use the charging base, you need only place the terminal(s) vertically on the base so the printer rests in the cradle at the top of the charging base.
NOTE: The charging base should only be used to charge your terminal(s); it is not designed to be a storage location for the terminal(s).
If the status light remains blue after you place the terminal on the base, the terminal is not seated correctly, and not connecting to the base’s gold charging contacts.
IMPORTANT! Do not slide a terminal onto the base, as it can damage the gold charging contacts. Always place the terminal onto the base vertically, as shown below
The LED at the bottom edge of the charging base indicates the terminal’s charging status:
Before you install and connect the multi-terminal charging base, make sure that the desired location is within reach of an AC outlet and that there is enough space to for the charging base and the terminals when connected.
Collect the original AC power adapters that were shipped with your PAX A920 or A920 Pro terminals (maximum of 5 per multi-terminal charging base).
Turn the multi-terminal charging base over to access the opening on the bottom.
Remove any twist ties that secure the charging cables together. Do not remove any of the nylon zip ties as each cable should be long enough to reach an outlet on the power bar.
Working one cable at a time, connect the cable’s USB plug into the AC adapter’s USB port.
Plug the adapter into an outlet on the power bar.
Repeat steps 4 and 5 for each additional charging cable.
After you connect all 5 cables to the power bar, plug in the power bar's cable to an available AC outlet.
If it is not already, switch the power bar's power button to the On/RESETposition; the switch lights up with a red indicator and the LEDs at the bottom edge of the charging bases light up.
Turn the multi-terminal charging base over to place it securely in its desired location. The base is ready to begin charging your terminals.
IMPORTANT! To minimize the risk of short-circuits and reduce the risk of fire, DO NOT connect any additional devices to the charging base's power bar.
To protect your PAX A920 or A920 Pro terminals from minor impact damage, you should install the silicone sleeves provided with the multi-terminal charging base as the charging bases are designed specifically for terminals with the sleeve.
Insert the top of the terminal into the sleeve's printer protection until the sleeve fits snugly onto the terminal’s top.
Pull the bottom of the sleeve over the bottom edge of the terminal.
Repeat for every terminal you intend to place on the charging bases.
NOTE: To add or change a SIM card, you need to remove the sleeve from the terminal.
The multi-terminal charging base has a power switch on the attached power bar, shown below:
To power on the terminal charging base, make sure the power cord is plugged into a grounded AC outlet and that the power switch is in the On/RESETposition; the switch lights up with a red indicator, as shown below:
To power off the terminal charging base, you can either push the power switch to the OFF position or unplug the power cord from the grounded AC outlet.
To use the charging base, you need only place the terminal(s) vertically on the base so the printer rests in the cradle at the top of the charging base.
NOTE: The charging base should only be used to charge your terminal(s); it is not designed to be a storage location for the terminal(s).
If the status light remains blue after you place the terminal on the base, the terminal is not seated correctly, and not connecting to the base’s gold charging contacts.
IMPORTANT! Do not slide a terminal onto the base, as it can damage the gold charging contacts. Always place the terminal onto the base vertically, as shown below:
The LED at the bottom edge of the charging base indicates the terminal’s charging status:
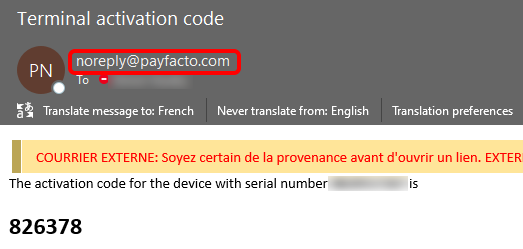
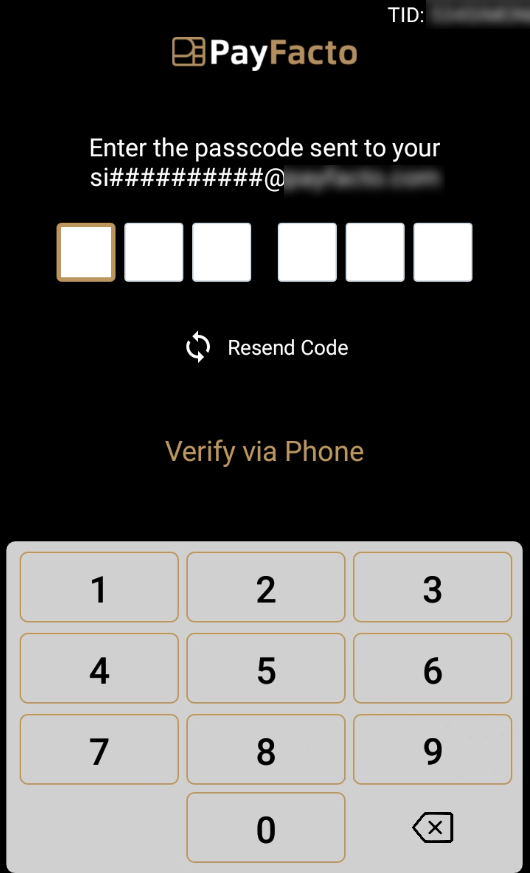
After configuring the terminal’s network connection, you need to start the PayFacto payment application to complete the remaining steps. Terminal activation requires you to input a One Time Passcode (OTP) that PayFacto sends to the email address or telephone number registered to your account.
IMPORTANT! To receive the OTP on your phone, your registered phone number must be able to receive text messages (SMS). If you cannot receive text messages, select the email option to get the OTP.
Touch the PAYMENT icon on the main screen. The Welcome To Your Payment Terminal screen appears.
NOTE: The terminal may need to download host and security parameters; this can take a few moments.
In the top right corner of the screen, your terminal ID (TID) appears; confirm that the number on the screen matches the TID on the label on the back of your terminal. The TID will not appear on your terminal screen after you complete the activation process.
IMPORTANT! If the TID does not match, call PayFacto immediately.
Touch anywhere on the screen to begin the activation process.
Touch the desired option to receive the OTP.
Phone Number
Touch the Send Code button.
IMPORTANT! The OTP code is valid for 15 minutes after you receive it. If you wait more than 15 minutes to enter the OTP, the terminal will display an error and you will have to request a new OTP.
If you select Email, look for a message from [email protected].
After you receive the 6-digit activation code, use the on-screen keypad to enter the code on the terminal screen.
If you enter the code incorrectly, a red exclamation appears to indicate that the code is incorrect.
Re-enter the code, or touch Resend Code to obtain a new OTP.
After you enter the OTP correctly, the payment application displays the Set Administrative Password screen to
This document explains how to install the multi-terminal charging base for PAX A920 or A920 Pro terminals and included silicone sleeves.
NOTE: The multi-terminal charging bases are designed to be used with only one model of PAX terminal, either the A920 or A920 Pro. You should never attempt to charge an A920 Pro terminal on an A920 charging base or vice-versa. Only use the charging base intended for your specific terminal model.
The multi-terminal charging base makes it easy to recharge multiple terminals without having to remove their protective silicone sleeves.
IMPORTANT! The terminals must be fitted with the PayFacto-branded silicone sleeve. The sleeve displays the PayFacto name and logo on the back. You should not use the charging base for any terminal not protected by a silicone sleeve.
IMPORTANT! The images used in this guide are of the multi-terminal charger for the PAX A920 and are used as examples only; the charging base and silicone sleeves you receive may differ in appearance. The charging bases for the PAX A920 Pro are black, but the installation instructions are the same for either multi-terminal charger.
The A80 cable attachment is anchored by a T bracket that keeps the attached cables from being accidentally disconnected .
With the terminal turned over, insert the T bracket into the guides on the underside of the A80 terminal.
Slide the T bracket up by pushing it from the bottom towards the top of the terminal.
To prevent the T bracket and cables from sliding off the terminal, you must next secure the T bracket to the terminal.
Place the short metal bracket at the top of the T bracket and insert the long screw at the opening near the top of the terminal.
When the end of the long screw comes out of the bottom of the T bracket, place the metal washer over the screw and then thread the thumb nut onto the end of the screw.
Using a Phillips head screwdriver, tighten the screw securely (but not excessively) into the thumb nut.
After you secure the T bracket to the terminal, you must insert the cables. This procedure explains how to install and secure the AC adapter and Ethernet cables; if you have additional cables, connect them to the appropriate port and use the same method to secure them in place.
Beginning with the AC adapter, inserting it in the terminal's cable guide on the left and connect the adapter to the Power port.
Insert the Ethernet cable in the terminal's cable guide on the right and connect it to the LAN port.
When the cables are properly seated in their ports, gently pull on the cables to remove any excess cable that is higher than the plane of the T bracket.
Place the 3-hole metal bracket over the cables, aligned with the screw holes in the T bracket and secure it in place using a Phillips head screwdriver to insert the two short screws.
Turn the terminal over and power on the terminal. The completed assembly should resemble the following:
This document will cover the configuration required to operate SecureTable using the Maitre’D direct integration to the STPI client.
SecureTable is a universal middleware platform that provides an EMV-Compliant, Pay at the Table (PATT) processing solution that can be connected to a POS (Point of Sale) system. The solution can work in standalone mode as well as integrated to a Point of Sale (POS) system such as Maitre’D, Veloce, Squirrel, Aloha and Micros among other.
SecureTable uses a “Pull” architecture. This means that a payment terminal using SecureTable can initiate the transaction process by Pulling check data from the POS system. In other words, after the guest checks are printed and handed to customers, there is no need for the server to walk back to the POS workstation to apply payments and close guest checks. All payments, including credit, debit and cash, can be applied at the table side, and checks are closed automatically.
By comparison, a traditional "Push" architecture is a system where the transaction would be initiated from the POS system, and check data pushed to the payment terminal. In a table-service restaurant, this process often required the customers to get up and walk to the POS workstation to insert their payment card and enter their PIN using a tethered payment terminal.
The integration of SecureTable with various POS systems allows the payment terminal to retrieve guest check data from the POS System. Once a payment has been processed by the payment terminal, SecureTable sends the payment data back to the POS System for reporting purposes. Payment amounts, tip amounts and card brand used are all automatically transmitted to the POS system to allow for accurate reporting.
SecureTable and SecurePay can both be used on the same POS system. This allows merchants to use any combination of stationary Pay-at-the-Counter terminals and wireless Pay-at-the-Table terminals. SecureTable and SecurePay share a similar user interface which provides a consistent user experience for customers and employees.
If a third-party solution with tethered (wired) payment terminals is already in place and integrated to the POS system, SecureTable can still be used without worry. A configurable table-locking or invoice-locking mechanism prevents accidentally accessing guest checks that are being processed by a payment terminal through SecureTable. This means that establishments can, for example, use wireless payment terminals with SecureTable in the dining room while using tethered payment terminals for the cashier station, bar, pickup counter and drive-through windows.
With a direct integration, Maitre’D communicates directly with SecureTable’s STPI client through a secure socket connection without using drop-files. This allows Maitre’D to take advantage of all the features offered by SecureTable, without the limitations imposed by using the former TPI client middleware.
This document will cover the configuration required to operate SecureTable using the Maitre’DVeloce direct integration to the STPI client.
SecureTable is a universal middleware platform that provides an EMV-Compliant, Pay at the Table (PATT) processing solution that can be connected to a POS (Point of Sale) system. The solution can work in standalone mode as well as integrated to a Point of Sale (POS) system such as Maitre’D, Veloce, Squirrel, Aloha and Micros among other.
SecureTable uses a “Pull” architecture. This means that a payment terminal using SecureTable can initiate the transaction process by Pulling check data from the POS system. In other words, after the guest checks are printed and handed to customers, there is no need for the server to walk back to the POS workstation to apply payments and close guest checks. All payments, including credit, debit and cash, can be applied at the table side, and checks are closed automatically. By comparison, a traditional "Push" architecture is a system where the transaction would be initiated from the POS system, and check data pushed to the payment terminal. In a table-service restaurant, this process often required the customers to get up and walk to the POS workstation to insert their payment card and enter their PIN using a tethered payment terminal.
The integration of SecureTable with various POS systems allows the payment terminal to retrieve guest check data from the POS System. Once a payment has been processed by the payment terminal, SecureTable sends the payment data back to the POS System for reporting purposes. Payment amounts, tip amounts and card brand used are all automatically transmitted to the POS system to allow for accurate reporting.
SecureTable and SecurePay can both be used on the same POS system. This allows merchants to use any combination of stationary Pay-at-the-Counter terminals and wireless Pay-at-the-Table terminals. SecureTable and SecurePay share a similar user interface which provides a consistent user experience for customers and employees.
If a third-party solution with tethered (wired) payment terminals is already in place and integrated to the POS system, SecureTable can still be used without worry. A configurable table-locking or invoice-locking mechanism prevents accidentally accessing guest checks that are being processed by a payment terminal through SecureTable. This means that establishments can, for example, use wireless payment terminals
with SecureTable in the dining room while using tethered payment terminals for the cashier station, bar, pickup counter and drive-through windows.
With a direct integration, Maitre’D communicates directly with SecureTable’s STPI client through a secure socket connection without using drop-files. This allows Maitre’D to take advantage of all the features offered by SecureTable, without the limitations imposed by using the former TPI client middleware.
Before a license can be activated, it needs to be purchased and created for you. Please contact the PayFacto Boarding team or your local Sales Representative to purchase a STPISecure license.
After you have purchased a STPISecure license, the license file will be sent to you as a text file attachment via e-mail. The e-mail will come from the PayFacto Boarding Team or your local Sales Representative.
Save the file from the e-mail to your Windows Desktop. Typically, the file is named something like "Licdefault_12345.txt".
Rename the file to "Lic.txt". To achieve this, you can right-click the file and select the Rename option, or select the file and press the F2 key on your keyboard.
Move the file to the following folder:
C:\Program Files (x86)\PayFacto\STPISecure\STPIClient\
The license activation process is now complete.
Here is a quick overview of the entire installation and setup process:
Install/enable Microsoft .NET Framework 3.5 SP1.
Install the latest version of Oracle’s Java for Windows.
Use the STPISecure to installer to install the STPIClient software.
Install the STPIClient license.
Start the STPIClient application for the first time.
Configure the STPIClient to start as a service (Optional).
Configure your POS System.
Connect, power up and configure payment terminals.
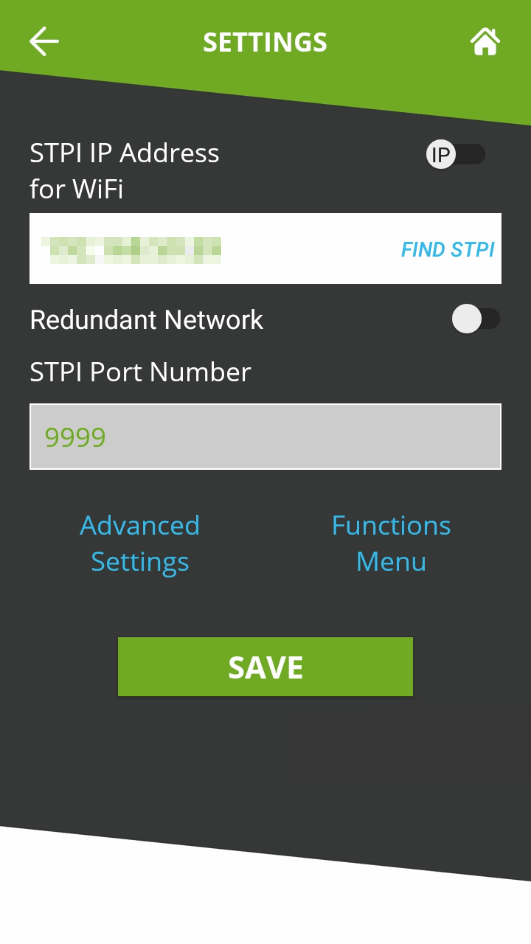
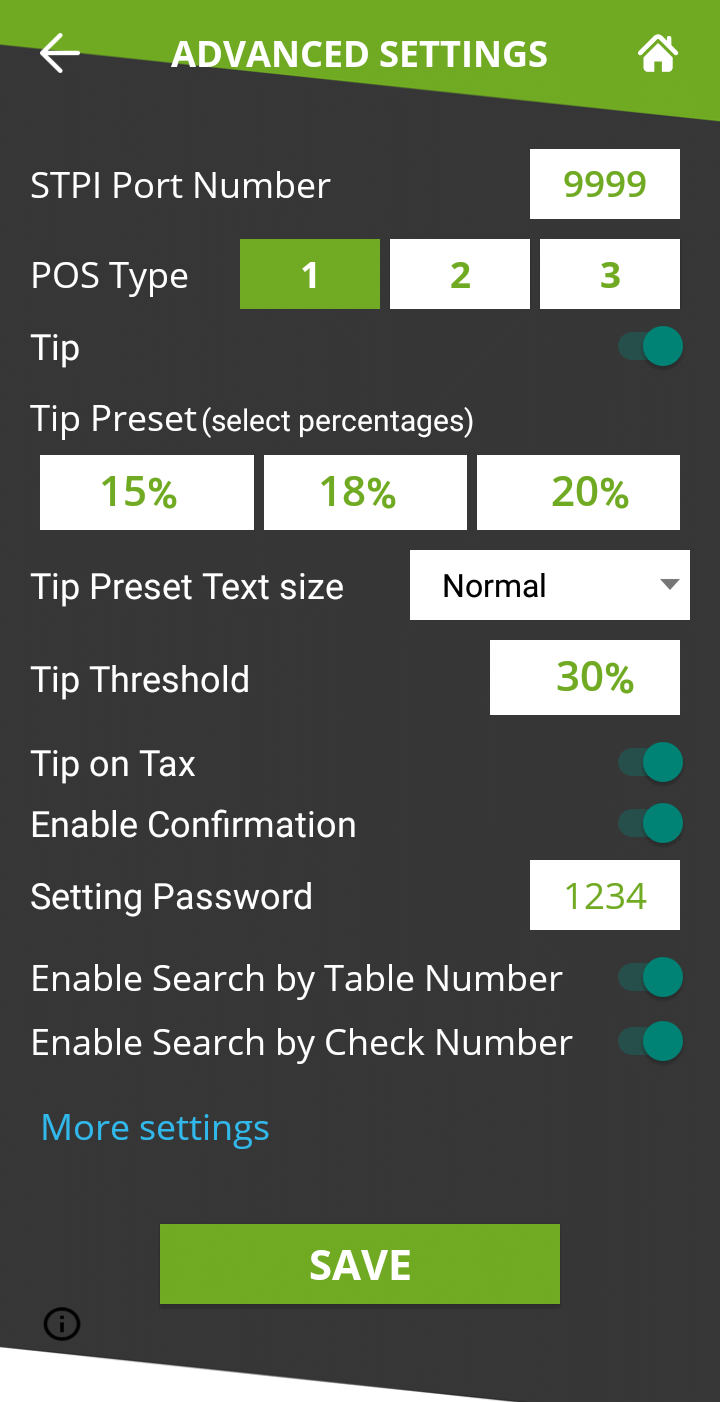
By default, the payment terminals using SecureTable will communicate with the POS system over TCP port 9999.
Open TCP port 9999 on the corporate firewall.
Open TCP port 9999 on the Windows Defender Firewall on the POS system's Back-Office as well as on all POS workstations.
The wireless network (for wireless payment terminals) needs to be able to communicate with the POS System.
While attempting to install STPISecure, an error message is displayed:
STPISecure requires Microsoft .NET Framework 3.5.
Please use Windows Update / Windows Features to install this version, and then re-run the installer.
Install Microsoft .NET Framework 3.5 through Windows Update or use the "Turn Windows features on or off" option from Add/Remove programs to enable .NET Framework 3.5.
Once Microsoft .NET Framework 3.5 is installed, retry installing STPISecure.
While attempting to install STPISecure, an error message is displayed:
STPISecure requires Java version 1.8 or newer.
Please install this separately and then re-run the installer.
Download and install Java from the Oracle website:
Once Java is installed on your system, retry installing STPISecure.
The .NET Framework (pronounced as "dot net") is a software framework developed by Microsoft that runs primarily on Microsoft Windows. Microsoft .NET Framework version 3.5 Service Pack 1 is required before the STPISecure installer can be used to install the STPISecure client or other components, such as the RTI-SIPA plugin.
After the STPISecure client is installed, configured and running properly on the POS system, make sure that all payment terminals are properly configured so they can communicate with the POS system. Android payment terminals are generally shipped with all the necessary applications pre-installed by PayFacto, including the latest versions of SecureTable and of the latest version of the Payment application. If the SecureTable application appears to be missing, install it using the instructions below.
The instructions below were created using the PAX A920 Android-based Payment terminal and the PAX store. However, the instructions are the same for all Android-based payment terminals, such as other models offered by PAX, AMP terminals or Clover Flex. For brands other than PAX, the mechanism they use to install apps may look different but the general principle should remain the same.
The STPISecure Installer, the STPISecure client software for SecureTable and the RTI-SIPA plugin for SecurePay requires the installation of Java for Windows software. This can be downloaded and installed for free from Oracle’s Java website, .
Please download and install the latest version of Java for Windows for your specific Windows edition (32-bit or 64-bit).
Electronic Funds Transfer Module Setup
Media type mappings for SecureTable or SecurePay
Generic Media Type mapping for SecureTable or SecurePay
Installation on Android Payment Terminals
SecureTable Application - Basic Navigation
Application Configuration
SecureTable Functions
Installation Process Overview
Install Microsoft .NET Framework 3.5 SP1
Install Java for Windows
Install the STPI Secure Client software
Activate the STPI Secure License
Start the STPI Client for the first time
Configure the STPI Client as a Service
SecureTable Full Transaction Workflow
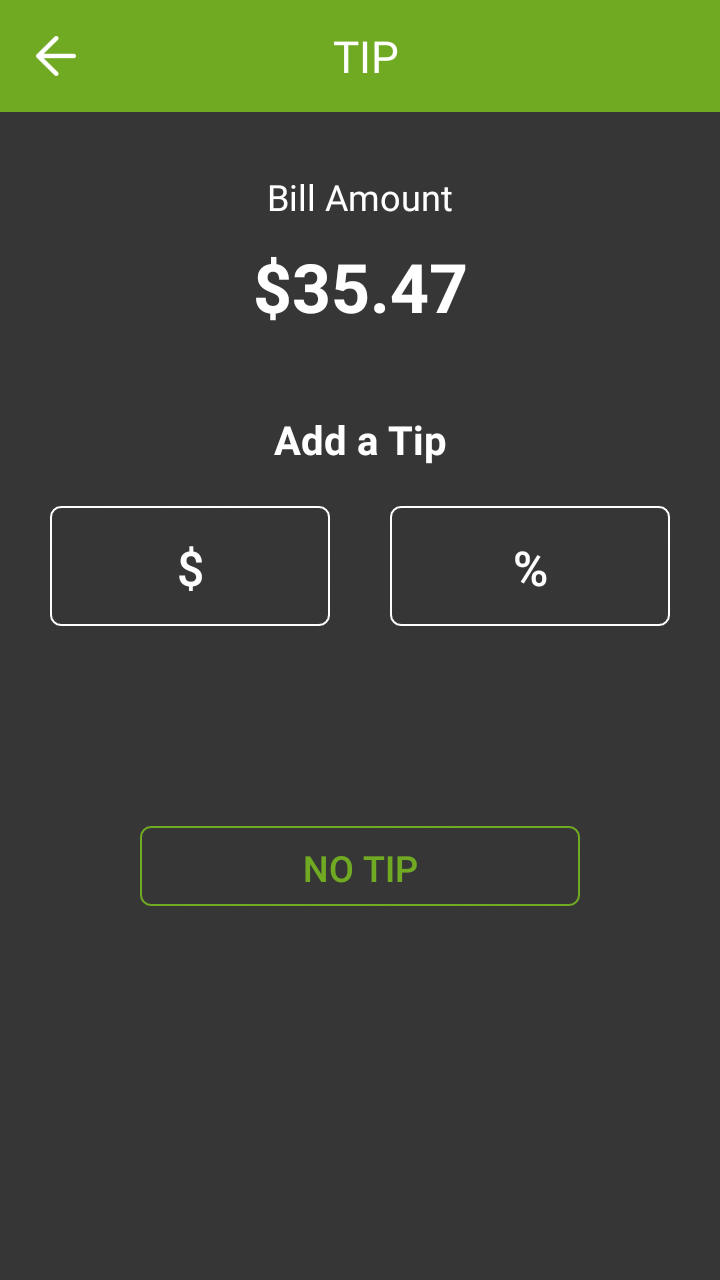
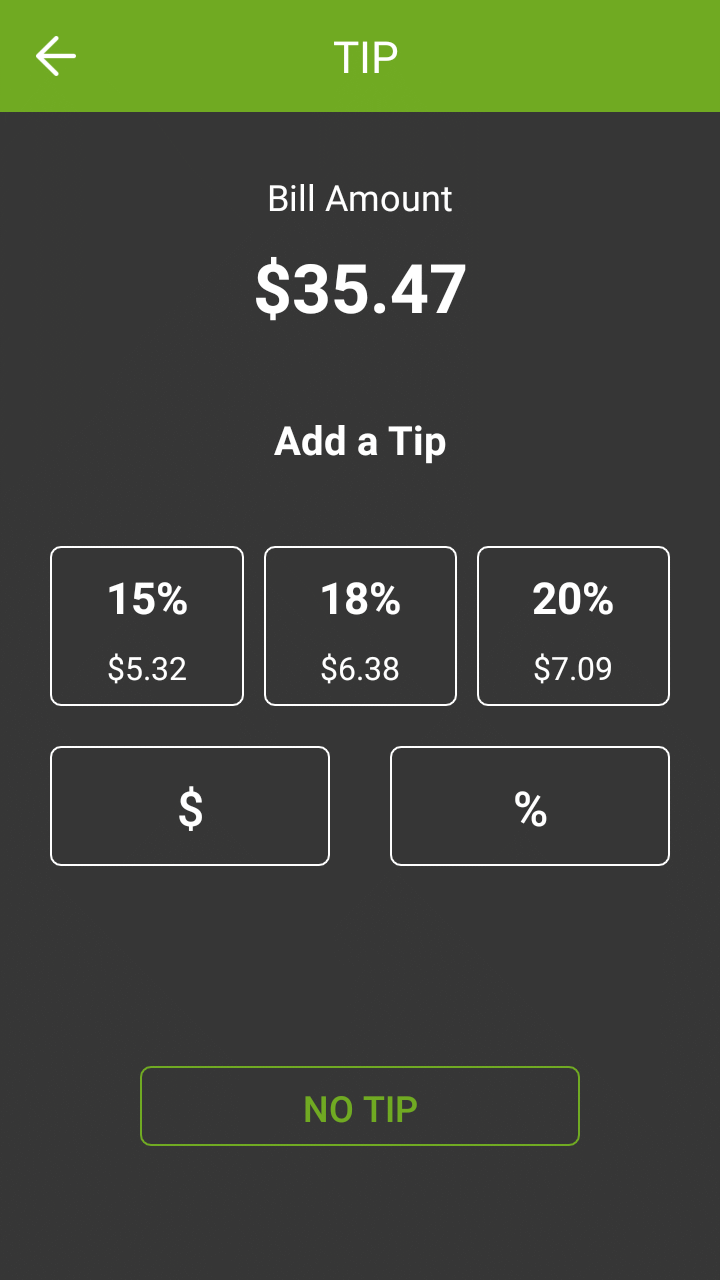
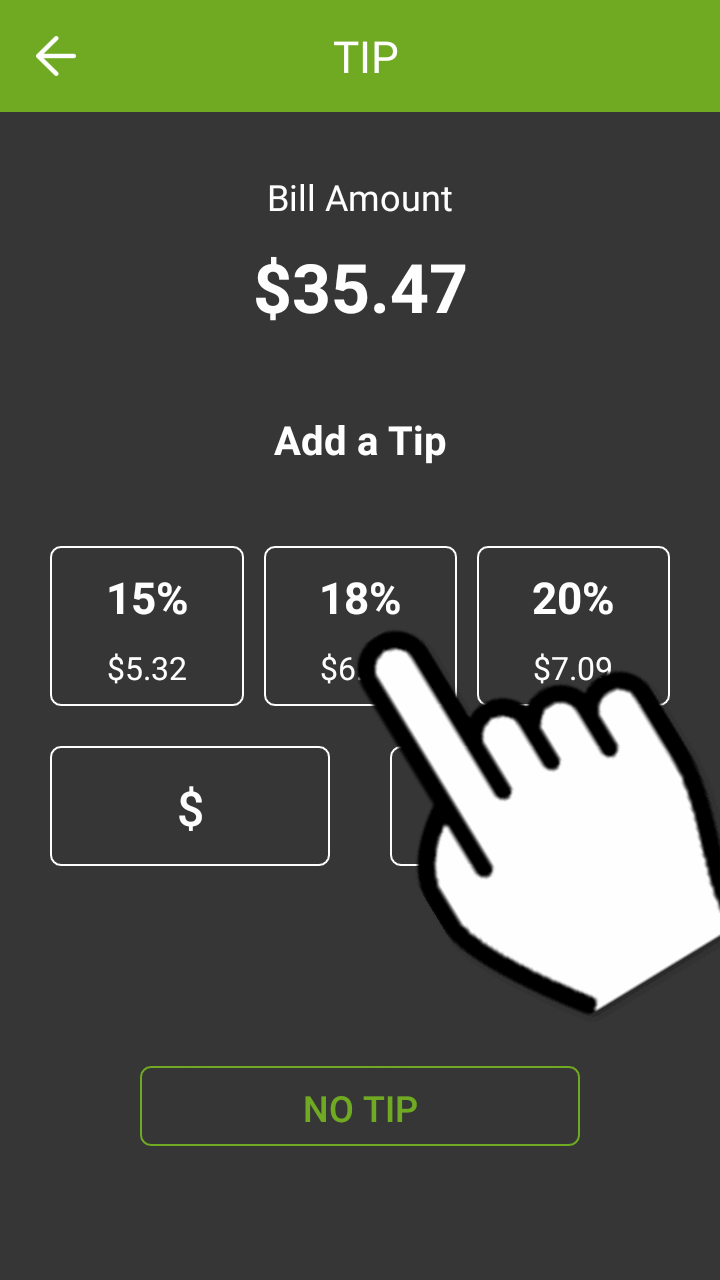
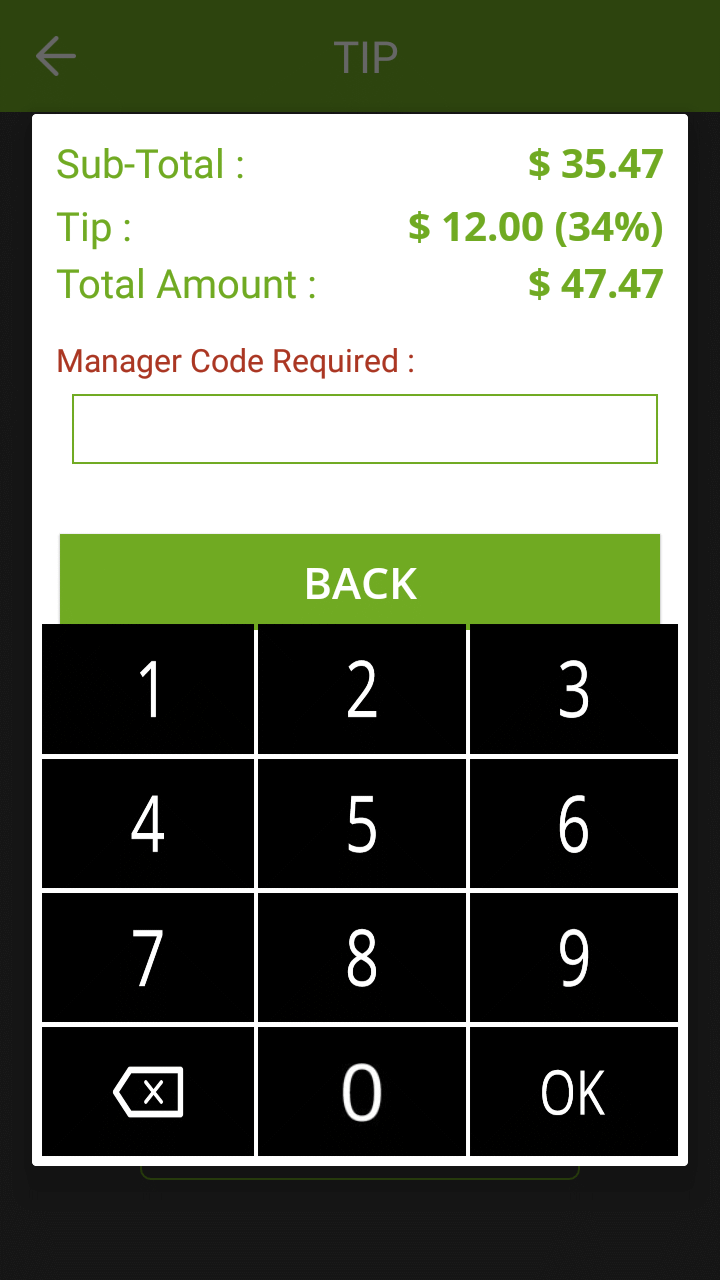
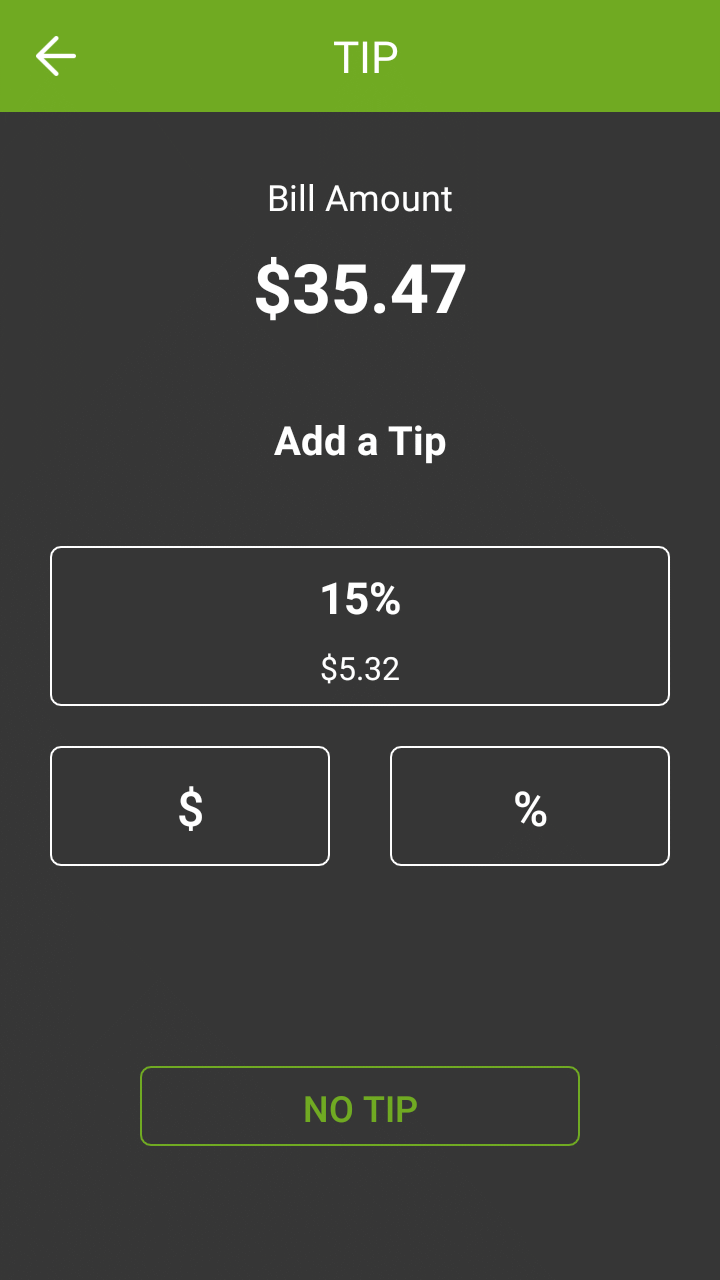
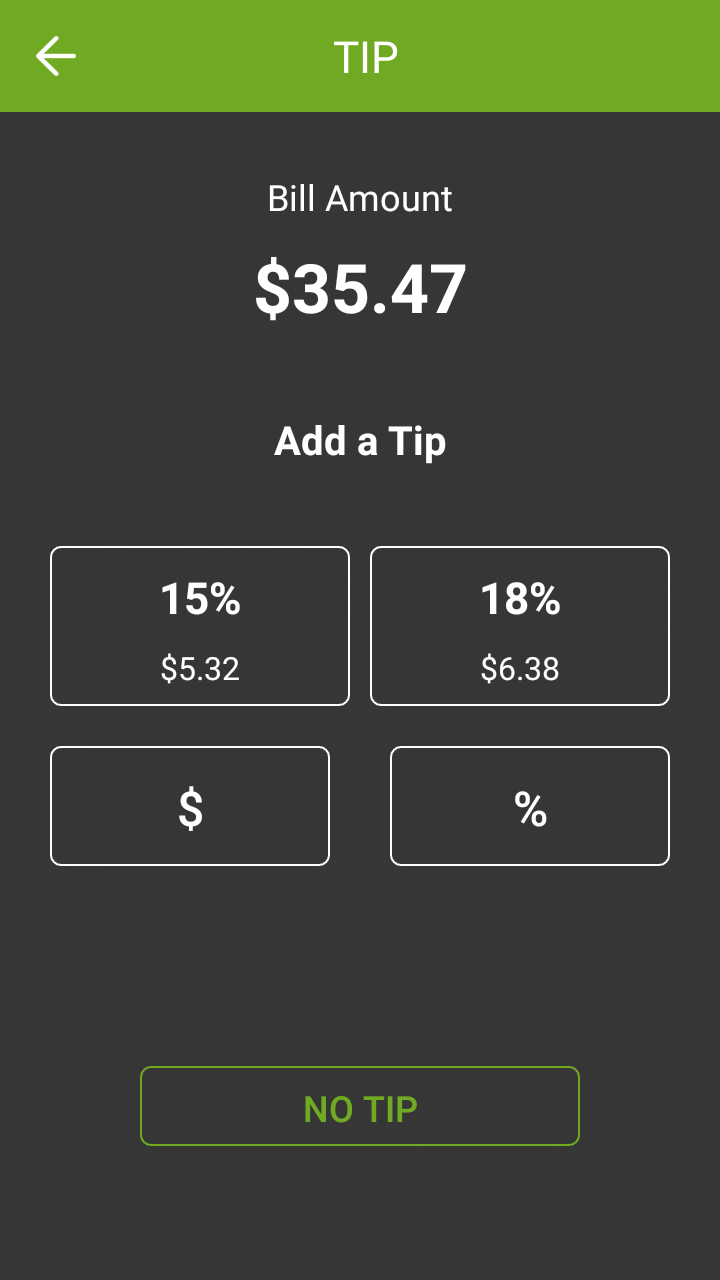
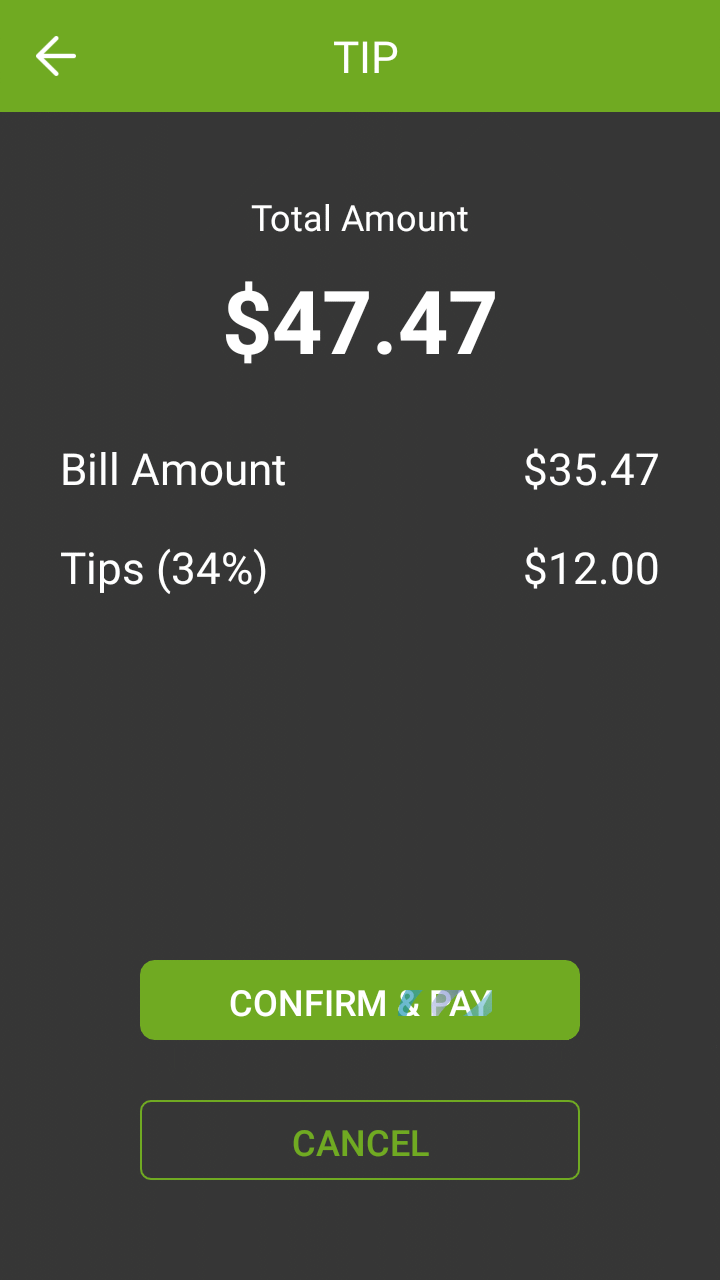
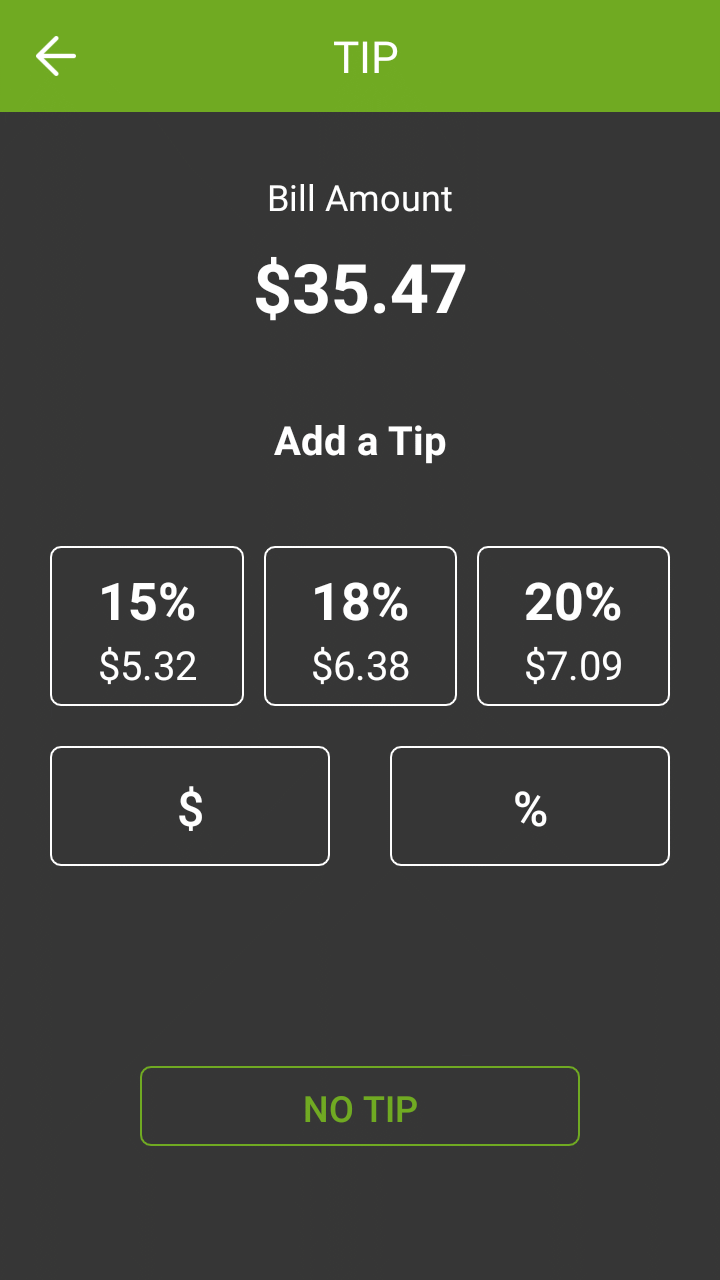
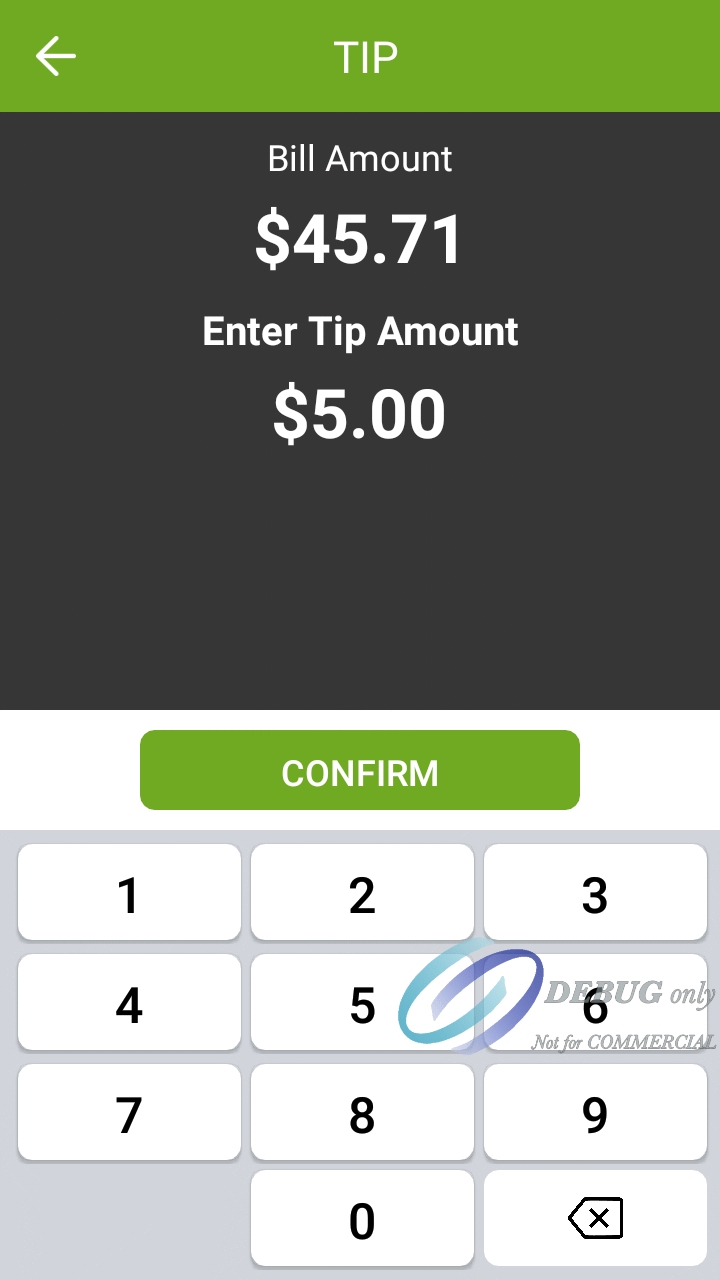
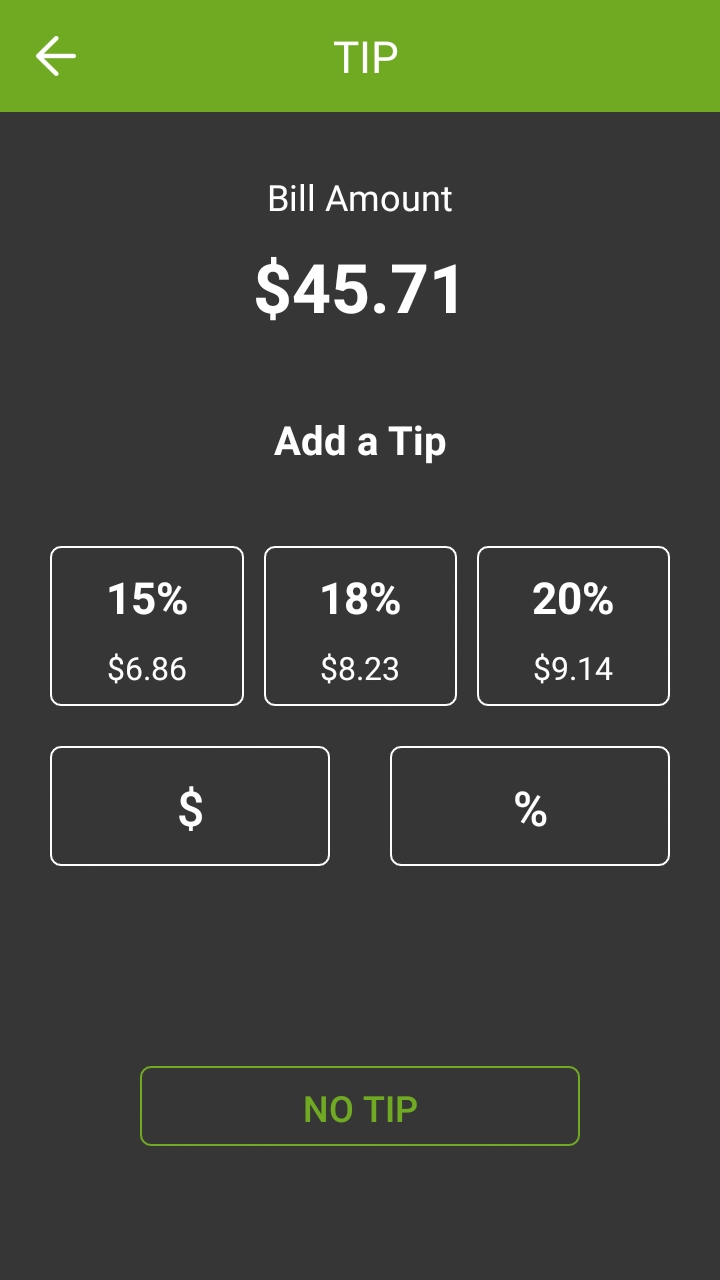
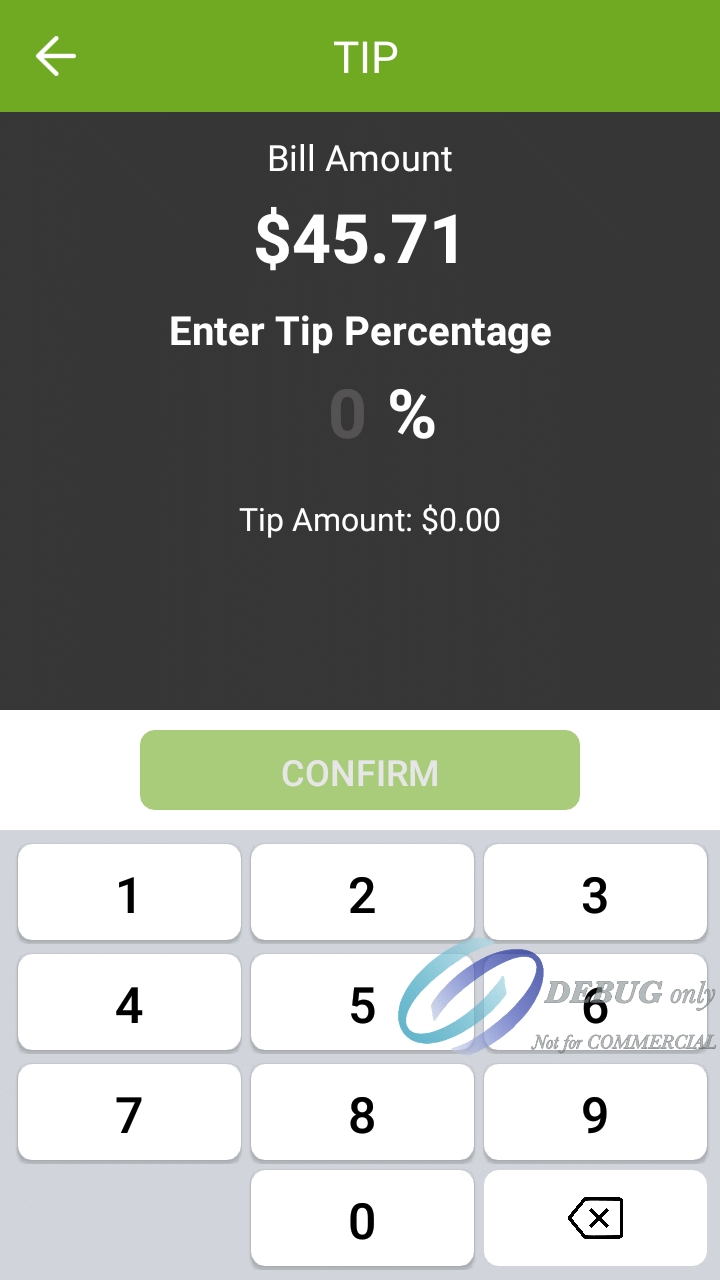
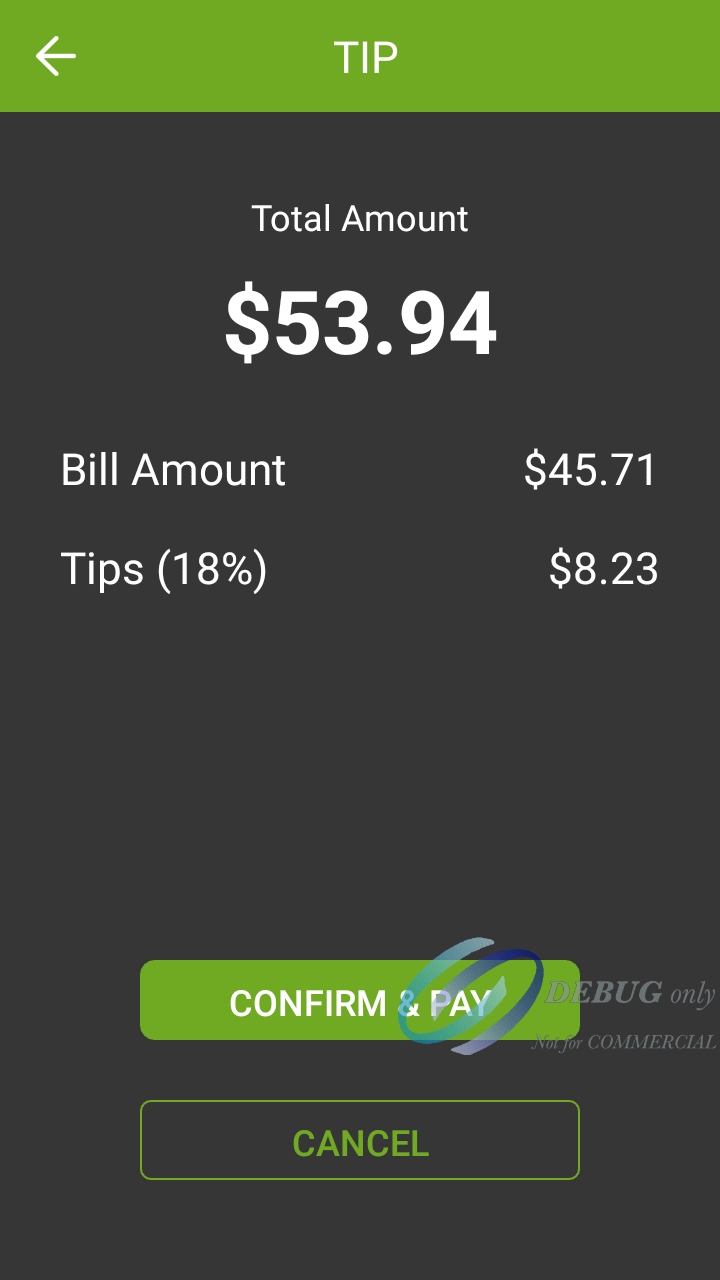
Working with Tips
Voids
LED Color
A920
A920 Pro
Blue: Charging base is plugged in, no terminal connected.
Red/Yellow: Terminal is charging.

Green: Terminal is fully charged.
LED Color
A920
A920 Pro
Blue: Charging base is plugged in, no terminal connected.
Red/Yellow: Terminal is charging.


Green: Terminal is fully charged.
Volume up button
Power button
Volume down button
Micro USB charging port
Contactless payment reader
Printer
Printer latch
Rear camera/scanner
Battery cover
On Windows 10, starting with version 1809, Microsoft .NET Framework 3.5 SP1 is included as a standard Windows feature and enabled by default. However, older versions of Windows 10, Enterprise or IoT editions, could be missing this essential component. Here is the procedure to check whether .NET Framework 3.5 SP1 is installed and how to enable it on Windows 10:
Click on the Windows 10 Start button and type Control Panel.
The Control Panel app should appear as a search result. Click on Open.
Within the Control Panel app, click on Programs.
Under Programs and Features, select Turn Windows features on or off.
The Windows Features list will appear.
Look for the feature called .NET Framework 3.5 (includes .NET 2.0 and 3.0).
a. If this feature is not listed, install .NET Framework manually. (See below)
b. If you see a black square in this checkbox, .NET Framework 3.5 is already enabled and no further action is required.
c. If the checkbox is blank, enable it.
NOTE: The black square in the check box means that the feature itself is enabled, but that some optional components are disabled. The optional components are not required for STPISecure or RTI-SIPA, so leave them disabled.
Click OK on the Windows Features list. This will close the list and apply any changes.
Files may be copied and you may be required to restart the PC.
For versions of Windows prior to Windows 10 1809, or for some older Enterprise or IoT editions, Microsoft .NET Framework 3.5 SP1 may need to be downloaded and installed manually.
The full installer can be obtained from the official Microsoft download site here:
Download the file and double-click it to start the installation process. Follow the on-screen instructions and restart your PC as required.
IMPORTANT! If the link provided here does not work, please use your preferred search engine and look for "Microsoft .NET Framework 3.5". Be sure to download the files from the official Microsoft download site. For security reasons, please avoid non-Microsoft sources.
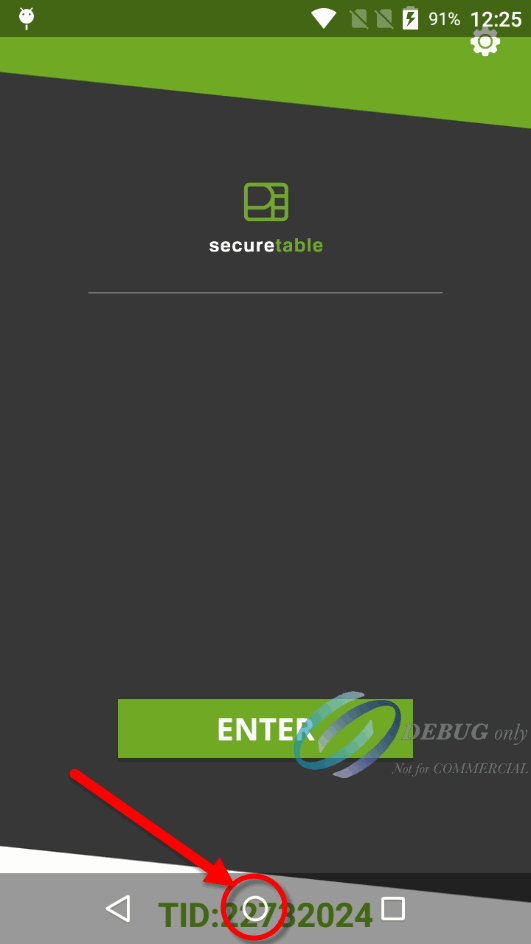
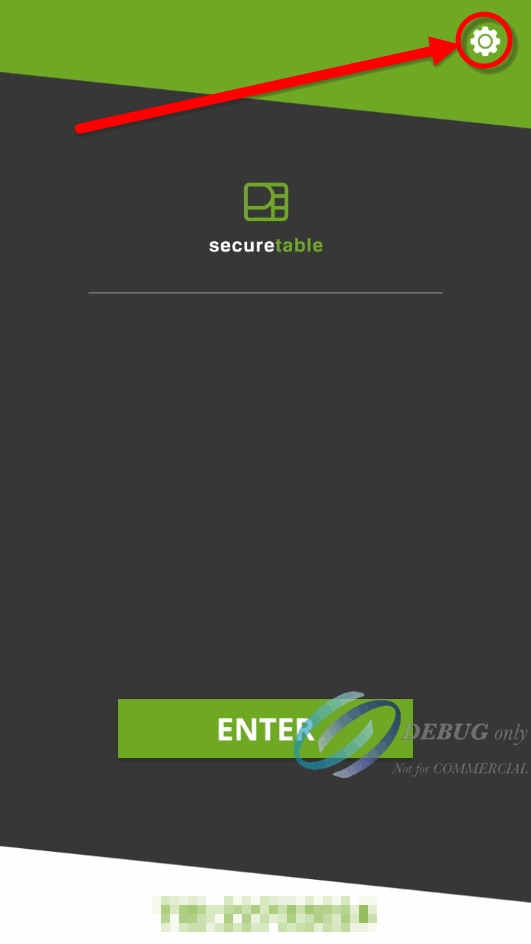
Use the ENTER button to start a transaction with SecureTable.
The Settings button is used to access SecureTable's configuration options. This icon appears in the top-right corner of the SecureTable home screen.
When available, the Home button will appear in the top-right corner of the screen. Use it to jump directly to the SecureTable home screen without saving changes.
When available, the Back button will appear in the top-left corner of the screen. Use it to go back to the previous screen without saving changes.
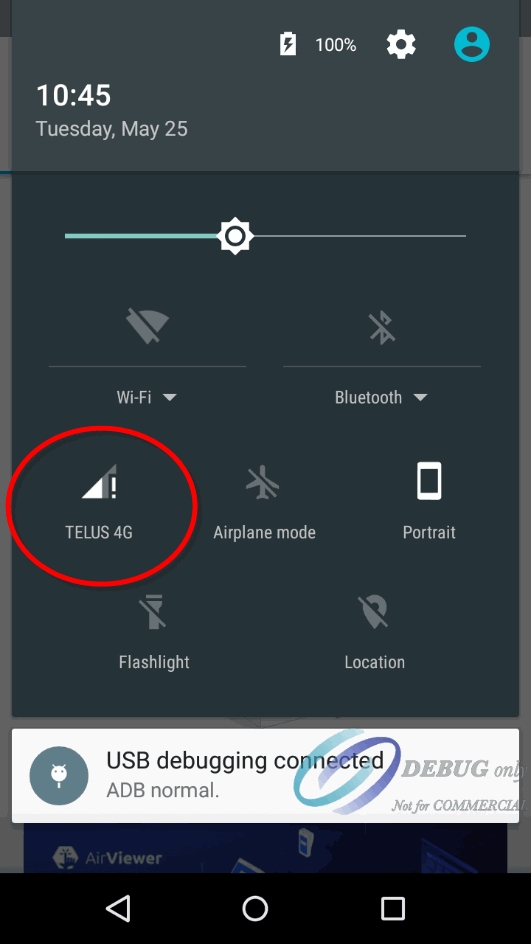
WiFi / 4G LTE
When available, the Wifi or 4G/LTE icon will appear in the top-left corner of the screen. The icon indicates which network is currently being used. Touching the icon allows the user to switch from WiFi to LTE or vice-versa.
The SecureTable application settings are protected by a password. The default password on a new installation is 1234.
NOTE: It is highly recommended to change the default password as soon as possible. See SecureTable Application Configuration for the detailed procedure.
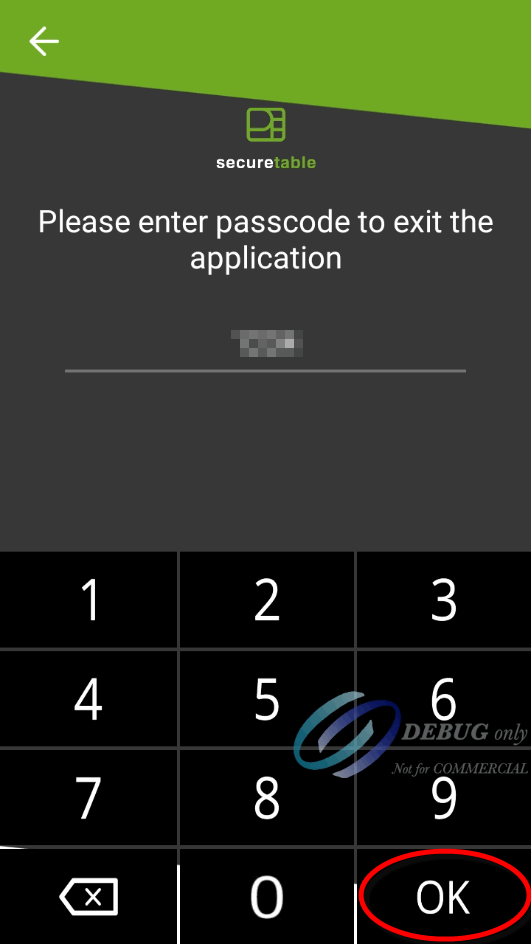
To exit the SecureTable application, swipe the terminal's screen either from the top edge going down, or the bottom edge going up, then touch the Android Home (circle) button.
You will be prompted to enter a passcode to exit the application. Enter the passcode and touch the OK button.
NOTE: The default passcode after a new installation is 1234. It is the same as the settings password.
Related Topics
Before installing SecureTable on your payment terminal, please make sure that the appropriate payment application is installed and configured properly. You may also want to check out our documentation on the PAX A920, A920Pro or A80 terminals or any other Android-based terminal you may be using with SecureTable.
PayFacto Payment Application (For the Canadian market):
BroadPOS Payment application (For the US market):
Link
PAX A920 Payment Terminal:
PAX A920 - Introduction
PAX A920 - Quick Setup Guide
Getting to know the PAX A920 Terminal
NOTE: The SecureTable application can be installed on certified payment terminals only. It cannot be used on regular phones or tablets.
Power-up your terminal, and make sure it is connected to the Internet.
If any application start automatically, shut them down to reach the Android home screen.
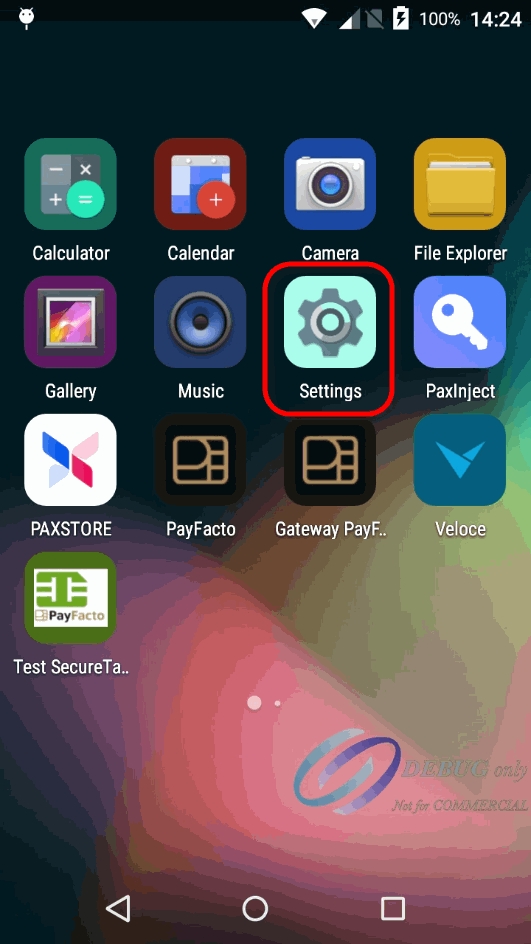
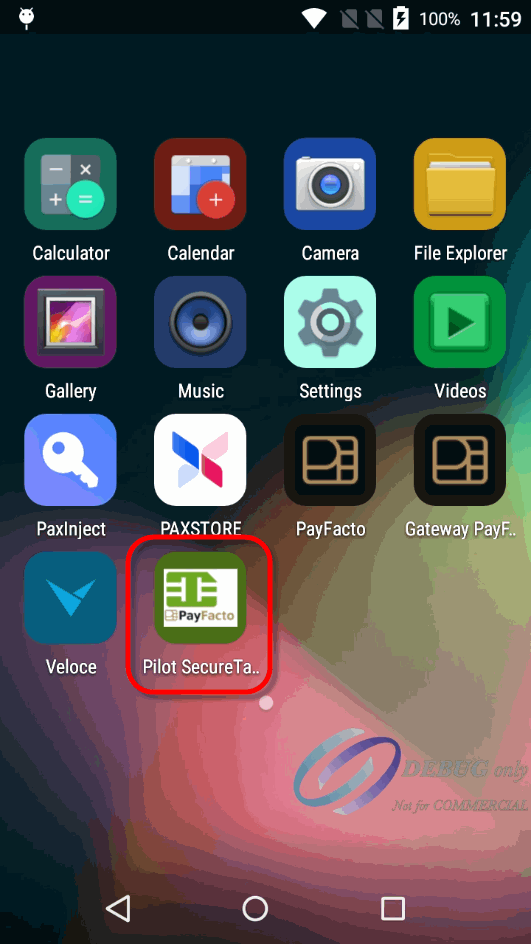
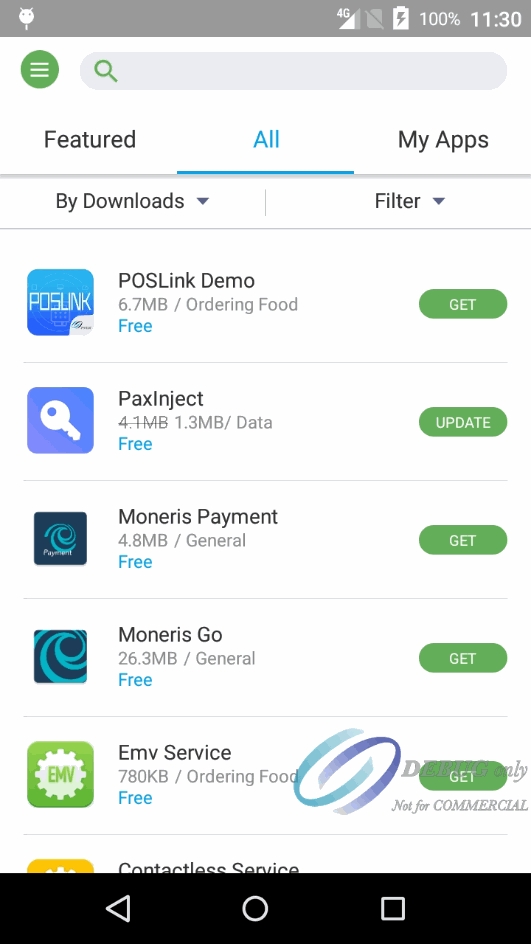
From the Android home screen, start the PAXSTORE by touching the appropriate icon.
In the PAXSTORE (Application Marketplace), search for SecureTable.
Locate the version which is appropriate for your region, and touch the GET button to download and install it.
During the installation, the GET button will turn to a circle with the Pause symbol inside. Once installation is complete, the GET button will change to OPEN.
An icon will also be created on the Android home screen.
Installation of the SecureTable application is now complete.
Insert the chip card and enter a PIN
Swipe the card’s magnetic strip
Tap the card for contactless payment
Insert the chip card and enter a PIN
Swipe the card’s magnetic strip
Tap the card for contactless payment
A920
A920 Pro

The PAX A920 Pro mobile payment terminal is perfect for most applications, whether retail, bar/restaurant, or delivery/transportation. This setup guide describes the following topics:
Initial terminal configuration
This document will introduce you to your payment terminal as well as guide you through the process of preparing and configuring it in order to quickly begin processing payments.
Your PAX A920 Pro payment processing terminal comes with the following:
You may also have an optional charger and external printer included, but this document addresses the most basic delivery configuration.
The following illustrations show the location of the main terminal features and hardware:
PayFacto uses a self-service terminal activation procedure designed to save time while also providing better security. The new activation procedure applies only to countertop and mobile PAX payment terminals using the Android operating system. The new procedure applies to:
All new merchants activating their terminals for the first time
Any existing merchants adding new payment terminals
Any existing merchants receiving replacement terminals
After you configure the terminal's network connection(s) and power on the terminal, the procedure comprises of 2 parts:
NOTE: If you have multiple new payment terminals, you need to perform the activation procedure on each terminal individually.
After configuring the terminal’s network connection, you need to start the PayFacto payment application to complete the remaining steps. Terminal activation requires you to input a One Time Passcode (OTP) that PayFacto sends to the email address or telephone number registered to your account.
IMPORTANT! To receive the OTP on your phone, your registered phone number must be able to receive text messages (SMS). If you cannot receive text messages, select the email option to get the OTP.
Touch the PAYMENT icon on the main screen. The Welcome To Your Payment Terminal screen appears.
NOTE: The terminal may need to download host and security parameters; this can take a few moments.
In the top right corner of the screen, your terminal ID (TID) appears; confirm that the number on the screen matches the TID on the label on the back of your terminal. The TID will not appear on your terminal screen after you complete the activation process.
IMPORTANT! If the TID does not match, call PayFacto immediately.
Touch anywhere on the screen to begin the activation process.
Touch the desired option to receive the OTP.
Phone Number
Touch the Send Code button.
IMPORTANT! The OTP code is valid for 15 minutes after you receive it. If you wait more than 15 minutes to enter the OTP, the terminal will display an error and you will have to request a new OTP.
If you select Email, look for a message from [email protected].
After you receive the 6-digit activation code, use the on-screen keypad to enter the code on the terminal screen.
If you enter the code incorrectly, a red exclamation appears to indicate that the code is incorrect.
Re-enter the code, or touch Resend Code to obtain a new OTP.
After you enter the OTP correctly, the payment application displays the Set Administrative Password screen to .
To prevent unauthorized individuals from changing the terminal’s configuration, you need to set the Administrator and Merchant passwords. These passwords restrict access to certain functions on the terminal.
When setting your passwords, you must respect the following parameters:
Passwords must be 6 characters long
The Administrator and Merchant passwords cannot be the same (can’t match)
You cannot use the same digit 6 times consecutively (for example: 111111 or 777777)
You cannot use 6 consecutive numbers, either ascending or descending (for example: 123456 or 987654)
On the Set Administrative Password screen, use the on-screen keypad to enter a 6-digit password in the Admin Password field and touch the Next icon on the keypad.
On the Confirm Administrative Password screen, re-enter the password in the Admin Password field and touch the Next icon on the keypad.
On the Set Merchant Password screen, use the on-screen keypad to enter a 6-digit password in the Merchant Password
Your payment terminal is now ready for use.
This step is required to have the STPISecure client start automatically when Windows starts, and have it run silently in the background.
IMPORTANT! If you have already configured the STPIClient application shortcut to start automatically with Windows by copying its shortcut to the Windows StartUp folder, be sure to un-do this configuration before proceeding further
Using Windows Explorer, browse to:
C:\Program Files (x86)\PayFacto\STPISecure\Install_As_Service\STPI InstallAsService\
Depending on your operating system, select the Win64 folder for 64-bit versions of Windows or Win32 for 32-bit versions of Windows.
Locate the file called InstallTGIClientService64.bat (for 64-bit Windows) or InstallTGIClientService32.bat (for 32-bit Windows). Right-click the file and select Run as administrator.
You may see a UAC prompt. Click Yes.
A command prompt window saying Running admin shell will appear. Leave it there. Do not close it.
The MSSM service installer window will open. Click the browse button (3 dots) next to the Path field:
In the Locate Application File window, browse to:
C:\Program Files (x86)\PayFacto\STPISecure\STPIClient\
Select the Run.bat file and click Open.
You will be taken back to the MSSN service Installer window. Click the Install Service button.
A confirmation message will appear. Click OK.
Locate the file called StartSTPIClientService64.bat (for 64-bit Windows) or StartSTPIClientService32.bat (for 32-bit Windows). Right-click the file and select Run as administrator.
You may see a UAC prompt. Click Yes.
To verify that the service is started properly, right-click the Windows start button and select the Run… option. You can also press the Windows key + R on your keyboard. In the Open: box, type services.msc and click OK.
In the services list, look for the StpiClient service. The Status should be Running and the Startup Type should be Automatic.
At this point, it is good practice to test your system to make sure it will recover properly in case of an unexpected restart. To do this, simply restart the PC and log back on.
From there, make sure that the STPIClient service is running by looking at the Windows services as described above.
The STPI Client is now up-and-running. It is also properly configured as a service and will start automatically in the background whenever Windows restarts.
SecureTable supports voids initiated by the POS system. To be able to use this feature, the POS system must support it as well.
The Void Sale operation consists in cancelling a sale transaction that was carried out in the current transaction batch. With this operation, the funds are returned to the customer.
IMPORTANT! Only transactions from the Current Batch can be voided. Transactions that belong to a closed batch cannot be voided. To refund a transaction belonging to a closed batch, see Refunds.
Initiate the void from the POS system. The POS system should tell you which Terminal ID was used in the original transaction, as well as the original check or invoice number. The information should be available either on-screen or on a printed coupon.
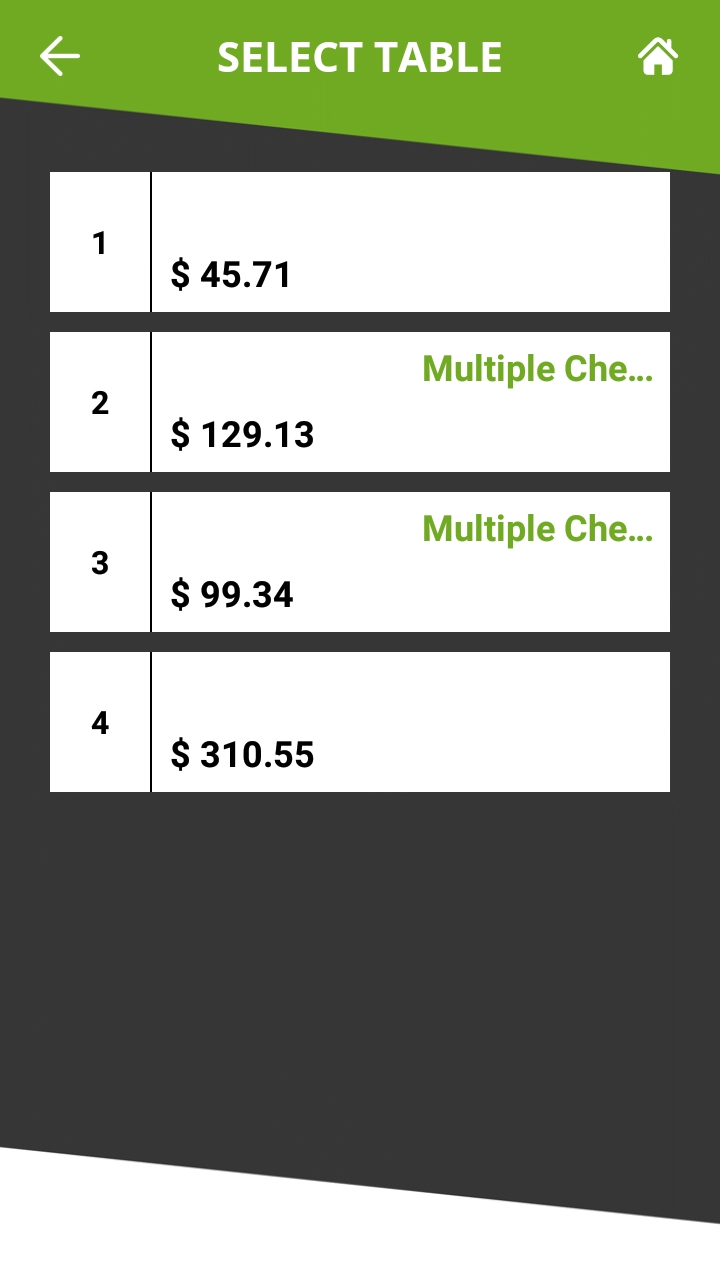
Locate the payment terminal with the appropriate Terminal ID (TID). On the SecureTable application, the terminal ID (TID) is displayed in green at the bottom of the home screen and consists of 8 digits.
Logon to SecureTable with your employee number. There is no need to enter a table or check number, so simply touch OK without entering anything if
prompted for those.
If there are voids to be treated, you will see a section for Voids at the top of the list of tables and checks. Touch the Voids box, which will display the list of pending voids
.
NOTE: If you don't see the Voids section, it means that no voids were initiated from the POS system, or your POS system does not support this feature with SecureTable
Locate the box that represents the transaction you wish to void and touch it. If multiple pending voids are listed, use the invoice (check) number or reference number to locate the one you wish to process. Touch the VOID to .
The payment application will display the transaction details. Verify that this is indeed the transaction you wish to void, then:
a. touch the green "I CONFIRM THE REQUEST" button to proceed, or;
b. Touch the red "CANCEL THE REQUEST" button to return to SecureTable. (This will return to the SecureTable Home Screen.)
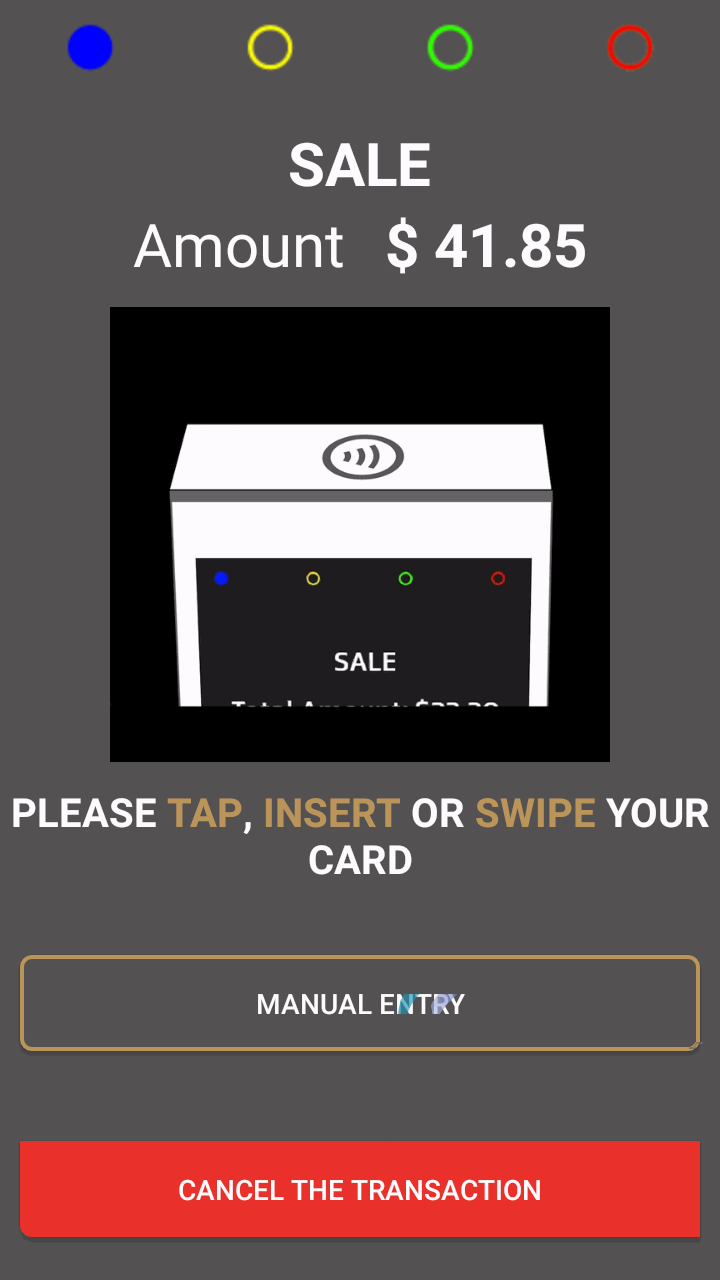
At this point, whether the customer will need to manipulate the payment terminal depends on the type of card used for the original payment.
a. For credit cards, no further manipulation is required and the void will be processed automatically.
b. For debit cards, hand the payment terminal to the customer. The customer will insert the original payment card and follow the prompts to process the void.
Once the process is completed, the terminal will return to the SecureTable home screen.
After the STPISecure client is installed, configured and running properly on the POS system, make sure that all payment terminals are properly configured so they can communicate with the POS system. Android payment terminals are generally shipped with all the necessary applications pre-installed by PayFacto, including the latest versions of SecureTable and of the latest version of the Payment application. If the SecureTable application appears to be missing, install it using the instructions below.
The instructions below were created using the PAX A920 Android-based Payment terminal and the PAX store. However, the instructions are the same for all Android-based payment terminals, such as other models offered by PAX, AMP terminals or Clover Flex. For brands other than PAX, the mechanism they use to install apps may look different but the general principle should remain the same.
Before installing SecureTable on your payment terminal, please make sure that the appropriate payment application is installed and configured properly. You may also want to check out our
documentation on the PAX A920, A920Pro or A80 terminals or any other Android-based terminal you may be using with SecureTable.
Android PayFacto Application - Manual setup of application
PayFacto - Clerk Management
PayFacto Quick Reference Guide
PAX A920 Payment Terminal:
PAX A920 - Introduction
PAX A920 - Quick Setup Guide
Getting to know the PAX A920 Terminal
NOTE: The SecureTable application can be installed on certified payment terminals only. It cannot be used on regular phones or tablets.
Power-up your terminal, and make sure it is connected to the Internet.
If any application start automatically, shut them down to reach the Android home screen.
3. From the Android home screen, start the PAXSTORE by touching the appropriate icon.
In the PAXSTORE (Application Marketplace), search for SecureTable.
Locate the version which is appropriate for your region, and touch the GET button to download and install it.
During the installation, the GET button will turn to a circle with the Pause symbol inside. Once installation is complete, the GET button will change to OPEN.
An icon will also be created on the Android home screen.
Installation of the SecureTable application is now complete.
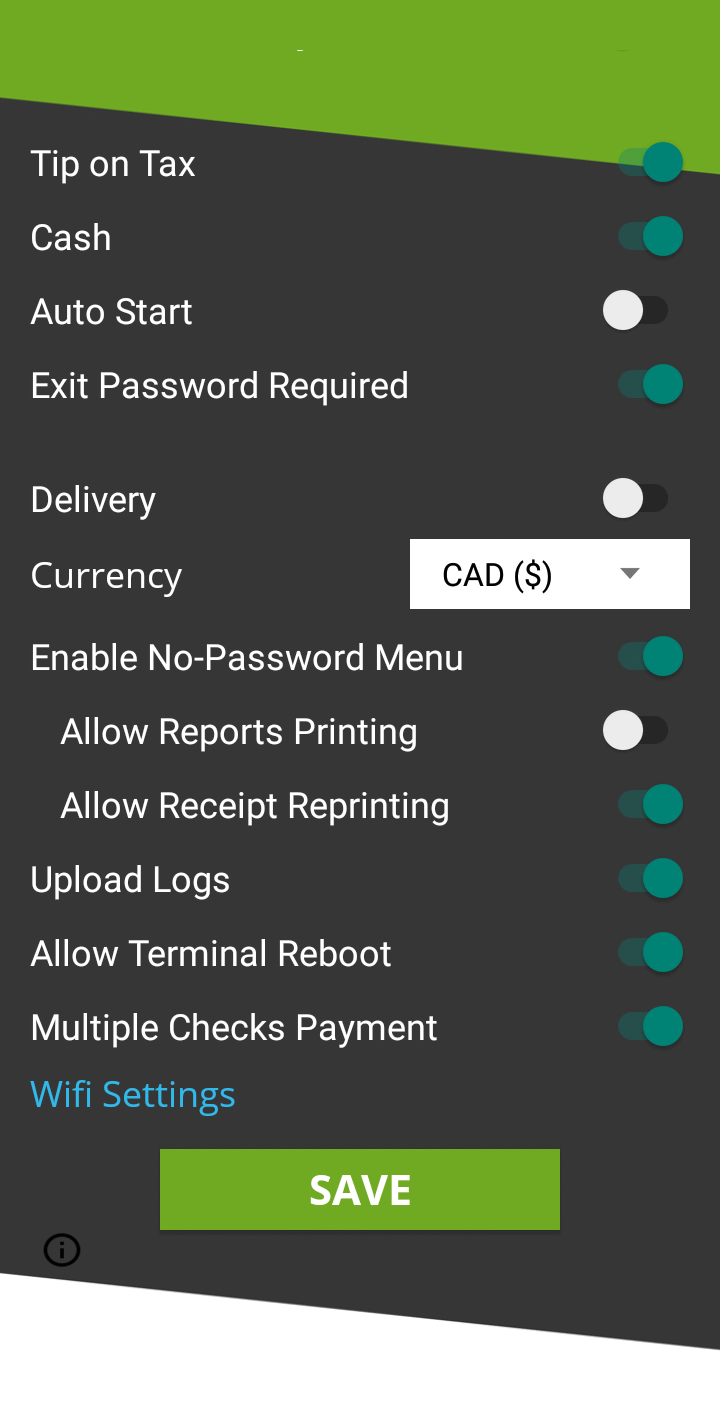
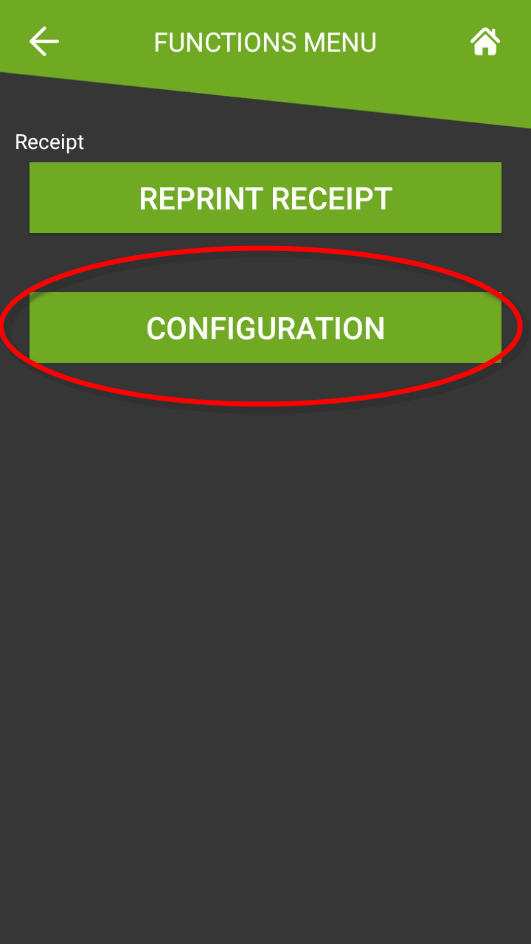
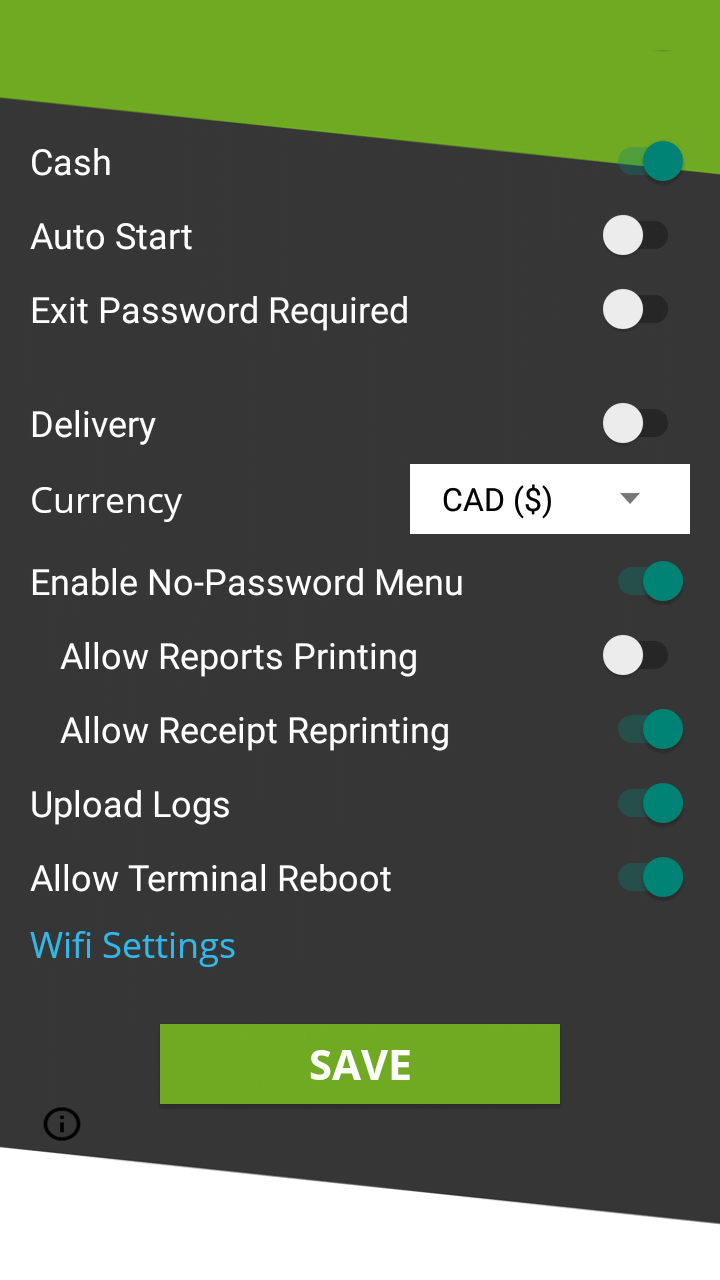
The No Password Menu is a simplified version of the Functions menu. It contains basic functions that are useful to employees, while manager functions remain hidden.
NOTE: Before the No Password menu can be used, the corresponding option needs to be enabled in the SecureTable application settings. Please consult the Enable No Password Menu option in the SecureTable application settings for more details.
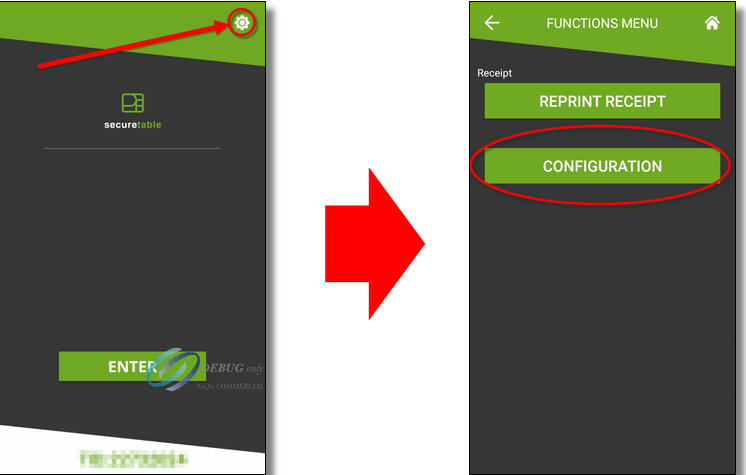
From the SecureTable home screen, touch the cog wheel icon ( ) at the top-right of the screen.
The FUNCTIONS menu will be displayed. The options available from this menu will vary based on your SecureTable application settings.
Print Reports
The Print Reports section will be displayed if the Allow Reports Printing option is enabled in the SecureTable Application Settings.
PRINT DETAILED REPORT
This option prints a report with the details of every card payment processed at the terminal since the last batch closing.
NOTE: Cash payments processed through the SecureTable application are not included in this report. Please use your POS system's reports for this purpose.
PRINT SUMMARY REPORT
This option prints a report that shows a summary of sales, refunds, tips and grand total for each card brand.
Receipt
The Receipt section will be displayed if the AllowReceiptReprinting option is enabled in the SecureTable Application Settings.
REPRINT RECEIPT
This option allows receipts to to be reprinted based on invoice number, sequence number or the last transaction processed at the terminal.
CONFIGURATION
This option brings up the SecureTable application settings.
The full functions menu contains all the options from the No Password Menu, plus a few more administrative options. To access the full functions menu:
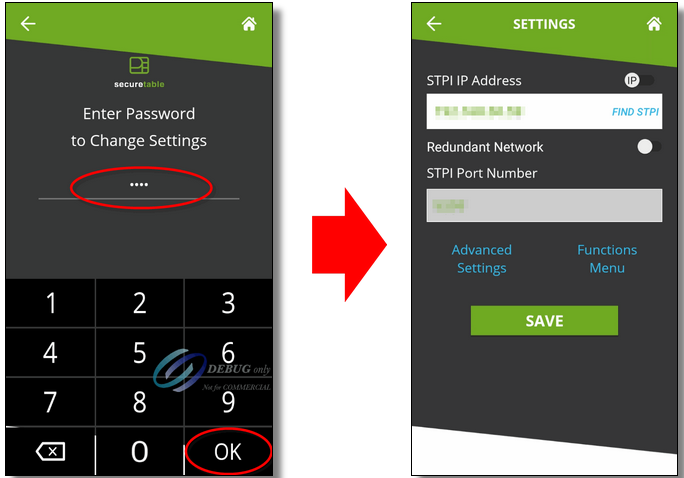
From the SecureTable home screen, touch the cog wheel icon ( ) at the top-right of the screen.
The FUNCTIONS menu (no password menu) will be displayed. Touch the CONFIGURATION option.
You will be prompted to enter a password before you can access settings. Enter the password and press the OK key.
NOTE: The default password after a new installation is 1234.
The Functions menu will be displayed. Contrary to the No Password Menu discussed above, all the options shown below are always available, regardless of the status of the advanced settings.
SETTLE BATCH
This option will manually close the current batch.
IMPORTANT! Transactions that are part of a batch that is closed can no longer be voided, reprinted or otherwise modified.
PRINT DETAILED REPORT
This option prints a report with the details of every card payment processed at the terminal since the last batch closing.
PRINT SUMMARY REPORT
This option prints a report that shows a summary of sales, refunds, tips and grand total for each card brand.
BACKUP SETTINGS
This option will save all of the current settings to an S3 Bucket cloud location. Backing up the settings allows for quick recovery of the configuration in case the settings get reset to default after a major application update or Android update.
RESTORE SETTINGS
Use this option to restore saved settings. Using this option will override all settings with the ones found in the backup, except for the terminal ID.
REPRINT RECEIPT
This option allows receipts to to be reprinted based on invoice number, sequence number or the last transaction processed at the terminal.
Before a license can be activated, it needs to be purchased and created for you. Please contact the PayFacto Boarding team or your local Sales Representative to purchase a STPISecure license.
After you have purchased a STPISecure license, the license file will be sent to you as a text file attachment via e-mail. The e-mail will come from the PayFacto Boarding Team or your local Sales Representative.
Save the file from the e-mail to your Windows Desktop. Typically, the file is named something like "Licdefault_12345.txt".
Rename the file to "Lic.txt". To achieve this, you can right-click the file and select the Rename option, or select the file and press the F2 key on your keyboard.
Move the file to the following folder:
C:\Program Files (x86)\PayFacto\STPISecure\STPIClient\
The license activation process is now complete.
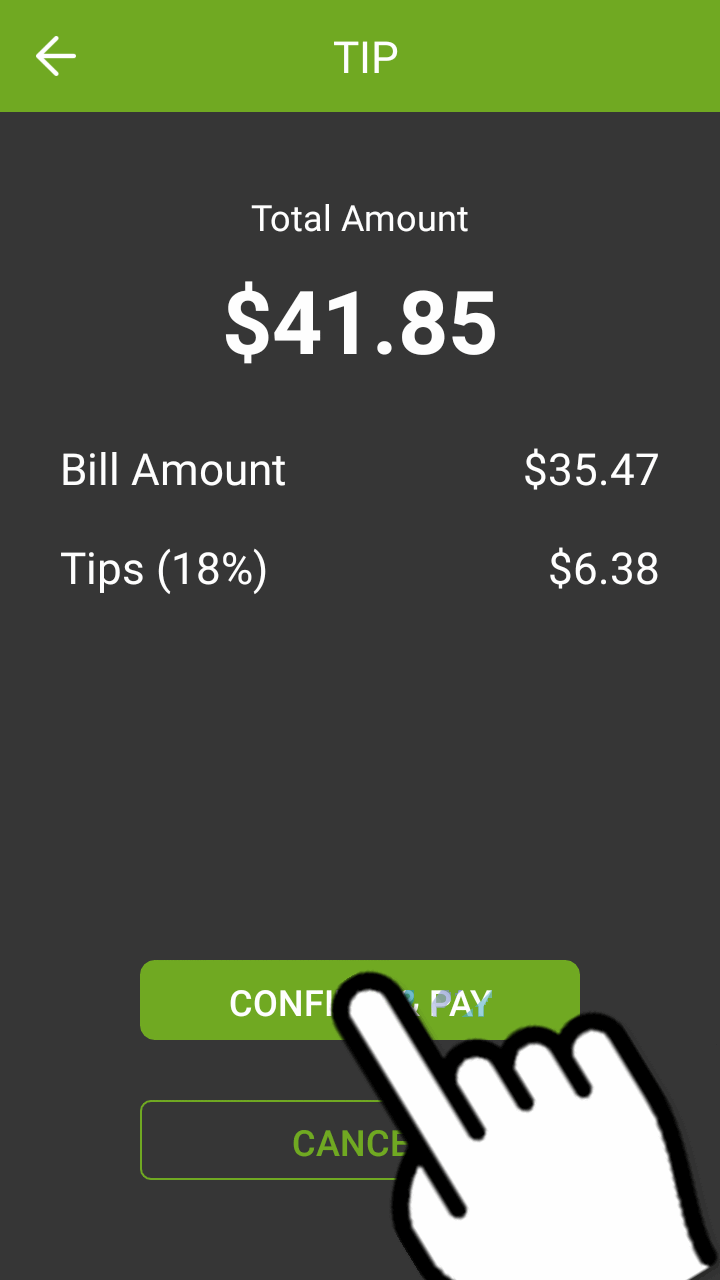
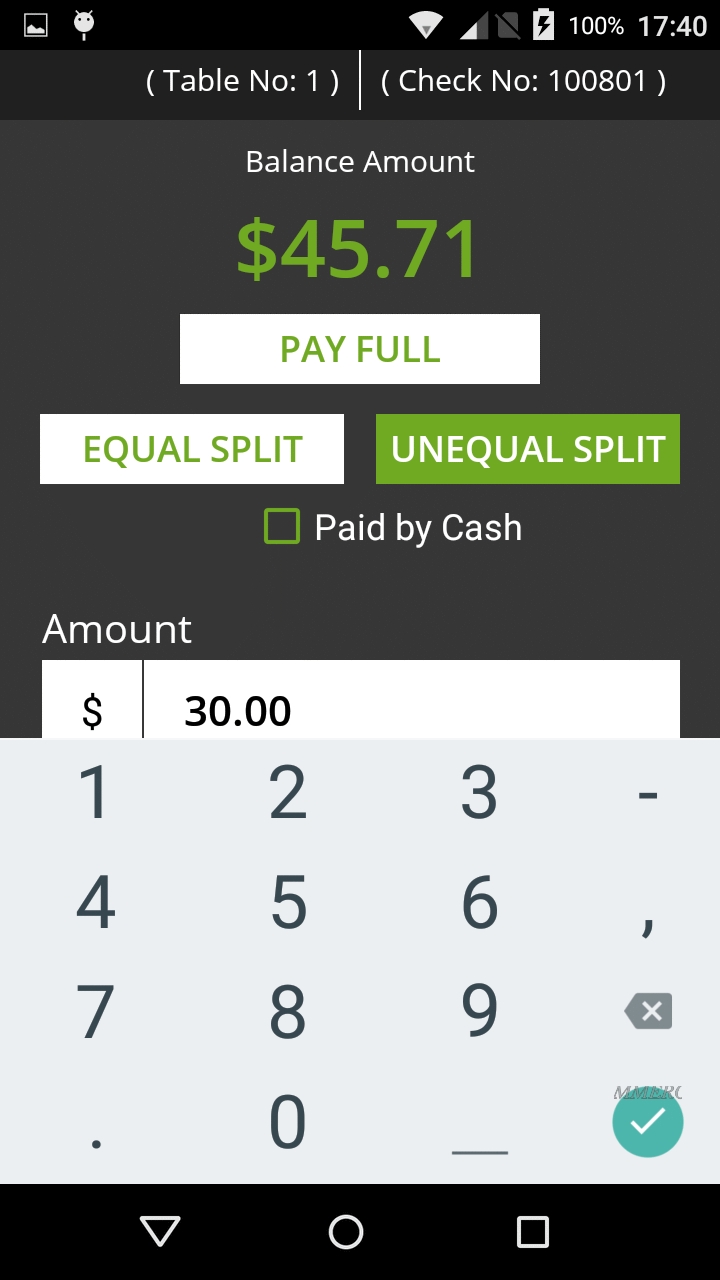
This section will cover the general workflow that users and customers will see when using SecureTable. The workflow will vary slightly based on the SecureTable application's configuration. The workflow steps that are user-configurable are also optional and can be skipped during the transaction process. Those will be indicated as such below.
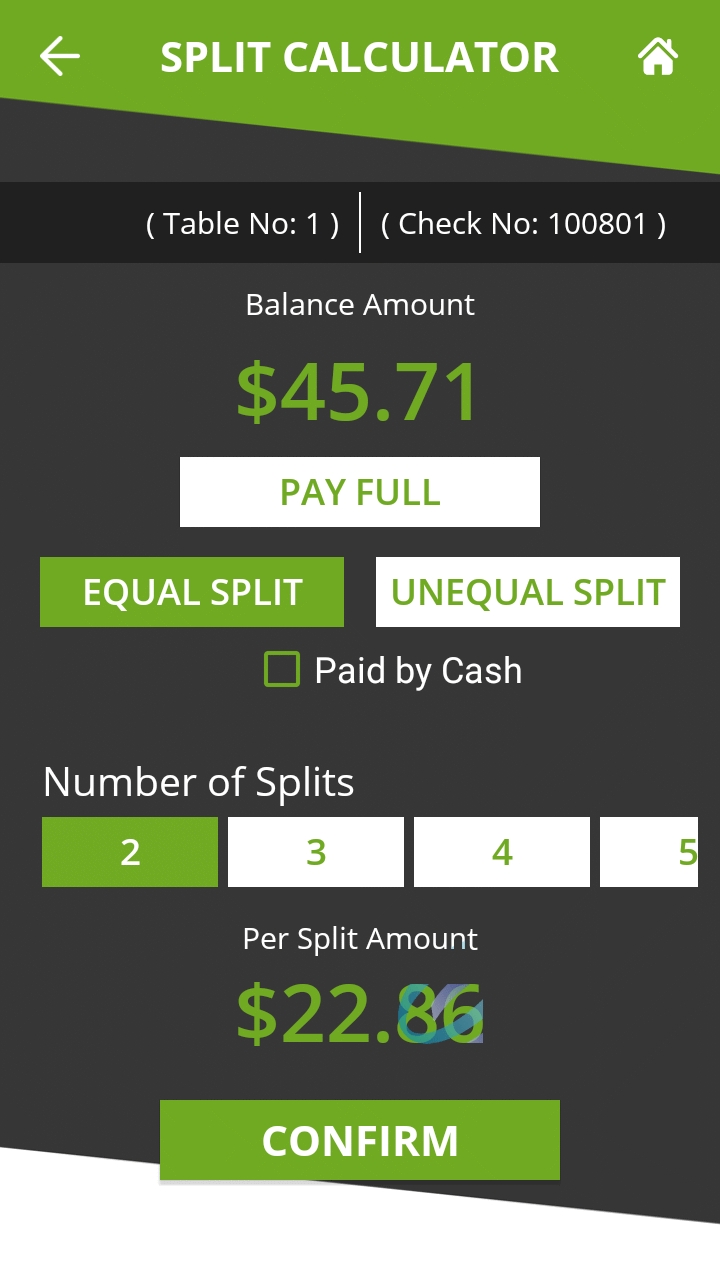
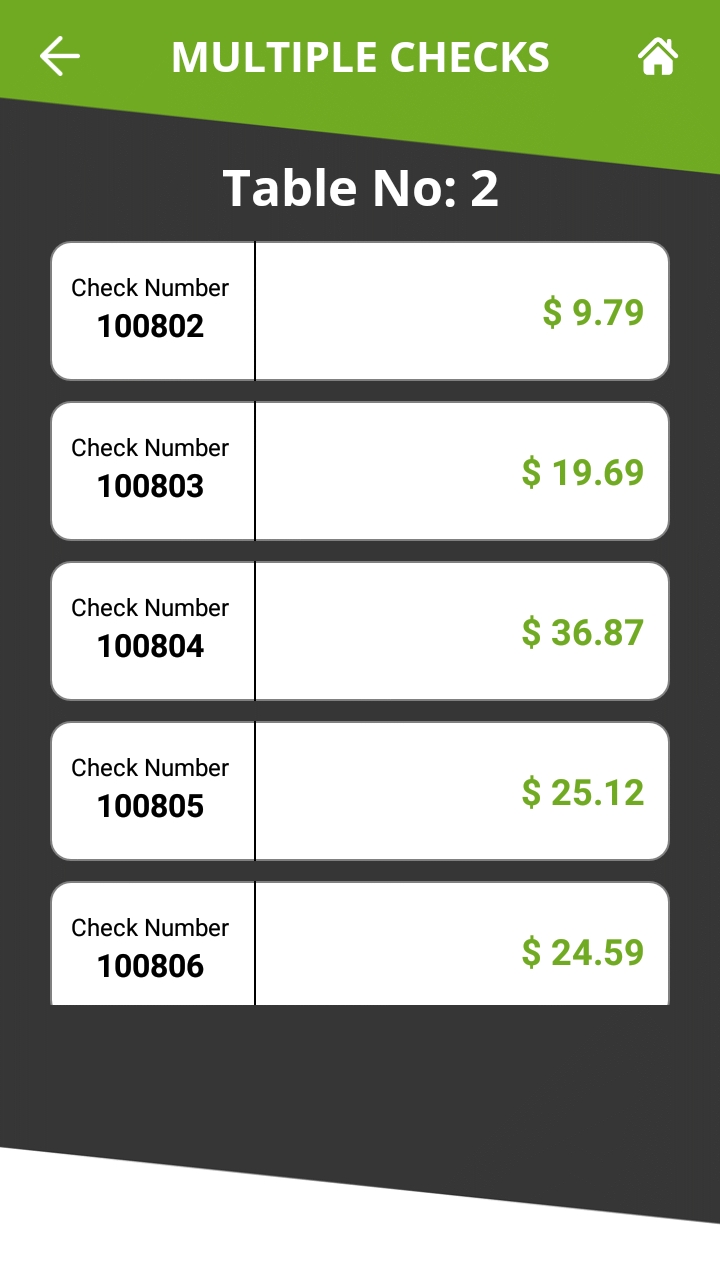
Before starting a transaction using a payment terminal with SecureTable, at least one check must be printed from the POS system. SecureTable can also work with split checks as well a tables with multiple checks. Open tables without printed checks cannot be accessed by SecureTable.
Make sure that the Maitre’D Electronic Funds Transfer Interface and Enhanced EFT options are included on the Maitre’D license. To confirm this, simply logon to the Maitre’D Back-Office using appropriate credentials, click on the File menu and select the Licenses option.
This will bring up the license’s properties. Two options are required for SecureTable to operate properly:
PayFacto uses a self-service terminal activation procedure designed to save time while also providing better security. The new activation procedure applies only to countertop and mobile PAX payment terminals using the Android operating system. The new procedure applies to:
All new merchants activating their terminals for the first time
Any existing merchants adding new payment terminals
This step is required to have the STPISecure client start automatically when Windows starts, and have it run silently in the background.
IMPORTANT! If you have already configured the STPIClient application shortcut to start automatically with Windows by copying its shortcut to the Windows StartUp folder, be sure to un-do this configuration before proceeding further.
Using Windows Explorer, browse to:
introduction
Requirements
STPI Secure Installation
Maître'D Configuration
SecureTable Application
Payment Process
Tasks - How To's
Troubleshooting
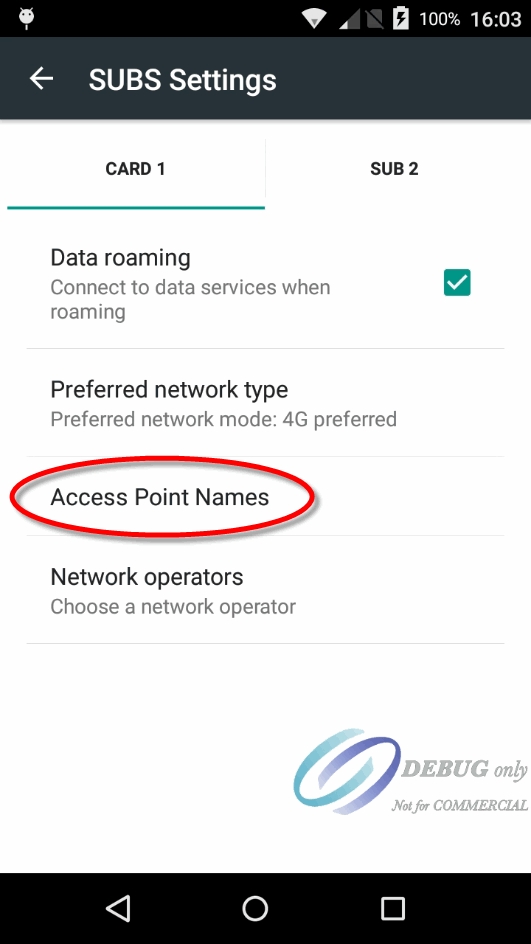
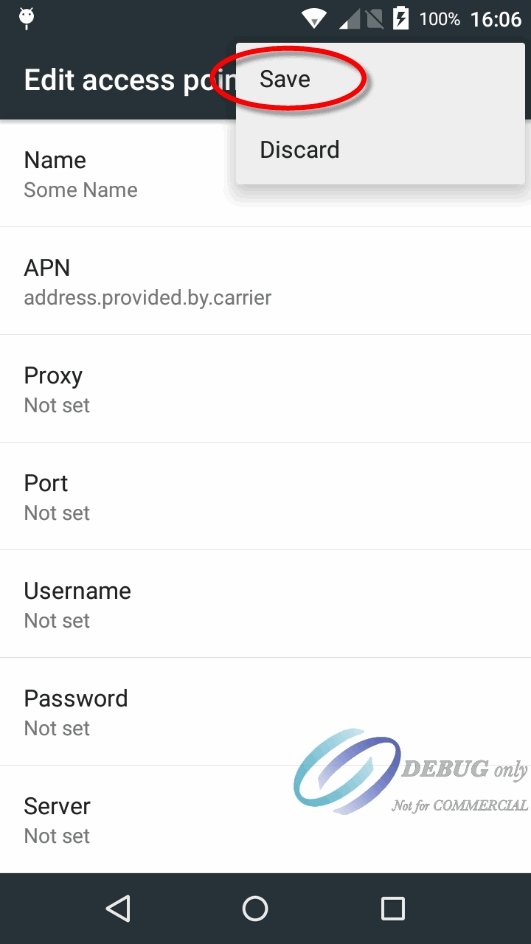
Configuring the Terminal Network Connections
Installing the SIM Card
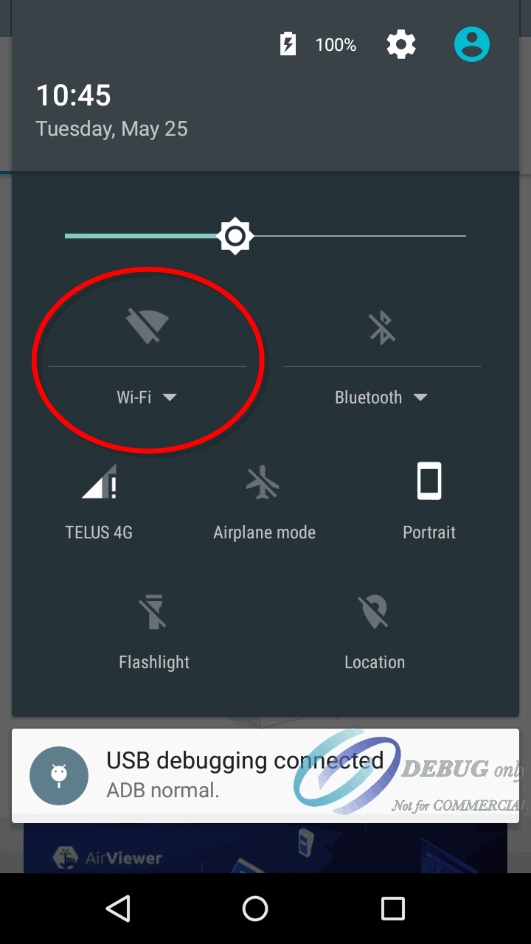
Configuring the Terminal Wi-Fi Connection
Configuring the Terminal Display Language
Activating the terminal
Terminal Activation
Activate Terminal
Set Passwords
Working with the terminal
Powering the Terminal On or Off
Terminal Input Options
Card Payment Options
Payment terminal
Roll of printer paper
AC power outlet
USB to USB Type-C charging cable
1. Magnetic stripe reader 2. Color touchscreen 3. Chip card reader 4. Scanner button
5. Volume control button 6. USB Type-C charging port 7. Power button 8. Scanner 9. Contactless payment reader
10. Printer 11. Printer latch 12. Rear camera 13. Battery cover 14. Battery cover latch
On the Confirm Merchant Password screen, re-enter the password in the Merchant Password field and touch the Next icon on the keypad.
Interface Electronic Fund Transfer.
Enhanced EFT.
If any of these two options are missing, they will need to be purchased before you can use SecureTable. Please contact your local sales representative.
Logon to the Maitre’D Back-Office with appropriate credentials. (Distributor or System Owner)
Start the Electronic Funds Transfer Module.
Click the View menu, and select Options…
The Configuration screen opens on the Interface branch.
The settings from the Interface, Identification, Operation, Receipt, Payment Device Tip Suggestion, Remote Payment Device and Home Page branches don't have any effect on the operation of SecureTable. Please make sure not to change or remove any settings found in these pages, as these could affect the operation of tethered payment terminals.
NOTE: It is possible to use tethered payment terminals from a third-party processor along with SecureTable. The settings in these windows would then be setup per your processor’s requirements.
Click on the Pay at the Table branch.
Pay at the table
Enable this option to activate Pay at the Table (PATT) functionality.
PATT Protocol
Select the SecureTablePay protocol.
Log Level
Select the desired log level for the Pay at the Table interface. Available choices are:
None: No log file is created.
Standard: Standard log level. All operations are logged in a summary format.
Detailed: Detailed log level. All operations are logged with detailed information.
Debug: Detailed log level with extra information for troubleshooting and investigation purposes.
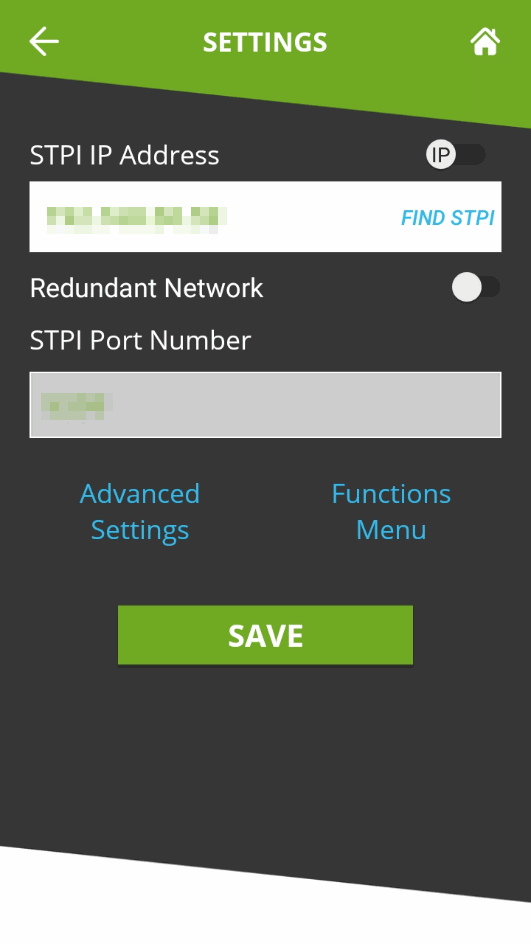
TCP Port
Type in the TCP Port number used by the STPI Secure client.
Send Invoices
Disabled. This option is not available because it is not compatible with the SecureTablePay protocol.
Get Invoice Status
Disabled. This option is not available because it is not compatible with the SecureTablePay protocol.
Partial Invoice Number
Enable this option to allow the payment terminal to retrieve checks by entering only the last 4 digits of the check number. If this option is disabled, the full check number will be required to retrieve checks.
Validate Employee
Enable this option to force the validation of the employee number entered at the payment terminal. With this option enabled, only the employee who owns the table associated with the printed check will be able to access that check from the payment terminal. If this option is disabled, any employee will be able to access any checks from the payment terminal.
Locking mode
Select the locking mode that will be used when accessing checks from the payment terminal. Two locking modes are available:
Table Locking
Select the table locking mode to lock the entire table as soon as a check is accessed by a payment terminal with SecureTable. For example, if you have 4 printed checks on Table #99, accessing any check from table #99 from a payment terminal with SecureTable will lock all checks from table #99. This prevents any of these checks from being accessed by other payment terminals or POS workstations.
Invoice Locking
Select the invoice locking option to lock only the check being accessed, without locking the entire table. This allows other checks on a given table to be closed simultaneously with other payment terminals or from POS workstations.
Shared Folder
This option is not available because it is not compatible with the SecureTablePay protocol.
Click OK to save changes and close the options window.
As soon as a table or invoice is accessed from a payment terminal with SecureTable, it is locked. This is done to prevent accidental double payment or double processing of invoices. While it is possible to override table or invoice locking, it is not recommended to do so. Unlocking a table or invoice in the middle of it being processed can cause invoices to remain open after being paid and discrepancies in reporting.
After you configure the terminal's network connection(s) and power on the terminal, the procedure comprises of 2 parts:
NOTE: If you have multiple new payment terminals, you need to perform the activation procedure on each terminal individually.
After configuring the terminal’s network connection, you need to start the PayFacto payment application to complete the remaining steps. Terminal activation requires you to input a One Time Passcode (OTP) that PayFacto sends to the email address or telephone number registered to your account.
IMPORTANT! To receive the OTP on your phone, your registered phone number must be able to receive text messages (SMS). If you cannot receive text messages, select the email option to get the OTP.
Touch the PAYMENT icon on the main screen. The Welcome To Your Payment Terminal screen appears.
NOTE: The terminal may need to download host and security parameters; this can take a few moments.
In the top right corner of the screen, your terminal ID (TID) appears; confirm that the number on the screen matches the TID on the label on the back of your terminal. The TID will not appear on your terminal screen after you complete the activation process.
IMPORTANT! If the TID does not match, call PayFacto immediately.
Touch anywhere on the screen to begin the activation process.
Touch the desired option to receive the OTP.
Phone Number
Touch the Send Code button.
IMPORTANT! The OTP code is valid for 15 minutes after you receive it. If you wait more than 15 minutes to enter the OTP, the terminal will display an error and you will have to request a new OTP.
If you select Email, look for a message from [email protected].
After you receive the 6-digit activation code, use the on-screen keypad to enter the code on the terminal screen.
If you enter the code incorrectly, a red exclamation appears to indicate that the code is incorrect.
Re-enter the code, or touch Resend Code to obtain a new OTP.
After you enter the OTP correctly, the payment application displays the Set Administrative Password screen to configure your terminal passwords.
To prevent unauthorized individuals from changing the terminal’s configuration, you need to set the Administrator and Merchant passwords. These passwords restrict access to certain functions on the terminal.
When setting your passwords, you must respect the following parameters:
Passwords must be 6 characters long
The Administrator and Merchant passwords cannot be the same (can’t match)
You cannot use the same digit 6 times consecutively (for example: 111111 or 777777)
You cannot use 6 consecutive numbers, either ascending or descending (for example: 123456 or 987654)
On the Set Administrative Password screen, use the on-screen keypad to enter a 6-digit password in the Admin Password field and touch the Next icon on the keypad.
On the Confirm Administrative Password screen, re-enter the password in the Admin Password field and touch the Next icon on the keypad.
On the Set Merchant Password screen, use the on-screen keypad to enter a 6-digit password in the Merchant Password field and touch the Next icon on the keypad.
On the Confirm Merchant Password screen, re-enter the password in the Merchant Password field and touch the Next icon on the keypad.
Your payment terminal is now ready for use.
On a Maitre'D POS system, the latest version of the STPISecure Installer is bundled with each service pack update. To obtain the latest compatible version of the STPI Secure Installer and ensure optimal compatibility, please install the latest service pack update for your Maitre'D POS system.
Once the Maitre'D service pack update is installed, the STPISecure installer will be located here:
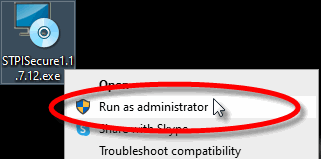
Locate the STPISecureX.X.X.X.exe file, then right-click the file and select Run as administrator.
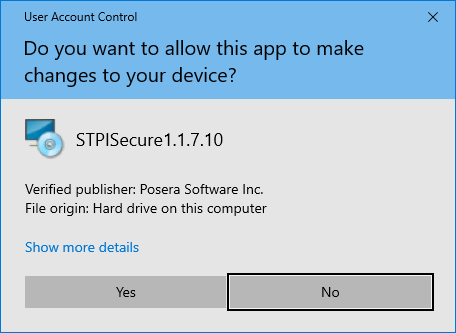
You may see a UAC prompt. Click Yes.
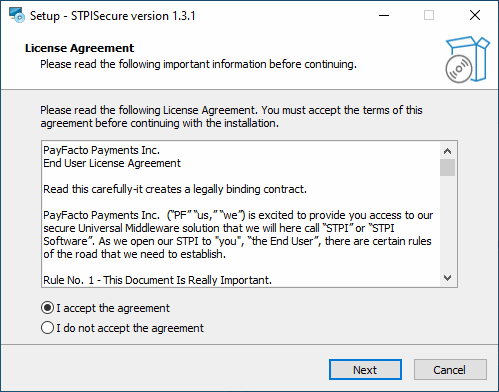
Please read the End-User Licence Agreement. If you agree with the terms, select I accept the agreement and click Next>.
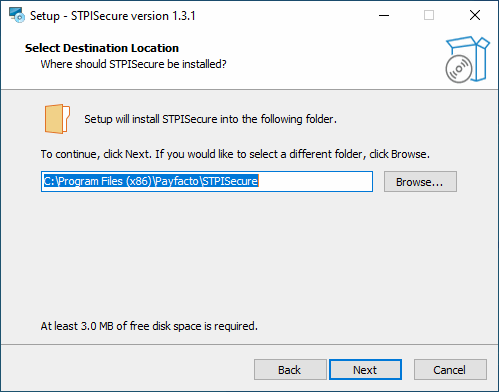
Select the installation destination for STPISecure files. Accept the default path by clicking Next>.
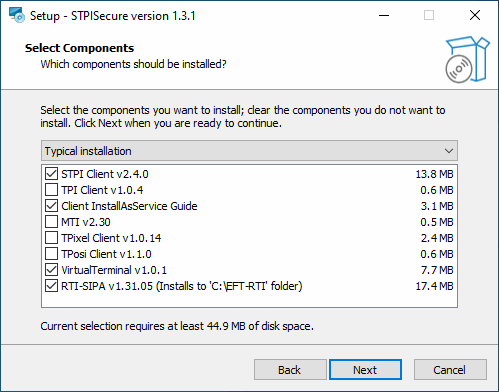
Select the components you wish to install and click Next>. A brief description of each available component is provided below. Install only what you need.
STPI Client v2.x.x.x
This component is required to use the SecureTable application with wireless payment terminals in a table service environment, with a POS system like Maitre'D, Veloce and others. It can be installed alone or alongside RTI-SIPA v1.xx.x.x if a combination of Wireless PATT terminals and fixed terminals are used.
STPI Client will have Tyro enabled
Select this option only if you are using STPISecure with Tyro EFTPOS solutions in Australia.
TPI Client v1.x.x
This component is only required with older versions of Maitre'D, such as 7.05.x.x. Do NOT install this component with newer versions of Maitre'D. Client
InstallAsService Guide
This component is optional and copies documents to the install folder with instructions on how to setup various clients as services.
MTI v2.30
This component is required for the Micros POS system only.
TPixel Client v1.0.12
This component is required for the Pixel Point POS system only.
TPosi Client v1.1.0
This component is required for the Positouch POS system only.
VirtualTerminal v1.0.1
This is an optional component that allows for the software to be tested and demonstrated.
RTI-SIPA v1.xx.x.x
This component installs the Retail Terminal Interface for Semi-Integrated Payment Application (RTISIPA) plugin files for use with the SecurePay application. This component needs to be installed on the POS system's main Back-Office PC as well as on all POS workstations that will manage a payment terminal. It can be installed alone or alongside STPI Client v2.x.x.x if a combination of Wireless PATT terminals and fixed terminals are used.
NOTE: If you don't use fixed payments terminals with SecurePay, you don't need to install this component
If you selected the Tyro option (STPI Client will have Tyro enabled), a passphrase will be requested. Create your own passphrase at this point and be sure to remember it, or write it down and store in a secure location.
NOTE: The passphrase must be at least 8 characters long and contain at least 1 uppercase letter, 1 lowercase letter, 1 number and 1 special character. The Next> button will remain grayed-out (inactive) until those requirements are met.
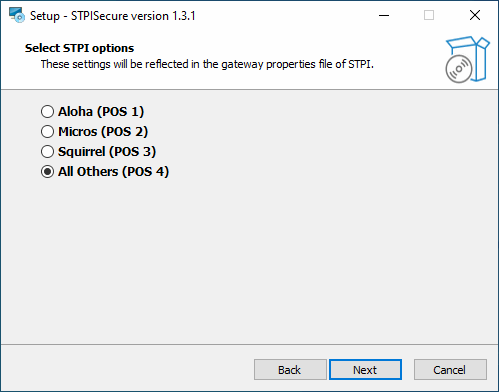
Select the All Others (POS 4) option and click Next>.
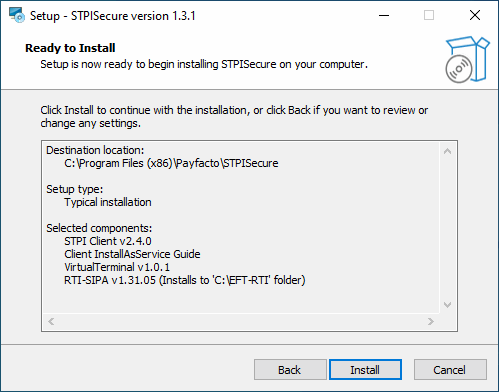
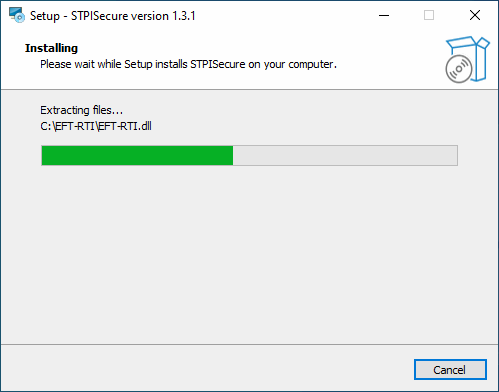
The setup wizard is now ready to begin the automated installation process. Review your settings and click the Install button.
You will see various progress bars during the installation process. This could take a few minutes.
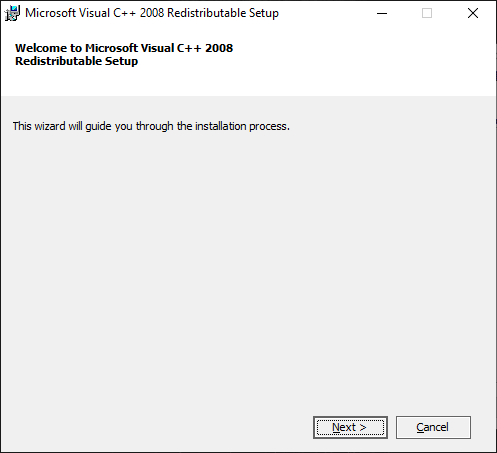
a. During the installation, you could see the installation of required components like Microsoft C++ 2008 Redistributables. This will only appear if the component is missing from your system. Otherwise, you will not see this.
b. Select I have read and accept the license terms and click Install.
c. A progress bar will be displayed during the installation process.
d. When the process completes, a confirmation will appear. Click Finish.
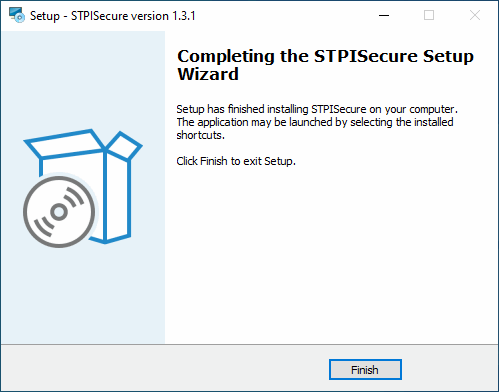
Once the installation completes, you will see the screen pictured below. Click the Finish button.
This completes the installation process for the STPISecure Client software.
• Maitre’D Electronic Funds Transfer Interface.
• Maitre’D Enhanced EFT option.
• Any supported Windows operating system with all latest updates.
• Java SE Runtime Environment.
• Microsoft .NET Framework 3.5.
• STPI Client software (included with the STPISecure Installer)
NOTE: The TPI client is NOT required, thanks to the direct integration of SecureTable within the Maitre’D software.
• SecureTable-Compatible Payment terminal(s)
• 1 Gbps (Gigabit) Ethernet (wired) network or better.
• WiFi network (802.11 ac or better)
• High-Speed Internet connection.
Here is a quick overview of the entire installation and setup process:
Install/enable Microsoft .NET Framework 3.5 SP1.
Install the latest version of Oracle’s Java for Windows.
Use the STPISecure to installer to install the STPIClient software.
Install the STPIClient license.
Start the STPIClient application for the first time.
Configure the STPIClient to start as a service (Optional).
Configure your POS System.
Connect, power up and configure payment terminals.
By default, the payment terminals using SecureTable will communicate with the POS system over TCP port 9999.
• Open TCP port 9999 on the corporate firewall.
• Open TCP port 9999 on the Windows Defender Firewall on the POS system's Back-Office as well as on all POS workstations.
• The wireless network (for wireless payment terminals) needs to be able to communicate with the POS System.
• Each payment terminal needs access to the Internet.
The .NET Framework (pronounced as "dot net") is a software framework developed by Microsoft that runs primarily on Microsoft Windows. Microsoft .NET Framework version 3.5 Service Pack 1 is required before the STPISecure installer can be used to install the STPISecure client or other components, such as the RTI-SIPA plugin
On Windows 10, starting with version 1809, Microsoft .NET Framework 3.5 SP1 is included as a standard Windows feature and enabled by default. However, older versions of Windows 10, Enterprise or IoT editions, could be missing this essential component. Here is the procedure to check whether .NET Framework 3.5 SP1 is installed and how to enable it on Windows 10:
Click on the Windows 10 Start button and type Control Panel.
The Control Panel app should appear as a search result. Click on Open.
Within the Control Panel app, click on Programs.
Under Programs and Features, select Turn Windows features on or off.
The Windows Features list will appear.
Look for the feature called .NET Framework 3.5 (includes .NET 2.0 and 3.0).
a. If this feature is not listed, install .NET Framework manually. (See below)
b. If you see a black square in this checkbox, .NET Framework 3.5 is already enabled and no further action is required.
c. If the checkbox is blank, enable it.
NOTE: The black square in the check box means that the feature itself is enabled, but that some optional components are disabled. The optional components are not required for STPISecure or RTI-SIPA, so leave them disabled.
Click OK on the Windows Features list. This will close the list and apply any changes.
Files may be copied and you may be required to restart the PC.
For versions of Windows prior to Windows 10 1809, or for some older Enterprise or IoT editions, Microsoft .NET Framework 3.5 SP1 may need to be downloaded and installed manually. The full installer can be obtained from the official Microsoft download site here: Microsoft .NET Framework 3.5 SP1 Download the file and double-click it to start the installation process. Follow the on-screen instructions and restart your PC as required.
IMPORTANT! If the link provided here does not work, please use your preferred search engine and look for "Microsoft .NET Framework 3.5". Be sure to download the files from the official Microsoft download site. For security reasons, please avoid non-Microsoft sources.
The STPISecure Installer, the STPISecure client software for SecureTable and the RTI-SIPA plugin for SecurePay requires the installation of Java for Windows software. This can be downloaded and installed for free from Oracle’s Java website, Here. Please download and install the latest version of Java for Windows for your specific Windows edition (32-bit
NOTE: Please consult Oracle's Java website for detailed licensing conditions and support.
Once the Maitre'D service pack update is installed, the STPISecure installer will be located here:
C:\POSERA\MaitreD\PRG\Setup
Locate the STPISecureX.X.X.X.exe file, then right-click the file and select Run as administrator.
You may see a UAC prompt. Click Yes.
Please read the End-User Licence Agreement. If you agree with the terms, select I accept the agreement and click Next>.
Select the installation destination for STPISecure files. Accept the default path by clicking Next>.
Select the components you wish to install and click Next>. A brief description of each available component is provided below. Install only what you need.
STPI Client v2.x.x.x
This component is required to use the SecureTable application with wireless payment terminals in a table service environment, with a POS system like Maitre'D, Veloce and others. It can be installed alone or alongside RTI-SIPA v1.xx.x.x if a combination of Wireless PATT terminals and fixed terminals are used.
TPI Client v1.x.x
This component is only required with older versions of Maitre'D, such as 7.05.x.x. Do NOT install this component with newer versions of Maitre'D.
Client InstallAsService Guide
This component is optional and copies documents to the install folder with instructions on how to setup various clients as services.
MTI v2.30
This component is required for the Micros POS system only.
TPixel Client v1.0.12
This component is required for the Pixel Point POS system only.
TPosi Client v1.1.0
This component is required for the Positouch POS system only.
VirtualTerminal v1.0.1
This is an optional component that allows for the software to be tested and demonstrated.
RTI-SIPA v1.xx.x.x
This component installs the Retail Terminal Interface for Semi-Integrated Payment Application (RTI-SIPA) plugin files for use with the SecurePay application. This component needs to be installed on the POS system's main Back-Office PC as well as on all POS workstations that will manage a payment terminal. It can be installed alone or alongside STPI Client v2.x.x.x if a combination of Wireless PATT terminals and fixed terminals are used.
NOTE: If you don't use fixed payments terminals with SecurePay, you don't need to install this component
Select the All Others (POS 4) option and click Next>.
The setup wizard is now ready to begin the automated installation process. Review your settings and click the Install button.
You will see various progress bars during the installation process. This could take a few minutes.
a. During the installation, you could see the installation of required components like Microsoft C++ 2008 Redistributables. This will only appear if the component is missing from your system. Otherwise, you will not see this.
b. Select I have read and accept the license terms and click Install.
c. A progress bar will be displayed during the installation process.
d. When the process completes, a confirmation will appear. Click Finish.
Once the installation completes, you will see the screen pictured below. Click the Finish button.
This completes the installation process for the STPISecure Client software.
Depending on your operating system, select the Win64 folder for 64-bit versions of Windows or Win32 for 32-bit versions of Windows.
Locate the file called InstallTGIClientService64.bat (for 64-bit Windows) or InstallTGIClientService32.bat (for 32-bit Windows). Right-click the file and select Run as administrator.
You may see a UAC prompt. Click Yes.
A command prompt window saying Running admin shell will appear. Leave it there. Do not close it.
The MSSM service installer window will open. Click the browse button (3 dots) next to the Path field:
In the Locate Application File window, browse to:
Select the Run.bat file and click Open.
You will be taken back to the MSSN service Installer window. Click the Install Service button.
A confirmation message will appear. Click OK.
Locate the file called StartSTPIClientService64.bat (for 64-bit Windows) or StartSTPIClientService32.bat (for 32-bit Windows). Right-click the file and select Run as administrator.
You may see a UAC prompt. Click Yes.
To verify that the service is started properly, right-click the Windows start button and select the Run… option. You can also press the Windows key + R on your keyboard. In the Open: box, type services.msc and click OK.
In the services list, look for the StpiClient service. The Status should be Running and the Startup Type should be Automatic.
At this point, it is good practice to test your system to make sure it will recover properly in case of an unexpected restart. To do this, simply restart the PC and log back on. From there, make sure that the STPIClient service is running by looking at the Windows services as described above.
The STPI Client is now up-and-running. It is also properly configured as a service and will start automatically in the background whenever Windows restarts.
After you remove the terminal and accessories from the box, you need to charge the terminal before you can use it. The pre-installed battery has a protective cover on the contacts to prevent the possibility of a short circuit during transport.
Turn the terminal over.
On the back of the terminal at the bottom, slide the battery cover locking switch to the right.
Lift the battery cover off the terminal. You should notice a plastic tab at the top of the battery.
Lift the battery from the terminal and remove the plastic tab.
Insert the USB cable in the AC outlet and connect the outlet to an AC plug.
Insert the micro USB connector in the terminal’s charging port, located on the left side, below the Volume Down button. The terminal begins charging.
NOTE: The terminal’s charging port may have a protective cover; you will need to remove it before inserting the micro USB port.
If the supplied roll of printer paper was not already installed in the terminal when you received it, you will need to install it before you can print any transaction receipts.
TIP: This procedure also applies to replacing a roll of printer paper.
On the back of the terminal at the top, lift the lever to unlock and open the printer cover.
NOTE: The printer cover opens on a hinge, it does not come off the terminal.
The paper tray contains an illustration of how to install the roll of paper.
Place the roll of printer paper in the paper tray, leaving about 2 inches (5 cm) of paper beyond the printer's cutter.
IMPORTANT! Make sure the paper unrolls from the back of the roll, otherwise the printer will be unable to print the transaction receipt.
Close the printer cover until it snaps into place and remove any excess paper.
The terminal requires a network connection to communicate with the payment processor server to process transactions.
The PAX A920 is a mobile payment terminal that can connect to mobile (LTE) and wireless (Wi-Fi) networks.
Mobile network access is required for delivery and transportation use, but it can also serve as a backup connection if your Wi-Fi network reception is unreliable in certain areas.
If you plan to use your terminal outside of your usual wi-fi network, you need to install the mobile SIM card, provided by PayFacto or your mobile communications provider. The SIM card will connect you to a mobile network, allowing you to process payments anywhere the terminal has reception. The terminal uses the regular (full) SIM card size.
NOTE: If you plan to use your terminal only on your wi-fi network, you can skip this procedure and proceed directly to .
On the back of the terminal at the bottom, slide the battery cover locking switch to the right.
Lift the battery cover off the terminal.
Lift the battery from the terminal to remove and set aside.
The terminal has illustrations for the different cards it can accept. Insert your SIM card in the space identified as
IMPORTANT! The SIM card goes into the leftmost space and should not require great force to insert.
Re-install the battery by sliding the thin segment into the terminal, near the charging connectors, and pushing on the bottom of the battery to seat it correctly.
Re-install the battery cover on the terminal and slide the lock switch to the lock position on the left.
Power on the terminal by pressing and holding the Power button for 3 seconds.
The terminal should identify the SIM card and configure the mobile network settings automatically.
This section explains how to turn wi-fi on and connect to your network.
To connect to your wireless network:
On the terminal’s main screen, touch the Settings icon.
On the Settings screen, touch the Please Input Password field and use the keypad to type the password: either 9876 or pax9876@@.
Touch the checkmark icon on the keypad when you are done and touch OK.
In the Wireless & networks section, touch Wi-Fi.
If Wi-Fi is Off, touch the toggle to turn it on. If Wi-Fi is already on, a list of available networks appears.
From the list of available networks, touch the name of the network you want to connect to.
TIP: You can touch Show password before typing to ensure you are entering the password correctly.
After the terminal displays Connected for the selected network, touch the Back icon to return to the Settings screen.
Touch the Back icon again to return to the main screen.
By default, the terminal displays all information in English. This procedure explains how to change the terminal’s display language if necessary.
IMPORTANT! Selecting a different language changes all text that appears on the terminal.
To change the terminal display language:
On the terminal’s main screen, touch the Settings icon.
On the Settings screen, touch the Please Input Password field and use the keypad to type the password: either 9876 or pax9876@@.
Touch the checkmark icon on the keypad when you are done and touch OK.
In order to get accurate reporting data with SecureTable or SecurePay, media types known as mappings need to be created for each card brand that will be accepted by the merchant. Before beginning, gather information on all the card brands and payment types that are accepted at the restaurant. Obtain this information from the restaurant owner and managers, and from the restaurant’s credit card processor.
NOTE: SecureTable and SecurePay can be used at the same time on the same POS system. Therefore, the merchant can have any combination of stationary terminals using SecurePay and mobile terminals using SecureTable. Both types of terminals will share the same media type mappings.
Logon to the Maitre’D Back-Office with appropriate credentials. (Distributor or System Owner)
Start the Point of Sale Control Module.
Click the Payments menu, and select the Media Types… option.
The list of all current media types will be displayed. Click the Add button.
A blank Media Type window will open directly on the Media Type branch. Configure according to the information below:
Media Type ID #
The Media Type ID number is automatically determined by Maitre’D when the Media Type is created. Maitre’D will always use the lowest available number between #2 and #23 inclusively.
Description
Enter a meaningful description for this media type. This should generally be a card brand name such as Visa, MasterCard, AMEX, etc. This description will be shown on customer receipts and media reports.
Payment Type
Select the Charge option from the drop-down list.
Payment Surplus
Select Tip Entry if the merchant accepts tips for servers.
Select NULL if the merchant does not accept tips.
Configure remaining options per the merchant’s needs and preferences.
Click on the Option branch.
Print Receipt (Optional)
Enable this option to allow for a receipt to be printed after the transaction has been processed.
Check on Receipt (Optional)
Enable this option to have the detailed check print on the receipt.
Folio
Disabled. This option needs to be disabled for cards to be read properly.
Keyboard Input
Disabled. This option cannot be used since the Folio option above also needs to be disabled.
Included in Report
Enable this option so that this media type is shown in Back-Office reports (Recommended). Disabling this option will cause this media type to be hidden in the reports (NOT recommended).
Open Drawer (Optional)
Enable this option to make the cash drawer open when this media type is used.
NOTE: Print Receipt, Check on Receipt and Open Drawer options have no effect on wireless payment terminals using SecureTable. However, payment terminals with SecurePay will be affected.
Configure remaining options per the merchant’s needs and preferences.
Click on the Card Property branch.
EFT Category
Set this drop-down list to whichever card brand that needs to be mapped to this media type.
Type
This drop-down list is used to determine the type of payment for the purpose of Sales Recording Modules and fiscal printers. The available settings are described below.
Cash
Select the Cash option for the default cash payment and any other payment involving cash, such as foreign currencies.
Credit
Select this option for all credit card payments.
Debit
Select this option for U.S. Debit and Canadian debit (Interac) payments.
Other
Select this option for all payments which do not fall in any of the above categories. Gift card purchases and Gift Card redeem are common examples of media types where Other needs to be selected.
Discount Rate
This option is not supported with EMV protocols and semi-integrated protocols like SecureTable or SecurePay. Leave this value at 0.00.
Tips Credit Fees
Enter the percentage of tips paid to the waiters that will be withheld to cover for fees charged by payment processors. If you do not wish to use this feature, leave it at 0.00.
NOTE: Some jurisdictions don't allow transaction or credit card processing fees to be passed down to employees. Please verify your local regulations before using this feature.
Electronic Funds Transfer
Enable this option. This option needs to be enabled to block operations that are not compatible with EMV payments, such as Cancel/Reopen Check.
Hide Card Number
This option automatically becomes enabled when Electronic Funds Transfer is enabled. Leave it enabled.
Show on Merchant Copy
Disable this option. This option was used by older, non-integrated protocols and caused the credit card number to be printed on the merchant copy of EFT transaction records. This option has no effect with any Electronic Funds Transfer protocol, semi-integrated protocols, SecureTable or SecurePay.
Credit Only
This option is not usable (grayed-out) with most EFT protocols. It is only used with the Datacap - DSIEMVUS semi-integrated protocols to allow Pre-Authorization and PreAuth Capture with select processors that support this feature.
Validation
Disable this option. Validation is only used with fully integrated EFT protocols and has no effect with semi-integrated protocols such as SecureTable or SecurePay.
Expiration
Disable this option. This option automatically becomes enabled when Electronic Funds Transfer is enabled. Make sure to DISABLE it. Otherwise, the POS will request the credit card’s expiration date, which will slow down your operations. This information is already checked by the payment terminal and does not need to be re-validated by the POS.
Debit Card
Enable this option if you are creating a mapping for U.S. Debit or Canadian Debit (Interac).
Disable this option for credit card brand mappings (Visa, Mastercard, American Express, Discover, etc.).
Card Validation
All the options in this section must be cleared. Make sure to clear the Custom Card checkbox as well as all the fields in the Card Validation section.
Click OK to save changes. The new media type will appear in the list.
Repeat the previous steps until all required mappings are created. At the end of the process, you should have one mapping for each card brand that is accepted by the merchant.
This configuration is optional for most merchants. Before proceeding, make sure that individual media type mappings are created for each accepted card brand.
A generic media type mapping may be required to cover the rare cases where a customer may pay with a card that is accepted by the merchant, but not already configured as a mapping in Maitre'D media types. If a dedicated media type mapping does not already exist, the payment would be recorded against the main media type, generally called "CREDIT/DEBIT". The goal of the generic mapping is to have such payments recorded against a media type with a more meaningful name, something like "Other Card Payment" for instance.
NOTE: SecureTable and SecurePay can be used at the same time on the same POS system. Therefore, the merchant can have any combination of stationary terminals using SecurePay and mobile terminals using SecureTable. Both types of terminals will share the same generic media type mapping.
Logon to the Maitre’D Back-Office with appropriate credentials. (Distributor or System Owner)
Start the Point of Sale Control Module.
Click the Payments menu, and select the Media Types… option.
The list of all current media types will be displayed. Click the Add button.
A blank Media Type window will open directly on the Media Type branch. Configure according to the information below:
Media Type ID #
The Media Type ID number is automatically determined by Maitre’D when the Media Type is created. Maitre’D will always use the lowest available number between #2 and #23 inclusively.
Description
Enter a meaningful description for this media type. For the Generic mapping, this could be Other Card Payments or something similar. This description will be shown on customer receipts and media reports.
Payment Type
Select the Charge option from the drop-down list.
Payment Surplus
Select Tip Entry if the merchant accepts tips for servers.
Select NULL if the merchant does not accept tips.
Configure remaining options per the merchant’s needs and preferences.
Click on the Option branch.
Print Receipt (Optional)
Enable this option to allow for a receipt to be printed after the transaction has been processed.
Check on Receipt (Optional)
Enable this option to have the detailed check print on the receipt.
Folio
Disabled. This option needs to be disabled.
Keyboard Input
Disabled. This option cannot be used since the Folio option above also needs to be disabled.
Included in Report
Enable this option so that this media type is shown in Back-Office reports (Recommended). Disabling this option will cause this media type to be hidden in the reports (NOT recommended).
Open Drawer (Optional)
Enable this option to make the cash drawer open when this media type is used.
NOTE: Print Receipt, Check on Receipt and Open Drawer options have no effect on wireless payment terminals using SecureTable. However, payment terminals with SecurePay will be affected.
Configure remaining options per the merchant's needs and preferences.
Click on the Card Property branch.
EFT Category
Set this drop-down list to Other EFT.
Type
Set this drop-down list to Credit.
Discount Rate
This option is not supported with EMV protocols and semi-integrated protocols like SecureTable or SecurePay. Leave this value at 0.00.
Tips Credit Fees
Enter the percentage of tips paid to the waiters that will be withheld to cover for fees charged by payment processors. If you do not wish to use this feature, leave it at 0.00.
NOTE: Some jurisdictions don't allow transaction or credit card processing fees to be passed down to employees. Please verify your local regulations before using this feature.
Electronic Funds Transfer
Enable this option. This option needs to be enabled to block operations that are not compatible with EMV payments, such as Cancel/Reopen Check.
Hide Card Number
Enable this option. It automatically becomes enabled when Electronic Funds Transfer is enabled, so leave it enabled.
Show on Merchant Copy
Disable this option. This option was used by older, non-integrated protocols and caused the credit card number to be printed on the merchant copy of EFT transaction records. This option has no effect with any Electronic Funds Transfer protocol, semi-integrated protocols, SecureTable or SecurePay.
Credit Only
This option is not usable (grayed-out) with most EFT protocols. It is only used with the Datacap - DSIEMVUS semi-integrated protocols to allow Pre-Authorization and PreAuth Capture with select processors that support this feature.
Validation
Disable this option. Validation is only used with fully integrated EFT protocols and has no effect with semi-integrated protocols such as SecureTable or SecurePay.
Expiration
Disable this option. This option automatically becomes enabled when Electronic Funds Transfer is enabled. Make sure to DISABLE it. Otherwise, the POS will request the credit card’s expiration date, which will slow down your operations. This information is already checked by the payment terminal and does not need to be re-validated by the POS.
Debit Card
Disable this option for the generic media type mapping.
Card Validation
All the options in this section must be cleared. Make sure to clear the Custom Card checkbox as well as all the fields in the Card Validation section.
Click OK to save changes. The new media type will appear in the list.
The configuration of the generic media type mapping is now completed.
In this task, we will configure Port Forwarding on a router/firewall device to allow SecureTable to communicate with the POS system through the STPI Client while delivery drivers are on their delivery routes. The device used in this tutorial is an Asus RT-AC66U B1 wireless router and firewall. While the exact settings and menus will differ between models and manufacturers, the general principles are the same.
If your restaurant's network is managed by a larger entity, such as a franchise head office or a network administrator, please communicate with them to inquire about setting up port forwarding. you can also provide your network administrator with the instructions below. They should be able to adapt them to your needs.
Port Forwarding is generally required when using SecureTable over mobile networks. If you don't use SecureTable over mobile networks, there is no need to configure port forwarding and you can skip this tutorial altogether. Also, some mobile carriers may offer special VPN access to your local network, which is a more secure alternative to port forwarding. Please inquire with your mobile carrier to see if they offer this option. If they do, Port Forwarding will not be required.
SecureTable is used over mobile networks mostly by delivery drivers. However, mobile network connectivity is also useful to cover gaps in a restaurant's WiFi coverage.
When SecureTable is used locally in the restaurant, payment terminals are able to communicate with the POS system through the STPI client directly over the local WiFi network. However, when drivers are out on the road, the payment terminals need to use mobile networks to access the Internet to authorize payments. Being on the "public" Internet, the payment terminal will not be able to communicate directly with the POS system to close the delivery orders. This is where Port Forwarding comes in. To connect to the POS system, the payment terminal needs to connect to the restaurant's router, which will then redirect the communication to the STPI Client via port forwarding.
An analogy often used to describe this is finding the bathroom inside your house. For anyone currently inside the house, finding the bathroom should be quite easy. However, for someone currently outside of the house, they first need to know your home address, then someone from inside the house needs to let them in and show them the way to the bathroom. This is essentially what happens when a payment terminal running SecureTable is being used on the road.
Before you begin the actual configuration, you need the following information:
Your router's public IP address.
Your router's private IP address.
Your router's username and password to access its configuration utility.
IP address and TCP port used by the STPI Secure Client.
Here are short instructions to find each piece of information:
This is the IP address that is given to your router by your Internet Service Provider (ISP). It is called a "public" address because it is facing the public Internet. You can easily find what is your public IP address by visiting the following site:
IP4.me is a simple site that will display your public IP address without any ads or unneeded information.
As its name suggests, the router's private IP address is invisible to the outside world. To find it, you need to be connected to your local network and follow these simple instructions:
Open a command prompt with administrative privileges. Do so by clicking the Windows Start menu and typing CMD. Then, select Run as Administrator under the Command Prompt app.
In the command prompt window, type ipconfig and press the ENTER key.
Look for the line that starts with Default Gateway, and take note of the IP address listed there. This is the private IP address of your router.
Every modern router has a configuration utility that is protected by a username and password. If you don't know what it is, either contact your network administrator or look for the default username and password in your device's documentation.
This is the IP address of the PC where STPI Secure has been installed. The TCP port number is normally configured during the installation. The default recommended value for the TCP port is 9999, but it could be configured differently during the installation process.
From a PC connected to the local network, open your favorite browser (Google Chrome, Microsoft Edge, Firefox, etc.) and type your router's private IP address in the address bar. Press ENTER on your keyboard.
The login screen for your router's configuration utility should be displayed. Type the username and password that will allow you to login to your device. This screen will differ depending on your device's manufacturer and model.
Your router's main configuration screen should be displayed.
Look for Port Forwarding settings. This is typically found in WAN settings, under Advanced settings. Again, this will be different based on your device's manufacturer and model. Please consult your device's documentation if you can't find the appropriate settings.
Enable Port Forwarding.
The task of configuring port forwarding on your router is now complete.
The SecureTable application has the ability to use Wifi and mobile networks to communicate with your POS system. Switching from one network to the other generally occurs automatically and transparently, but there are situations where users may want to control how and when the application switches networks.
One such example is if you have areas at the limit of the Wifi range. In such an area, the terminal may repeatedly switch between Wifi and mobile networks, causing connectivity issues. In this case, the user may want to force the application to use the mobile network all the time while in that area.
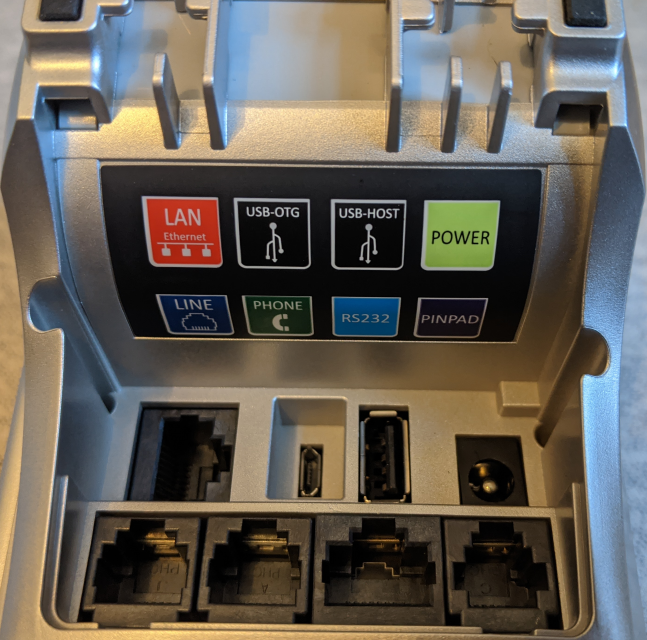
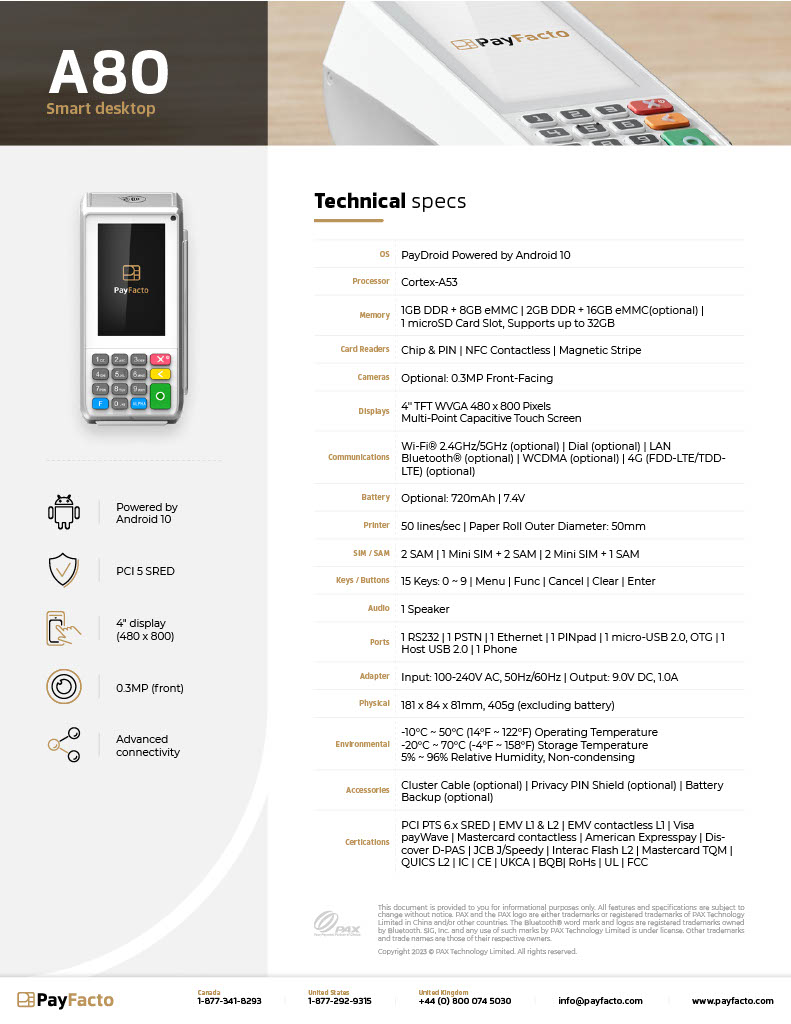

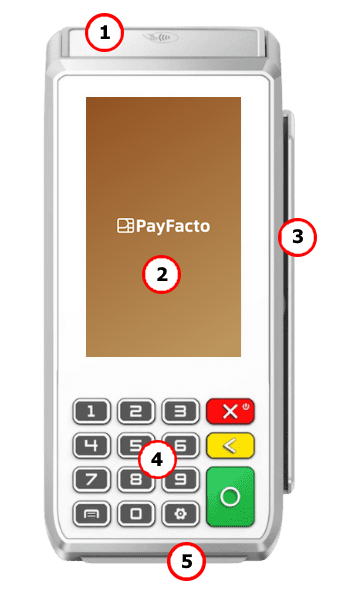
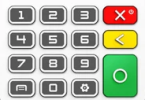
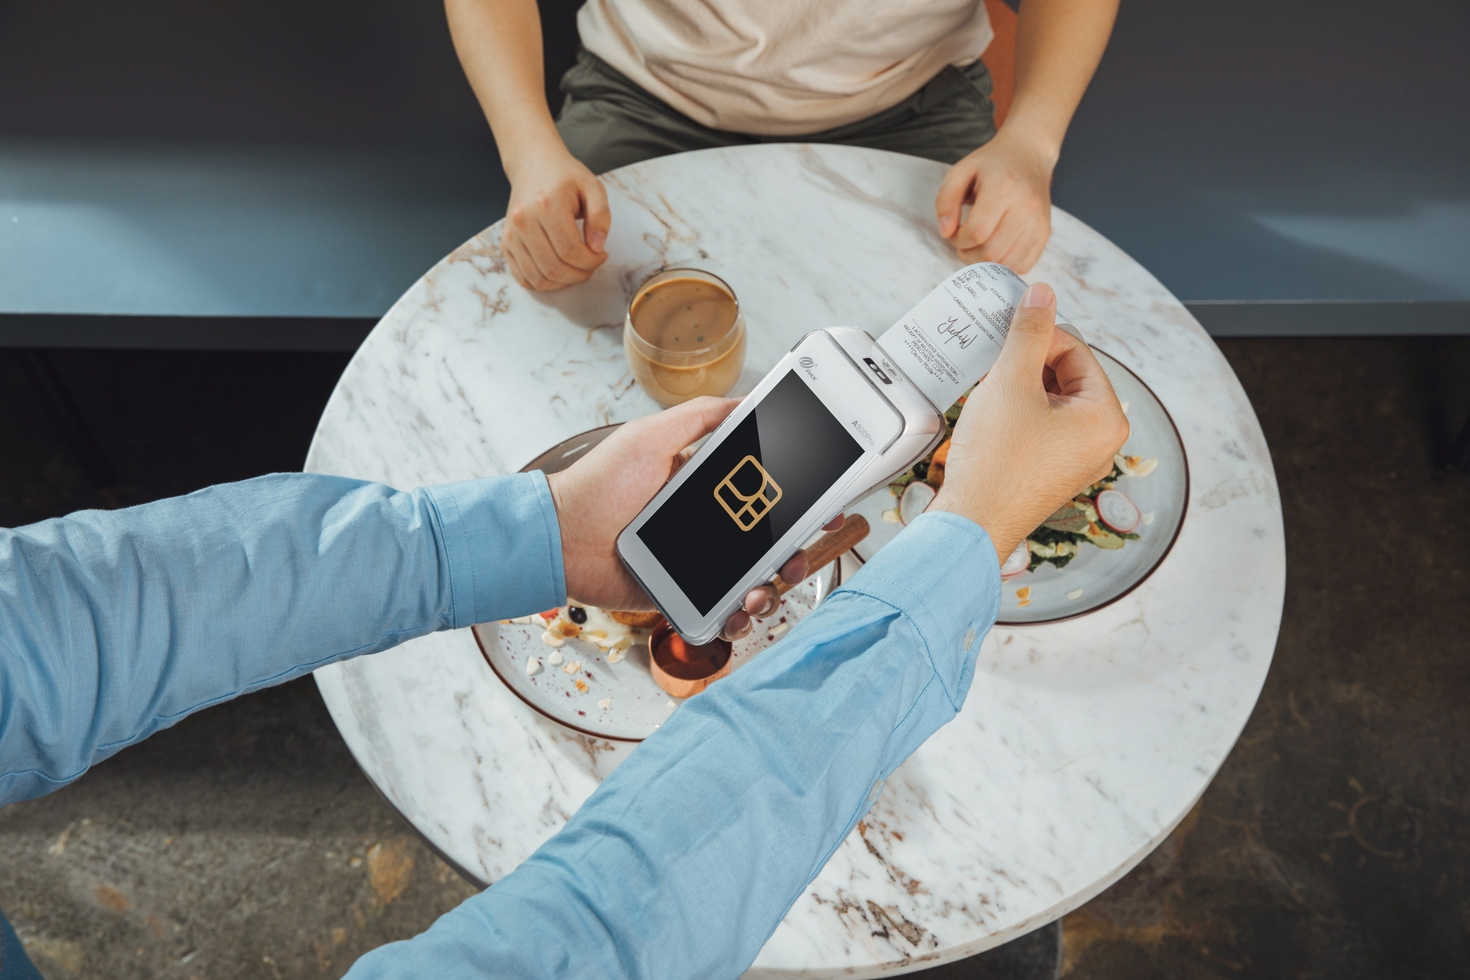
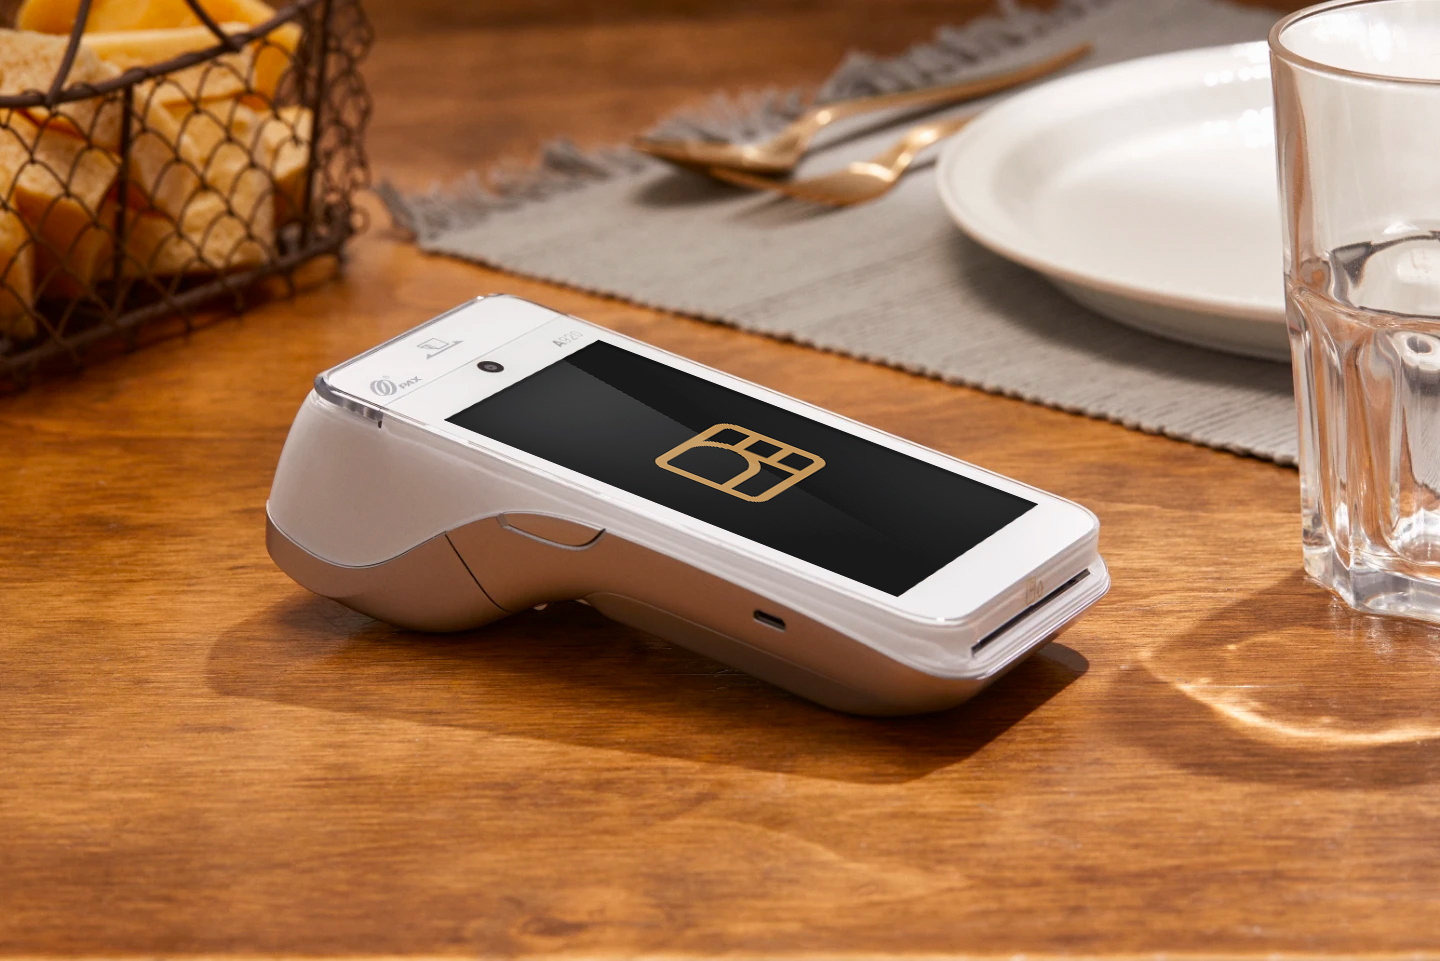
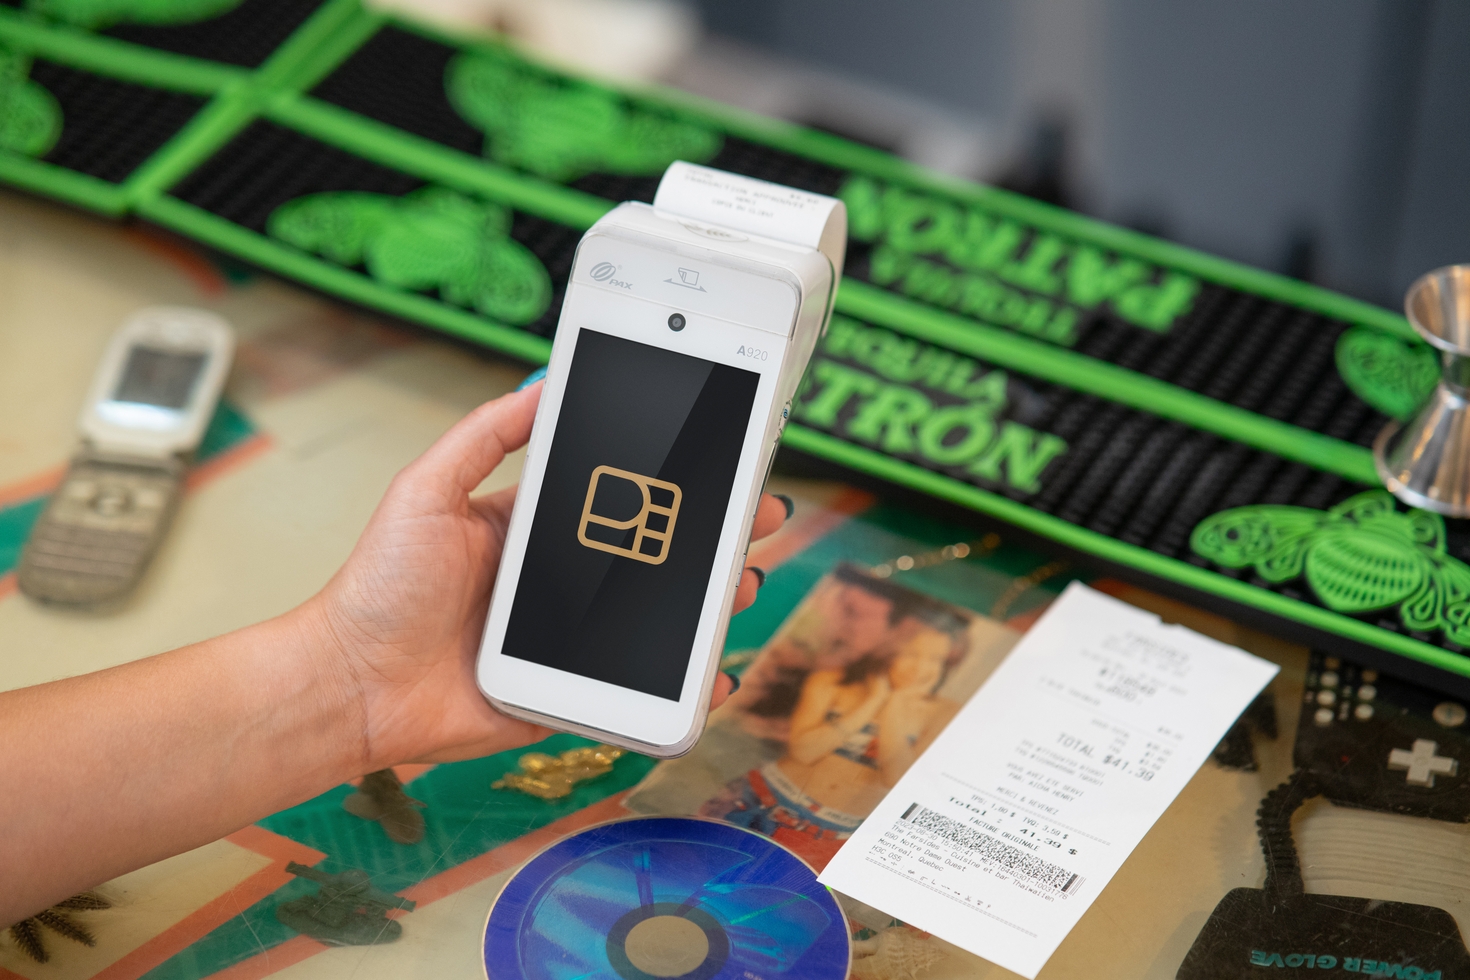
Re-install the battery by sliding the thin segment into the terminal, near the charging connectors, and pushing on the bottom of the battery to seat it correctly.
Re-install the battery cover on the terminal and slide the lock switch to the lock position on the left and turn the terminal over.
Enter the password for the selected network and touch CONNECT.
Scroll to the Personal section and touch Language & input.
Touch Language.
Scroll to and touch the desired language.
Touch the Back icon twice to return to the main screen.
TCP Port number used by STPISecure. Default: 9999
Leave blank.
IP address of the PC where STPI Secure was installed.
TCP
Leave blank.
Save your settings.
Some router models may need to be rebooted. Please refer to your device's documentation to learn how to do this.
To charge the terminal:
Turn the terminal over.
On the back of the terminal at the bottom, slide the battery cover locking switch to the right.
Lift the battery cover off the terminal. You should notice a plastic tab at the top of the battery.
Lift the battery from the terminal and remove the plastic tab.
Re-install the battery and push on the bottom of the battery to seat it correctly.
Re-install the battery cover on the terminal and slide the lock switch to the lock position on the left and turn the terminal over.
Insert the USB cable in the AC outlet and connect the outlet to an AC plug.
Insert the USB Type-C connector in the terminal’s charging port, located on the left side, below the Volume control button. The terminal begins charging.
NOTE: The terminal’s charging port may have a protective cover; you will need to remove it before inserting the USB Type-C connector.
If the supplied roll of printer paper was not already installed in the terminal when you received it, you will need to install it before you can print any transaction receipts.
TIP: This procedure also applies to replacing a roll of printer paper.
On the back of the terminal near the top, lift the lever to unlock and open the printer cover.
NOTE: The printer cover opens on a hinge, it does not come off the terminal.
The paper tray contains an illustration of how to install the roll of paper.
Place the roll of printer paper in the paper tray, leaving about 2 inches (5 cm) of paper beyond the printer's cutter.
IMPORTANT! Make sure the paper unrolls from the back of the roll, otherwise the printer will be unable to print the transaction receipt.
Close the printer cover until it snaps into place and remove any excess paper.
The terminal requires a network connection to communicate with the payment processor server to process transactions.
The PAX A920 Pro is a mobile payment terminal that can connect to mobile (LTE) and wireless (Wi-Fi) networks.
Mobile network access is required for delivery and transportation use, but it can also serve as a backup connection if your Wi-Fi network reception is unreliable in certain areas.
If you plan to use your terminal outside of your usual wi-fi network, you need to install the mobile SIM card, provided by PayFacto or your mobile communications provider. The SIM card will connect you to a mobile network, allowing you to process payments anywhere the terminal has reception. Mobile network access can also serve as a backup connection if your wi-fi network reception is unreliable in certain areas. The terminal uses the micro-SIM card size.
NOTE: If you plan to use your terminal only on your wi-fi network, you can skip this procedure and proceed directly to Configuring the Terminal Wi-Fi Connection.
Make sure the terminal is powered off and turn the terminal over.
On the back of the terminal at the bottom, slide the battery cover locking switch to the right.
Lift the battery cover off the terminal.
Lift the battery from the terminal to remove and set aside.
The terminal has illustrations for the different cards it can accept. Insert your SIM card in the space identified as SIM1 so the diagonal corner is facing the top left side.
IMPORTANT! The SIM card goes into the lower space and should not require great force to insert.
Re-install the battery and push on the bottom of the battery to seat it correctly.
Re-install the battery cover on the terminal and slide the lock switch to the lock position on the left.
Power on the terminal by pressing and holding the Power button for 3 seconds.
The terminal should identify the SIM card and configure the mobile network settings automatically.
This section explains how to turn Wi-Fi on and connect to your network.
On the terminal’s main screen, touch the Settings icon.
On the Settings screen, touch the Please Input Password field and use the keypad to type the password: either pax9876@@ or 9876.
Touch the checkmark icon on the keypad when you are done and touch OK.
On the Settings page, touch Network & Internet.
On the Network & Internet page, touch Wi-Fi.
On the Wi-Fi page, if Wi-Fi is Off, touch the toggle to turn it on. If Wi-Fi is already on, a list of available networks appears.
From the list of available networks, touch the name of the network you want to connect to.
Enter the password for the selected network and touch CONNECT.
TIP: You can touch Show password before typing to ensure you are entering the password correctly.
After the terminal displays Connected for the selected network, touch the Back icon to return to the Network & Internet page.
By default, the terminal displays all information in English. This procedure explains how to change the terminal’s display language if necessary.
IMPORTANT! Selecting a different language changes all text that appears on the terminal.
On the terminal’s main screen, touch the Settings icon.
On the Settings screen, touch the Please Input Password field and use the keypad to type the password: either pax9876@@ or 9876.
Touch the checkmark icon on the keypad when you are done and touch OK.
On the Settings page, scroll to the bottom and touch System.
On the System page, touch Languages & input.
On the Languages & input page, touch Languages.
On the Language preferences page, touch Add a language.
On the Add a language page, scroll to and touch the desired language.
NOTE: If the language has localized variants, select the appropriate regional option for your country.
If the selected language does not appear automatically, you can drag the language to the top of the list, as shown below:
Before using mobile networks with SecureTable, the following requirements need to be met:
Use SecureTable version 4.67.6 or later.
Use an Android payment terminal equipped with a SIM card. (The SIM card is provided by your preferred mobile network carrier.)
Configure an APN on your Android terminal to allow Internet connectivity through mobile networks. You can learn how to configure an APN here: Task : Add an APN to Your Payment Terminal.
Setup Port Forwarding on your router/firewall. A generic walkthrough is provided here:
Configure Redundant Network as described here:
You can always tell which network SecureTable is currently using by looking at the icon in the upper-left corner of the home screen:
SecureTable operating on Wifi
SecureTable operating on Mobile
The icon also informs the user of the signal strength.
Excellent signal
Good signal
Fair signal
Poor signal
No signal
By default, SecureTable will always try to connect to known Wifi networks to reduce fees related to data usage over mobile networks. However, it is possible to force SecureTable to use mobile networks. This is useful to cover blind spots in Wifi coverage or in areas at the limit of Wifi range, where the signal can be unstable.
1. Touch the Wifi icon in the upper-left corner of the screen.
2. Touch the LTE signal icon or the SWITCH TO LTE button.
3. A confirmation dialog will appear. Touch YES to switch to LTE.
IMPORTANT! After manually switching to LTE, SecureTable will not try to switch back to Wifi on its own. If you wish to use Wifi again, you will need to switch to Wifi manually.
1. Touch the 4G/LTE icon in the upper-left corner of the screen.
2. Touch the Wifi signal icon or the SWITCH TO WIFI button.
3. A confirmation dialog will appear. Touch YES to switch to Wifi.
IMPORTANT! In the Select Network screen, the Wifi network appears as if it is unavailable. This is normal. This is because the Wifi antenna of the terminal was disabled during the manual switch to LTE. If the terminal is within Wifi range, switching back to Wifi will reactivate the antenna and reconnect to the network.
When the option Auto-connect to LTE is enabled, SecureTable can attempt to connect to LTE in the event that the connection fails over Wifi. This failover feature will only occur during a transaction process. It will never happen when the SecureTable application is idle.
1. Start a transaction as you normally would, by touching the ENTER button.
2. Input your server number and touch OK.
3. If there is an issue with the Wifi connectivity, the terminal will remain on "Fetching tables" longer than usual.
4. After a few seconds, an error message will appear: Unable to reach Wi-Fi network, connecting to LTE. Touch YES to connect to LTE.
5. The transaction process will resume over LTE.
IMPORTANT! After this type automatic switch to LTE, SecureTable will not try to switch back to Wifi on its own. If you wish to use Wifi again, you will need to switch to Wifi manually.
When WiFi signal is lost, SecureTable will automatically switch to Mobile networks, regardless of the status of the Auto-connect to LTE option. This happens without user intervention, as soon as the WiFi signal is lost. When the terminal is brought back within WiFi range, SecureTable will automatically switch back to the WiFi network.
1. The terminal is brought to the limit of Wifi coverage.
2. WiFi signal is lost.
3. SecureTable automatically switches to 4G/LTE mobile network.
Enter Button
Use the ENTER button to start a transaction with SecureTable. Settings The
Settings
The Settings button is used to access SecureTable's configuration options. This icon appears in the topright corner of the SecureTable home screen.
Home
When available, the Home button will appear in the top-right corner of the screen. Use it to jump directly to the SecureTable home screen without saving changes.
Back
When available, the Back button will appear in the top-left corner of the screen. Use it to go back to the previous screen without saving changes.
WiFi / 4G LTE
When available, the Wifi or 4G/LTE icon will appear in the top-left corner of the screen. The icon indicates which network is currently being used. Touching the icon allows the user to switch from WiFi to LTE or viceversa.
The SecureTable application settings are protected by a password. The default password on a new installation is 1234.
NOTE: It is highly recommended to change the default password as soon as possible. See SecureTable Application Configuration for the detailed procedure.
To exit the SecureTable application, swipe the terminal's screen either from the top edge going down, or the bottom edge going up, then touch the Android Home (circle) button.
You will be prompted to enter a passcode to exit the application. Enter the passcode and touch the OK button.
NOTE: The default passcode after a new installation is 1234. It is the same as the settings password.
to run with Administrative privileges To run correctly, the STPI Secure Client needs to run with Windows Administrative privileges. To achieve this:
From the Windows desktop, open the folder called STPI Shortcuts by double-clicking on it.
2.Two shortcuts allow you to start the STPI Client. You can use either STPIClient (Hidden) or STPIClient. Select the shortcut which better meets your desired use case:
STPIClient
This shortcut makes the STPI Client run with the command prompt window visible on the screen. This takes up space on the screen and on the Windows taskbar, but allows you to see all the operations going through the STPI Client in real-time.
This shortcut allows the STPI Client to run with the command prompt window hidden from view. This frees up space on the screen and Windows taskbar, but the operations going through the STPI Client are not visible.
Right-click the shortcut called STPIClient or STPIClient (Hidden), and select the Properties option.
The STPIClient or STPIClient (Hidden) shortcut's properties page opens to the Shortcut tab. Click the Advanced... button.
Activate the Run as administrator checkbox and click OK.
You will be back to the STPIClient (or STPIClient (Hidden)) shortcut's properties page. Click OK to close it.
With this setup, the STPI Secure client will always start with administrative privileges whenever you use this shortcut.
IMPORTANT! If you intend to use the STPIClient as a service instead of running it as an application, please skip the rest of the instructions on this page and go directly to the Configure the STPIClient as a Service guide.
You can add a copy of the STPIClient or STPIClient (Hidden) shortcut to the Windows startup folder to force the STPI client to start automatically as Windows starts. Here is the procedure to follow with Windows 10:
Make sure that hidden files and folders are visible:
a. From Windows explorer, click on the View menu and make sure that the Hidden Items option is selected from the Show/Hide section.
Browse to the following folder:
Copy the STPISecure or STPISecure (Hidden) shortcut to the StartUp folder.
NOTE: Be sure to apply the Run as administrator option as explained above, before copying the shortcut.
With this setup, the STPI Client application with automatically start itself if Windows is restarted.
Double-click the STPIClient or STPISecure (Hidden) shortcut.
2. you will see a UAC warning. Click Yes.
If you selected the regular STPISecure shortcut, a command prompt window will appear, with the Running Admin shell header. You will see text scrolling on the window. If you used the STPISecure (Hidden) instead, you will not see this window and skip directly to the next step.
The very first time the STPIClient starts, you will see a Windows Security Alert from the Windows Defender Firewall.
a. Enable the Domain networks, such as a workplace network option (available only if your PC is part of an Active Directory domain).
b. Enable the Private networks, such as my home or work network option.
c. Disable the Public networks option.
d. Click Allow access.
If you selected the STPISecure shortcut, the command prompt window will remain on the screen. You may minimize it, but do not close it.
6. An icon will also be added to the Windows system tray.
IMPORTANT! Stopping the STPI Client application will prevent payment terminals using SecureTable from processing transactions. Only stop the STPI Client for troubleshooting purposes.
If you are using the STPISecure shortcut, simply close the command prompt window by clicking the "X" in the upper-right corner.
You can also right-click the STPI icon in the system tray and select the Exit option.
The STPI Client software is now up-and-running on your system.
NOTE: Before the No Password menu can be used, the corresponding option needs to be enabled in the SecureTable application settings. Please consult the Enable No Password Menu option in the SecureTable application settings for more details.
From the SecureTable home screen, touch the cog wheel icon ( ) at the top-right of the screen.
The FUNCTIONS menu will be displayed. The options available from this menu will vary based on your SecureTable application settings.
The Print Reports section will be displayed if the Allow Reports Printing option is enabled in the SecureTable Application Settings.
PRINT DETAILED REPORT
This option prints a report with the details of every card payment processed at the terminal since the last batch closing.
NOTE: Cash payments processed through the SecureTable application are not included in this report. Please use your POS system's reports for this purpose.
PRINT SUMMARY REPORT
This option prints a report that shows a summary of sales, refunds, tips and grand total for each card brand.
The Receipt section will be displayed if the AllowReceiptReprinting option is enabled in the SecureTable Application Settings.
REPRINT RECEIPT
This option allows receipts to to be reprinted based on invoice number, sequence number or the last transaction processed at the terminal.
CONFIGURATION
This option brings up the SecureTable application settings.
The full functions menu contains all the options from the No Password Menu, plus a few more administrative options. To access the full functions menu:
From the SecureTable home screen, touch the cog wheel icon ( ) at the top-right of the screen.
The FUNCTIONS menu (no password menu) will be displayed. Touch the CONFIGURATION option.
You will be prompted to enter a password before you can access settings. Enter the password and press the OK key.
The SETTINGS screen will be displayed. Touch the blue Functions Menu link.
NOTE: The default password after a new installation is 1234.
The Functions menu will be displayed. Contrary to the No Password Menu discussed above, all the options shown below are always available, regardless of the status of the advanced settings.
SETTLE BATCH
This option will manually close the current batch.
IMPORTANT! Transactions that are part of a batch that is closed can no longer be voided, reprinted or otherwise modified.
PRINT DETAILED REPORT
This option prints a report with the details of every card payment processed at the terminal since the last batch closing.
PRINT SUMMARY REPORT
This option prints a report that shows a summary of sales, refunds, tips and grand total for each card brand.
BACKUP SETTINGS
This option will save all of the current settings to an S3 Bucket cloud location. Backing up the settings allows for quick recovery of the configuration in case the settings get reset to default after a major application update or Android update.
RESTORE SETTINGS
Use this option to restore saved settings. Using this option will override all settings with the ones found in the backup, except for the terminal ID.
REPRINT RECEIPT
This option allows receipts to to be reprinted based on invoice number, sequence number or the last transaction processed at the terminal.
From the SecureTable home screen, touch the cog wheel icon ( ) at the top-right of the screen.
The FUNCTIONS menu will be displayed. Touch the CONFIGURATION button.
You will be prompted to enter a password before you can access settings. Enter the password and press the OK key.
The SETTINGS screen will be displayed.
NOTE: The default password after a new installation is 1234.
NOTE: Before configuring the IP address or URL, it is strongly recommended to start the STPI Client on the PC where it was installed, and make sure it is running properly. This will allow you to test the communication using the FIND STPI links found with some settings.
IP / URL toggle switch
By default, the toggle switch is set to IP, and the field is labeled STPI IP Address. By touching the toggle switch, the field will change to STPI URL Address.
The IP option is used to locate the STPISecure Client using an IP address, such as 192.168.xxx.xxx.
The URL option is used to locate the STPISecure Client using a Uniform Rersource Locator (URL), such as https://payfacto.com/.
STPI IP/URL Address for WiFi
Enter the IP address or URL of the PC or resource where the STPI Client is installed and running, when accessing it through the local WiFi network.
Find STPI
After entering the IP address or URL, touch this link to verify the communication between your payment terminal and the STPI Client.
Redundant Network
Enable this option to allow the SecureTable application to communicate over both WiFi and 4G/LTE mobile networks. By default, SecureTable will always try to use WiFi networks first, to avoid extra costs from using data over mobile networks. If the terminal is out of range of any known WiFi networks, SecureTable will automatically switch to 4G/LTE mobile network. Enabling this option will also unlock additional settings.
NOTE: A SIM card needs to be installed in the payment terminal to get access to 4G/LTE mobile networks. Also, this option will be hidden if no SIM card is detected.
Auto-connect to LTE
** This settings is only visible if Redundant Network is also enabled.
With this option enabled, SecureTable will offer the option to automatically switch from WiFi to 4G/LTE if unable to reach the POS system during a transaction. This switch will only happen if the application is actively trying to connect to the POS system. It will not happen while the application is idle.
If this option is disabled and there is a WiFi communication issue during a transaction, you will get a generic error message and you will need to manually switch to 4G/LTE and re-attempt the transaction.
STPI IP/URL Address for LTE
** This settings is only visible if Redundant Network is also enabled.
Enter the Public IP address or URL to access the STPI Client is installed and running, when accessing it through the 4G/LTE mobile network.
Find STPI
After entering the IP address or URL, touch this link to verify the communication between your payment terminal and the STPI Client.
NOTE: The STPI Client needs to be up-and-running. If you are using FIND STPI for 4G/LTE, Port Forwarding also needs to be configured on the router/firewall controlling the access to the local area network.
STPI Port Number
This field displays the current TCP port number used for communication with the STPI Client.
NOTE: This setting can only be modified from the Advanced Settings screen and is displayed here for information purposes only.
Advanced Settings
Touch this link to access the Advanced Settings screen.
Functions Menu
Touch this link to access the Functions Menu screen.
SAVE
Touch this button to save your changes and return to the home screen.
NOTE: On a brand-new installation, the application will not let you save your settings with an empty (blank) STPI Port Number. To prevent this issue, go to the Advanced Settings screen, configure the STPI Port Number, Save, and then go back to the basic settings screen to set the IP address or URL.
STPI Port Number
Default: 9999
This is the TCP port number used by STPI. Be sure that this TCP port is unblocked by your network administrator.
POS Type
Select 1 for Maitre’D, Veloce or any POS other than Micros or Squirrel.
Select 2 for Micros.
Select 3 for Squirrel.
Tip
Enable this option to have the SecureTable application prompt for tip entry. Disable this option to prevent tip entry. Disabling this option will also hide all the tip-related options below.
Tip Preset (Select percentages)
Configure preset tip percentages that the customer will see when prompted for tip. Up to 3 presets can be configured. If you do not wish to use all of them, presets that are set to 0% will not be displayed to the customer.
Tip Preset Text Size
Select the text size used to display preset tip percentages. Available choices are Normal, Medium and Large.
Tip Threshold
Enter the maximum allowed tip percentage. Any tip amount that exceeds this percentage will require the settings password to be entered. Setting the percentage to 0% disables the tip threshold validation.
Tip on Tax
Enable this option to calculate the tip percentage from the total check amount, including taxes. If this option is disabled, the tip amount will be calculated on the sub-total instead, which does not include taxes.
NOTE: For the Tip on Tax feature to have an effect, the POS system needs to send both the sub-total and check total as separate values to the STPIClient. If the POS system only sends the check total without the sub-total, this setting will have no effect. The percentage will be calculated on the check total sent by the POS, regardless of the status of this option.
Enable Confirmation
Enable this option to present a dedicated tip confirmation screen for the customer. If this option is disabled, the tip confirmation screen will be skipped when selecting a tip preset or the NO TIP option. If using custom $ or custom % with this option disabled, the tip amount, percentages and resulting totals will be updated in real-time as the customer types the numbers in, but no additional confirmation screen will be presented before the actual payment.
Setting Password
Configure the password used to access settings. This is also the password that will be requested if the customer enters a tip amount that exceeds the Tip Threshold.
Enable Search by Table Number
Enable this option to have the terminal prompt the server for a table number. This allows the SecureTable application to search for all available checks for a given table number.
Enable Search by Check Number
Enable this option to have the terminal prompt for a check number. This allows servers to enter a check number in order to directly access a check, instead of selecting the check from a list.
More Settings
Touch this link to view more advanced settings.
SAVE
Touch this button to save your changes and return to the home screen.
Cash
Enable this option to allow cash payments to be applied on checks from the SecureTable application.
Auto Start
Enable this option to have the SecureTable application start automatically when powering on the payment terminal.
Exit Password Required
With this option enabled, the SecureTable application will request the settings password before closing.
Delivery
Enable this option to use the SecureTable application in Delivery mode. With this option enabled, the payment terminal will display the delivery order numbers instead of table numbers.
Currency
Select the default currency for your region. Supported currencies are:
Canadian Dollar (CAD ($))
United States Dollar (USD ($))
United Kingdom Pound (GBP (£))
European Union Euro (EUR (€))
Enable No-Password Menu
Enable this option to allow users to access a simplified version of the Functions menu without entering a password. This menu is accessed by touching the cog wheel icon ( ) at the top-right of the home screen. Enabling this option will also unlock access to the Allow Reports Printing and Allow Receipt Reprinting options below.
Allow Reports Printing
Enable this option to allow users to access and print the Detailed Report and Summary Report from the No-password menu. If this option is disabled, the reports can still be printed from the FUNCTIONS menu, which requires the settings password.
Allow Receipt Reprinting
Enable this option to activate the Reprint Receipt option in the No-password menu. If this option is disabled, the receipts can still be reprinted from the FUNCTIONS menu, which requires the settings password.
Upload Logs
Enable this option to upload the SecureTable application logs to the PayFacto Cloud services. It is recommended to leave this option enabled.
Allow Terminal Reboot
Enable this option to allow the terminal to reboot after an automatic batch settlement. It is recommended to leave this option enabled.
WiFi Settings
Use this shortcut to configure the payment terminal's WiFi settings.
SAVE
Touch this button to save your changes and return to the home screen.
NOTE: The payment terminal MUST be connected to your WiFi or Ethernet network and have internet access. Otherwise, payments cannot be processed and payment information cannot be transmitted to the POS system.
IMPORTANT! Be sure to touch the SAVE button to save your changes. Using any other button to exit from the settings screen will discard all changes.
Being specifically designed for fine dining and delivery transactions, tip management is an integral part of SecureTable. This section focuses on the various options available in SecureTable to facilitate tip management.
Tip options are found in SecureTable's advanced settings. Here is a summary of available tip options:
Tip
Enable this option to have the SecureTable application prompt for tip entry. Disable this option to prevent tip entry. Disabling this option will also hide all the tip-related options below.
Tip Preset (Select percentages)
Configure preset tip percentages that the customer will see when prompted for tip. Up to 3 presets can be configured. If you do not wish to use all of them, presets that are set to 0% will not be displayed to the customer.
Tip Preset Text Size
Select the text size used to display preset tip percentages. Available choices are Normal, Medium and Large.
Tip Threshold
Enter the maximum allowed tip percentage. Any tip amount that exceeds this percentage will require the settings password to be entered. Setting the percentage to 0% disables the tip threshold validation.
Tip on Tax
Enable this option to calculate the tip percentage from the total check amount, including taxes. If this option is disabled, the tip amount will be calculated on the sub-total instead, which does not include taxes.
NOTE: For the Tip on Tax feature to have an effect, the POS system needs to send both the sub-total and check total as separate values to the STPIClient. If the POS system only sends the check total without the sub-total, this setting will have no effect. The percentage will be calculated on the check total sent by the POS, regardless of the status of this option.
Enable Confirmation
Enable this option to present a dedicated tip confirmation screen for the customer. If this option is disabled, the tip confirmation screen will be skipped when selecting a tip preset or the NO TIP option. If using custom $ or custom % with this option disabled, the tip amount, percentages and resulting totals will be updated in real-time as the customer types the numbers in, but no additional confirmation screen will be presented before the actual payment.
Tip presets are used to simplify and speed up the tipping process by allowing customers to select between pre-calculated tip percentages that are commonly used. Any percentage can be configured, but they need to be realistic for the market in which the terminal is used.
Up to 3 tip presets can be configured.
Presets configured at 0% are not displayed.
The space used by each preset button is automatically adjusted to fit the width of the screen, as demonstrated in screenshots below.
One tip preset
Two tip presets
Three tip presets
No tip presets
The Tip Preset Text Size drop-down allows you to change the font size used to display percentages and amounts in each tip preset. The screenshots below illustrate each available size.
Normal
Medium
Large
The Tip Threshold is a control measure to prevent accidental over-tipping. If the tip amount exceeds the set threshold, SecureTable will request the administrator password before applying the tip.
IMPORTANT! Be sure to carefully evaluate how tips work in the establishment before setting this value. With low value items, the threshold percentage can be exceeded very quickly. For example, buying a water bottle for $2.00 and leaving $1.00 as a tip is already 50% in tip value.
Tip amount is higher than 30% threshold
Manager code is requested after touching the CONFIRM button
The tip confirmation screen is an extra step which allows the customer to review the details of the payment in a clear, minimalist display, without any other distractions on the terminal screen.
With the tip confirmation option enabled, the customer is presented with the detailed calculation of the tip. This screen also allows the customer to quickly back track and make corrections using the Back ( ) button.
Add tip
Confirmation screen
Payment
If tip confirmation is disabled, the confirmation screen is skipped and the terminal proceeds directly to the payment. If the customer notices a mistake once the payment process is started, the transaction needs to be canceled at the payment application which will bring the customer back to the tip calculation screen.
Add tip
Payment
For more details and to quickly see the difference between various configurations, click the drop-downs below:
In order to get accurate reporting data with SecureTable or SecurePay, media types known as mappings need to be created for each card brand that will be accepted by the merchant. Before beginning, gather information on all the card brands and payment types that are accepted at the restaurant. Obtain this information from the restaurant owner and managers, and from the restaurant’s credit card processor.
NOTE: SecureTable and SecurePay can be used at the same time on the same POS system. Therefore, the merchant can have any combination of stationary terminals using SecurePay and mobile terminals using SecureTable. Both types of terminals will share the same media type mappings.
Logon to the Maitre’D Back-Office with appropriate credentials. (Distributor or System Owner)
Start the Point of Sale Control Module.
Click the Payments menu, and select the Media Types… option.
The list of all current media types will be displayed. Click the Add button.
A blank Media Type window will open directly on the Media Type branch. Configure according to the information below:
Media Type ID
# The Media Type ID number is automatically determined by Maitre’D when the Media Type is created. Maitre’D will always use the lowest available number between #2 and #23 inclusively.
Description
Enter a meaningful description for this media type. This should generally be a card brand name such as Visa, MasterCard, AMEX, etc. This description will be shown on customer receipts and media reports.
Payment Type
Select the Charge option from the drop-down list.
Payment Surplus
• Select Tip Entry if the merchant accepts tips for servers.
• Select NULL if the merchant does not accept tips.
Configure remaining options per the merchant’s needs and preferences.
Click on the Option branch.
Print Receipt (Optional)
Enable this option to allow for a receipt to be printed after the transaction has been processed.
Check on Receipt (Optional)
Enable this option to have the detailed check print on the receipt.
Folio
Disabled. This option needs to be disabled for cards to be read properly.
Keyboard Input
Disabled. This option cannot be used since the Folio option above also needs to be disabled.
Included in Report
Enable this option so that this media type is shown in Back-Office reports (Recommended). Disabling this option will cause this media type to be hidden in the reports (NOT recommended).
Open Drawer (Optional)
Enable this option to make the cash drawer open when this media type is used.
NOTE: Print Receipt, Check on Receipt and Open Drawer options have no effect on wireless payment terminals using SecureTable. However, payment terminals with SecurePay will be affected.
Configure remaining options per the merchant’s needs and preferences.
Configure remaining options per the merchant’s needs and preferences.
EFT Category
Set this drop-down list to whichever card brand that needs to be mapped to this media type.
Type
This drop-down list is used to determine the type of payment for the purpose of Sales Recording Modules and fiscal printers. The available settings are described below.
Cash
Select the Cash option for the default cash payment and any other payment involving cash, such as foreign currencies.
Credit
Select this option for all credit card payments.
Debit
Select this option for U.S. Debit and Canadian debit (Interac) payments.
Other
Select this option for all payments which do not fall in any of the above categories. Gift card purchases and Gift Card redeem are common examples of media types where Other needs to be selected.
Discount Rate
This option is not supported with EMV protocols and semi-integrated protocols like SecureTable or SecurePay. Leave this value at 0.00.
Tips Credit Fees
Enter the percentage of tips paid to the waiters that will be withheld to cover for fees charged by payment processors. If you do not wish to use this feature, leave it at 0.00.
NOTE: Some jurisdictions don't allow transaction or credit card processing fees to be passed down to employees. Please verify your local regulations before using this feature.
Electronic Funds Transfer
Enable this option. This option needs to be enabled to block operations that are not compatible with EMV payments, such as Cancel/Reopen Check.
Hide Card Number
This option automatically becomes enabled when Electronic Funds Transfer is enabled. Leave it enabled.
Show on Merchant Copy
Disable this option. This option was used by older, non-integrated protocols and caused the credit card number to be printed on the merchant copy of EFT transaction records. This option has no effect with any Electronic Funds Transfer protocol, semi-integrated protocols, SecureTable or SecurePay.
Credit Only
This option is not usable (grayed-out) with most EFT protocols. It is only used with the Datacap - DSIEMVUS semi-integrated protocols to allow Pre-Authorization and PreAuth Capture with select processors that support this feature.
Validation
Disable this option. Validation is only used with fully integrated EFT protocols and has no effect with semi-integrated protocols such as SecureTable or SecurePay.
Expiration
Disable this option. This option automatically becomes enabled when Electronic Funds Transfer is enabled. Make sure to DISABLE it. Otherwise, the POS will request the credit card’s expiration date, which will slow down your operations. This information is already checked by the payment terminal and does not need to be re-validated by the POS.
Debit Card
• Enable this option if you are creating a mapping for U.S. Debit or Canadian Debit (Interac).
• Disable this option for credit card brand mappings (Visa, Mastercard, American Express, Discover, etc.).
Card Validation
All the options in this section must be cleared. Make sure to clear the Custom Card checkbox as well as all the fields in the Card Validation section.
Click OK to save changes. The new media type will appear in the list.
Repeat the previous steps until all required mappings are created. At the end of the process, you should have one mapping for each card brand that is accepted by the merchant.
This configuration is optional for most merchants. Before proceeding, make sure that individual media type mappings are created for each accepted card brand. A generic media type mapping may be required to cover the rare cases where a customer may pay with a card that is accepted by the merchant, but not already configured as a mapping in Maitre'D media types. If a dedicated media type mapping does not already exist, the payment would be recorded against the main media type, generally called "CREDIT/DEBIT". The goal of the generic mapping is to have such payments recorded against a media type with a more meaningful name, something like "Other Card Payment" for instance.
NOTE: SecureTable and SecurePay can be used at the same time on the same POS system. Therefore, the merchant can have any combination of stationary terminals using SecurePay and mobile terminals using SecureTable. Both types of terminals will share the same generic media type mapping.
Logon to the Maitre’D Back-Office with appropriate credentials. (Distributor or System Owner)
Start the Point of Sale Control Module.
Click the Payments menu, and select the Media Types… option.
The list of all current media types will be displayed. Click the Add button.
A blank Media Type window will open directly on the Media Type branch. Configure according to the information below:
Media Type ID #
The Media Type ID number is automatically determined by Maitre’D when the Media Type is created. Maitre’D will always use the lowest available number between #2 and #23 inclusively.
Description
Enter a meaningful description for this media type. For the Generic mapping, this could be Other Card Payments or something similar. This description will be shown on customer receipts and media reports.
Payment
Type Select the Charge option from the drop-down list.
Payment Surplus
• Select Tip Entry if the merchant accepts tips for servers.
• Select NULL if the merchant does not accept tips.
Configure remaining options per the merchant’s needs and preferences.
Click on the Option branch.
Print Receipt (Optional)
Enable this option to allow for a receipt to be printed after the transaction has been processed.
Check on Receipt (Optional)
Enable this option to have the detailed check print on the receipt.
Folio
Disabled. This option needs to be disabled.
Keyboard Input
Disabled. This option cannot be used since the Folio option above also needs to be disabled.
Included in Report
Enable this option so that this media type is shown in Back-Office reports (Recommended). Disabling this option will cause this media type to be hidden in the reports (NOT recommended).
Open Drawer (Optional)
Enable this option to make the cash drawer open when this media type is used.
NOTE: Print Receipt, Check on Receipt and Open Drawer options have no effect on wireless payment terminals using SecureTable. However, payment terminals with SecurePay will be affected.
Configure remaining options per the merchant's needs and preferences.
Click on the Card Property branch.
EFT Category
Set this drop-down list to Other EFT.
Type
Set this drop-down list to Credit.
Discount Rate
This option is not supported with EMV protocols and semi-integrated protocols like SecureTable or SecurePay. Leave this value at 0.00.
Tips Credit Fees
Enter the percentage of tips paid to the waiters that will be withheld to cover for fees charged by payment processors. If you do not wish to use this feature, leave it at 0.00.
NOTE: Some jurisdictions don't allow transaction or credit card processing fees to be passed down to employees. Please verify your local regulations before using this feature.
Electronic Funds Transfer
Enable this option. This option needs to be enabled to block operations that are not compatible with EMV payments, such as Cancel/Reopen Check.
Hide Card Number
Enable this option. It automatically becomes enabled when Electronic Funds Transfer is enabled, so leave it enabled.
Show on Merchant Copy
Disable this option. This option was used by older, non-integrated protocols and caused the credit card number to be printed on the merchant copy of EFT transaction records. This option has no effect with any Electronic Funds Transfer protocol, semi-integrated protocols, SecureTable or SecurePay.
Credit Only
This option is not usable (grayed-out) with most EFT protocols. It is only used with the Datacap - DSIEMVUS semi-integrated protocols to allow Pre-Authorization and PreAuth Capture with select processors that support this feature.
Validation
Disable this option. Validation is only used with fully integrated EFT protocols and has no effect with semi-integrated protocols such as SecureTable or SecurePay.
Expiration
Disable this option. This option automatically becomes enabled when Electronic Funds Transfer is enabled. Make sure to DISABLE it. Otherwise, the POS will request the credit card’s expiration date, which will slow down your operations. This information is already checked by the payment terminal and does not need to be re-validated by the POS.
Debit Card
Disable this option for the generic media type mapping.
Card Validation
All the options in this section must be cleared. Make sure to clear the Custom Card checkbox as well as all the fields in the Card Validation section.
Click OK to save changes. The new media type will appear in the list.
The configuration of the generic media type mapping is now completed.
An Access Point Name (APN) is the name of a gateway between a GSM, GPRS, 3G or 4G/LTE mobile network and another computer network, frequently the public Internet. In simple terms, an APN is required for your mobile device to be able to access the Internet through the carrier's mobile network.
Most mobile devices (phones, tablets, etc.) supplied by common carriers come with the carrier's APN pre-configured, so most users don't need to worry about manually configuring an APN.
However, mobile devices provided by PayFacto are carrier-agnostic, so they can connect to your carrier of choice to access GSM, GPRS, 3G or 4G/LTE mobile networks for mobile payment processing. For this reason, the APN can't be configured in advance and therefore needs to be configured manually.
Before configuring an APN on your Android terminal, be sure to have a SIM card installed in your terminal. Please review the documentation specific to your terminal model to learn how to install a SIM card.
Exit any payment application that may be running on the terminal. You should now see the home screen of your terminal.
Touch the settings app icon to access the device's settings.
A password prompt will appear. Enter the device's password and touch the OK button
.
NOTE: Settings passwords are changed before shipping to end-users. Passwords are unique to each terminal. Please review the documentation that came with your terminal to find your settings password.
In the Wireless & Networks section, touch the More... option.
Touch Cellular Networks.
Touch Access Point Names
.
The first time you access this setting, the list of APN's should be empty. Touch the "+" sign at the very top of the list to add a new entry.
Configure the following settings:
Name
Give a meaningful name to this APN. This generally corresponds to your mobile network carrier name.
APN
This is the actual name of the gateway. This is provided by your mobile service carrier.
MCC
The default value for this setting is 302. Leave it to the default value unless otherwise specified by your mobile service carrier.
MNC
The default value for this setting is 760. Leave it to the default value unless otherwise specified by your mobile service carrier.
Other settings
The settings listed above are the minimal settings required to get an APN to work properly. Different carriers may require additional settings to be configured. Please inquire with your mobile service carrier.
Touch the 3 dots at the top-right of the screen and select Save.
The new APN will appear in the list.
Use the Back button to exit all the way back to the home screen.
To make sure that your APN and SIM card work properly, they need to be tested. Unfortunately, payment terminals don't have browsers which would allow for a quick and easy test, but here's a workaround:
Disabling WiFi will ensure that you are testing Internet connectivity through the mobile network only.
From the Home screen, swipe twice from the very top of the screen. This will show some quick settings for the terminal. Touch the Wi-Fi icon to disable your Wi-Fi connection.
While still in the settings screen, touch the Cellular Data icon. Then, make sure that the Cellular Data option is enabled.
Since the PAX Store requires Internet connectivity to allow you to download applications, you can use it to tell if your APN and SIM card are working properly.
Start the PAXSTORE by touching its icon on the home screen.
Once in the PAXSTORE, touch "All" near the top of the screen.
If the APN is correctly configured and that Internet access is working properly through the mobile network, you will see a list of applications that can be downloaded and installed:
If the APN is not configured correctly or if there is an issue with Internet connectivity through the mobile network, you will see a message saying "Network Unavailable" briefly displayed on the screen. Instead of the applications list, you will see a "Click to refresh" message and an empty box icon.
If Internet access is not working, please review your APN settings and try restarting your terminal. If Internet access through mobile networks still doesn't work, please call the PayFacto help desk or your mobile network carrier for assistance.
Now that Internet access through the mobile network is tested, don't forget to re-enable WiFi to keep data usage from the mobile network at a minimum.
Make sure that the Maitre’D Electronic Funds Transfer Interface and Enhanced EFT options are included on the Maitre’D license. To confirm this, simply logon to the Maitre’D Back-Office using appropriate credentials, click on the File menu and select the Licenses option.
This will bring up the license’s properties. Two options are required for SecureTable to operate properly:
• Interface Electronic Fund Transfer.
• Enhanced EFT.
If any of these two options are missing, they will need to be purchased before you can use SecureTable. Please contact your local sales representative.
Logon to the Maitre’D Back-Office with appropriate credentials. (Distributor or System Owner)
Start the Electronic Funds Transfer Module.
Click the View menu, and select Options…
The Configuration screen opens on the Interface branch.
The settings from the Interface, Identification, Operation, Receipt, Payment Device Tip Suggestion, Remote Payment Device and Home Page branches don't have any effect on the operation of SecureTable. Please make sure not to change or remove any settings found in these pages, as these could affect the operation of tethered payment terminals.
NOTE: It is possible to use tethered payment terminals from a third-party processor along with SecureTable. The settings in these windows would then be setup per your processor’s requirements.
Click on the Pay at the Table branch.
Pay at the table
Enable this option to activate Pay at the Table (PATT) functionality.
PATT Protocol
Select the SecureTablePay protocol.
Log Level
Select the desired log level for the Pay at the Table interface. Available choices are:
• None: No log file is created.
• Standard: Standard log level. All operations are logged in a summary format.
• Detailed: Detailed log level. All operations are logged with detailed information.
• Debug: Detailed log level with extra information for troubleshooting and investigation purposes.
TCP Port
Type in the TCP Port number used by the STPI Secure client.
Send Invoices
Disabled. This option is not available because it is not compatible with the SecureTablePay protocol.
Get Invoice Status
Disabled. This option is not available because it is not compatible with the SecureTablePay protocol.
Partial Invoice Number
Enable this option to allow the payment terminal to retrieve checks by entering only the last 4 digits of the check number. If this option is disabled, the full check number will be required to retrieve checks.
Validate Employee
Enable this option to force the validation of the employee number entered at the payment terminal. With this option enabled, only the employee who owns the table associated with the printed check will be able to access that check from the payment terminal. If this option is disabled, any employee will be able to access any checks from the payment terminal.
Locking mode
Select the locking mode that will be used when accessing checks from the payment terminal. Two locking modes are available:
Table Locking
Select the table locking mode to lock the entire table as soon as a check is accessed by a payment terminal with SecureTable. For example, if you have 4 printed checks on Table #99, accessing any check from table #99 from a payment terminal with SecureTable will lock all checks from table #99. This prevents any of these checks from being accessed by other payment terminals or POS workstations.
Invoice Locking
Select the invoice locking option to lock only the check being accessed, without locking the entire table. This allows other checks on a given table to be closed simultaneously with other payment terminals or from POS workstations.
Shared Folder
This option is not available because it is not compatible with the SecureTablePay protocol.
7. Click OK to save changes and close the options window.
As soon as a table or invoice is accessed from a payment terminal with SecureTable, it is locked. This is done to prevent accidental double payment or double processing of invoices. While it is possible to override table or invoice locking, it is not recommended to do so. Unlocking a table or invoice in the middle of it being processed can cause invoices to remain open after being paid and discrepancies in reporting.
IMPORTANT! Before attempting to start the STPI Secure client, a license needs to be installed. Otherwise, the STPI Secure Client will attempt to start and immediately shutdown.
After the STPISecure installation process, a folder called STPI Shortcuts was created on your Windows Desktop. This folder contains the shortcut that will be used to start the STPI Client software.
To run correctly, the STPI Secure Client needs to run with Windows Administrative privileges. To achieve this:
From the Windows desktop, open the folder called STPI Shortcuts by double-clicking on it.
Two shortcuts allow you to start the STPI Client. You can use either STPIClient (Hidden) or STPIClient. Select the shortcut which better meets your desired use case:
This shortcut makes the STPI Client run with the command prompt window visible on the screen. This takes up space on the screen and on the Windows taskbar, but allows you to see all the operations going through the STPI Client in real-time.
This shortcut allows the STPI Client to run with the command prompt window hidden from view. This frees up space on the screen and Windows taskbar, but the operations going through the STPI Client are not visible.
Right-click the shortcut called STPIClient or STPIClient (Hidden), and select the Properties option.
The STPIClient or STPIClient (Hidden) shortcut's properties page opens to the Shortcut tab. Click the Advanced... button.
Activate the Run as administrator checkbox and click OK.
You will be back to the STPIClient (or STPIClient (Hidden)) shortcut's properties page. Click OK to close it.
With this setup, the STPI Secure client will always start with administrative privileges whenever you use this shortcut.
IMPORTANT! If you intend to use the STPIClient as a service instead of running it as an application, please skip the rest of the instructions on this page and go directly to the guide.
You can add a copy of the STPIClient or STPIClient (Hidden) shortcut to the Windows startup folder to force the STPI client to start automatically as Windows starts. Here is the procedure to follow with Windows 10:
Make sure that hidden files and folders are visible:
a. From Windows explorer, click on the View menu and make sure that the Hidden Items option is selected from the Show/Hide section.
Browse to the following folder:
C:\ProgramData\Microsoft\Windows\Start Menu\Programs\StartUp
Copy the STPISecure or STPISecure (Hidden) shortcut to the StartUp folder.
NOTE: Be sure to apply the Run as administrator option as explained above, before copying the shortcut.
With this setup, the STPI Client application with automatically start itself if Windows is restarted.
Double-click the STPIClient or STPISecure (Hidden) shortcut.
you will see a UAC warning. Click Yes.
If you selected the regular STPISecure shortcut, a command prompt window will appear, with the Running Admin shell header. You will see text scrolling on the window. If you used the STPISecure (Hidden) instead, you will not see this window and skip directly to the next step.
The very first time the STPIClient starts, you will see a Windows Security Alert from the Windows Defender Firewall.
a. Enable the Domain networks, such as a workplace network option (available only if your PC is part of an Active Directory domain).
b. Enable the Private networks, such as my home or work network option.
c. Disable the Public networks option.
d. Click Allow access.
If you selected the STPISecure shortcut, the command prompt window will remain on the screen. You may minimize it, but do not close it.
An icon will also be added to the Windows system tray.
IMPORTANT! Stopping the STPI Client application will prevent payment terminals using SecureTable from processing transactions. Only stop the STPI Client for troubleshooting purposes.
If you are using the STPISecure shortcut, simply close the command prompt window by clicking the "X" in the upper-right corner.
You can also right-click the STPI icon in the system tray and select the Exit option.
The STPI Client software is now up-and-running on your system.
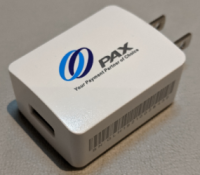

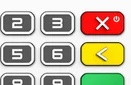
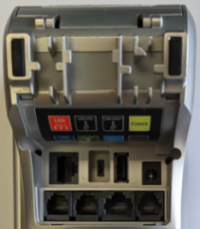
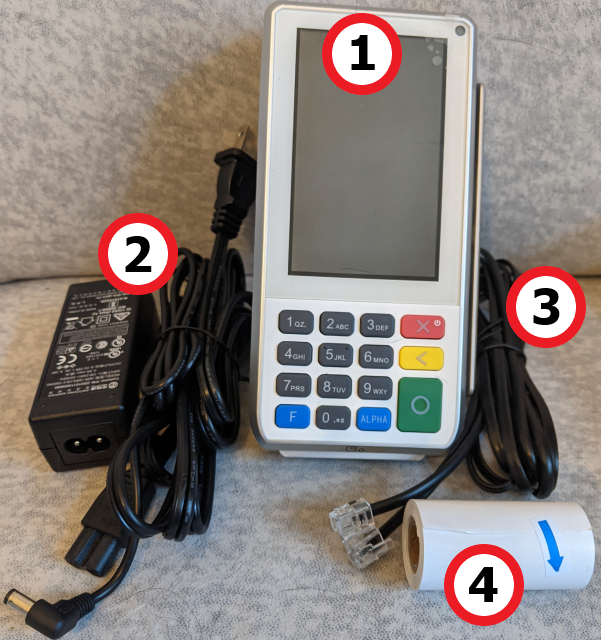
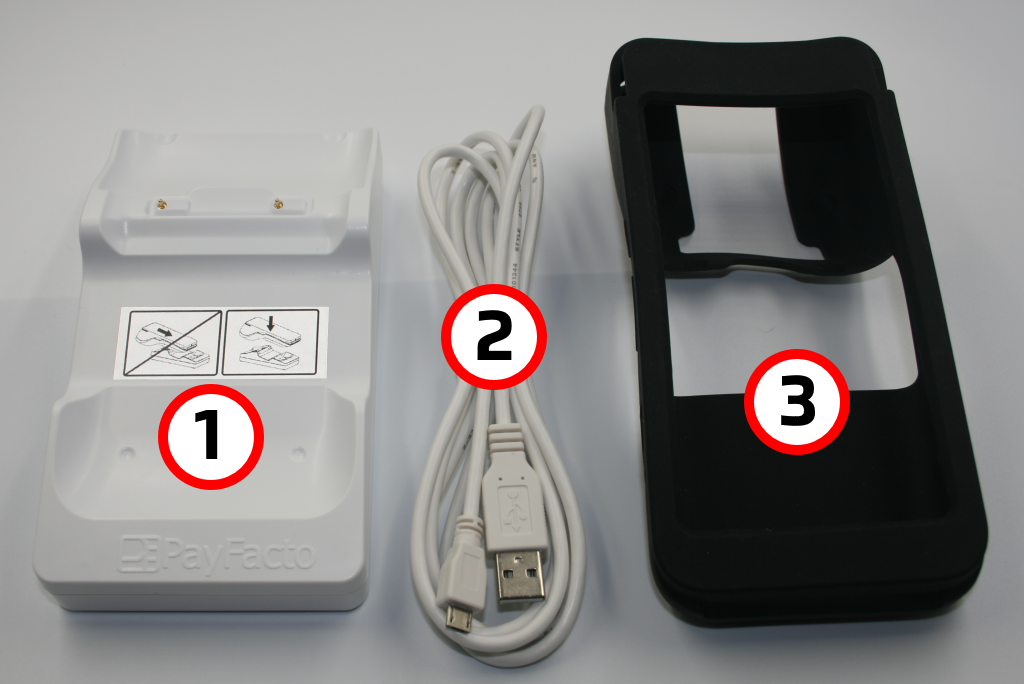
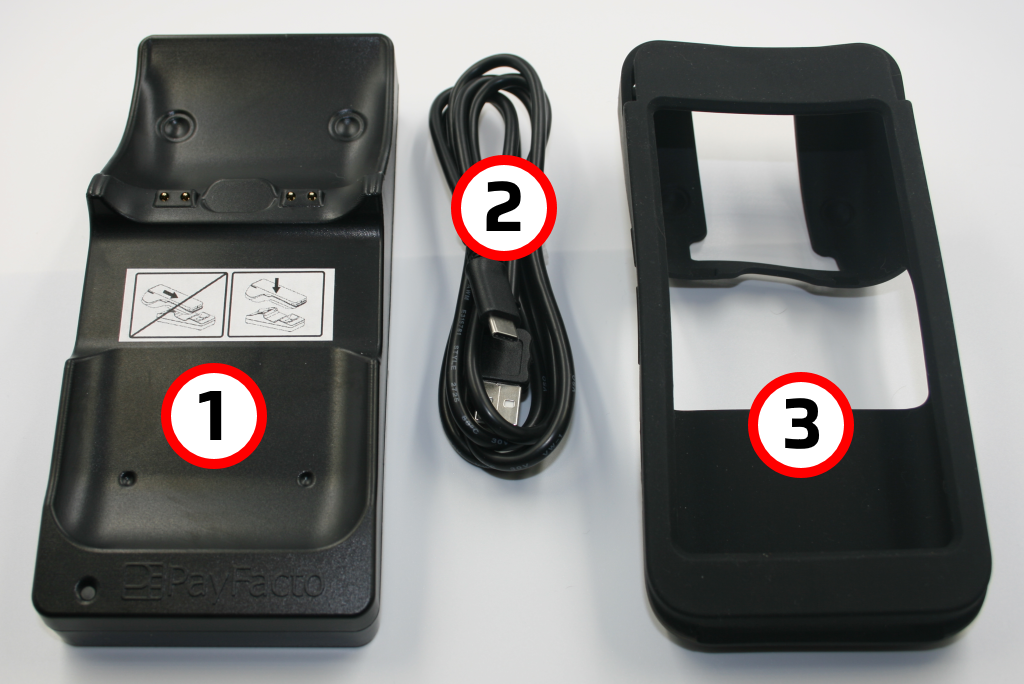

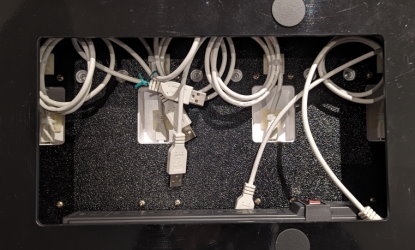
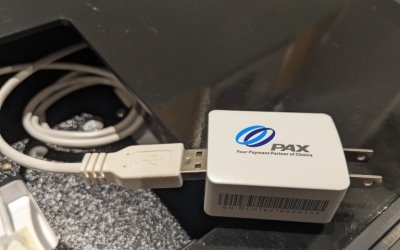
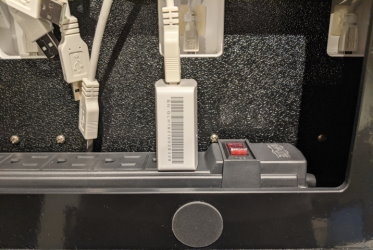
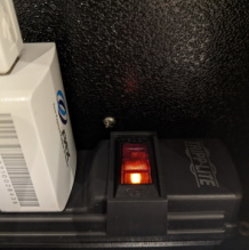
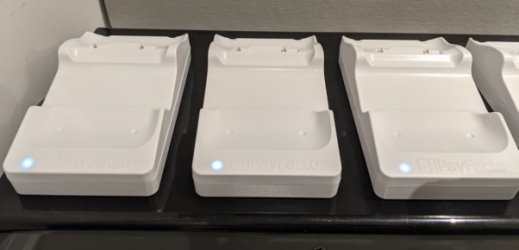
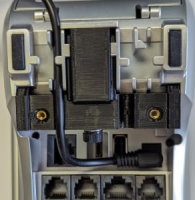
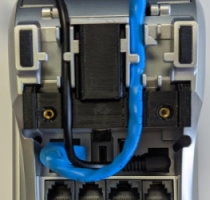
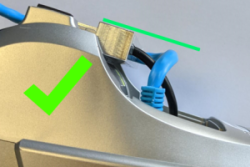
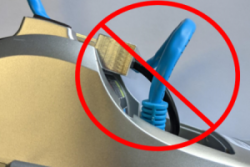
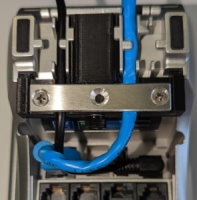
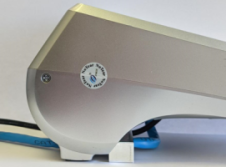

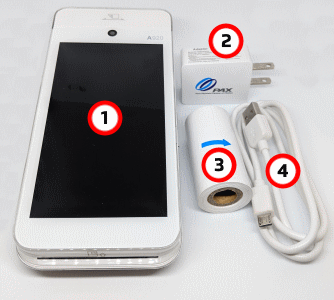

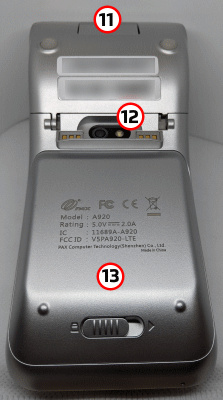
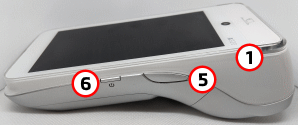
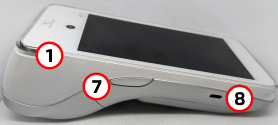
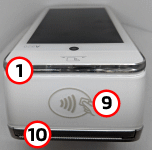
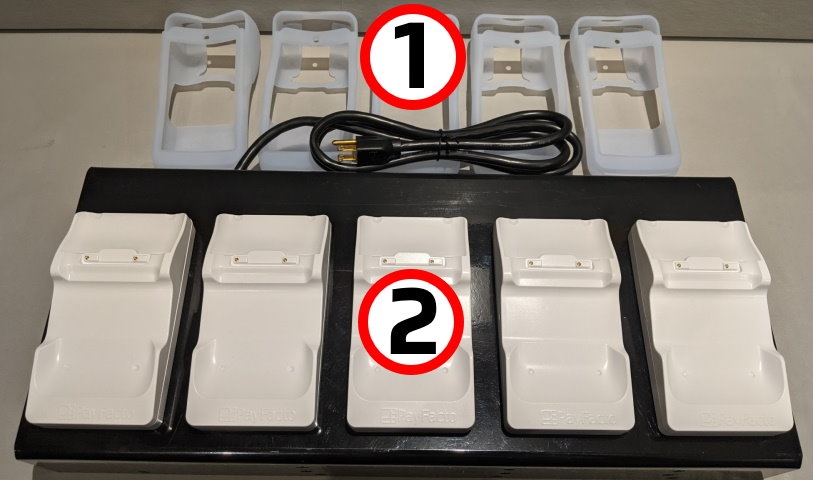
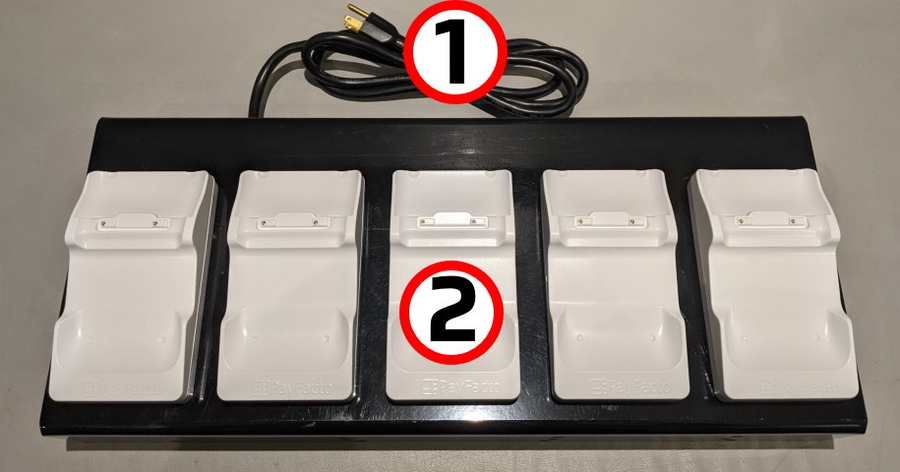
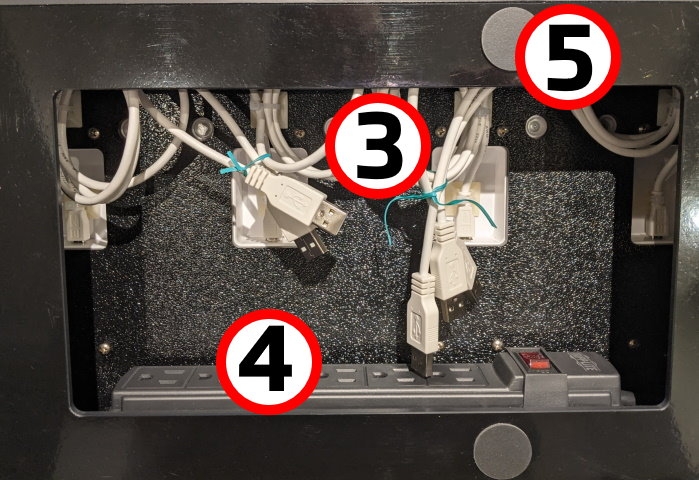


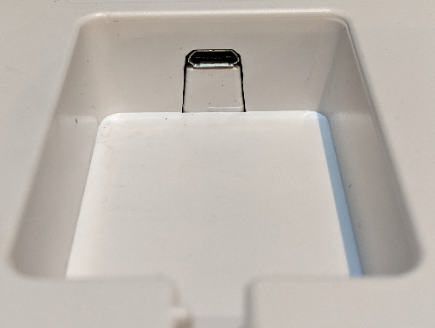
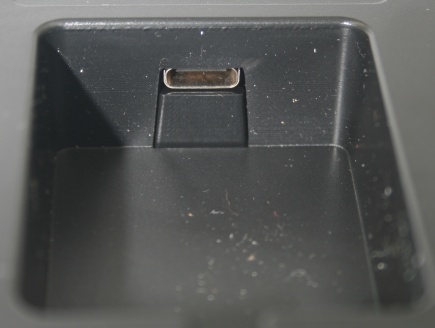
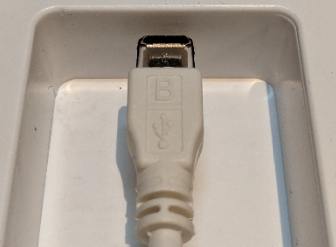
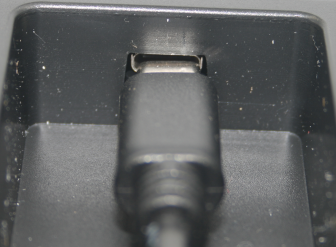
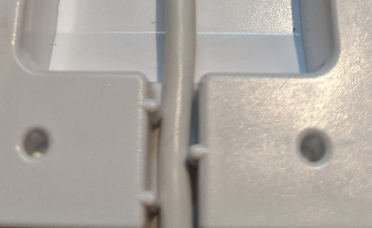
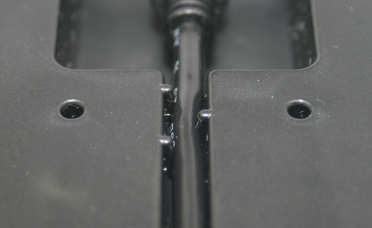
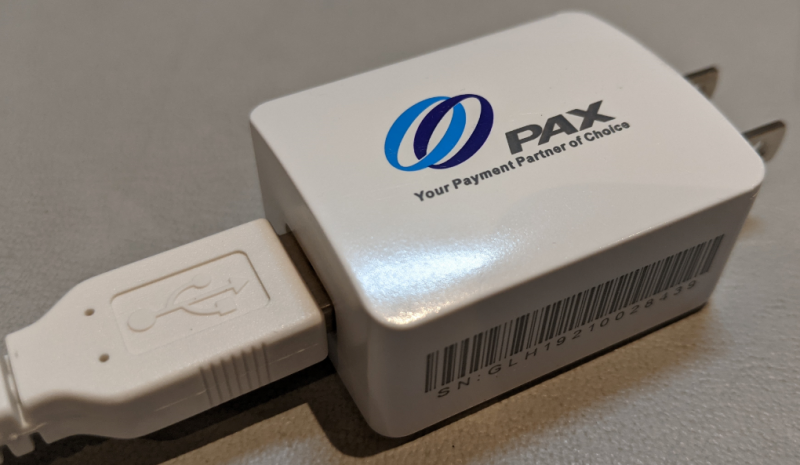
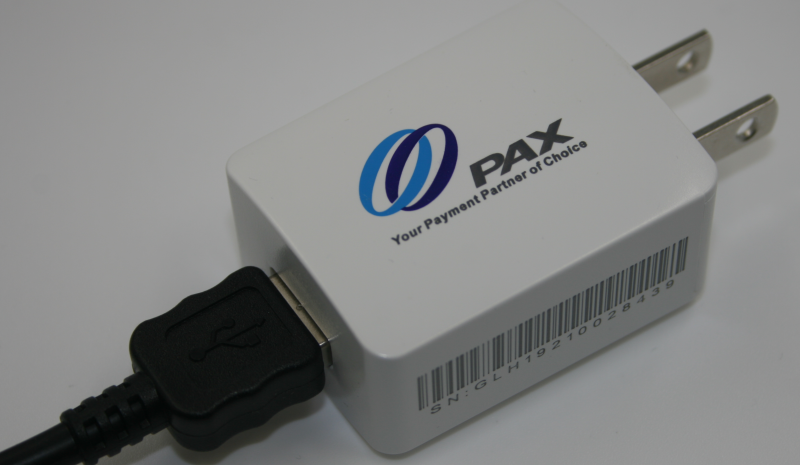

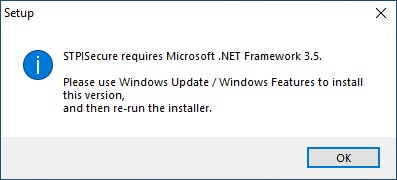
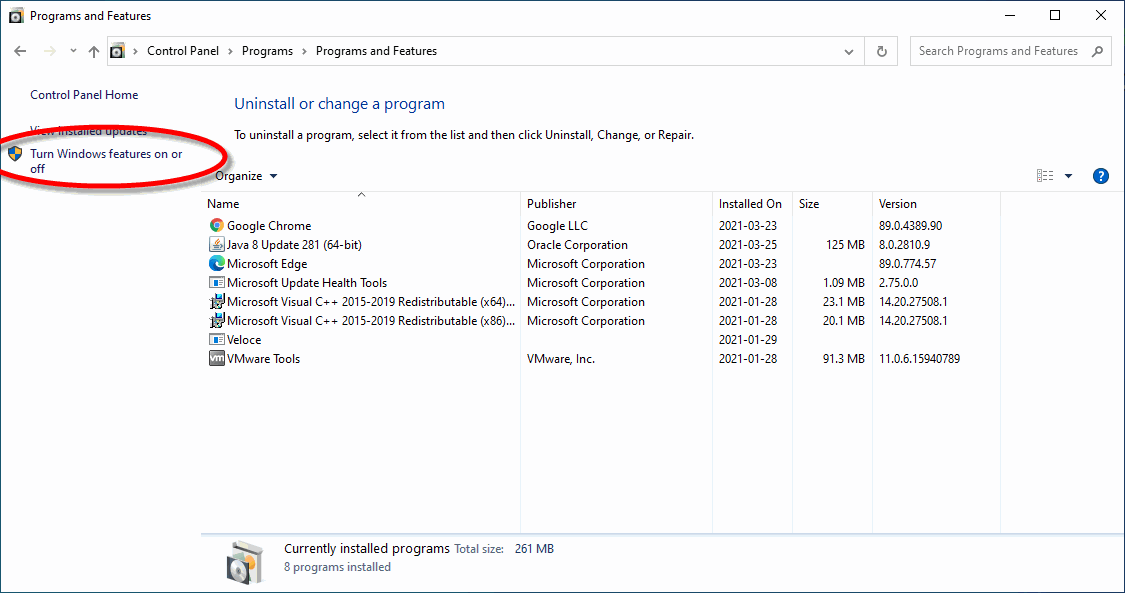
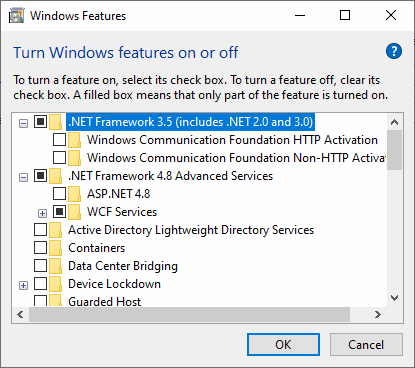
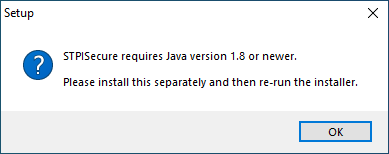
Australian Dollar (AUD ($))
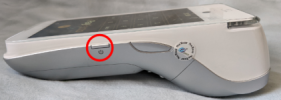

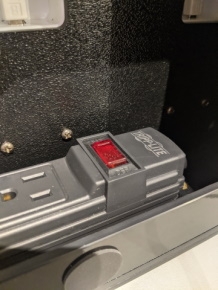
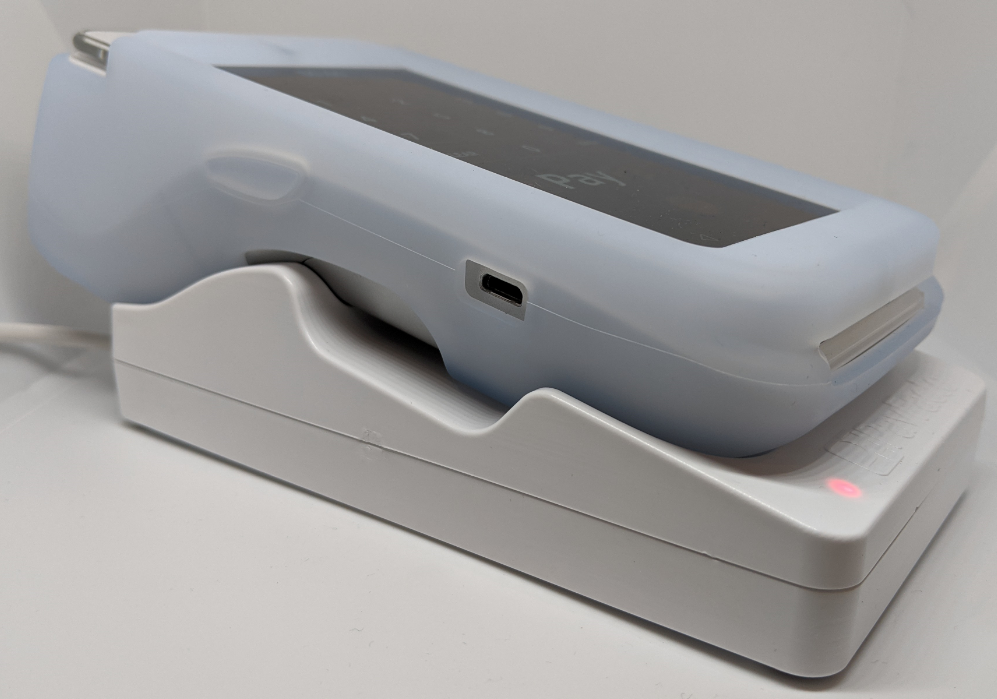
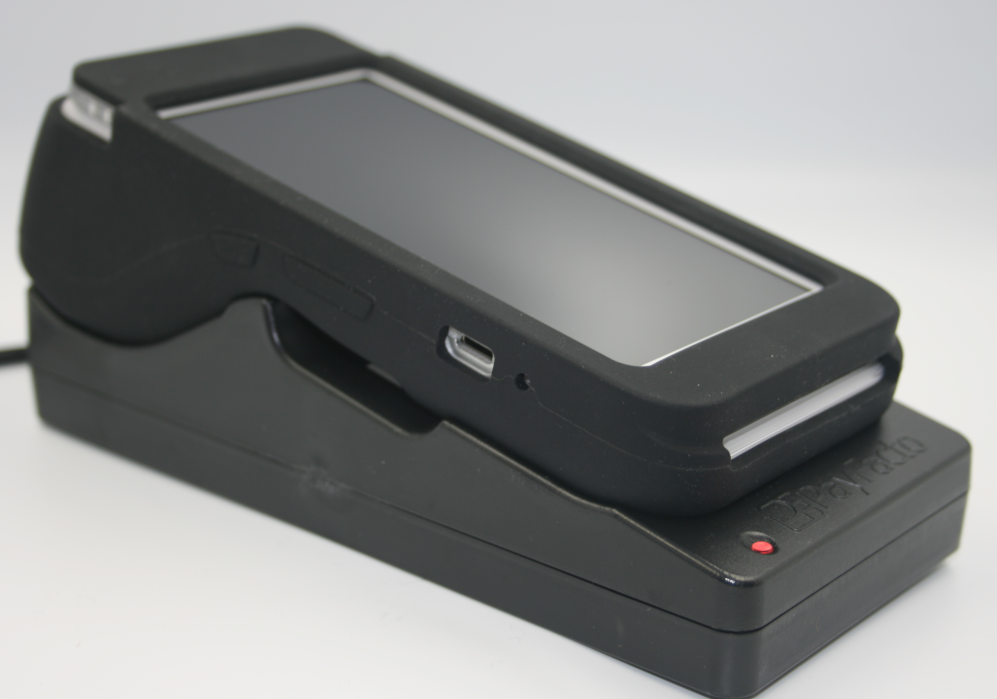


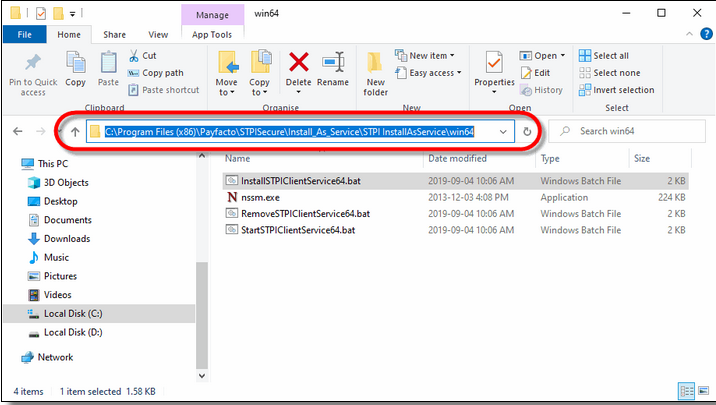
The terminal uses 2 ¼” or 58mm thermal paper rolls to print transaction receipts.
On the back of the terminal at the top, lift the lever with the contactless logo to unlock and open the printer cover.
NOTE: The printer cover opens on a hinge, it does not come off the terminal.
Place the roll of printer paper in the paper tray, leaving about 2 inches (5 cm) of paper beyond the printer's cutter as shown in the following example:
IMPORTANT! Make sure the paper unrolls from the back of the roll, otherwise the printer will be unable to print the transaction receipt.
Close the printer cover until it snaps into place and remove any excess paper.

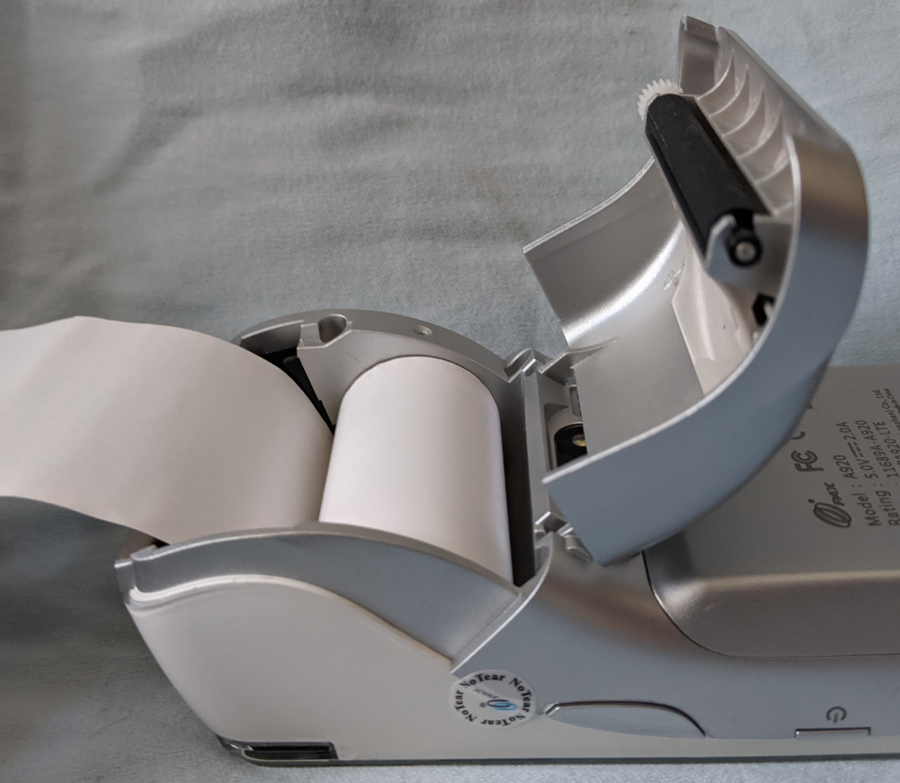


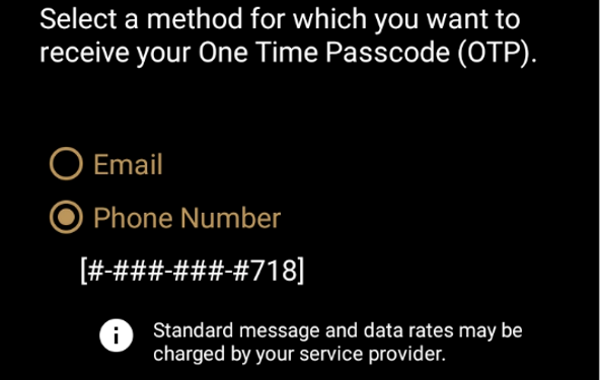
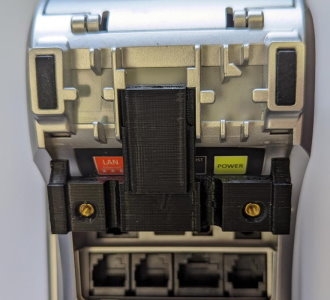
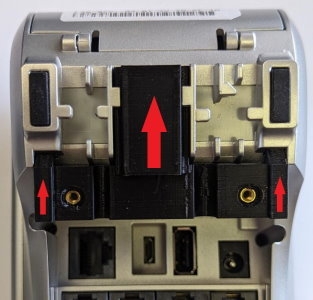


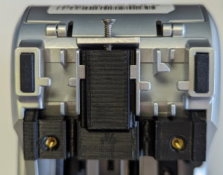

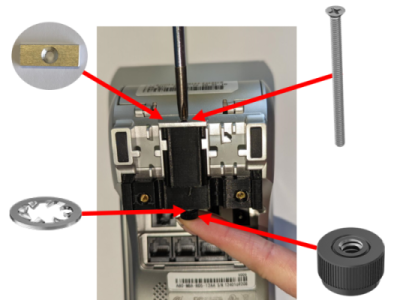


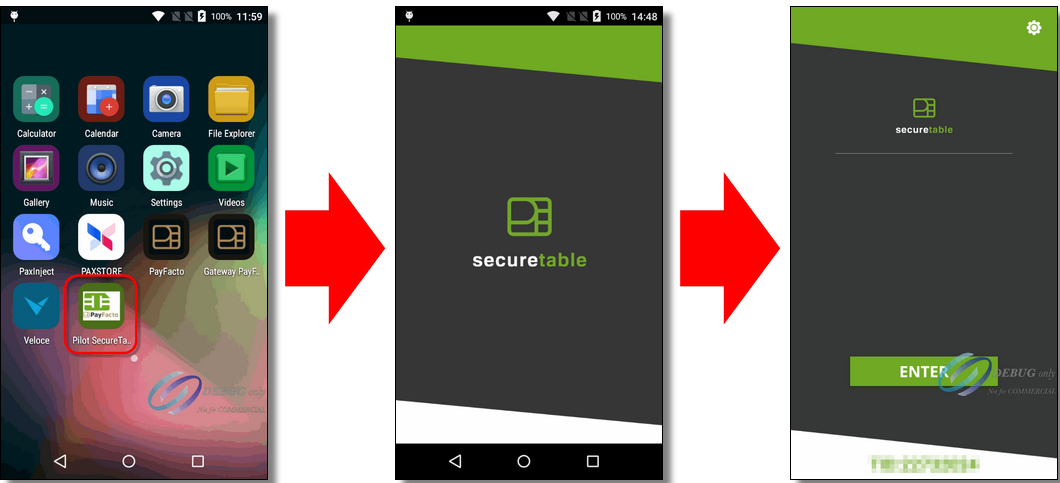

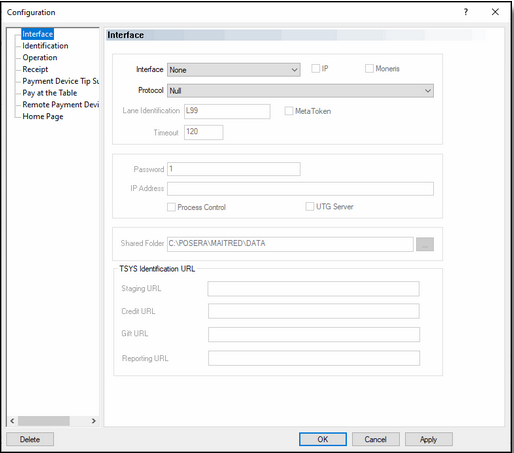
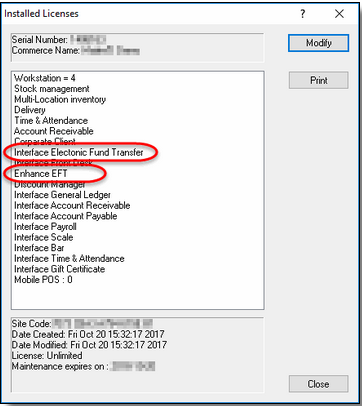
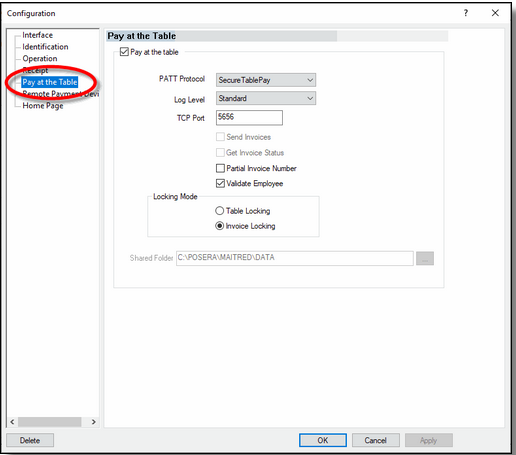
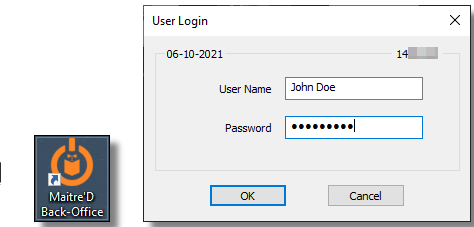
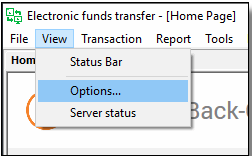

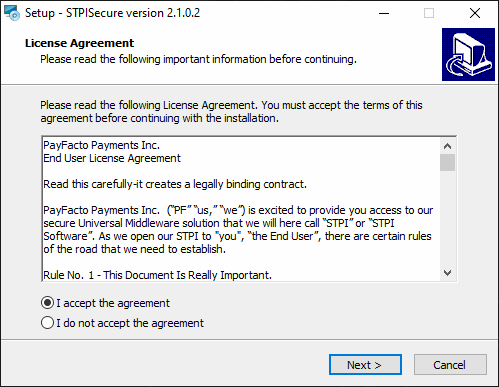


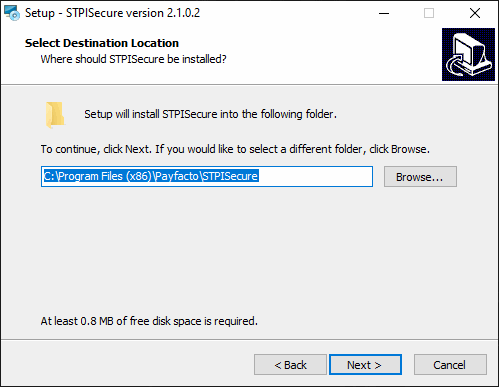
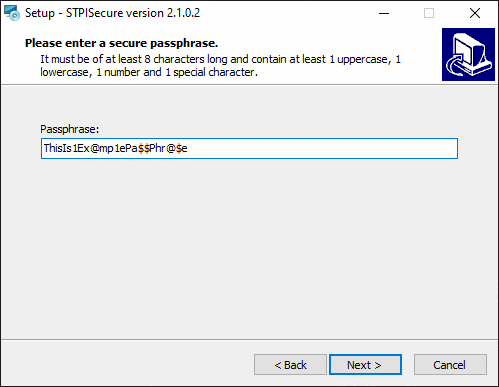

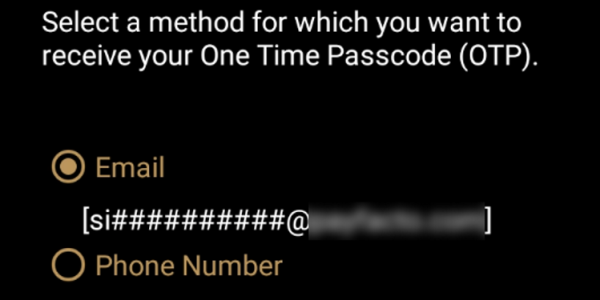

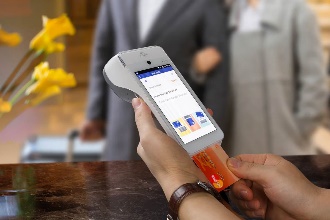
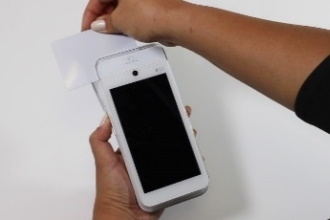

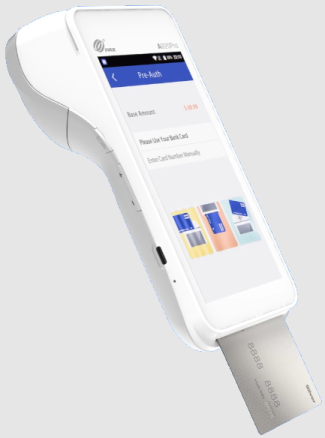
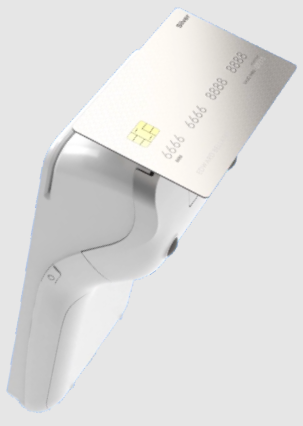
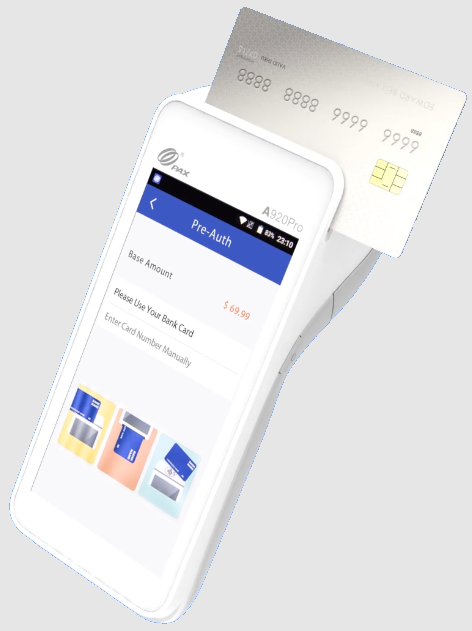

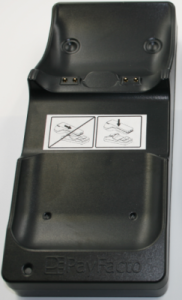
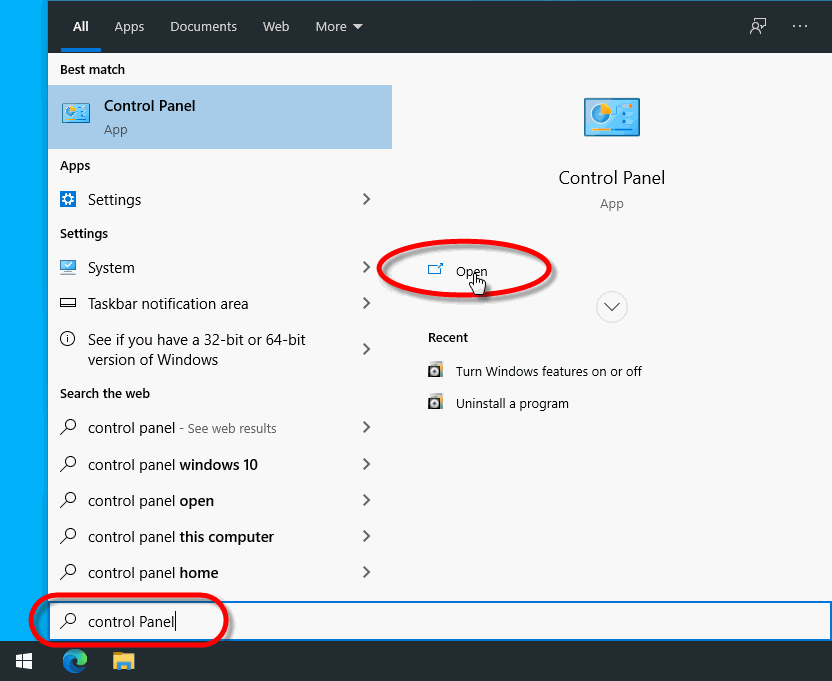


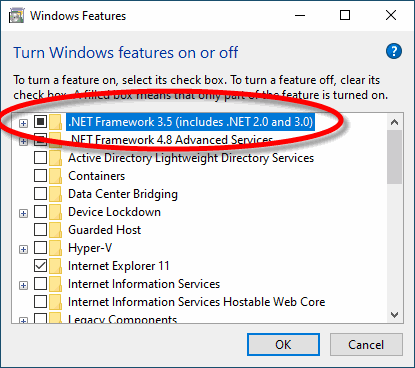


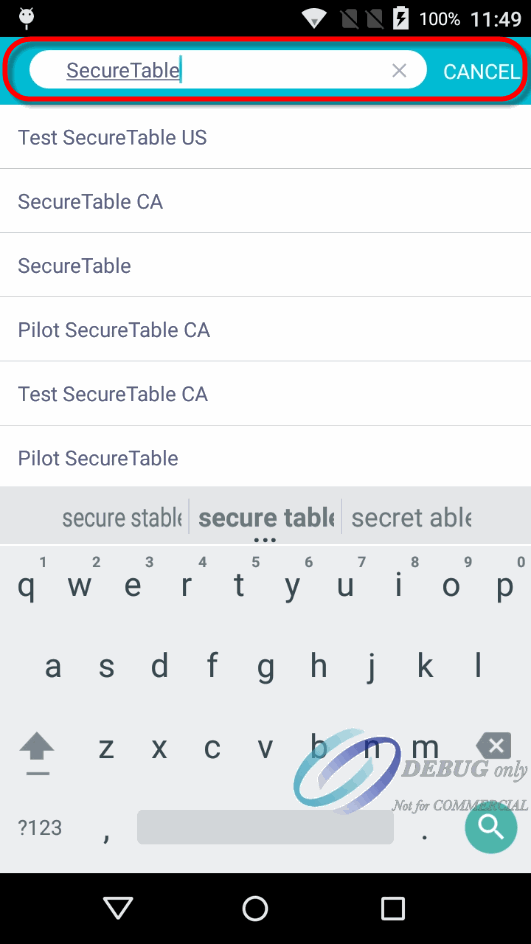

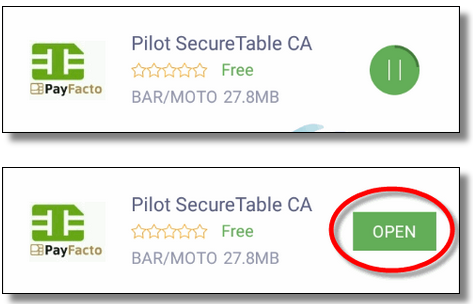


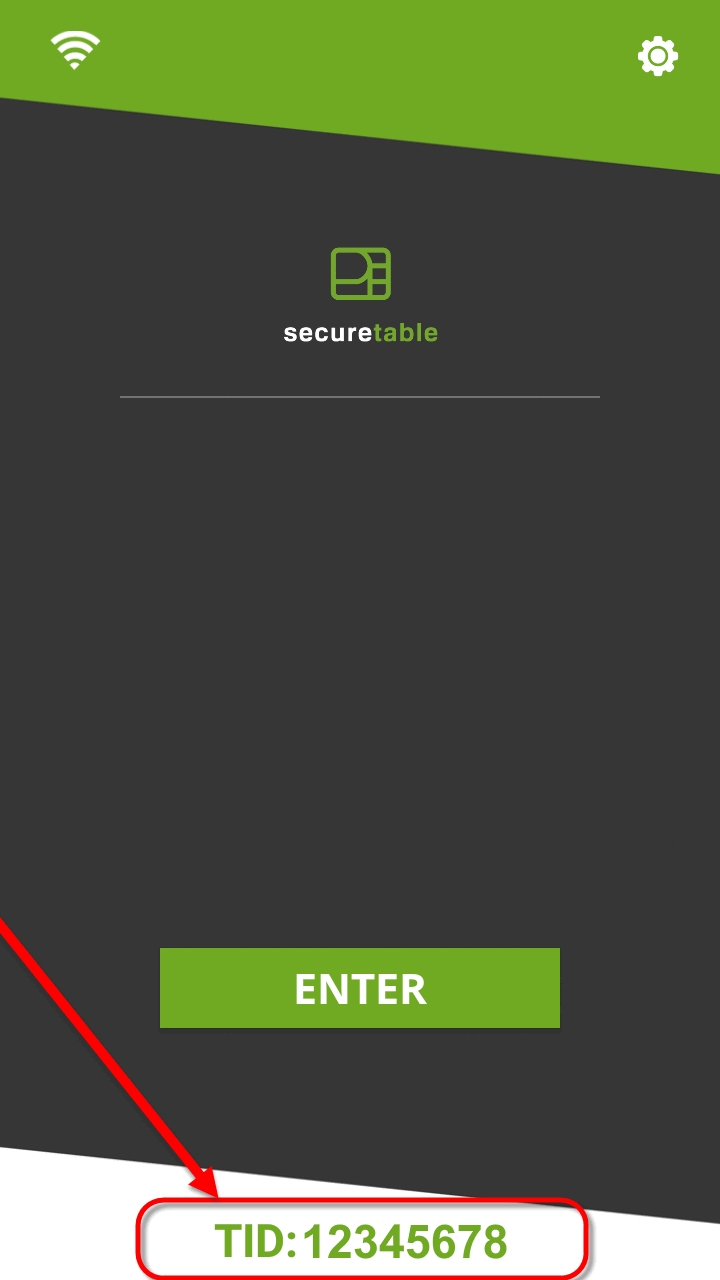


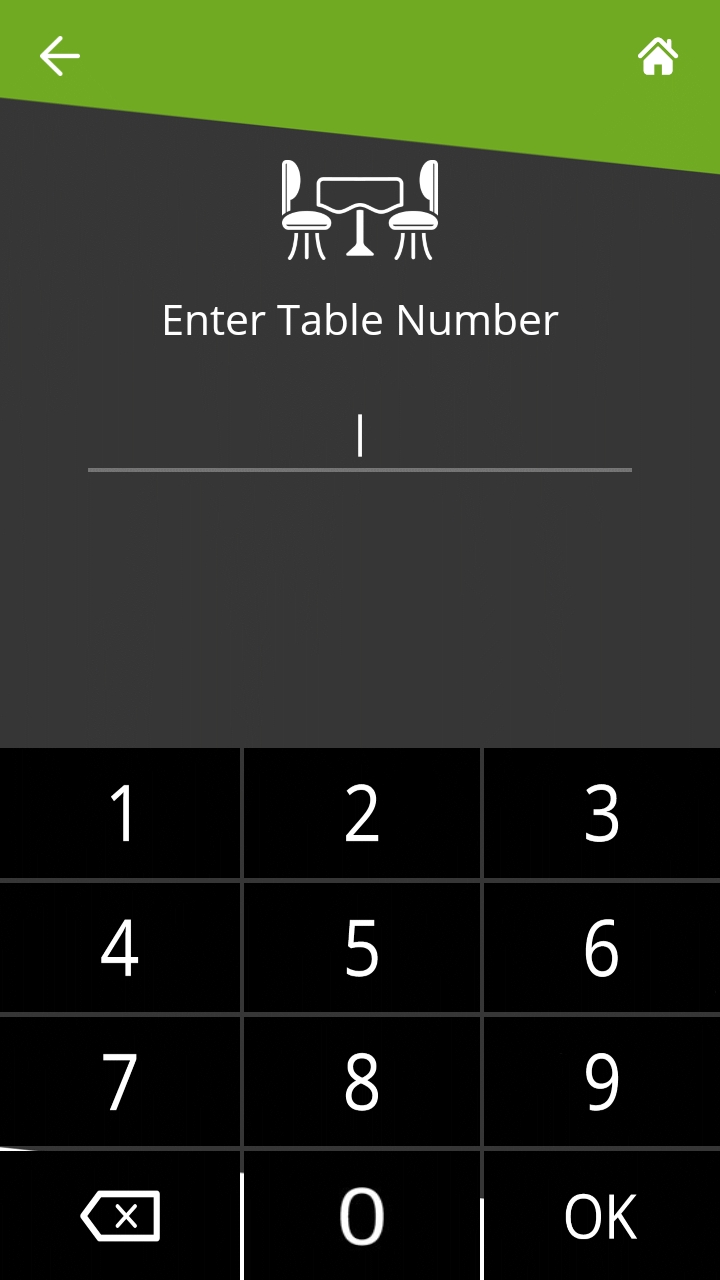

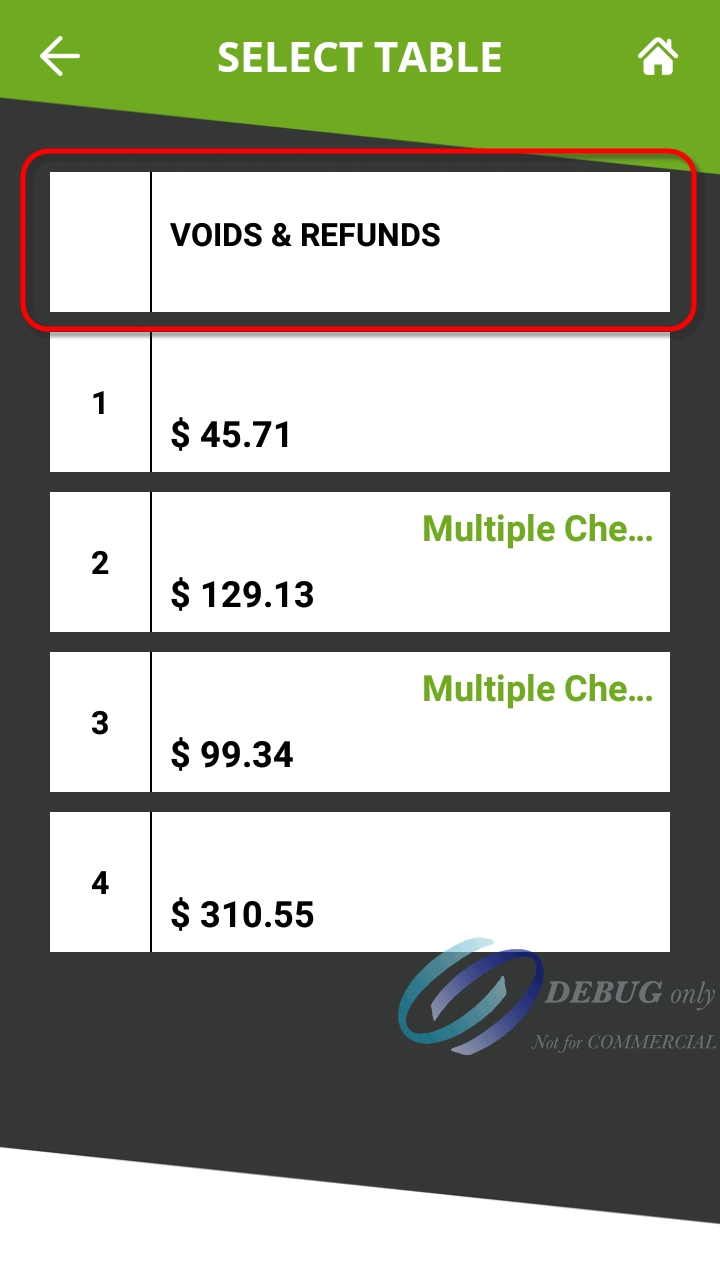
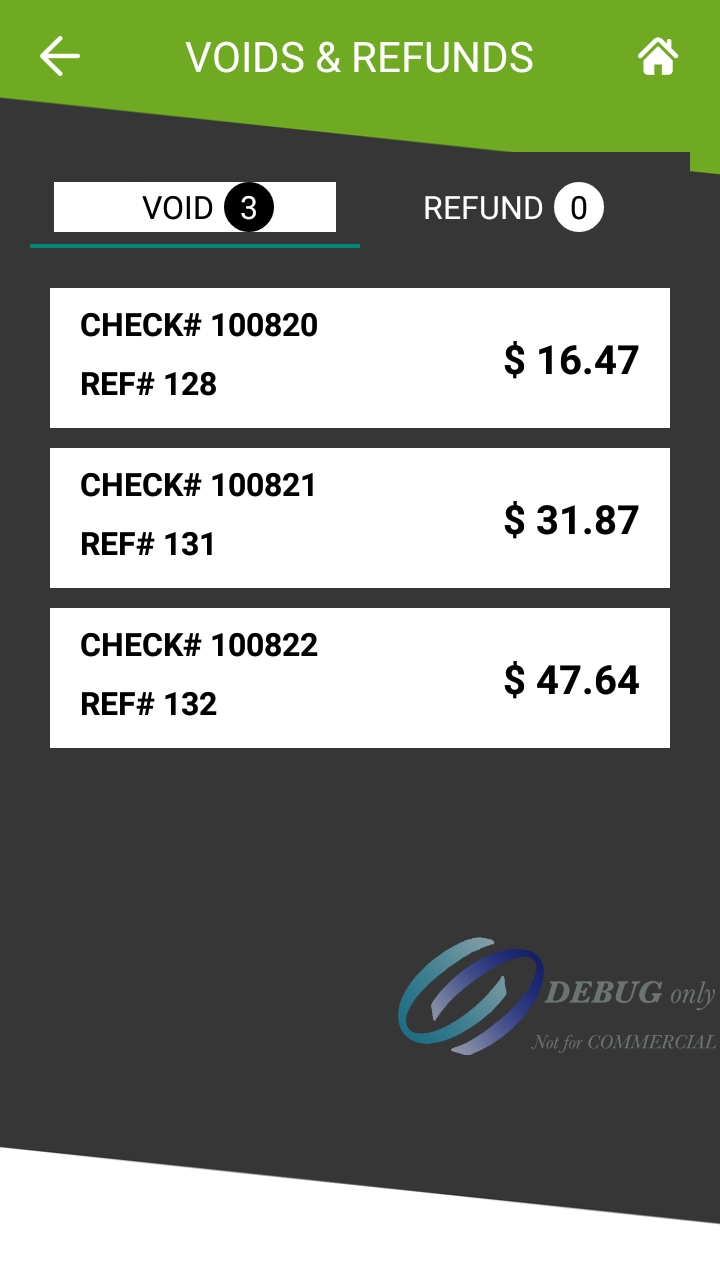
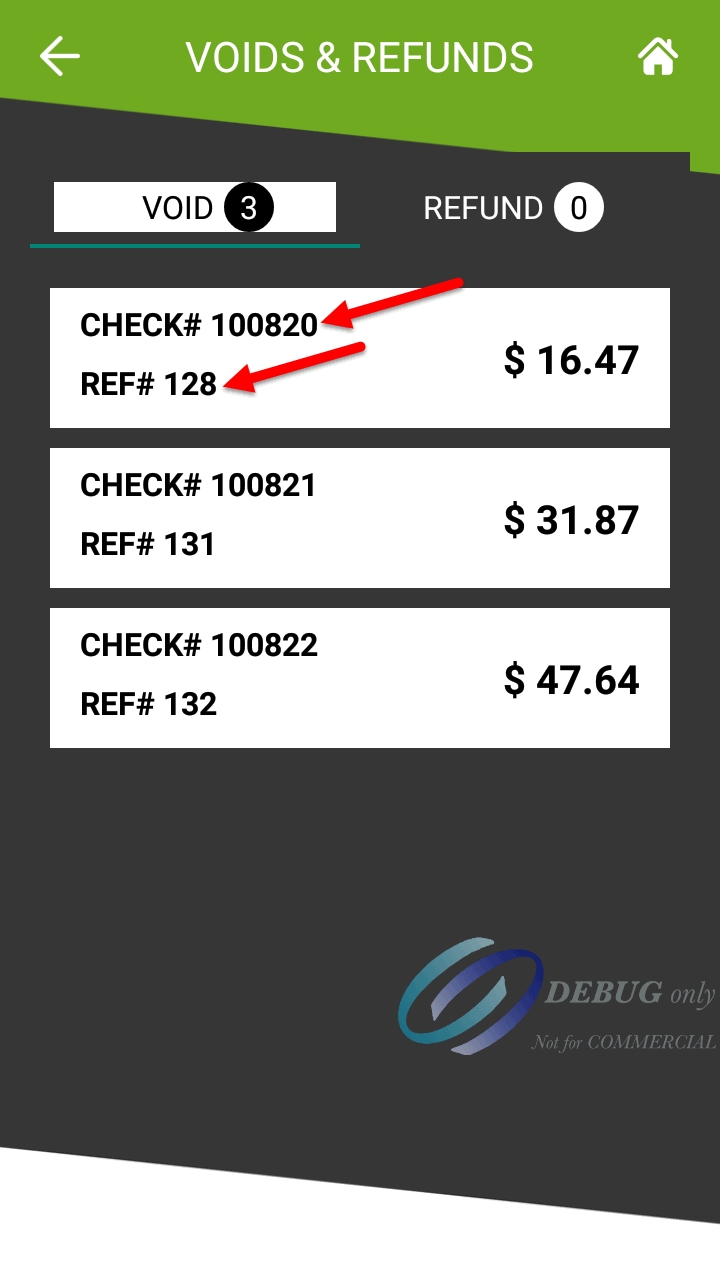
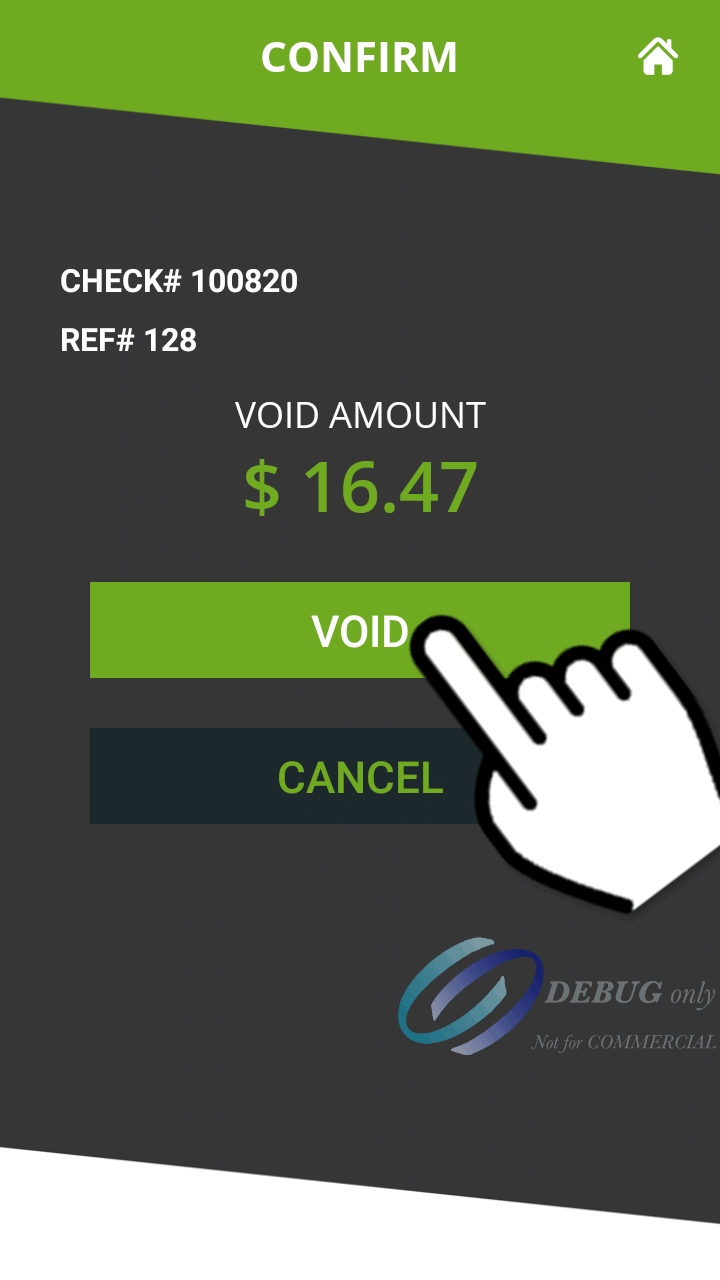
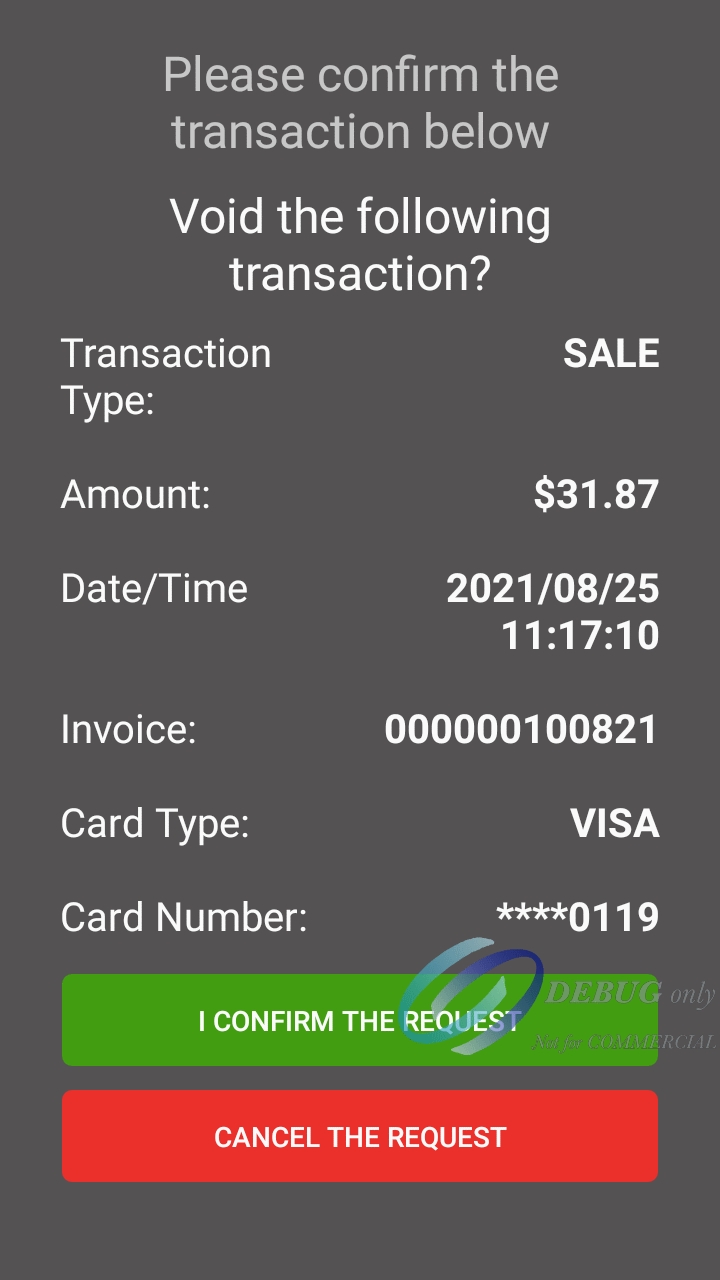


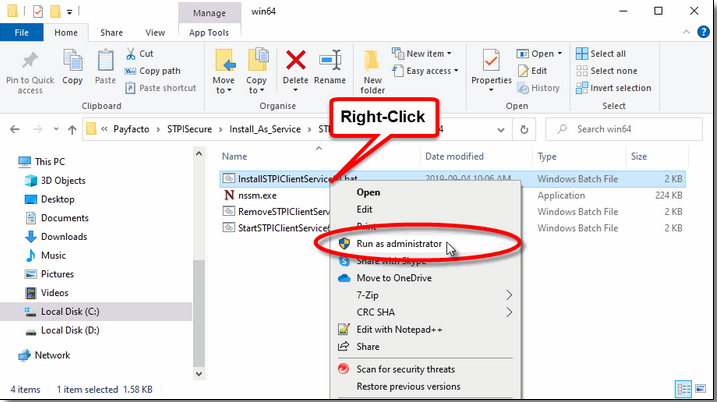
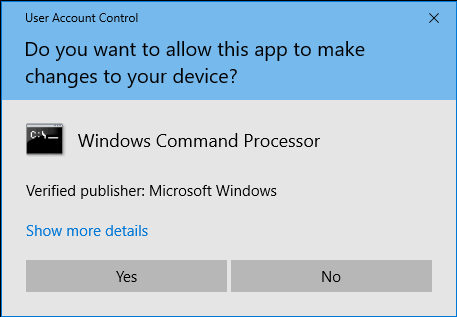
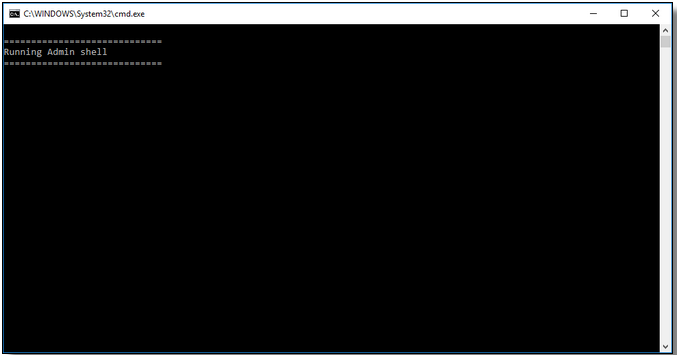

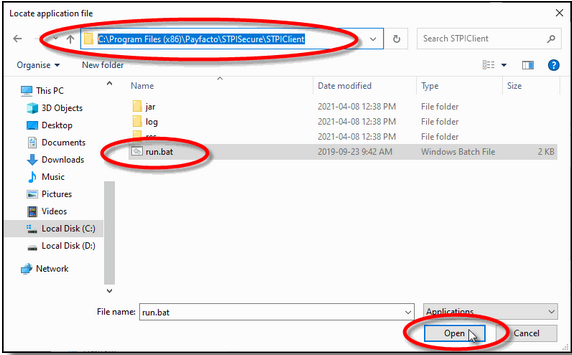
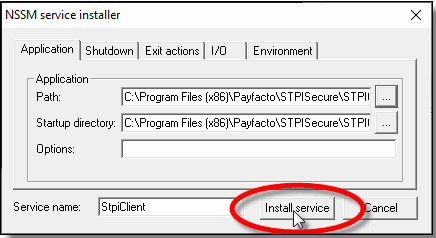
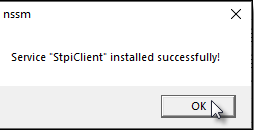
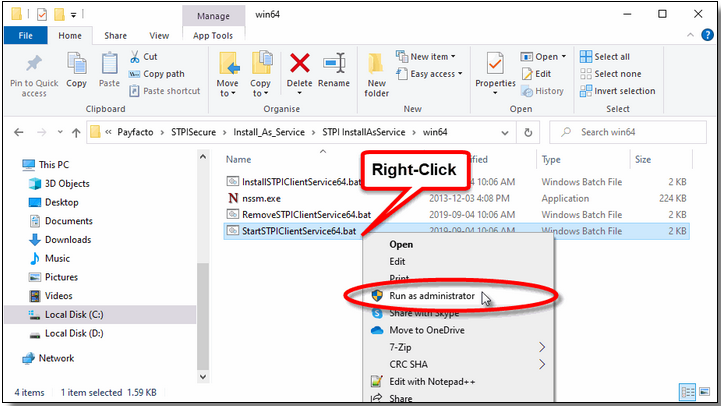
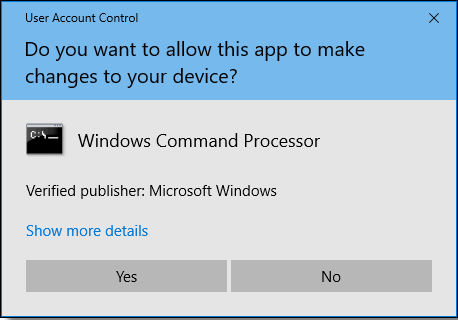
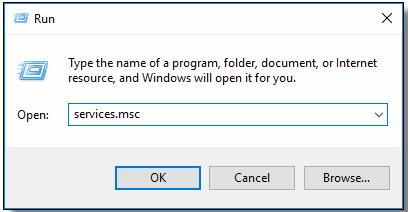
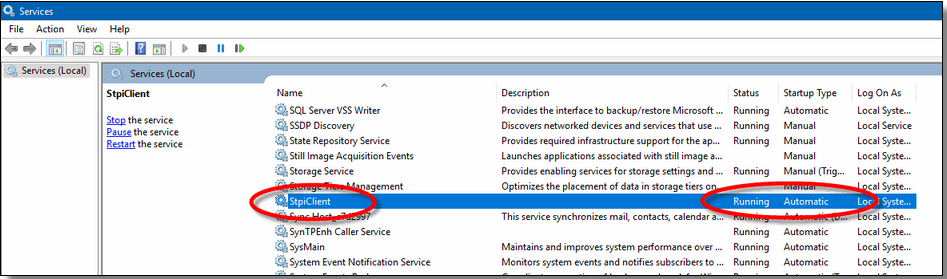

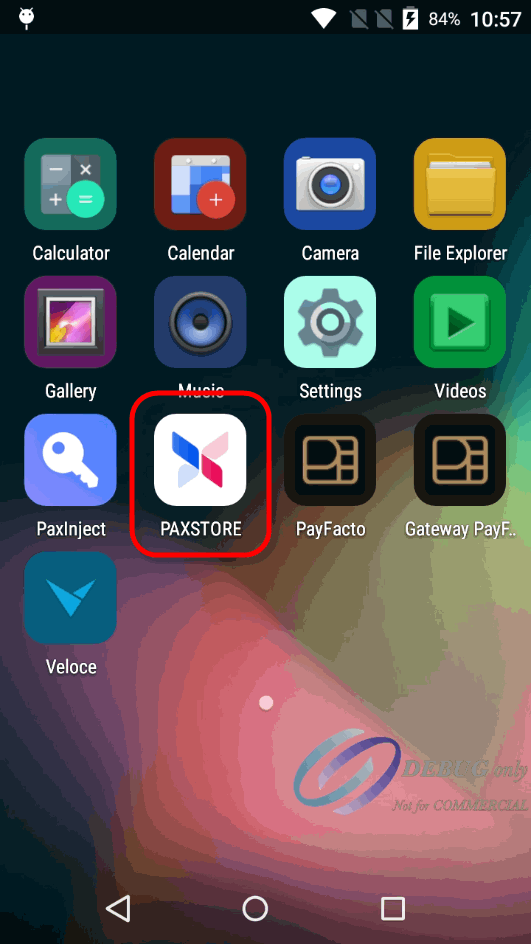


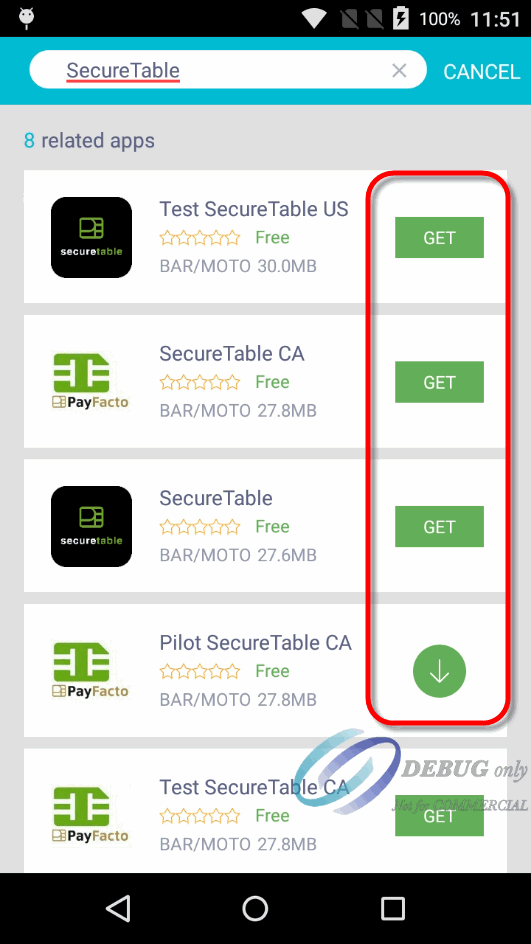


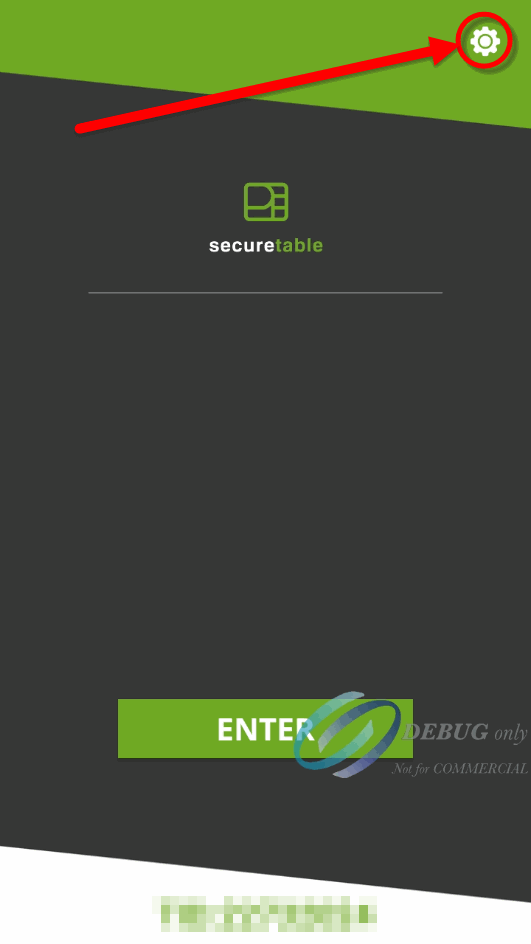

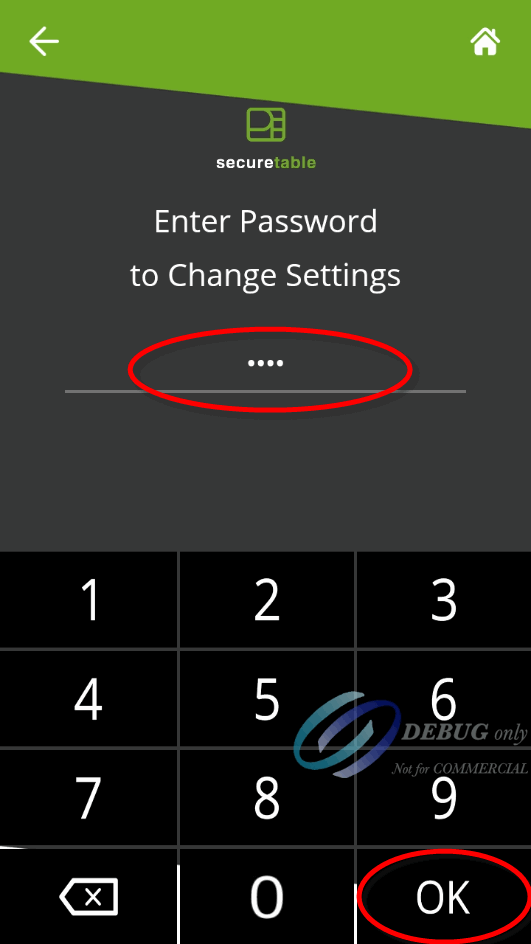


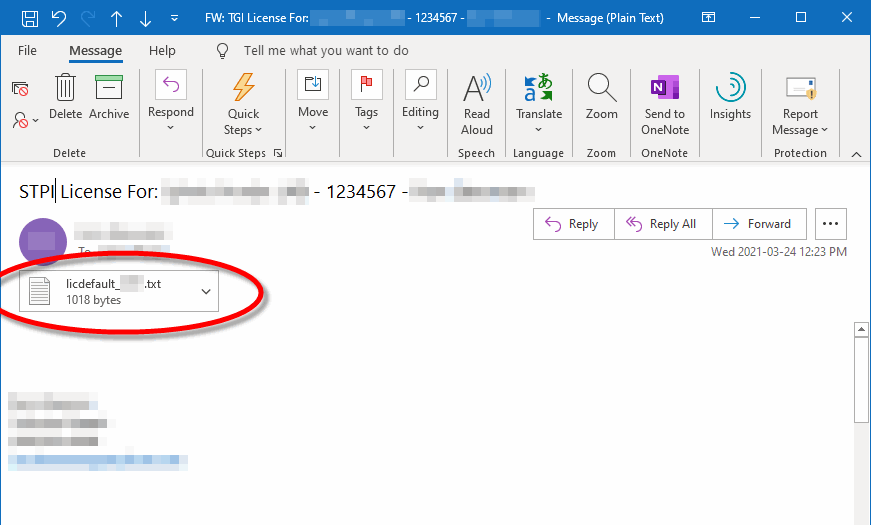


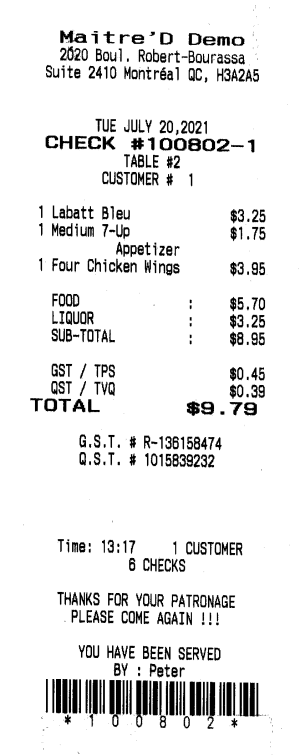
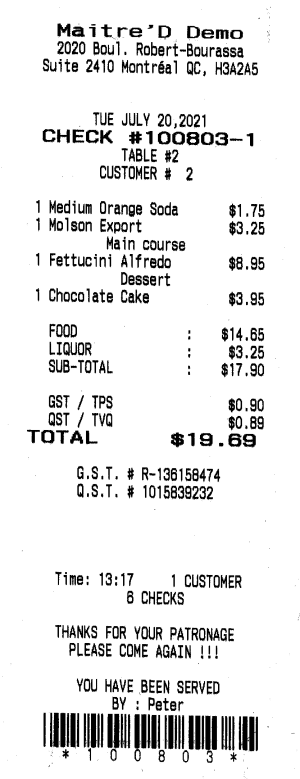
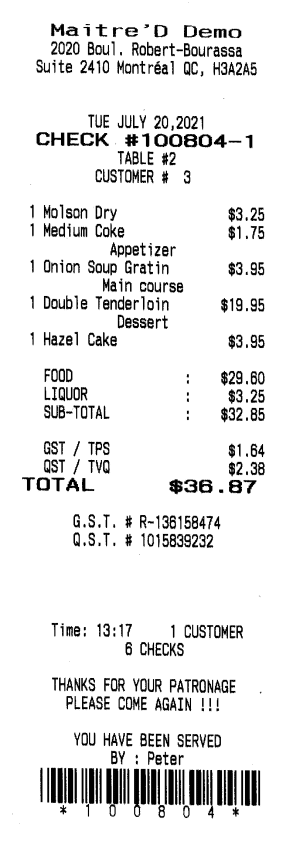
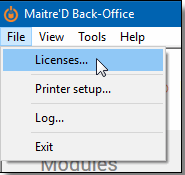
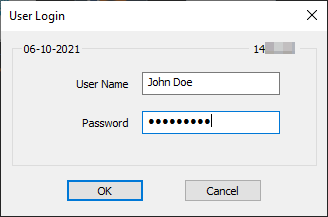
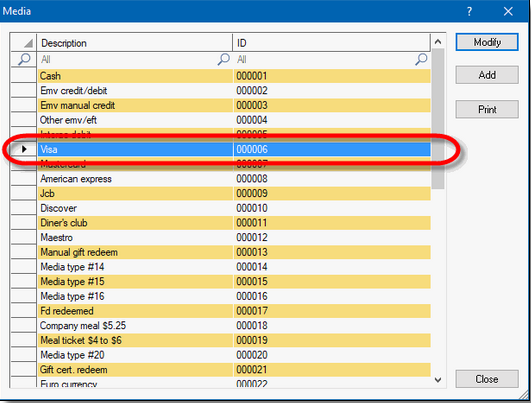
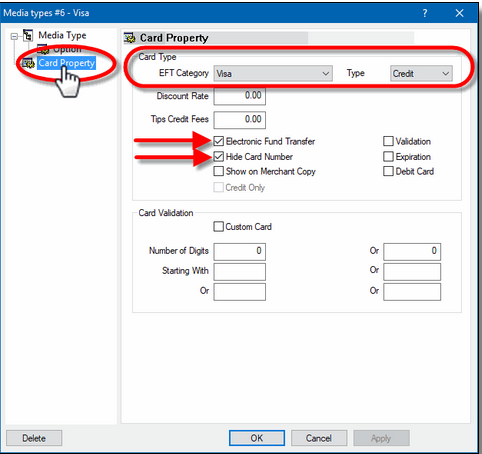
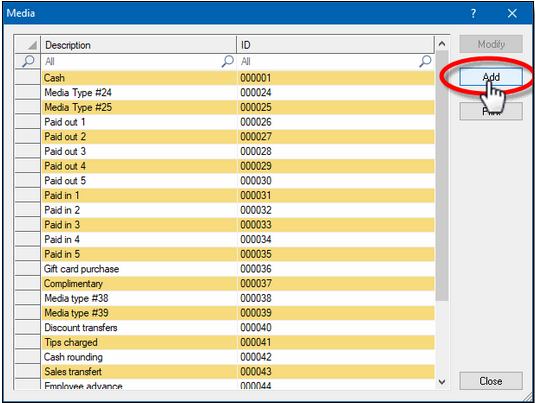
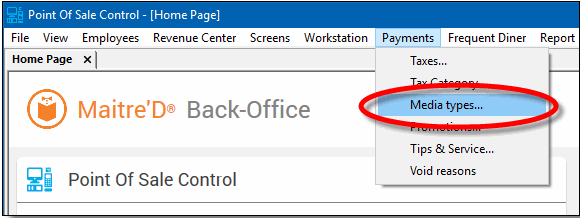
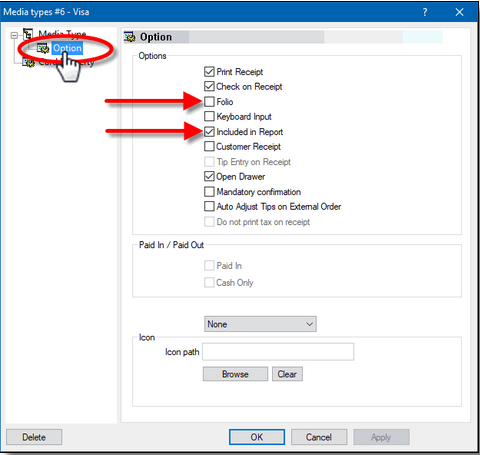
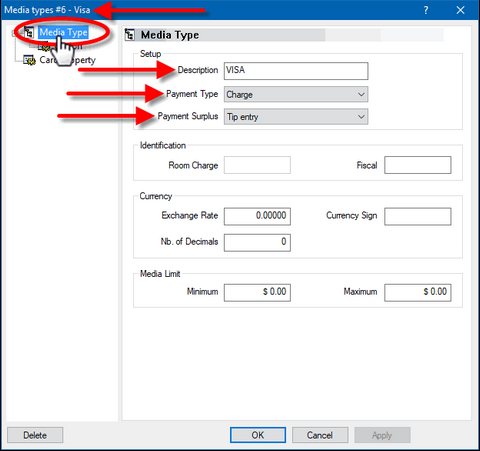


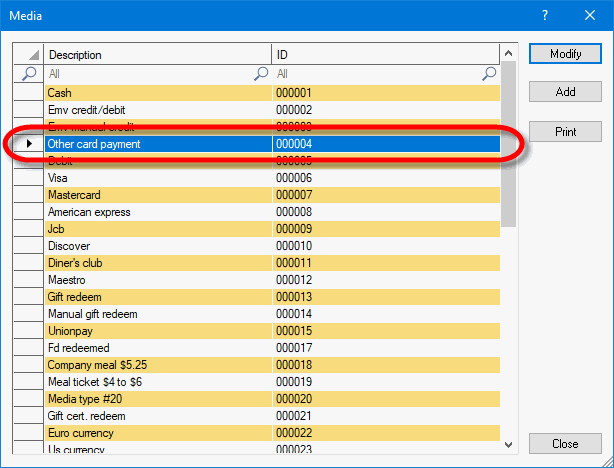

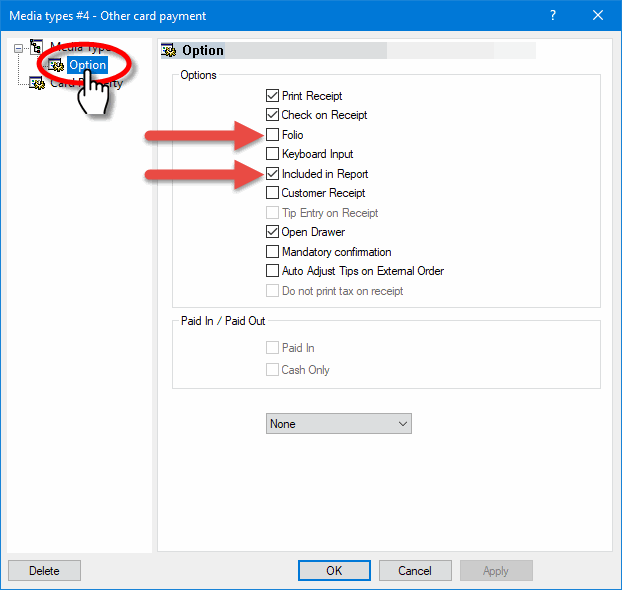


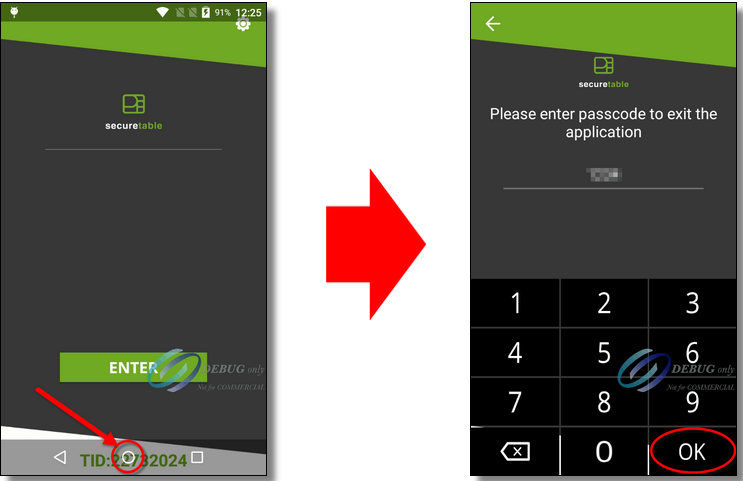


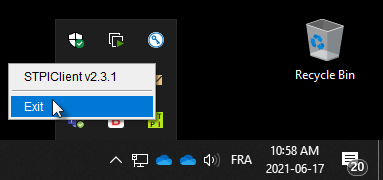


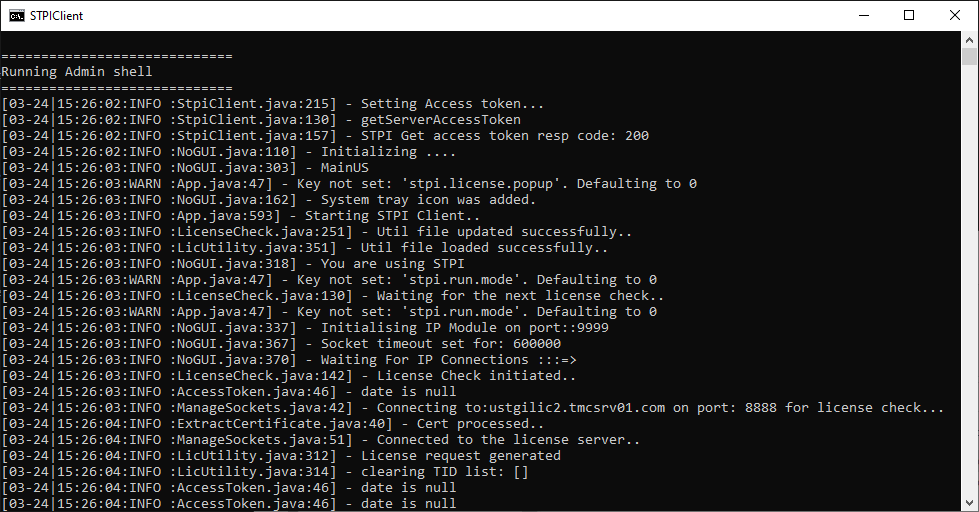

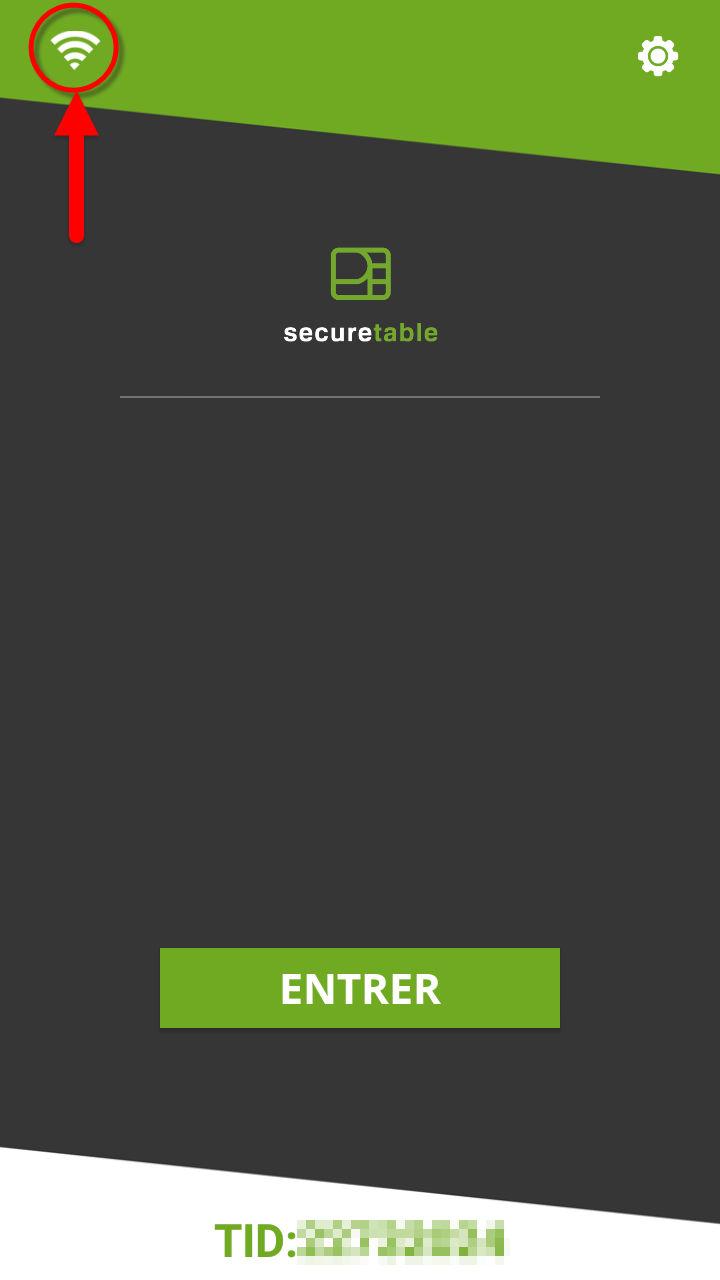
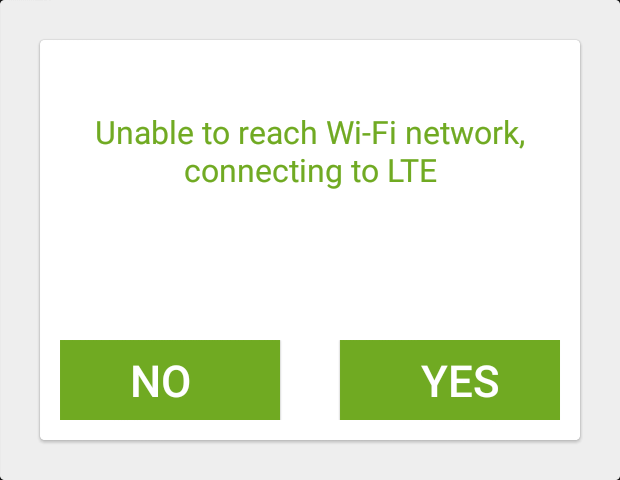
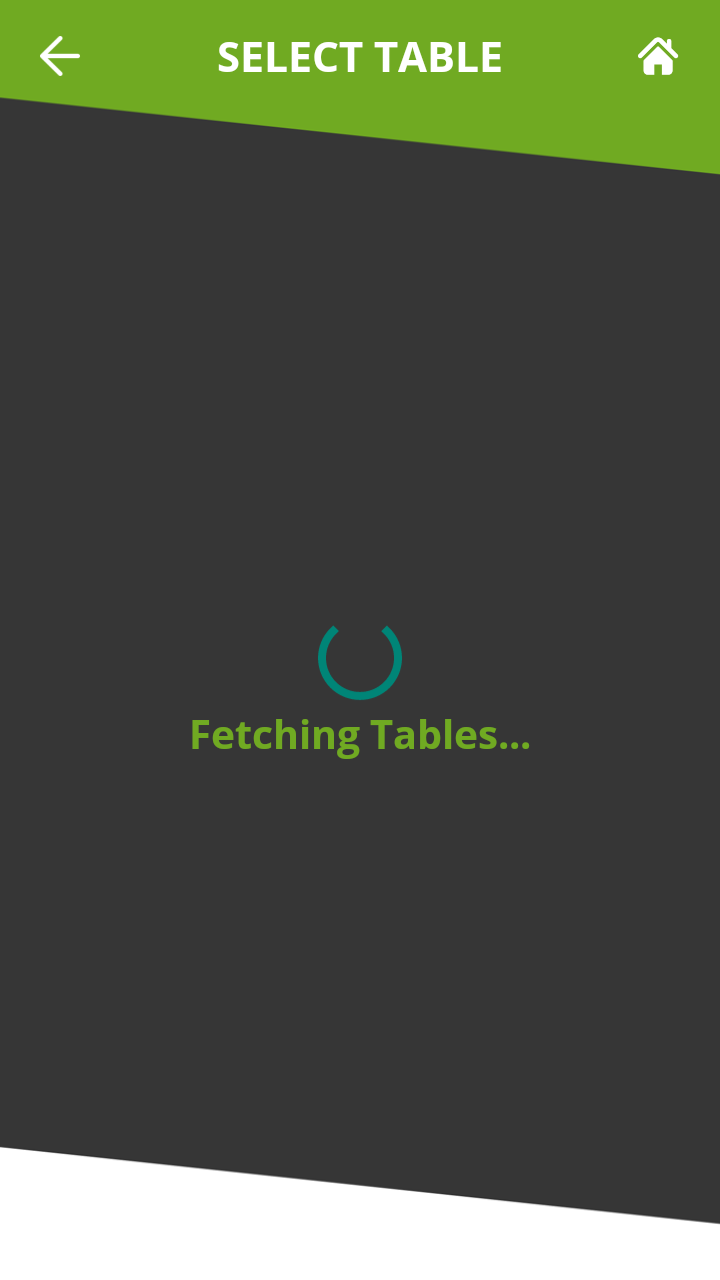


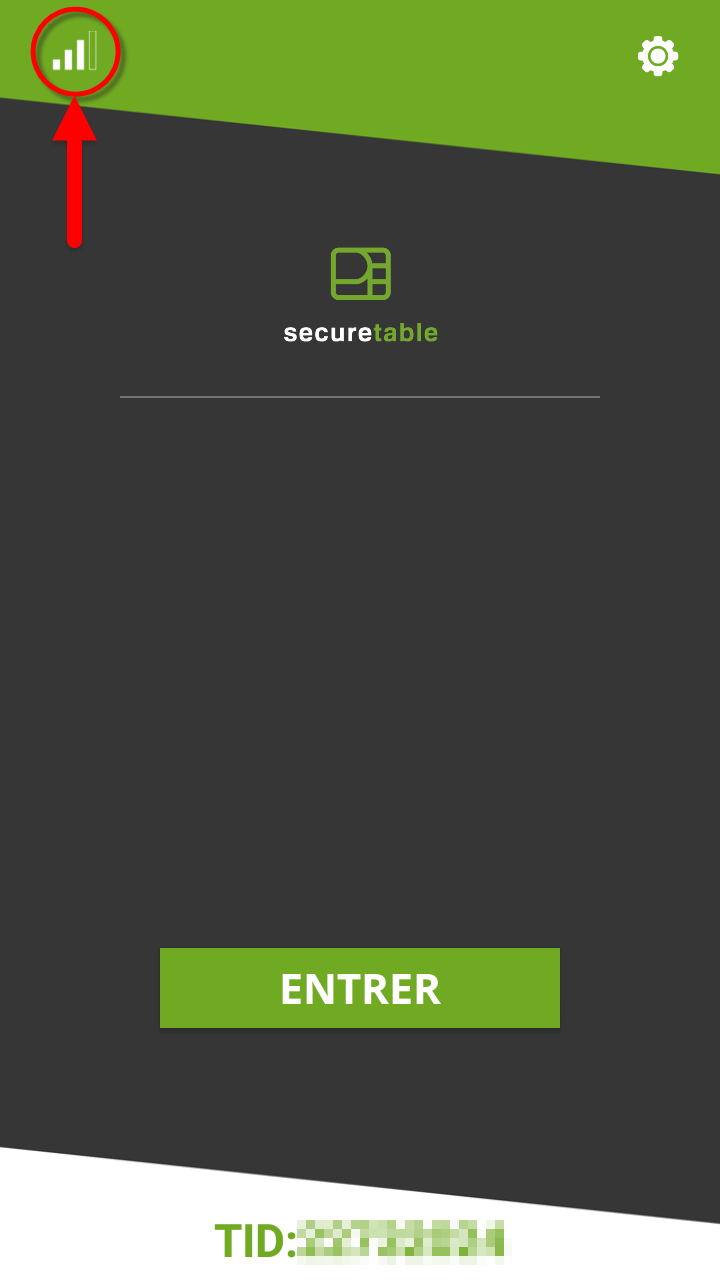


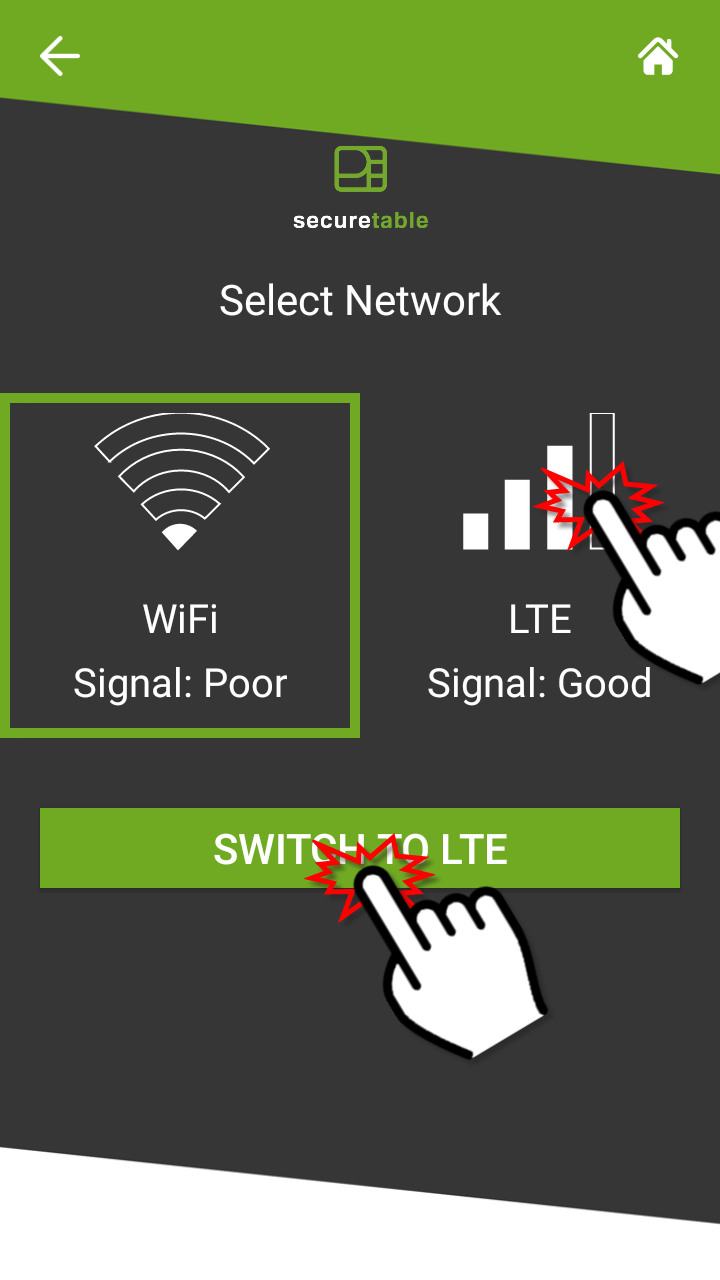
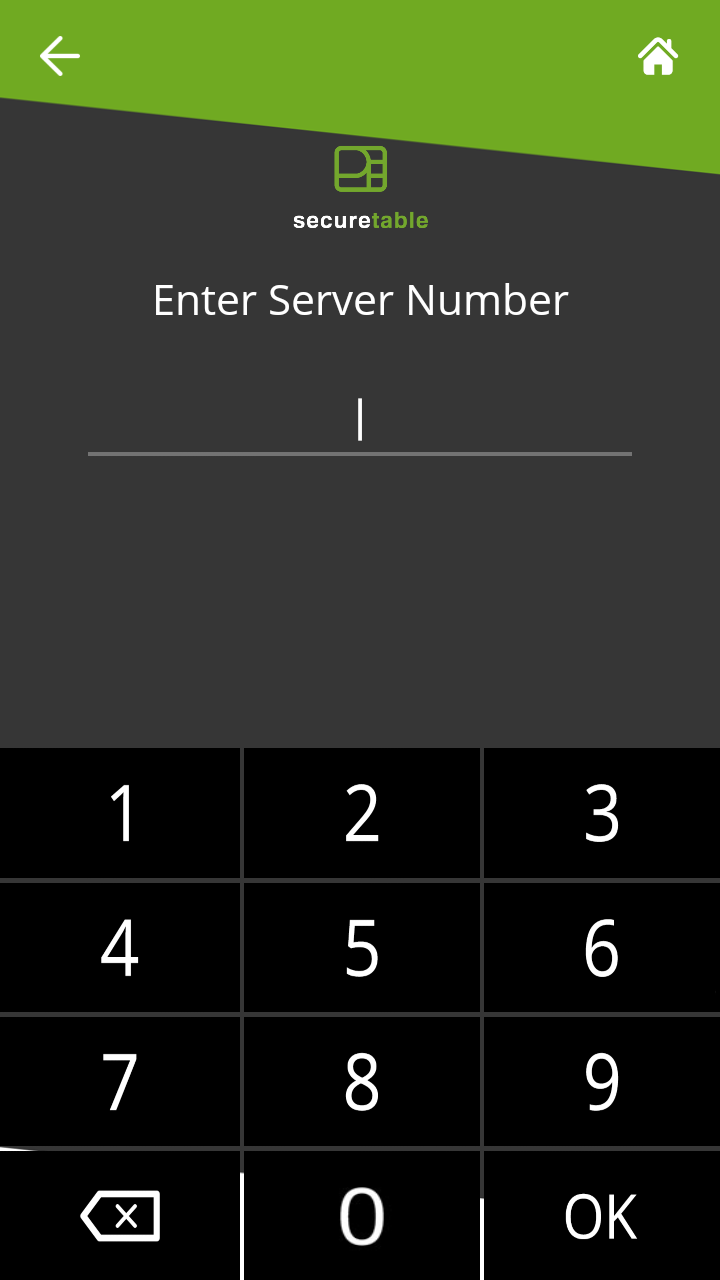
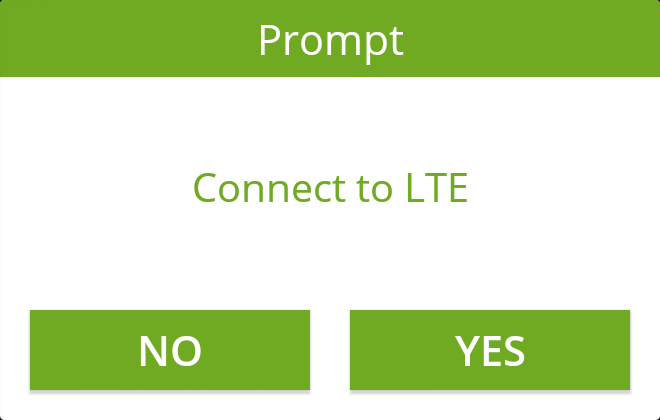
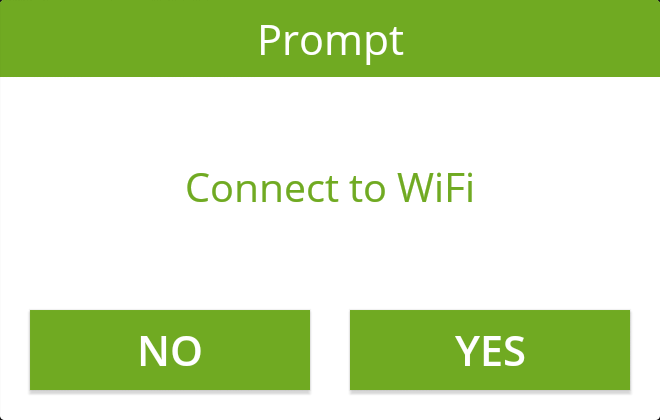
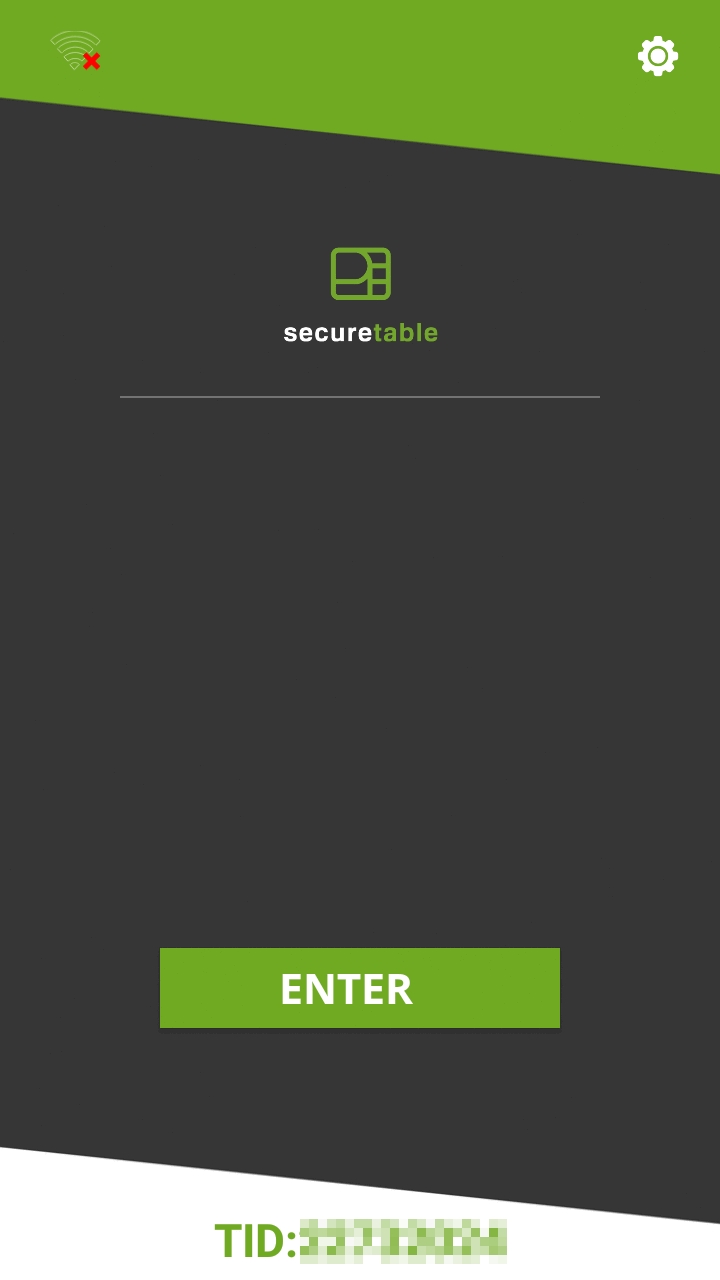
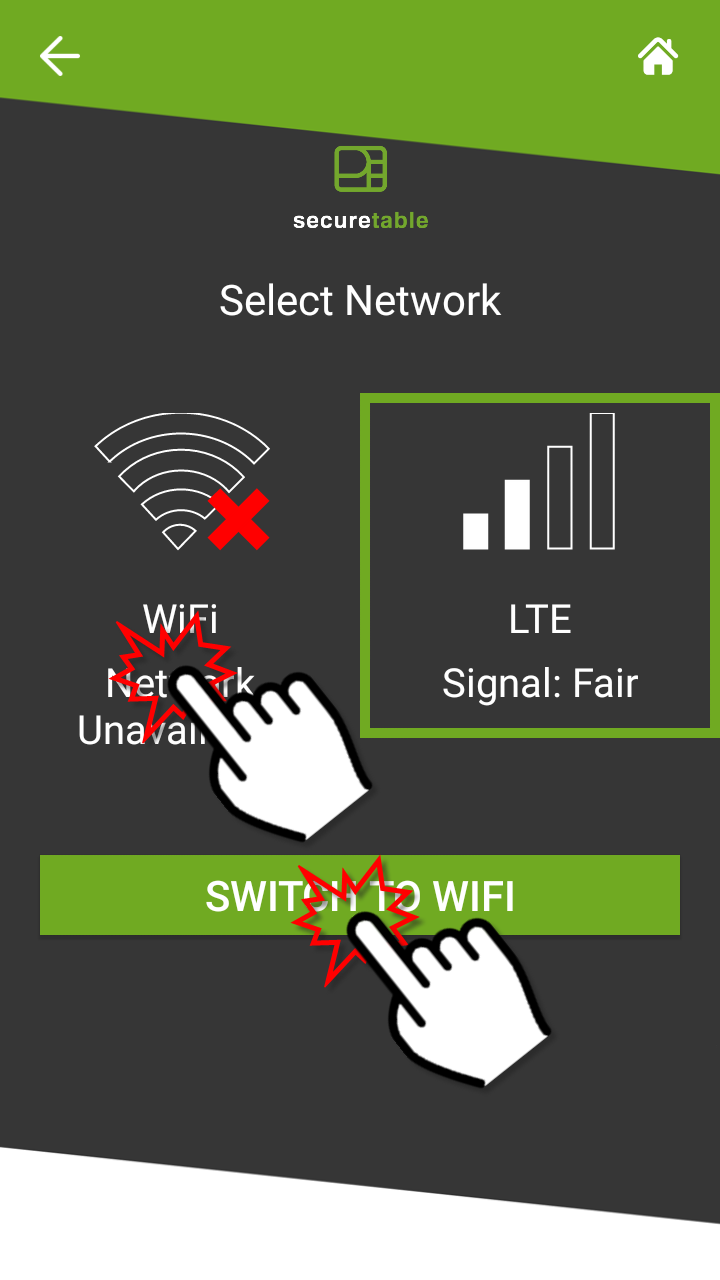
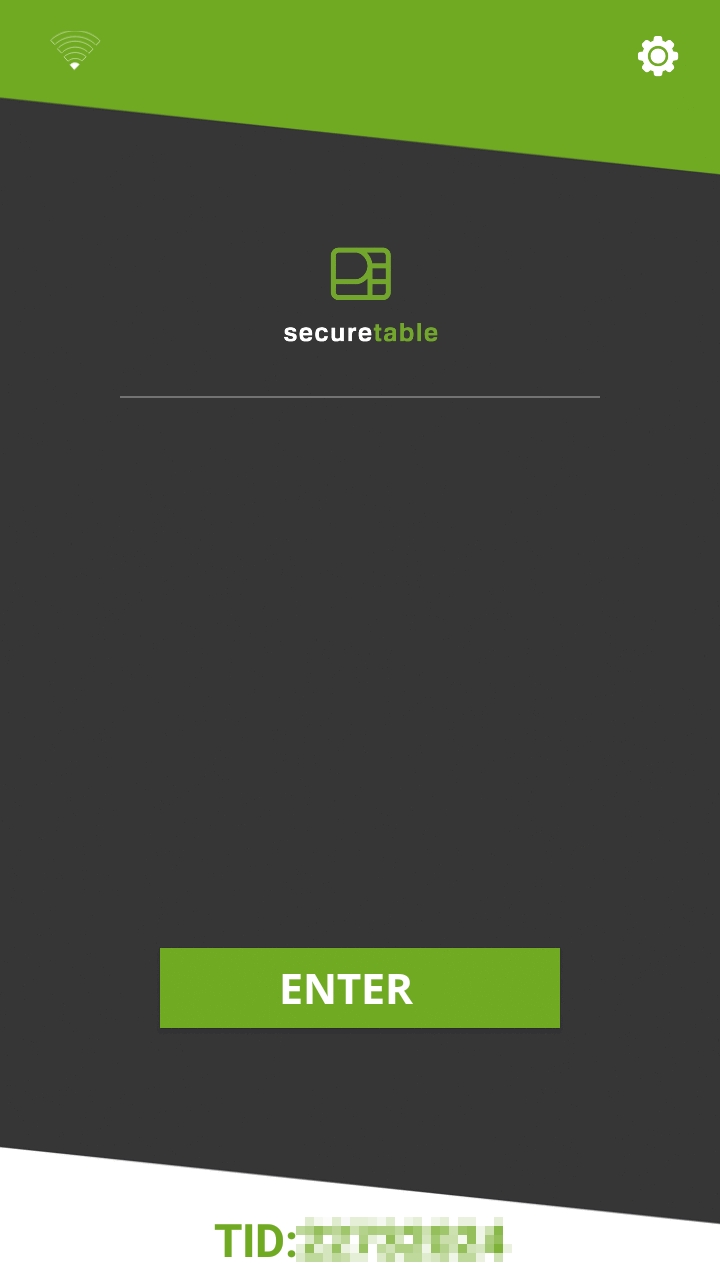

3. You will be prompted to enter a password before you can access settings. Enter the password and press the OK key.
4. The SETTINGS screen will be displayed.
NOTE: The default password after a new installation is 1234.
NOTE: Before configuring the IP address or URL, it is strongly recommended to start the STPI Client on the PC where it was installed, and make sure it is running properly. This will allow you to test the communication using the FIND STPI links found with some settings.
IP / URL toggle switch
By default, the toggle switch is set to IP, and the field is labeled STPI IP Address. By touching the toggle switch, the field will change to STPI URL Address.
• The IP option is used to locate the STPISecure Client using an IP address, such as 192.168.xxx.xxx.
• The URL option is used to locate the STPISecure Client using a Uniform Rersource Locator (URL), such as https://payfacto.com/.
Enter the IP address or URL of the PC or resource where the STPI Client is installed and running, when accessing it through the local WiFi network.
Find STPI
After entering the IP address or URL, touch this link to verify the communication between your payment terminal and the STPI Client.
Redundant Network
Enable this option to allow the SecureTable application to communicate over both WiFi and 4G/LTE mobile networks. By default, SecureTable will always try to use WiFi networks first, to avoid extra costs from using data over mobile networks. If the terminal is out of range of any known WiFi networks, SecureTable will automatically switch to 4G/LTE mobile network. Enabling this option will also unlock additional settings.
NOTE: A SIM card needs to be installed in the payment terminal to get access to 4G/LTE mobile networks. Also, this option will be hidden if no SIM card is detected.
Auto-connect to LTE
** This settings is only visible if Redundant Network is also enabled. With this option enabled, SecureTable will offer the option to automatically switch from WiFi to 4G/LTE if unable to reach the POS system during a transaction. This switch will only happen if the application is actively trying to connect to the POS system. It will not happen while the application is idle. If this option is disabled and there is a WiFi communication issue during a transaction, you will get a generic error message and you will need to manually switch to 4G/LTE and re-attempt the transaction.
STPI IP/URL Address for LTE
** This settings is only visible if Redundant Network is also enabled. Enter the Public IP address or URL to access the STPI Client is installed and running, when accessing it through the 4G/LTE mobile network.
Find STPI
After entering the IP address or URL, touch this link to verify the communication between your payment terminal and the STPI Client.
NOTE: The STPI Client needs to be up-and-running. If you are using FIND STPI for 4G/LTE, Port Forwarding also needs to be configured on the router/firewall controlling the access to the local area network.
STPI Port Number
This field displays the current TCP port number used for communication with the STPI Client.
NOTE: This setting can only be modified from the Advanced Settings screen and is displayed here for information purposes only.
Advanced Settings
Touch this link to access the Advanced Settings screen.
Functions Menu
Touch this link to access the Functions Menu screen.
SAVE
Touch this button to save your changes and return to the home screen.
NOTE: On a brand-new installation, the application will not let you save your settings with an empty (blank) STPI Port Number. To prevent this issue, go to the Advanced Settings screen, configure the STPI Port Number, Save, and then go back to the basic settings screen to set the IP address or URL.
STPI Port Number
Default: 9999 This is the TCP port number used by STPI. Be sure that this TCP port is unblocked by your network administrator.
POS Type
• Select 1 for Maitre’D, Veloce or any POS other than Micros or Squirrel.
• Select 2 for Micros.
• Select 3 for Squirrel.
Tip
Enable this option to have the SecureTable application prompt for tip entry. Disable this option to prevent tip entry. Disabling this option will also hide all the tip-related options below.
Tip Preset (Select percentages)
Configure preset tip percentages that the customer will see when prompted for tip. Up to 3 presets can be configured. If you do not wish to use all of them, presets that are set to 0% will not be displayed to the customer.
Tip Preset Text Size
Select the text size used to display preset tip percentages. Available choices are Normal, Medium and Large.
Tip Threshold
Enter the maximum allowed tip percentage. Any tip amount that exceeds this percentage will require the settings password to be entered. Setting the percentage to 0% disables the tip threshold validation.
Tip on Tax
Enable this option to calculate the tip percentage from the total check amount, including taxes. If this option is disabled, the tip amount will be calculated on the sub-total instead, which does not include taxes.
NOTE: For the Tip on Tax feature to have an effect, the POS system needs to send both the sub-total and check total as separate values to the STPIClient. If the POS system only sends the check total without the sub-total, this setting will have no effect. The percentage will be calculated on the check total sent by the POS, regardless of the status of this option.
Enable Confirmation
Enable this option to present a dedicated tip confirmation screen for the customer. If this option is disabled, the tip confirmation screen will be skipped when selecting a tip preset or the NO TIP option. If using custom $ or custom % with this option disabled, the tip amount, percentages and resulting totals will be updated in real-time as the customer types the numbers in, but no additional confirmation screen will be presented before the actual payment.
Setting Password
Configure the password used to access settings. This is also the password that will be requested if the customer enters a tip amount that exceeds the Tip Threshold.
Enable Search by Table Number
Enable this option to have the terminal prompt the server for a table number. This allows the SecureTable application to search for all available checks for a given table number.
Enable Search by Check Number
Enable this option to have the terminal prompt for a check number. This allows servers to enter a check number in order to directly access a check, instead of selecting the check from a list.
More Settings
Touch this link to view more advanced settings.
SAVE
Touch this button to save your changes and return to the home screen.
Cash
Enable this option to allow cash payments to be applied on checks from the SecureTable application.
Auto Start
Enable this option to have the SecureTable application start automatically when powering on the payment terminal.
Exit Password Required
With this option enabled, the SecureTable application will request the settings password before closing.
Delivery
Enable this option to use the SecureTable application in Delivery mode. With this option enabled, the payment terminal will display the delivery order numbers instead of table numbers.
Currency
Select the default currency for your region. Supported currencies are:
• Canadian Dollar (CAD ($))
• United States Dollar (USD ($))
• United Kingdom Pound (GBP (£))
• European Union Euro (EUR (€))
• Australian Dollar (AUD ($))
Enable No-Password Menu
Enable this option to allow users to access a simplified version of the Functions menu without entering a password. This menu is accessed by touching the cog wheel icon ( ) at the top-right of the home screen. Enabling this option will also unlock access to the Allow Reports Printing and Allow Receipt Reprinting options below.
Allow Reports Printing
Enable this option to allow users to access and print the Detailed Report and Summary Report from the Nopassword menu. If this option is disabled, the reports can still be printed from the FUNCTIONS menu, which requires the settings password.
Allow Receipt Reprinting
Enable this option to activate the Reprint Receipt option in the No-password menu. If this option is disabled, the receipts can still be reprinted from the FUNCTIONS menu, which requires the settings password.
Upload Logs
Enable this option to upload the SecureTable application logs to the PayFacto Cloud services. It is recommended to leave this option enabled.
Allow Terminal Reboot
Enable this option to allow the terminal to reboot after an automatic batch settlement. It is recommended to leave this option enabled.
WiFi Settings
Use this shortcut to configure the payment terminal's WiFi settings.
SAVE
Touch this button to save your changes and return to the home screen.
NOTE: The payment terminal MUST be connected to your WiFi or Ethernet network and have internet access. Otherwise, payments cannot be processed and payment information cannot be transmitted to the POS system.
IMPORTANT! Be sure to touch the SAVE button to save your changes. Using any other button to exit from the settings screen will discard all changes.
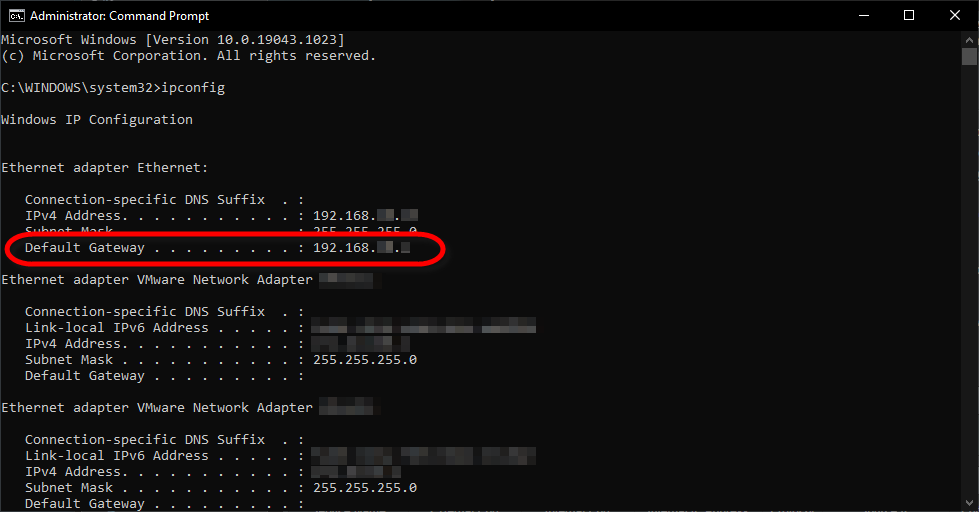
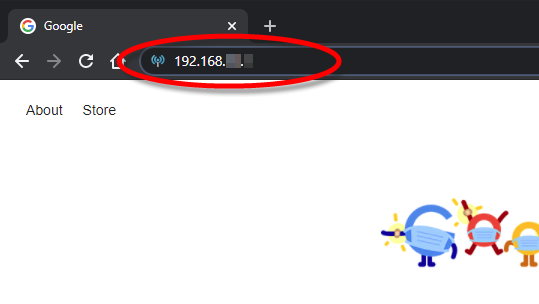


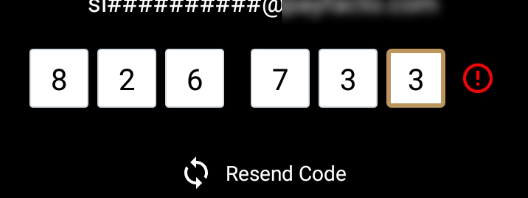
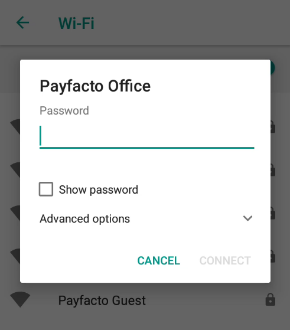
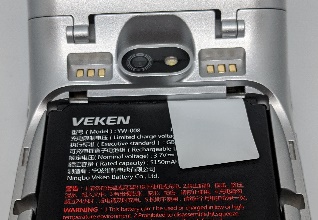
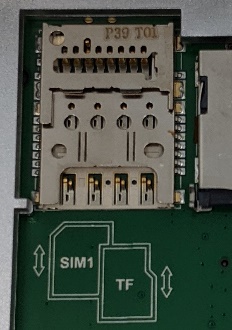

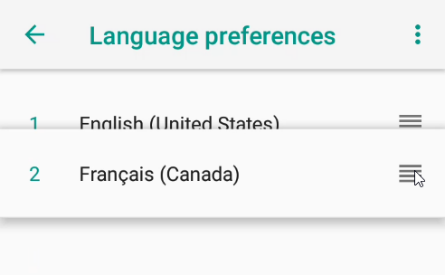
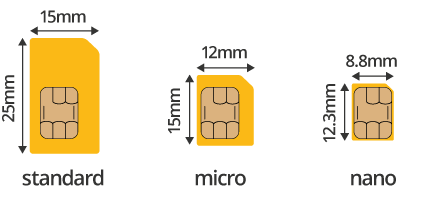
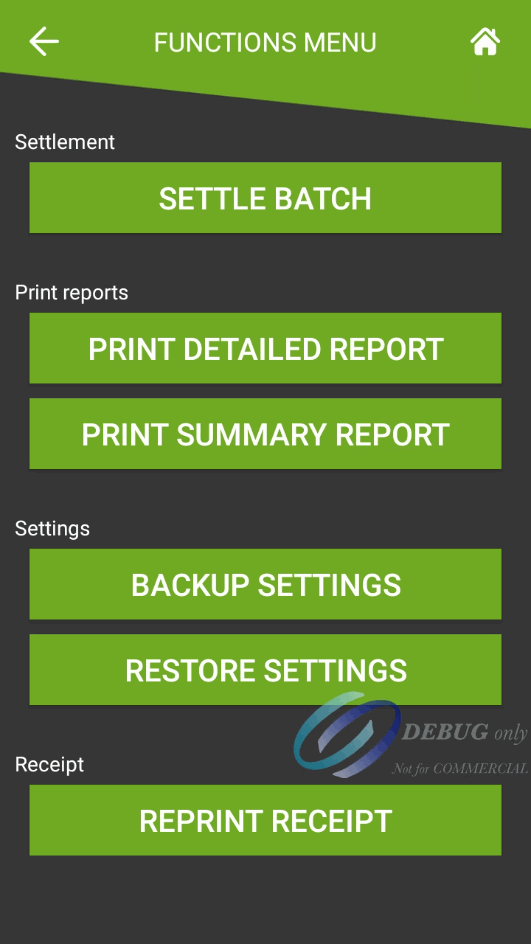
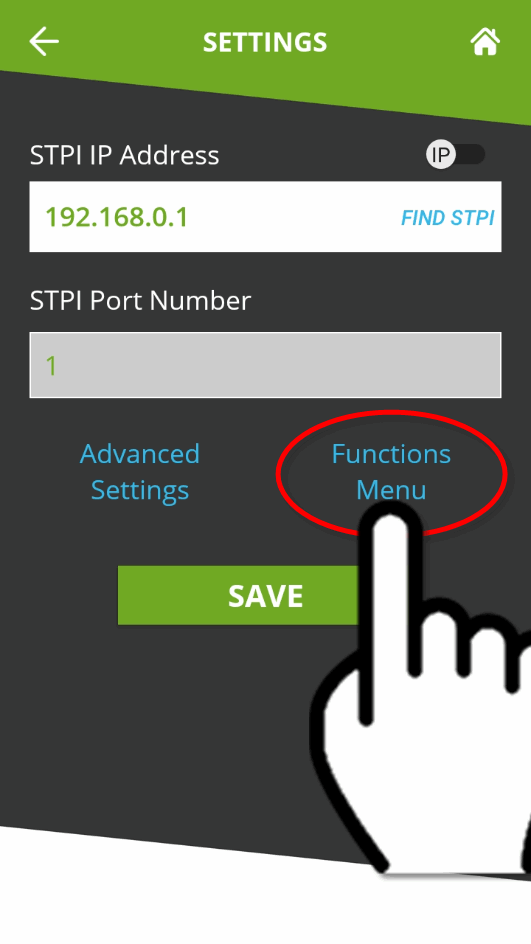
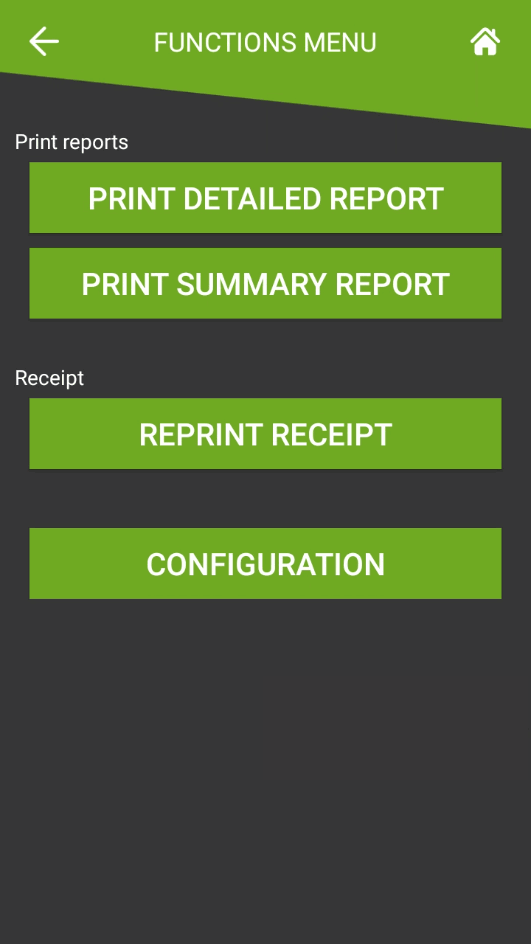

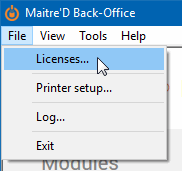
This section will cover the general workflow that users and customers will see when using SecureTable. The workflow will vary slightly based on the SecureTable application's configuration. The workflow steps that are user-configurable are also optional and can be skipped during the transaction process. Those will be indicated as such below.
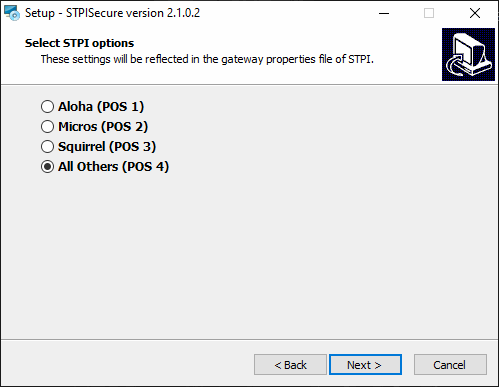
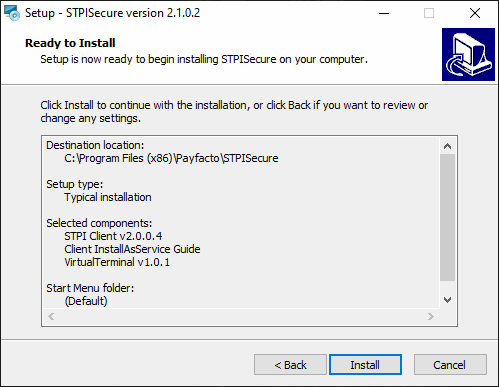
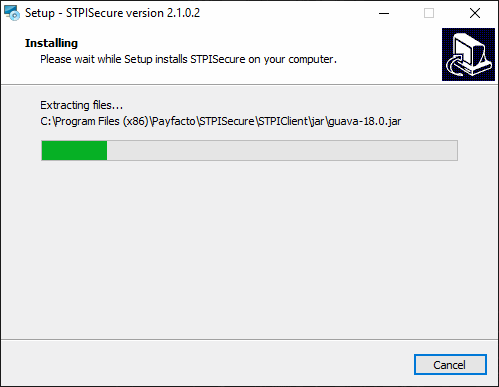


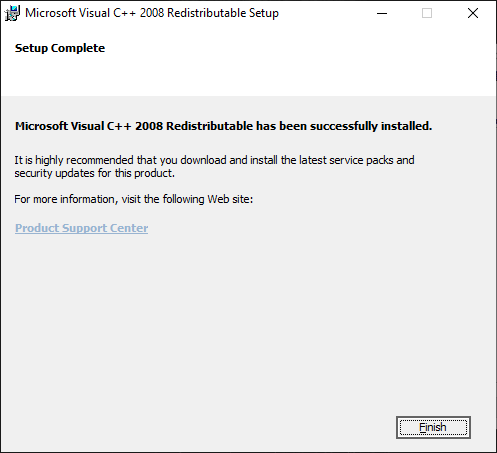
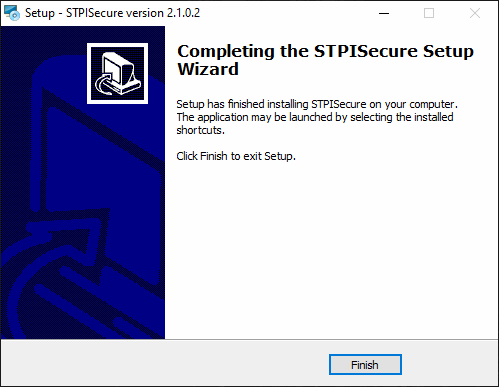

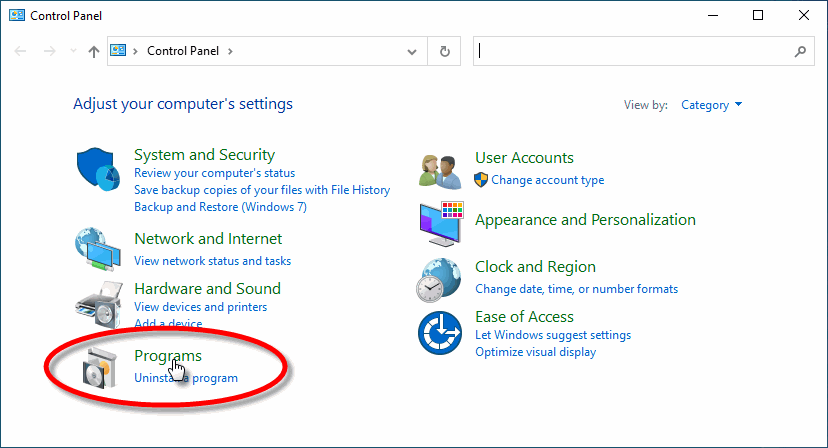
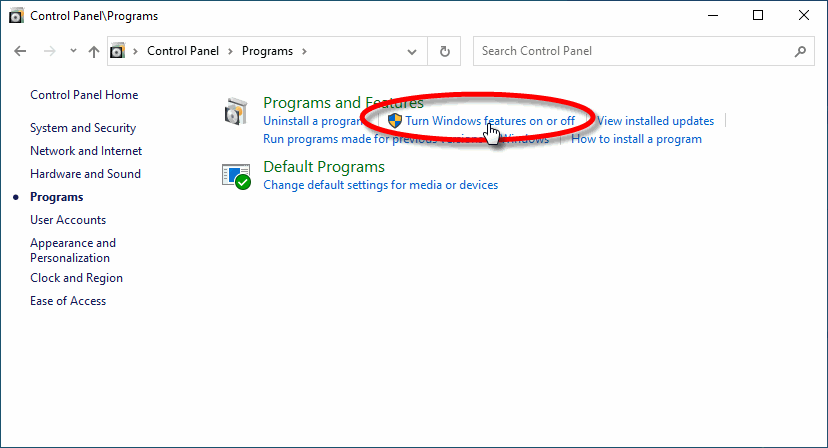


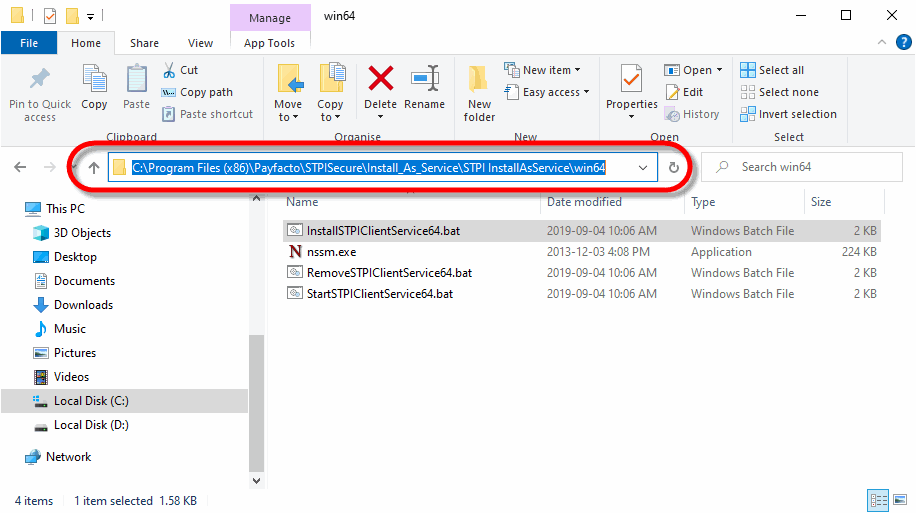
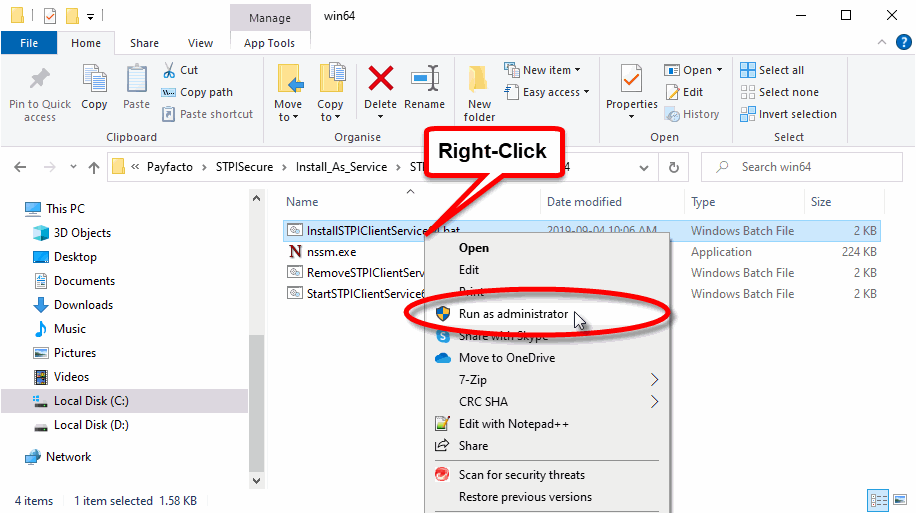
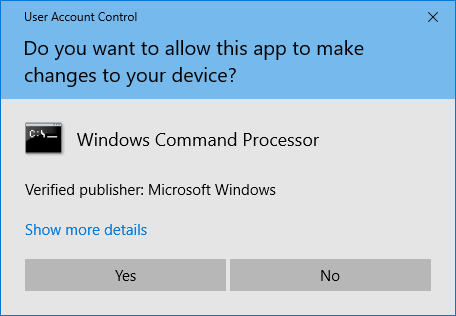
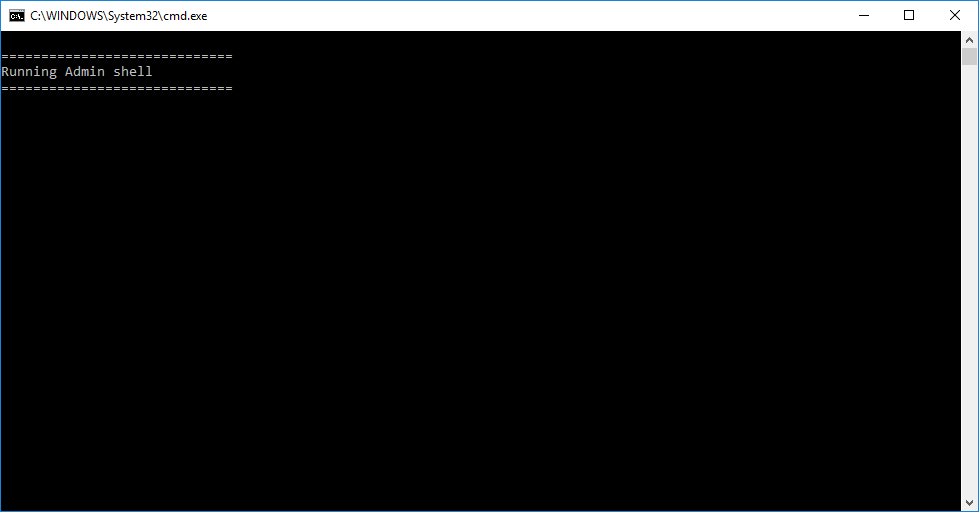
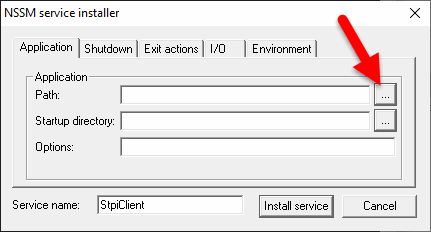
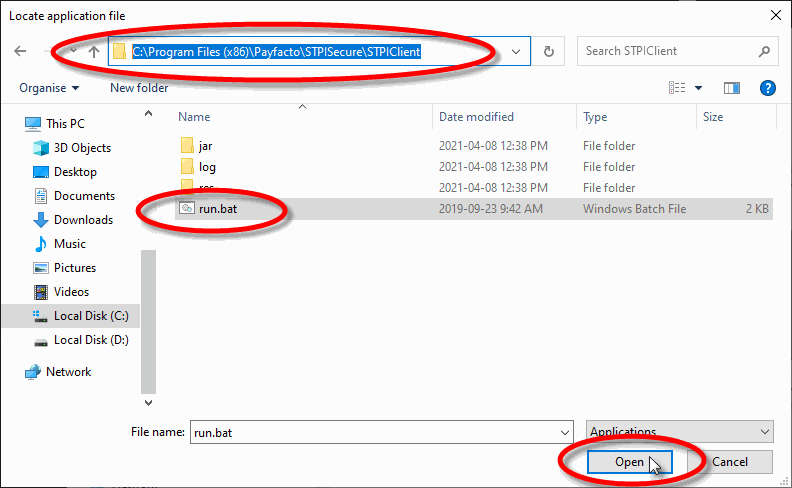
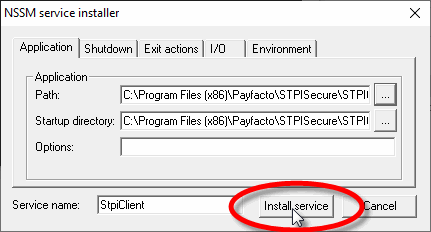
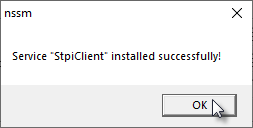
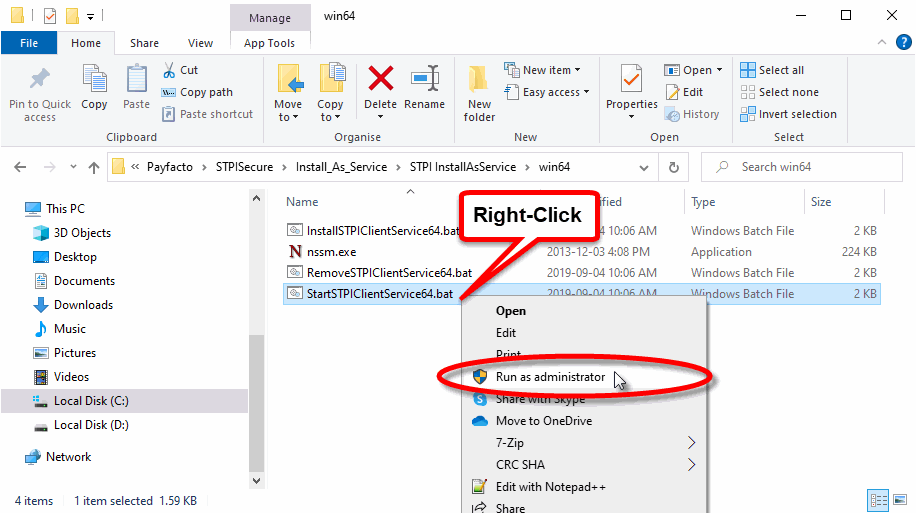


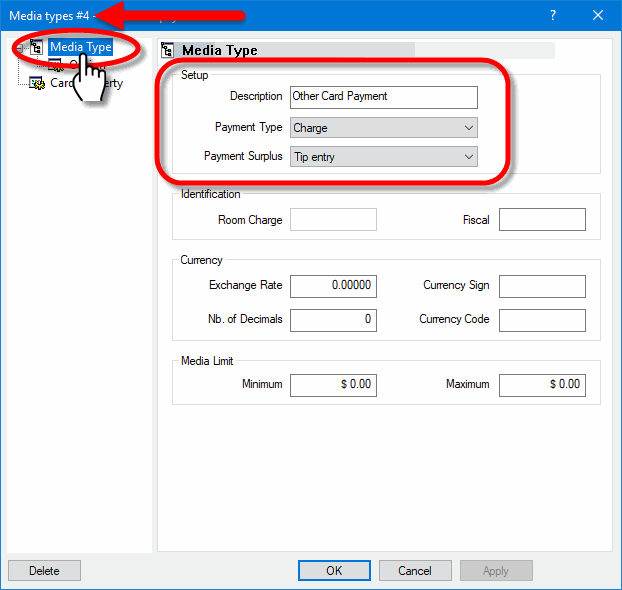

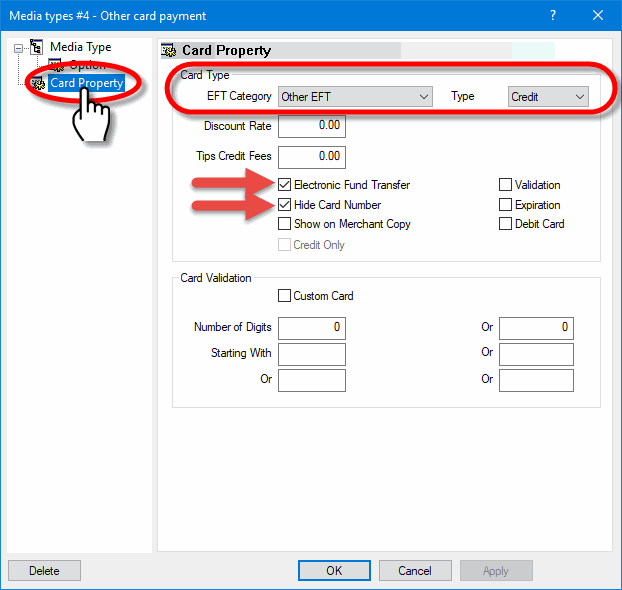
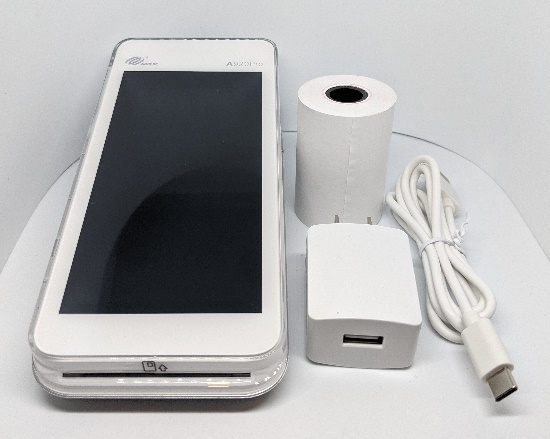
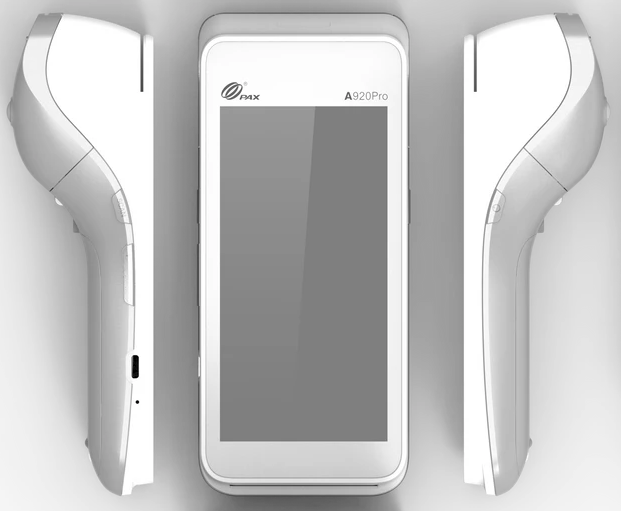
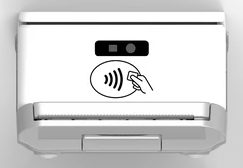
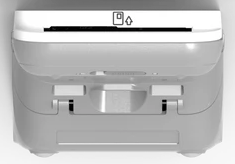
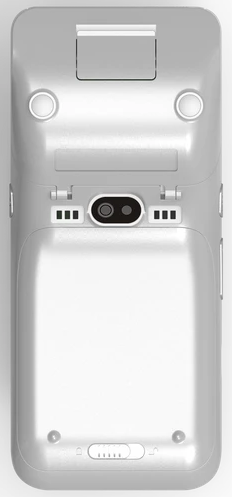

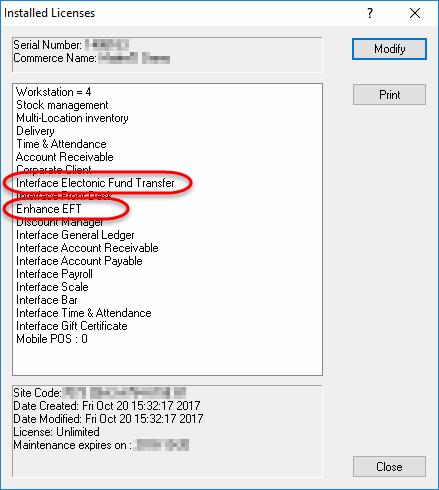
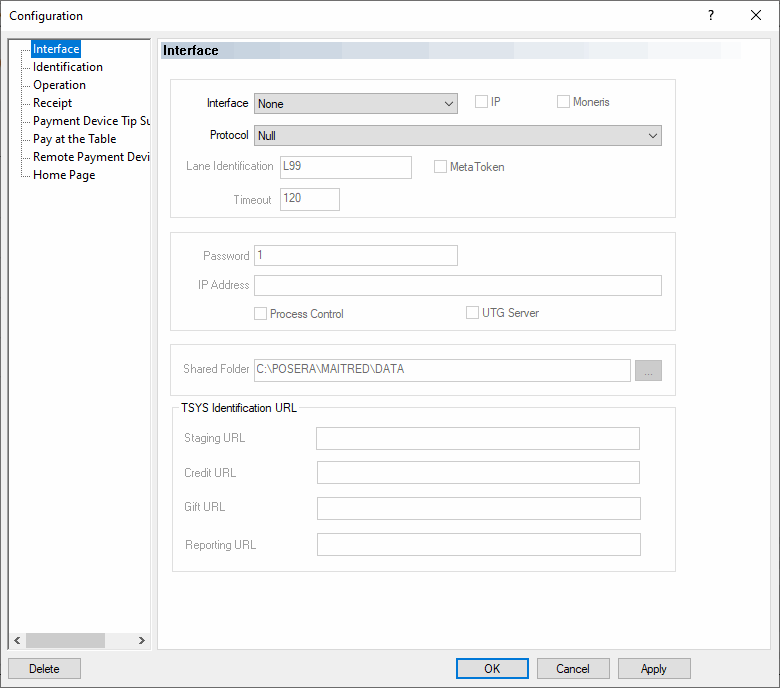
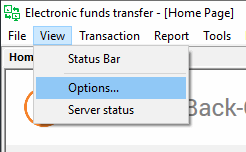


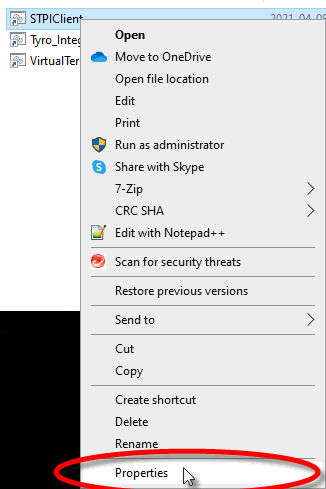
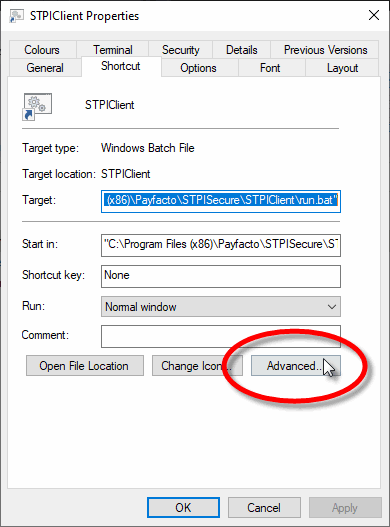
Before starting a transaction using a payment terminal with SecureTable, at least one check must be printed from the POS system. SecureTable can also work with split checks as well a tables with multiple checks. Open tables without printed checks cannot be accessed by SecureTable.
The workflow will vary based on SecureTable's application settings. This section covers all possible configurations. Here are quick links to each step of the workflow:
Enter Table Number (Optional)
(Optional)
(with tip presets)
(Card processing)
The transaction workflow always starts from the SecureTable home screen. To start, simply press the ENTER button.
Enter the Server, Clerk or employee number and press the OK button in the lower-right corner of the screen. The server number is mandatory to start a transaction. It will be used to filter the tables and checks, and only the tables or checks that are related to the server number entered will be available.
NOTE: On devices equipped with a physical keypad, the on-screen keypad will not be displayed. The physical keypad buttons will be used instead.
This screen will only be displayed if the Enable Search by Table Number option is enabled in the SecureTable application's settings.
The table number is used to further filter the checks that will be displayed. This is useful to display the full list of checks associated with a specific table.
To use it, enter the table number and press the OK button in the lower-right corner of the screen. To skip this step, simply press OK without entering a table number.
NOTE: On devices equipped with a physical keypad, the on-screen keypad will not be displayed. The physical keypad buttons will be used instead.
This screen will only be displayed if the Enable Search by Check Number option is enabled in the SecureTable application's settings.
The check number is used to search for a specific check. This is useful when you have the check in hand and you just want to bring it up immediately on the SecureTable application.
To use it, enter the check number and press the OK button in the lower-right corner of the screen. To skip this step, simply press OK without entering a check number.
NOTE: On devices equipped with a physical keypad, the on-screen keypad will not be displayed. The physical keypad buttons will be used instead.
This screen may look different or may not be displayed altogether, based on settings and previous choices made:
A list of all tables containing printed checks will be displayed if both the Table Number and Check Number screens were skipped.
A single table will be displayed if a valid table number was entered at the Table Number screen and the check number was skipped.
This screen will be skipped altogether if a check number was entered at the Check Number screen. In this case, SecureTable will skip directly to the Split Calculator screen, further below.
The table number is indicated to the left of each white box. Each box displays the total amount due for the entire table, and the green Multiple Checks text indicates that this table has more than one printed checks.
To select a table, simply touch the desired box.
When a table containing multiple printed checks is selected, the list of available checks is displayed. On a typical payment terminal screen, up to 5 checks can be displayed at once. If there are more than 5 checks, the list can be scrolled by swiping up and down the screen.
This screen will not be displayed if a table with a single check was selected, or if a check number was entered at the Check Number screen.
To select a check to be paid, simply touch the corresponding box on the screen.
The split calculator is the step where the server discusses with the customer about how the check will be paid. The following needs to be determined:
Will the check be paid by cash or by card?
Will the check be paid in full in one payment, or in multiple payments (split)?
If the payment is to be split, will it be in equal or unequal amounts?
Paid by Cash
Enable this checkbox if the customer pays with cash. If the customer pays by card, leave this box unchecked.
PAY FULL
Touch this button to pay the check in full.
EQUAL SPLIT
Touch this button to split the check amount in up to 10 equal parts.
UNEQUAL SPLIT
Touch this button to split the check in unequal parts.
Equal split is used to divide the total check amount in up to 10 equal parts. This is useful when there is a single printed check for 2 or more customers, and they want to split the expense among themselves.
After touching the EQUAL SPLIT button, select the Number of Splits. The Per Split Amount will be updated automatically.
Touch the CONFIRM button to proceed with the first payment.
NOTE: If the amount is not equally divisible by the number of splits selected, there will be a difference of $0.01 between split amounts. In the screenshot above, dividing $45.71 by 2 creates the first split at $22.86 and the second one at $22.85.
The UNEQUAL SPLIT function is used to divide the check amount in unequal parts. This is useful if the in a single printed check which multiple customers wish to pay with various amounts.
After touching the UNEQUAL SPLIT button, touch the Amount field and enter the amount that the customer wishes to pay.
Touch the CONFIRM button to proceed with the first payment.
If the Tip option is enabled in the SecureTable application settings, the tip calculation screen will be displayed.
When the Tip calculation screen appears, the payment terminal needs to be handed to the customer. The customer has the following options:
Select one of the pre-set percentages;
Enter a custom dollar amount;
Enter a custom percentage;
Leave no tip at all.
Bill Amount
This section shows the total amount to be paid.
Add a Tip
In this section, the tip presets configured in the Tip Preset Percentages in SecureTable's advanced settings are displayed. Each percentage box also indicates the corresponding dollar amount.
Touching a preset automatically adds the stated tip amount to the transaction.
$
Touch the $ button to enter a custom dollar amount as tip instead of using a preset.
%
Touch the % button to enter a custom percentage of tip instead of using a preset.
NO TIP
Touch this button to skip the tip entry process altogether and leave no tip.
The screen below only appears if the customer touches the $ button to enter a custom tip amount.
The customer uses the provided keypad to enter a tip amount, which will make the green CONFIRM button available.
The customer can use the backspace key to correct typing mistakes.
When ready, the customer presses the green CONFIRM button.
NOTE: On devices equipped with a physical keypad, the on-screen keypad will not be displayed. The physical keypad buttons will be used instead.
The screen below only appears if the customer touches the % button to enter a custom tip percentage.
The customer uses the provided keypad to enter a tip percentage, which will make the green CONFIRM button available.
Also note the Tip Amount value is updated in real-time as the customer types the percentage. This is provided so that the customer will immediately know exactly how much will be added to the check as tips, based on the percentage entered.
The customer can use the backspace key to correct typing mistakes.
When ready, the customer presses the green CONFIRM button.
NOTE: On devices equipped with a physical keypad, the on-screen keypad will not be displayed. The physical keypad buttons will be used instead.
If the Enable Confirmation option is enabled in the SecureTable application settings, the tip confirmation screen will appear. This is the last confirmation before the actual payment.
Total amount
This is the total amount to be paid, which is calculated from the check amount plus tip amount.
Bill Amount
This is the amount that was passed from the POS system. It is also known as the Check amount or Invoice amount, depending on the terminology used by the POS system.
Tips (__%)
This field displays the tip amount added. The percentage between parenthesis is calculated from the Bill amount vs. tip amount, and is always rounded to the nearest percentage point.
CONFIRM & PAY
Touch this button to proceed with the actual payment.
CANCEL
Touch this button to cancel the transaction and return to the home screen to start over. A confirmation screen will be displayed before actually cancelling the operation.
At this point, SecureTable will call the payment application installed on the payment terminal. The prompts that the customer will see will depend on the payment application used and the card type used. For more information on this specific part of the workflow, please consult your payment application's documentation.
After the payment has been authorized by the payment application, the payment data will be sent to the POS system. Note that only non-sensitive data is exchanged between SecureTable and the POS system.
The message Payment applied successfully! will be briefly displayed on the screen.
Then, one of two things can happen:
Splits
If this was a payment resulting from a split, SecureTable will return to the Split Calculator to process the next payment.
Full payment / Last payment
If this was a full payment or the last payment of a series of splits, SecureTable will return to the home screen.
The payment workflow with SecureTable is now complete, and the application is ready to process the next payment.