Loading...
Loading...
Loading...
Loading...
Loading...
Loading...
Loading...
Loading...
Loading...
Loading...
Loading...
Loading...
Loading...
Loading...
Loading...
Loading...
Loading...
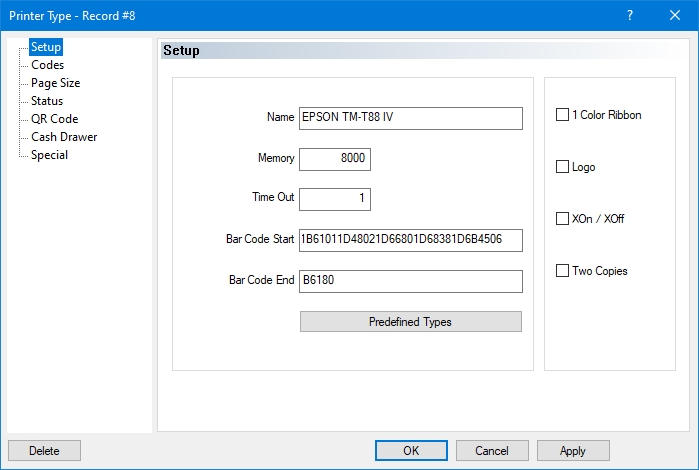
Type in the model name of the printer.
Type in the amount of memory (in bytes) available with the printer. This is also referred to as the print buffer in some manufacturer's documentation.
Type in the number of seconds the Back-Office waits for a reply from the original printer before the system sends data to the replacement printer.
If the printer supports bar code printing, enter the code which marks the bar code start. (Up to 48 characters)
If the printer supports bar code printing, enter the code which marks the bar code end. (Up to 48 characters)
Enable this option if the printer uses a one-color ink ribbon. This option causes the printer to alternately use both sides of the ribbon. Otherwise, the printer uses ribbons with more than one color. For thermal printers, this option is disabled.
Select this option if the invoice paper has the restaurant logo at the top of each form, or to print the Logo with a compatible printer.
NOTE: To print the restaurant name and address under the Logo, enable the Print Logo And Address option of Point of Sale Control > Revenue Center > Options > Check. To generate the Logo from the printer, you must enter the proper hexadecimal code in Page Setup field of Point of Sale Control > Workstation > Printer Type > Codes. The logo must also be loaded in the printer's memory using a special utility supplied by the printer's manufacturer.
Enable this option if the printer uses the XON/XOFF communication protocol.
Enable this option if your printer is able to print two copies of a credit card authorization slip using carbon paper. Disable this option if your printer is not using carbon. This option is only used when the Electronic Funds Transfer module is installed.
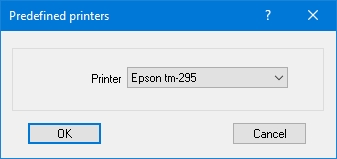
Click this button to choose a printer from the predefined printers list.
Related Topics

Type in the printer code to determine which printer prints first when all of your printers are linked together.
Type in the printer code that cancels "Select On".
Type in the printer code that activates the printing of characters in a larger type size.
Type in the printer code that cancels "Expanded On".
Type in the printer code to select another printer ink color if the printer prints in more than one color.
Type in the printer code that cancels "Red On".
Type in the printer code that activates the line feed function.
Type in the hexadecimal printer code that tells the printer to begin printing on the left side of the paper.
Type in the printer code that activates the line feed function.
Type in the hexadecimal printer code that tells the printer to advance to the top of the form. This code has no meaning in slip printers.
Type in the printer code that activates the multiple line feed (form feed) function.
Type in the printer code that activates the paper cutting function. If you have a slip printer, type in the code used to release the paper.
Enter the hexadecimal printer code that activates the printing of characters in extra large type size.
NOTE: Epson TM-88 = 1D2167
NOTE: The Extra Large mode can be used to print the Order Number on top of the check by adding the following configuration keys & values in the POS.INI files of the workstations:
PrintOrderNumOnTop=True
PrintBigOrderNumInvoice=True
The Extra Large mode can be used to print the Order Number on the kitchen chit by adding the following configuration key & value:
PrintBigOrderNumKitchen=True
Enter the hexadecimal printer code that cancels "Extra Large On".
NOTE: Epson TM-88 = 1D2180
Enter the hexadecimal printer code that activates the printing of characters in white on black.
NOTE: Epson TM-88 = 1D4201
Enter the hexadecimal printer code that cancels "Reverse On".
NOTE: Epson TM-88 = 1D4280
Enter the hexadecimal printer code that activates the printing of characters in double height type size.
Enter the hexadecimal printer code that cancels "Double-Height On".
Type in the hexadecimal printer code that the Back-Office uses to prepare the printer for printing a check. If you have a slip printer, this code is sent when you insert a sheet of paper.
NOTE: To print the restaurant Logo on a compatible printer, enter the proper hexadecimal code here and enable the Logo option of Point of Sale Control > Workstation > Printer Type > Setup. To print the restaurant name and address under the Logo, enable the Print Logo And Address option of Point of Sale Control > Revenue Center > Options > Check.
Type in the hexadecimal printer code that the Back-Office can use to prepare the printer for printing a reward coupon with an alternate Logo.
Related Topics
Logical printers are conceptual printers used to direct orders to physical printers based on certain criteria such as revenue centers.
The advantage of setting up logical printers is that it is very easy to redirect an order to a new physical printer by just pointing the logical printer to the new physical printer instead of reconfiguring each revenue center and mode.
Another advantage is when a guest orders items from different revenue centers. Even though the order prints at the same printer, separate requisition coupons are printed. This allows each coupon to be given to the appropriate section such as the grill or the bar.
Up to 30 logical printers can be configured in a Maitre'D Database.
Logon to the Maitre’D Back-Office with appropriate credentials. (Distributor or System Owner)
Start the Point of Sale Control module.
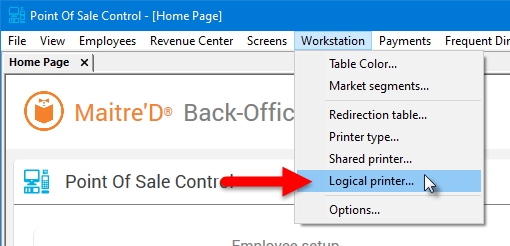
Click on the Workstation menu and select the Logical Printer... option.
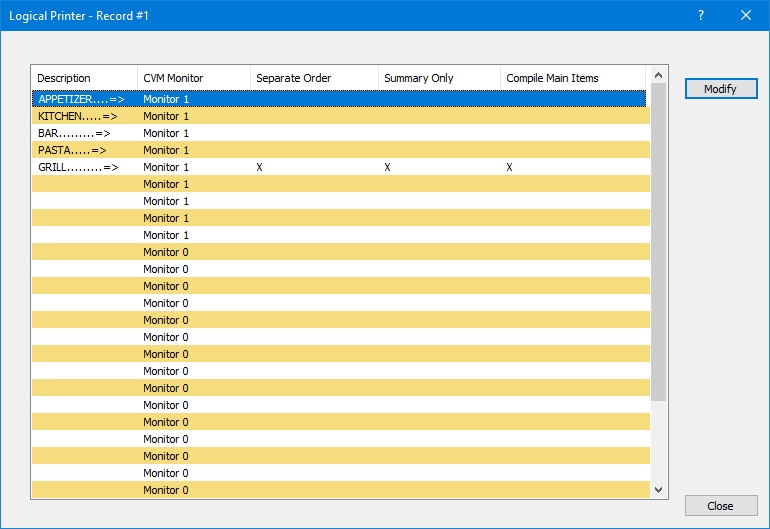
The list of logical printers will be displayed. The spreadsheet layout provides a preview of the configuration of each logical printer.
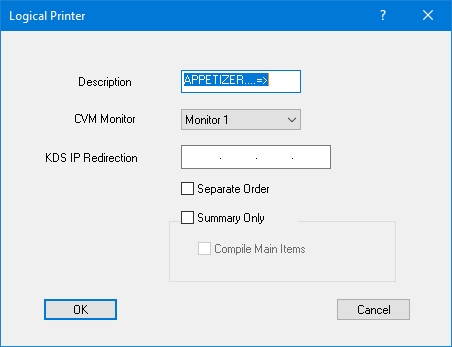
To change the settings of a logical printer, select an entry from the list and click the Modify button. The detailed properties of the selected logical printer will be displayed.
Type a meaningful description for the logical printer. For example, if the printer is used at the appetizer prep station, it may be called "Appetizers"
From the drop-down list, select the monitor to use to display items sent to this logical printer. This setting will have an effect only if kitchen monitors are in use.
Type the IP address of the KDS monitor to use. See KDS documentation for more information on how to use this setting.
If you enable this option, that logical printer will print a separate coupon for each sales item.
Enable this option to override any compilation option and remove any customer information. With this option, all ordered items will appear in a simple list, without compilation and without customer information. The star character ( * ) that normally prints to indicate a change of plate is also not printed.
NOTE: This option overrides the Compilation and Compilation By Customer options from Point of Sale Control > Revenue Center > Options > Kitchen.
Enable this option to further simplify the kitchen printout. With this option enabled, all modifiers will be removed from the printout and the identical main items will be compiled.
NOTE: This option becomes available only if the Summary Only option is also enabled.
Click OK to save changes and return to the logical printers list.
Once all the necessary logical printers are created, you can assign logical printers to each sales item. This is accomplished from Point of Sale Control > Revenue Center > Items Setup... > [Select an item] > Configuration > [Select a configuration] > Printing. Up to 9 printouts can be assigned to each sales item.
The newly created logical printers will also become available in the Printers section of the Workstation options (Point of Sales Control > Workstation > Options... > [Select workstation] > Printers) as well as for redirection tables (Point of Sales Control > Workstation > Redirection Table...).
Enable this option if the printer type you are defining is a KDS monitor from PayFacto.
Enable this option if the printer type you are defining is a Remote Display.
Enable this option if you are using an internal printer, such as the embedded printer in a SHARP 5300 POS terminal.
Enable this option to print coupons as labels to stick on packages. Each coupon will include the current and total label count. For Delivery orders, Kitchen coupons will also show the Delivery number, and Delivery 2 coupons will include the client address, name and check total and number.
Enable this option to force Maitre'D to send "Purge" commands to older serial printers.
NOTE: This option should only be used on very old printers, and only if the printer won't print without this option. If the printer works with this option disabled, leave it disabled.
NOTE: For best output we also recommend enabling the following options:
Items without Quantity: Point of Sale Control > View > Options > Configuration > POS.
Compilation: Point of Sale Control > Revenue Center > Options > Options > Kitchen.
Modifier On Same Line: Point of Sale Control > Revenue Center > Options > Options > Kitchen.
Separate Order: Point of Sale Control > Workstation > Logical Printer.
Enlarged: (Enabled for Sales Item, Disabled for Modifiers) Point of Sale Control > Revenue Center > Item Setup > Configuration > Printing.
Enable this option if the printer is using infrared communication.
Enter the baud rate of the printer.
Related Topics
Shared printers are workstation and network printers that can be used by more than one device on the network. For example, several POS workstations can be configured to print on the same printer.
A replacement printer can be designated for every shared printer that is configured. If the shared printer fails to respond, Maitre'D will send the printout to the replacement printer and will print a short message to inform that there is a problem with the shared printer. When the shared printer is back online, printing will resume at the shared printer.
Local workstation printers as well as network printers can be shared by setting them up as shared printers.
Before configuring Shared Printers, make sure that physical printers (devices) are setup.
Logon to the Maitre’D Back-Office with appropriate credentials. (Distributor or System Owner)
Start the Point of Sale Control module.
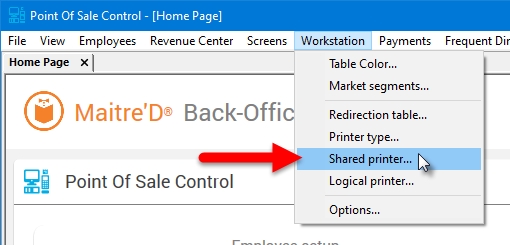
Click on the Workstation menu and select the Shared Printer... option.
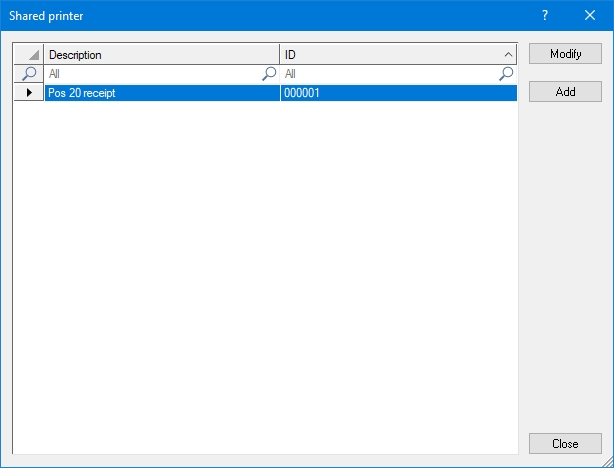
The list of available shared printers will be displayed. If this is your first time accessing it, it should be empty.
Select an existing Shared Printer and click the Modify button to edit its properties.
Click Add to create a new Shared Printer.
Click Close to exit and return to the Point of Sale Control module.
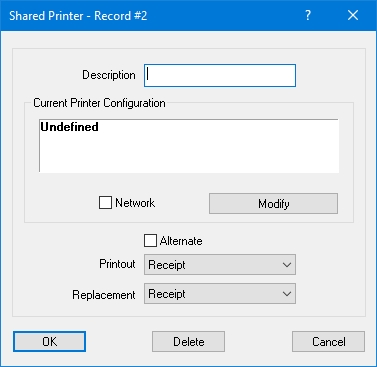
Clicking Add with create a blank Shared Printer.
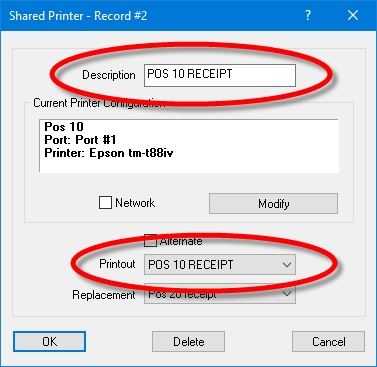
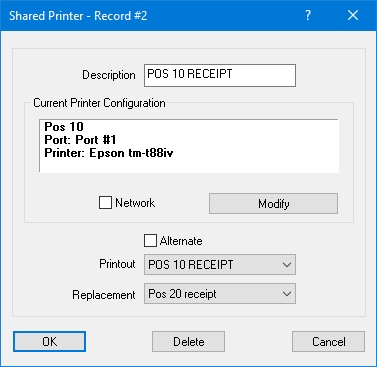
Type a meaningful description for this shared printer. The description should provide an indication of where the printer is located and what it is used for. For instance, "BAR RECEIPT" suggests that this shared printer refers to the receipt printer located at the bar. "POS 4 KITCHEN" would be a kitchen requisition printer connected to POS #4, etc.
When creating a new shared printer, this is initially undefined. To configure the Shared Printer, click the Modify button.
Click this button to modify the Current Printer Configuration.
Enable this option if you are setting up a standalone network printer that is not driven by a workstation (NOT RECOMMENDED). If you are setting up a Network printer that is configured as a device on a workstation, DO NOT enable this option.
IMPORTANT! Using this option is NOT RECOMMENDED. This is only for Network Printers which are NOT driven by a workstation. While using this method does not require a driving workstation to be running, it WILL cause print jobs to be lost if a print job is sent while the printer is busy. Use at your own risk.
Enable this option to force Maitre'D to send every other print job to the Replacement shared printer.
Select the Shared Printer to use for the main printout. From the drop-down list, select the entry with the same name as the description above.
Select a replacement shared printer. If the main shared printer does not respond, the print job will be redirected to the replacement printer.
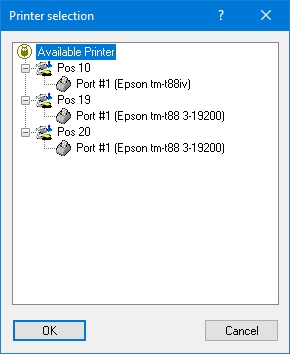
Start by filling up the Description of the Shared Printer, then click the Modify button to select the physical printer to be shared. Select one of the available printers and click OK.
Select the main Printout. This should be the same as the description.
Select a replacement shared printer. If you do not wish to use an alternate printer in case of failure, select Null.
Once all the settings are configured, click OK to save changes and exit.
Repeat these steps to configure all the required shared printers.
Physical printers are the actual printing devices. They are either physically connected to a POS workstation by a serial, parallel or USB cable, or connected to the Ethernet network and driven by a POS workstation.
Logon to the Maitre’D Back-Office with appropriate credentials. (Distributor or System Owner)
Start the Point of Sale Control module.
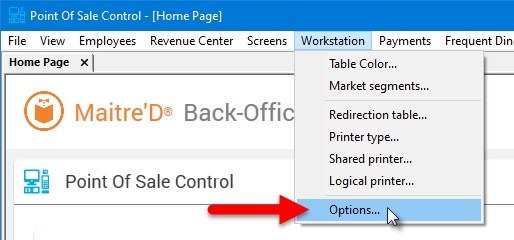
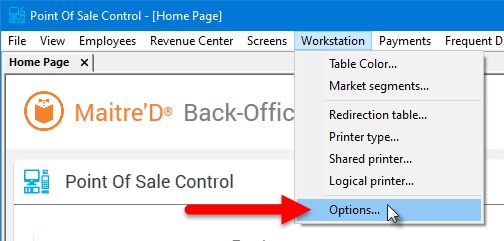
Click on the Workstation menu and select the Options... option.
The list of all available workstations will be displayed. Select the workstation that the physical printer is attached to and click the Modify button. For network printers, select the workstation that will be responsible to drive the physical printer and click Modify.
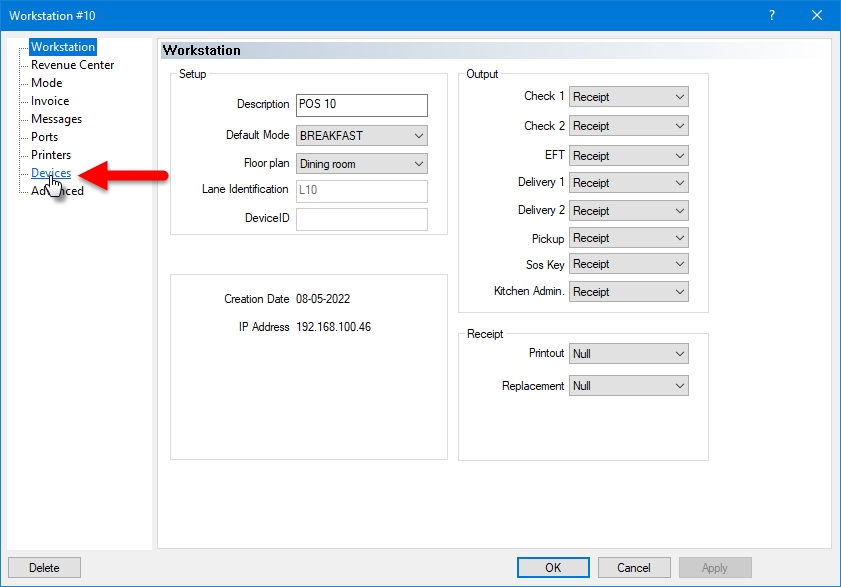
The workstation's properties opens on the default Workstation branch. Click on the Devices branch.
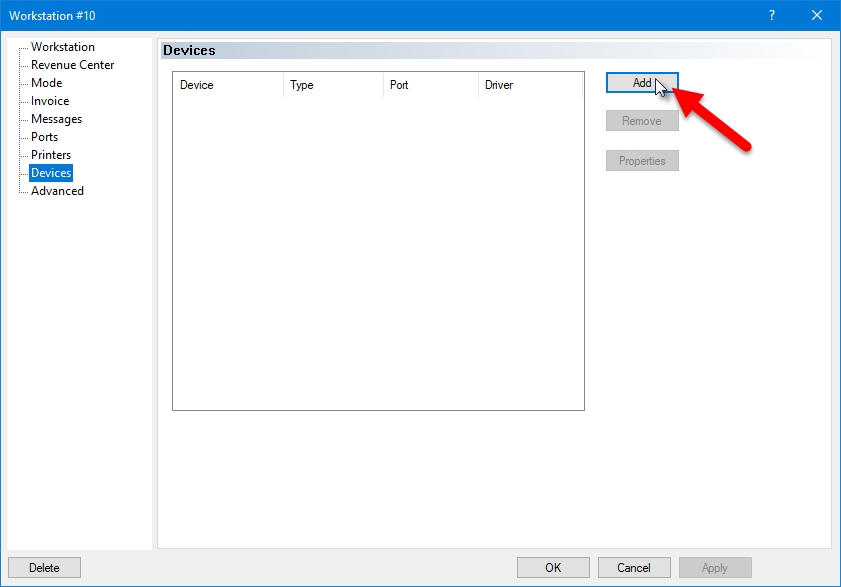
On the workstation's Devices screen, click the Add button.
The Add Device dialog opens. Select Printer to setup a serial or parallel printer, or Network Printer to setup an Ethernet printer. Once the appropriate printer type is selected, click the Setup button.
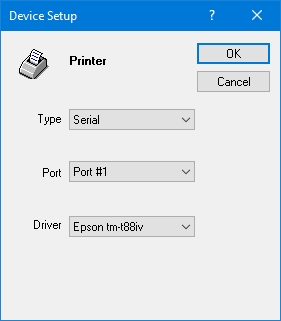
Configure the physical printer's properties:
From the Type drop-down list, select Serial for serial (RS-232) printers or Parallel for parallel printers.
From the Port drop-down list, select the physical port to which the printer is connected.
From the Driver drop-down list, select the appropriate Printer Type for this physical printer.
Type the IP address of the network printer.
Type the TCP port number of the network printer.
From the Driver drop-down list, select the appropriate Printer Type for this physical printer.
Once all the fields are configured, click OK to save your settings.
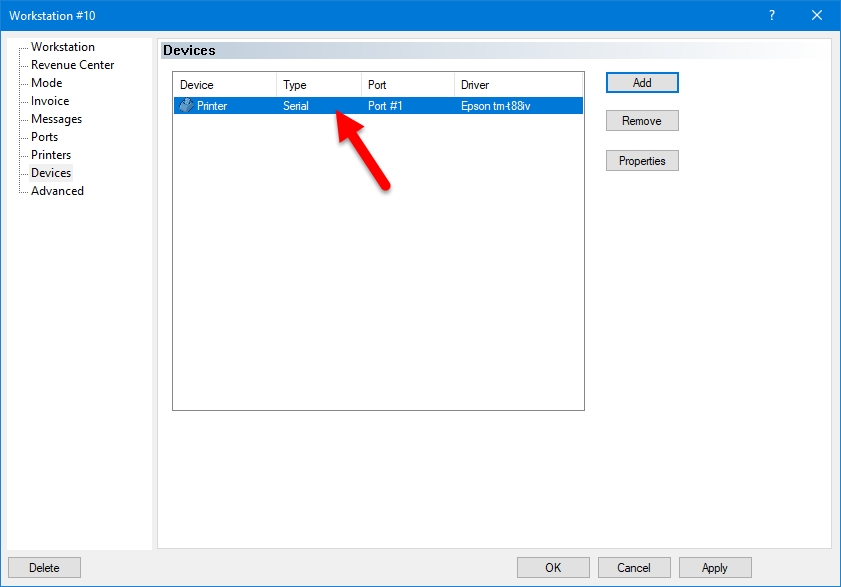
The new device will appear in the workstation's device list:
+Click OK to save changes and return to the workstation's list.
Repeat this process to configure all your physical printers.
Before a receipt printer can be used with Maitre'D, a Printer Type must be created to correctly identify the printer's manufacturer and model. Up to 10 printer types can be configured in Maitre'D.
Maitre'D comes with a large selection of pre-defined printer types. This means that many commonly used printers in the industry are already configured in Maitre'D.
If the exact manufacturer and model are not found in the list of Maitre'D Predefined Types, a custom Printer Type can be created using the documentation provided by the manufacturer.
Logon to the Maitre’D Back-Office with appropriate credentials. (Distributor or System Owner)
Start the Point of Sale Control module.
Click on the Workstation menu and select the Printer Type option.
The list of printer types will be displayed.
Select an existing printer type and click the Modify button to edit its properties.
Click Add to create a new Printer Type. Up to 10 printer types can be created.
Click the Print button to generate a printable report will all printer type settings.
Click Close to exit and return to the Point of Sale Control module.
Whether you edit an existing printer type or create a new one, the printer type's properties open on the Setup page:
Click the Predefined Types button, then select your printer model from the list. If the exact model is not listed, select a similar one from the same manufacturer to use as a base.
The Printer Type will be populated with the appropriate values for the selected printer model:
If the selected predefined printer type does not match your model exactly, be sure to review your printer's documentation and manually edit the appropriate fields.
Related Topics
After redirection tables are created, they can be assigned to each mode or revenue center for each workstation. This is done through the Workstation's options.
Logon to the Maitre’D Back-Office with appropriate credentials. (Distributor or System Owner)
Start the Point of Sale Control module.
Click on the Workstation menu and select the Options... option.
The list of available workstations will be displayed. Select the workstation for which you wish to assign redirection tables and click the Modify button.
,The workstation's properties open on the Workstation branch. Click on the Printers branch.
You will see a list of the available modes.
If the Redirection Table by Revenue Center option is enabled, you will see the list of Revenue Centers instead:
Select a Mode (or Revenue Center) and click the Modify button. From the drop-down list, select the Redirection Table to assign to this Mode (or Revenue Center), then click OK.
Repeat until all modes (or Revenue Centers) are configured.
Click OK to save changes to the Workstation's configuration and return to the list of workstations.
Repeat these steps for each workstation.
Redirection Tables are used to route printouts so that they print at the appropriate printer in the restaurant. Printer routes can be set by mode. This means that a certain POS workstation can print at one printer in the morning during the breakfast period, and print at another printer during the lunch period or the dinner period.
Before setting up redirection tables:
make sure that Logical Printers, Physical Printers and Shared Printers are setup.
To make use of redirection tables, the option Automatic Redirection Table must be enabled in Point of Sales Control > View > Options > Printing.
Optionally, the option Redirection table by Revenue Center may be used to control redirection tables by Revenue Center instead of by Mode. This option is also located in Point of Sales Control > View > Options > Printing.
Logon to the Maitre’D Back-Office with appropriate credentials. (Distributor or System Owner)
Start the Point of Sale Control module.
Click on the Workstation menu and select the Redirection Table... option.
The list of available redirection tables will be displayed:
Select an existing Redirection Table and click the Modify button to edit its properties.
Click Add to create a new Redirection Table.
Click Close to exit and return to the Point of Sale Control module.
The Redirection Table's settings will be displayed:
Type a meaningful description for this redirection table.
Select a logical printer from the table and click the Modify button to edit its properties.
This column lists all available logical printers. The first two entries (Receipt and Default) cannot be modified, except for KDS IP Redirection and Inventory Location. The other entries in this list are configured in Point of Sale Control > Workstation > Logical Printer...
This column lists which shared printer is associated with each logical printer.
This column lists which KDS monitor is associated with each logical printer.
This column is only available if the Inventory Management module with the Multi-Location option is activated on the Maitre'D license. It lists the Inventory Locations from which inventory quantities should be depleted for each logical printer.
This column lists the internal ID associated with each logical printer.
Click OK to save changes and return to the list of Redirection Tables.
Click Delete to delete this Redirection Table. A confirmation dialog will be displayed before the redirection table is effectively deleted.
Click Cancel to exit this screen without making any changes.
Select a Logical Printer from the list and click the Modify button to change its properties.
This field displays the name of the Logical Printer being modified.
From the drop-down list, select the Shared Printer to use with this Logical Printer.
From the drop-down list, select the KDS Monitor to use with this Logical Printer.
If required, enter the IP address to use for redirections.
If the Inventory Management module with the Multi-Location option is available, select the location from which Inventory Quantities will be depleted when using this Logical Printer.
Click OK to save changes and return to the redirection table. The changes will appear on the screen:
Repeat steps 6 and 7 for each Logical Printer.
Once all the Logical Printers have been configured, click OK to save changes and return to the list of redirection tables.
Create as many redirection tables as required for your use case.
Type in the maximum amount of characters that the printer can print on one line.
Type in the number of lines you want printed per page. If you are using a slip printer, type in a minus (-) sign before the number of lines. If you are using a paper roll, type in 0.
Type in the number of lines the printer should skip at the top of the page so that printing over the restaurant's logo does not occur, or so the printer does not start printing at the top of the page.
Type in the number of lines the printer should advance the page before the paper is cut. If you are using attached forms, type in the number of line feeds needed to go to the correct page before printing resumes.
Type the amount of lines you want the printer to advance each time it prints a line.
Type in the maximum number of lines you want the printer to advance during the multiple line feed function.
Related Topics
Type in the cash drawer code the Back-Office sends to the cash drawer to inquire about the cash drawer's status. The code determines if the cash drawer is open or closed.
Type in the cash drawer code sends to the Back-Office that should be compared to the status value for checking the status of the cash drawer.
Type in the cash drawer code sent to open the cash drawer.
Type in the cash drawer code sent to open a second cash drawer connected to the same printer.
NOTE: For Epson printers, set this field to "1B70015050". You need an Epson Cable Adapter for Two Cash Drawers, available from Blue Star Canada, who manufactures it as Part # EPCB2TIR. They can be reached at 1 (800) 317-1132 or https://www.bluestarinc.com/
Type in the code to compare with the status to inquire about the drawer status.
Related Topics
Printer Types
Setup
Codes
Page Size
Status
QR Code
Cash Drawer
Special
Printers can be used with POS workstations through the Point of Sale Control module. Maitre'D supports a wide range of printers that are used in the industry, and a complete compatibility list can be found on the Maitre'D website.
Supported printers include IP printers, serial printers, parallel printers, and USB printers.
ESC/POS is a printer control language developed by Epson to control receipt printers used at the POS. It is a specialized variant of the generic Epson Standard Code for Printers (ESC/P), and has been the industry standard for decades. ESC/POS adoption is so wide that many competing manufacturers support it with their receipt printers.
Maitre'D is fully compatible with ESC/POS. While Maitre'D will work with any printer which is also ESC/POS compatible, Epson-branded printers are always preferred, due to their outstanding compatibility and reliability.
In a Maitre'D database, many components are required to ensure good printing functionality:
Printer Types
Logical Printers
Physical Printers (Devices)
Shared Printers
Redirection Tables
Printer types are used to define the physical properties of various printer models used with your Maitre'D POS system.
Logical printers are conceptual printers used to direct orders to physical printers based on certain criteria such as revenue centers.
Physical printers are used to define each individual printing device. Each device is assigned a printer type and connection properties.
Shared printers are workstation and network printers that can be used by more than one device on the Maitre'D network.
Redirection Tables are used to route printouts so that they print at the appropriate printer in the restaurant. Printer routes can be set by mode. This means that a certain POS workstation can print at one printer in the morning during the breakfast period, and print at another printer during the lunch period or the dinner period.
Printing components are inter-dependent. To facilitate the configuration of the Maitre'D database, each component should be created in order:
Printer types are required when creating physical printers as well as shared printers. Printer types should be created first.
Logical printers must exist before creating sales items, redirection tables and before configuring workstation options. Logical printers must be configured early in the Maitre'D database configuration process.
Physical printers must exit before configuring shared printers. Remember that Printer Types must exist before you can create physical printers.
Shared printers must exist before Redirection Tables can be created. Also remember that physical printers must exist before you can configure shared printers.
If you intend to use redirection tables, they should be created before you configure your workstation's options. Before you can create Redirection Tables however, you need to make sure that you have the necessary logical printers as well as shared printers.
Of course, it is always possible to go back and forth to create components that may have been forgotten along the way.

Use these options to configure the QR Code printout for receipt printers. Maitre'D uses Epson ESC/POS codes for this purpose. Any printer that is Epson ESC/POS compatible and which supports these codes will be able to make use of them.
NOTE: Older printer models may not be able to support QR codes. For example, the Epson TM-T88III (or older revisions) does not support QR Codes. An Epson TM-T88IV or later is required for QR Codes to print. Make sure to check with the manufacturer to see if your printer model supports QR Codes before attempting to use them.
Type in the ESC/POS code for the QR Code Model to use. This is the code that tells the printer which QR Code model to use.
Type in the ESC/POS code for the QR Code Size. This is the code that tells the printer which size of QR code to print.
Type in the ESC/POS code for QR code error. This is the code which tells the printer what to do in case of error.
Type in the ESC/POS code for QR Code Store Data command. This is the code which tells the printer to start storing QR Code data in its internal memory.
Type in the ESC/POS code for QR Code Print Data command. This is the code that tells the printer to start printing the QR Code.
Type in the ESC/POS code for the Justify Center command. This code tells the printer to print centered on the paper roll.
Type in the ESC/POS code for the justify left command. This code tells the printer to print starting from the left side of the paper roll.
Related Topics
Enter the printer's status code in this field. Epson printers typically use 1B76 or 100401.
Type the printer code that send to the Back-Office.
Type the delay in second to wait for the status result.
Type the status value. This field is often left blank for Epson printers.
Related Topics
