Workstation

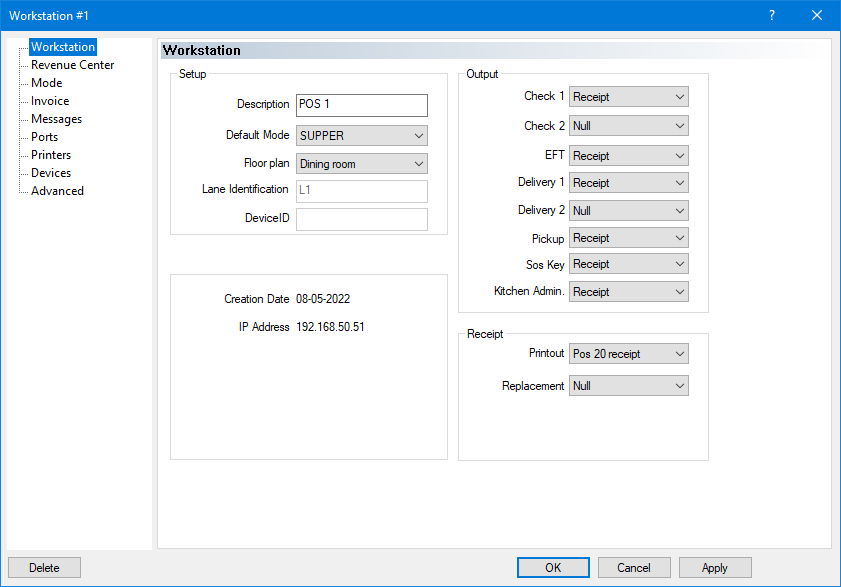
The Workstation branch of the workstation options contains basic configuration information along with print output configuration for the selected workstation.
Setup Section
Description
Type a meaningful description for the selected POS workstation (up to 20 characters). Ideally, the description should hint at the workstation's location and typical usage. For example, Take-Out Counter, Bar, Cashier Lane 1, Cashier Lane 2, Hostess Station, Drive-Thru Order, Drive-Thru Pickup, etc.
Default Mode
Select the default mode for this workstation. Select Closed to prevent this workstation from being used at all.
Floor Plan
Select the floor plan to use on this workstation.
Lane Identification
This field only becomes available if a non-EMV, fully integrated EFT protocol is selected in the Electronic Funds Transfer module. The term "Lane" refers to the queue area at a cashier workstation and identifies the payment device for the purpose of Electronic Funds Transfer.
Device ID
Type the Payment Device ID for non-EMV, fully integrated EFT protocols.
NOTE: Non-EMV, fully integrated protocols include Datacap DSIClientX and the non-EMV version of the Tender-Retail protocol. These protocols are considered obsolete.
Creation Date
The date listed here indicates when the workstation's data was created for the last time.
IP Address
The IP address listed here is the current IP address of the workstation, or the IP address that was used the last time the workstation was connected.
Output Section
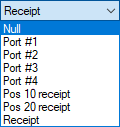
In this section, each setting has a drop-down list with a few built-in options. Here are the definitions of each option:

Null
Select this option if you do not wish to print this output at all.
Port #1, #2, #3, #4
Select one of the Port numbers to send the output to a serial printer connected to the corresponding COM port number. By default, Port #1 is mapped to COM 1, Port #2 to COM 2 and so on. Port mappings can be changed in the Ports branch of the workstation's options.
Receipt
Selecting the Receipt option will redirect the output to the printer defined in the Receipt section, at the bottom of the screen.
Shared Printers
Shared printers will also be listed here. It is possible to redirect any output to any shared printer configured in Point of Sale Control > Workstation > Shared Printer...
Outputs
Check 1
Select the printer location used to print the first copy of the guest check. This field is usually set to Receipt.
Check 2
Select the printer location used to print a second copy of the guest check if necessary. This field is usually set to Null or Receipt.
EFT
Select the printer to which the Electronic Funds Transfer (EFT) credit card voucher or transaction record is printed. This field is usually set to Receipt.
NOTE: This field only becomes available if the Electronic Funds Transfer module is in use.
Delivery 1, Delivery 2
Select the printer location for the main delivery check and the secondary delivery check. The main delivery check usually goes to the customer and will have the restaurant name and address and the customer name and address print at the top. The secondary delivery check will only have the customer name and address only printed at the top of the check and usually goes to the delivery driver. These fields are usually set to Receipt or Null.
NOTE: This field only becomes available if the Delivery module is in use.
Pickup
Select the printer which will be printing delivery pickup checks.
SOS Key
You can select on which printer will be printed the SOS message. The whole message is a coupon with a big SOS plus the workstation number from which the message was issued. If you select a printer, a SOS button will appear on the workstation server screen. This field is usually set to Null or Receipt.
Kitchen Admin.
Enable the printer where the kitchen chit will print to notify the food runners of a table number change. In an environment where the Hostess can order, there is a Table Transfer function on her screen to easily manage table transfer when the customers decide to change table just after she assigns them to a table. This field is usually set to Null or the main kitchen printer.
Receipt Section
Printout
Select the local port # or shared printer where the receipt will print for this workstation. If it is a local parallel printer, set this field to Receipt.
Replacement
Select the local port # or shared printer where the receipt should print for this workstation if the default Printout printer fails to respond.
Related Topics
Last updated
Was this helpful?

