Loading...
Loading...
Loading...
Loading...
Loading...
Loading...
Loading...
Loading...
Loading...
Loading...
Loading...
Loading...
Loading...
Loading...
Loading...
Loading...
Loading...
Loading...
Loading...
Loading...
Loading...
Introduction
Transactions
Application Configuration
Operator Management
Printing
Passwords
Reporting


This guide describes the features of the Gift PayFacto powered by DataCandy application on your Android-powered payment terminal and explains how to use them when processing gift card transactions for your business.
IMPORTANT: The transactions explained in this document apply only gift cards issued by DataCandy. Using a card issued by another gift card company will result in a refused transaction.
Gift cards are prepaid debit card that contain a specific amount of money for use by customers to pay for products or services. When activated, gift cards loaded with funds for future use. When using a gift card for a purchase, the card balance reduces by the amount of the transaction.
Some gift cards allow you to add funds (open loop), while others have a finite amount that cannot be reloaded (closed loop). Depending on your business, you can offer gift cards for use in specific locations or at all affiliated brands.
Gift cards can pay for products or services, in whole or in part, depending on the transaction and the funds balance remaining on the card. Gift cards cannot be used without prior activation.
If you enter a password incorrectly, the terminal displays an Access refused error message. The Password field re-appears, prompting you for the required password with a number in parenthesis, which represents the number of tries remaining before the terminal locks out the user profile. An operator has 5 attempts to enter the password correctly; the counter resets after the password is entered correctly. If you incorrectly enter a password 5 times, the terminal locks and requires that you contact Technical Support to obtain a Superuser password.
The Gift PayFacto application uses an Administrator password to prevent unauthorized access to certain functions. As a fraud prevention method, you can also require the Administrator password when a transaction requires the manual entry of the gift card number rather than swiping the card.
Additionally, if you activate the Enable waiters function, each waiter will need to enter their unique password before they can perform a transaction. Refer to the Operator Management section for more information about the Enable waiters function.
If you have forgotten the Administrator password, the reset procedure requires that you contact Technical Support to obtain a Superuser password. To obtain support 24/7, contact PayFacto at 1-888-800-6622
If you notice an error in your personalized header or footer, or you want to change some text in the message, you can easily edit your message. Repeat either the Add Personalized Receipt Header or the Add Personalized Receipt Footer procedure and adjust the text on the line(s) you want to modify.
The PayFacto Gift application can run independently of the payment application running on your terminal or POS. If you are using PayFacto Gift as a standalone application, there are application and terminal settings you may want to configure to meet your business requirements.
These settings include:
For bookkeeping purposes, invoices are numbered. The numbering can be done manually or automatically. By default, the terminal numbers the invoices automatically, in sequence. If you disable automatic invoice numbering, the terminal prompts the operator to manually input an invoice number (maximum of 12 numeric characters); you cannot process a redemption transaction without an invoice number.
Touch the Action button on the main screen.
Touch Settings.
Enter the Admin password and touch OK.
In the General section, toggle Automatic Invoice Number to On
,Touch the Back icon to return to the main screen.
The DataCandy Settings section of the Settings page are generally configured prior to delivery or as part of the application’s setup process. They should not require modification. If your terminal is having problems communicating with the DataCandy server, you may need to adjust one or more of the fields contained in this section. Refer to the DataCandy email for the values.
The available fields include:
Production URL: Touch this toggle switch to On (to the right) to enable the terminal to communicate with the DataCandy server. When toggled to Off (to the left), the terminal cannot communicate with the DataCandy server.
URL: The address of the DataCandy server.
WSN: The WorkStation Number; a unique value for each terminal.
IMPORTANT: Changing these fields to any value other than those provided by DataCandy or PayFacto will prevent your terminal from processing gift cards.
Touch the Action button on the main screen.
Touch Settings.
Enter the Admin password and touch OK.
Scroll to the DataCandy Settings section.
Confirm that the URL field is set to https://secure.datacandy.com/.
If the value is different, touch the field, enter the correct value, and touch OK.
Confirm that the Merhcant ID field corresponds to the Merchant ID from the DataCandy email.
If the value is different, touch the field, enter the correct value, and touch OK.
Confirm that the Merchant password field corresponds to the Merchant password from the DataCandy email.
If the value is different, touch the field, enter the correct value, and touch OK.
Confirm that the Access key field corresponds to the Access key from the DataCandy email.
If the value is different, touch the field, enter the correct value, and touch OK.
Touch the Back icon to return to the main screen.
It is simple to change a waiter’s password. You may need to change a password if an employee is assigned another employee’s number, or you may want to change passwords on a recurring basis for terminal security.
Touch the Action button on the main screen.
Touch Settings.
Enter the Admin password and touch OK.
In the General section, touch the Waiters Management.
Locate the waiter whose password you want to change and touch the Edit (pencil) icon.
Enter the waiter’s current password in the Enter Old password field.
Touch the Password field and enter a new password that is 4 to 6 characters in length.
Touch the Repeat password field and re-enter the new password to confirm.
Touch OK.
Touch the Back icon to return to the main screen.
The magnetic stripe on gift cards can be damaged and become unreadable by the terminal. In such situations, the card number can be entered manually using the terminal’s number pad. Manual entry of card numbers is also susceptible to fraud, so it is strongly recommended to require the Administrator password prior to manually entering a card number.
Touch the Action button on the main screen.
Touch Settings.
Enter the Admin password and touch OK.
In the General section, touch the Manual entry password toggle button to enable (to the right) or disable (to the left) password protection for manual card number entry.
Touch the Back icon to return to the main screen.
You can add your business information at the top of every printed receipt. Your business and contact information can contain up to 4 lines with 44 characters (including spaces) per line.
TIP: You should prepare your header information on a piece of paper in advance, to ensure that you have the correct number of characters per line.
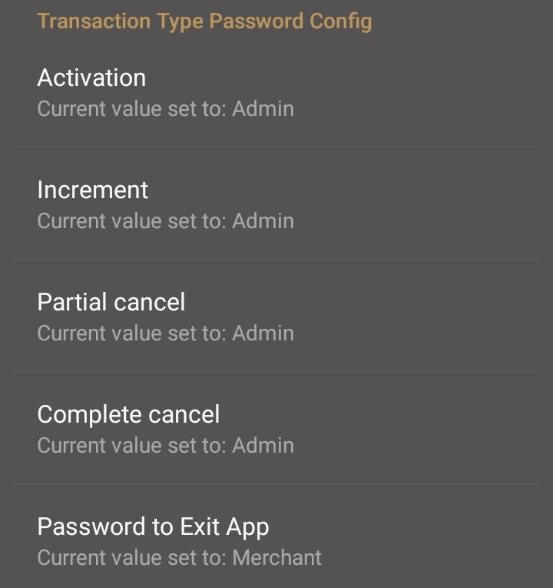
If you use the Gift PayFacto application on the terminal in standalone mode (no POS), you can password protect the Activation and Increment transactions using the administrator password. This security measure prevents the adding of funds or activation of a gift card without the authorization of a supervisor with the administrator password.
If you are using a terminal that communicates with a POS, the application ignores the administrator password requirement.
You can add a personalized message at the bottom of every printed receipt. Your message can contain up to 4 lines with 44 characters (including spaces) per line.
TIP: You should prepare your header information on a piece of paper in advance, to ensure that you have the correct number of characters per line.
Merchant password: The information in this field should correspond to the Merchant password sent to you by DataCandy. If the Merchant password value does not match the one from in the DataCandy email, make the necessary corrections.
Version: This is a static value that should not be changed; it should always be 2010-01-06.
Access key: The information in this field should correspond to the Access key sent to you by DataCandy. If the Access key value does not match the one from in the DataCandy email, make the necessary corrections.
App Version: This field displays the current version of the Gift PayFacto powered by DataCandy app installed on the terminal; the field is read-only and cannot be modified.
Confirm that the Production URL toggle switch is set to On (to the right).


Touch the Action button on the main screen.
Touch Settings.
Enter the Admin password and touch OK.
In the General section, touch the Printer Options.
Scroll down to the Merchant header section, toggle Merchant header Printing to On (to the right).
Touch Merchant name and enter the text for the merchant name in the text field that appears and touch OK.
Touch Merchant street address and enter the text for the street address for your business in the text field that appears and touch OK.
Touch Merchant city province and enter the text for the city and province for your business in the text field that appears and touch OK.
Touch Extra receipt and enter any additional information (for example, the phone number) in the text field that appears and touch OK.
Touch the Back icon to return to the main screen.
Touch the Action button on the main screen.
Touch Settings.
Enter the Admin password and touch OK.
Scroll to the Set passwords section, toggle Password on transactions to On (to the right).
Touch the Back icon to return to the main screen.
Touch the Action button on the main screen.
Touch Settings.
Enter the Admin password and touch OK.
In the General section, touch the Printer Options.
Scroll down to the Footer section, toggle Footer Printing to On (to the right).
Touch Footer Line 1 and enter the text for the merchant name in the text field that appears and touch OK.
If necessary, repeat step 6 for Footer Line 2, Footer Line 3, and Footer Line 4 as required.
Touch the Back icon to return to the main screen.
By default, the terminal prints 2 receipts for all gift card transactions, with the Merchant copy printing first. You can adjust these settings to suit your business needs. The available transaction printing options are:
Enabling or disabling the printing of receipts
Number of copies
Which copy does the terminal print first
Color depth of the printout
IMPORTANT: It is strongly recommended that you do not disable the printing of transaction receipts, as customers need their receipt to know the balance of their gift card or to reverse a redemption.
Touch the Action button on the main screen.
Touch Settings.
Enter the Admin password and touch OK.
In the General section, touch the Printer Options.
In the Copies section, toggle Receipt Copy Printouts to On (to the right) to enable receipt printing or Off (to the left) to disable printing.
Touch Number of copies to set the number or receipts that print; touch 1 or 2.
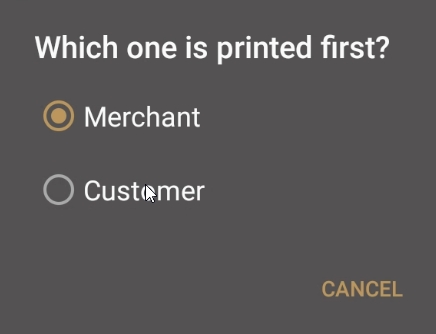
Touch Which one is printed first to select which receipt prints first; touch Merchant or Customer.
TIP: If you set 1 as the number of copies in step 6, you should select Customer in this step.
Touch Select color depth of printouts to set the color density of the receipts. The color depth and its associated printing speed affect the terminal’s battery life. The options are:
Pale: Lightest printout, prints faster and uses less battery.
Normal: Default printout setting, average printing speed and battery use.
Dark: Darkest printing, prints slower and uses more battery.
Touch the Back icon to return to the main screen.
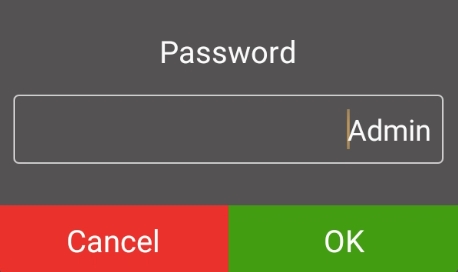
Before using the terminal, an Administrator password was assigned during the initial configuration. The Administrator password provides access to advanced terminal functions and can also enable password-protected operations. You can change the Administrator password whenever you feel it necessary.
IMPORTANT: Do not forget the new Administrator password; the only way to reset it is to contact the technical support team.
Touch the Action button on the main screen.
Touch Settings
Enter the Admin password and touch OK.
Scroll to the Set passwords section, touch Administrator password.
Enter the current Admin password and touch OK.
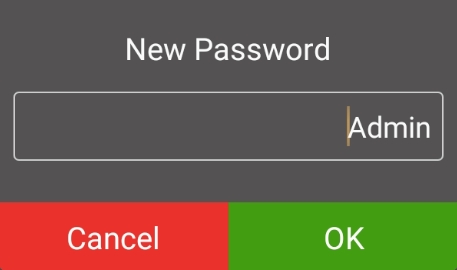
Enter the new, 6-character password in the New Password field and touch OK.
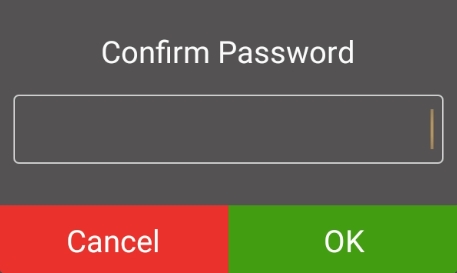
Re-enter the new password in the Confirm Password field and touch OK.
If the passwords match, the terminal displays New password saved and returns to the Settings page.
If the passwords do not match, the terminal displays Invalid password and returns to the Settings page without changing the Administrator password.
Touch the Back icon to return to the main screen.
In addition to printing receipts for completed gift card transactions, you can configure the following terminal printer settings:
In addition to printing receipts for completed gift card transactions, you can configure the following terminal printer settings:
Print declined transactions: Prints the transaction receipt when the transaction is declined
Print reverse on declined: Prints the transaction result in white on a dark background for declined transactions
Print ECR mode transactions: Uses the terminal’s printer for payment transactions processed on a separate device (semi-integrated solutions).
Print second copy on ECR mode: Uses the terminal’s printer for the second copy of a transaction processed on a separate device (semi-integrated).
Touch the Action button on the main screen.
Touch Settings.
Enter the Admin password and touch OK.
In the General section, touch the Printer Options.
In the Receipts section, touch the toggle button to enable (to the right) or disable (to the left) printing for the declined and ECR mode printing options.
Touch the Back icon to return to the main screen.
Configuring Transaction Printing Options
Additional Printing Options
Add Personalized Receipt Header
Add Personalized Receipt Footer
Edit Personalized Messages
Deleting Personalized Messages
The terminal can print reports, allowing you to view detailed or summary information on the day’s gift card transactions. You can print reports to view information on gift card transactions by employee of for the overall merchant account. Report data comes from the DataCandy server.
IMPORTANT: Gift card reports are based on the current day’s transactions. If you do not print a report for a specific day, you will not be able to print the previous day’s report the next day.
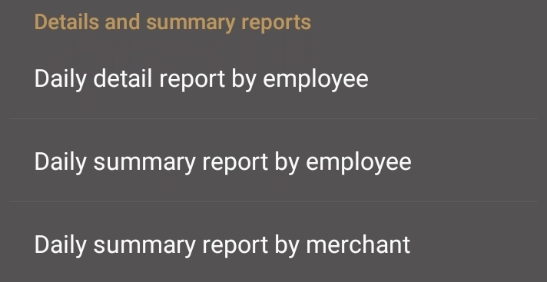
Daily detail report by employee: Prints a detailed report of all the day’s gift card transactions, separated by employee.
Daily summary report by employee: Prints a summary report of the day’s different types of gift card transactions, separated by employee.
Daily summary report by merchant: Prints a summary report of the day’s various types of gift card transactions for the merchant account.
Regardless of the report you want to view, the procedure is the same. Viewing the detailed report for the current batch of transactions allows you to see each individual transaction’s details and allows you to reprint or void the transaction if desired.
Touch the Action button on the main screen.
Touch Settings.
Enter the Admin password and touch OK.
The selected report appears on the terminal screen.In the Details and summary reports section, touch the report you want to view:
Daily detail report by employee
Daily summary report by employee
Daily summary report by merchant
The selected report appears on the terminal screen.
Touch the Back icon to return to the main screen.
Enter the Admin password and touch OK.
In the General section, touch the Printer Options.
Scroll down to the Merchant header section.
Touch Merchant header Value Reset.
The Merchant name, Merchant street address, Merchant city province, and Extra receipt fields are cleared.
Touch the Back icon to return to the main screen.
Touch the Action button on the main screen.
Touch Settings.
Enter the Admin password and touch OK.
In the General section, touch the Printer Options.
Scroll down to the Footer section.
Touch Footer Value Reset.
The Footer Line 1, Footer Line 2, Footer Line 3, and Footer Line 4 are cleared.
Touch the Back icon to return to the main screen.
The Gift PayFacto application allows you to assign passwords to protect the terminal from unauthorized use. All terminal passwords are 6 numeric (numbers only) characters in length to provide security without slowing down the overall time it takes to process a transaction.
The terminal has 2 types of user passwords:
Administrator (Admin)

Operator
For more information on specific password procedures, click any of the following links:
Gift cards are an easy method for restaurants to encourage guests to return. If your business employs wait staff that access the payment terminal, you can require each server to identify themselves and enter a password before completing a transaction; this ensures that no unauthorized individuals can use the terminal. The Gift PayFacto application refers to terminal operators as waiters. Operator management procedures include:
By default, any number of servers can operate the terminal, but you can require individual servers to identify themselves. When enabled, the terminal requires that individual servers enter their identification number and password prior to completing a transaction.
IMPORTANT: When you enable the use of waiters, you must add at least one waiter before you can process a transaction.
Touch the Action button on the main screen.
Touch Settings.
Enter the Admin password and touch OK.
In the General section, touch the Enable waiters toggle button to enable (to the right) the identification of terminal operators.
Touch the Back icon to return to the main screen.
When you enable the use of waiters, you need to add at least one waiter to the terminal. If you enable waiters on the terminal, but don’t configure at least one waiter, the terminal will not allow you to process a transaction.
Touch the Action button on the main screen.
Touch Settings.
Enter the Admin password and touch OK.
In the General section, touch the Waiters Management.
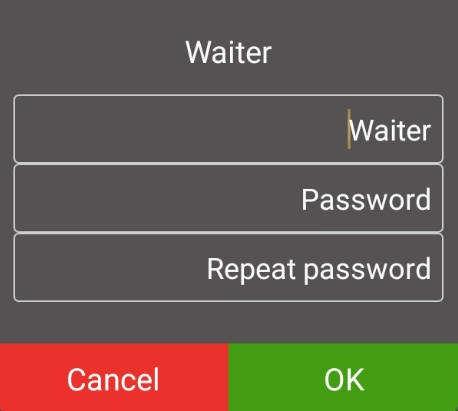
Tap the Add New Waiter button.
Enter the waiter’s unique identification number in the Waiter field; numbers can range from 1 to 999.
Touch the Password field and enter the waiter’s password.
Touch the Repeat password field and re-enter the password to confirm.
Touch OK. The new clerk ID appears in a list.
Repeat steps 5 to 9 for each additional waiter you want to create.
Touch the Back icon to return to the main screen.
TIP: If a waiter forgets their password, you can use the Administrator password as a workaround.
It is simple to change a waiter’s password. You may need to change a password if an employee is assigned another employee’s number, or you may want to change passwords on a recurring basis for terminal security.
Touch the Action button on the main screen.
Touch Settings.
Enter the Admin password and touch OK.
In the General section, touch the Waiters Management.
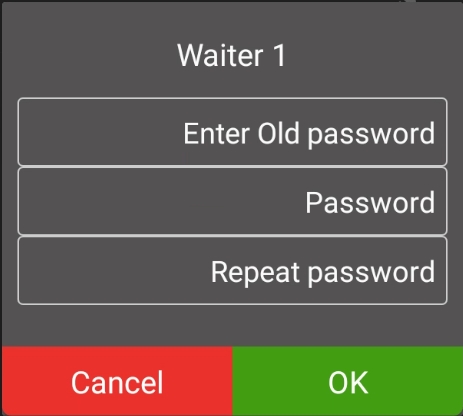
Locate the waiter whose password you want to change and touch the Edit (pencil) icon.
Enter the waiter’s current password in the Enter Old password field.
Touch the Password field and enter a new password that is 4 to 6 characters in length.
Touch the Repeat password field and re-enter the new password to confirm.
Touch OK.
Touch the Back icon to return to the main screen.
You may want to remove the requirement for waiters to identify themselves. There are 3 ways to remove waiters from the terminal:
IMPORTANT: If your business uses more than one terminal, you must disable or delete the waiter(s) from all terminals.
If you choose to disable waiter identification, any waiters you have previously configured (including their passwords) will remain stored on the terminal but the terminal operators will not need to identify themselves before processing a gift card transaction.
Touch the Action button on the main screen.
Touch Settings.
Enter the Admin password and touch OK.
In the General section, touch the Enable waiters toggle button to disable (to the left) the identification of terminal operators.
Touch the Back icon to return to the main screen.
Deleting a single waiter only removes that clerk and the associated password from the terminal. All other waiters configured on the terminal remain operational.
Touch the Action button on the main screen.
Touch Settings.
Enter the Admin password and touch OK.
In the General section, touch the Waiters Management.
Locate the waiter whose password you want to change and touch the Delete (trash can) icon.
Touch OK to confirm you want to delete the waiter.
Repeat steps 5 and 6 for each individual waiter you want to remove.
Touch the Back icon to return to the main screen.
If required, you can delete all existing waiters on the terminal at one time.
IMPORTANT: If you delete all waiters from the terminal, you must either disable waiter identification or add at least one new waiter before you can process any gift card transactions. Refer to the or procedure for the appropriate information.
Touch the Action button on the main screen.
Touch Settings.
Enter the Admin password and touch OK.
In the General section, touch the Waiters Management.
Tap the Delete All Waiter button.
Touch OK to confirm you want to delete all the waiters from the terminal.
Touch the Back icon to return to the main screen.
Understanding Passwords
Incorrect Password Entries
Forgotten Passwords
Change an Operator's Password
Change the Administrator Password
Password Protection for Transactions
Require Password for Manual Gift Card Entry

Gift card transactions are very similar to regular credit or debit card transactions with the exception that gift cards have a preset amount available to spend. Depending on your Point of Sale (POS) environment, you may need to indicate that a sale is a debit card transaction on the POS workstation before using the payment terminal.
If you are using your payment terminal in standalone mode (no communication with a POS), or your POS system does not need to identify gift card transactions, then the transaction workflow begins on the payment terminal. Gift card transactions are similar to regular sales transactions, but some of the terms may differ; for more information about processing gift card transactions, refer to the following links:
(process a sale)
(empties the balance of a card)
(card balance inquiry)
(add funds to the gift card balance)
(reimburse the entirety of a previous gift card sale)
(reimburse a portion of a previous gift card sale)
(new cards must be activated before use)
There are 7 transactions available when you accept gift cards. Each transaction type applies to a specific situation as explained below:
Redemption: Uses a portion of the remaining balance on the card as payment for a product or service.
Empty Card: A redemption used to clear the remaining balance on the card. Only applicable to card balances below $5 ($4.99 or less).
Balance: Informational only; queries the DataCandy server for the remaining card balance.
Increment: Adds funds to an active card.
Processing sales using gift cards are referred to as redemptions. A redemption is like any other sale, except instead of using a credit or debit card, the customer presents a gift card. The sale amount is deducted from the card’s balance and the new balance is printed on the customer receipt. Redeeming funds from a gift card to pay for a purchase is a two-step process:
The sale transaction is processed on the Point of Sale (POS) system.
The funds redeemed from the card’s current balance.
Process the sale transaction on your POS, indicating that the payment method is a gift card.
Touch the number pad to enter the redemption amount.
Touch Redemption.
Swipe the customer’s gift card. You can also touch GIFT CARD MANUAL ENTRY, enter the Admin password, and then enter the card number and touch OK.
The authorization server deducts the amount from the card balance, and the terminal prints a transaction receipt. Tear off the receipt and hand it to the customer with their card. Touch OK to print a second receipt, or touch CANCEL.
If a customer has a balance of $4.99 or less on their gift card, they can empty the card balance for a sale. The purchase cannot be more than the available card balance. After the balance is reduced to $0.00, the gift card becomes inactive. Emptying the balance of a card is a two-step process:
The sale transaction is processed on the Point of Sale (POS) system.
The funds redeemed from the card’s remaining balance.
Process the sale transaction on your POS, indicating that the payment method is a gift card.
Touch the Action button on the main screen.
Touch Transactions.
Touch Empty Card.
Touch Empty Card.
Swipe the customer’s gift card. You can also touch GIFT CARD MANUAL ENTRY, enter the Admin password, and then enter the card number and touch OK.
The authorization server empties the card balance, and the terminal prints a transaction receipt. Tear off the receipt and hand it to the customer with their card. Touch OK to print a second receipt, or touch CANCEL.
Because gift cards are loaded with a set amount of money, customers may not know their balance prior to paying for a product or service. Checking the available funds on a gift card does not affect the balance.
Touch the Action button on the main screen.
Touch Transactions.
Touch Balance.
Swipe the customer’s gift card. You can also touch GIFT CARD MANUAL ENTRY, enter the Admin password, and then enter the card number and touch OK.
The authorization server verifies the card balance, and the terminal prints a transaction receipt. Tear off the receipt and hand it to the customer with their card. Touch OK to print a second receipt, or touch CANCEL.
If a customer has a reloadable gift card, they can add funds to their balance (increment) whenever they want. Adding funds is a two-step process:
Customer pays for the funds they want to add using cash, credit, or debit.
The funds are added to the card’s existing balance.
Using your POS, process the payment for the funds that will be added to the card.
Touch the Action button on the main screen.
Touch Transactions.
Touch Increment.
Touch the number pad to enter the funds amount to add to the card balance.
Touch Increment.
Swipe the customer’s gift card. You can also touch GIFT CARD MANUAL ENTRY, enter the Admin password, and then enter the card number and touch OK.
The authorization server adds the increment amount to the card balance; the terminal prints a transaction receipt showing the new balance. Tear off the receipt and hand it to the customer with their card. Touch OK to print a second receipt, or touch CANCEL.
A complete cancel reverses the entire amount of a previous redemption. Gift cards do not allow for refunds in the same way as credit or debit cards. If a customer wants to return a product redeemed (purchased) with a gift card, the transaction must be reversed to allow the funds to be returned to the card balance. Reversing the complete amount is a two-step process:
The transaction is reversed on the Point of Sale (POS) system.
The full amount of the redemption is reversed to return the funds to the card’s balance.
IMPORTANT: The customer must present the original transaction receipt, as it contains the transaction confirmation number required to cancel the previous redemption. Transaction confirmation numbers have a maximum length of 12 digits.
Touch the Action button on the main screen.
Touch Transactions.
Touch Complete Cancel.
Touch Complete Cancel.
Use the number pad to enter the transaction confirmation number that appears on the original receipt and touch OK.
Swipe the customer’s gift card. You can also touch GIFT CARD MANUAL ENTRY, enter the Admin password, and then enter the card number and touch OK.
The authorization server cancels the previous redemption and increments the total to the card balance; the terminal prints a transaction receipt showing the updated balance. Tear off the receipt and hand it to the customer with their card. Touch OK to print a second receipt, or touch CANCEL.
While the procedure reimburses an entire transaction, you can cancel a partial amount of a transaction. Use this transaction if your customer used a gift card to purchase more than one product or service in a single transaction. Cancelling a partial amount is a two-step process:
The portion of the transaction is reversed on the Point of Sale (POS) system.
The partial amount of the redemption is reversed to return the funds to the card’s balance.
IMPORTANT: The customer must present the original transaction receipt, as it contains the transaction confirmation number required to cancel the previous redemption. Transaction confirmation numbers have a maximum length of 12 digits.
Touch the Action button on the main screen.
Touch Transactions.
Touch Partial Cancel.
Touch the Number pad to enter the amount of the transaction to reverse.
Touch Partial Cancel.
Use the number pad to enter the transaction confirmation number that appears on the original receipt and touch OK.
Swipe the customer’s gift card. You can also touch GIFT CARD MANUAL ENTRY, enter the Admin password, and then enter the card number and touch OK.
The authorization server cancels the specified amount of the previous redemption and increments the amount to the card balance; the terminal prints a transaction receipt showing the updated balance. Tear off the receipt and hand it to the customer with their card. Touch OK to print a second receipt, or touch CANCEL.
Gift cards have no value and cannot be redeemed prior to activation. When you activate a card, you are adding funds to the card balance while the card’s unique identification number is registered as valid on the DataCandy server. Cards may have a preset value or allow the purchaser to add funds in the amount of their choosing; the procedure is the same for both. Activating a card is a two-step process:
Customer pays for the card’s preset value or the amount they wish to load onto the card using cash, credit, or debit.
The card is registered as active on the DataCandy server and the funds are added to the card’s balance.
Using your POS, process the sale for the card’s value or the funds to add to the card.
Touch the Action button on the main screen.
Touch Transactions.
Touch Activation.
Touch the number pad to enter the amount of funds to increment to the new card’s balance.
Touch Activation.
Swipe the customer’s gift card. You can also touch GIFT CARD MANUAL ENTRY, enter the Admin password, and then enter the card number and touch OK.
The authorization server activates the card and increments the balance; the terminal prints a transaction receipt showing the card balance. Tear off the receipt and hand it to the customer with their card. Touch OK to print a second receipt, or touch CANCEL.

Complete Cancel: Reverses the full amount from a previous transaction and adds the funds back to the card’s balance. Requires the authorization number from DataCandy printed on the original receipt.
Partial Cancel: Reverses a partial amount from a previous transaction and adds the funds back to the card’s balance. Requires the authorization number from DataCandy printed on the original receipt.
Activation: Activates and adds funds to a new card.