Loading...
Loading...
Loading...
Loading...
Loading...
Loading...
Loading...
Loading...
Loading...
Loading...
Loading...
Loading...
Loading...
Loading...
Loading...
Loading...
Loading...
Loading...
Loading...
Loading...
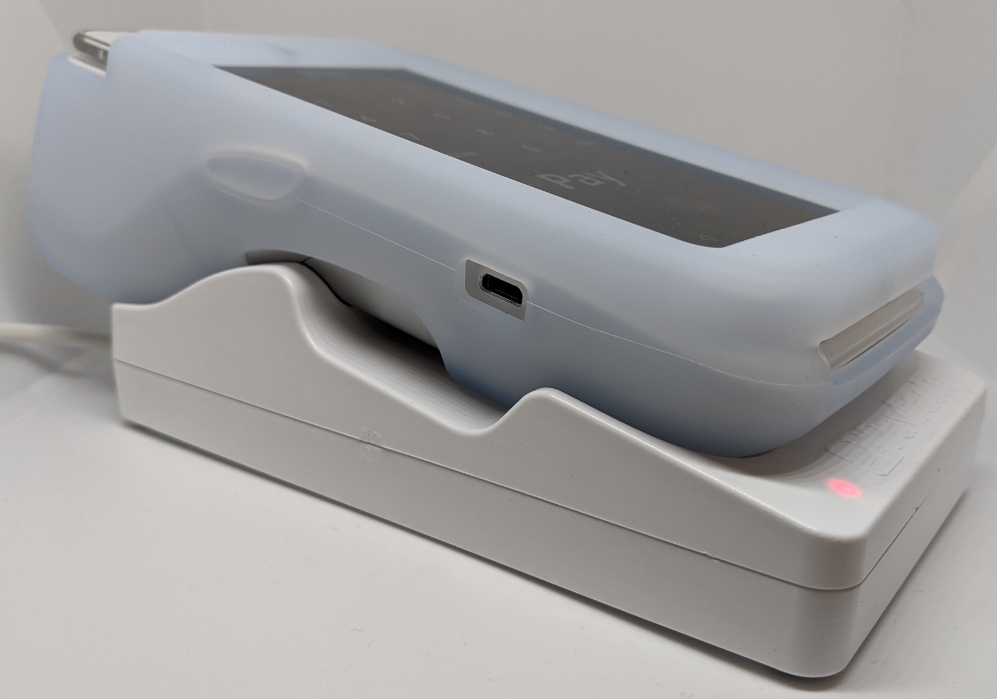
This document explains how to install the charging base for the PAX A920 or A920 Pro terminal and included silicone sleeve. The charging base makes it easy to recharge the terminal without having to remove the silicone sleeve to ensure that the USB power connector is properly seated in the terminal’s charging port.
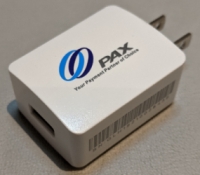
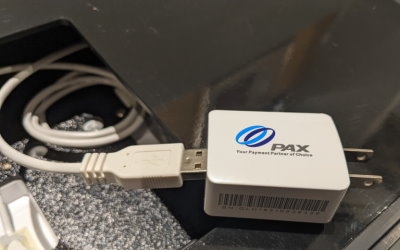
To ensure the best charging results, you must use the original AC power adapter that came with your PAX A920 or A920 Pro terminal. The AC power adapter should have the PAX logo printed on one side as shown below:
Your PAX A920 or A920 Pro terminal charging base includes the following components:
A920
Charging base
6-foot (180cm) USB to micro-USB cable
Protective silicone sleeve
A920 Pro
Charging base
5-foot (152cm) USB to USB Type-C cable
Protective silicone sleeve
To ensure the best charging results, you must use the original AC power adapter that came with your PAX A920 or A920 Pro terminals. The AC power adapter should have the PAX logo printed on one side as shown below:
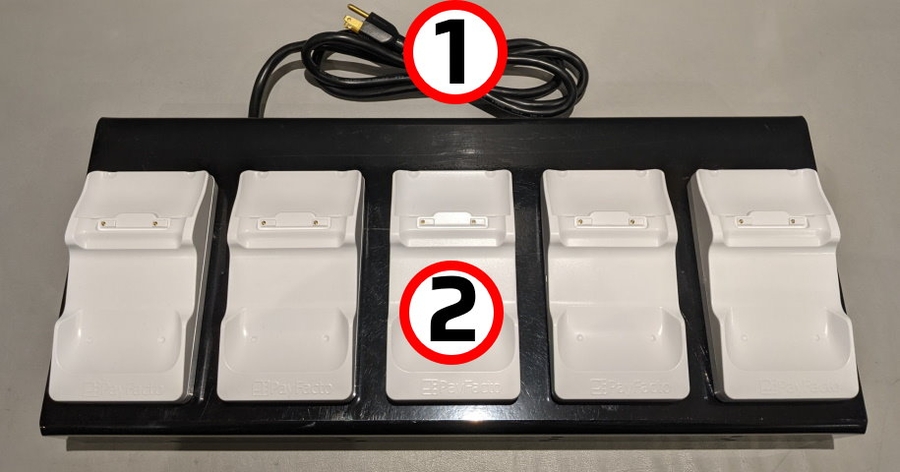
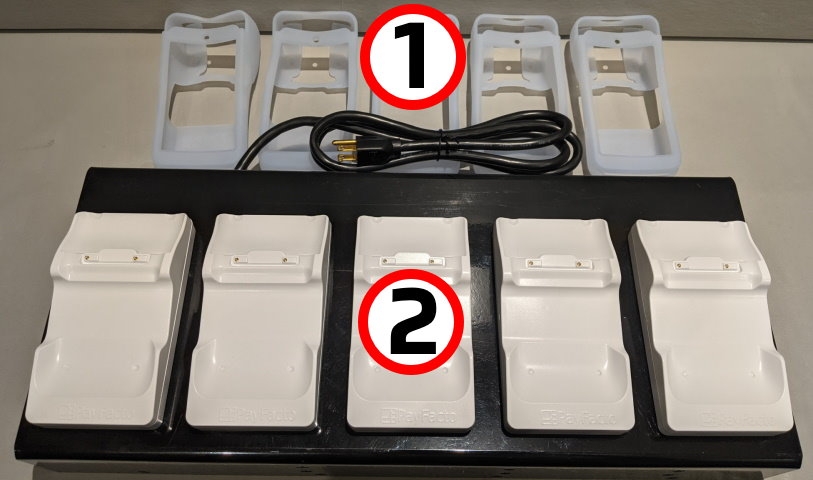
Your multi-terminal charging base comes with the following:
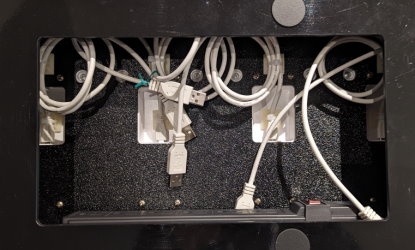
The following images show the location of the main charging base components:
AC power cord
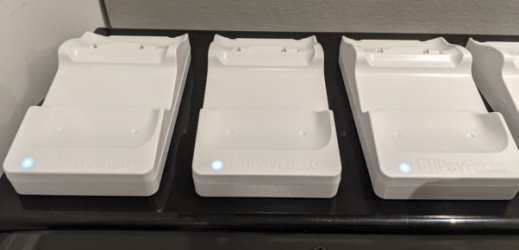
Multi-terminal charging bases (x5)
USB charging cables (x5)
Six (6) outlet power bar
Protective silicone sleeves (x5)
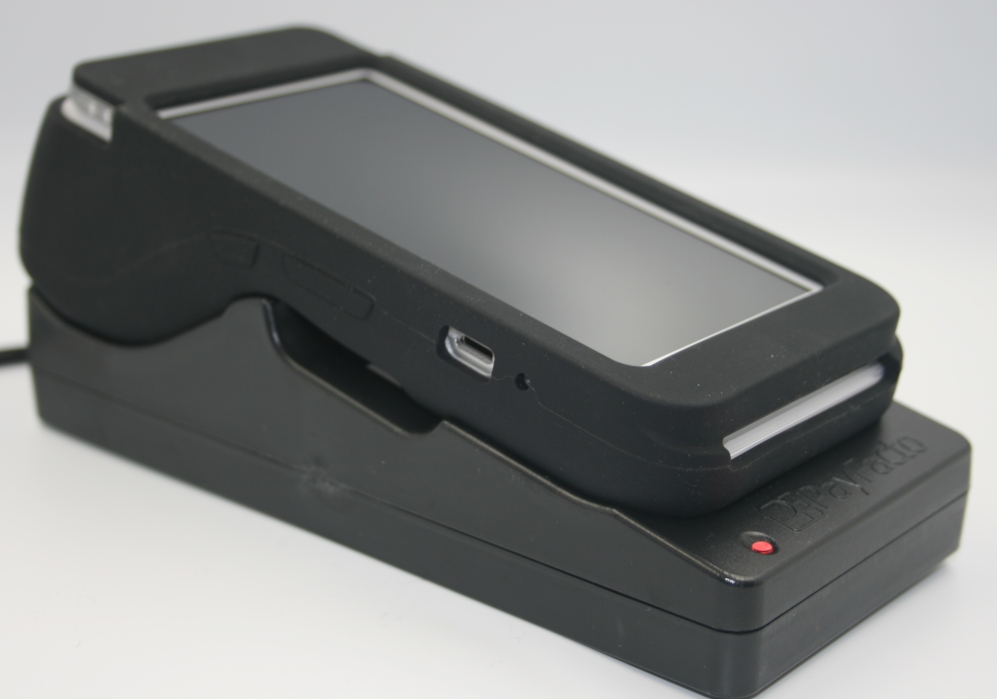
Multi-terminal charging base
Turn the charging base over and locate the USB connection port.
A920
A920 Pro
Insert the cable’s micro-USB (A920) or USB Type-C (A920 Pro) plug into the base’s connection port.
A920
A920 Pro
Secure the cable in the guide at the top of the charging base and turn the charging base over.
A920
A920 Pro
Connect the cable’s USB plug into the AC adapter’s USB port.
A920
A920 Pro
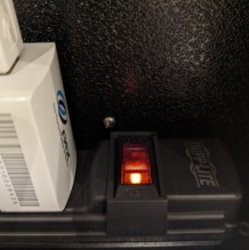
Plug the adapter into an AC outlet. The LED at the bottom edge of the base lights up.
To protect your PAX A920 or A920 Pro terminal from minor impact damage, you should install the silicone sleeve provided with the terminal charging base as the charging base is designed specifically for terminals with the sleeve.
Insert the top of the terminal into the sleeve's printer protection until the sleeve fits snugly onto the terminal’s top.
Pull the bottom of the sleeve over the bottom edge of the terminal.
Repeat for any additional terminals you intend to place on the charging base.
If the status light remains blue after you place the terminal on the base, the terminal is not seated correctly, and not connecting to the base’s gold charging contacts.
IMPORTANT! Do not slide a terminal onto the base, as it can damage the gold charging contacts. Always place the terminal onto the base vertically, as shown below
The LED at the bottom edge of the charging base indicates the terminal’s charging status:
LED Color
A920
A920 Pro
Blue: Charging base is plugged in, no terminal connected.
Red/Yellow: Terminal is charging.
Green: Terminal is fully charged.
The multi-terminal charging base has a power switch on the attached power bar, shown below:
• To power on the terminal charging base, make sure the power cord is plugged into a grounded AC outlet and that the power switch is in the On/RESETposition; the switch lights up with a red indicator, as shown below:
• To power off the terminal charging base, you can either push the power switch to the OFF position or unplug the power cord from the grounded AC outlet.
To use the charging base, you need only place the terminal(s) vertically on the base so the printer rests in the cradle at the top of the charging base.
If the status light remains blue after you place the terminal on the base, the terminal is not seated correctly, and not connecting to the base’s gold charging contacts.
IMPORTANT! Do not slide a terminal onto the base, as it can damage the gold charging contacts. Always place the terminal onto the base vertically, as shown below:
The LED at the bottom edge of the charging base indicates the terminal’s charging status:
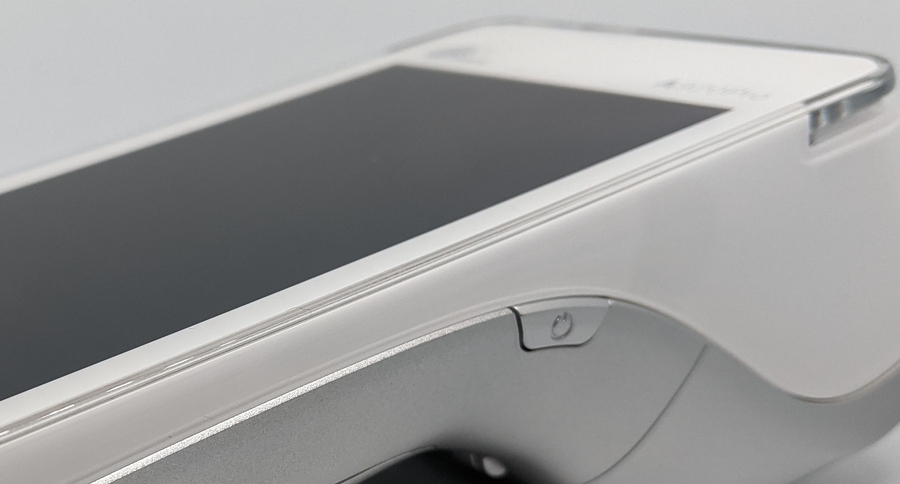
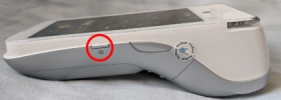
To power the terminal on, press and hold the power key on the right side of the terminal for 2-3 seconds.
To power off the terminal:
Press and hold the power key on the right side of the terminal for 2-3 seconds.
Touch the Power off icon and then touch Power off again.
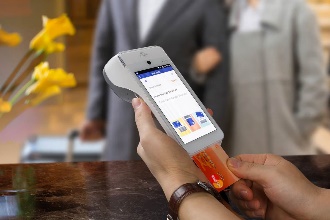
Your terminal operators and your customers enter information and respond to prompts using the terminal’s touch screen. The application prompts you and your customers on the next action to perform.
There are three (3) ways for a customer to use their payment card with the terminal:
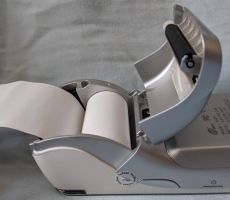
The terminal uses 2 ¼” or 58mm thermal paper rolls to print transaction receipts.
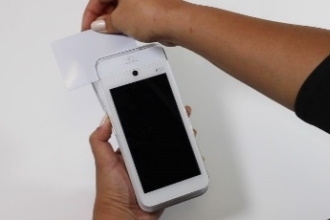
On the back of the terminal at the top, lift the lever to unlock and open the printer cover.
Place the roll of printer paper in the paper tray, leaving about 2 inches (5 cm) of paper beyond the printer's cutter.
IMPORTANT! Make sure the paper unrolls from the back of the roll, otherwise the printer will be unable to print the transaction receipt.
Close the printer cover until it snaps into place and remove any excess paper.
To power the terminal on, press and hold the power key on the right side of the terminal for 2-3 seconds.
To power off the terminal:
Press and hold the power key on the right side of the terminal for 2-3 seconds.
Touch the Power off icon and then touch Power off again.
Your terminal operators and your customers enter information and respond to prompts using the terminal’s touch screen. The application prompts you and your customers on the next action to perform.
There are three (3) ways for a customer to use their payment card with the terminal:
The terminal uses 2 ¼” or 58mm thermal paper rolls to print transaction receipts.
On the back of the terminal at the top, lift the lever to unlock and open the printer cover.
Place the roll of printer paper in the paper tray, leaving about 2 inches (5 cm) of paper beyond the printer's cutter.
IMPORTANT! Make sure the paper unrolls from the back of the roll, otherwise the printer will be unable to print the transaction receipt.
Close the printer cover until it snaps into place and remove any excess paper.
This document will introduce you to your payment terminal as well as guide you through the process of preparing and configuring your it in order to quickly begin processing payments.
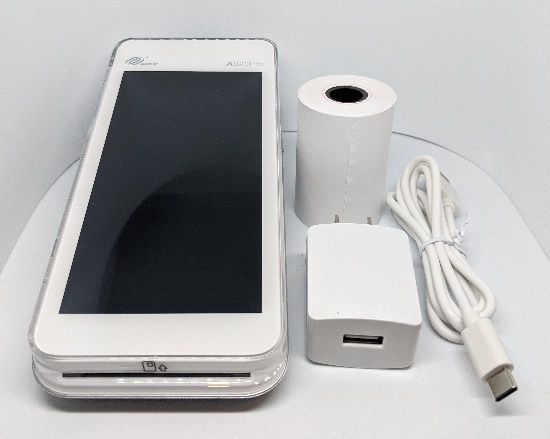
Your PAX A920 payment processing terminal comes with the following:
Payment terminal
AC power outlet
Roll of printer paper
Charging cable
You may also have an optional charger and external printer included, but this document addresses the most basic delivery configuration.
The following illustrations show the location of the main terminal features and hardware:
PayFacto uses a self-service terminal activation procedure designed to save time while also providing better security. The new activation procedure applies only to countertop and mobile PAX payment terminals using the Android operating system. The new procedure applies to:
All new merchants activating their terminals for the first time
Initial terminal configuration
Charging the Terminal
Installing the Printer Paper
Configuring the Terminal Network Connections
Activating the terminal
Terminal Activation
Activate Terminal
Set Passwords
Working with the terminal
Powering the Terminal On or Off
Terminal Input Options
Card Payment Options
This document will introduce you to your payment terminal as well as guide you through the process of preparing and configuring it in order to quickly begin processing payments.
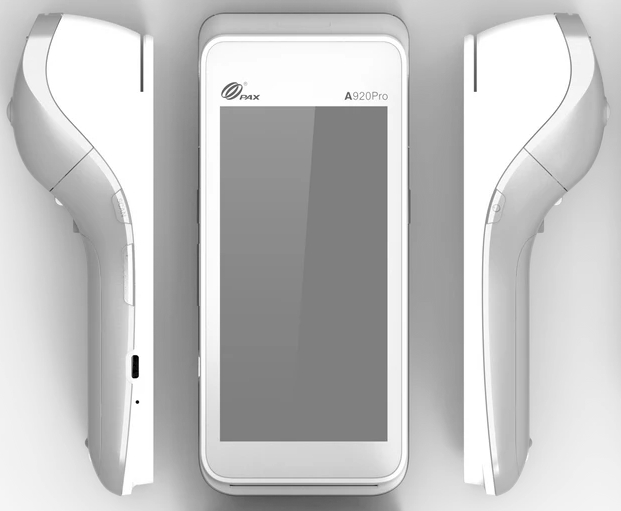
Your PAX A920 Pro payment processing terminal comes with the following:
Payment terminal
Roll of printer paper
AC power outlet
USB to USB Type-C charging cable
You may also have an optional charger and external printer included, but this document addresses the most basic delivery configuration.
The following illustrations show the location of the main terminal features and hardware:
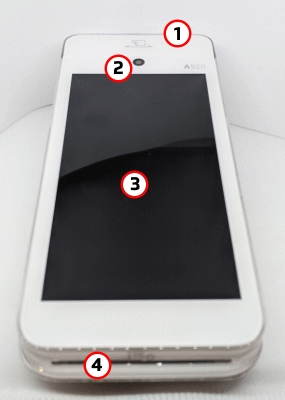
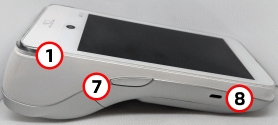
1. Magnetic stripe reader 2. Color touchscreen 3. Chip card reader 4. Scanner button
5. Volume control button 6. USB Type-C charging port 7. Power button 8. Scanner 9. Contactless payment reader
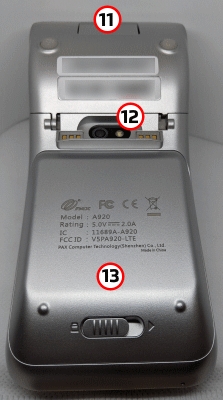
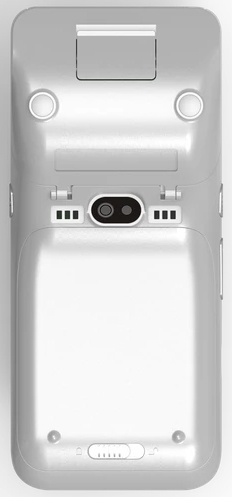
10. Printer 11. Printer latch 12. Rear camera 13. Battery cover 14. Battery cover latch
Any existing merchants adding new payment terminals
Any existing merchants receiving replacement terminals
After you configure the terminal's network connection(s) and power on the terminal, the procedure comprises of 2 parts:
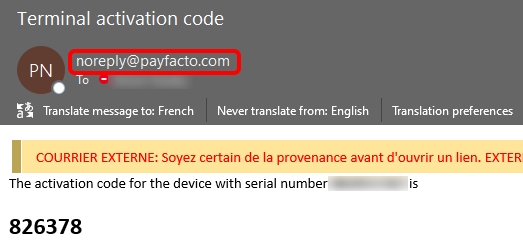
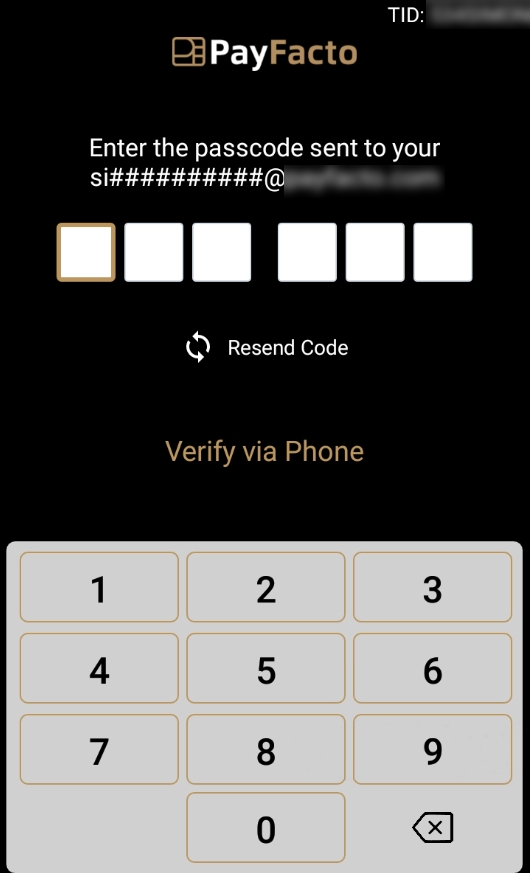
After configuring the terminal’s network connection, you need to start the PayFacto payment application to complete the remaining steps. Terminal activation requires you to input a One Time Passcode (OTP) that PayFacto sends to the email address or telephone number registered to your account.
IMPORTANT! To receive the OTP on your phone, your registered phone number must be able to receive text messages (SMS). If you cannot receive text messages, select the email option to get the OTP.
Touch the PAYMENT icon on the main screen. The Welcome To Your Payment Terminal screen appears.
In the top right corner of the screen, your terminal ID (TID) appears; confirm that the number on the screen matches the TID on the label on the back of your terminal. The TID will not appear on your terminal screen after you complete the activation process.
IMPORTANT! If the TID does not match, call PayFacto immediately.
Touch anywhere on the screen to begin the activation process.
Touch the desired option to receive the OTP.
Phone Number
Touch the Send Code button.
IMPORTANT! The OTP code is valid for 15 minutes after you receive it. If you wait more than 15 minutes to enter the OTP, the terminal will display an error and you will have to request a new OTP.
If you select Email, look for a message from [email protected].
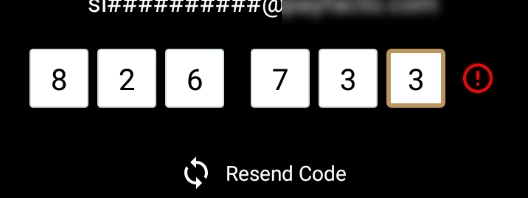
After you receive the 6-digit activation code, use the on-screen keypad to enter the code on the terminal screen.
If you enter the code incorrectly, a red exclamation appears to indicate that the code is incorrect.
Re-enter the code, or touch Resend Code to obtain a new OTP.
After you enter the OTP correctly, the payment application displays the Set Administrative Password screen to configure your terminal passwords.
To prevent unauthorized individuals from changing the terminal’s configuration, you need to set the Administrator and Merchant passwords. These passwords restrict access to certain functions on the terminal.
When setting your passwords, you must respect the following parameters:
Passwords must be 6 characters long
The Administrator and Merchant passwords cannot be the same (can’t match)
You cannot use the same digit 6 times consecutively (for example: 111111 or 777777)
You cannot use 6 consecutive numbers, either ascending or descending (for example: 123456 or 987654)
On the Set Administrative Password screen, use the on-screen keypad to enter a 6-digit password in the Admin Password field and touch the Next icon on the keypad.
On the Confirm Administrative Password screen, re-enter the password in the Admin Password field and touch the Next icon on the keypad.
On the Set Merchant Password screen, use the on-screen keypad to enter a 6-digit password in the Merchant Password field and touch the Next icon on the keypad.
On the Confirm Merchant Password screen, re-enter the password in the Merchant Password field and touch the Next icon on the keypad.
Your payment terminal is now ready for use.
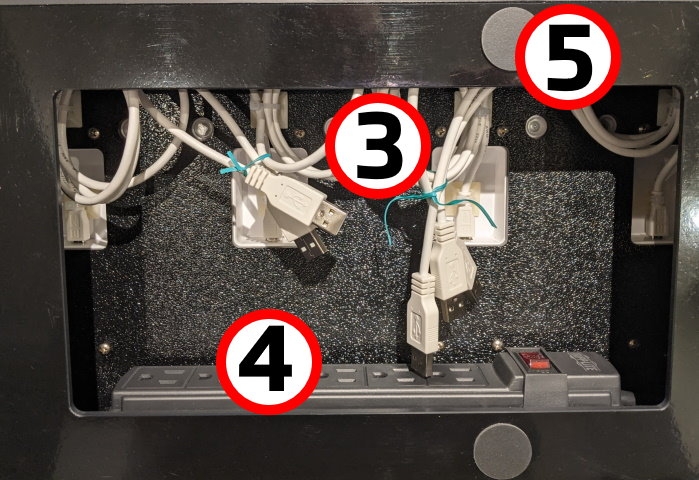
Collect the original AC power adapters that were shipped with your PAX A920 or A920 Pro terminals (maximum of 5 per multi-terminal charging base).
Turn the multi-terminal charging base over to access the opening on the bottom.
Remove any twist ties that secure the charging cables together. Do not remove any of the nylon zip ties as each cable should be long enough to reach an outlet on the power bar.
Working one cable at a time, connect the cable’s USB plug into the AC adapter’s USB port.
Plug the adapter into an outlet on the power bar.
Repeat steps 4 and 5 for each additional charging cable.
After you connect all 5 cables to the power bar, plug in the power bar's cable to an available AC outlet.
If it is not already, switch the power bar's power button to the On/RESETposition; the switch lights up with a red indicator and the LEDs at the bottom edge of the charging bases light up.
Turn the multi-terminal charging base over to place it securely in its desired location. The base is ready to begin charging your terminals.
IMPORTANT! To minimize the risk of short-circuits and reduce the risk of fire, DO NOT connect any additional devices to the charging base's power bar.
To protect your PAX A920 or A920 Pro terminals from minor impact damage, you should install the silicone sleeves provided with the multi-terminal charging base as the charging bases are designed specifically for terminals with the sleeve.
Insert the top of the terminal into the sleeve's printer protection until the sleeve fits snugly onto the terminal’s top.
Pull the bottom of the sleeve over the bottom edge of the terminal.
Repeat for every terminal you intend to place on the charging bases.
LED Color
A920
A920 Pro
Blue: Charging base is plugged in, no terminal connected.
Red/Yellow: Terminal is charging.
Green: Terminal is fully charged.


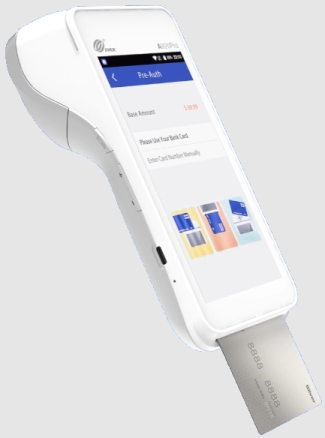
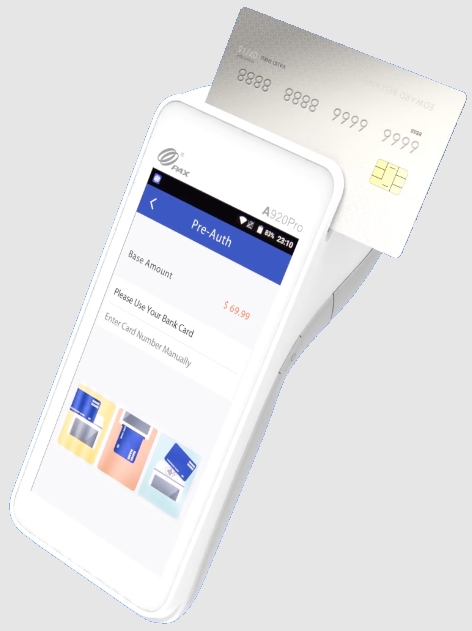
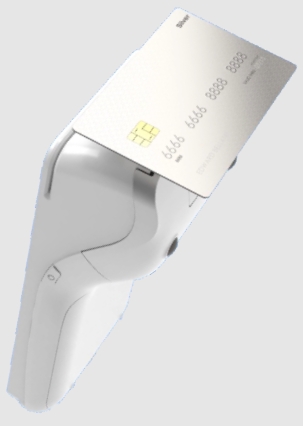
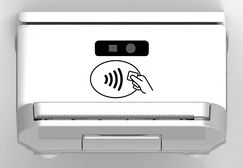
Insert the chip card and enter a PIN
Swipe the card’s magnetic strip
Tap the card for contactless payment
Insert the chip card and enter a PIN
Swipe the card’s magnetic strip
Tap the card for contactless payment
Magnetic stripe reader
Front-facing camera (not used)
Color touchscreen
Chip card reader
Volume up button
Power button
Volume down button
Micro USB charging port
Contactless payment reader
Printer
Printer latch
Rear camera/scanner
Battery cover


PayFacto uses a self-service terminal activation procedure designed to save time while also providing better security. The new activation procedure applies only to countertop and mobile PAX payment terminals using the Android operating system. The new procedure applies to:
All new merchants activating their terminals for the first time
Any existing merchants adding new payment terminals
Any existing merchants receiving replacement terminals
After you configure the terminal's network connection(s) and power on the terminal, the procedure comprises of 2 parts:
After configuring the terminal’s network connection, you need to start the PayFacto payment application to complete the remaining steps. Terminal activation requires you to input a One Time Passcode (OTP) that PayFacto sends to the email address or telephone number registered to your account.
IMPORTANT! To receive the OTP on your phone, your registered phone number must be able to receive text messages (SMS). If you cannot receive text messages, select the email option to get the OTP.
Touch the PAYMENT icon on the main screen. The Welcome To Your Payment Terminal screen appears.
In the top right corner of the screen, your terminal ID (TID) appears; confirm that the number on the screen matches the TID on the label on the back of your terminal. The TID will not appear on your terminal screen after you complete the activation process.
IMPORTANT! If the TID does not match, call PayFacto immediately.
Touch anywhere on the screen to begin the activation process.
Touch the desired option to receive the OTP.
Phone Number
Touch the Send Code button.
IMPORTANT! The OTP code is valid for 15 minutes after you receive it. If you wait more than 15 minutes to enter the OTP, the terminal will display an error and you will have to request a new OTP.
If you select Email, look for a message from [email protected].
After you receive the 6-digit activation code, use the on-screen keypad to enter the code on the terminal screen.
If you enter the code incorrectly, a red exclamation appears to indicate that the code is incorrect.
Re-enter the code, or touch Resend Code to obtain a new OTP.
After you enter the OTP correctly, the payment application displays the Set Administrative Password screen to
To prevent unauthorized individuals from changing the terminal’s configuration, you need to set the Administrator and Merchant passwords. These passwords restrict access to certain functions on the terminal.
When setting your passwords, you must respect the following parameters:
Passwords must be 6 characters long
The Administrator and Merchant passwords cannot be the same (can’t match)
You cannot use the same digit 6 times consecutively (for example: 111111 or 777777)
You cannot use 6 consecutive numbers, either ascending or descending (for example: 123456 or 987654)
On the Set Administrative Password screen, use the on-screen keypad to enter a 6-digit password in the Admin Password field and touch the Next icon on the keypad.
On the Confirm Administrative Password screen, re-enter the password in the Admin Password field and touch the Next icon on the keypad.
On the Set Merchant Password screen, use the on-screen keypad to enter a 6-digit password in the Merchant Password field and touch the Next icon on the keypad.
Your payment terminal is now ready for use.
On the Confirm Merchant Password screen, re-enter the password in the Merchant Password field and touch the Next icon on the keypad.
After you remove the terminal and accessories from the box, you need to charge the terminal before you can use it. The pre-installed battery has a protective cover on the contacts to prevent the possibility of a short circuit during transport.
To charge the terminal:
Turn the terminal over.
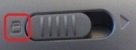
On the back of the terminal at the bottom, slide the battery cover locking switch to the right.
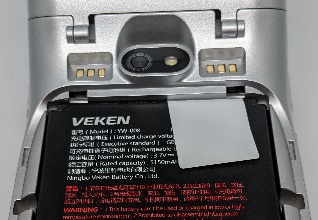
Lift the battery cover off the terminal. You should notice a plastic tab at the top of the battery.
Lift the battery from the terminal and remove the plastic tab.
Re-install the battery and push on the bottom of the battery to seat it correctly.
Re-install the battery cover on the terminal and slide the lock switch to the lock position on the left and turn the terminal over.
Insert the USB cable in the AC outlet and connect the outlet to an AC plug.
Insert the USB Type-C connector in the terminal’s charging port, located on the left side, below the Volume control button. The terminal begins charging.
If the supplied roll of printer paper was not already installed in the terminal when you received it, you will need to install it before you can print any transaction receipts.
TIP: This procedure also applies to replacing a roll of printer paper.
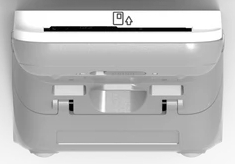
On the back of the terminal near the top, lift the lever to unlock and open the printer cover.
The paper tray contains an illustration of how to install the roll of paper.
Place the roll of printer paper in the paper tray, leaving about 2 inches (5 cm) of paper beyond the printer's cutter.
IMPORTANT! Make sure the paper unrolls from the back of the roll, otherwise the printer will be unable to print the transaction receipt.
Close the printer cover until it snaps into place and remove any excess paper.
The terminal requires a network connection to communicate with the payment processor server to process transactions.
The PAX A920 Pro is a mobile payment terminal that can connect to mobile (LTE) and wireless (Wi-Fi) networks.
Mobile network access is required for delivery and transportation use, but it can also serve as a backup connection if your Wi-Fi network reception is unreliable in certain areas.
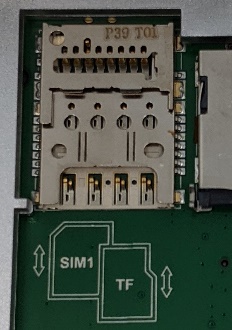
If you plan to use your terminal outside of your usual wi-fi network, you need to install the mobile SIM card, provided by PayFacto or your mobile communications provider. The SIM card will connect you to a mobile network, allowing you to process payments anywhere the terminal has reception. Mobile network access can also serve as a backup connection if your wi-fi network reception is unreliable in certain areas. The terminal uses the micro-SIM card size.
Make sure the terminal is powered off and turn the terminal over.
On the back of the terminal at the bottom, slide the battery cover locking switch to the right.
Lift the battery cover off the terminal.
Lift the battery from the terminal to remove and set aside.
IMPORTANT! The SIM card goes into the lower space and should not require great force to insert.
Re-install the battery and push on the bottom of the battery to seat it correctly.
Re-install the battery cover on the terminal and slide the lock switch to the lock position on the left.
Power on the terminal by pressing and holding the Power button for 3 seconds.
The terminal should identify the SIM card and configure the mobile network settings automatically.
This section explains how to turn Wi-Fi on and connect to your network.
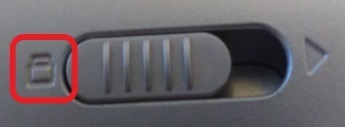
On the terminal’s main screen, touch the Settings icon.
On the Settings screen, touch the Please Input Password field and use the keypad to type the password: either pax9876@@ or 9876.
Touch the checkmark icon on the keypad when you are done and touch OK.
TIP: You can touch Show password before typing to ensure you are entering the password correctly.
After the terminal displays Connected for the selected network, touch the Back icon to return to the Network & Internet page.
By default, the terminal displays all information in English. This procedure explains how to change the terminal’s display language if necessary.
IMPORTANT! Selecting a different language changes all text that appears on the terminal.
On the terminal’s main screen, touch the Settings icon.
On the Settings screen, touch the Please Input Password field and use the keypad to type the password: either pax9876@@ or 9876.
Touch the checkmark icon on the keypad when you are done and touch OK.
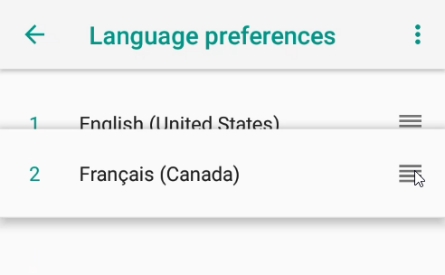
If the selected language does not appear automatically, you can drag the language to the top of the list, as shown below:


The terminal has illustrations for the different cards it can accept. Insert your SIM card in the space identified as SIM1 so the diagonal corner is facing the top left side.
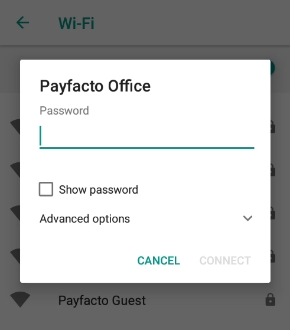
On the Network & Internet page, touch Wi-Fi.
On the Wi-Fi page, if Wi-Fi is Off, touch the toggle to turn it on. If Wi-Fi is already on, a list of available networks appears.
From the list of available networks, touch the name of the network you want to connect to.
Enter the password for the selected network and touch CONNECT.
On the System page, touch Languages & input.
On the Languages & input page, touch Languages.
On the Language preferences page, touch Add a language.
On the Add a language page, scroll to and touch the desired language.

After you remove the terminal and accessories from the box, you need to charge the terminal before you can use it. The pre-installed battery has a protective cover on the contacts to prevent the possibility of a short circuit during transport.
Turn the terminal over.
On the back of the terminal at the bottom, slide the battery cover locking switch to the right.
Lift the battery cover off the terminal. You should notice a plastic tab at the top of the battery.
Lift the battery from the terminal and remove the plastic tab.
Insert the USB cable in the AC outlet and connect the outlet to an AC plug.
Insert the micro USB connector in the terminal’s charging port, located on the left side, below the Volume Down button. The terminal begins charging.
If the supplied roll of printer paper was not already installed in the terminal when you received it, you will need to install it before you can print any transaction receipts.
TIP: This procedure also applies to replacing a roll of printer paper.
On the back of the terminal at the top, lift the lever to unlock and open the printer cover.
The paper tray contains an illustration of how to install the roll of paper.
Place the roll of printer paper in the paper tray, leaving about 2 inches (5 cm) of paper beyond the printer's cutter.
IMPORTANT! Make sure the paper unrolls from the back of the roll, otherwise the printer will be unable to print the transaction receipt.
Close the printer cover until it snaps into place and remove any excess paper.
The terminal requires a network connection to communicate with the payment processor server to process transactions.
The PAX A920 is a mobile payment terminal that can connect to mobile (LTE) and wireless (Wi-Fi) networks.
Mobile network access is required for delivery and transportation use, but it can also serve as a backup connection if your Wi-Fi network reception is unreliable in certain areas.
If you plan to use your terminal outside of your usual wi-fi network, you need to install the mobile SIM card, provided by PayFacto or your mobile communications provider. The SIM card will connect you to a mobile network, allowing you to process payments anywhere the terminal has reception. The terminal uses the regular (full) SIM card size.
On the back of the terminal at the bottom, slide the battery cover locking switch to the right.
Lift the battery cover off the terminal.
Lift the battery from the terminal to remove and set aside.
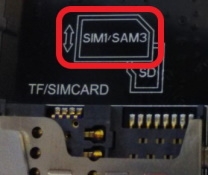
The terminal has illustrations for the different cards it can accept. Insert your SIM card in the space identified as SIM1/SAM3 so the diagonal corner is facing the top right side.
IMPORTANT! The SIM card goes into the leftmost space and should not require great force to insert.
Re-install the battery by sliding the thin segment into the terminal, near the charging connectors, and pushing on the bottom of the battery to seat it correctly.
Re-install the battery cover on the terminal and slide the lock switch to the lock position on the left.
Power on the terminal by pressing and holding the Power button for 3 seconds.
The terminal should identify the SIM card and configure the mobile network settings automatically.
This section explains how to turn wi-fi on and connect to your network.
To connect to your wireless network:
On the terminal’s main screen, touch the Settings icon.
On the Settings screen, touch the Please Input Password field and use the keypad to type the password: either 9876 or pax9876@@.
Touch the checkmark icon on the keypad when you are done and touch OK.
In the Wireless & networks section, touch Wi-Fi.
If Wi-Fi is Off, touch the toggle to turn it on. If Wi-Fi is already on, a list of available networks appears.
From the list of available networks, touch the name of the network you want to connect to.
Enter the password for the selected network and touch
TIP: You can touch Show password before typing to ensure you are entering the password correctly.
After the terminal displays Connected for the selected network, touch the Back icon to return to the Settings screen.
Touch the Back icon again to return to the main screen.
By default, the terminal displays all information in English. This procedure explains how to change the terminal’s display language if necessary.
IMPORTANT! Selecting a different language changes all text that appears on the terminal.
To change the terminal display language:
On the terminal’s main screen, touch the Settings icon.
On the Settings screen, touch the Please Input Password field and use the keypad to type the password: either 9876 or pax9876@@.
Touch the checkmark icon on the keypad when you are done and touch OK.
Re-install the battery by sliding the thin segment into the terminal, near the charging connectors, and pushing on the bottom of the battery to seat it correctly.
Re-install the battery cover on the terminal and slide the lock switch to the lock position on the left and turn the terminal over.
Touch Language.
Scroll to and touch the desired language.
Touch the Back icon twice to return to the main screen.