Loading...
Loading...
Loading...
Loading...
Loading...
Loading...
Loading...
Loading...
Loading...
Loading...
Loading...
Loading...
Loading...
Loading...
Loading...
Logon to the Maitre’D Back-Office with appropriate credentials. (Distributor or System Owner)
On the Main Back-Office screen, click on the File menu and select the Licenses… option.
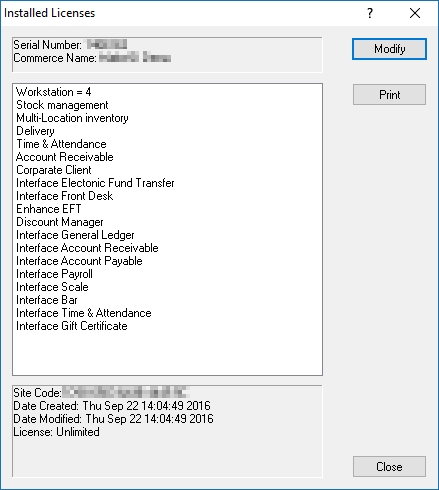
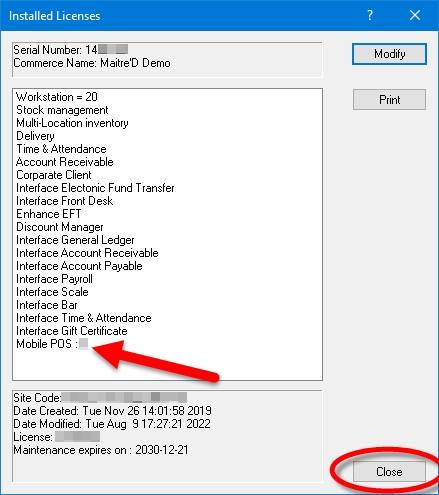
The Installed Licenses window will appear.
Verify all the modules, interfaces and options listed here and make sure they correspond to your Maitre’D invoice.
Also make sure that the license Serial Number and Commerce Name are correct.
If a purchased option is missing or if there is a mistake in the commerce name, please contact the Maitre’D help desk to have the missing options added to your license.
After your Maitre'D license has been activated, it is possible to add new options to it, to keep up with your business' growth. For instance, you could add a new module such as the Inventory Management module, or increase the number of POS workstations to meet your needs.
The first step to add new functionalities to your Maitre'D license is to contact your PayFacto representative to purchase the options you need. Once the purchase and invoicing process has been completed, you will be able to start the activation process.
Logon to the Maitre’D Back-Office with appropriate credentials. (Distributor or System Owner)
On the Main Back-Office screen, click on the File menu and select the Licenses… option.
The Installed Licenses window will appear.
Click the Modify button. This will bring up the Request Key Code window. Leave this window up on the screen, and proceed to the next step.
Logon to the Maitre'D Distributor Portal:
http://distributors.maitredpos.com/
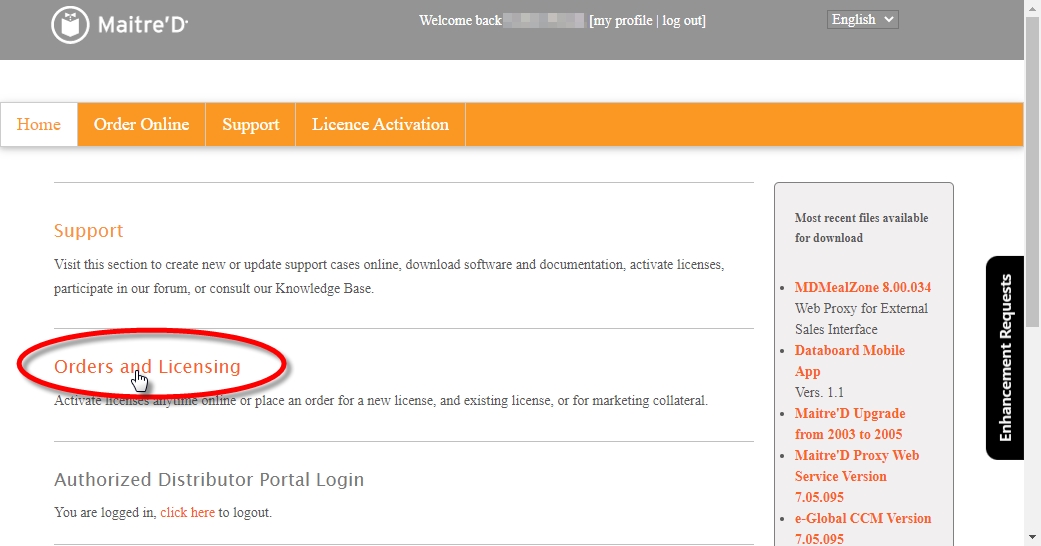
Click on Orders and Licensing.
Click on License Activation.
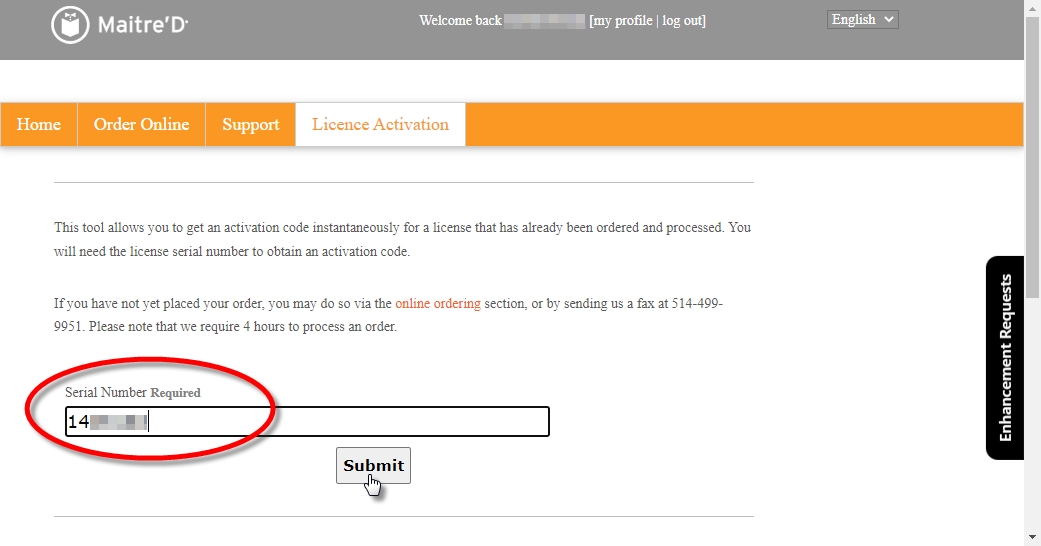
Enter the Maitre'D license Serial Number for which the add-on was purchased and click the Submit button.
Available add-ons will be listed here. Locate the Add-On you wish to activate and click the Activate link. For the purpose of this example, we are activating an add-on for two new Mobile POS workstations.
IMPORTANT! If the add-on you are looking for is not listed, make sure it was ordered and invoiced. Also remember that there is a 72 hours turn-around time for new orders.
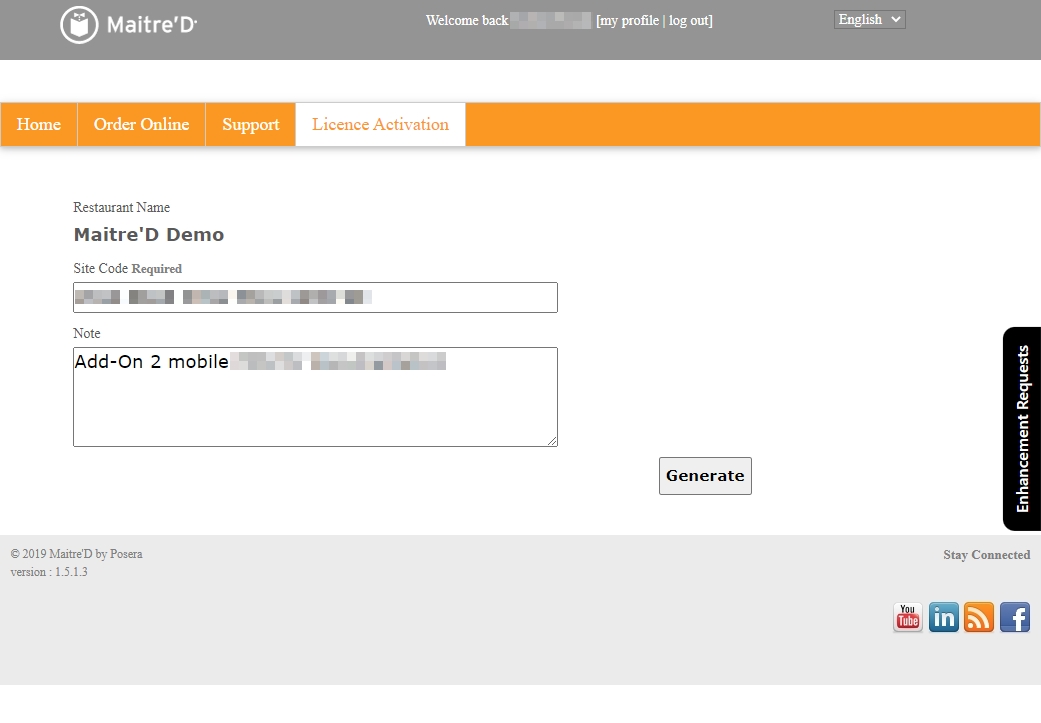
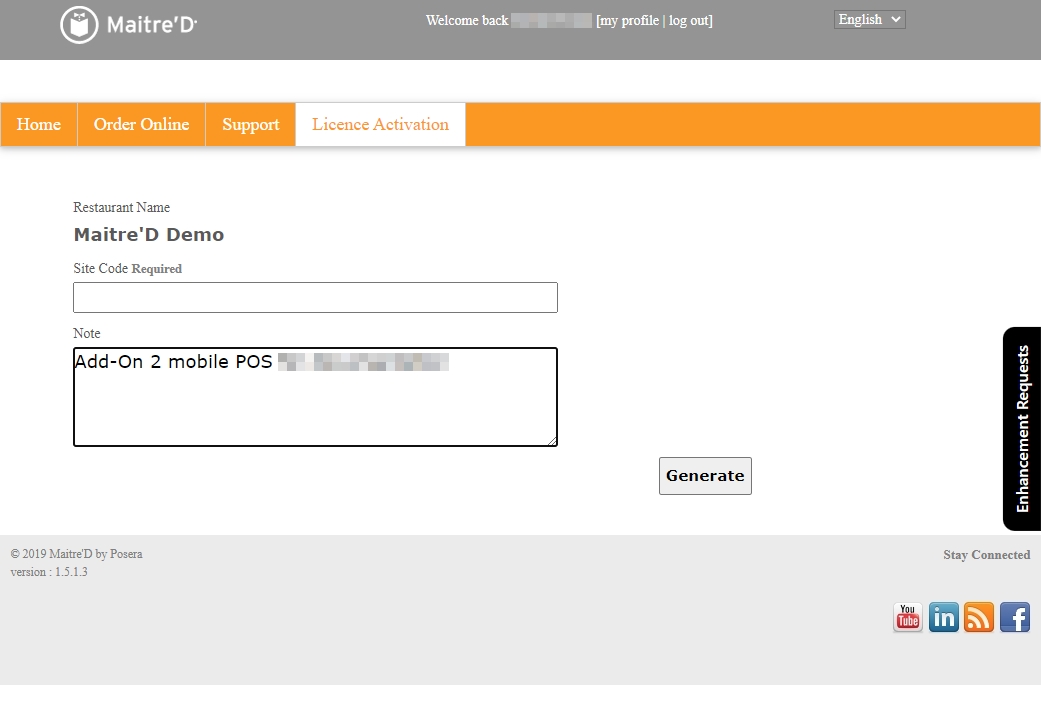
The Distributor Portal will request a Site Code.
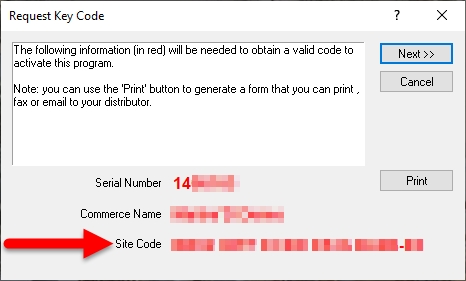
Copy the Site Code from the Request Key Code window which you left open earlier. Paste the Site Code in the Site Code field of the Distributor Portal. Click the Generate button on the Distributor Portal and click the Next >> button on the Request Key Code window.
The Distributor Portal will now display the Activation Code. Select the entire code and copy it to the clipboard by pressing CTRL + C on your keyboard.
Maitre'D will now request a Key Code. Paste the Activation Code which you copied from the website by pressing CTRL + V on your keyboard. Click Next >>
NOTE: The terms "Activation Code" and "Key Code" are used interchangeably between Maitre'D and the distributor portal. For the purpose of license activation, they mean the same thing.
The Maitre'D license will be updated, which could take a few seconds. Once the license is updated, click Close.
You will be prompted to restart the computer. Log off from the Maitre'D distributor portal, save your work and close applications that may be running, then click Yes to restart your computer.
IMPORTANT! Do not attempt to skip or bypass the computer restart. This may cause your license to deactivate itself completely along with other unwanted effects.
Once the computer finishes restarting, logon to the Maitre'D Back-Office as you normally would and start using your new options.
Before the license can be activated, you need:
The Maitre’D license serial number can be obtained by ordering a Maitre’D license through our ordering system, by phone or by e-mail.
NOTE: Please note that there is a turnaround time of 4 hours for all orders and that new licenses are only created during normal business hours. The License serial number can be found on the invoice received after the creation of the license.
Obtain the commerce name from the restaurant owner or manager. The commerce name is limited to 20 characters, including spaces.
When a new license is activated for the first time, you will be given the opportunity to configure the commerce name as it will appear in the Maitre’D Back-Office, on report headers and on the header of printed guest checks, invoices and receipts.
With the license serial number and commerce name in hand, you can proceed with the license activation.
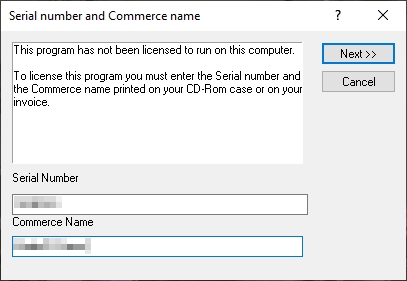
After restarting from the installation of the Maitre’D Back-Office, Auxiliary or Backup Server software, the Maitre’D License Activation prompt will automatically appear.
Enter the required information:
a. Type in the license Serial Number as it appears on your Maitre’D invoice.
b. Type in the Commerce Name as it should appear in the Maitre’D Back-Office, on report headers and on the header of printed guest checks, invoices and receipts.
c. Click Next >> to continue the process.
The Site Code will be generated. Select it and copy it to the clipboard.
Logon to the Maitre'D Distributor Portal:
http://distributors.maitredpos.com/
Select your language.
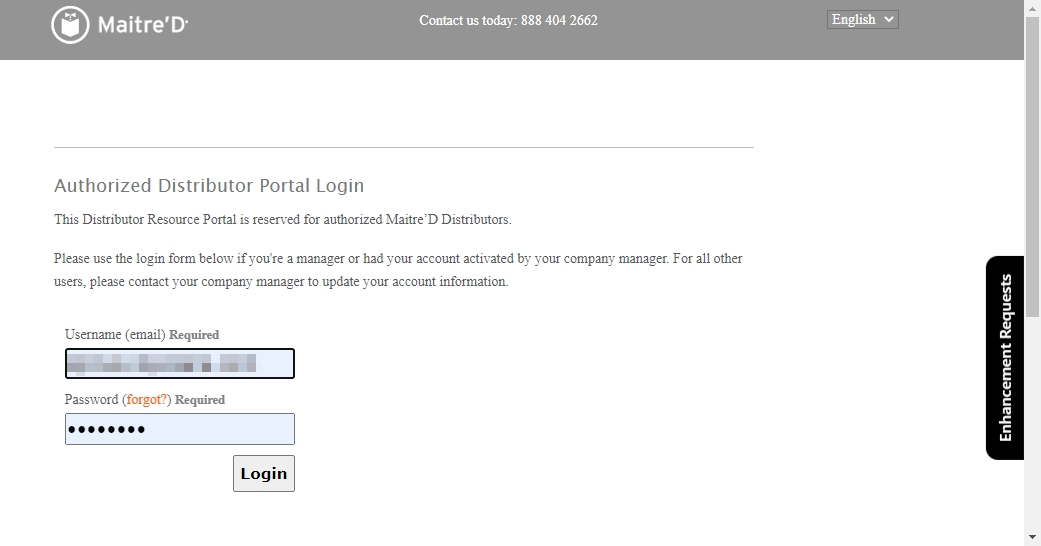
Enter your username and password, then click the Login button.
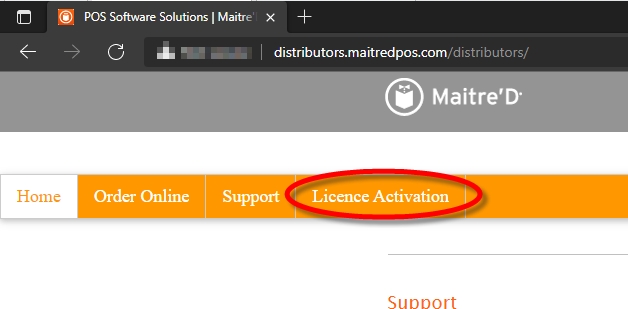
Click the License Activation link, near the top of the page.
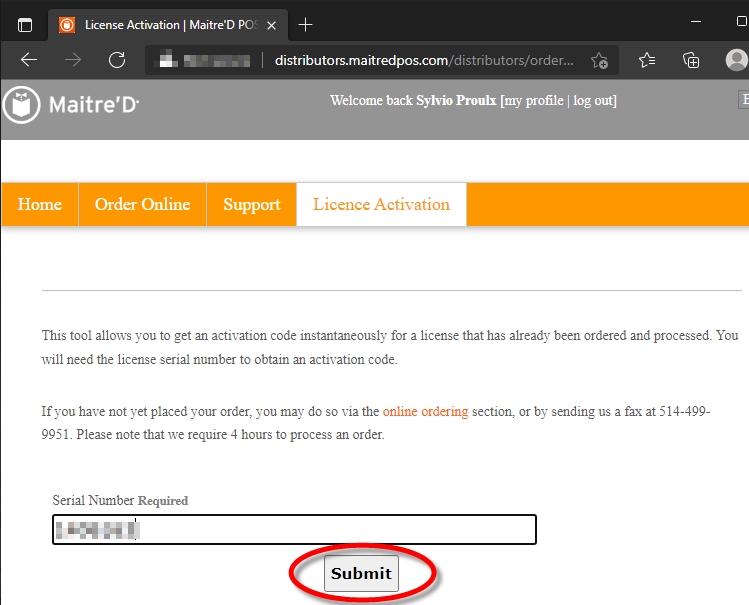
Type in the license serial number and click the Submit button.
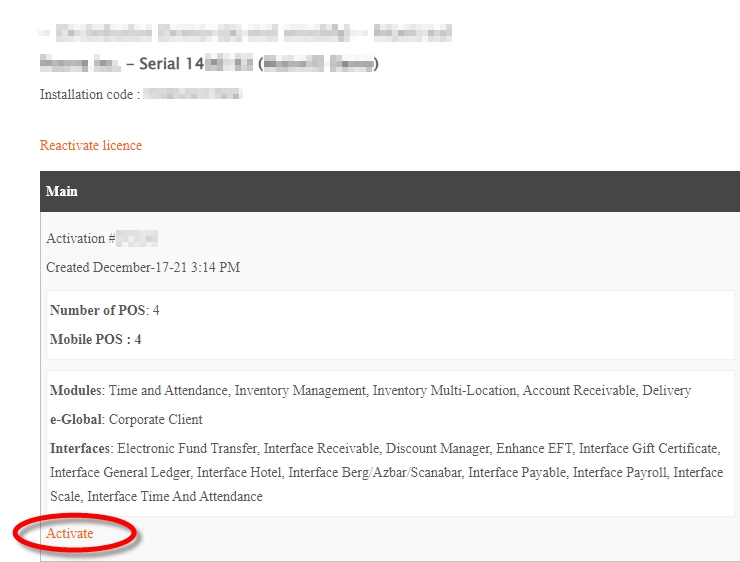
Locate the activation record for your license and click the Activate link.
NOTE: The activation record for the Main Back-Office is identified by the word "Main" in the record header. Also, all the modules and interfaces purchased with the license are listed.
If this is the very first activation of this license, you will be allowed to type in the Restaurant Name (commerce name). This name is case sensitive. Otherwise, the restaurant name will be filled in for you and cannot be modified.
Paste in the Site Code copied earlier.
Click the Generate button.
Your Activation Code (key code) will be generated. Select it and copy it to the clipboard.
Paste the key code (activation code) in the Key Code field and click Next >> to continue.
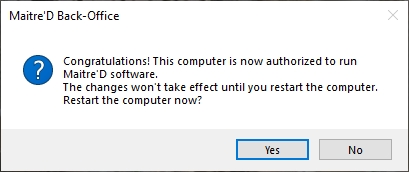
A confirmation prompt will appear, stating that the computer needs to be restarted.
Click Yes to restart your computer.
IMPORTANT! The computer MUST be restarted at this point. Otherwise, the license will not work properly.
After restarting, the Maitre’D Back-Office Server will attempt to start itself. You may see various progress bars as the Maitre'D database is updated.
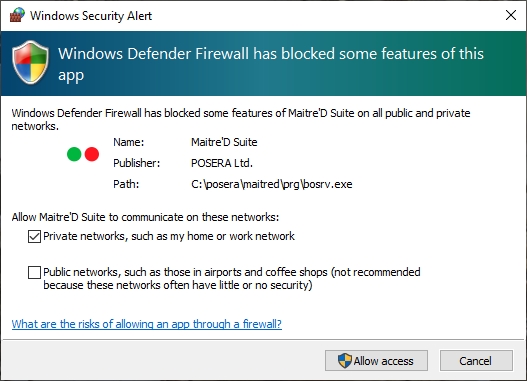
If the Maitre’D Back-Office Server is not already authorized, a Windows Security Alert will be triggered from the Windows Firewall:
a. If the Maitre’D Back-Office computer is on a domain, select the Domain networks, such as a workplace network option.
b. If the Maitre’D Back-Office computer is on a network without a domain, select the Private networks, such as my home or work network option.
c. Click the Allow Access button.
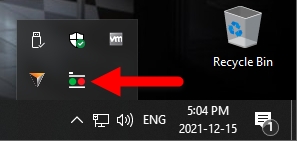
The Maitre'D Back-Office Server will start, and an icon will be added to the notification area.
The Maitre'D Back-Office Software is now licensed to run on this PC.
Before the license can be activated, you need:
When activating an Auxiliary Back-Office, the serial number to use is the same as the Main Back-Office. The Auxiliary back-Office is an option that can be purchased through the same channels as new licenses and license add-ons.
NOTE: Please note that there is a turnaround time of 4 hours for all orders and that new licenses are only created during normal business hours. The License serial number can be found on the invoice received after the creation of the license.
When activating an Auxiliary Back-Office, the Main Back-Office should already be up-and-running, therefore the commerce name is already established and can no longer be changed.
Obtain the commerce name from printed guest checks or receipts, or by looking up the license details on the Main Back-Office PC.
With the license serial number and commerce name in hand, you can proceed with the license activation.
After restarting from the installation of the Maitre’D Back-Office, Auxiliary or Backup Server software, the Maitre’D License Activation prompt will automatically appear.
Enter the required information:
a. Type in the license Serial Number as it appears on your Maitre’D invoice.
b. Type in the Commerce Name as it should appear in the Maitre’D Back-Office, on report headers and on the header of printed guest checks, invoices and receipts.
c. Click Next >> to continue the process.
The Site Code will be generated. Select it and copy it to the clipboard.
Logon to the Maitre'D Distributor Portal:
http://distributors.maitredpos.com/
Select your language.
Enter your username and password, then click the Login button.
Click the License Activation link, near the top of the page.
Type in the license serial number and click the Submit button.
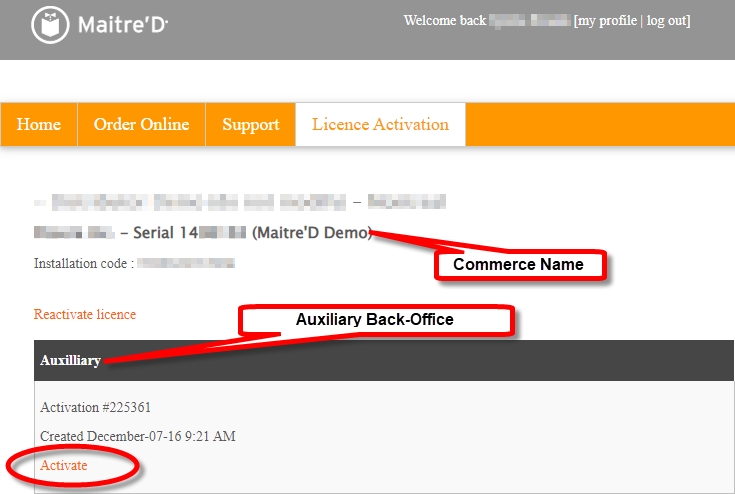
Locate the activation record for your license and click the Activate link.
NOTE: The activation record for the Auxiliary Back-Office is identified by the word "Auxiliary" in the record header. Because the Main Back-Office was already activated, the commerce name is displayed and cannot be modified.
If this is the very first activation of this license, you will be allowed to type in the Restaurant Name (commerce name). This name is case sensitive. Otherwise, the restaurant name will be filled in for you and cannot be modified.
Paste in the Site Code copied earlier.
Click the Generate button.
Your Activation Code (key code) will be generated. Select it and copy it to the clipboard.
Paste the key code (activation code) in the Key Code field and click Next >> to continue.
A confirmation prompt will appear, stating that the computer needs to be restarted.
Click Yes to restart your computer.
IMPORTANT! The computer MUST be restarted at this point. Otherwise, the license will not work properly.
After restarting, start the Maitre’D Auxiliary Back-Office by double-clicking the corresponding icon on the Windows Desktop.
The Maitre'D Auxiliary Back-Office Software is now licensed to run on this PC.
This option allows the creation and modification of Back-Office access levels.
There are 9 levels of access in Maitre’D. Level Zero is the highest and can access levels 1 to 8. Level 1 may access levels 2 to 8. A lower level access may not have more accesses than a higher level. E.g. Level 5 may only have access to those options available in 6 to 8.
This access is restricted to Maitre’D Certified technicians and installers. All other access levels are unable to see or grant this access. The properties of this access level cannot be modified, and except for certified technicians, no one should ever have this access, no matter the reason.
The System Owner access level is restricted to the restaurant management. Only top-level managers should have this access, as this allows them to create and delete other users, as well as take media reports with decrypted credit card PANs and expiration dates. This access cannot see or modify the distributor access.
These levels can be fully customized. Each access level can change the properties of the lower access levels, but not the higher access levels. These levels can be assigned to anyone with a business requirement to use the back-office software. These access levels are typically assigned for price maintenance tasks, report taking, batch closing, etc.
Password
Type in the quick-access password to use to open the Maitre’D Back-Office with this access level. This essentially allows the user to login by typing only a password, without a username.
NOTE: When the Use Username Login option is enabled under Server Control / View / Options / Advanced / Miscellaneous, the Password field is disabled and cannot be used. This is because this feature is incompatible with PCI-DSS compliance rules and needs to be completely disabled on systems where integrated credit cards are in use.
Enabling the Fast Access option allows you to create scripted tasks for Maitre’D Back-Office users with this access. Instead of gaining full access to all the features of the Maitre’D Back-Office, the user will be forced to perform specific tasks.
Fast Access
Enable this option to enable the Fast Access feature and gain access to the Advanced Access option and Settings button. If this option is enabled without any other option, users will be constricted to their scripted tasks, without any possibility of performing any other action in the Maitre’D Back-Office.
Advanced Access
With this option enabled, users will be able to access all the features of the Maitre’D Back-Office once the scripted tasks have been executed.
Shortcut Access
This option only affects access levels 2 to 8. Enable this option to allow users to use the blue shortcuts throughout the Maitre’D Back-Office.
Settings
Click the Settings button to configure the scripted tasks for this user access.
Select the Maitre’D Back-Office language to be used by this user access. Available choices are English, French or Spanish.
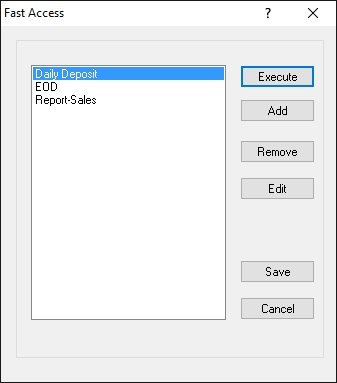
Fast Access Settings are accessed by clicking the Settings button on the Password Editor Screen. This dialog allows you to setup the tasks that users will be able to perform.
Select an existing task and click the Execute button to perform this task.
Click the Add button to create a new task and add it to the list.
Select an existing task and click the Remove button to delete it from the list.
Select an existing task and click the Edit button to change its properties.
Click the Save button to save settings and exit.
Click Cancel to exit without saving.
The access editor allows you to fully customize the Maitre’D Back-Office modules and menu options that users can or cannot access.
The access editor can be used in conjunction with the Fast Access feature to further restrict access to only the features that are necessary for specific employee job function.
NOTE: The Distributor Access Level cannot be restricted.
A green checkmark indicates that this user can access a module or menu.
A red [X] indicates that this user cannot access the indicated module or menu.
Use the [+] and [-] signs to expand or collapse branches and sub-branches.
Select a branch or a menu option and click the Toggle button to switch between the green checkmark and red [X]. Toggling the top level of a branch will cause all the sub-elements under that branch to be toggled in one operation.
Click the Apply button to save settings without exiting.
Click OK to save settings and exit.
Click Cancel to exit without saving.
Use this tool to create Maitre'D Back-Office user accounts with various access levels, tailored to the user's needs.
Click the New button to create a new user.
Click the Delete button to permanently delete an existing user.
This button is only available to PayFacto technicians to reset an account’s password history for troubleshooting purposes.
Click the UnLock button to unlock a locked account.
Click the Discard button to clear information that was entered during the process of creating a new user.
Click OK to commit changes and exit out of the User Editor tool.
Click Apply to commit changes without exiting from the User Editor Tool.
Click Cancel to exit out of the User Editor tool without saving changes.
User Name
Type a user name for this account. The user name should allow the person logging in to be identified.
Access Level
Choose an access level for this user:
Distributor
This access is restricted to Maitre’D Certified technicians and Resellers. All other access levels are unable to see or grant this access.
System Owner
The System Owner access level is restricted to the restaurant management. Only top-level managers should have this access, as this allows them to create and delete other users, as well perform any administrative task on the Maitre’D system.
Access Levels 2 through 8
These access levels can be fully customized. These access levels can be used for anyone requiring access to the Maitre’D back-office software.
Password
Type in a password for the new user. The password must be at least 7 characters, and comprised of a mix of letters and numbers.
Confirm Password
Confirm the password for this new user.
User must change password at next login
Enable this option to force the user to change the login password during the next login. This option should be used for every new account and afterwards if there is a doubt that an account password may have been compromised.
Maitre’D will automatically force users to change their passwords every 90 days. Also, Maitre’D keeps a history of each user’s passwords so that the last 4 passwords cannot be re-used. In case a password becomes compromised or if you have any doubts to that effect, you can force any user to change their password by checking the User must change password at next login box in their account’s properties. Of course, you need to be logged in with Distributor or System Owner access in order to do this.
After 5 unsuccessful login attempts, Maitre’D will automatically lock the user account. To unlock an account, someone with Distributor or System Owner access needs to login, access the user editor, select the locked account and click the Unlock button.
Locked accounts are marked with a padlock icon.
The Main Back-Office desktop is the starting point for all tasks that can be carried out at the Maitre'D Back-Office PC. It gives you access to all the Maitre'D modules as well as tools to manage your license options and Back-Office users.
NOTE: The screenshot above displays all available modules. Modules that are not included with your license will not be displayed, so your own Maitre'D Back-Office desktop may look slightly different.
Below is a short description of every module and option that can appear on the Maitre'D Main Back-Office Desktop. For more information on a specific module, please consult the documentation specific to that module.
The Point of Sale (POS) Control module is a core Maitre'D module that is included with every license. It allows restaurants to manage their day-to-day operations from one central location. This is where employee access to the POS workstations is managed and where sales items are created.
Delivery is an optional module that can be purchased separately. It allows restaurants to configure the delivery system, including creating, modifying and deleting customers and street code records.
Electronic Funds Transfer is an optional module that allows Maitre'D to interface with various payment solution providers to process credit and debit card payments.
Inventory Management is an optional module that allows restaurants to keep track of all the stock trough recipes linking ingredients to sales items.
Account Receivable is an optional module that allows restaurants to manage their customer's accounts. Customers can charge meals to their account and restaurants can send statements to their customers.
Time and Attendance is an optional module that allows restaurants to manage employee's schedules, tasks, pay rates, punch-in, punch-out and break times.
The Accounting Interface is an optional module that allows Maitre'D to interface with third-party accounting software such as Quickbooks and ACCPAC.
System Configuration is a core Maitre'D module that is included with every license. It is used to configure general restaurant data such as postal and shipping addresses, and also to configure localization data such as currency symbols, date and time formats, etc. This module is also used to manage backups of the Maitre'D settings and contains advanced configuration options to modify all the prompts contained in the Maitre'D system.
Server Control is a core Maitre'D module that is included with every license. As its name implies, this module contains all the options to manage the Maitre'D Back-Office Server, like starting and stopping the server, performing end-of-days, etc. This module also includes many optional interfaces such as the hotel Interface, gift certificate interface, discount manager, etc.
The Local Workstation icon appears when the Local Workstation option is enabled within the Server Control module. This option allows the main Back-Office PC to be used as a POS workstation.
Converter is an optional module that is included with E-Global and DataBoard solutions. It allows the conversion of data files from sales, management, payroll and inventory in industry-standard database format for consumption by E-Global Corporate Communication Module (CCM), DataBoard, or other third-party solution. It also manages incoming data from E-Global.
Floor Management is an optional module that allows restaurants to manage their floor plans, create sections and view the floor plan with a graphical representation.
The Exit and log on icon is used to quickly close all open Maitre'D Back-Office modules and display the login prompt.
After the initial logon and initial user creation is completed, other user accounts will need to be created. These accounts can be used for various tasks, ranging from basic reporting to all types of configuration changes. Due to the sensitive nature of the data that can be accessed through the Maitre’D Back-Office, its access needs to be protected adequately by usernames and passwords.
Furthermore, to ensure compliance with PCI-DSS, individual user accounts need to be created for each user requiring access to the Maitre’D Back-Office. Sharing accounts or disclosing passwords will automatically make your site non-compliant against PCI-DSS rules.
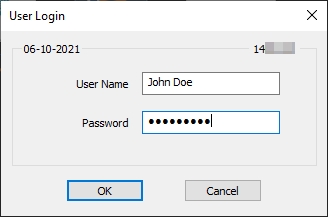
Logon to the Maitre’D Back-Office with appropriate credentials. (Distributor or System Owner)
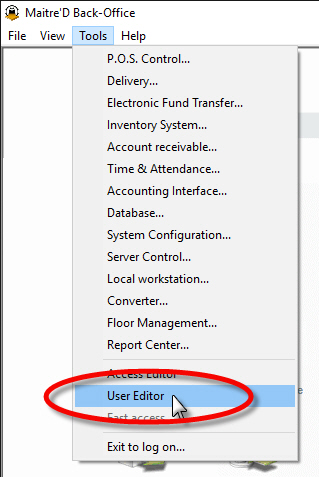
From the main back-office screen, click on the Tools menu, and select the User Editor option.
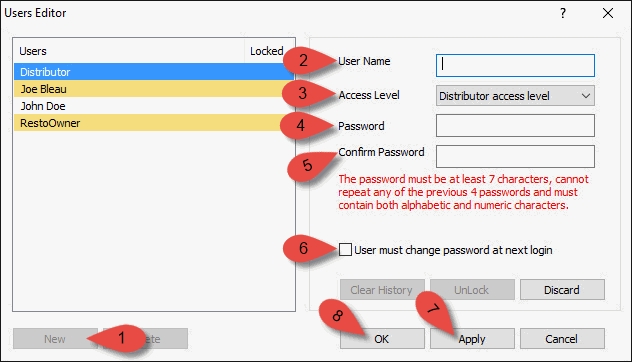
The User Editor window will be displayed. All existing users with access levels equal or lower than yours will be listed here, if any.
Click the New button to create a new user.
Click the Delete button to permanently delete an existing user
This button is only available to PayFacto technicians to reset an account’s password history for troubleshooting purposes.
Click the UnLock button to unlock a locked account.
Click the Discard button to clear information that was entered during the process of creating a new user.
Click OK to commit changes and exit out of the User Editor tool.
Click Apply to commit changes without exiting from the User Editor Tool.
Click Cancel to exit out of the User Editor tool without saving changes.
Type a user name for this account. The user name should allow the person logging in to be identified.
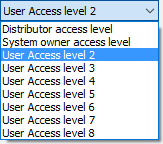
Choose an access level for this user:
Distributor
This access is restricted to Maitre’D Certified technicians and Resellers. All other access levels are unable to see or grant this access.
System Owner
The System Owner access level is restricted to the restaurant management. Only top-level managers should have this access, as this allows them to create and delete other users, as well perform any administrative task on the Maitre’D system.
Access Levels 2 through 8
These access levels can be fully customized. These access levels can be used for anyone requiring access to the Maitre’D back-office software.
Type in a password for the new user. The password must be at least 7 characters, and comprised of a mix of letters and numbers.
Confirm the password for this new user.
Enable this option to force the user to change the login password during the next login. This option should be used for every new account and afterwards if there is a doubt that an account password may have been compromised.
Click the Apply button to create the user without exiting the User Editor. This will allow you to create more users.
Click OK to save your changes and exit.
Maitre’D will automatically force users to change their passwords every 90 days. Also, Maitre’D keeps a history of each user’s passwords so that the last 4 passwords cannot be re-used. In case a password becomes compromised or if you have any doubts to that effect, you can force any user to change their password by checking the User must change password at next login box in their account’s properties. Of course, you need to be logged in with Distributor or System Owner access in order to do this.
After 5 unsuccessful login attempts, Maitre’D will automatically lock the user account. To unlock an account, someone with Distributor or System Owner access needs to login, access the user editor, select the locked account and click the Unlock button.
Locked accounts are marked with a padlock icon:
Never share your password with anyone, for any reason, under any circumstances.
Use complex passwords. Maitre’D already forces you to use a minimum of 7 characters with a mix of letters and numbers, however:
Try using 8 or more characters. Long passwords are harder to guess.
Avoid using combinations like 123abcd, or 123456a, or abcdef1, etc. These combinations are easy to guess and can get your system compromised.
Avoid using combinations of adjacent letters and numbers on the keyboard, such as “qwertyu8”.
Avoid using common words with letters replaced by numbers or symbols, such as “P@ssw0rd” or M1cro$0ft. Unfortunately, hackers know these tricks, too.
Try using 8 or more characters mixed in with capital letters, numbers and special characters. A very effective technique is to choose a phrase which only you would know, then take the first few letters of each word to start building your password. Then, throw in a few numbers and add a special character or two.
Do not use any word from any dictionary in any language. Hackers can use sophisticated dictionary attacks; therefore, any dictionary words are not safe to use as passwords.
Never use any kind of personal information as your password, such as your spouse’s name, children’s names, birth dates, anniversaries, etc.
Make sure that only key personnel have Distributor or System Owner access. Give lower access to everyone else.
If you have even the smallest doubt that someone may know your password, have it changed immediately.
When an employee quits or is terminated, immediately delete this person’s account from Maitre’D. If you need to keep the account for audit purposes, then immediately change the password.
Strictly enforce passwords management policies with all employees using any part of your computer system.
The License option allows to view the options that are currently available on the active Maitre'D license. Additional modules, interfaces and components can be purchased through your Maitre'D Reseller or Sales Representative. Once purchased, they can be activated here.
Serial Number
Each Maitre'D installation has a unique serial number. You will need to provide this number when purchasing additional Maitre'D components or when calling the Help Desk.
Commerce Name
This is the commerce name that was assigned when the license was originally activated. It appears in the header of guest checks and receipts, as well as on the header of reports generated from the Report Center module.
Use the modify button to generate a site code and display the prompt that will allow you to enter an activation key for newly purchased Maitre'D components.
NOTE: The activation key can only be generated by authorized Maitre'D Resellers using the Maitre'D Distributor Portal, or by Maitre'D Help Desk Specialists.
Use the Print button to print the license information on the default printer.
Use the Close button to close this screen and return to the Maitre'D Back-Office.
This option is driven by the operating system. This option allows to select the printer and parameters you wish to use to print your reports.
This option allows to view the last report requested and to reprint it if necessary
The Log option allows to start and view operations traces about Maitre'D Main Module.
Log Level
Three different Log level are available: Standard, Detail and Debug.
This option is for troubleshooting purposes and should only be used with the supervision of a certified Maitre'D specialist.
Use the View button to access to log file.
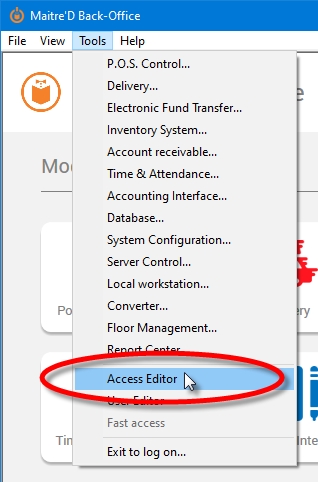
The Access Editor is located under the Tools pull down menu in the main Back-Office screen.
This option allows the creation and modification of Back-Office access levels.
There are 9 levels of access in Maitre’D. Level Zero is the highest and can access levels 1 to 8. Level 1 may access levels 2 to 8. A lower level access may not have more accesses than a higher level. E.g. Level 5 may only have access to those options available in 6 to 8.
This access is restricted to Maitre’D Certified technicians and installers. All other access levels are unable to see or grant this access. The properties of this access level cannot be modified, and except for certified technicians, no one should ever have this access, no matter the reason.
The System Owner access level is restricted to the restaurant management. Only top-level managers should have this access, as this allows them to create and delete other users, as well as take media reports with decrypted credit card PANs and expiration dates. This access cannot see or modify the distributor access.
These levels can be fully customized. Each access level can change the properties of the lower access levels, but not the higher access levels. These levels can be assigned to anyone with a business requirement to use the back-office software. These access levels are typically assigned for price maintenance tasks, report taking, batch closing, etc.
The default language used throughout the Maitre’D Back-Office and POS workstations is determined by the language configured for the System Owner access level. All access levels can be assigned different languages, but it’s the System Owner language that will decide which one is the default.
Upon opening the Access Editor tool, you will be prompted for an access level. Select the access level which you want to edit. Note that the Distributor access level cannot be edited.
Type in the quick-access password to use to open the Maitre’D Back-Office with this access level. This essentially allows the user to login by typing only a password, without a username.
NOTE: When the Use Username Login option is enabled under Server Control / View / Options / Advanced / Miscellaneous, the Password field is disabled and cannot be used. This is because this feature is incompatible with PCI-DSS compliance rules and needs to be completely disabled on systems where integrated credit cards are in use.
Enabling the Fast Access option allows you to create scripted tasks for Maitre’D Back-Office users with this access. Instead of gaining full access to all the features of the Maitre’D Back-Office, the user will be forced to perform specific tasks.
Enable this option to enable the Fast Access feature and gain access to the Advanced Access option and Settings button. If this option is enabled without any other option, users will be constricted to their scripted tasks, without any possibility of performing any other action in the Maitre’D Back-Office.
With this option enabled, users will be able to access all the features of the Maitre’D Back-Office once the scripted tasks have been executed.
This option only affects access levels 2 to 8. Enable this option to allow users to use the blue shortcuts throughout the Maitre’D Back-Office.
Click the Settings button to configure the scripted tasks for this user access.
Select the Maitre’D Back-Office language to be used by this user access. Available choices are English, French or Spanish.
NOTE: The language selected for the System Owner access level will determine the default language for the whole system, including POS workstations.
Fast Access Settings are accessed by clicking the Settings button on the Password Editor Screen. This dialog allows you to setup the tasks that users will be able to perform.
Select an existing task and click the Execute button to perform this task.
Click the Add button to create a new task and add it to the list.
Select an existing task and click the Remove button to delete it from the list.
Select an existing task and click the Edit button to change its properties.
Click the Save button to save settings and exit.
Click Cancel to exit without saving.
The access editor allows you to fully customize the Maitre’D Back-Office modules and menu options that users can or cannot access.
The access editor can be used in conjunction with the Fast Access feature to further restrict access to only the features that are necessary for specific employee job function.
NOTE: The Distributor Access Level cannot be restricted.
A green checkmark indicates that this user can access a module or menu.
A red “X” indicates that this user cannot access the indicated module or menu.
Use the “+” and “-“ signs to expand or collapse branches and sub-branches.
Select a branch or a menu option and click the Toggle button to switch between the green checkmark and red “X”. Toggling the top level of a branch will cause all the sub-elements under that branch to be toggled in one operation.
Click the Apply button to save settings without exiting.
Click OK to save settings and exit.
Click Cancel to exit without saving.
The Main Back-Office desktop is the starting point for all tasks that can be carried out at the Maitre'D Back-Office PC. It gives you access to all the Maitre'D modules as well as tools to manage you license options and Back-Office users.
NOTE: The screenshot above displays all available modules. Modules that are not included with your license will not be displayed, so your own Maitre'D Back-Office desktop may look slightly different.
Below is a short description of every module and option that can appear on the Maitre'D Main Back-Office Desktop. For more information on a specific module, please consult the documentation specific to that module.
The Point of Sale (POS) Control module is a core Maitre'D module that is included with every license. It allows restaurants to manage their day-to-day operations from one central location. This is where employee access to the POS workstations is managed and where sales items are created.
Delivery is an optional module that can be purchased separately. It allows restaurants to configure the delivery system, including creating, modifying and deleting customers and street code records.
Electronic Funds Transfer is an optional module that allows Maitre'D to interface with various payment solution providers to process credit and debit card payments.
Inventory Management is an optional module that allows restaurants to keep track of all the stock trough recipes linking ingredients to sales items.
Account Receivable is an optional module that allows restaurants to manage their customer's accounts. Customers can charge meals to their account and restaurants can send statements to their customers.
Time and Attendance is an optional module that allows restaurants to manage employee's schedules, tasks, pay rates, punch-in, punch-out and break times.
The Accounting Interface is an optional module that allows Maitre'D to interface with third-party accounting software such as Quickbooks and ACCPAC.
The report Center is a core Maitre'D module that is included with every license. It allows restaurants to generate reports for all aspects of their business.
Database is a core Maitre'D module that is included with every license. It is mainly used by trained Maitre'D specialists to troubleshoot issues or repair corrupt data.
System Configuration is a core Maitre'D module that is included with every license. It is used to configure general restaurant data such as postal and shipping addresses, and also to configure localization data such as currency symbols, date and time formats, etc. This module is also used to manage backups of the Maitre'D settings and contains advanced configuration options to modify all the prompts contained in the Maitre'D system.
Server Control is a core Maitre'D module that is included with every license. As its name implies, this module contains all the options to manage the Maitre'D Back-Office Server, like starting and stopping the server, performing end-of-days, etc. This module also includes many optional interfaces such as the hotel Interface, gift certificate interface, discount manager, etc.
The Local Workstation icon appears when the Local Workstation option is enabled within the Server Control module. This option allows the main Back-Office PC to be used as a POS workstation.
Converter is an optional module that is included with E-Global and DataBoard solutions. It allows the conversion of data files from sales, management, payroll and inventory in industry-standard database format for consumption by E-Global Corporate Communication Module (CCM), DataBoard, or other third-party solution. It also manages incoming data from E-Global.
Floor Management is an optional module that allows restaurants to manage their floor plans, create sections and view the floor plan with a graphical representation.
The Exit and log on icon is used to quickly close all open Maitre'D Back-Office modules and display the login prompt.
The report Center is a core Maitre'D module that is included with every license. It allows restaurants to generate reports for all aspects of their business.
.
Compare your password against "Most Common Password Lists", such as NordPass' annual list: . If your password (or a close variant) appears on this kind of lists, change it immediately.
Maitre'D Back-Office License Activation
Maitre'D Auxiliary Back- Office License Activation
Check Current License Options
Add-on Option to Existing Lisense

