Loading...
Loading...
Loading...
Loading...
Loading...
Loading...
Loading...
Loading...
If the Single Pre-Auth option is enabled in EFT / View / Options / Identification, you will be forced to close a bar tab that reaches its pre-authorized amount. This articles describes what this process looks like.
Start the bar tab as described in Starting Bar Tab.
Order items normally.
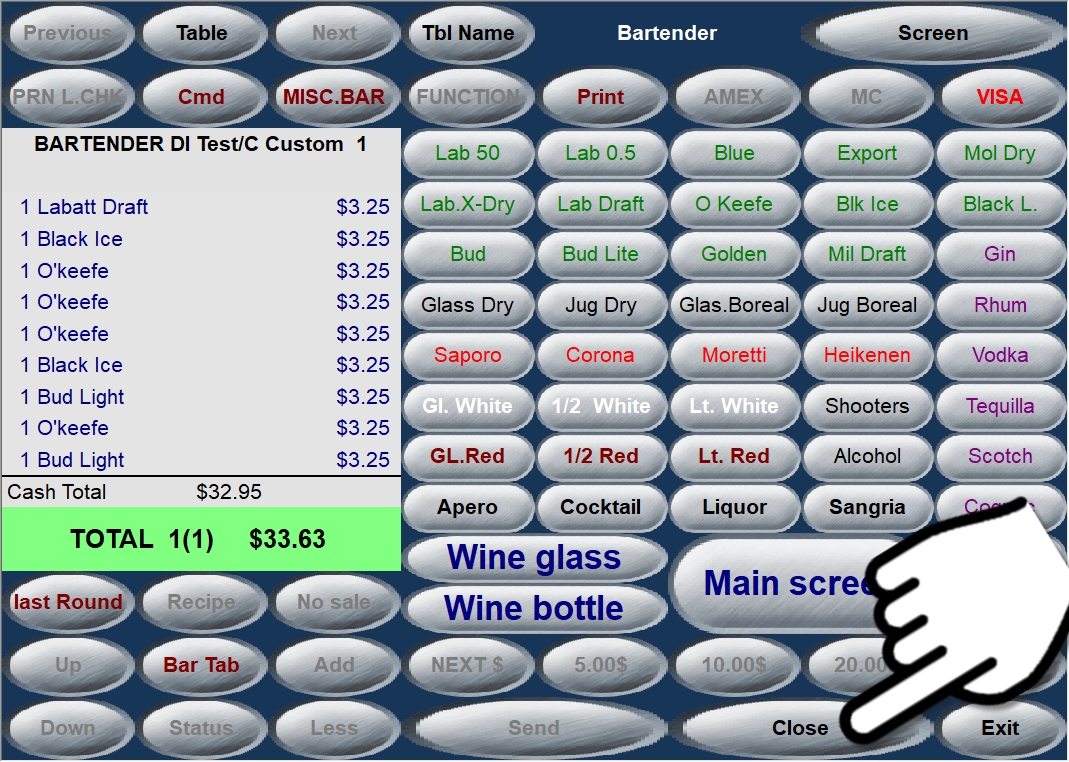
The bar tab below is very close to its original pre-auth amount, which was set at $25.00.
Ordering an extra item brings the total above the $25.00 pre-auth. The message "Please close the check" is displayed.
As you press OK on the message, the item that brought the total above the limit is automatically voided.
Close the bar tab as described in Closing a Bar Tab.
At this point, if the customer wishes to stay and continue ordering items, a brand new bar tab will need to be started.
Related Topics
Closing a Bar Tab involves printing the check and applying the payment.
Recall the bar tab using your preferred method.
Press the Close key.
Press PRINT CHECK. The check will be printed at the receipt printer, and the POS will initiate the closing process with the payment terminal.
PRINT CHECK Screen
Processing External Payment
Printed Check
The payment terminal will make sounds and process the request. This process is completely automated, and the customer's credit card is not required.
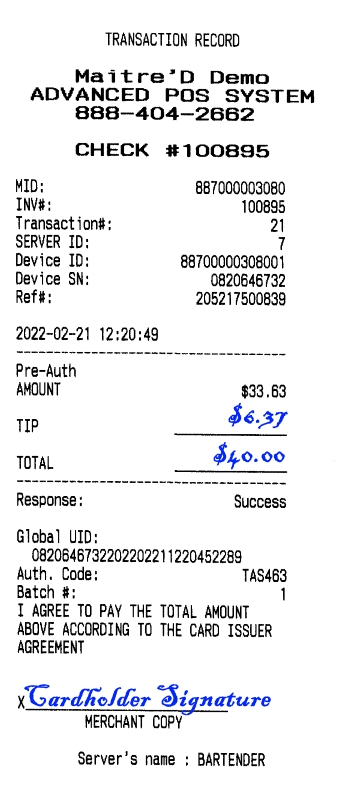
A merchant copy and customer copy of the transaction records will be printed at the Point of Sale's receipt printer.
Merchant Copy
Customer Copy
Bring the check and both copies of the transaction record to the customer. Be sure to provide a pen.
The customer will write a tip amount and the new total on the merchant copy. The customer will also sign the merchant copy.
Pickup the signed merchant copy from the customer. The customer keeps the check and the customer copy for personal records.
Proceed with Finalizing a Pre-Authorization.
IMPORTANT! Do not skip the finalization process. Otherwise, the transaction will not be funded. The merchant will lose the value of the sale and the employee will lose on the tips.
Related Topics
The Finalization is the process by which the actual purchase amount is funded from the credit card. At the same time, any tips that the customer wishes to give to the employee are added to the final amount.
IMPORTANT! Do not skip the finalization process. Otherwise, the transaction will not be funded. The merchant will lose the value of the sale and the employee will lose on the tips.
Exit from the order screen or the table number screen until you reach the SERVER NUMBER prompt. Enter your server number and press the READING key.
Un-finalized bar tabs will show up as blue boxes on the screen. The letter "A" in the upper-left corner of the blue box means that this is an Authorized transaction. The 3 or 4 digits immediately following the "A" correspond to the last 3 or 4 digits of the check. Press the blue box that corresponds to the bar tab you wish to finalize.
Verify the check number and transaction information. Here, you can validate the full check number, the table number, check amount, the brand and the last 4 digits of the credit card number used to settle the bar tab. Once you have confirmed that this is the correct transaction to be finalized, press the Finalization key at the bottom of the screen.
A keypad will appear. This is where you can enter the finalization amount.
Type the TOTAL AMOUNT, (check total + tips) as written down by the customer on the TOTAL line of the merchant copy of the transaction record.
Signed merchant copy
Finalization screen at the Point of Sale
A confirmation screen will appear. Confirm that the amount is correct and press OK.
The payment terminal will automatically process the request. This process is completely automated, and the customer's credit card is not required.
A final transaction record with the final amount and tip adjustment will be printed.
IMPORTANT! It is not strictly necessary to have the customer sign this last copy of the transaction record. However, it is strongly recommended to do so if the customer made mistakes while filling the tip and total lines on the original copy. This could protect the merchant against chargebacks.
Related Topics
Logon to the Point of Sale with an employee configured to use Bar Tabs:
Enter your Server Number.
Open a table by typing a table number, or access "Table 0" mode by pressing the BAR key without entering an table number.
Start the Bar Tab pre-authorization process:
Press the Bar Tab key.
Type the pre-athorization amount using the keypad, or press ENTER to use the default amount.
The Point of Sale will activate the payment terminal.
Process the Pre-Authorization at the payment terminal:
The payment terminal is at the home screen.
The payment terminal activates when the ENTER key is pressed at the Point of Sale.
Insert / Tap / Swipe the customer's credit card.
Remove the card when prompted.
The Pre-Authorization will be approved and the terminal returns to the home screen
Once the Pre-Authorization is approved, the Point of Sale will ask whether a customer copy of the transaction record should be printed:
Press Yes to print a copy for the customer in addition to the merchant copy. If you press No, only the merchant copy will print.
At this point, be sure to hand the credit card back to the customer, and have the customer sign the merchant copy of the transaction record. Place the signed transaction record in a safe location. In the event that the customer forgets to notify the staff before leaving, this document allows the merchant to charge the customer's credit card up to the pre-authorized amount, to cover for items purchased by the customer.
Order items at the Point of Sale like you normally would. On the order screen and also on the customers list as the bar tab is recalled, you will notice that the Cardholder's name was automatically assigned as the Bar Tab name.
Order Screen
Customer List
NOTE: "DI Test/Card 01" is the actual cardholder name associated with the test credit card that was used for this demonstration.
Related Topics
To increment a Bar Tab is the process of increasing the Pre-Authorization amount to cover more items purchased by the customer.
IMPORTANT! Incrementing a bar tab is only possible if the Single pre-auth option is DISABLED in EFT / View / Options / Identification. See Electronic Funds Transfer Setup
Order items as you normally would, until the pre-authorized amount is reached.
As the pre-authorized amount is reached, the POS will automatically request the amount to be increased. By default, the POS will suggest the next increment of the amount configured in the Default Amount field, under EFT / View / Options / Identification.
The Default Amount is $25.00, so the POS suggests $50.00 for the next increment.
If needed, the employee may enter a different amount using the provided keypad.
After pressing ENTER on the keypad, the POS will process the external payment using the connected payment terminal.
The payment terminal will activate and start making sounds. This process is entirely automated. The customer's credit card is not required.
If the increment is approved, you may resume ordering items as usual.
IMPORTANT! Items should always be ordered at the POS before being served or poured. That way, if the increment is declined, you will be able to quickly cancel the last ordered item(s), which will bring the total below the original pre-authorized amount. Then, you should close the bar tab and inform the customer that the increment was declined.
Related Topics
If the employee makes a mistake or if the customer changes his/her mind, it is possible to quickly void the pre-authorization associated with a bar tab, as long as there are no items ordered (sent) on the bar tab.
NOTE: If items were already sent to requisition printers, you will not be able to use this method. Please see Voiding a Bar Tab with Sent Items.
Start the bar tab as described in Starting Bar Tab.
Order items, but do not press the send key.
The customer changes mind at this point. For instance, the customer decides to pay cash instead of using credit.
Remove the items from the bar tab using the Less key. You may also use the Clear key.
Use "Less" or "Clear".
Using "Clear" will ask for confirmation.
Once all the items are cleared, press the EXIT key.
The message "PLEASE WAIT - PROCESSING EFT" will appear on the POS screen.
The payment terminal will make sounds and process the request. This process is completely automated, and the customer's credit card is not required.
Transaction records will be printed. Both the merchant copy and the customer copy are printed.
Hand the customer copy to the customer and keep the merchant copy. No signature is required.
The POS will return to the TABLE NUMBER > prompt.
The void process is now completed.
IMPORTANT! It is not possible to use this method if items were "sent". You will not be allowed to void these items and therefore you will not be able to void the bar tab. In this case, please see Voiding a Bar Tab with Sent Items.
Related Topics
If the customer wishes to change payment method, it is possible to void the pre-authorization on a bar tab and use a different payment method to settle the check.
NOTE: If items are not yet sent to the kitchen, you may use the following method:
Start the bar tab as described in .
Order items and press the send key. At this point, items are sent to requisition printers and deducted from inventory.
The customer changes mind at this point. For instance, the customer decides to pay cash instead of using credit.
Access the TABLE VERIFICATION screen through READING or CLOSE keys.
From the Server login screen, enter you server number and use the READING key, or;
Once logged in with your server number, press the CLOSE key.
At the TABLE VERIFICATION screen, press the blue box that corresponds to the bar tab for which you need to void the pre-authorization..
The message "Void current status ?" will appear on the POS screen. Press OK.
The payment terminal will make sounds and process the request. This process is completely automated, and the customer's credit card is not required.
Transaction records will be printed. Both the merchant copy and the customer copy are printed.
Customer copy
Merchant Copy
Hand the customer copy to the customer and keep the merchant copy. No signature is required.
The POS will automatically return to the SERVER NUMBER > prompt.
Type in your employee number and press the READING key.
The TABLE VERIFICATION screen appears. Press the GREEN box if you wish to access the bar tab to add or void items. Press the RED box if you wish to print the check and close the bar tab immediately.
When the bar tab is closed, you will have access to all the usual modes of payment, including cash and credit cards.
The void process is now completed.
Related Topics
.


