Loading...
Loading...
Loading...
Loading...
Loading...
Loading...
Loading...
Loading...
Loading...
Loading...
Loading...
The Revenue Center branch of the workstation options allows you to select which Revenue Center(s) will be available from the selected workstation.
Employees will only be able to access the listed revenue centers when using this workstation. Revenue centers that are not listed here are not accessible from this workstation.
The revenue center that bears a green checkmark is the default revenue center for this workstation.
Select a revenue center from the list and click the Modify button to set or un-set the Default status. To change the Default attribute, you need to select the current default revenue center and un-set the default attribute first. Then you will be able to assign the default attribute to another revenue center.
Click the Add button to add revenue centers to the list. If all the available revenue centers are already listed, this button will become grayed-out.
Select a revenue center from the list and click the Remove button to delete it from the list.
Related Topics
Workstation Configuration
Workstation
Revenue Center
Mode
Invoice
Messages
Ports
Printers
Devices
Advanced (Advanced POS UI)
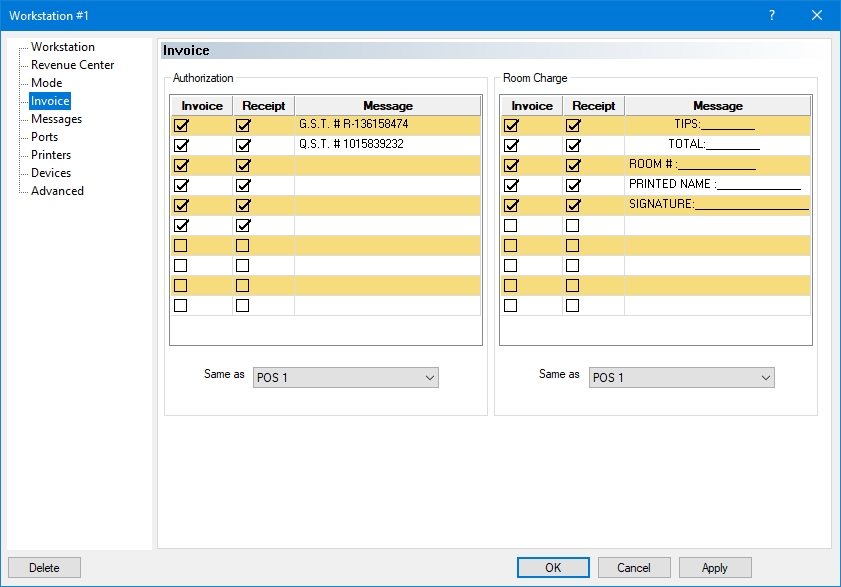
The Invoice branch of the workstation options allows you to configure custom messages to be printed on regular guest checks as well as Room Charge guest checks.
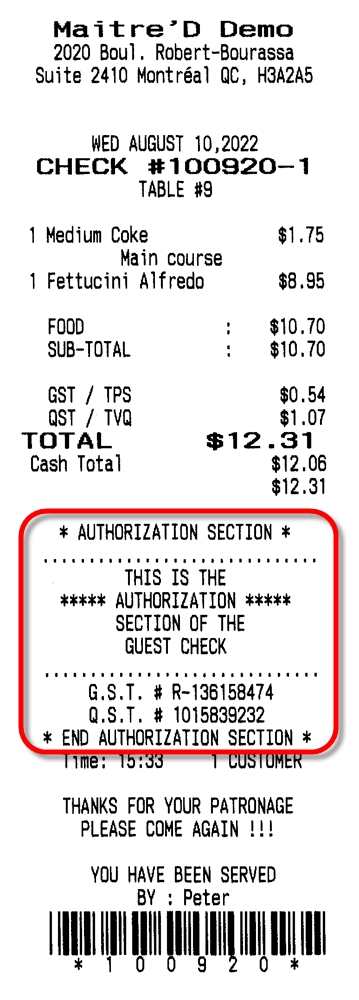
The Authorization section of the guest check is located below the check total and above the check time. It will automatically print on all guest checks and receipts. If the Room Charge section is also present, the Authorization section will print below the room charge section.
Place a checkmark next to each line you want to have printed on the guest check. Up to 10 lines can be enabled. You can enable blank lines to create white space on the guest check.
Place a checkmark next to each line you want to have printed on the receipt. Up to 10 lines can be enabled. Selected lines which are left blank create white space on the receipt.
Type the message you want to print on each line. Up to 29 characters can be printed on each line. The text will always be centered on the guest check or receipt, so you need to type spaces to fill up all 29 character positions if you want the text to be aligned to the left or right.
To avoid re-typing the same information for each workstation, select the POS workstation to use as a model from the drop-down list. This workstation will then use the same settings as the selected workstation.
The Room Charge section of the guest check is located above the Authorization section and above the check time. It will print automatically on systems where Room Charge is is use.
Place a checkmark next to each line you want to have printed on the guest check. Up to 10 lines can be enabled. You can enable blank lines to create white space on the guest check.
Place a checkmark next to each line you want to have printed on the receipt. Up to 10 lines can be enabled. Selected lines which are left blank create white space on the receipt.
Type the message you want to print on each line. Up to 29 characters can be printed on each line. The text will always be centered on the guest check or receipt.
To avoid re-typing the same information for each workstation, select the POS workstation to use as a model from the drop-down list. This workstation will then use the same settings as the selected workstation.
Guest Check with Authorization
Receipt with Authorization
Guest Check with Room Charge and Authorization
Receipt with Room Charge and Authorization
Related Topics
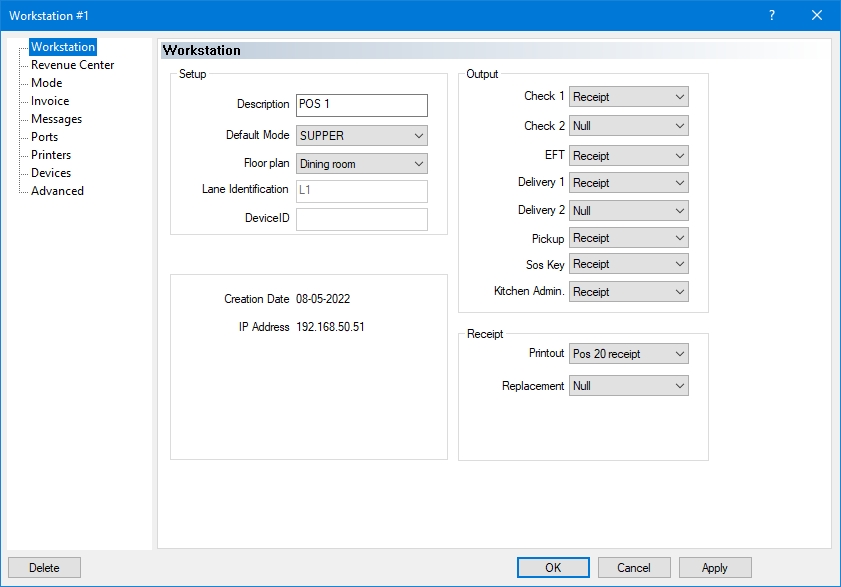
The Workstation branch of the workstation options contains basic configuration information along with print output configuration for the selected workstation.
Type a meaningful description for the selected POS workstation (up to 20 characters). Ideally, the description should hint at the workstation's location and typical usage. For example, Take-Out Counter, Bar, Cashier Lane 1, Cashier Lane 2, Hostess Station, Drive-Thru Order, Drive-Thru Pickup, etc.
Select the default mode for this workstation. Select Closed to prevent this workstation from being used at all.
Select the floor plan to use on this workstation.
This field only becomes available if a non-EMV, fully integrated EFT protocol is selected in the Electronic Funds Transfer module. The term "Lane" refers to the queue area at a cashier workstation and identifies the payment device for the purpose of Electronic Funds Transfer.
Type the Payment Device ID for non-EMV, fully integrated EFT protocols.
NOTE: Non-EMV, fully integrated protocols include Datacap DSIClientX and the non-EMV version of the Tender-Retail protocol. These protocols are considered obsolete.
The date listed here indicates when the workstation's data was created for the last time.
The IP address listed here is the current IP address of the workstation, or the IP address that was used the last time the workstation was connected.
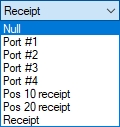
In this section, each setting has a drop-down list with a few built-in options. Here are the definitions of each option:
Select this option if you do not wish to print this output at all.
Select one of the Port numbers to send the output to a serial printer connected to the corresponding COM port number. By default, Port #1 is mapped to COM 1, Port #2 to COM 2 and so on. Port mappings can be changed in the Ports branch of the workstation's options.
Selecting the Receipt option will redirect the output to the printer defined in the Receipt section, at the bottom of the screen.
Shared printers will also be listed here. It is possible to redirect any output to any shared printer configured in Point of Sale Control > Workstation > Shared Printer...
Select the printer location used to print the first copy of the guest check. This field is usually set to Receipt.
Select the printer location used to print a second copy of the guest check if necessary. This field is usually set to Null or Receipt.
Select the printer to which the Electronic Funds Transfer (EFT) credit card voucher or transaction record is printed. This field is usually set to Receipt.
NOTE: This field only becomes available if the Electronic Funds Transfer module is in use.
Select the printer location for the main delivery check and the secondary delivery check. The main delivery check usually goes to the customer and will have the restaurant name and address and the customer name and address print at the top. The secondary delivery check will only have the customer name and address only printed at the top of the check and usually goes to the delivery driver. These fields are usually set to Receipt or Null.
NOTE: This field only becomes available if the Delivery module is in use.
Select the printer which will be printing delivery pickup checks.
You can select on which printer will be printed the SOS message. The whole message is a coupon with a big SOS plus the workstation number from which the message was issued. If you select a printer, a SOS button will appear on the workstation server screen. This field is usually set to Null or Receipt.
Enable the printer where the kitchen chit will print to notify the food runners of a table number change. In an environment where the Hostess can order, there is a Table Transfer function on her screen to easily manage table transfer when the customers decide to change table just after she assigns them to a table. This field is usually set to Null or the main kitchen printer.
Select the local port # or shared printer where the receipt will print for this workstation. If it is a local parallel printer, set this field to Receipt.
Select the local port # or shared printer where the receipt should print for this workstation if the default Printout printer fails to respond.
Related Topics
The Mode branch of the workstation options allows you to configure the mode schedule for each day of the week for the selected workstation.
Maitre'D supports up to 32 modes which can be controlled by this scedule.
Clicking on a cell allows the time to be modified.
This scedule accepts decimal numbers and uses military time. For example, to set a mode to start at 7:00 AM, type 7.00. For 2:30 PM, type 14.30.
Pressing "ENTER" on your keyboard will automatically select the next cell to the right. Once the last column (Sunday) is reached, pressing enter will select the first cell of the next line.
If a mode should be skipped altogether for certain days, select the appropriate cell in the schedule and press the BACKSPACE key on your keyboard. The cell will become blank.
The last row is called "Closed". This is the time at which the workstation closes and can no longer be used, until the time of the first mode is reached.
If the restaurant operates 24 hours and the workstations should never close, simply delete the time in each cell of the Closed row by pressing the BACKSPACE key on your keyboard.
Related Topics
This series of articles describes the configuration of typical Maitre'D POS workstations.
Before proceeding, it is strongly suggested to complete the following configuration tasks:
Setup Revenue Centers and Modes.
Setup Printer Types.
Setup Logical Printers.
Setup Physical Printers.
Setup Shared Printers.
Setup Redirection Tables.
Logon to the Maitre’D Back-Office with appropriate credentials. (Distributor or System Owner)
Start the Point of Sale Control module.
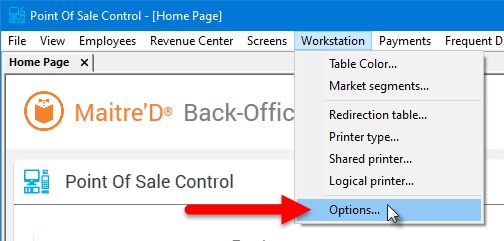
Click on the Workstation menu and select the Options... option.
The list of available workstations will be displayed. Select the workstation for which you wish to change settings and click the Modify button.
The workstation's properties open on the Workstation branch.
Refer to the following articles for details for each branch.
Related Topics
The Ports branch of the workstation options allows you to remap Maitre'D ports to custom Windows COM ports.
For each Maitre'D port, select the Windows COM port number to use.
This is especially useful in situations where Windows assigns the lower COM port numbers to internal system hardware, and the actual available COM ports are COM 5 through COM 8, for example.
Also, some USB-to-Serial adapter drivers will set the emulated COM port number to COM 9 or higher. This is another situation where port remapping would be required.
Related Topics
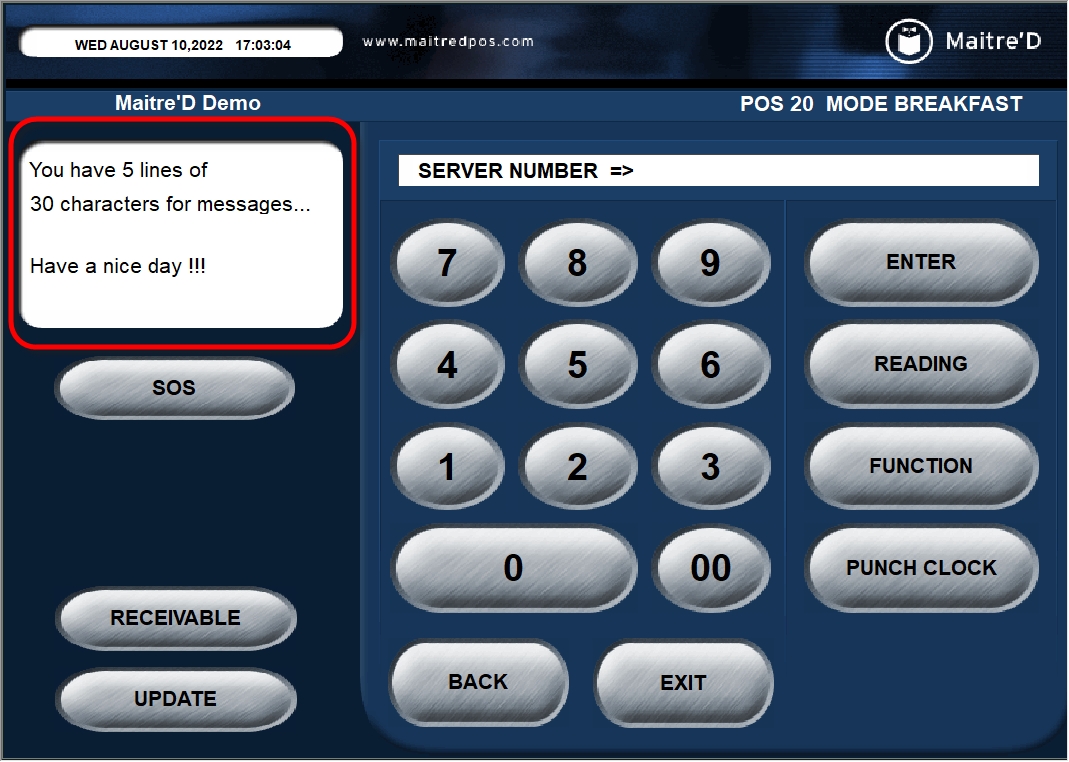
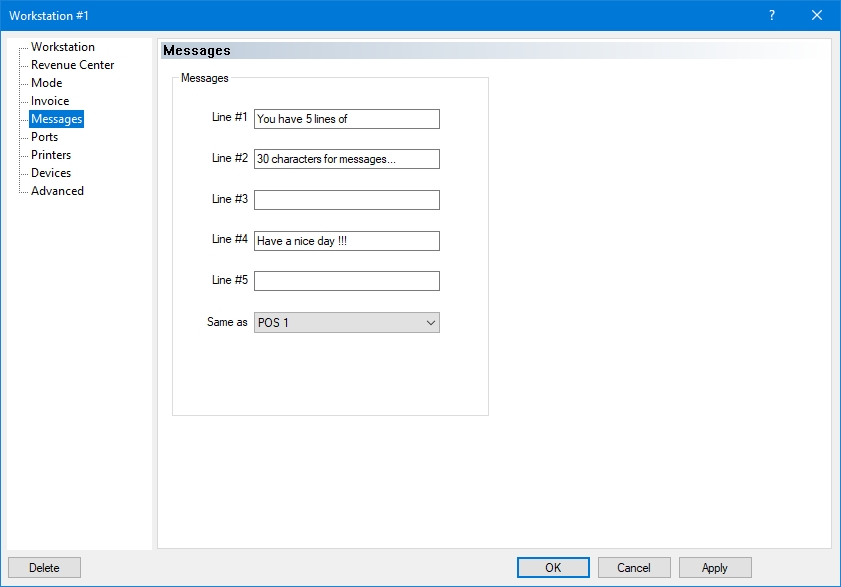
The Messages branch of the workstation options allows you to configure custom messages to be displayed on the workstation's home screen.
Each line allows up to 30 characters for custom messages.
To avoid re-typing the same information for each workstation, select the POS workstation to use as a model from the drop-down list. This workstation will then use the same settings as the selected workstation.
Related Topics
The Printers branch of the workstation options allows you to configure the output for each logical printer, as well as the Inventory Location to use if the Inventory Management module with the Multi-Location option is present.
Select a logical printer from the table and click the Modify button to edit its properties.
This column lists all available logical printers. The first two entries (Receipt and Default) cannot be modified, except for KDS IP Redirection and Inventory Location. The other entries in this list are configured in Point of Sale Control > Workstation > Logical Printer...
This column lists which shared printer is associated with each logical printer.
This column is only available if the Inventory Management module with the Multi-Location option is activated on the Maitre'D license. It lists the Inventory Locations from which inventory quantities should be depleted for each logical printer.
This column lists the internal ID associated with each logical printer.
Related Topics
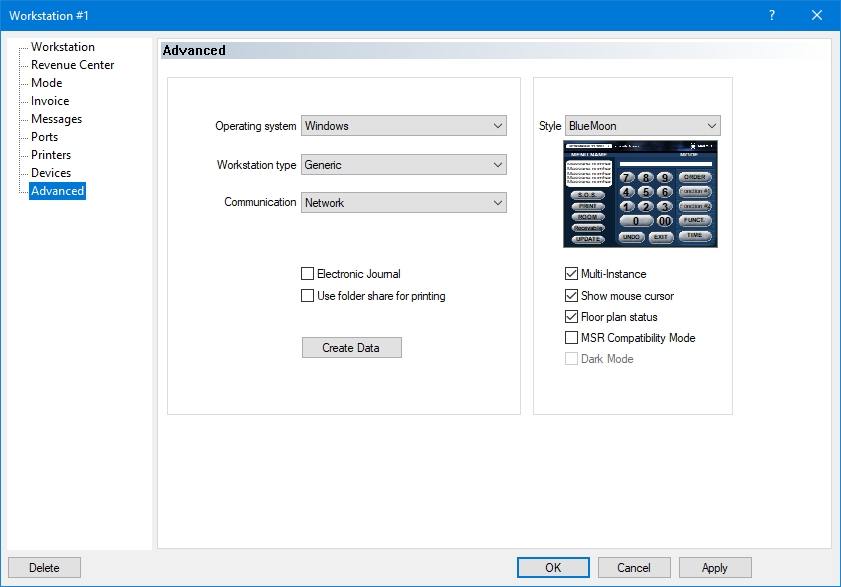
The Advanced branch of the workstation options allows you to configure advanced operation options for your workstation.
Select between Windows or Mobile POS App. Use Windows for any windows-based POS workstation or tablet. Use Mobile POS app for Android or iOS-based tablets.
Use the Generic options for most situations. The other options should be used only if you have older Panasonic or Sharp POS workstations. This drop-down list becomes unavailable if the operating system is set to Mobile POS App.
This drop-down list is always set to Network. This drop-down list becomes unavailable if the operating system is set to Mobile POS App.
Enable this option to create a text file containing a chronological log of all transactions done on a fixed workstation. This feature is not available on mobile workstations.
NOTE: By default, each workstation saves the resulting JournalXX.Log file in the C:\WS folder of its own hard drive , where XX is the workstation number. You can specify a path to save the electronic journals of all workstations in a central location by going to System Configuration > View > Options > Directories, and entering a path in the POS Electronic Journal Path field.
Enable this option to use a shared folder on the Maitre'D Back-Office server as a print spooler for this workstation. If this option is disabled, the workstation will have its own local folder as its print spooler.
Click this button to manually trigger the creation of the workstation's data.
Select the Legacy POS style to use for this POS workstation. This option becomes unavailable if the Advanced POS UI (HTML POS) is in use.
Enable this option to allow the workstation application to run in a window which can be resized.
Enable this option to display the mouse pointer while the workstation application is running. This allows a mouse to be used instead of a touch-screen. If this option is disabled, the mouse pointer is hidden.
Enable this option to use the floor plan as a screen saver on the workstation.
Enable this option to synchronize with the Magnetic Card Reader of a Posiflex J2 workstation running CE.NET. Disable this option on Windows workstations.
Enable this option to use the Advanced POS UI (HTML POS) in Dark Mode. This option is not available with the Legacy POS UI.
Related Topics
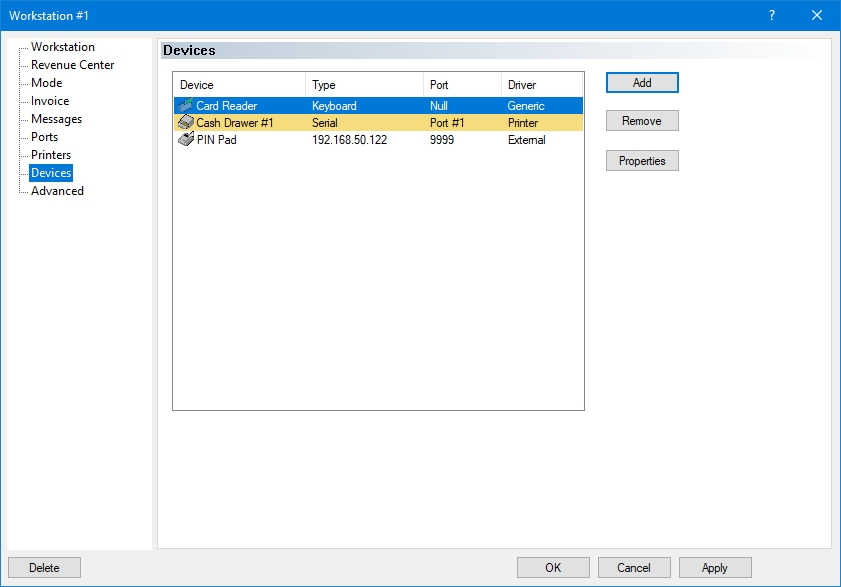
The Devices branch of the workstation options allows you to configure various devices to work with the workstation, such as printers, card readers, barcode scanners, payment terminals, etc.
This column lists the devices currently configured for this workstation.
This column lists the device's sub-type. For example, a device of type "Printer" could have a sub-type of Serial or Parallel, "Card Readers" can have sub-types of Serial, Keyboard or Device, etc.
This column lists the port to which the device is connected. This could be a COM port, and LPT port, TCP port, etc.
This column lists the type of driver used by the device.
Click the Add button to add a new device to this workstation.
Select an existing device from the list and click Remove to delete the device from the list.
Select an existing device from the list and click Properties to view or edit its current configuration.
Bar dispensers are also known as Liquor Control Devices. Maitre'D supports many models from Azbar, Berg and Auper.
Biometric readers include fingerprint reading devices. Maitre'D supports a few models manufactured by Digital Persona.
Card readers are used to read magnetic stripe cards, such as employee cards and gift cards. They can also be used to read credit cards with older, non-EMV Electronic Funds Transfer protocols like Datacap's DSIClientX.
Cash card readers are devices which can read smart cards used by various meal plan providers and college campuses.
Maitre'D supports up to 2 cash drawers per POS workstation. Cash drawers are used to store cash bills and coins.
Coin dispensers are devices which can dispense change automatically.
Kitchen displays are monitors which displays orders on a screen in various kitchen preparation areas. They can replace traditional kitchen printers.
Maitre'D supports Digital Video Recording and security camera equipment. An overlay is displayed over the security camera footage so managers can track what employees are doing when using POS workstations.
Maitre'D supports various types of fiscal printers and sales recording modules, such as the Québec Sales Recording Module and the Greek fiscal printer.
Line displays are small, customer-facing LCD displays which displays item names and running total during the ordering process.
Network printers are receipt or kitchen printers that can connect through an Ethernet interface instead of the traditional serial or LPT ports.
PIN Pads are in fact payment terminals used to process card payments with EMV-compliant payment solutions.
PIN Pad docking stations are used by some Electronic Funds Transfer protocols to transfer data from a delivery payment terminal to Maitre'D.
Maitre'D supports a wide variety of receipt and kitchen printers. Devices using the standard printer device type generally connect via a serial or parallel interface.
Scales can be connected to your POS to automatically register items sold by weight.
Bar code scanners can be used with Maitre'D to lookup PLU's as well as to facilitate recalling printed guest checks.
Related Topics

