You may notice one or more of the following symptoms:
When starting the installation of a POS, Auxiliary or Backup Server, you are unable to select the Main Back-Ofice PC, or the Main Back-Office PC is simply not listed among the available network devices.
Existing POS workstations "see" the Maitre'D Back-Office on the network, but display various error messages when attempting to connect.
After installing an Auxiliary Back-Office or Backup Server, it refuses to start and will not even allow the license to be activated.
While trying to start an Auxiliary Back-Office, Bo.exe seems like it wants to start, but immediately stops or crashes.
During the installation of the Maitre'D Back-Office, the folder C:\POSERA\MaitreD\ is automatically shared.
However, the default sharing settings in Windows 10 may not allow POS Workstations, Auxiliary Back-Offices or Backup Servers to work properly.
Follow this procedure to configure Windows sharing options correctly.
Using Windows File Explorer, browse to C:\POSERA\.
Within the C:\POSERA\ folder, right-click the MaitreD folder and select Properties.
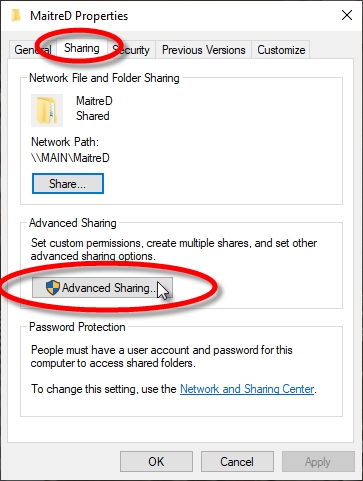
The MaitreD folder's properties will appear. Click on the Sharing tab, then click on the Advanced Sharing... button.
The Advanced Sharing window opens. The Share this folder option should already be selected. Now click the Permissions button.
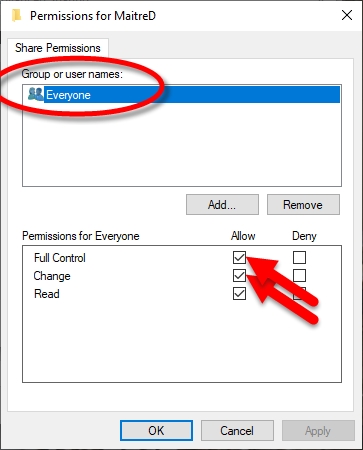
The Permissions for the Maitre'D folder will be displayed. By default, the group called Everyone will be listed, which only has the Read permission. Add check marks next to Change and Full Control, under the Allow column.
Click OK on the Permissions Window, then click OK on the Advanced sharing window. Finally, click Close on the MaitreD folder properties window.
The updated permissions are applied automatically. There is no need to restart the PC.
Retry the operation that was previously failing.


Sometimes, Windows will display incorrect or blank icons on the Windows Desktop or within folders. This often happens if an icon is changed as part of a software update, where Windows will continue displaying the old icon instead of the new one.
For instance, if Maitre'D was upgraded from an older version to the very latest version, you may notice that the Maitre'D Back-Office shortcuts and program files are still using the original icons while they should have been upgraded starting with Maitre'D version 7.08.000.240.
Old Icon
Latest Icon
This happens because Microsoft Windows uses a temporary database called an Icon Cache to speed up the display process for icons. When Windows File Explorer needs to display an icon, it first looks up this database, and if a corresponding icon is found there, this is the icon that gets displayed. Thus, if a shortcut or an executable is updated after the original icon was stored in this icon cache, the old icon will most likely continue to be displayed for some time.
To resolve this issue, the Windows Icon Cache needs to be deleted and rebuilt. Here is how to proceed:
IMPORTANT! This solution involves using the Windows Command Prompt with Administrative privileges to delete files. While following this procedure will fix the issue discussed in this article, using these instructions incorrectly could cause irreversible damage. Use at your own risks.
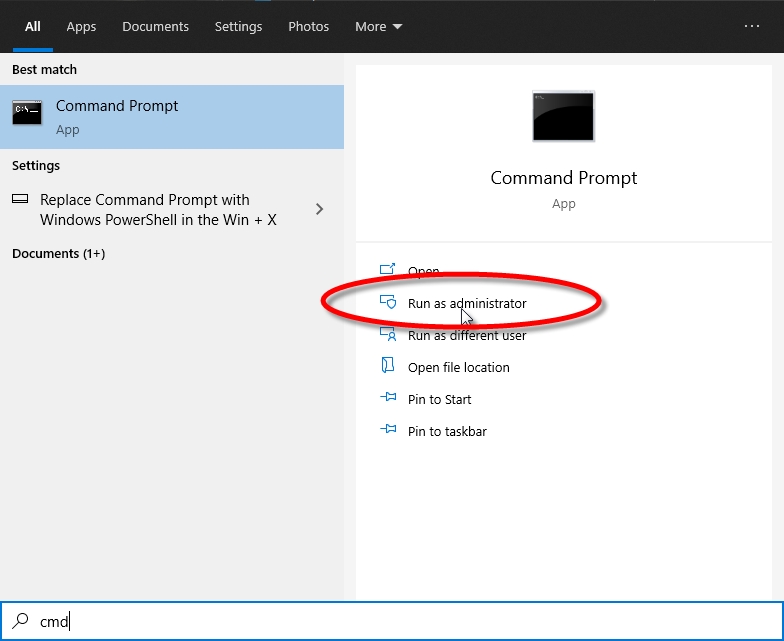
Open an elevated command prompt by clicking the Windows Start menu and typing "CMD". Select the Run as Administrator option.
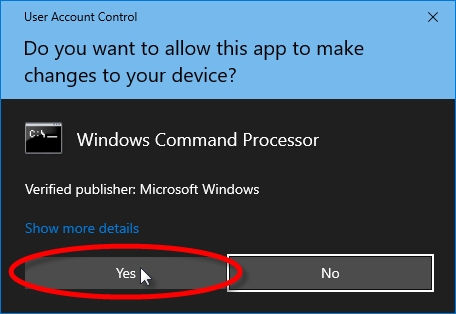
You may get a UAC warning. Click Yes.>
The command prompt will open at the C:\Windows\System32> prompt. Jump to the root of the C:\ drive by typing the following command:
cd\ [ENTER]
Navigate to the icon cache folder by typing the following command at the C:\> prompt:
cd %localappdata%\microsoft\windows\explorer [ENTER]
The prompt will change to:
C:\Users\[YourUserName]\AppData\Local\Microsoft\Windows\Explorer>
You can verify that you are in the correct folder by typing the following command:
dir [ENTER]
All the files within the folder will be listed.
We can see that about half of the file names in this folder start with "iconcache". This means we are in the right folder.
Now leave the command prompt window up on the screen, and close any other application or background tasks you may have running, including the Maitre'D Back-Office, Maitre'D Back-Office Server, POS workstation, etc. The only thing that should be running is the command prompt window.
Right-click the Windows Task Bar and select Task Manager.
If you only see the basic Task Manager window, click the More details down-arrow.
In the Processes tab, scroll all the way down to the Windows Explorer process. Right-Click the Windows Explorer process, and select the End Task option.
The entire screen will turn blank, except for the command prompt window and the Task Manager window. Now close the Task Manager window, so that there is nothing but the command prompt window up on the screen.
Now, delete all the files that start with "iconcache" in their file name. This can be done by typing the following command at the command prompt:
del iconcache* [ENTER]
NOTE: If you get "Access Denied" error messages after running this command, it means some application or process is locking up the files. Close any open program and try again.
If all went well, it will look like nothing happened. Seeing no error message means that the command worked as intended. We can verify this by listing the contents of the folder with the dir command again:
dir [ENTER]
All the files within the folder will be listed. This time, you will notice that all the "iconcache" files listed earlier are now missing. This is exactly what we want.
Close the command prompt window by clicking the "X" in the upper-right corner.
On your keyboard, press CTRL + ALT + DEL simultaneously. On the menu that appears on your screen, click Sign out. This will bring you to the Windows sign on screen.
Sign on with your usual username and password.
Now that the icon cache database files have been deleted, Windows will automatically rebuild the icon cache database from scratch. This will force the new icons to be used, as all remnants of old icons were forcibly deleted.
NOTE: Attempting to delete the icon cache files directly from the File Explorer will not work, as they are constantly being accessed by the Windows Explorer process. This is why we need to use the command prompt after manually stopping the Windows Explorer process.
Configure the Maitre'D Sharing Operations
Old icons are still displayed after upgrading to the latest version of Maitre'D upragad


