Loading...
Loading...
Loading...
Loading...
Loading...
Loading...
Loading...
Loading...
Loading...
Loading...
Loading...
Loading...
Loading...
Loading...
Loading...
Loading...
Loading...
Loading...
Loading...
Loading...
Loading...
Loading...
Loading...
Loading...
Loading...
Loading...
Loading...
Loading...
Loading...
Loading...
Loading...
Loading...
Loading...
Loading...
Loading...
Loading...
Loading...
Loading...
Loading...
Loading...
Loading...
Loading...
Loading...
Prior to installing Maitre’D, the computer’s hard drive must be properly formatted and partitioned, and a compatible version of Microsoft Windows® needs to be installed. For instruction on formatting and partitioning the hard disk and installing Microsoft Windows®, please refer to Microsoft Windows® documentation or to the documentation provided by your computer's manufacturer.
This manual explains the installation for the Maitre’D software on the Microsoft Windows 10 operating system with Microsoft Network. Maitre’D can be installed on any networking system that uses or emulates the TCP/IP communication protocol. Please refer to the appropriate documentation for more information.
Your operating system needs to be kept up-to-date with all the latest updates. This will ensure that all critical and security-related updates are installed and will help maintain PCI-DSS compliance.
Most recent Windows operating systems use a feature called User Account Control or UAC . This feature exists to improve the operating system's security by preventing some types of applications to run without the user's knowledge. Make sure that this feature is activated and set to the default (recommended) level before installing Maitre’D. Using UAC is required to maintain PCI-DSS compliance and to ensure basic safety of the system.
IMPORTANT! In Windows 10, disabling UAC through registry hacks or Group Policy Objects (GPOs) will cause some operating system features to stop working correctly, in addition to compromize the system's overall security. Also, installing any software in a “non-UAC” environment and re-enabling UAC afterwards WILL cause issues. For instance, automatic End of Day may not work, or you may be unable to start or stop the Maitre’D Back-Office server from the Server Control module. Other unforeseen and unwanted side effects may also occur.
Starting with Windows 10, Windows Smart Screen is an integral part of the operating system. This feature is active by default and needs to remain active in order to ensure basic safety of the system and maintain PCI-DSS compliance.
Install a reputable anti-virus and anti-malware solution on the PC. The Anti-Virus / Anti-Malware solution needs to be fully operational at all times and maintained with the latest updates and virus definitions. It needs to be installed on the main Back-Office PC as well as all POS workstations, Auxiliary Back-Office and Backup Servers. PayFacto does not recommend any brand in particular. However, while Microsoft's Windows Defender solution is free, bundled with Windows and works in most cases, we do recommend using a reputable, independently branded and well reviewed product.
This is a critical component of the Maitre’D system’s security and a requirement for PCI-DSS compliance.
In addition to the perimeter firewall which protects your network, a software firewall needs to be installed on the main Back-Office PC as well as all POS workstations, Auxiliary Back-Office and Backup Servers. The Windows Defender Firewall is adequate for most installations.
This is a critical component of the Maitre’D system’s security and a requirement for PCI-DSS compliance.
POS Workstations are generally pre-configured with an appropriate version of Microsoft Windows. Like the Maitre’D Back-Office Server PC, make sure to:
Install all Windows Updates.
Ensure that UAC is enabled and set to the default level.
Ensure that Windows Smart Screen is enabled.
Install, update and maintain a reputable anti-virus / anti-malware solution.
Install, update and maintain a reputable software firewall.
Make sure that the TCP/IP network is properly configured so that the Maitre’D Back-Office Server PC and all POS workstations can communicate with each other.
IMPORTANT! With Windows 10, Network Discovery and File & Printer sharing are disabled by default. Password Protected Sharing is enabled. These default settings may prevent Maitre'D from working correctly. See how to correctly configure these settings in this topic: Configure your Windows Network Profile
To be able to download files for the Maitre'D POS system, you need a distributor account. Please contact your sales representative to obtain an account if you don't already have one.
Logon to:
Select your language.
Enter your username and password.
Click the Login button.
Click the Support link, either at the very top of the page or in the main body.
Click Knowledge Base. (You may need to scroll down a bit) This will open a new browser window.
Click the Knowledge Base tile.
Click the Software Downloads tile.
Click the Maitre'D 7 Back-Office Suite Downloads link.
For Maitre'D 7, there are 3 downloads:
Download this file if Maitre'D is already installed and needs to be upgraded to the latest version.
Download this file to install Maitre'D from scratch on a new system. Includes Service Pack Update 7.08.000.180.
Download this file to have the full contents of the original Maitre'D DVD, which includes the Maitre'D Back-Office Full Install, with a graphical user interface to facilitate the installation of backup and auxiliary servers, POS workstations, etc.
IMPORTANT! Downloaded files are *.zip archives that need to be extracted for the installation to work. Please see Extracting Files
Related Topics
To save some time during the installation of a new Maitre'D POS system, a custom installer set can easily be created with the latest service pack update. This way, Maitre'D will be installed and updated to the latest version in one single operation.
Custom installers can be created from the Maitre'D DVD or the Back-Office full install. Download the one you want (or both), and also download the latest service pack update.
Instructions to download files are provided here:
The files downloaded from the Distributor portal are *.zip files that need to be extracted before they can be used. Fortunately, even a "vanilla" Windows 10 installation has the necessary tools to work with *.zip files.
Copy downloaded files to your Windows Desktop.
Right-Click the file you wish to extract, and select the Extract All... option.
By default, the Windows Zip extraction tool will create a folder with the same name as the Zip file where files will be extracted. Don't change anything and simply click the Extract button. (Don't worry, the original *.zip file will NOT be overwritten).
A new folder will be created to store all the extracted files. You may see a progress bar while large files are being extracted.
The folder where files were extracted will open automatically for you. You can minimize it to the task bar. We'll be using this later.
Repeat this process for all 3 downloaded files:
MDBO708000DVD.zip (Maitre'D DVD)
MDBO708000BO.zip (Maitre'D Back-Office Full Install)
MDBO708000xxx.zip (Service Pack update, where "xxx" is the Service Pack version number)
NOTE: If you use a third-party archiving tool to extract files, please refer to the documentation provided with your tool of choice.
Now that all files were extracted, we need to copy the latest service pack update in the installer sets.
Open the MDBO708000xxx folder, then right-click the MDBO708000xxx.exe file and select Copy.
Open the MDBO708000DVD folder, then browse to the \bo\Disk1\ subfolder.
Right-click in an empty space within the folder and select the Paste option.
The file will be copied.
Copy the contents of the MDBO708000DVD folder to the root of a removable media, such as a DVD-ROM or a USB thumb drive.
IMPORTANT! The files must be copied at the root of the removable media (DVD-ROM or USB Thumb drive). If the files are inside a sub-folder, the links provided in the autorun program will not work, and you will get error messages when attempting to install applications.
Installer files are located at the root of the E:\ drive.
This installer will work.
Installer files are located inside a folder, in E:\MDBO708000DVD.
This installer will NOT work.
Open the MDBO708000xxx folder, then right-click the MDBO708000xxx.exe file and select Copy.
Open the MDBO708000BO folder, then browse to the \Disk1\ subfolder.
Right-click in an empty space within the folder and select the Paste option.
The file will be copied.
The installers are now ready to be used. With the service pack update file copied to the installer folder, the installer will automatically detect that an update is available and prompt for its installation during the Maitre'D setup process.
You can run the Maitre'D Back-Office installation program straight from your desktop. However, it is recommended to copy the install set(s) to removable media, such as a portable hard drive, DVD-ROM or USB thumb drive.
IMPORTANT! The DVD Installer files MUST be copied to the root of a removable media (DVD-ROM or USB Thumb Drive) to work correctly. The Autorun installer will not work if the files are located in a sub-folder.
The Network Profile feature was introduced with Windows Vista and was carried over to later versions of Microsoft Windows. In Windows 10, the default Network Profile settings will prevent Maitre'D from working correctly by disabling File & Printer sharing and forcing Password Protected Sharing. This topic explains how to configure these settings to allow Maitre'D to operate normally.
By default, on a new Windows 10 installation, your Network Profile will be set to "Public". This is the most secure setting, and is intended for use on public networks, such as public WiFi provided at airports, coffee shops, etc. This setting will "hide" the PC from other devices on the network, which will cause issues with Maitre'D. This profile also hides settings that need to be enabled for Maitre'D to work correctly. This needs to be changed to either Private or Domain.
In the Windows Notification area, click on the Network Connection icon, then click on the network connection you wish to configure. (there could be more than one.)
This will bring up basic settings. Click on the Network connection (again).
The Network profile options will be displayed. Select either Private or Domain.
If your Maitre'D Main Back-Office PC is part of an Active Directory Domain, your Network Profile needs to be set to "Domain". If the PC is not on a domain, this option will not be available, therefore your Network Profile needs to be set to "Private".
If you believe that the PC should be using the Domain Network Profile but this option is not available, please ask your network administrator for advice.
Just like before, in the Windows Notification area, click on the Network Connection icon, then click on the network connection you wish to configure. (there could be more than one.)
This will bring up basic settings. This time, click Change advanced sharing options.
Under the Private (or domain) profile, make sure that:
a. Turn on network discovery is selected.
b. Turn on file and printer sharing is selected.
Click on the down-arrow next to All Networks. This will display more options.
Scroll down to the Password Protected Sharing section and select Turn off password protected sharing.
Click Save changes.
This configuration needs to be done on the Main Back-Office PC, all Auxiliary Back-Office and Backup Server PCs, as well as on all POS workstations.
The connectivity between the Main Maitre'D Back-Office PC and other components of the Maitre'D network can easily be tested. For the example below, we are testing connectivity to a PC named "MAIN-BACK-OFFICE".
From any PC or POS on the Maitre'D network, right-click the Windows Start button and select Run...
In the Run... box, type two back-slashes (\\) followed by the name of the PC you want to connect to. For example:
\\MAIN-BACK-OFFICE
Click OK.
a. If the Maitre'D Back-Office is already installed, you will see the MaitreD shared folder on the PC named MAIN-BACK-OFFICE.
b. If the Maitre'D Back-Office is not yet installed, you will see an empty folder on the PC named MAIN-BACK-OFFICE.
c. If the network settings are not configured properly, you will see an error message.
The network settings now allow communication between all the components of the Maitre'D Network.
(blank in the original doc)
Before Installing Maitre'D
Configure your Windows Network Profile
Download Maitre'D Setup Files
Creat your own Custom Maitre'D Installer
Before the license can be activated, you need:
When activating an Auxiliary Back-Office, the serial number to use is the same as the Main Back-Office. The Auxiliary back-Office is an option that can be purchased through the same channels as new licenses and license add-ons.
NOTE: Please note that there is a turnaround time of 4 hours for all orders and that new licenses are only created during normal business hours. The License serial number can be found on the invoice received after the creation of the license.
When activating an Auxiliary Back-Office, the Main Back-Office should already be up-and-running, therefore the commerce name is already established and can no longer be changed.
Obtain the commerce name from printed guest checks or receipts, or by looking up the license details on the Main Back-Office PC.
Before the license can be activated, you need:
The Maitre’D license serial number can be obtained by ordering a Maitre’D license through our ordering system, by phone or by e-mail.
NOTE: Please note that there is a turnaround time of 4 hours for all orders and that new licenses are only created during normal business hours. The License serial number can be found on the invoice received after the creation of the license.
Obtain the commerce name from the restaurant owner or manager. The commerce name is limited to 20 characters, including spaces.
When a new license is activated for the first time, you will be given the opportunity to configure the commerce name as it will appear in the Maitre’D Back-Office, on report headers and on the header of printed guest checks, invoices and receipts.
IMPORTANT! Before installing a Maitre'D Backup Server, the main Maitre'D Back-Office must be installed. Its license must also be activated, and the Maitre'D Back-Office Server must be running.
Additionally, the POS software must be installed locally on the PC where the Backup Server will be installed.
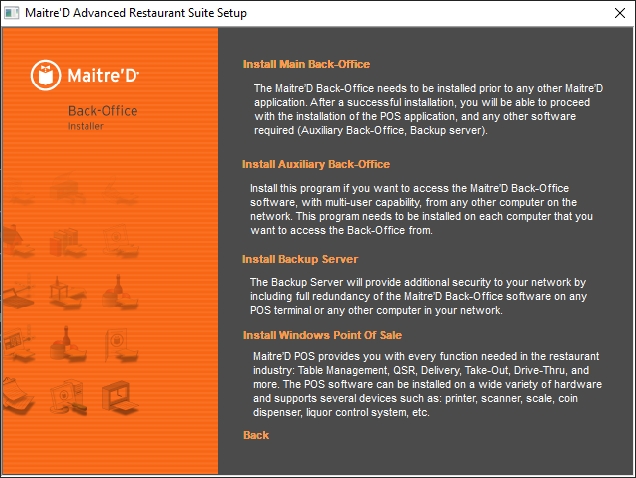
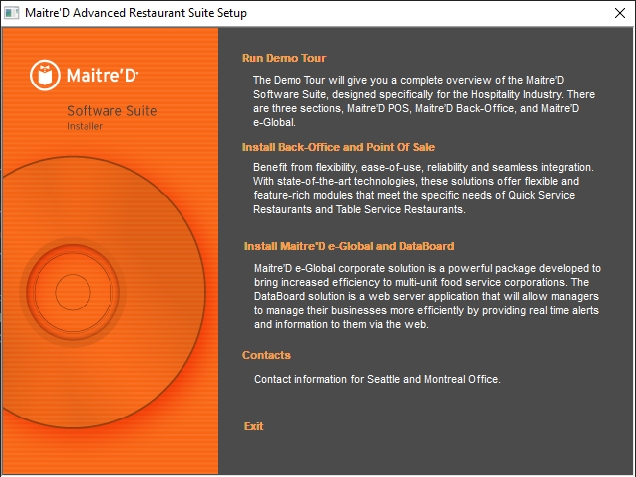
Start the installation process using one of the following methods:
Before performing the actual installation, the InstallShield Wizard will analyze your system. If required software components are missing, these will be installed at this point. Click the Install button to proceed.
NOTE: The PC may need to be restarted after components are installed. Following a computer restart, you will need to start the installation process again.
A splash Screen will be briefly displayed.
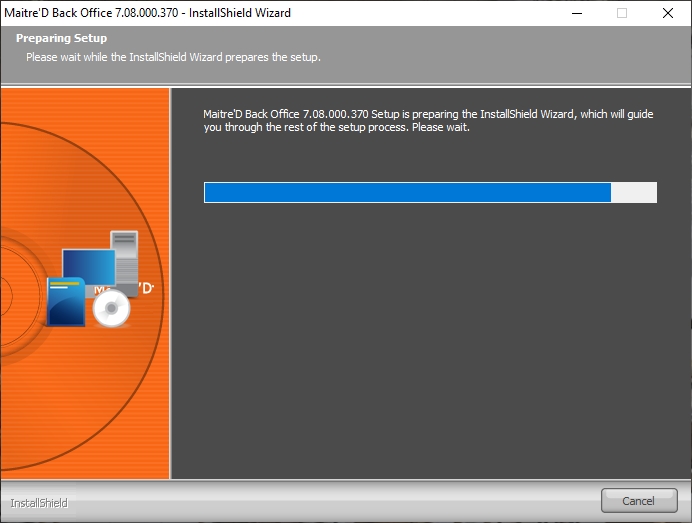
The InstallShield Wizard will prepare the installation. This could take a few seconds.
The welcome screen appears. Read the welcome message to make sure that the InstallShield Wizard will install a Maitre'D Backup Server. Click Next > to continue the installation.
Read the license agreement and select I accept the terms of the license agreement. Click Next > to continue.
Select the Maitre’D installation folders and click Next > to continue.
Select whether you prefer connecting to the Maitre'D Main Back-Office Server by Machine Name or by IP Address.
a. If Select by Machine Name was selected, you will be asked to select the PC on which the Maitre'D Main Back-Office Server is running. Click OK after making a selection.
NOTE: If the computer running the Maitre'D Main Back-Office Server is not listed, click Cancel and connect by IP Address instead.
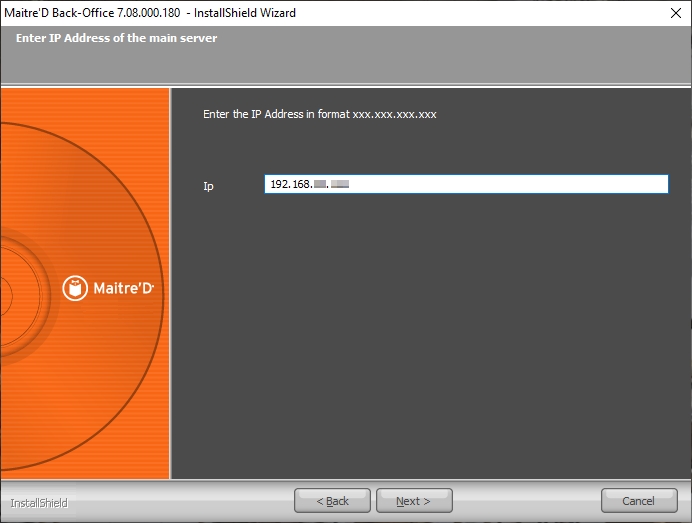
b. If Select by IP Address was selected, you will be asked to type the IP address of the PC on which the Maitre'D Main Back-Office Server is running. Click Next > after typing the IP address.
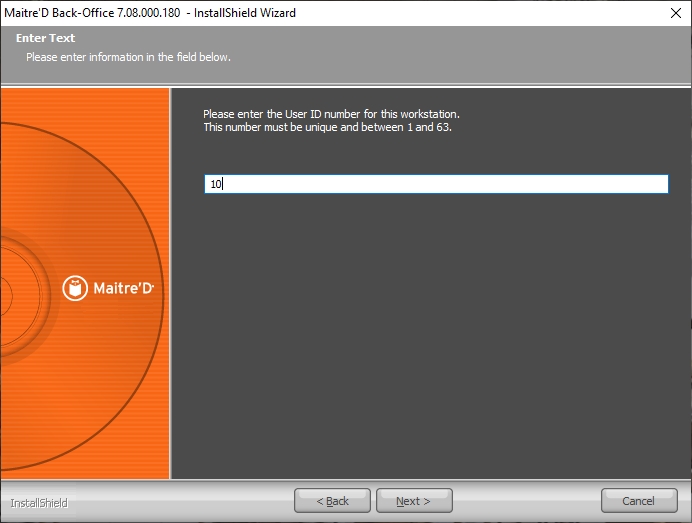
You will be asked to provide a Workstation User ID Number for the Backup Server. This number needs to be unique (not already used by a POS, another auxiliary or another backup server) and between 1 and 63 inclusively.
NOTE: We recommend assigning a number higher than the maximum number of POS, while also leaving "free numbers" for future expansion. For example, if you currently have 4 POS workstations, we would recommend assigning number 10 to the Auxiliary Back-Office.
Files will be installed automatically. This could take a few minutes.
If a service pack is available, installation will start automatically. It is highly recommended to always install the latest service pack available before using the Maitre’D software. Click Yes to begin the installation of the service pack.
IMPORTANT! Installation of the latest service pack available is required to maintain PCI-DSS compliance. Installation of the latest service pack is also required to benefit from the latest feature updates and bug fixes.
a) The InstallShield Wizard will prepare the Service Pack installation. This could take a few seconds.
b) The welcome screen appears. Click Next > to continue the installation.
c) Read the license agreement. Click Yes to agree and continue the installation.
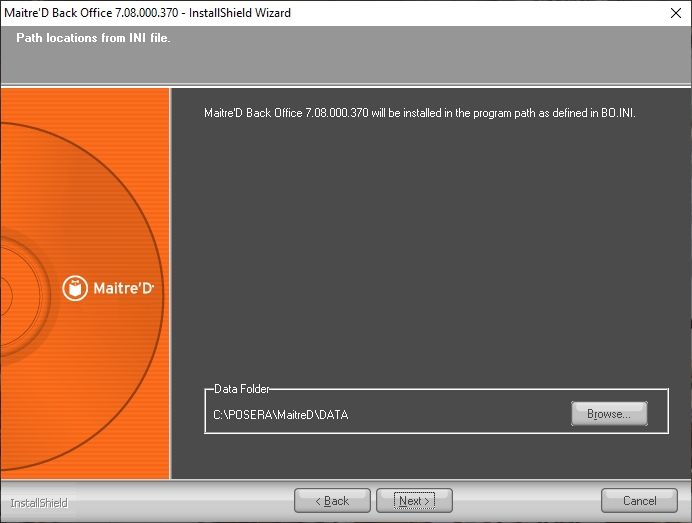
d) Select the path where the BO.INI file can be found. This should not need to be changed, but you can click Browse… to change the folder if required. The service pack files will be installed in the path as defined in the BO.INI file. Click Next > to proceed.
e) Files will be copied. This could take a few minutes.
After files are copied, the InstallShield wizard will remind you that the computer needs to be restarted before Maitre'D can be used. Click the Finish button.
A dialog box will inform you that your computer is about to be restarted. Click OK, and your computer will restart.
WARNING! Do not attempt to override the computer restart. This will damage the Maitre'D files and cause various issues.
After the computer restart, start the Maitre'D Back-Office Server will attempt to start itself in Backup mode.
Since there is no license installed, you will be prompted to enter a license serial number and a commerce name.
IMPORTANT! Now that the Maitre'D files are in place, it is strongly suggested to configure the Maitre'D Shared Folder correctly, even before activating the license. Please see Configure the Maitre'D Sharing Options
The installation process is now completed. Please proceed to the Maitre’D license activation.
Related Topics
Start the installation process using one of the following methods:
Before performing the actual installation, the InstallShield Wizard will analyze your system. If required software components are missing, these will be installed at this point. Click the Install button to proceed.
NOTE: The PC may need to be restarted after components are installed. Following a computer restart, you will need to start the installation process again.
A splash Screen will be briefly displayed.
The InstallShield Wizard will prepare the installation. This could take a few seconds.
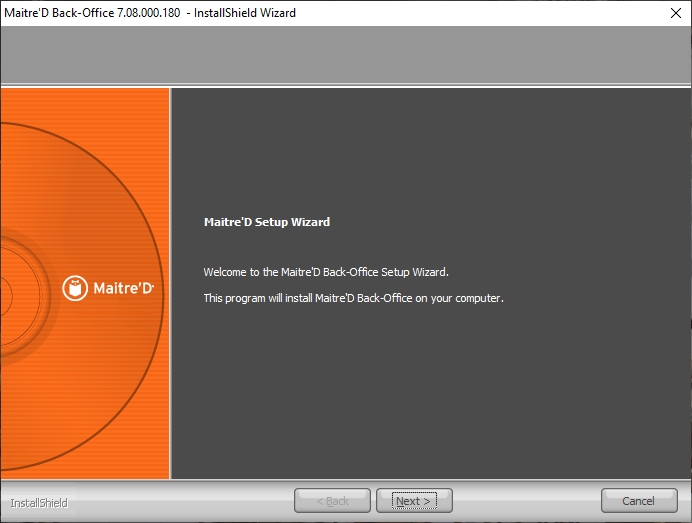
The welcome screen appears. Click Next > to continue the installation.
Read the license agreement and select I accept the terms of the license agreement. Click Next > to continue.
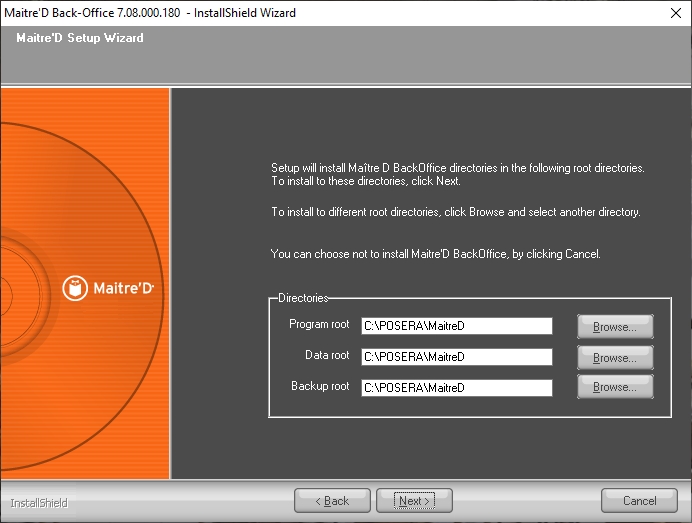
Select the Maitre’D installation folders and click Next > to continue.
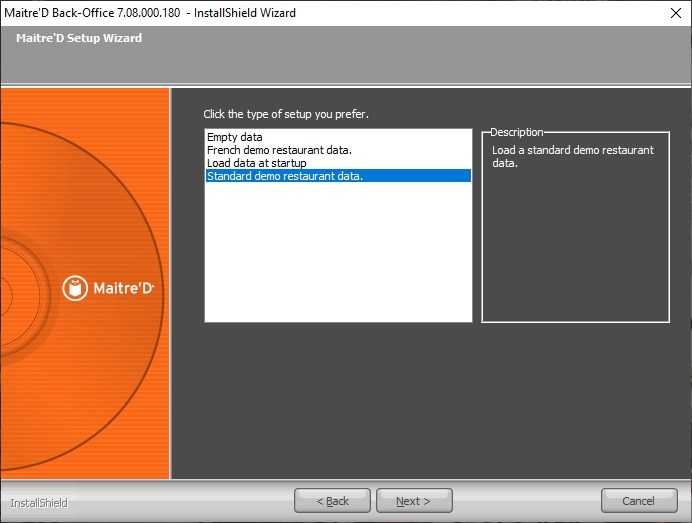
Select the type of installation and click Next > to continue. The available types are described below.
Select this option to install Maitre’D with an empty database. It will need to be fully programmed before use.
Select this option to install a generic restaurant data for demonstration purposes in the French language.
Select this option to restore an existing restaurant data when the software is started for the first time.
Select this option to install a generic restaurant data for demonstration purposes in the English language.
Select the Maitre’D program group that will be created in the Windows Start Menu. Click Next > to continue.
Files will be installed automatically. This could take a few minutes.
If a service pack is available, installation will start automatically. It is highly recommended to always install the latest service pack available before using the Maitre’D software. Click Yes to begin the installation of the service pack.
IMPORTANT! Installation of the latest service pack available is required to maintain PCI-DSS compliance. Installation of the latest service pack is also required to benefit from the latest feature updates and bug fixes.
a. The InstallShield Wizard will prepare the Service Pack installation. This could take a few seconds.
b. The welcome screen appears. Click Next > to continue the installation.
c. Read the license agreement. Click Yes to agree and continue the installation.
d. Select the path where the BO.INI file can be found. This should not need to be changed, but you can click Browse… to change the folder if required. The service pack files will be installed in the path as defined in the BO.INI file. Click Next > to proceed.
e. Files will be copied. This could take a few minutes.
After files are copied, the InstallShield wizard will remind you that the computer needs to be restarted before Maitre'D can be used. Click the Finish button.
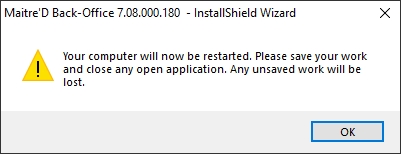
A dialog box will inform you that your computer is about to be restarted. Click OK, and your computer will restart.
WARNING! Do not attempt to override the computer restart. This will damage the Maitre'D files and cause various issues.
After the computer restart, the Maitre'D Back-Office Server will attempt to start.
Since there is no license installed, you will be prompted to enter a license serial number and a commerce name.
IMPORTANT! Now that the Maitre'D files are in place, it is strongly suggested to configure the Maitre'D Shared Folder correctly, even before activating the license. Please see Configure the Maitre'D Sharing Options
The installation process is now completed. Please proceed to the Maitre’D license activation.
Related Topics
IMPORTANT! Before installing a Maitre'D Auxiliary Back-Office, the main Maitre'D Back-Office must be installed. Its license must also be activated, and the Maitre'D Back-Office Server must be running.
Start the installation process using one of the following methods:
Before performing the actual installation, the InstallShield Wizard will analyze your system. If required software components are missing, these will be installed at this point. Click the Install button to proceed.
NOTE: The PC may need to be restarted after components are installed. Following a computer restart, you will need to start the installation process again.
A splash Screen will be briefly displayed.
The InstallShield Wizard will prepare the installation. This could take a few seconds.
The welcome screen appears. Read the welcome message to make sure that the InstallShield Wizard will install an Auxiliary Back-Office. Click Next > to continue the installation.
Read the license agreement and select I accept the terms of the license agreement. Click Next > to continue.
Select the Maitre’D installation folders and click Next > to continue.
Select whether you prefer connecting to the Maitre'D Main Back-Office Server by Machine Name or by IP Address.
a. If Select by Machine Name was selected, you will be asked to select the PC on which the Maitre'D Main Back-Office Server is running. Click OK after making a selection.
NOTE: If the computer running the Maitre'D Main Back-Office Server is not listed, click Cancel and connect by IP Address instead.
b. If Select by IP Address was selected, you will be asked to type the IP address of the PC on which the Maitre'D Main Back-Office Server is running. Click Next > after typing the IP address.
You will be asked to provide a Workstation User ID Number for the Auxiliary Back-Office. This number needs to be unique (not already used by a POS, another auxiliary or another backup server) and between 1 and 63 inclusively.
NOTE: We recommend assigning a number higher than the maximum number of POS, while also leaving "free numbers" for future expansion. For example, if you currently have 4 POS workstations, we would recommend assigning number 10 to the Auxiliary Back-Office.
Files will be installed automatically. This could take a few minutes.
If a service pack is available, installation will start automatically. It is highly recommended to always install the latest service pack available before using the Maitre’D software. Click Yes to begin the installation of the service pack.
IMPORTANT! Installation of the latest service pack available is required to maintain PCI-DSS compliance. Installation of the latest service pack is also required to benefit from the latest feature updates and bug fixes.
a. The InstallShield Wizard will prepare the Service Pack installation. This could take a few seconds.
b. The welcome screen appears. Click Next > to continue the installation.
c. Read the license agreement. Click Yes to agree and continue the installation.
d. Select the path where the BO.INI file can be found. This should not need to be changed, but you can click Browse… to change the folder if required. The service pack files will be installed in the path as defined in the BO.INI file. Click Next > to proceed.
e. Files will be copied. This could take a few minutes.
After files are copied, the InstallShield wizard will remind you that the computer needs to be restarted before Maitre'D can be used. Click the Finish button.
A dialog box will inform you that your computer is about to be restarted. Click OK, and your computer will restart.
WARNING! Do not attempt to override the computer restart. This will damage the Maitre'D files and cause various issues.
After the computer restart, start the Maitre'D Auxiliary Back-Office by double-clicking the icon on the Windows desktop.
Since there is no license installed, you will be prompted to enter a license serial number and a commerce name.
IMPORTANT! Now that the Maitre'D files are in place, it is strongly suggested to configure the Maitre'D Shared Folder correctly, even before activating the license. Please see Configure the Maitre'D Sharing Options
The installation process is now completed. Please proceed to the Maitre’D license activation.
Related Topics
This section explains how to logon to the Maitre’D Back-Office for the first time after installing and activating the Maitre’D software.
From the Windows Desktop, double-click the Maitre’D Back-Office icon.
The login prompt appears. Type Distributor (with a capital “D”) in the User Name field, and press the space bar twice in the password field. Click OK to proceed.
The language selector appears. Select the appropriate language and click OK to proceed.
NOTE: The language that is selected by default depends on the language settings of the System Owner access level.
You will be prompted to create a new Distributor password. Enter a password that meets requirements and click OK to proceed.
The Maitre’D Back-Office desktop will be displayed.
IMPORTANT! After the first login, it is strongly recommended to create more Maitre’D Back-Office user accounts for managers and employees who will require access to the Maitre'D Back-Office for various tasks.
It is important to be familiar with the various types of cables and connectors that can be encountered in most hardware installations. Here is a list of all the cables and connectors in use today:
Serial cables and connectors are commonly used to connect serial printers, room charge servers and other devices to Maitre’D Back-Office servers and workstations. Serial cables are available with two types of connectors. The most common one is the DB-9 connector, but DB-25 connectors are also very common, especially with serial printers.
It is easy to mistake male and female connectors because of how they are built. The female DB-9 connector has 9 holes. The male DB-9 has 9 pins.
Again, it is easy to mistake male and female connectors because of how they are built. The female DB-25 connector has 25 holes. The male DB-25 has 25 pins.
Parallel or LPT printers connect through a factory-made parallel printer cable. On the computer-end of the connection, a DB-25 female connector is used. At the printer end, a female 36-Pin Centronics port is used.
Unshielded Twisted Pair (UTP) cables are typically used along with 8P8C (8 Pins 8 Conductors) modular connectors to connect Ethernet adapters to TCP/IP networks. In common networking “lingo”, the male connector is known as a Plug while the female connector is known as a Jack.
Note that 8P8C is the correct name for this type of connector. “RJ-45” actually comes from the expression “Registered Jack number 45”, which was used by a well-known telephone company using a similar connector.
There are two distinct types of 8P8C plugs. The type that should be used depends on the type of UTP cable being used. On the picture below, the plug on the left is designed to be used with Solid Core UTP cable, while the plug on the right is designed for Stranded Wire UTP cable. Notice the difference in the golden part of the plugs.
NOTE: It is crucial to use the correct type of plug with each type of UTP cable. Using the wrong type will result in unreliable cabling and poor network communication.
Unshielded Twisted Pair (UTP) cables are available in various categories. The most widely used are Category 5e for 10/100 Mbps connections and Category 6 for 1000 Mbps (Gigabit) connections. Category 6A was recently introduced to support connections up to 10,000 Mbps (10GBase-T Ethernet).
Among each cable category, there are two types of cables: Solid Core Wire and Stranded Wire.
Solid Core wire cables can cover greater distances than stranded wire, but they are generally more fragile. They are more prone to breaking if they are bent and twisted repeatedly. Solid core wire cables are also cheaper than stranded wire cables. Therefore, solid core cables are meant to be used in permanent runs, inside walls, ceilings, etc.
NOTE: Make sure to use the correct type of 8P8C plug for solid core wire.
Stranded wire is more flexible than solid core wire. Therefore, it is more resistant to bending and twisting. Unfortunately, this type of cable is much less reliable than solid core wire as distance increases, and it is also more expensive. For all of these reasons, stranded wire cables should only be used for very short distances, or between wall jacks and network devices.
NOTE: Make sure to use the correct type of 8P8C plug for stranded wire
Cat 5e is the most common and cheapest network cable available. It supports network speeds up to 1000 Mbps (Gigabit Ethernet). According to the current ANSI TIA/EIA 568 standard, the diameter of the conductors within the cable should be no thicker than 22 American Wire Gauge (AWG) and no thinner than 24 AWG.
Cat 6 cable is designed specifically for Gigabit Ethernet (1000 Mbps), but it can also support 10GBaseT (10,000 Mbps) over short distances. Cat 6 cables are slightly bigger in diameter than their Cat 5e counterparts mainly due to a higher twist rate of conductor pairs within the cable, thicker sheathing and the introduction of a non-metallic spacer to separate conductor pairs within the cable. Cat 6 cables also use 23 AWG conductors, further contributing to overall cable diameter.
Cat 6A cable is designed specifically for 10GBaseT (10,000 Mbps). These cables are even bigger than Cat 6 cables. They also use 23 AWG conductors, but they have an even higher twist rate, thicker sheathing and a bigger non-metallic spacer between conductor pairs inside the cable.
Category 6e is not a standard, and is frequently misused because category 5 followed with 5e as an enhancement on category 5. Soon after the ratification of Cat 6, a number of manufacturers began offering cable labeled as "Category 6e". Their intent was to suggest their offering was an upgrade to the Category 6 standard—presumably naming it after Category 5e. However, no legitimate Category 6e standard exists, and Cat 6e is not a recognized standard by the Telecommunications Industry Association.
Each category of network cable (5e, 6, 6A) is also available in shielded versions that are referred to as either U/FTP or F/UTP depending on the type of shielding they have. Shielded cables offer superior performance and reliability in harsh environments with multiple sources of possible interference such as:
• Electrical wiring • Electric motors (such as HVAC systems, A/C or refrigeration equipment, etc.) • High-power electrical equipment (such as ovens, industrial equipment, etc.) • Wi-Fi antennas and devices
Unfortunately, shielded cables are generally much more expensive than their unshielded counterparts, and they require special shielded connectors which are also more expensive and harder to handle than standard connectors.
F/UTP stands for Foil shield over Unshielded Twisted Pairs. Basically, all 4 conductor pairs are wrapped in a single foil shielding. There is also a drain wire that needs to be grounded by using specially designed connectors.
U/FTP stands for overall Unshielded, Foil over Twisted Pairs. This type of cable has each conductor pairs individually wrapped in a foil shielding. This type also has a drain wire that needs to be grounded by using specially designed connectors.
In order to be effective, shielded cables need to be terminated with shielded 8P8C (RJ45) plugs and use a special conductor separator in order to avoid alien cross-talk between conductors within the connector. Also, very strict and manufacturer-specific precautions need to be taken when crimping shielded connectors to shielded cables. Please review manufacturer-supplied instructions.
Using downloaded files is the quickest way to get a system up and running. However, it gets a bit tricky if you need to install an auxiliary or backup server. These matters will be covered here.
Before you begin, we highly recommend downloading the latest installer and service pack, and creating your own install set. This will allow you to install Maitre'D and get it updated to the latest version in one single operation.
Please see:
Make sure the installer files are extracted, either on you local hard drive or on a removable media. Installation will not work if the files are still within a *.zip archive. (See )
Using Windows File Explorer, browse to the folder containing the install files.
Locate the file called Setup.exe and double-click on it.
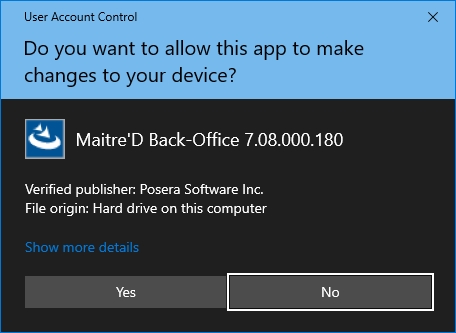
You may get a UAC warning. Click Yes.
The Maitre'D Back-Office InstallShield wizard will start.
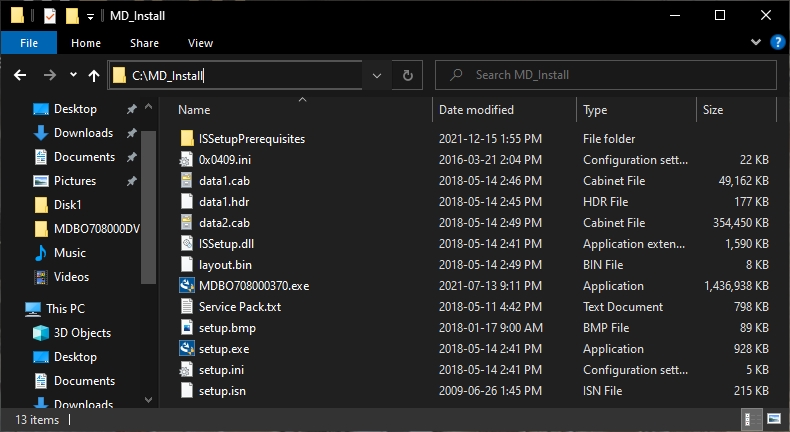
Extract the installation files on you local hard drive. We will be using the command prompt, so to make your life easier, you can copy the files in a folder at the root of the C:\ drive. For this example, we copied the install files to a folder called MD_Install, at the root of the C:\ drive.
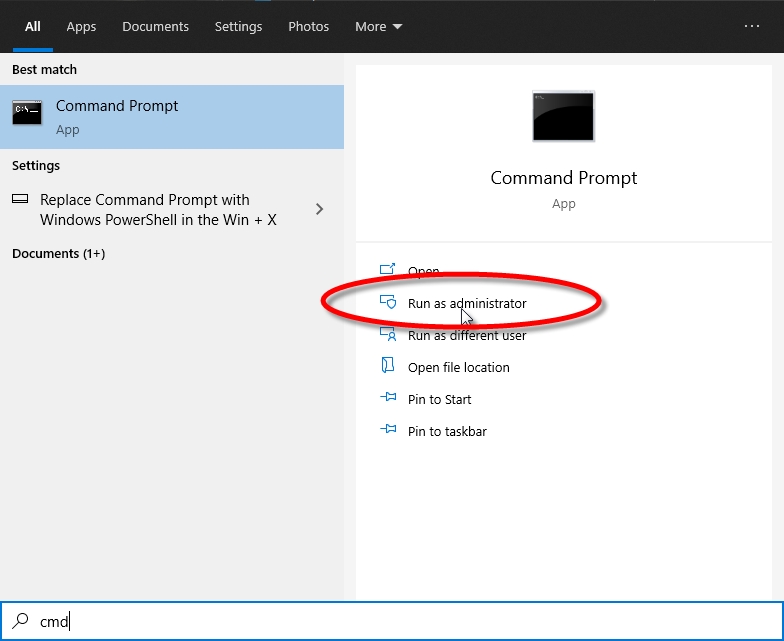
Open an elevated command prompt by clicking the Windows Start menu and typing "CMD". Select the Run as Administrator option.
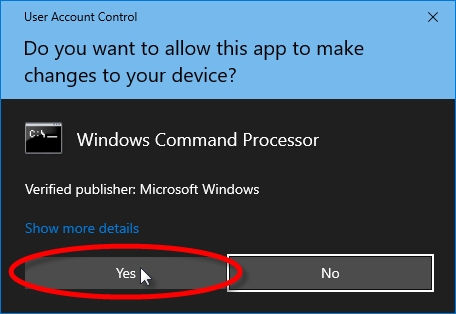
You may get a UAC warning. Click Yes.>
The command prompt will open at the C:\Windows\System32> prompt. Jump to the root of the C:\ drive by typing the following command:
cd\ [ENTER]
navigate to the MD_Install folder by typing the following command at the C:\> prompt:
cd md_install [ENTER]
The prompt will not look like this: C:\MD_Install>. Start the Maitre'D Auxiliary Back-Office setup by typing the following command:
setup.exe aux [ENTER]
Repeat steps 1 through 5 of the Auxiliary Back-Office setup above.
The prompt will not look like this: C:\MD_Install>. Start the Maitre'D Backup Server setup by typing the following command:
setup.exe backup [ENTER]
Related Topics
With the license serial number and commerce name in hand, you can proceed with the license activation.
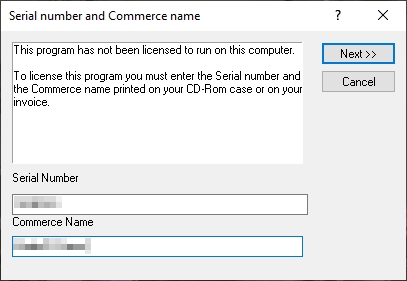
After restarting from the installation of the Maitre’D Back-Office, Auxiliary or Backup Server software, the Maitre’D License Activation prompt will automatically appear.
Enter the required information:
a. Type in the license Serial Number as it appears on your Maitre’D invoice.
b. Type in the Commerce Name as it should appear in the Maitre’D Back-Office, on report headers and on the header of printed guest checks, invoices and receipts.
c. Click Next >> to continue the process.
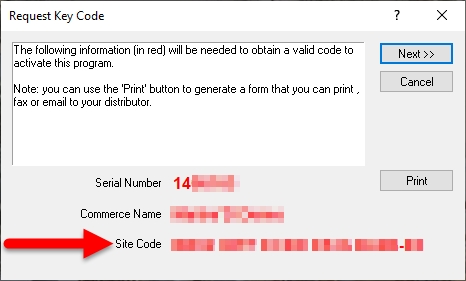
The Site Code will be generated. Select it and copy it to the clipboard.
Logon to the Maitre'D Distributor Portal:
Select your language.
Enter your username and password, then click the Login button.
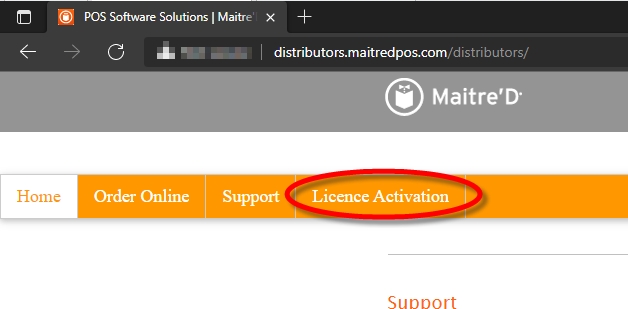
Click the License Activation link, near the top of the page.
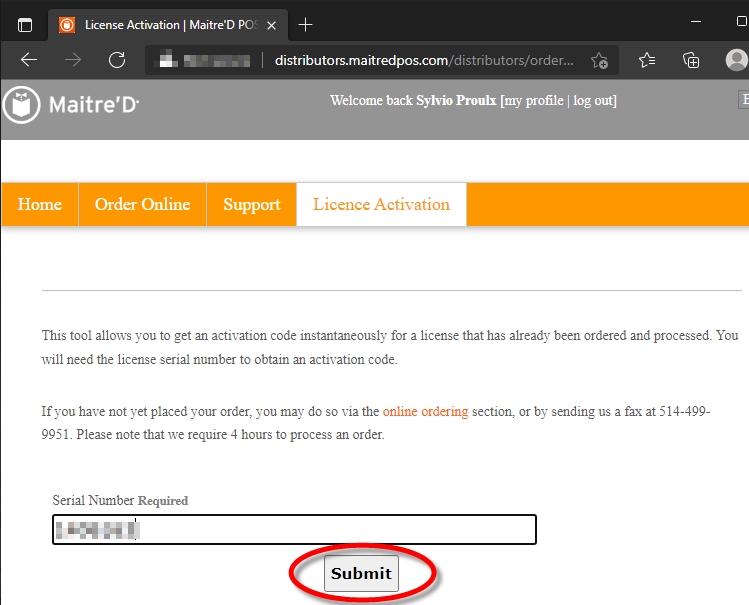
Type in the license serial number and click the Submit button.
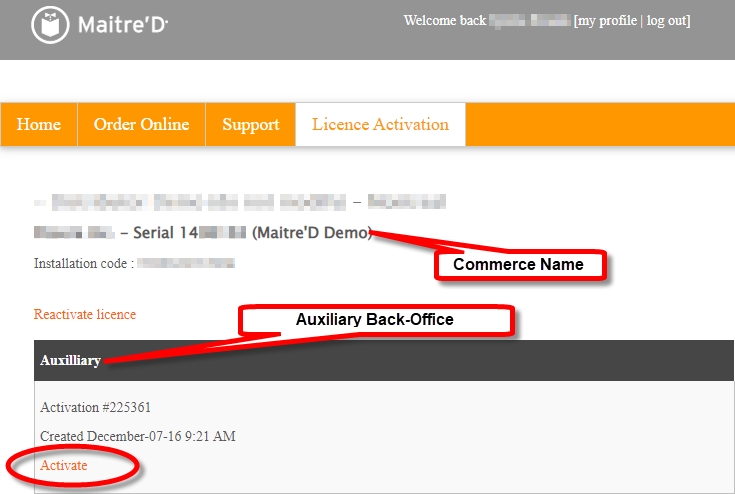
Locate the activation record for your license and click the Activate link.
NOTE: The activation record for the Auxiliary Back-Office is identified by the word "Auxiliary" in the record header. Because the Main Back-Office was already activated, the commerce name is displayed and cannot be modified.
If this is the very first activation of this license, you will be allowed to type in the Restaurant Name (commerce name). This name is case sensitive. Otherwise, the restaurant name will be filled in for you and cannot be modified.
Paste in the Site Code copied earlier.
Click the Generate button.
Your Activation Code (key code) will be generated. Select it and copy it to the clipboard.
Paste the key code (activation code) in the Key Code field and click Next >> to continue.
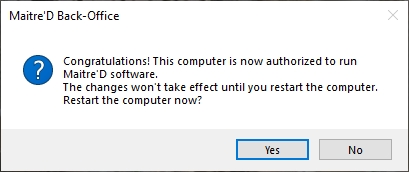
A confirmation prompt will appear, stating that the computer needs to be restarted.
Click Yes to restart your computer.
IMPORTANT! The computer MUST be restarted at this point. Otherwise, the license will not work properly.
After restarting, start the Maitre’D Auxiliary Back-Office by double-clicking the corresponding icon on the Windows Desktop.
The Maitre'D Auxiliary Back-Office Software is now licensed to run on this PC.
With the license serial number and commerce name in hand, you can proceed with the license activation.
After restarting from the installation of the Maitre’D Back-Office, Auxiliary or Backup Server software, the Maitre’D License Activation prompt will automatically appear.
Enter the required information:
a. Type in the license Serial Number as it appears on your Maitre’D invoice.
b. Type in the Commerce Name as it should appear in the Maitre’D Back-Office, on report headers and on the header of printed guest checks, invoices and receipts.
c. Click Next >> to continue the process.
The Site Code will be generated. Select it and copy it to the clipboard.
Logon to the Maitre'D Distributor Portal:
Select your language.
Enter your username and password, then click the Login button.
Click the License Activation link, near the top of the page.
Type in the license serial number and click the Submit button.
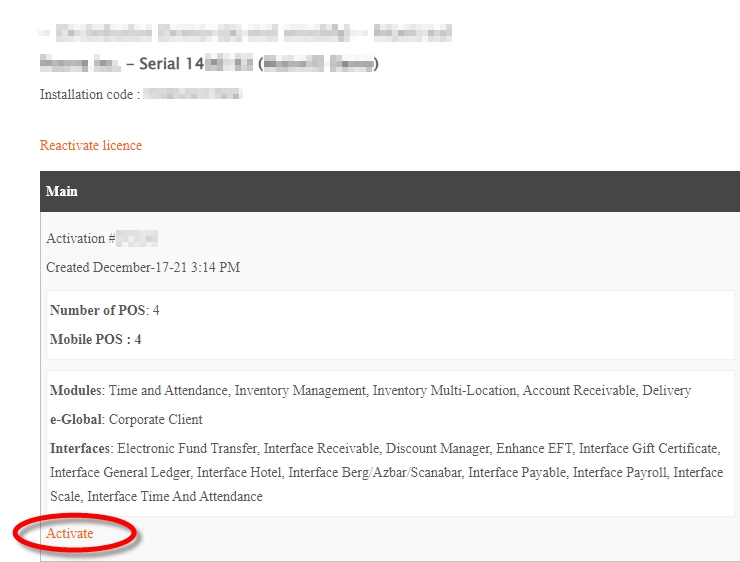
Locate the activation record for your license and click the Activate link.
NOTE: The activation record for the Main Back-Office is identified by the word "Main" in the record header. Also, all the modules and interfaces purchased with the license are listed.
If this is the very first activation of this license, you will be allowed to type in the Restaurant Name (commerce name). This name is case sensitive. Otherwise, the restaurant name will be filled in for you and cannot be modified.
Paste in the Site Code copied earlier.
Click the Generate button.
Your Activation Code (key code) will be generated. Select it and copy it to the clipboard.
Paste the key code (activation code) in the Key Code field and click Next >> to continue.
A confirmation prompt will appear, stating that the computer needs to be restarted.
Click Yes to restart your computer.
IMPORTANT! The computer MUST be restarted at this point. Otherwise, the license will not work properly.
After restarting, the Maitre’D Back-Office Server will attempt to start itself. You may see various progress bars as the Maitre'D database is updated.
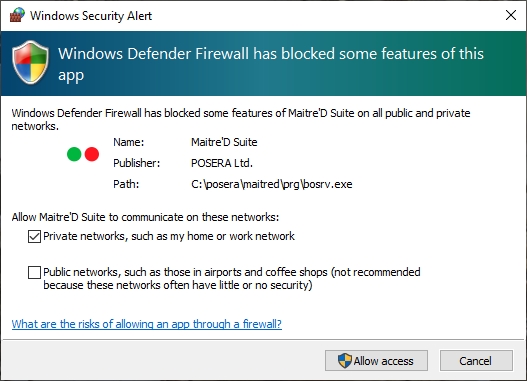
If the Maitre’D Back-Office Server is not already authorized, a Windows Security Alert will be triggered from the Windows Firewall:
a. If the Maitre’D Back-Office computer is on a domain, select the Domain networks, such as a workplace network option.
b. If the Maitre’D Back-Office computer is on a network without a domain, select the Private networks, such as my home or work network option.
c. Click the Allow Access button.
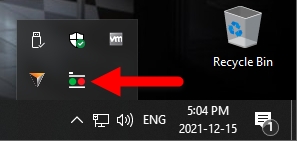
The Maitre'D Back-Office Server will start, and an icon will be added to the notification area.
The Maitre'D Back-Office Software is now licensed to run on this PC.
Follow the steps described in .
The installation process will start. Follow the steps as outlined in the .
The installation process will start. Follow the steps as outlined in the .
Main Back Office - Before Activating the License
Main Back-Office - License Activation
Auxiliary Back - Office - Before Activating the License
Auxiliary Back - Office License Activation
Start the Installation from a DVD (for downloaded DVD Files)
Start the Installation from Downloaded Files
Installation Process for the Maitre'D Back-Office
Installation Process for the Maitre'D Point of Sale
Installation Process for the Maitre'D Auxiliary Back-Office
Installation Process for the Maitre'D Backup Server
DB9 Female
DB9 Female
March 2012
1.0
Initial Release
ALL
May 2013
1.01
Added DB-9 Female to DB-9 Female connection for serial printers.
11
April 2016
1.20
• Revamped document for Maitre’D 7.05.106 and 8.04.000.
• Updated headers, footers and cover page with new company logos.
• Added more details to Document Revision History
ALL
July 2019
1.21
Updated Copyright Information
ALL
November 2021
1.22
• Updated Copyright Information and transferred to PayFacto.
• Added PayFacto logos.
ALL
The very first step to ensure top performance from the network is to obtain and install the very latest available driver for your Network Interface Card (NIC). These drivers can be obtained from the manufacturer of the network interface card or networking chipset. Here is a list of some of the most popular brands and manufacturers: • 3Com • Realtek • Intel • D-Link • Netgear • Cisco / Linksys • Belkin • TRENDnet • StarTech • TP-Link
Very often, Windows will install a Microsoft generic driver for a device. While these drivers allow the device to function at a basic level, it may not be able to unlock all the features of the device. Whenever a device is using a Microsoft generic driver, steps should be taken to obtain and install the latest available manufacturer-approved driver.
If you own a PC that was manufactured by a major manufacturer such as Dell, HP/Compaq, IBM or others, you may not always have the latest drivers provided by the manufacturer. Always check your PC manufacturer’s site first, and then check your NIC manufacturer’s site, in case a more recent driver is available for your device and operating system
Having the very latest driver available is crucial, especially if multiple operating systems are in use in your network, such as Windows Embedded POS Ready 2009 and Windows 7
Network equipment, such as hubs, switches and routers have built-in firmware that can be updated. Check the manufacturer’s website to find the latest available firmware for your hardware, and apply these updates.
The hardware chosen plays a big part in network performance. For example, using an Ethernet switch will provide more bandwidth than a hub at the same speed, due to the full-duplex capability and the elimination of network collisions. Network cables are often neglected, yet they play a big part in the performance as well.
For instance, using Cat5e cables on a Gigabit Ethernet network may work, but you may find that the performance of such a network is worse than a 10BaseT network, because the cables are not suitable for the equipment.
Once the latest drivers are installed for the network hardware, all the available settings and features will be unlocked. These settings and features are very often overlooked. Not only can they improve networking performance, but they can also improve general system performance by freeing up memory and CPU time by relieving the operating system of some basic tasks.
There are far too many manufacturers, device types and models to list all possible settings here. For a complete list of settings and features for your specific hardware, please consult your manufacturer’s website and documentation. Here is a quick list of settings that are common to almost all network adapter cards:
For 100Mbps and gigabit adapters, the speed will most likely be set to some kind of “auto detect” setting. The auto-detect feature generates a small amount of unneeded traffic to detect the speed of the network. If you know the actual speed at which your network is running, then make sure to select the same speed everywhere, instead of using the auto-detect feature. For example, if you have 100Mbps switches and adapters everywhere, then select 100Mbps on all your adapters and other network hardware you may have, such as switches, hubs, routers, etc.
Using components of different speeds on the same network or “Throttling down” generates a lot of overhead that will cause slower components to operate even slower than their nominal speeds.
For example, some newer network equipment supports Gigabit Ethernet (1000 Mbps), while some older equipment may still only support up to 100 Mbps. When working with such a mixed environment, make sure to use the highest common denominator, so that all equipment operates at the same speed setting. For instance, if a switch can operate at 10, 100 and 1000 Mbps but your main back-office computer can only support 10 and 100 Mbps, then configure everything to operate at 100 Mbps.
Typically, available choices are Full Duplex or Half Duplex. An adapter working in Full Duplex can work at full speed while receiving and transmitting at the same time. An adapter working in Half Duplex can work at full speed while receiving, or at full speed when transmitting. If it is doing both at the same time, then the transmit/receive speed is cut in half.
For example, if you have a 100Mbps adapter running in half-duplex, it would be able to transmit at 100Mbps or receive at 100Mbps. However, if it is transmitting and receiving at the same time, then it would transmit at 50Mbps and receive at 50Mbps.
Adapters should always be set to Full Duplex. If that setting is not available, see if a driver update is available, or simply replace the network adapter with one that supports full duplex.
TCP/IP offloading should be enabled on all adapters that support it. This setting forces the network adapter to take care of TCP/IP transmit and receive checksums, instead of the operating system. This frees up CPU time as well as memory, and the adapter card performs much better than the operating system at these tasks. It can improve networking performance as well as general system performance.
October 2013
1.0
Original Release.
N/A
December 2016
2.0
Complete re-write under new corporate template Added contents for Windows 10
ALL
July 2019
2.1
Updated Copyright Information Removed contents related to Windows XP
ALL
November 2021
2.2
Updated Copyright Information and transferred to PayFacto. Added PayFacto logos.
ALL
Microsoft periodically releases updates for its operating systems through an automated engine known as Windows Updates or Microsoft Updates. In many restaurants, workstations simply don’t have Internet access, and are therefore unable to get these important updates. These updates are absolutely necessary to ensure smooth operation of your system, and all updates labeled as “Critical” by Microsoft are absolutely necessary in order to maintain PCI-DSS compliance.
Whenever possible, the back-office PC should be allowed to install Windows updates automatically. However, even with automatic updates, some important updates (often called “recommended updates”) may not be installed. For this reason, you must run Windows Update manually from time to time, and install all recommended updates, not only the critical ones.
Just like the main back-office PC, POS workstations also need to be updated through Windows Updates. If the POS workstations don’t have direct internet access, make sure to get them connected at least periodically so they get all the latest updates and fixes. As with the main back-office PC, make sure to periodically run Windows Updates manually, and install any and all recommended updates in addition to critical updates.
Windows Updates / Microsoft Updates will also update other Microsoft products you may have. If you are using Maitre’D 8, you also have Microsoft SQL Server 2008 R2 installed. Be sure to manually run Microsoft Updates periodically and be on the lookout for available updates and service packs for this product as well.
Here is a list of all default ports and processes commonly used in Maitre’D 8. Use this list to help in building rules and exception for firewalls and Anti-Virus software.
TCP Port 443 Traffic: Inbound and Outbound Protocol: TCP Services: https over SSL/TLS Applications: N/A Network: LAN, WAN and Internet This is the port used by Microsoft B.I.T.S. to securely transfer files from the Maitre’D Back-Office over to Posera’s secured file server. Microsoft B.I.T.S. uses https over SSL/TLS for secure transfer, so this port needs to be open for outbound traffic. Also, this port is required for all https traffic, so it needs to be open for inbound traffic as well.
Traffic: Inbound and Outbound Protocol: TCP Services: Applications Applications: BOSRV.EXE, POS.EXE, STARTER.EXE. Network: LAN only This is the default port used by the Maitre’D Back-Office server to initiate communication with the workstations and needs to be open for inbound and outbound traffic on the local network only. This port is user-configurable in Server Control / View / Options / Advanced / TCP/IP Port.
Traffic: Inbound and Outbound Protocol: TCP Services: Applications Applications: All Maitre’D applications Network: LAN only This port is used by workstations to initiate communication with the Maitre’D Back-Office server and needs to be open for inbound and outbound traffic on the local network only. This port number could change depending on what has been configured as default communication port. The port number will always be Default Port + 1. For instance, if the default port is set to 5000, then workstations will use TCP port 5001 to initiate communications.
Traffic: Inbound and Outbound Protocol: TCP, UDP Services: Applications Applications: BOSRV.EXE, POS.EXE, STARTER.EXE, OCS.EXE, MDTransServer.exe, MDTransClient.exe, UtilityCenter.exe Network: LAN only This port is used by the Maitre’D OCS configuration to communicate between the Maitre’D Back-Office server and all the OCSes operating in the restaurant. This port needs to be open for inbound and outbound traffic on the local network only. Note that UDP broadcasts are used on this port to discover peers.
Traffic: Inbound and Outbound Protocol: TCP Services: Applications Applications: BOSRV.EXE, MDMonitor.exe Network: LAN only This port is used by the Maitre’D Back-Office server to communicate with the Maitre’D Monitor Service (MDMonitor.exe). This port needs to be open for inbound and outbound traffic on the local network only.
Traffic: Inbound and Outbound Protocol: Varies according to service provider Services: Varies according to service provider Applications: BOSRV.EXE, BOSRVEFT.EXE, varies according to service provider. Network: LAN and Internet Ports used for EFT vary according to processors / acquirers. Please review the documentation provided by your EFT processor / acquirer to learn which ports need to be opened. For some interfaces, the TCP port is user-configurable through EFT / View / Options / Interface. In all cases, ports used need to be opened for inbound and outbound traffic over the local network as well as over the internet.
Room Charge Interface (TCP/IP based protocols only) Traffic: Inbound and Outbound Protocol: Varies according to service provider Services: Varies according to service provider Applications: BOSRV.EXE, varies according to service provider. Network: LAN only The TCP port used for the Room Charge / Hospitality / PMS interface is userconfigurable from Server Control / View / Options / Room Charge / Communication / IP Port. Please review the documentation provided by your Room Charge / Hospitality / Property Management software provider
Frequent Diner Interface (Third-party interfaces using TCP/IP only)
Traffic: Inbound and Outbound Protocol: Varies according to service provider Services: Varies according to service provider Applications: BOSRV.EXE, varies according to service provider. Network: LAN and Internet The TCP port used for the Frequent Diner interface is user-configurable from Server Control / View / Options / Frequent Diner / Communication / TCP Port. Please review the documentation provided by your Frequent Diner interface provider.
Traffic: Inbound and Outbound Protocol: Varies according to service provider Services: Varies according to service provider Applications: BOSRV.EXE, BOSRVEFT.EXE, varies according to service provider. Network: LAN and Internet The TCP port used for the Gift Certificate interface is user-configurable from Server Control / View / Options / Gift Certificate / Communication / TCP Port. Please review the documentation provided by your Gift Certificate interface provider.
Traffic: Inbound and Outbound Protocol: Varies according to service provider Services: Varies according to service provider Applications: BOSRV.EXE, MDProcessor.exe, varies according to service provider. Network: LAN and Internet The TCP port used for the Table Management interface is user-configurable from Server Control / View / Options / Table Management / Port. Please review the documentation provided by your Table Management interface provider.
Traffic: Inbound and Outbound Protocol: Varies according to service provider Services: Varies according to service provider Applications: BOSRV.EXE, MDProcessor.exe, varies according to service provider. Network: LAN and Internet
The TCP port used for the Schedule interface is determined by the service provider. In Maitre’D, a URL to communicate with the service provider is configured in Time & Attendance / View / Options / Schedule Interface. Please review the documentation provided by your Table Management interface provider.
In Maitre’D 8, Threaded Communication is always enabled and cannot be disabled. This means that more ports are actually used by Maitre’D to communicate with workstations. With Threaded Comms, Maitre’D receives data over ports 1001 and 1002, and then replies to the workstation over another port so that TCP Ports 1001 and 1002 remain free.
The port number that will be used by Maitre’D to reply to the workstation is determined by the Windows network driver. Typically, the first available port will be used. These extraneous ports are used for outbound communication only, so they should not be blocked by your local firewall. However, firewalls on the receiving end need to be able to accept communication on those ports.
In order to ensure smooth operations, rules should be added to firewalls and anti-virus software so that the following processes and applications are never blocked or scanned:
This is the Main Back-Office server process which needs to be running at all times for your Maitre’D system to work. This process needs to be excluded from virus scans and allowed through the firewall for inbound and outbound communication across the local network only.
This is the process managing all Electronic Funds Transfer (EFT) transactions. This process needs to be excluded from virus scans and allowed through the firewall for inbound and outbound communication across the local network as well as over the internet
This application is actually the Report Center module. It does not need to communicate through firewalls, but it does need to be excluded from virus scans. Historically, this application was often viewed as a virus by many major Anti-Virus suites, and was also very often blocked by Windows’ Data Execution Prevention engine. To ensure smooth operation of reports, this application needs to be excluded from any scan or security feature which can potentially block it.
This is the process that manages the Maitre’D Schedule Interface and the Table Management interface. This process needs to be excluded from virus scans and allowed through the firewall for inbound and outbound communication across the local network as well as over the internet.
Executable name: MDTransServer.exe This service manages communications between Maitre’D and OCS devices on the network. This service needs to be excluded from virus scans and allowed through the firewall for inbound and outbound communication across the local network only.
Executable name: MDTransClient.exe
This service manages communications from OCS devices on the network. This service needs to be excluded from virus scans and allowed through the firewall for inbound and outbound communication across the local network only.
Executable name: MDMonitor.exe
This service oversees special operations with the workstations and also manages the posting of transactions to the SQL Database. This service needs to be excluded from virus scans and allowed through the firewall for inbound and outbound communication across the local network only.
In order to operate properly, Maitre’D 8 requires other services to be running. These services are generally provided by Microsoft, and are automatically configured during the installation of Maitre’D 8.
Executable name: C:\Windows\System32\svchost.exe -k netsvcs
Transfers files in the background using idle network bandwidth. If the service is disabled, then any applications that depend on BITS, such as Windows Update or MSN Explorer, will be unable to automatically download programs and other information.
The Maitre’D Communication Server and Maitre’D Monitor services are both dependant on this service. It needs to be running at all times. This service needs to be excluded from virus scans and allowed through the firewall for inbound and outbound communication on TCP Port 443, for the local network, across corporate WANs and over the internet.
Executable name: fdlauncher.exe
Service to launch full-text filter daemon process which will perform document filtering and word breaking for SQL Server full-text search. Disabling this service will make fulltext search features of SQL Server unavailable.
This service needs to be running at all times, be excluded from virus scans and allowed through the firewall for inbound and outbound communication across the local network only.
Executable name: Sqlservr.exe
Provides storage, processing and controlled access of data, and rapid transaction processing. This service needs to be running at all times, be excluded from virus scans and allowed through the firewall for inbound and outbound communication across the local network only.
Executable name: SqlAgent.exe
Executes jobs, monitors SQL Server, fires alerts, and allows automation of some administrative tasks. This service needs to be running at all times, be excluded from virus scans and allowed through the firewall for inbound and outbound communication across the local network only.
Executable name: Sqlbrowser.exe
Provides SQL Server connection information to client computers
This service needs to be running at all times, be excluded from virus scans and allowed through the firewall for inbound and outbound communication across the local network only.
Executable name: ReportingServicesService.exe
Manages, executes, renders, schedules and delivers reports.
This service needs to be running at all times, be excluded from virus scans and allowed through the firewall for inbound and outbound communication across the local network only.
Executable name: SQLWriter.exe
Provides the interface to backup/restore Microsoft SQL server through the Windows VSS infrastructure.
This service needs to be running at all times, be excluded from virus scans and allowed through the firewall for inbound and outbound communication across the local network only.
User Account Control (UAC) is a technology and security infrastructure introduced with Microsoft's Windows Vista and Windows Server 2008 operating systems, with a more relaxed version also present in Windows 7, Windows Server 2008 R2, Windows 8, Windows Server 2012 and Windows 10. It aims to improve the security of Microsoft Windows by limiting application software to standard user privileges until an administrator authorizes an increase or elevation. In this way, only applications trusted by the user may receive administrative privileges, and malware should be kept from compromising the operating system. In other words, a user account may have administrator privileges assigned to it, but applications that the user runs do not inherit those privileges unless they are approved beforehand or the user explicitly authorizes it.
DO NOT disable UAC. Before installing Maitre’D, make sure that UAC is active and set to the default (Recommended) level. As a security feature, UAC is required to operate at all times on all Windows systems that support it. This is also necessary to maintain PCI-DSS compliance on all systems using Electronic Funds Transfer, even in EMV environments.
NOTE: In Windows 8.1 and Windows 10, disabling UAC will cause some operating system features to stop working. Also, installing any software in a “non-UAC” environment and re-enabling UAC afterwards WILL cause issues. For instance, automatic End of Day may not work, or you may be unable to start or stop the Maitre’D Back-Office server from the Server Control module.
On the Main Back-office PC, the MaitreD folder, located in C:\POSERA\MaitreD, needs to be shared for all workstations to see. All workstations need Full Control over that shared folder, as files will be read, written, modified, deleted, and executed.
If Windows 7 is in use, please see the Advanced Sharing options section above.
On the backup server, the MaitreD folder, located in C:\POSERA\MaitreD, is not shared. However, it will automatically become shared if the backup server needs to take over from a failed main back-office. Therefore, the user which is logged on to Windows on that PC needs to have enough access to be able to change sharing settings. The application that will change the sharing is bosrv.exe.
Here is a list of all default ports and processes commonly used in Maitre’D 7. Use this list to help in building rules and exception for firewalls and Anti-Virus software.
Traffic: Inbound and Outbound Protocol: TCP Services: Applications Applications: BOSRV.EXE, POS.EXE, STARTER.EXE. Network: LAN only This is the default port used by the Maitre’D Back-Office server to initiate communication with the workstations and needs to be open for inbound and outbound traffic on the local network only. This port is user-configurable in Server Control / View / Options / Advanced / TCP/IP Port.
Traffic: Inbound and Outbound Protocol: TCP Services: Applications Applications: All Maitre’D applications Network: LAN only This port is used by workstations to initiate communication with the Maitre’D Back-Office server and needs to be open for inbound and outbound traffic on the local network only. This port number could change depending on what has been configured as default communication port. The port number will always be Default Port + 1. For instance, if the default port is set to 5000, then workstations will use TCP port 5001 to initiate communications.
Traffic: Inbound and Outbound Protocol: Varies according to service provider Services: Varies according to service provider Applications: BOSRV.EXE, BOSRVEFT.EXE, varies according to service provider. Network: LAN and Internet Ports used for EFT vary according to processors / acquirers. Please review the documentation provided by your EFT processor / acquirer to learn which ports need to be opened. For some interfaces, the TCP port is user-configurable through EFT / View / Options / Interface. In all cases, ports used need to be opened for inbound and outbound traffic over the local network as well as over the internet.
NOTE: A lot of providers use TCP Port #443 (HTTPS), but some may use other ports as well.
Traffic: Inbound and Outbound Protocol: Varies according to service provider Services: Varies according to service provider Applications: BOSRV.EXE, varies according to service provider. Network: LAN only The TCP port used for the Room Charge / Hospitality / PMS interface is userconfigurable from Server Control / View / Options / Room Charge / Communication / IP Port. Please review the documentation provided by your Room Charge / Hospitality / Property Management software provider.
Frequent Diner Interface (Third-party interfaces using TCP/IP only)
Traffic: Inbound and Outbound Protocol: Varies according to service provider Services: Varies according to service provider Applications: BOSRV.EXE, varies according to service provider. Network: LAN and Internet The TCP port used for the Frequent Diner interface is user-configurable from Server Control / View / Options / Frequent Diner / Communication / TCP Port. Please review the documentation provided by your Frequent Diner interface provider.
Traffic: Inbound and Outbound Protocol: Varies according to service provider Services: Varies according to service provider Applications: BOSRV.EXE, BOSRVEFT.EXE, varies according to service provider. Network: LAN and Internet The TCP port used for the Gift Certificate interface is user-configurable from Server Control / View / Options / Gift Certificate / Communication / TCP Port. Please review the documentation provided by your Gift Certificate interface provider.
Traffic: Inbound and Outbound Protocol: Varies according to service provider Services: Varies according to service provider Applications: BOSRV.EXE, MDProcessor.exe, varies according to service provider. Network: LAN and Internet The TCP port used for the Table Management interface is user-configurable from Server Control / View / Options / Table Management / Port. Please review the documentation provided by your Table Management interface provider.
Traffic: Inbound and Outbound Protocol: Varies according to service provider Services: Varies according to service provider Applications: BOSRV.EXE, MDProcessor.exe, varies according to service provider. Network: LAN and Internet The TCP port used for the Schedule interface is determined by the service provider. In Maitre’D, a URL to communicate with the service provider is configured in Time & Attendance / View / Options / Schedule Interface. Please review the documentation provided by your Table Management interface provider.
If your system has the Threaded Communication enabled (ThreadedComm=2 in the bo.ini) more ports are actually used by Maitre’D to communicate with workstations. With this option enabled, Maitre’D receives data over ports 1001 and 1002, and then replies to the workstation over another port so that TCP Ports 1001 and 1002 remain free.
The port number that will be used by Maitre’D to reply to the workstation is determined by the Windows network driver. Typically, the first available port will be used. These extraneous ports are used for outbound communication only, so they should not be blocked by your local firewall.
In order to ensure smooth operations, rules should be added to firewalls and anti-virus software so that the following processes and applications are never blocked or scanned:
This is the process managing all Electronic Funds Transfer (EFT) transactions. This process needs to be excluded from virus scans and allowed through the firewall for inbound and outbound communication.
This application is actually the Report Center module. It does not need to communicate through firewalls, but it does need to be excluded from virus scans or other software which may interpret BoReport.exe’s behavior as a threat.
This is the process that manages E-Global Head-Office server communication with restaurants. If used, this process needs to be excluded from virus scans and allowed through the firewall for inbound and outbound communication.
This is the process that manages E-Global communication from the restaurant to the Head-Office server. If used, this process needs to be excluded from virus scans and allowed through the firewall for inbound and outbound communication.
This is the process that manages the Maitre’D Schedule and Table Management Interfaces. If used, this process needs to be excluded from virus scans and allowed through the firewall for inbound and outbound communication.
On corporate networks with high levels of security and restrictions, Security Alerts about security certificates like the examples below may appear:
NOTE: Dialog boxes may differ slightly depending on your Windows version and your language settings.
To resolve this issue :
1- Ask the network administrator or IT department to unblock / whitelist the following
Once you receive confirmation from your IT department or network administrator that the URL has been unblocked or whitelisted, you can confirm that the issue is resolved by following these steps:
1- open an internet browser window (Google Chrome, Microsoft Edge, Firefox, etc…), then copy the URL below and paste it into your browser’s address bar:
http://ocsp.pki.goog/GTSGIAG3/MFEwTzBNMEswSTAJBgUrDgMCGgUA BBT27bBjYjKBmjX2jXWgnQJKEapsrQQUd8K4UJpndnaxLcKG0IOgfqZ% 2BuksCEAMtBRMuCmJTJfoYmAg9mqk%3D
2- A prompt to download a file should appear.
NOTE: The appearance of the dialog may differ depending on your browser and Windows version used.
3- Click the Cancel button. (There is no need to actually download this file. The simple fact that the download prompt comes up is enough to tell that the URL was correctly unblocked.)
The issue is now resolved.
1- Click the Windows 7 Orb, and select the Control Panel option.
2- Under Network and Internet, click on View network status and tasks.
3- On the left-hand side, click on Change adapter settings.
4- Select the Local Area Connection, or any connection you use to connect to the Maitre’D network, and click the Advanced menu.
a. If you can’t see the menu bar, click on the Organize button, point to Layout and click on the Menu Bar option.
5- From the Advanced menu, select the Advanced Settings… option.
6- As the Advanced Settings window opens on the Adapters and Bindings tab, locate the Local Area Connection in the top part of the window.
7- Select the Local Area Connection, and click the green up-arrow button to move it towards the top of the list.
8- Make sure that the Local Area Connection is at the very top of the list.
9- Make sure that the Local Area Connection remains selected. Then, using the same method as described above, make sure that the Internet Protocol Version 4 (TCP/IPv4) is listed first under each binding.
10-Repeat step #9 for each connection. For example, if you have multiple NIC cards, wireless adapters or VPN connections, make sure that the TCP/IPv4 protocol comes first for each of them.
11-Click on the Provider Order tab, and locate the Microsoft Windows Network provider.
12-Select the Microsoft Windows Network provider, and click the green up-arrow until it reaches the top of the list.
13-Click OK to save your settings and close this window.
14-Repeat these steps for each and every connection you use for Maitre’D on this PC, if there is more than one.
15-Repeat these steps on all Windows 7 PCs across your network.
The 128 bit TCP/IPv6 is the protocol that is meant to replace the current 32 bit TCP/IPv4 protocol. However, as of November 2016, TCP/IPv6 traffic barely represents 16% of all the Internet traffic monitored by Google1 . Furthermore, TCP/IPv6 used in conjunction with TCP/IPv4 on the same system is known to have caused communication issues.
For these reasons, it is recommended that the TCP/IPv6 be disabled on all systems that support it. These include:
• Windows 7 • Windows 8.1 • Windows 10 • Windows Server 2008
Before disabling the TCP/IPv6 protocol, please ensure that it is not used within the organization and that there are no plans to do so in the near future. Also, please confirm this information with the local IT department or system administrator. Note that disabling the TCP/IPv6 is not permanent. It can very easily be re-enabled should it be required in the future.
1- Click the Windows 7 Orb, and select the Control Panel option.
2- Under Network and Internet, click on View network status and tasks
3- On the left-hand side, click on Change adapter settings.
4- Right-Click the Local Area Connection, or any connection you use to connect to the Maitre’D network, and select the Properties option.
5- The Local Area Connection Properties window will open. Remove the check mark from Internet Protocol Version 6 (TCP/IPv6).
6- Click OK to save the changes, and close all other remaining windows.
If there is a need to re-enable Internet Protocol Version 6 (TCP/IPv6), simply follow the exact same steps as described above to reach the local area connection properties, and re-enable the checkmark.
The instructions below only apply to the Windows 7 or later operating systems. These are new options that were not available in previous versions.
1- Click on the Windows 7 start button, and select the Control Panel option.
2- Click on Network and Internet
3- Click Network and Sharing Center.
4- On the left-hand side, click Change advanced sharing settings.
5- Configure the settings for Domain and Work profiles as illustrated on the following page.
a. Select Turn on network discovery. b. Select Turn on file and printer sharing. c. Select Turn off Public Folder sharing. d. Select Use 128-bit encryption to help protect file sharing connections.
Normally, all the required exceptions are automatically added to the Windows firewall the first time you start Maitre’D. However, to ensure fluid communications between multiple operating systems, additional firewall rules could be setup.
Here are the instructions to create rules in the Windows Firewall under Windows XP Professional. These steps are somewhat similar to those of Windows 7. Of course, there are other Firewalls available, but there are far too many to give detailed instructions about all of them. For more details on setting up rules for other firewalls, please consult the documentation that was provided with the software that you purchased.
1- Click the Windows Start button, and select the Control Panel option.
NOTE: The screenshots were taken on Windows XP. Settings for Windows 7, 8.1 and 10 are similar.
2- Double-click on Windows Firewall
3- Click on the Exceptions tab.
4- Click on Add Program…
5- Click Browse…
6- Browse to C:\POSERA\MaitreD\PRG, select the file called bosrv.exe, and click Open.
7- The program will be displayed in the list.
8- Repeat the above steps for the following programs, which are all located under C:\POSERA\MaitreD\PRG.
a. Bosrveft.exe b. Boreport.exe
9- Click OK to close this window.
10-You will be back to the Exceptions tab. Now, click on Add Port.
11- You will be opening port 1001 on the firewall. This port is used for Workstation communication. Therefore, give a meaningful name to this rule, such as “Maitre’D Workstations”, and type in 1001 in the port number field.
12- Select the TCP option, and then click OK to save this rule. 13-Create another port rule for port 1002 using the same steps as above. 14-Lastly, click OK to save your settings and close the Windows Firewall configuration window.
If you have a different firewall or if you are using a different version of Windows, please consult the relevant documentation which came with your software to learn how to setup exceptions and rules.
Please read the next section for a complete list of ports and applications used in Maitre’D 7.05 and Maitre’D 8.
Windows Server 2003, Windows Server 2008 and Windows Server 2012 all have the Data Execution Prevention (DEP) security tool enabled for all programs and services by default. This feature is required for security purposes, and should never be disabled for any reason. This feature prevents applications from running malicious code on your server and is essential for its protection. It is also required for PCI-DSS compliance.
However, Maitre’D processes and executable files need to be excluded from DEP in order for some Maitre’D features to work properly. This section will explain how to exclude Maitre’D files and processes from DEP.
NOTE: On Windows XP, Windows 7 and Windows 8, DEP is enabled only for essential Windows programs and services by default. Therefore, the configuration explained in the following section does not need to be applied to these operating systems.
1- Click the Windows Server 2008 Start button, and select Control Panel.
2- Select System and Security.
3- Select System
4- On the left-hand side, click on Advanced System Settings.
5- The System Properties window will open on the Advanced tab. Click the Settings… button located in the Performance section.
6- Click the Data Execution Prevention tab, and click the Add… button.
7- Select the executable file to be excluded from DEP, and click the Open button.
8- A new entry will be added to the DEP list as Maitre’D Suite.
9- Repeat the process for all Maitre’D executables that need to be excluded from DEP. They will all be listed as Maitre’D Suite. This is normal.
All versions
• C:\POSERA\MaitreD\PRG\BoSrv.exe • C:\POSERA\MaitreD\PRG\BoSrvEFT.exe • C:\POSERA\MaitreD\PRG\Bo.exe • C:\POSERA\MaitreD\PRG\Boar.exe • C:\POSERA\MaitreD\PRG\Bocnfg.exe • C:\POSERA\MaitreD\PRG\Bodeliv.exe • C:\POSERA\MaitreD\PRG\Boeft.exe • C:\POSERA\MaitreD\PRG\Bofloor.exe • C:\POSERA\MaitreD\PRG\Bogl.exe • C:\POSERA\MaitreD\PRG\Boinv.exe • C:\POSERA\MaitreD\PRG\Bopos.exe • C:\POSERA\MaitreD\PRG\BoReport.exe • C:\POSERA\MaitreD\PRG\BoTa.exe • C:\POSERA\MaitreD\PRG\Converter.exe • C:\POSERA\MaitreD\PRG\Mapper.exe • C:\Windows\System32\Crypserv.exe • C:\ProgramData\Posera\Maitre'D\8(or 7)\Crp32002.ngn
Maitre’D 7.05 only
• C:\POSERA\MaitreD\PRG\BoUtil.exe
Maitre’D 8.0 only
• C:\POSERA\MaitreD\PRG\DatabaseCenter.exe • C:\POSERA\MaitreD\PRG\BoSafe.exe • C:\POSERA\MaitreD\PRG\MDAgent.exe • C:\POSERA\MaitreD\PRG\MDEODMonitor.exe • C:\POSERA\MaitreD\PRG\MDMonitor.exe • C:\POSERA\MaitreD\PRG\MDProcessor.exe
URL:


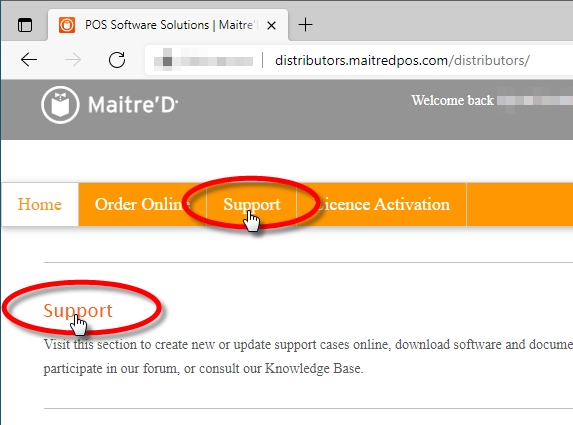


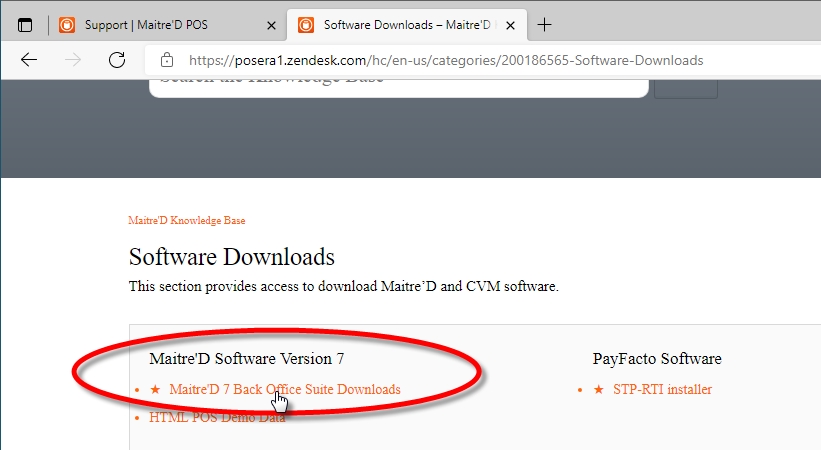
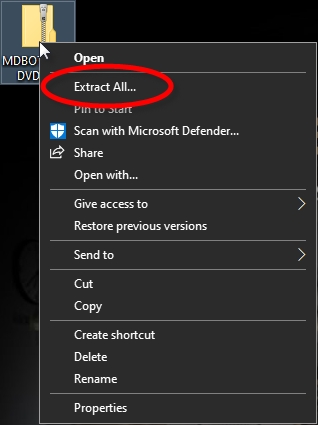

To facilitate reading and interpretation of hardware requirements, they are broken down in 3 tiers:
The minimum requirement is the bare minimum that will allow the Maitre'D Advanced POS User Interface to operate adequately, without any consideration for possible expansion or "future-proofing".
The recommended hardware configuration should yield adequate performance in most situations and provide headroom for future expansion of the system.
The hardware configuration for large sites should yield adequate performance in restaurants using 20 or more POS workstations. This requirement also applies to restaurants with high volume of orders, where the number of POS workstations may not be as high as 20, but where the POS Workstations are in near-constant use.
Hardware
Recommended
Large sites
Operating System
CPU
Intel Core i5 2300 series
or better
Intel Core i7 2600 series
or better
RAM
8Gb
16Gb
Storage
SATA SSD
5Gb (installation)
+
10Gb (storage)
NVMe SSD
5Gb (installation)
+
10Gb (storage)
Graphics
DirectX 9 compatible or later
DirectX 9 compatible or later
Display
1920 x 1080
1920 x 1080
Network
Gigabit
Gigabit or better
Pointing Device
Mouse or equivalent
Mouse or equivalent
Printer (optional)
Ink jet or laser,
US Letter or A4
Ink jet or laser,
US Letter or A4
Hardware
Minimum
Recommended
High Volume
Operating System
CPU
1 Ghz
Any Dual Core
Dual Core, 2 Ghz or better
RAM
4Gb
4Gb
4Gb
Storage (free space)
500Mb
500Mb
500Mb
Graphics
DirectX 9 compatible or later
DirectX 9 compatible or later
DirectX 9 compatible or later
Display
800 x 600
1024 x 768
1024 x 768 or better
Network
Gigabit
Gigabit
Gigabit or better
Pointing Device
Resistive touch screen
Projected Capacitive touch screen
Projected Capacitive touch screen
Hardware
Minimum
Recommended
High Volume
Operating System
Windows 10 Pro, IoT, Enterprise
Windows 11
Windows 10 Pro, IoT, Enterprise
Windows 11
Windows 10 Pro, IoT, Enterprise
Windows 11
CPU
Intel Celeron J1900
or better
Intel Celeron J4105
or better
Intel Core i3 2100 series
or better
RAM
4Gb
8Gb
8Gb
Storage (free space)
1Gb
1Gb
1Gb
Graphics
DirectX 11 compatible or later
DirectX 11 compatible or later
DirectX 11 compatible or later
Display
1024 x 768
1024 x 768 or better
1024 x 768 or better
Network
Gigabit
Gigabit
Gigabit or better
Pointing Device
Resistive touch screen
Projected Capacitive touch screen
Projected Capacitive touch screen
Hardware
Minimum
Recommended
Operating System
Android 10
Android 11 or later
CPU
Samsung Exynos 9611 or better
Qualcomm Snapdragon 662 or better
Unisoc Tiger T618 or better
Samsung Exynos 990 or better
Qualcomm Snapdragon 865 or better
RAM
4Gb or more
6Gb or more
Storage
32Gb or more
64Gb or more
Screen Size
10'' or more
10'' or more
Screen Resolution
1080 x 1920 or better
1200 x 2000 or better
Hardware
Minimum
Recommended
Operating System
iOS 14
iOS 14 or later
CPU
Apple A10X Fusion or better
Apple A12 Bionic or better
RAM
3Gb or more
3Gb or more
Storage
32Gb or more
64Gb or more
Screen Size
10'' or more
10'' or more
Screen Resolution
1080 x 1920 or better
1200 x 2000 or better
In some cases, Windows 11 may have more stringent hardware requirements than Maitre'D. If you wish to use your POS system with Windows 11, these requirements need to be accounted for:
CPU
RAM
4 gigabyte (GB) for POS workstations or 8 gigabyte (GB) for a back-office PC, auxiliary back-office, or backup server.
Storage
64 GB or larger.
System Firmware
UEFI, Secure Boot capable.
TPM
Trusted Platform Module (TPM) version 2.0.
Graphics Card
Compatible with DirectX 12 or later with WDDM 2.0 driver.
Display
High definition (720p) display that is greater than 9'' diagonally, 8 bits per color channel.
Additional Information
List of compatible Intel Processors
These settings need to be configured in Internet Explorer, or directly in the Internet Options in the Windows Control Panel. This only applies to Maitre’D 8.0 or later.
These settings are meant to resolve the issue where a Windows logon prompt would appear while trying to load the Maitre’D 8.0 KPI reports.
1- Click on the Windows 7 start button, and select the Control Panel option
2- Click on Network and Internet.
3- Click Internet Options.
4- Click on the Security tab, then on Local Intranet and then click on Custom Level…
5- Scroll all the way down the list and choose Automatic logon with current user name and password
6- Click OK to close this window.
7- Make sure that all instances of Internet Explorer and all Maitre’D Modules are closed, then start the Maitre’D Back-Office again. You should no longer be prompted for your Windows Username and password
If you are still being prompted for a Windows username and password, try rebooting the computer. If it is still doing it after the reboot, then you may need to enable the same configuration for the Internet zone.
8- Follow the same steps as above to reach the Internet options.
9- This time, from the Security tab, select Internet and perform the same configuration as explained for the Local Intranet zone.
1 Gigahertz (GHZ) or faster, with 2 or more cores on a or System on a Chip (SoC).
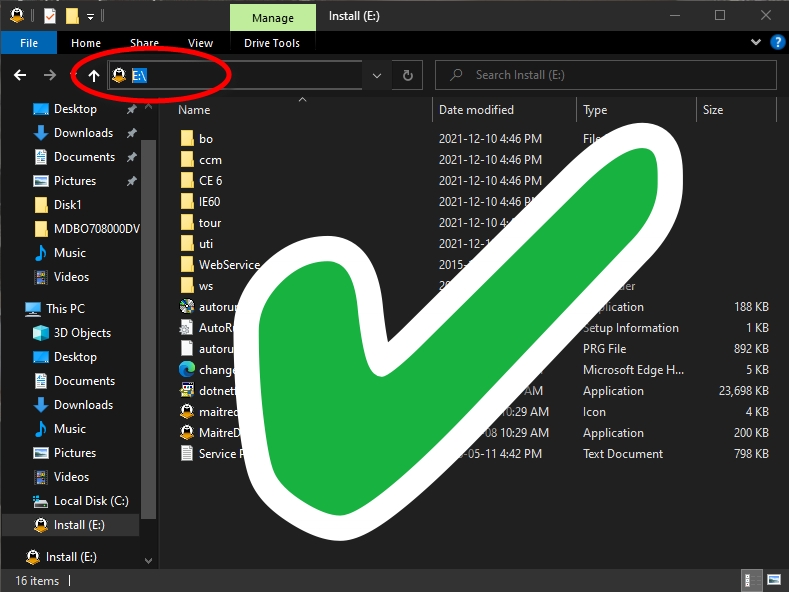
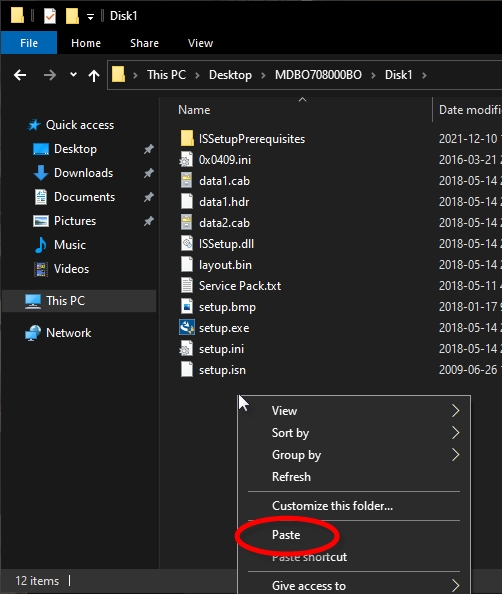
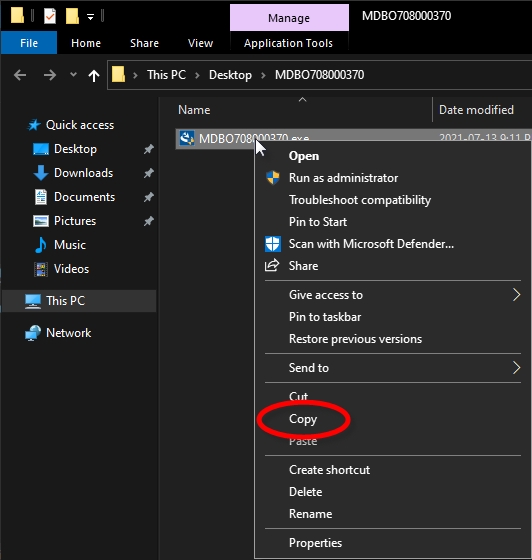


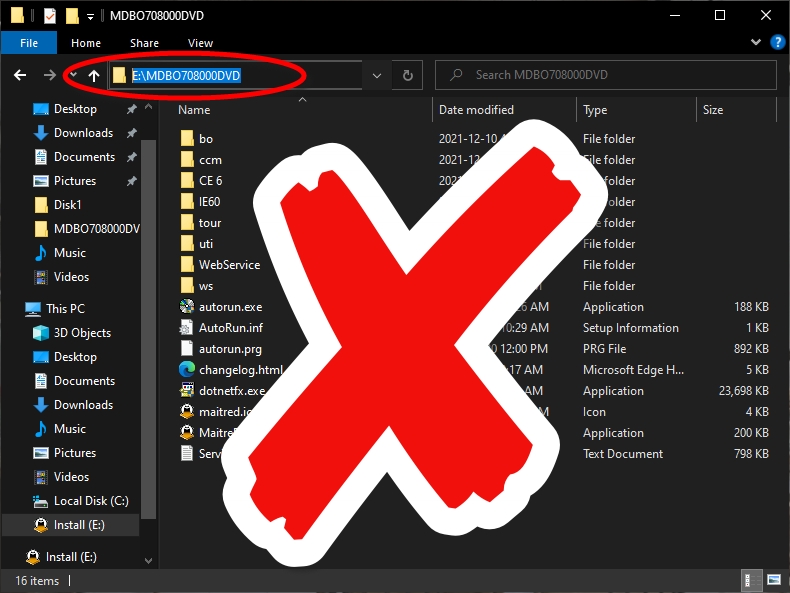
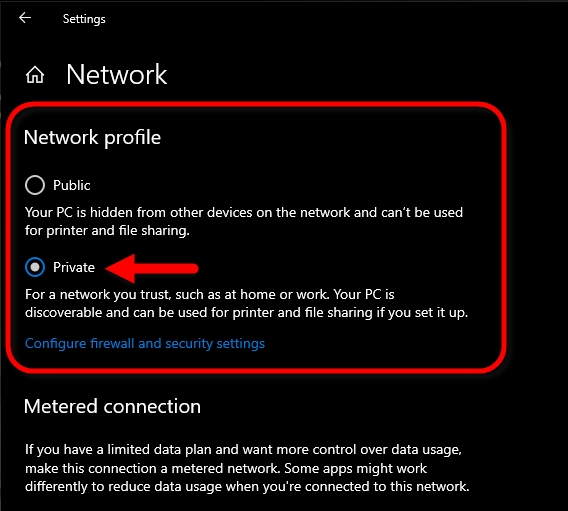
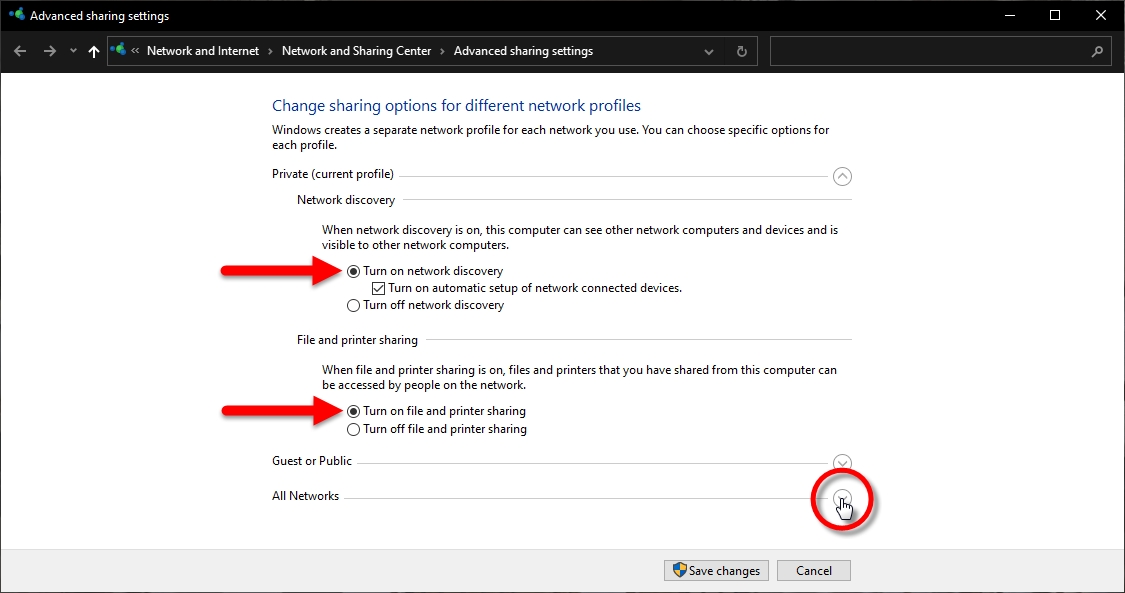
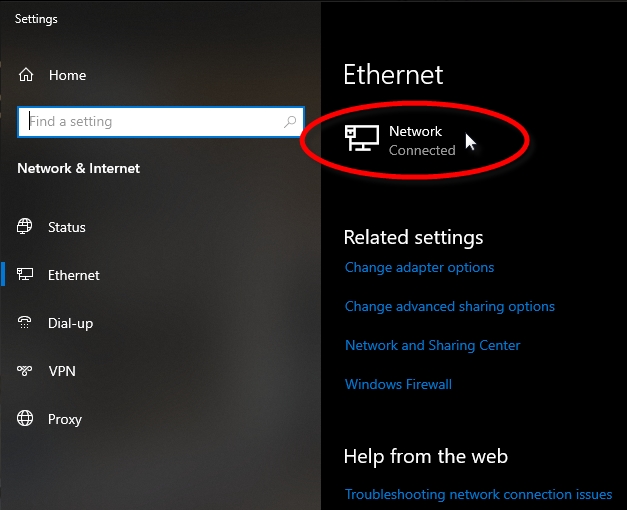


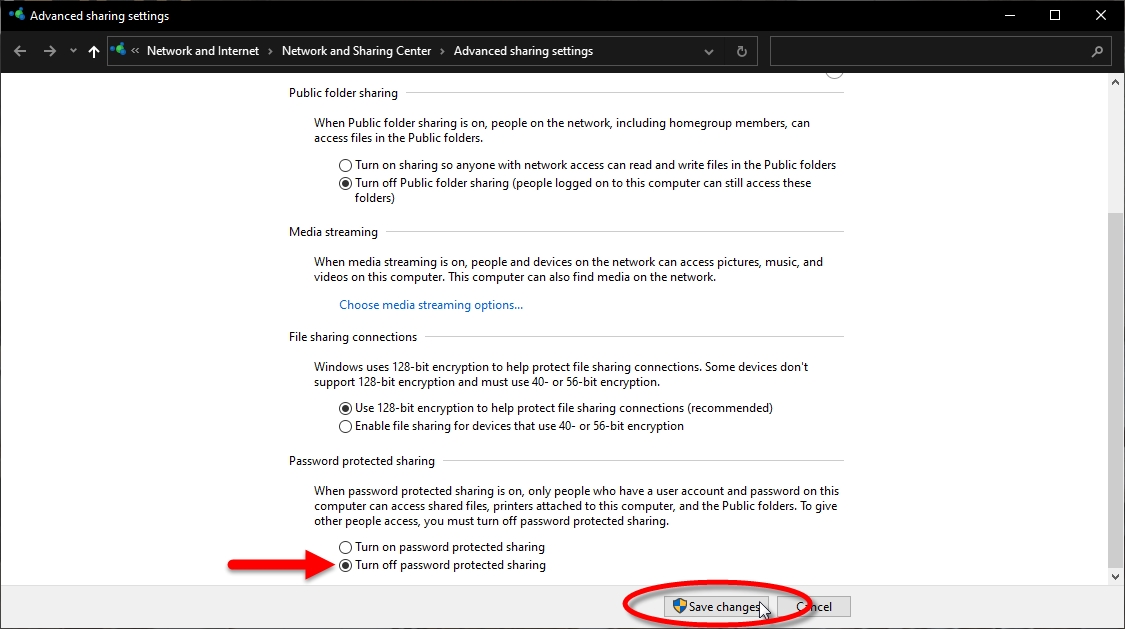

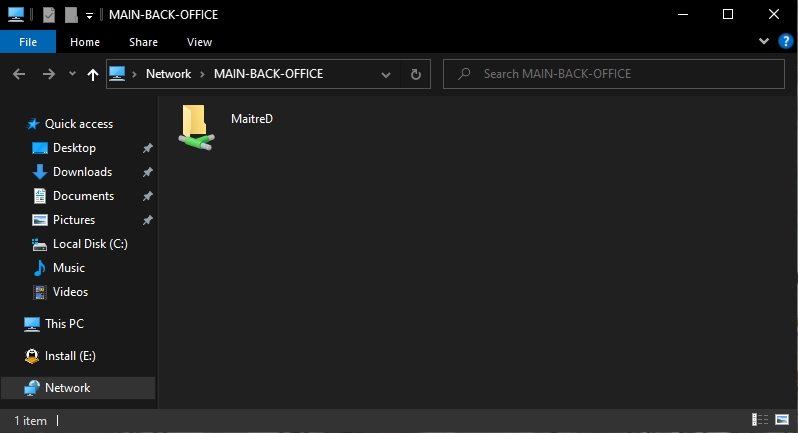
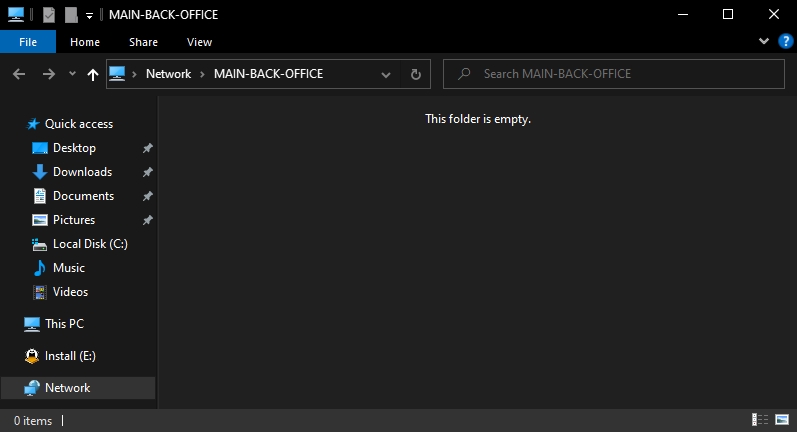
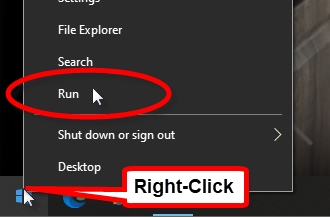

Originally, the Maitre'D installer was shipped on a physical DVD. Being fully aware that many recent laptops and even full-sized desktop computers are no longer shipped with optical drives, and also to reduce e-waste and shipping costs, the files are available for download from the Maitre'D Distributor Portal.
Instructions to download files are provided here:
Insert the DVD in the DVD-ROM drive.
The disk should auto-play.
Use File Explorer to browse your DVD-ROM drive.
Double-click Autorun.exe.
Copy all the DVD files to the root of a removable media, such as a USB thumb drive.
Use File Explorer to browse the removable media.
Double-click Autorun.exe.
As the Autorun tool starts, you may see a Windows User Account Control (UAC) message. Click Yes.
The first installer screen will be displayed:
Select the option to take a tour of Maitre'D.
Select this option to install the Maitre'D Back-Office Server, Backup Server, Auxiliary Server or Point of Sale software. This will open another menu page with all necessary installation options.
Select this option to install the Maitre'D e-Global solution. This will open another menu page with all necessary installation options.
IMPORTANT! The DataBoard option listed here is obsolete. Please consult up-to-date DataBoard documentation and installation instructions here:
Select this option to view contact information.
IMPORTANT! This will display old Posera contact Information. Please contact PayFacto instead. View up-to-date contact information here:
Select this option to exit from the installer.
Select this option to install the Maitre'D Main Back-Office server software.
The Maitre'D Back-Office needs to be installed prior to any other Maitre'D application. After a successful installation, you will be able to proceed with the installation of the Point of Sale application, and any other software required, such as the Auxiliary Back-Office or Backup Server.
Select this option to install a Maitre'D Auxiliary Back-Office.
Install this program if you want access to the Maitre'D Back-Office software, with multi-user capability, from any other computer on the Maitre'D network. This program needs to be installed on each computer that you want to access the Back-Office from.
Select this option to install a Maitre'D Backup Server.
The Backup Server will provide additional security to your network by including full redundancy of the Maitre'D Back-Office software on any Point of Sale workstation or any other computer in your network.
Select this option to install the Maitre'D Point of Sale software on a workstation.
The Maitre'D Point of Sale provides you with every function needed in the restaurant industry. Table management, QSR, Delivery, Take-out, Drive-Thru and more. The Point of Sale software can be installed on a wide variety of hardware and supports several devices such as: Printers, scanners, scales, coin dispensers, liquor control systems, etc.
Select this option to return to the previous screen.
To start the installation of the Maitre'D Back-Office, select the first option: Install Main Back-Office. This will launch the Maitre'D Back-Office InstallShield Wizard.
Select this option to install the Maitre'D e-Global Solution.
The Maitre'D e-Global corporate solution is a powerful package developed to bring increased efficiency to multi-unit food service corporations. It allows them to receive data from all units at the frequency they desire. e-Global also allows them to manage each unit's database remotely, providing more control over menus, promotions and prices.
Do not use this option, as this version of DataBoard is now obsolete.
IMPORTANT! The DataBoard option listed here is obsolete. Please consult up-to-date DataBoard documentation and installation instructions here:


Maitre'D Installation Guide


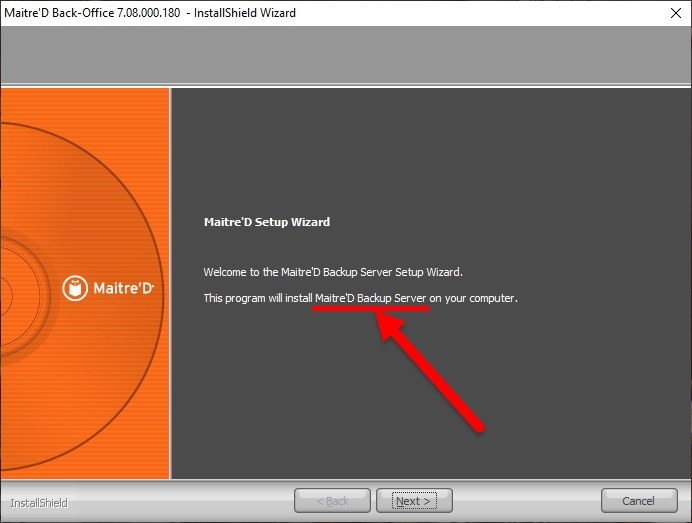
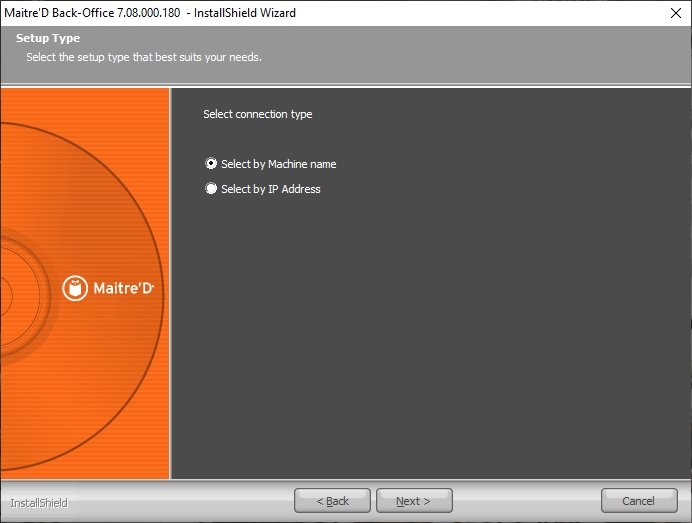
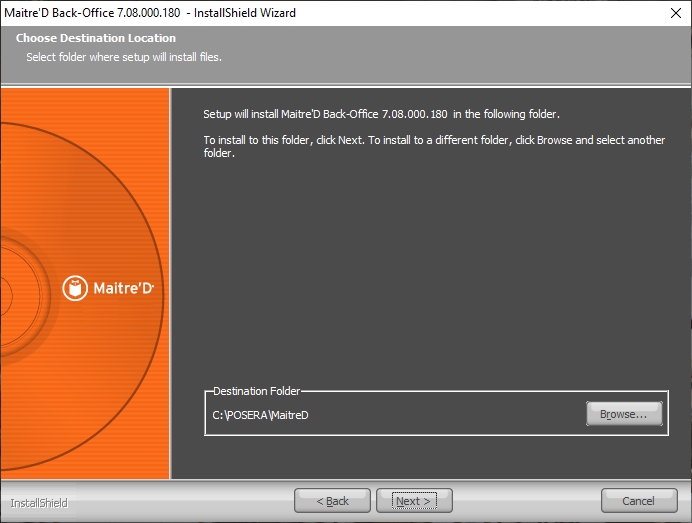
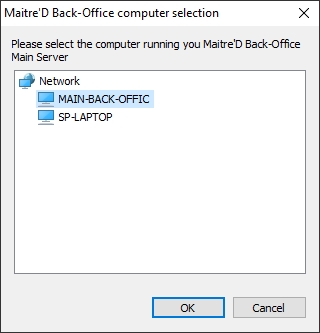
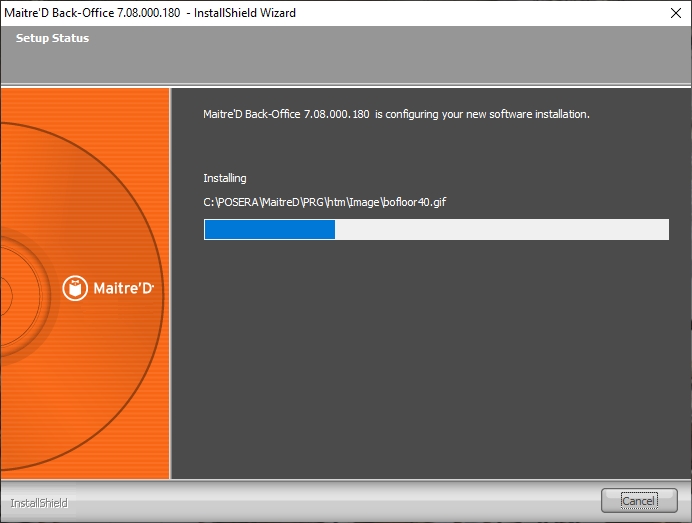
A UTP Patch Cable is used to connect a device (PC, laptop, workstation, etc.) to an Ethernet hub or switch. Factory-made patch cables can be purchased in almost any computer hardware or electronics store.
A UTP Cross-Over cable can be used to connect two Ethernet devices together without using an Ethernet hub or switch. Factory-made Cross-Over cables can be purchased in almost any computer hardware or electronics store. Cross-Over cables can be recognized by the use of different colors for their connectors, generally red and blue.
In order to save on costs and customize the length of your cables, you can make your own connections using bulk cable, appropriate 8P8C plugs and a suitable crimping tool. In order for your cables to work and to ensure interchangeability, some standards need to be followed.
Two standards are in use when creating connections for UTP cables. Generally speaking, it does not matter which standard you choose, as long as you use the same standard across the entire installation. However, the most commonly used standard today is TIA/EIA 568-B.
The total length of a UTP cable run should never be greater than 100 meters (330 feet), all cable types combined, between two active (powered) Ethernet devices. Active Ethernet devices include computers, workstations, hubs, switches, routers and repeaters.
Because stranded cable becomes less reliable as distance increases, its use needs to be limited to two lengths of up to 5 meters each (16 feet), at each end of a single cable run. For example, you could use a 5-meter patch cable between a computer and a wall jack, and another 5-meter patch cable from the patch panel to the Ethernet switch.
If your computers and workstations are connected directly to a hub or switch without using wall jacks or patch panels, you may use a single length of up to 10 meters (32 feet) of stranded wire UTP cable. For longer distances, use solid core wire cable.
In order to follow the TIA/EIA 568-A standard, the wires need to be ordered as illustrated in the image below. Pins are numbered from 1 to 8 while holding the plastic locking tab away from you.
In order to follow the TIA/EIA 568-B standard, the wires need to be ordered as illustrated in the image below. Pins are numbered from 1 to 8 while holding the plastic locking tab away from you.
In order to create a Cross-Over cable, all you need to do is to make one end of the cable using the TIA/EIA 568-A standard, and the other end using the TIA/EIA 568-B standard. Such a cable will allow you to connect two Ethernet devices together without a hub or switch.


