Loading...
Loading...
Loading...
Loading...
Loading...
Loading...
Loading...
Loading...
Loading...
Loading...
Loading...
Loading...
Loading...
Loading...
Loading...
Loading...
Loading...
Loading...
Loading...
Loading...
Loading...
Loading...
Loading...
Loading...
Loading...
Loading...
Loading...
Loading...
Loading...
Loading...
Loading...
Loading...
Loading...
Loading...
Loading...
Loading...
Loading...
Loading...
Loading...
Loading...
Loading...
Loading...
Loading...
Loading...
Loading...
Loading...
Loading...
Loading...
Loading...
Loading...
Loading...
Loading...
Loading...
Loading...
Loading...
Loading...
Loading...
Loading...
Loading...
Loading...
Loading...
Loading...
Loading...
Loading...
Loading...
Loading...
Loading...
Loading...
Loading...
Printer Types
Setup
Codes
Page Size
Status
QR Code
Cash Drawer
Special
Printers can be used with POS workstations through the Point of Sale Control module. Maitre'D supports a wide range of printers that are used in the industry, and a complete compatibility list can be found on the Maitre'D website.
Supported printers include IP printers, serial printers, parallel printers, and USB printers.
ESC/POS is a printer control language developed by Epson to control receipt printers used at the POS. It is a specialized variant of the generic Epson Standard Code for Printers (ESC/P), and has been the industry standard for decades. ESC/POS adoption is so wide that many competing manufacturers support it with their receipt printers.
Maitre'D is fully compatible with ESC/POS. While Maitre'D will work with any printer which is also ESC/POS compatible, Epson-branded printers are always preferred, due to their outstanding compatibility and reliability.
In a Maitre'D database, many components are required to ensure good printing functionality:
Printer Types
Logical Printers
Physical Printers (Devices)
Shared Printers
Redirection Tables
Printer types are used to define the physical properties of various printer models used with your Maitre'D POS system.
Logical printers are conceptual printers used to direct orders to physical printers based on certain criteria such as revenue centers.
Physical printers are used to define each individual printing device. Each device is assigned a printer type and connection properties.
Shared printers are workstation and network printers that can be used by more than one device on the Maitre'D network.
Redirection Tables are used to route printouts so that they print at the appropriate printer in the restaurant. Printer routes can be set by mode. This means that a certain POS workstation can print at one printer in the morning during the breakfast period, and print at another printer during the lunch period or the dinner period.
Printing components are inter-dependent. To facilitate the configuration of the Maitre'D database, each component should be created in order:
Printer types are required when creating physical printers as well as shared printers. Printer types should be created first.
Logical printers must exist before creating sales items, redirection tables and before configuring workstation options. Logical printers must be configured early in the Maitre'D database configuration process.
Physical printers must exit before configuring shared printers. Remember that Printer Types must exist before you can create physical printers.
Shared printers must exist before Redirection Tables can be created. Also remember that physical printers must exist before you can configure shared printers.
If you intend to use redirection tables, they should be created before you configure your workstation's options. Before you can create Redirection Tables however, you need to make sure that you have the necessary logical printers as well as shared printers.
Of course, it is always possible to go back and forth to create components that may have been forgotten along the way.
Before a receipt printer can be used with Maitre'D, a Printer Type must be created to correctly identify the printer's manufacturer and model. Up to 10 printer types can be configured in Maitre'D.
Maitre'D comes with a large selection of pre-defined printer types. This means that many commonly used printers in the industry are already configured in Maitre'D.
If the exact manufacturer and model are not found in the list of Maitre'D Predefined Types, a custom Printer Type can be created using the documentation provided by the manufacturer.
Logon to the Maitre’D Back-Office with appropriate credentials. (Distributor or System Owner)
Start the Point of Sale Control module.
Click on the Workstation menu and select the Printer Type option.
The list of printer types will be displayed.
Select an existing printer type and click the Modify button to edit its properties.
Click Add to create a new Printer Type. Up to 10 printer types can be created.
Click the Print button to generate a printable report will all printer type settings.
Click Close to exit and return to the Point of Sale Control module.
Whether you edit an existing printer type or create a new one, the printer type's properties open on the Setup page:
Click the Predefined Types button, then select your printer model from the list. If the exact model is not listed, select a similar one from the same manufacturer to use as a base.
The Printer Type will be populated with the appropriate values for the selected printer model:
If the selected predefined printer type does not match your model exactly, be sure to review your printer's documentation and manually edit the appropriate fields.
Related Topics
The Network Profile feature was introduced with Windows Vista and was carried over to later versions of Microsoft Windows. In Windows 10, the default Network Profile settings will prevent Maitre'D from working correctly by disabling File & Printer sharing and forcing Password Protected Sharing. This topic explains how to configure these settings to allow Maitre'D to operate normally.
By default, on a new Windows 10 installation, your Network Profile will be set to "Public". This is the most secure setting, and is intended for use on public networks, such as public WiFi provided at airports, coffee shops, etc. This setting will "hide" the PC from other devices on the network, which will cause issues with Maitre'D. This profile also hides settings that need to be enabled for Maitre'D to work correctly. This needs to be changed to either Private or Domain.
In the Windows Notification area, click on the Network Connection icon, then click on the network connection you wish to configure. (there could be more than one.)
This will bring up basic settings. Click on the Network connection (again).
The Network profile options will be displayed. Select either Private or Domain.
If your Maitre'D Main Back-Office PC is part of an Active Directory Domain, your Network Profile needs to be set to "Domain". If the PC is not on a domain, this option will not be available, therefore your Network Profile needs to be set to "Private".
If you believe that the PC should be using the Domain Network Profile but this option is not available, please ask your network administrator for advice.
Once the profile is set to either Private or Domain, some additional options need to be changed:
Just like before, in the Windows Notification area, click on the Network Connection icon, then click on the network connection you wish to configure. (there could be more than one.)
This will bring up basic settings. This time, click Change advanced sharing options.
Under the Private (or domain) profile, make sure that:
a. Turn on network discovery is selected.
b. Turn on file and printer sharing is selected.
Click on the down-arrow next to All Networks. This will display more options.
Scroll down to the Password Protected Sharing section and select Turn off password protected sharing.
Save changes.
This configuration needs to be done on the Main Back-Office PC, all Auxiliary Back-Office and Backup Server PCs, as well as on all POS workstations.
The connectivity between the Main Maitre'D Back-Office PC and other components of the Maitre'D network can easily be tested. For the example below, we are testing connectivity to a PC named "MAIN-BACK-OFFICE".
From any PC or POS on the Maitre'D network, right-click the Windows Start button and select Run...
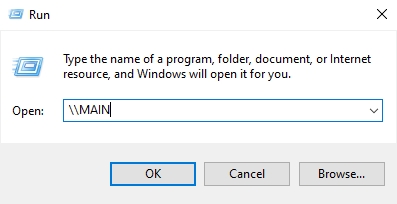
In the Run... box, type two back-slashes (\\) followed by the name of the PC you want to connect to. For example:
\\MAIN-BACK-OFFICE
Click OK.
a. If the Maitre'D Back-Office is already installed, you will see the MaitreD shared folder on the PC named MAIN-BACK-OFFICE.
b. If the Maitre'D Back-Office is not yet installed, you will see an empty folder on the PC named MAIN-BACK-OFFICE.
c. If the network settings are not configured properly, you will see an error message.
The network settings now allow communication between all the components of the Maitre'D Network.
Introduction
Printer Types
Logiciel Printers
Physical Printers
Shared Printers
Redirection Tables
Maitre'D Point of Sale (POS) is an application that is used to place orders and can be installed on either a stand-alone or a network computer as well as Android or iOS tablets. A stand-alone configuration allows restaurants to run both the Maitre'D Back-Office and the Point of Sale application on a single computer. Restaurants can customize several features of the POS workstations to meet their specific needs.
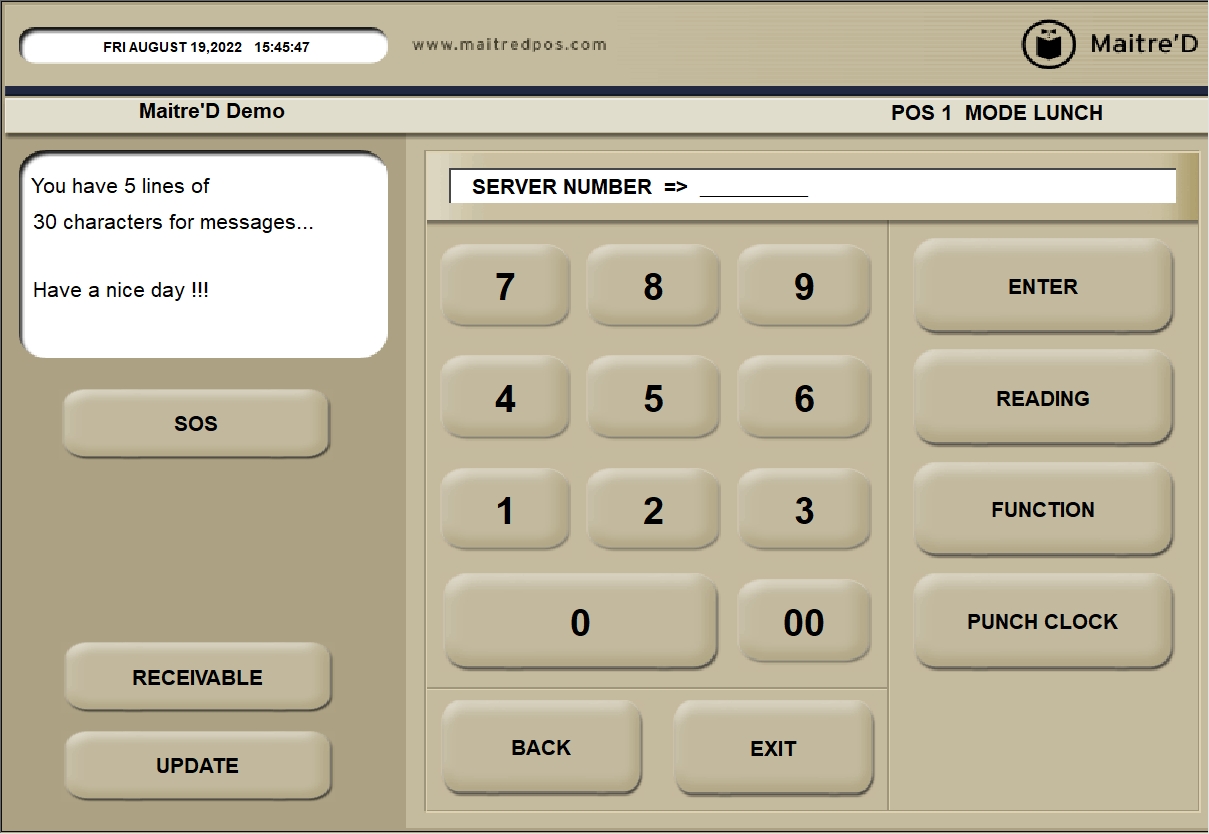
Each POS workstation can run in up to 32 modes. Modes allow different screens to be displayed at different times of the day. The start time and the end time of each mode on each workstation can be configured independently. For example, the BREAKFAST mode can be configured to run from 6 AM till 11:30 AM on POS workstation 1. Between 6 AM to 11:30 AM, when employees log on to Maitre'D POS, they will only have access to the breakfast screen. At 11:30 AM, the mode will be LUNCH, and any employee logging in to that workstation will now be presented with the lunch screen.
Customizable messages can be printed on guest checks. In the POS Workstation options, a message can be defined that will print on the guest check. Each workstation can print its own message, or all the workstations can be set to print the same message.
The Maitre'D Hotel Interface allows additional message lines to be added to a guest check. Hotels can use these lines to add information such as the room number, or print a line where guests can specify the tip and the total amount.
Customizable messages can also be configured to appear on the POS workstation screen.
Each workstation can have a separate output printer or can share the same printer with other workstations.
POS workstations can support a large array of peripheral devices such as scales, magnetic card readers, bar code scanners and more. Many industry standard device drivers are installed with the Maitre'D installation. The Maitre'D website contains a list of certified devices.
Maitre'D can be installed on several different platforms such as Windows 10, 11, Windows IoT and Enterprise, Android and iOS. This allows Maitre'D to run on multiple types of devices such as Windows PC's, purpose-built workstations, Android or iOS-based tablets and payment terminals.
Maitre'D has built-in support for several types of industry standard workstations which simplifies workstation installation and configuration.
Allows every transaction on the POS workstation to be recorded and saved in a text file as a journal. Managers and owners can use this journal to view all the transactions that have occurred and trace any discrepancies when they occur.
Designed to run on operating systems such as Android and iOS, Maitre'D offers built in support for hand held devices.
Each workstation can display the floor plan status on the terminal screen as a screen saver. This allows servers and managers to quickly view the status of the guests and pick up alerts as they are working.
Type in the maximum amount of characters that the printer can print on one line.
Type in the number of lines you want printed per page. If you are using a slip printer, type in a minus (-) sign before the number of lines. If you are using a paper roll, type in 0.
Type in the number of lines the printer should skip at the top of the page so that printing over the restaurant's logo does not occur, or so the printer does not start printing at the top of the page.
Type in the number of lines the printer should advance the page before the paper is cut. If you are using attached forms, type in the number of line feeds needed to go to the correct page before printing resumes.
Type the amount of lines you want the printer to advance each time it prints a line.
Type in the maximum number of lines you want the printer to advance during the multiple line feed function.
Related Topics
Type in the printer code to determine which printer prints first when all of your printers are linked together.
Type in the printer code that cancels "Select On".
Type in the printer code that activates the printing of characters in a larger type size.
Type in the printer code that cancels "Expanded On".
Type in the printer code to select another printer ink color if the printer prints in more than one color.
Type in the printer code that cancels "Red On".
Type in the printer code that activates the line feed function.
Type in the hexadecimal printer code that tells the printer to begin printing on the left side of the paper.
Type in the printer code that activates the line feed function.
Type in the hexadecimal printer code that tells the printer to advance to the top of the form. This code has no meaning in slip printers.
Type in the printer code that activates the multiple line feed (form feed) function.
Type in the printer code that activates the paper cutting function. If you have a slip printer, type in the code used to release the paper.
Enter the hexadecimal printer code that activates the printing of characters in extra large type size.
NOTE: Epson TM-88 = 1D2167
NOTE: The Extra Large mode can be used to print the Order Number on top of the check by adding the following configuration keys & values in the POS.INI files of the workstations:
PrintOrderNumOnTop=True
PrintBigOrderNumInvoice=True
The Extra Large mode can be used to print the Order Number on the kitchen chit by adding the following configuration key & value:
PrintBigOrderNumKitchen=True
Enter the hexadecimal printer code that cancels "Extra Large On".
NOTE: Epson TM-88 = 1D2180
Enter the hexadecimal printer code that activates the printing of characters in white on black.
NOTE: Epson TM-88 = 1D4201
Enter the hexadecimal printer code that cancels "Reverse On".
NOTE: Epson TM-88 = 1D4280
Enter the hexadecimal printer code that activates the printing of characters in double height type size.
Enter the hexadecimal printer code that cancels "Double-Height On".
Type in the hexadecimal printer code that the Back-Office uses to prepare the printer for printing a check. If you have a slip printer, this code is sent when you insert a sheet of paper.
NOTE: To print the restaurant Logo on a compatible printer, enter the proper hexadecimal code here and enable the Logo option of Point of Sale Control > Workstation > Printer Type > Setup. To print the restaurant name and address under the Logo, enable the Print Logo And Address option of Point of Sale Control > Revenue Center > Options > Check.
Type in the hexadecimal printer code that the Back-Office can use to prepare the printer for printing a reward coupon with an alternate Logo.
Related Topics
Type in the model name of the printer.
Type in the amount of memory (in bytes) available with the printer. This is also referred to as the print buffer in some manufacturer's documentation.
Type in the number of seconds the Back-Office waits for a reply from the original printer before the system sends data to the replacement printer.
If the printer supports bar code printing, enter the code which marks the bar code start. (Up to 48 characters)
If the printer supports bar code printing, enter the code which marks the bar code end. (Up to 48 characters)
Enable this option if the printer uses a one-color ink ribbon. This option causes the printer to alternately use both sides of the ribbon. Otherwise, the printer uses ribbons with more than one color. For thermal printers, this option is disabled.
Select this option if the invoice paper has the restaurant logo at the top of each form, or to print the Logo with a compatible printer.
NOTE: To print the restaurant name and address under the Logo, enable the Print Logo And Address option of Point of Sale Control > Revenue Center > Options > Check. To generate the Logo from the printer, you must enter the proper hexadecimal code in Page Setup field of Point of Sale Control > Workstation > Printer Type > Codes. The logo must also be loaded in the printer's memory using a special utility supplied by the printer's manufacturer.
Enable this option if the printer uses the XON/XOFF communication protocol.
Enable this option if your printer is able to print two copies of a credit card authorization slip using carbon paper. Disable this option if your printer is not using carbon. This option is only used when the Electronic Funds Transfer module is installed.
Click this button to choose a printer from the predefined printers list.
Related Topics
Enter the printer's status code in this field. Epson printers typically use 1B76 or 100401.
Type the printer code that send to the Back-Office.
Type the delay in second to wait for the status result.
Type the status value. This field is often left blank for Epson printers.
Related Topics
Use these options to configure the QR Code printout for receipt printers. Maitre'D uses Epson ESC/POS codes for this purpose. Any printer that is Epson ESC/POS compatible and which supports these codes will be able to make use of them.
NOTE: Older printer models may not be able to support QR codes. For example, the Epson TM-T88III (or older revisions) does not support QR Codes. An Epson TM-T88IV or later is required for QR Codes to print. Make sure to check with the manufacturer to see if your printer model supports QR Codes before attempting to use them.
Type in the ESC/POS code for the QR Code Model to use. This is the code that tells the printer which QR Code model to use.
Type in the ESC/POS code for the QR Code Size. This is the code that tells the printer which size of QR code to print.
Type in the ESC/POS code for QR code error. This is the code which tells the printer what to do in case of error.
Type in the ESC/POS code for QR Code Store Data command. This is the code which tells the printer to start storing QR Code data in its internal memory.
Type in the ESC/POS code for QR Code Print Data command. This is the code that tells the printer to start printing the QR Code.
Type in the ESC/POS code for the Justify Center command. This code tells the printer to print centered on the paper roll.
Type in the ESC/POS code for the justify left command. This code tells the printer to print starting from the left side of the paper roll.
Related Topics
Type in the cash drawer code the Back-Office sends to the cash drawer to inquire about the cash drawer's status. The code determines if the cash drawer is open or closed.
Type in the cash drawer code sends to the Back-Office that should be compared to the status value for checking the status of the cash drawer.
Type in the cash drawer code sent to open the cash drawer.
Type in the cash drawer code sent to open a second cash drawer connected to the same printer.
NOTE: For Epson printers, set this field to "1B70015050". You need an Epson Cable Adapter for Two Cash Drawers, available from Blue Star Canada, who manufactures it as Part # EPCB2TIR. They can be reached at 1 (800) 317-1132 or https://www.bluestarinc.com/
Type in the code to compare with the status to inquire about the drawer status.
Related Topics
Enable this option if the printer type you are defining is a KDS monitor from PayFacto.
Enable this option if the printer type you are defining is a Remote Display.
Enable this option if you are using an internal printer, such as the embedded printer in a SHARP 5300 POS terminal.
Enable this option to print coupons as labels to stick on packages. Each coupon will include the current and total label count. For Delivery orders, Kitchen coupons will also show the Delivery number, and Delivery 2 coupons will include the client address, name and check total and number.
Enable this option to force Maitre'D to send "Purge" commands to older serial printers.
NOTE: This option should only be used on very old printers, and only if the printer won't print without this option. If the printer works with this option disabled, leave it disabled.
NOTE: For best output we also recommend enabling the following options:
Items without Quantity: Point of Sale Control > View > Options > Configuration > POS.
Compilation: Point of Sale Control > Revenue Center > Options > Options > Kitchen.
Modifier On Same Line: Point of Sale Control > Revenue Center > Options > Options > Kitchen.
Separate Order: Point of Sale Control > Workstation > Logical Printer.
Enlarged: (Enabled for Sales Item, Disabled for Modifiers) Point of Sale Control > Revenue Center > Item Setup > Configuration > Printing.
Enable this option if the printer is using infrared communication.
Enter the baud rate of the printer.
Related Topics
Physical printers are the actual printing devices. They are either physically connected to a POS workstation by a serial, parallel or USB cable, or connected to the Ethernet network and driven by a POS workstation.
Logon to the Maitre’D Back-Office with appropriate credentials. (Distributor or System Owner)
Start the Point of Sale Control module.
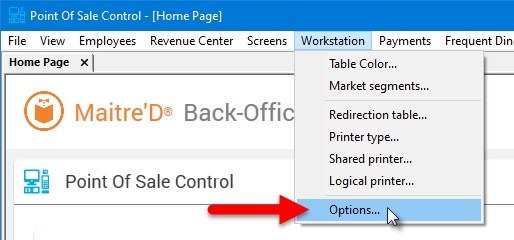
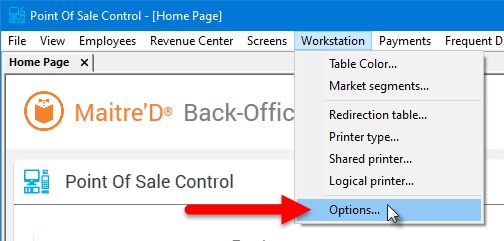
Click on the Workstation menu and select the Options... option.
The list of all available workstations will be displayed. Select the workstation that the physical printer is attached to and click the Modify button. For network printers, select the workstation that will be responsible to drive the physical printer and click Modify.
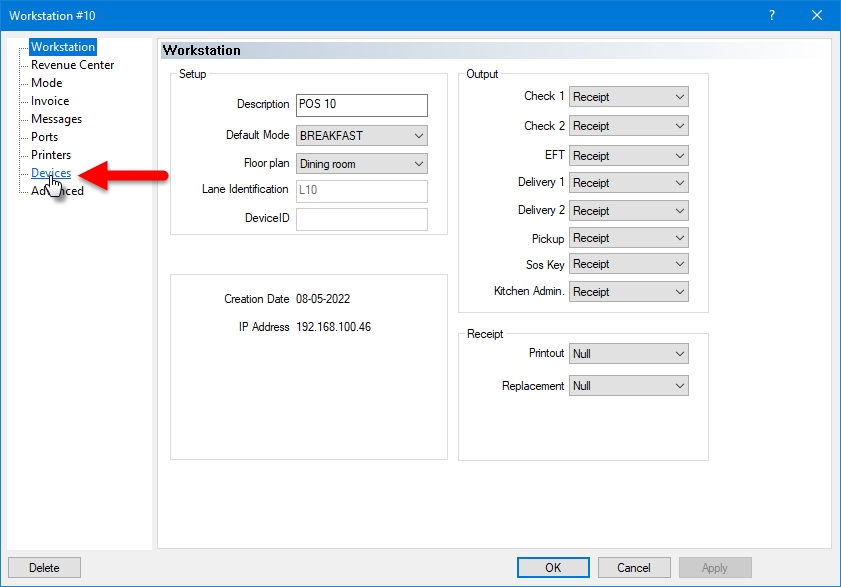
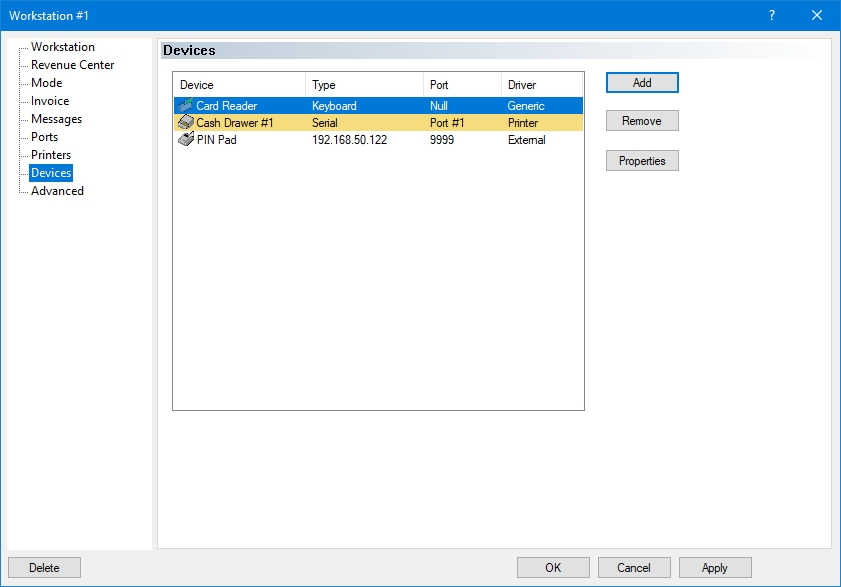
The workstation's properties opens on the default Workstation branch. Click on the Devices branch.
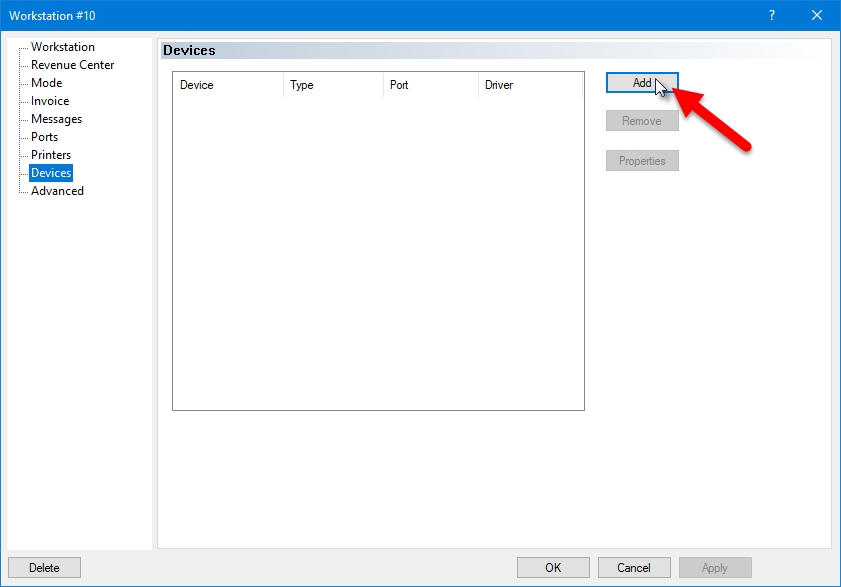
On the workstation's Devices screen, click the Add button.
The Add Device dialog opens. Select Printer to setup a serial or parallel printer, or Network Printer to setup an Ethernet printer. Once the appropriate printer type is selected, click the Setup button.
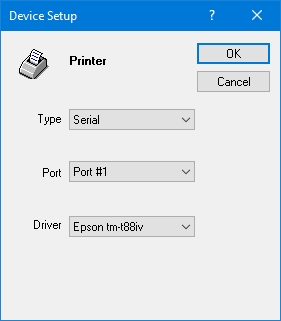
Configure the physical printer's properties:
From the Type drop-down list, select Serial for serial (RS-232) printers or Parallel for parallel printers.
From the Port drop-down list, select the physical port to which the printer is connected.
From the Driver drop-down list, select the appropriate Printer Type for this physical printer.
Type the IP address of the network printer.
Type the TCP port number of the network printer.
From the Driver drop-down list, select the appropriate Printer Type for this physical printer.
Once all the fields are configured, click OK to save your settings.
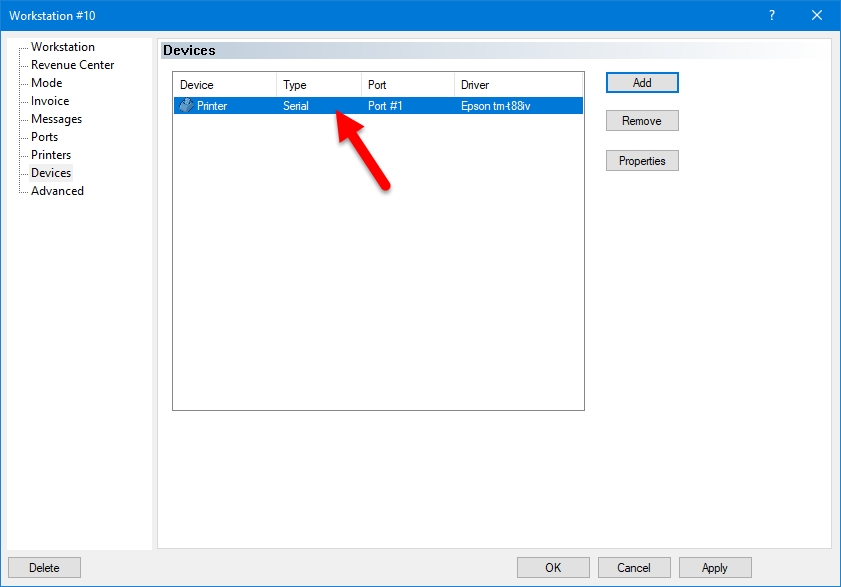
The new device will appear in the workstation's device list:
+Click OK to save changes and return to the workstation's list.
Repeat this process to configure all your physical printers.
Logical printers are conceptual printers used to direct orders to physical printers based on certain criteria such as revenue centers.
The advantage of setting up logical printers is that it is very easy to redirect an order to a new physical printer by just pointing the logical printer to the new physical printer instead of reconfiguring each revenue center and mode.
Another advantage is when a guest orders items from different revenue centers. Even though the order prints at the same printer, separate requisition coupons are printed. This allows each coupon to be given to the appropriate section such as the grill or the bar.
Up to 30 logical printers can be configured in a Maitre'D Database.
Logon to the Maitre’D Back-Office with appropriate credentials. (Distributor or System Owner)
Start the Point of Sale Control module.
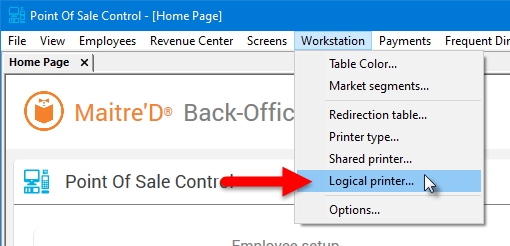
Click on the Workstation menu and select the Logical Printer... option.
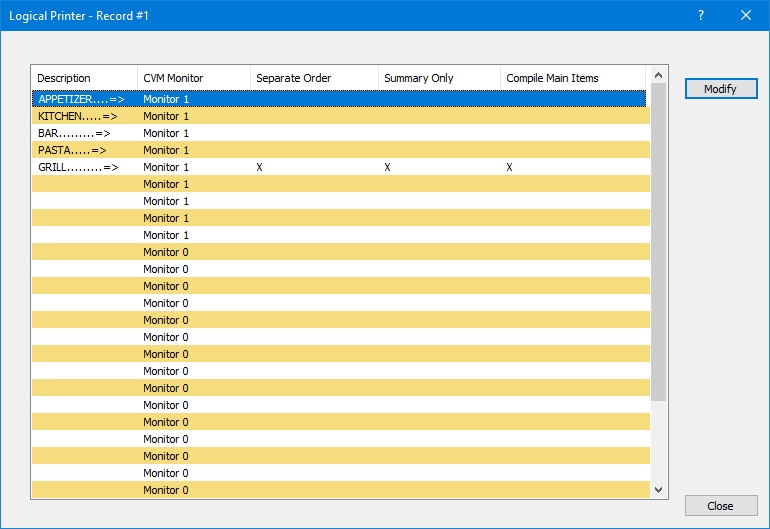
The list of logical printers will be displayed. The spreadsheet layout provides a preview of the configuration of each logical printer.
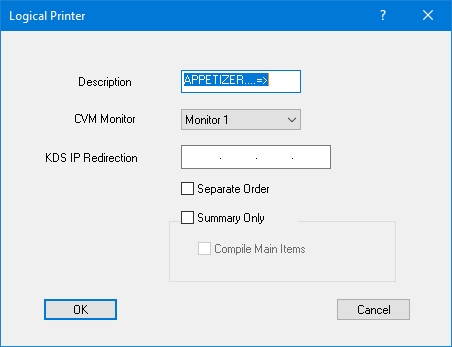
To change the settings of a logical printer, select an entry from the list and click the Modify button. The detailed properties of the selected logical printer will be displayed.
Type a meaningful description for the logical printer. For example, if the printer is used at the appetizer prep station, it may be called "Appetizers"
From the drop-down list, select the monitor to use to display items sent to this logical printer. This setting will have an effect only if kitchen monitors are in use.
Type the IP address of the KDS monitor to use. See KDS documentation for more information on how to use this setting.
If you enable this option, that logical printer will print a separate coupon for each sales item.
Enable this option to override any compilation option and remove any customer information. With this option, all ordered items will appear in a simple list, without compilation and without customer information. The star character ( * ) that normally prints to indicate a change of plate is also not printed.
NOTE: This option overrides the Compilation and Compilation By Customer options from Point of Sale Control > Revenue Center > Options > Kitchen.
Enable this option to further simplify the kitchen printout. With this option enabled, all modifiers will be removed from the printout and the identical main items will be compiled.
NOTE: This option becomes available only if the Summary Only option is also enabled.
Click OK to save changes and return to the logical printers list.
Once all the necessary logical printers are created, you can assign logical printers to each sales item. This is accomplished from Point of Sale Control > Revenue Center > Items Setup... > [Select an item] > Configuration > [Select a configuration] > Printing. Up to 9 printouts can be assigned to each sales item.
The newly created logical printers will also become available in the Printers section of the Workstation options (Point of Sales Control > Workstation > Options... > [Select workstation] > Printers) as well as for redirection tables (Point of Sales Control > Workstation > Redirection Table...).
After redirection tables are created, they can be assigned to each mode or revenue center for each workstation. This is done through the Workstation's options.
Logon to the Maitre’D Back-Office with appropriate credentials. (Distributor or System Owner)
Start the Point of Sale Control module.
Click on the Workstation menu and select the Options... option.
The list of available workstations will be displayed. Select the workstation for which you wish to assign redirection tables and click the Modify button.
,The workstation's properties open on the Workstation branch. Click on the Printers branch.
You will see a list of the available modes.
If the Redirection Table by Revenue Center option is enabled, you will see the list of Revenue Centers instead:
Select a Mode (or Revenue Center) and click the Modify button. From the drop-down list, select the Redirection Table to assign to this Mode (or Revenue Center), then click OK.
Repeat until all modes (or Revenue Centers) are configured.
Click OK to save changes to the Workstation's configuration and return to the list of workstations.
Repeat these steps for each workstation.
Redirection Tables are used to route printouts so that they print at the appropriate printer in the restaurant. Printer routes can be set by mode. This means that a certain POS workstation can print at one printer in the morning during the breakfast period, and print at another printer during the lunch period or the dinner period.
Before setting up redirection tables:
make sure that Logical Printers, Physical Printers and Shared Printers are setup.
To make use of redirection tables, the option Automatic Redirection Table must be enabled in Point of Sales Control > View > Options > Printing.
Optionally, the option Redirection table by Revenue Center may be used to control redirection tables by Revenue Center instead of by Mode. This option is also located in Point of Sales Control > View > Options > Printing.
Logon to the Maitre’D Back-Office with appropriate credentials. (Distributor or System Owner)
Start the Point of Sale Control module.
Click on the Workstation menu and select the Redirection Table... option.
The list of available redirection tables will be displayed:
Select an existing Redirection Table and click the Modify button to edit its properties.
Click Add to create a new Redirection Table.
Click Close to exit and return to the Point of Sale Control module.
The Redirection Table's settings will be displayed:
Type a meaningful description for this redirection table.
Select a logical printer from the table and click the Modify button to edit its properties.
This column lists all available logical printers. The first two entries (Receipt and Default) cannot be modified, except for KDS IP Redirection and Inventory Location. The other entries in this list are configured in Point of Sale Control > Workstation > Logical Printer...
This column lists which shared printer is associated with each logical printer.
This column lists which KDS monitor is associated with each logical printer.
This column is only available if the Inventory Management module with the Multi-Location option is activated on the Maitre'D license. It lists the Inventory Locations from which inventory quantities should be depleted for each logical printer.
This column lists the internal ID associated with each logical printer.
Click OK to save changes and return to the list of Redirection Tables.
Click Delete to delete this Redirection Table. A confirmation dialog will be displayed before the redirection table is effectively deleted.
Click Cancel to exit this screen without making any changes.
Select a Logical Printer from the list and click the Modify button to change its properties.
This field displays the name of the Logical Printer being modified.
From the drop-down list, select the Shared Printer to use with this Logical Printer.
From the drop-down list, select the KDS Monitor to use with this Logical Printer.
If required, enter the IP address to use for redirections.
If the Inventory Management module with the Multi-Location option is available, select the location from which Inventory Quantities will be depleted when using this Logical Printer.
Click OK to save changes and return to the redirection table. The changes will appear on the screen:
Repeat steps 6 and 7 for each Logical Printer.
Once all the Logical Printers have been configured, click OK to save changes and return to the list of redirection tables.
Create as many redirection tables as required for your use case.
Shared printers are workstation and network printers that can be used by more than one device on the network. For example, several POS workstations can be configured to print on the same printer.
A replacement printer can be designated for every shared printer that is configured. If the shared printer fails to respond, Maitre'D will send the printout to the replacement printer and will print a short message to inform that there is a problem with the shared printer. When the shared printer is back online, printing will resume at the shared printer.
Local workstation printers as well as network printers can be shared by setting them up as shared printers.
Before configuring Shared Printers, make sure that physical printers (devices) are setup.
Logon to the Maitre’D Back-Office with appropriate credentials. (Distributor or System Owner)
Start the Point of Sale Control module.
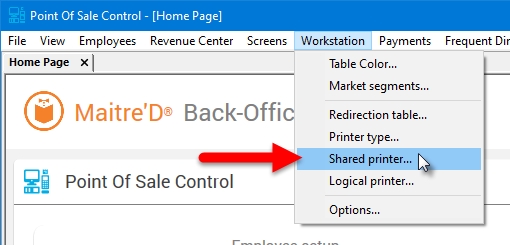
Click on the Workstation menu and select the Shared Printer... option.
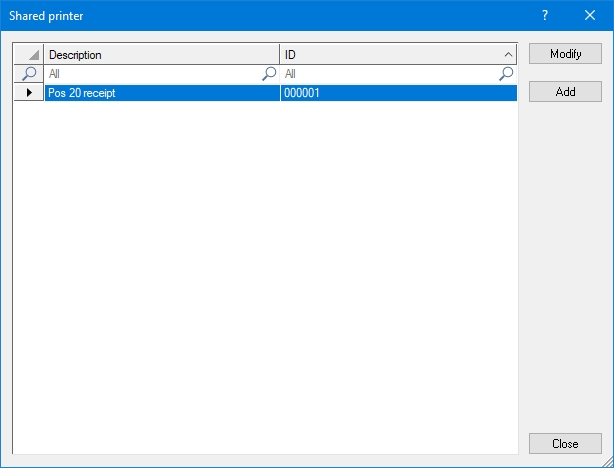
The list of available shared printers will be displayed. If this is your first time accessing it, it should be empty.
Select an existing Shared Printer and click the Modify button to edit its properties.
Click Add to create a new Shared Printer.
Click Close to exit and return to the Point of Sale Control module.
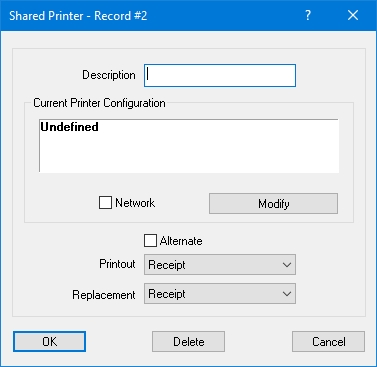
Clicking Add with create a blank Shared Printer.
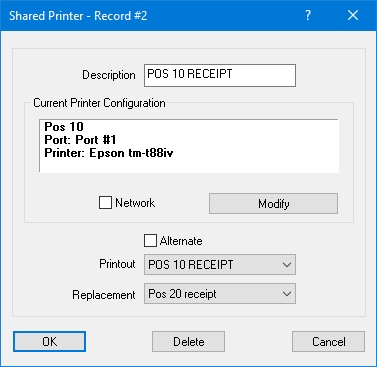
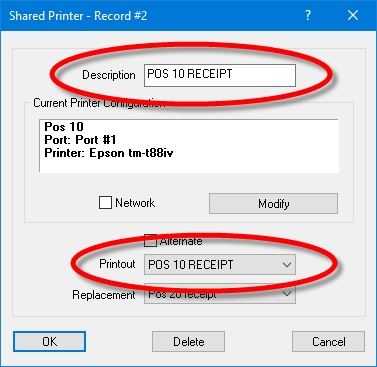
Type a meaningful description for this shared printer. The description should provide an indication of where the printer is located and what it is used for. For instance, "BAR RECEIPT" suggests that this shared printer refers to the receipt printer located at the bar. "POS 4 KITCHEN" would be a kitchen requisition printer connected to POS #4, etc.
When creating a new shared printer, this is initially undefined. To configure the Shared Printer, click the Modify button.
Click this button to modify the Current Printer Configuration.
Enable this option if you are setting up a standalone network printer that is not driven by a workstation (NOT RECOMMENDED). If you are setting up a Network printer that is configured as a device on a workstation, DO NOT enable this option.
IMPORTANT! Using this option is NOT RECOMMENDED. This is only for Network Printers which are NOT driven by a workstation. While using this method does not require a driving workstation to be running, it WILL cause print jobs to be lost if a print job is sent while the printer is busy. Use at your own risk.
Enable this option to force Maitre'D to send every other print job to the Replacement shared printer.
Select the Shared Printer to use for the main printout. From the drop-down list, select the entry with the same name as the description above.
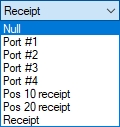
Select a replacement shared printer. If the main shared printer does not respond, the print job will be redirected to the replacement printer.
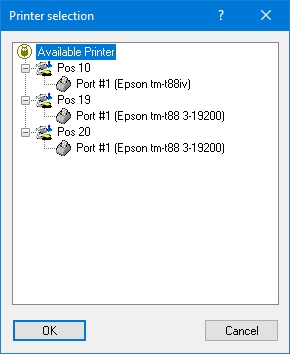
Start by filling up the Description of the Shared Printer, then click the Modify button to select the physical printer to be shared. Select one of the available printers and click OK.
Select the main Printout. This should be the same as the description.
Select a replacement shared printer. If you do not wish to use an alternate printer in case of failure, select Null.
Once all the settings are configured, click OK to save changes and exit.
Repeat these steps to configure all the required shared printers.
Before a Maitre'D POS workstation can be installed, a number of things must be in place:
The Maitre'D Back-Office server must be running and connected to the network.
Make sure that the POS hardware meets the minimum requirement for your application. See Hardware Requirements.
Make sure the POS runs a supported operating system. See Operating System Requirements.
Just like the Maitre'D Back-Office PC, make sure to update the operating system and use all of its security features. See Before Installing Maitre'DChap 1: Hardware and Software Requirements.
Connect the POS to the network and make sure it can communicate with the Maitre'D Back-Office PC and use its shared folder. See Configure your Windows Network Profile.
Please review the items above and resolve any issue before attempting to install the Maitre'D POS software on your new POS hardware.
With this out of the way, proceed to the next topics.
Related Topics
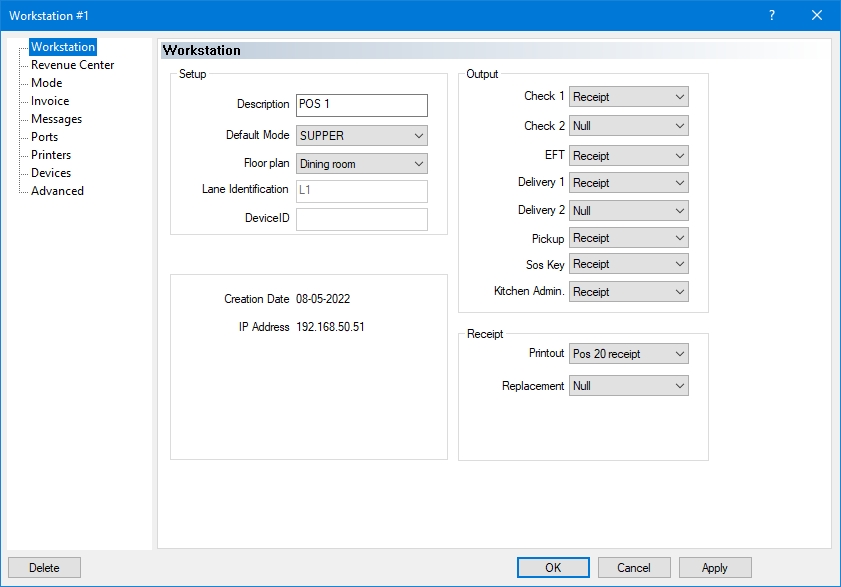
The Workstation branch of the workstation options contains basic configuration information along with print output configuration for the selected workstation.
Type a meaningful description for the selected POS workstation (up to 20 characters). Ideally, the description should hint at the workstation's location and typical usage. For example, Take-Out Counter, Bar, Cashier Lane 1, Cashier Lane 2, Hostess Station, Drive-Thru Order, Drive-Thru Pickup, etc.
Select the default mode for this workstation. Select Closed to prevent this workstation from being used at all.
Select the floor plan to use on this workstation.
This field only becomes available if a non-EMV, fully integrated EFT protocol is selected in the Electronic Funds Transfer module. The term "Lane" refers to the queue area at a cashier workstation and identifies the payment device for the purpose of Electronic Funds Transfer.
Type the Payment Device ID for non-EMV, fully integrated EFT protocols.
NOTE: Non-EMV, fully integrated protocols include Datacap DSIClientX and the non-EMV version of the Tender-Retail protocol. These protocols are considered obsolete.
The date listed here indicates when the workstation's data was created for the last time.
The IP address listed here is the current IP address of the workstation, or the IP address that was used the last time the workstation was connected.
In this section, each setting has a drop-down list with a few built-in options. Here are the definitions of each option:
Select this option if you do not wish to print this output at all.
Select one of the Port numbers to send the output to a serial printer connected to the corresponding COM port number. By default, Port #1 is mapped to COM 1, Port #2 to COM 2 and so on. Port mappings can be changed in the Ports branch of the workstation's options.
Selecting the Receipt option will redirect the output to the printer defined in the Receipt section, at the bottom of the screen.
Shared printers will also be listed here. It is possible to redirect any output to any shared printer configured in Point of Sale Control > Workstation > Shared Printer...
Select the printer location used to print the first copy of the guest check. This field is usually set to Receipt.
Select the printer location used to print a second copy of the guest check if necessary. This field is usually set to Null or Receipt.
Select the printer to which the Electronic Funds Transfer (EFT) credit card voucher or transaction record is printed. This field is usually set to Receipt.
NOTE: This field only becomes available if the Electronic Funds Transfer module is in use.
Select the printer location for the main delivery check and the secondary delivery check. The main delivery check usually goes to the customer and will have the restaurant name and address and the customer name and address print at the top. The secondary delivery check will only have the customer name and address only printed at the top of the check and usually goes to the delivery driver. These fields are usually set to Receipt or Null.
NOTE: This field only becomes available if the Delivery module is in use.
Select the printer which will be printing delivery pickup checks.
You can select on which printer will be printed the SOS message. The whole message is a coupon with a big SOS plus the workstation number from which the message was issued. If you select a printer, a SOS button will appear on the workstation server screen. This field is usually set to Null or Receipt.
Enable the printer where the kitchen chit will print to notify the food runners of a table number change. In an environment where the Hostess can order, there is a Table Transfer function on her screen to easily manage table transfer when the customers decide to change table just after she assigns them to a table. This field is usually set to Null or the main kitchen printer.
Select the local port # or shared printer where the receipt will print for this workstation. If it is a local parallel printer, set this field to Receipt.
Select the local port # or shared printer where the receipt should print for this workstation if the default Printout printer fails to respond.
Related Topics
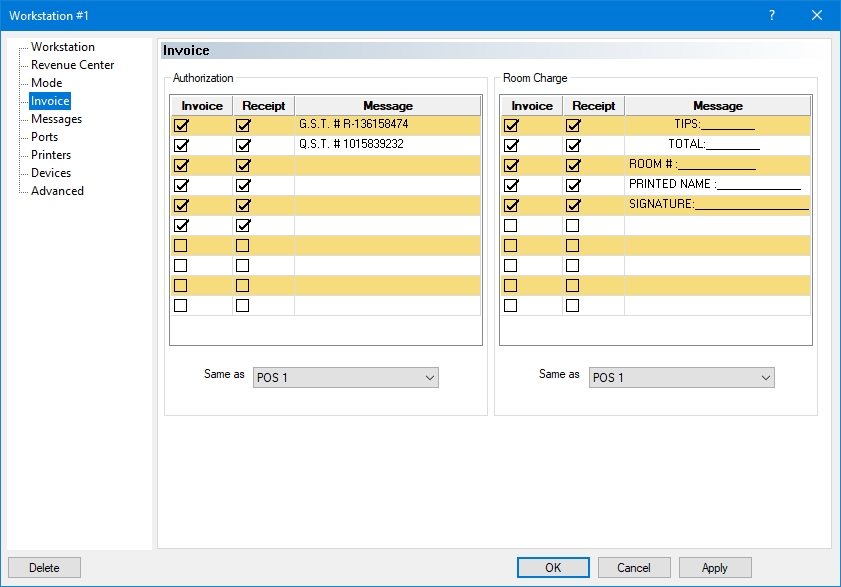
The Invoice branch of the workstation options allows you to configure custom messages to be printed on regular guest checks as well as Room Charge guest checks.
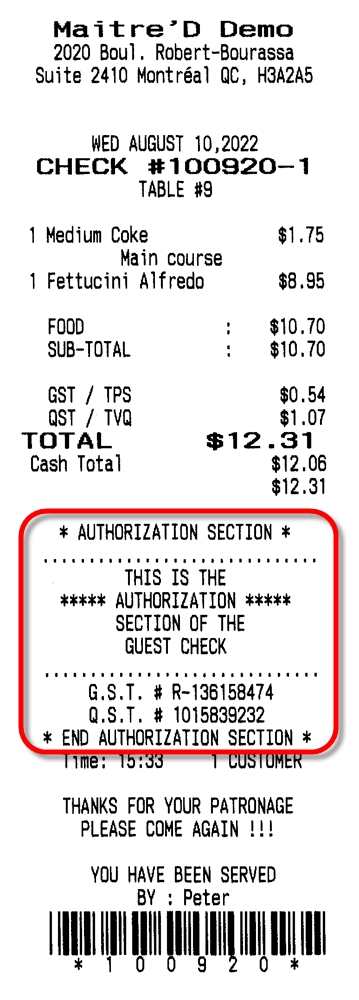
The Authorization section of the guest check is located below the check total and above the check time. It will automatically print on all guest checks and receipts. If the Room Charge section is also present, the Authorization section will print below the room charge section.
Place a checkmark next to each line you want to have printed on the guest check. Up to 10 lines can be enabled. You can enable blank lines to create white space on the guest check.
Place a checkmark next to each line you want to have printed on the receipt. Up to 10 lines can be enabled. Selected lines which are left blank create white space on the receipt.
Type the message you want to print on each line. Up to 29 characters can be printed on each line. The text will always be centered on the guest check or receipt, so you need to type spaces to fill up all 29 character positions if you want the text to be aligned to the left or right.
To avoid re-typing the same information for each workstation, select the POS workstation to use as a model from the drop-down list. This workstation will then use the same settings as the selected workstation.
The Room Charge section of the guest check is located above the Authorization section and above the check time. It will print automatically on systems where Room Charge is is use.
Place a checkmark next to each line you want to have printed on the guest check. Up to 10 lines can be enabled. You can enable blank lines to create white space on the guest check.
Place a checkmark next to each line you want to have printed on the receipt. Up to 10 lines can be enabled. Selected lines which are left blank create white space on the receipt.
Type the message you want to print on each line. Up to 29 characters can be printed on each line. The text will always be centered on the guest check or receipt.
To avoid re-typing the same information for each workstation, select the POS workstation to use as a model from the drop-down list. This workstation will then use the same settings as the selected workstation.
Guest Check with Authorization
Receipt with Authorization
Guest Check with Room Charge and Authorization
Receipt with Room Charge and Authorization
Related Topics
The Revenue Center branch of the workstation options allows you to select which Revenue Center(s) will be available from the selected workstation.
Employees will only be able to access the listed revenue centers when using this workstation. Revenue centers that are not listed here are not accessible from this workstation.
The revenue center that bears a green checkmark is the default revenue center for this workstation.
Select a revenue center from the list and click the Modify button to set or un-set the Default status. To change the Default attribute, you need to select the current default revenue center and un-set the default attribute first. Then you will be able to assign the default attribute to another revenue center.
Click the Add button to add revenue centers to the list. If all the available revenue centers are already listed, this button will become grayed-out.
Select a revenue center from the list and click the Remove button to delete it from the list.
Related Topics
This series of articles describes the configuration of typical Maitre'D POS workstations.
Before proceeding, it is strongly suggested to complete the following configuration tasks:
Setup Revenue Centers and Modes.
Setup Printer Types.
Setup Logical Printers.
Setup Physical Printers.
Setup Shared Printers.
Setup Redirection Tables.
Logon to the Maitre’D Back-Office with appropriate credentials. (Distributor or System Owner)
Start the Point of Sale Control module.
Click on the Workstation menu and select the Options... option.
The list of available workstations will be displayed. Select the workstation for which you wish to change settings and click the Modify button.
The workstation's properties open on the Workstation branch.
Refer to the following articles for details for each branch.
Related Topics
Mobile POS workstations require some specific settings in Point of Sale Control > Workstation > Options.
Logon to the Maitre’D Back-Office with appropriate credentials. (Distributor or System Owner)
Start the Point of Sale Control module.
Click on the Workstation menu and select the Options... option.
The list of available workstations will be displayed. Select the workstation for which will be used as a Mobile POS and click the Modify button.
The workstation's properties open on the Workstation branch.
Since Mobile devices can't print on their own, set all Outputs and Receipt printouts to NULL.
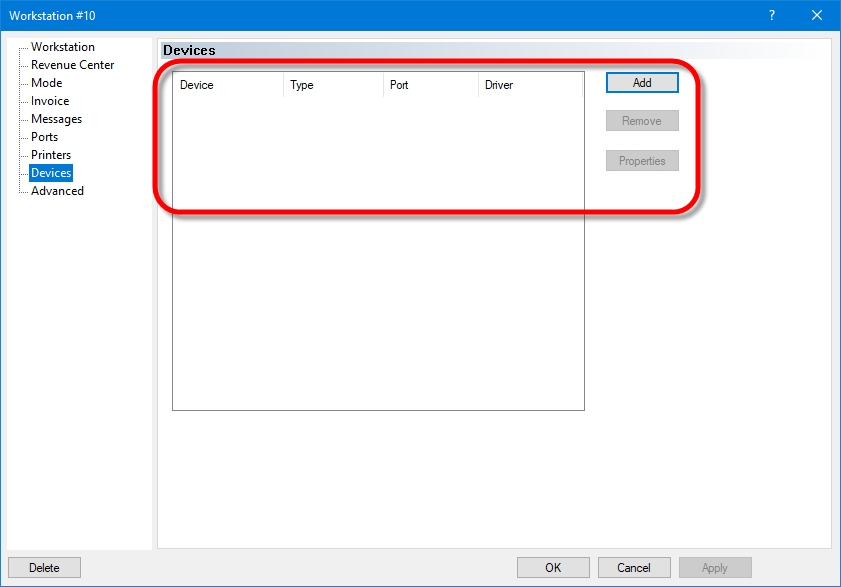
In the Devices tab, make sure there are no devices setup. The device list should be empty.
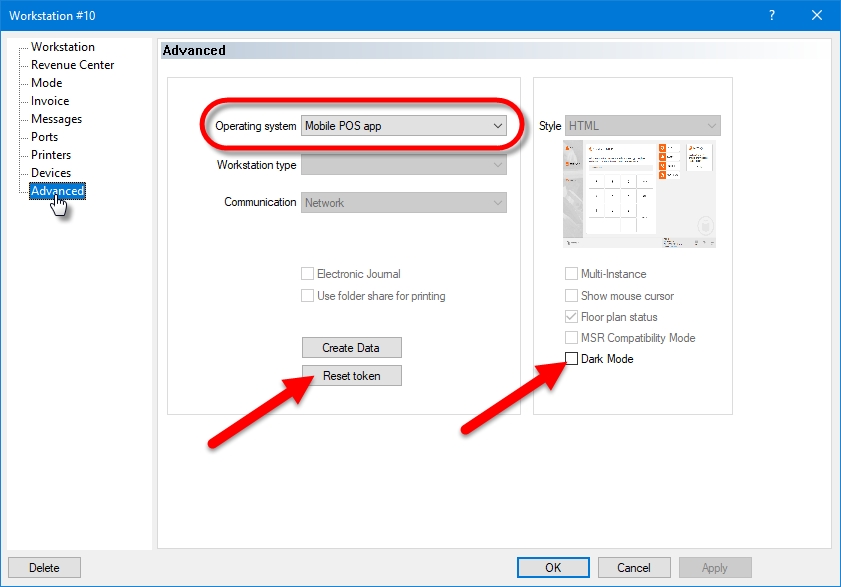
Click on the Advanced tab.
From the drop-down list, select the Mobile POS app option.
Enable this option to use this mobile POS with the Dark user interface. If this option is disabled, this mobile POS will use the Light user interface.
NOTE: Contrary to the Advanced User Interface (HTML POS), there is no toggle switch to change between Dark mode and Light mode on the Mobile POS app. This change can only be made from the Maitre'D Back-Office.
When the Mobile POS application connects to the Maitre'D Back-Office for the first time, a token is created to speed up subsequent connections. If you experience connection issues, resetting the token will delete the current connection token and force a new one to be created. This should resolve any authentication issues.
Once this mobile POS is configured, click OK to save changes and return to the list of workstations.
Repeat this process for all Mobile POS workstations.
Related Topics
The Mode branch of the workstation options allows you to configure the mode schedule for each day of the week for the selected workstation.
Maitre'D supports up to 32 modes which can be controlled by this scedule.
Clicking on a cell allows the time to be modified.
This scedule accepts decimal numbers and uses military time. For example, to set a mode to start at 7:00 AM, type 7.00. For 2:30 PM, type 14.30.
Pressing "ENTER" on your keyboard will automatically select the next cell to the right. Once the last column (Sunday) is reached, pressing enter will select the first cell of the next line.
If a mode should be skipped altogether for certain days, select the appropriate cell in the schedule and press the BACKSPACE key on your keyboard. The cell will become blank.
The last row is called "Closed". This is the time at which the workstation closes and can no longer be used, until the time of the first mode is reached.
If the restaurant operates 24 hours and the workstations should never close, simply delete the time in each cell of the Closed row by pressing the BACKSPACE key on your keyboard.
Related Topics
The Printers branch of the workstation options allows you to configure the output for each logical printer, as well as the Inventory Location to use if the Inventory Management module with the Multi-Location option is present.
Select a logical printer from the table and click the Modify button to edit its properties.
This column lists all available logical printers. The first two entries (Receipt and Default) cannot be modified, except for KDS IP Redirection and Inventory Location. The other entries in this list are configured in Point of Sale Control > Workstation > Logical Printer...
This column lists which shared printer is associated with each logical printer.
This column is only available if the Inventory Management module with the Multi-Location option is activated on the Maitre'D license. It lists the Inventory Locations from which inventory quantities should be depleted for each logical printer.
This column lists the internal ID associated with each logical printer.
Related Topics
Start the POS workstation and logon to Windows with a user account with administrative privileges.
At the Windows desktop, right-click the start button and select the Run option.
In the Run dialog box, type two back-slashes ( \\ ) followed by the host name of the PC where the Maitre'D Back-Office is installed, then click OK.
You may be asked to enter your credentials. Do so, and be sure to activate the Remember my credentials checkbox.
If your network is configured correctly, you will see the MaitreD shared folder through the network.
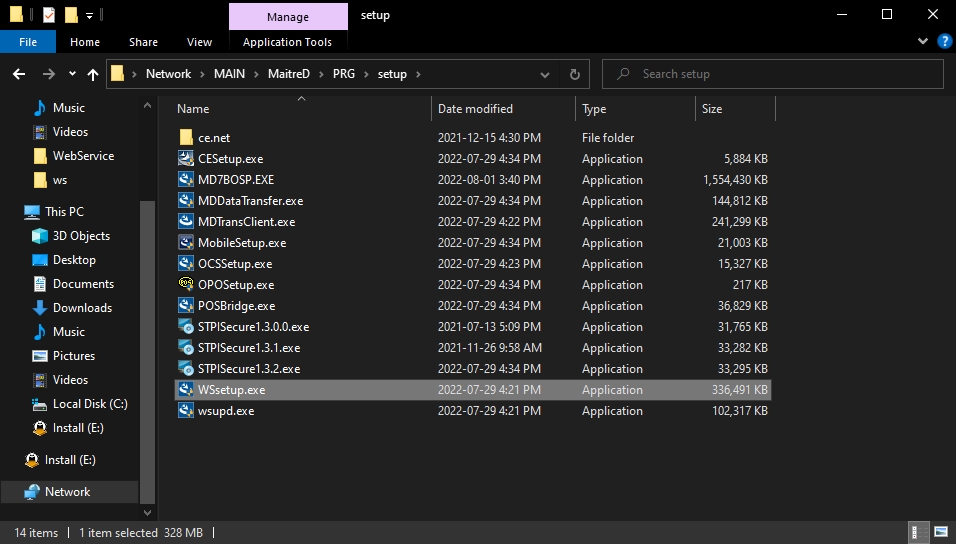
Browse to the MaitreD\PRG\Setup folder, and double-click the WSsetup.exe installer to start the POS installation.
You will see a UAC warning. Click Yes to proceed.
The InstallShield wizard will start by installing required redistributable packages. Click the Install button.
Once the redistributables are installed, the Maitre'D POS InstallShield Wizard will start proper.
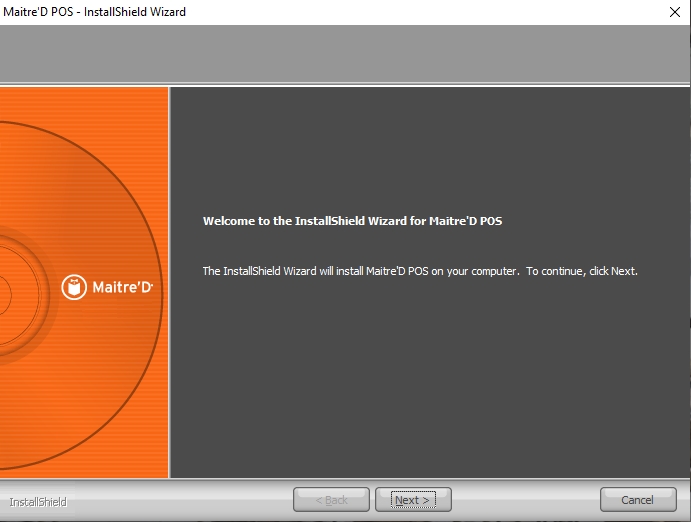
The Welcome screen will appear. Click Next >.
The Maitre'D POS End-User License Agreement (EULA) will be displayed. Please take time to read and understand the terms of the license agreement and click Yes to accept the terms.
Your network will be analyzed and the list of available computers will be displayed. From the list, select the computer which is currently running the Maitre'D Back-Office and click OK.
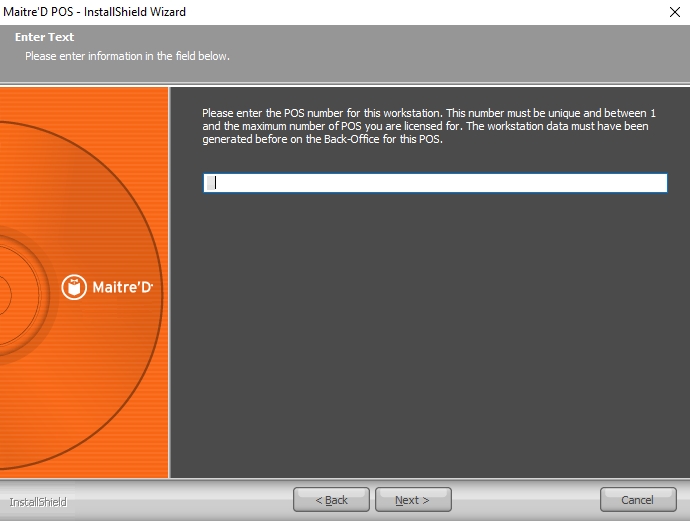
Type the workstation number for this POS and click Next >. Valid numbers are from 1 to the number of POS workstations you Maitre'D license has. For instance, if you purchased a license with 5 POS workstations, valid POS numbers will be from 1 to 5.
Confirm the installation path for the POS and click Next >. The default path is C:\WS.
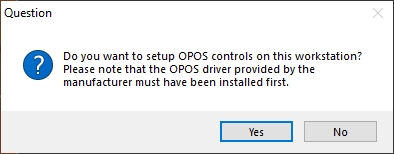
You will be prompted whether to setup the OPOS Controls for this workstation. If OPOS devices are attached to this POS, click Yes. Otherwise, click No. Note that it is always possible to manually run the OPOS setup (OPOSetup.exe) utility later, from the C:\WS folder.
Files will be installed. This part of the process is automated.
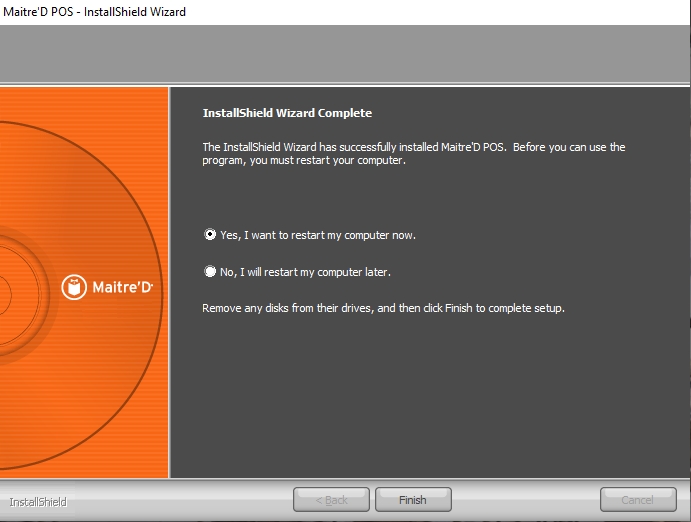
You will be prompted to restart the PC. Select Yes, I want to restart my computer now and click the Finish button.
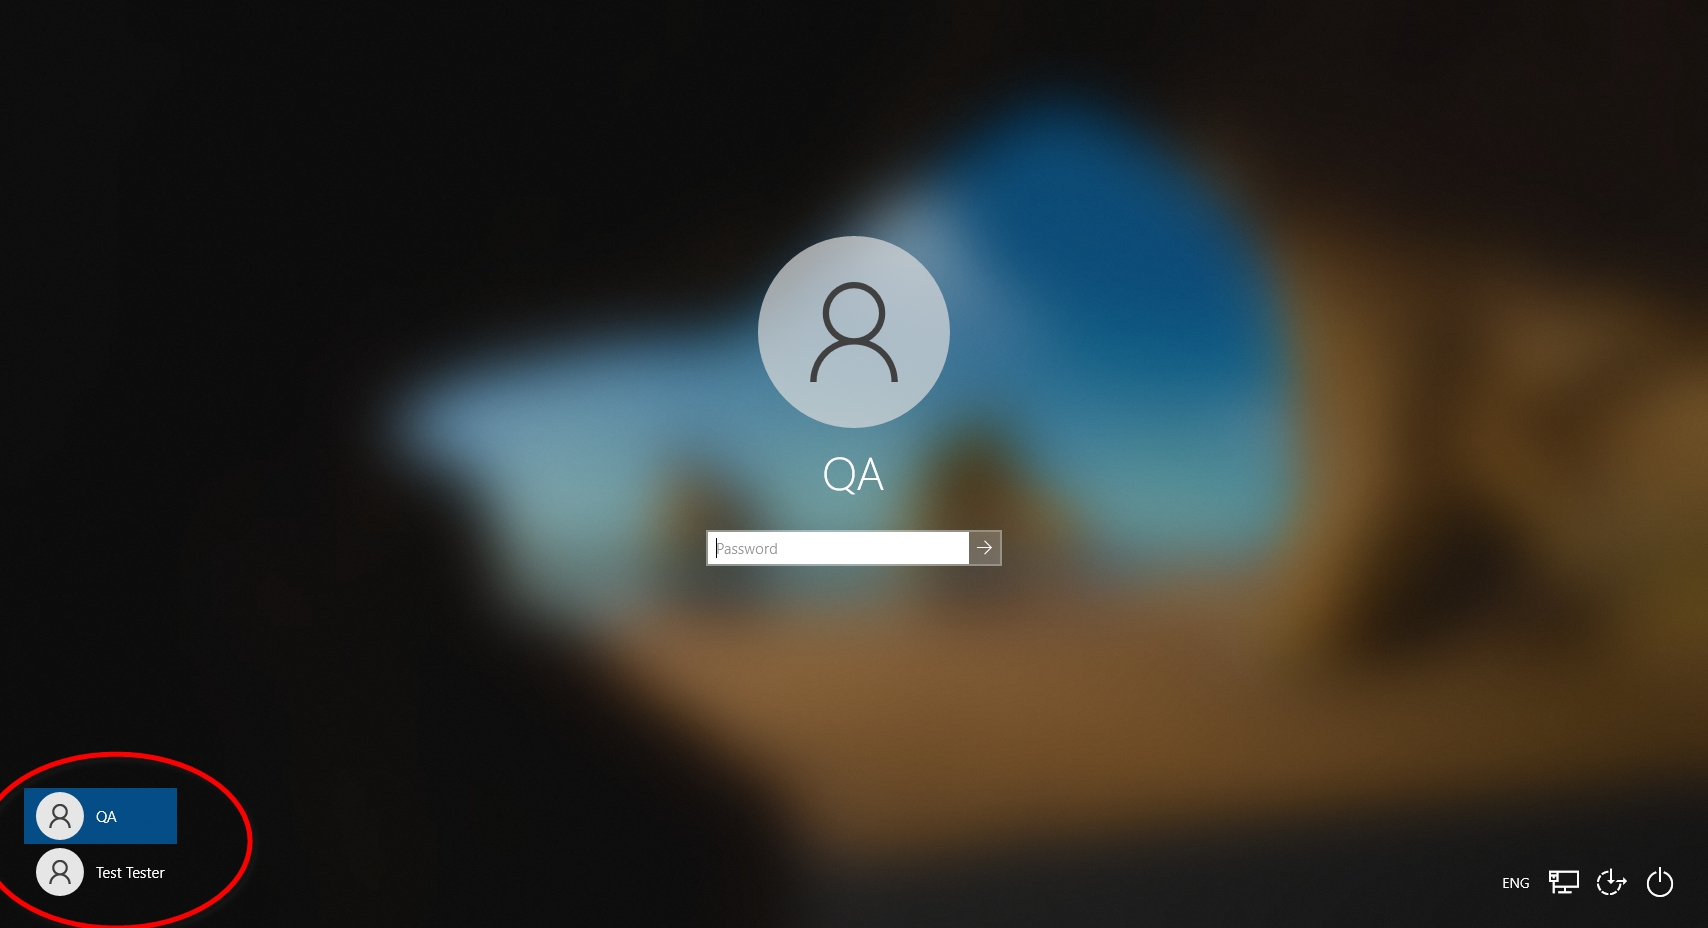
The POS will restart. Once the POS finishes restarting, logon with the same Windows account used to install the POS software.
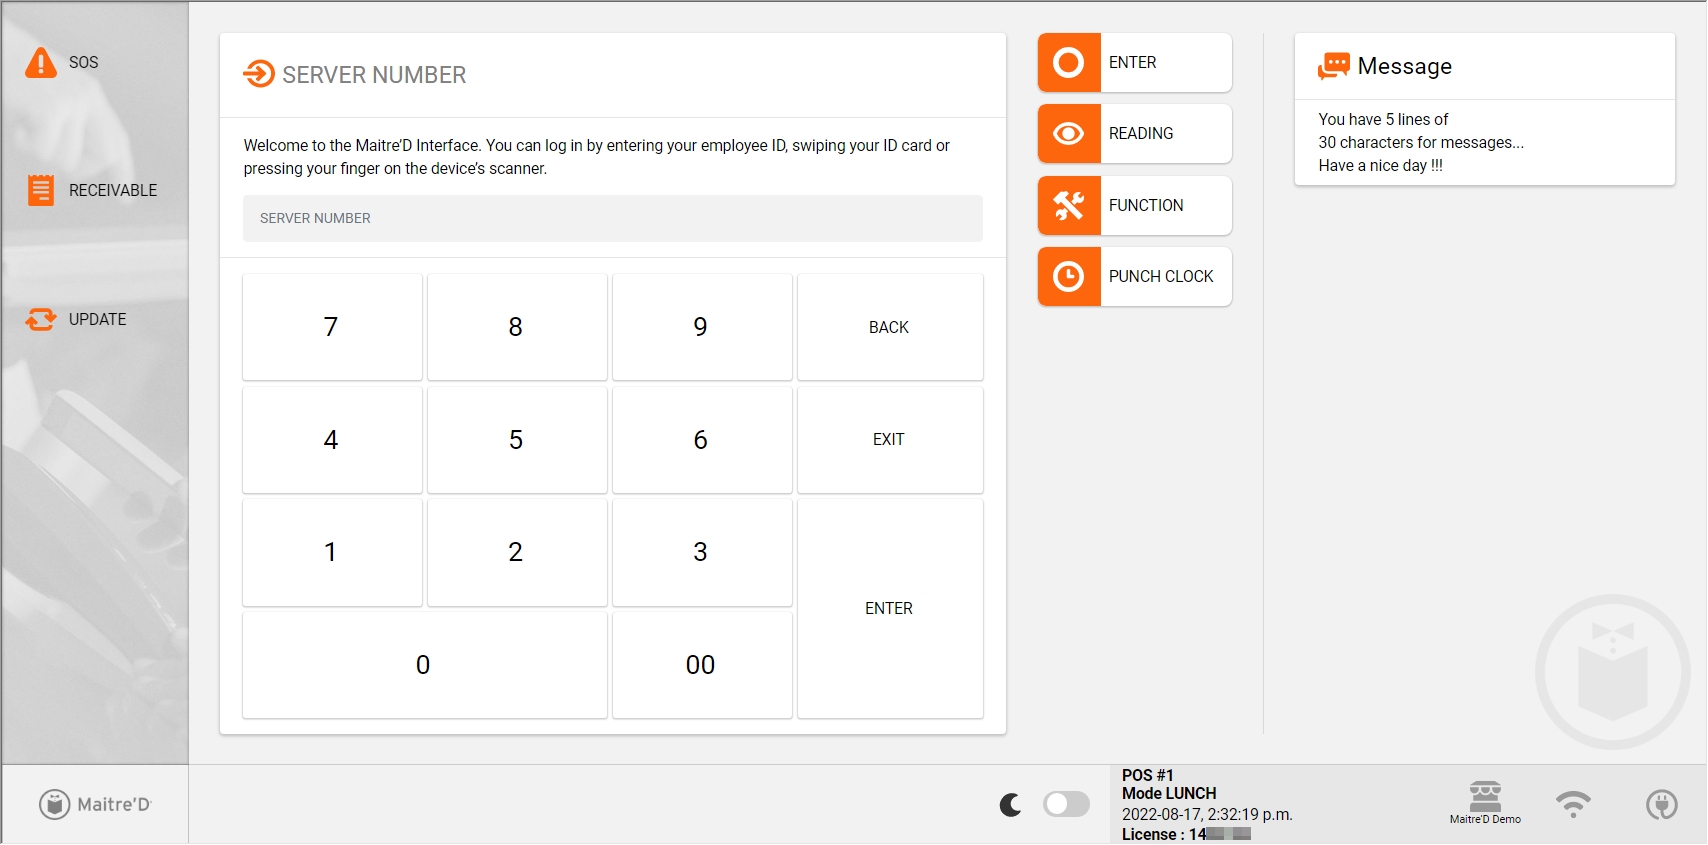
The POS software should start by itself. On the first start, the POS could take longer to start as it downloads files from the Maitre'D Back-Office server. Eventually, the POS home screen will be displayed.
The Maitre'D POS software is now installed and functional.
Related Topics
Once a user logs on with a valid Windows user name and password, the Maitre'D POS application should start automatically. This happens because the POS application's shortcut is copied to the Windows "Startup" folder during the installation process.
Users may want to disable this automatic startup behaviour to use the PC for other purposes or for troubleshooting. The following instructions will show how to disable and re-enable automatic startup for the Maitre'D POS application.
Use this method to quickly disable automatic startup of the Maitre'D POS application, with the possibility of quickly re-enabling automatic startup as needed.
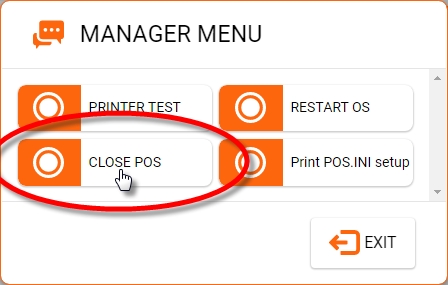
If the POS application is currently running, close it. If you have a keyboard connected, simply press ALT + F4 and the POS application will close. Otherwise, use a manager employee number to access the manager's menu and close the POS. (FUNCTION > Manager Menu > System Functions > Close POS).
Invoke the Task manager, either by right-clicking the task bar and selecting the Task Manager option, or by pressing CTRL + ALT + DEL on your keyboard and selecting the Task Manager option.
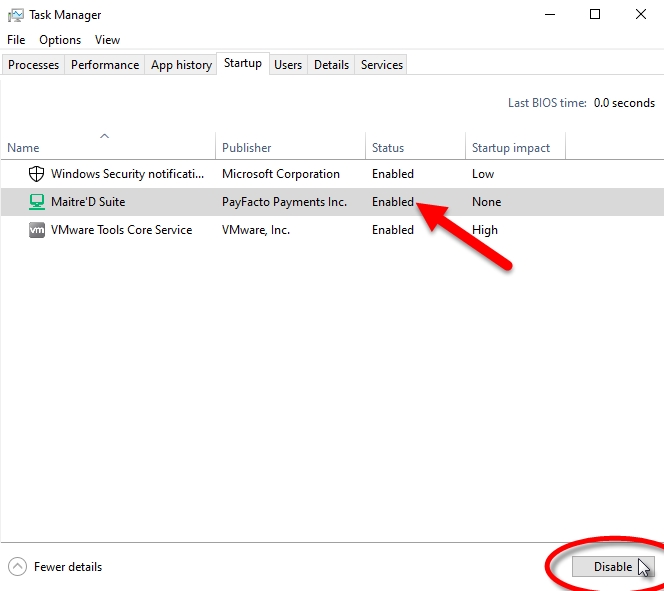
On the Task Manager window, click the Startup tab. The applications that start when Windows starts will be listed here. Select Maitre'D Suite from the list, and click the Disable button, in the lower-right corner.
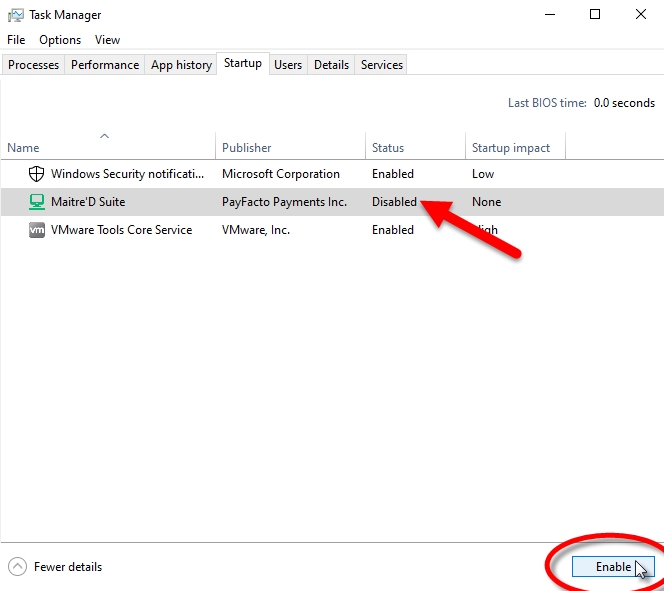
The status of the application will change to Disabled.
Close the task manager. If you restart the computer at this point, the Maitre'D POS application will no longer start automatically.
To re-enable automatic startup, simply follow the same steps. This time, when you select the Maitre'D Suite option, the button in the lower-right corner will say "Enable". Click it and the status will change back to Enabled.
Use this method to permanently disable automatic startup. It is possible to re-enable automatic startup after this, but a bit more work will be required.
If the POS application is currently running, close it. If you have a keyboard connected, simply press ALT + F4 and the POS application will close. Otherwise, use a manager employee number to access the manager's menu and close the POS. (FUNCTION > Manager Menu > System Functions > Close POS).
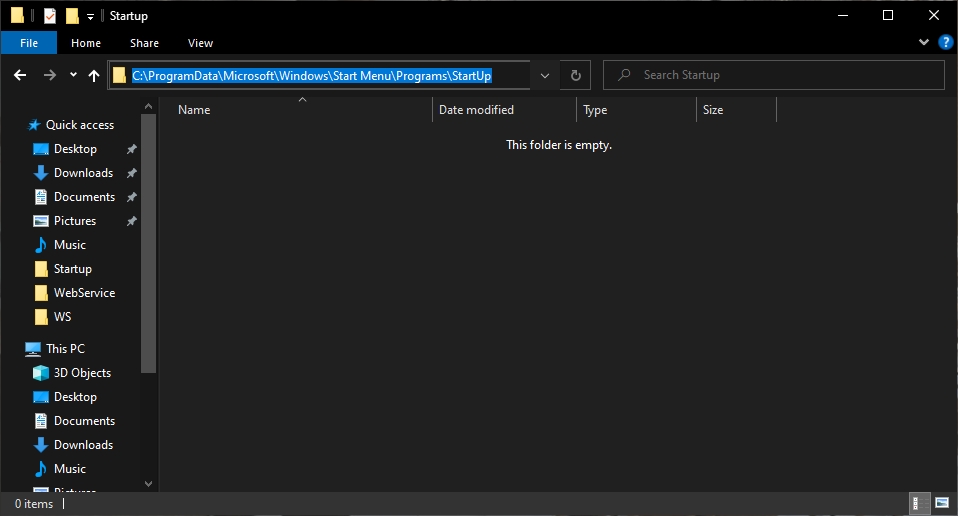
Using Windows File Explorer, browse to C:\ProgramData\Microsoft\Windows\Start Menu\Programs\Startup\. Note that you need to be able to see hidden files and folders.
Locate the Maitre'D POS shortcut and delete it.
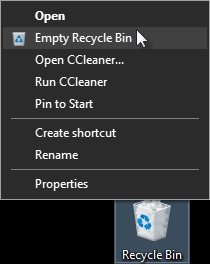
Empty the recycle bin.
If you restart the computer at this point, the Maitre'D POS application will not start automatically after you logon to Windows.
If you wish to re-enable automatic startup but the shortcut was deleted, here is how to re-create it:
Using Windows File Explorer, browse to C:\WS.
Locate the file called Starter.exe. Right-click the file and select the Copy option.
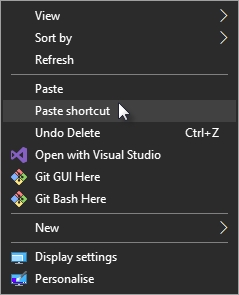
Right-click an empty space on the Windows desktop and select the Paste Shortcut option.
This will create a shortcut called "Starter.exe - Shortcut". Rename it to Maitre'D POS.
Using Windows File Explorer, browse to C:\ProgramData\Microsoft\Windows\Start Menu\Programs\Startup\. Note that you need to be able to see hidden files and folders.
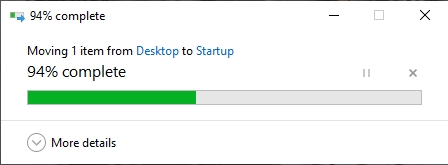
Drag-and-Drop the Maitre'D POS shortcut from the desktop to the Startup folder.
You will see a dialog box explaining that you need administrator privileges to perform this operation. Click Continue and the shortcut will be copied.
If you restart the computer at this point, the Maitre'D POS application will start automatically after you logon to Windows.
Related Topics
While it is possible to configure Windows to logon automatically using a specified user, it is not recommended to do so. Since Windows 10 version 2004 (released in December 2019), Microsoft has taken active steps to hide the features that make automatic logon possible, making the use of this feature increasingly complex.
As a result, enabling automatic logon features now require a combination of Windows registry editing as well as tweaks in the Group Policy Objects (GPO). Incorrect manipulation of the Windows Registry and GPOs may cause damage to the operating system and cause loss of data.
IMPORTANT! The autologon feature is provided as a convenience. However, this feature may be a security risk. If you set a computer for autologon, anyone who can physically obtain access to the computer can gain access to all the computer's contents, including any networks it is connected to. Additionally, when autologon is turned on, the password is stored in the registry in plain text. The specific registry key that stores this value can be remotely read by the Authenticated Users group. This setting is recommended only for cases in which the computer is physically secured and steps have been taken to make sure that untrusted users cannot remotely access the registry.
Source:
For these reasons, PayFacto does not provide direct instructions on how to setup automatic logon. If you wish to use this feature despite these warnings, you must do so at your own risk and through your own research.
PayFacto considers any form of automatic logon as a liability and a major security risk. The use of automatic logon can compromise the data stored on the affected computer as well as the data stored on other computers connected to the same network. Every reasonable step must be taken to ensure the security of your data, which includes using unique usernames with strong passwords. Bypassing this basic security requirement by using automatic logon is against PayFacto's data security policy, and PayFacto will decline any responsibility for any data breach or data loss in a system using any form of automatic logon.
Related Topics
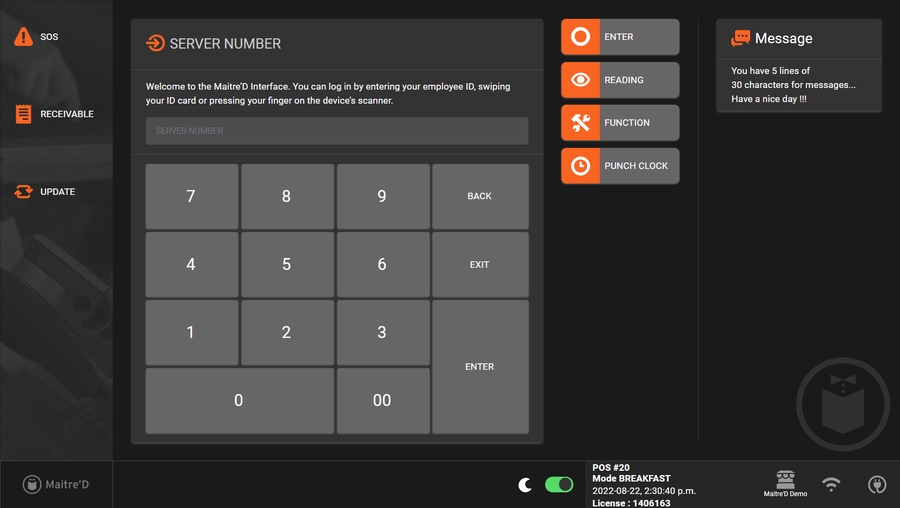
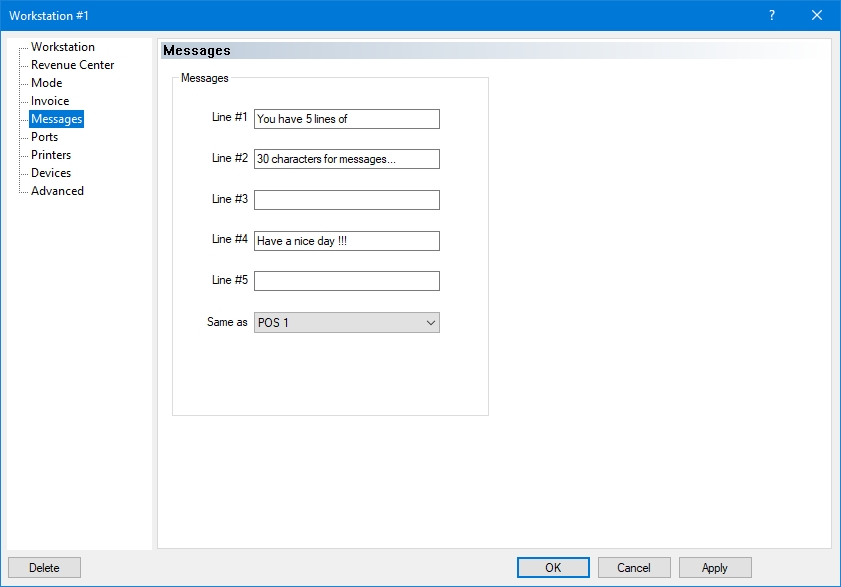
The Messages branch of the workstation options allows you to configure custom messages to be displayed on the workstation's home screen.
Each line allows up to 30 characters for custom messages.
To avoid re-typing the same information for each workstation, select the POS workstation to use as a model from the drop-down list. This workstation will then use the same settings as the selected workstation.
Related Topics
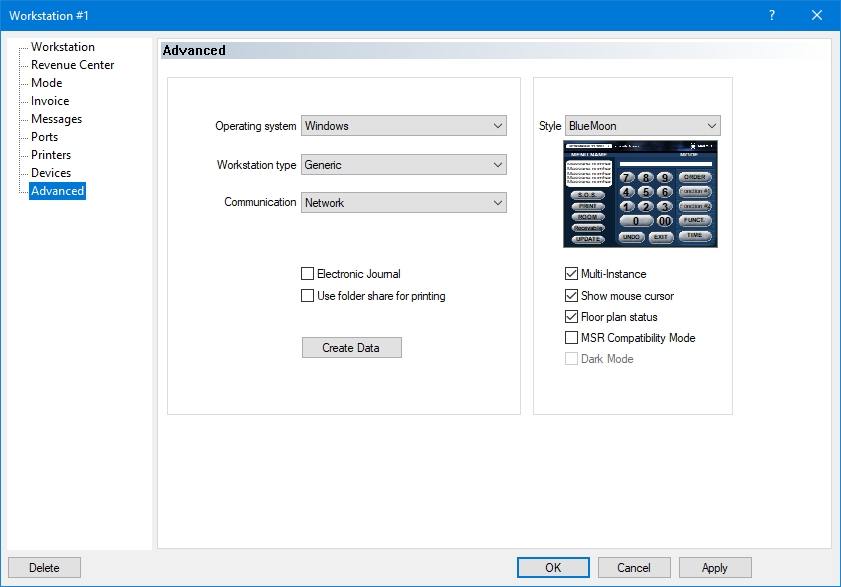
The Advanced branch of the workstation options allows you to configure advanced operation options for your workstation.
Select between Windows or Mobile POS App. Use Windows for any windows-based POS workstation or tablet. Use Mobile POS app for Android or iOS-based tablets.
Use the Generic options for most situations. The other options should be used only if you have older Panasonic or Sharp POS workstations. This drop-down list becomes unavailable if the operating system is set to Mobile POS App.
This drop-down list is always set to Network. This drop-down list becomes unavailable if the operating system is set to Mobile POS App.
Enable this option to create a text file containing a chronological log of all transactions done on a fixed workstation. This feature is not available on mobile workstations.
NOTE: By default, each workstation saves the resulting JournalXX.Log file in the C:\WS folder of its own hard drive , where XX is the workstation number. You can specify a path to save the electronic journals of all workstations in a central location by going to System Configuration > View > Options > Directories, and entering a path in the POS Electronic Journal Path field.
Enable this option to use a shared folder on the Maitre'D Back-Office server as a print spooler for this workstation. If this option is disabled, the workstation will have its own local folder as its print spooler.
Click this button to manually trigger the creation of the workstation's data.
Select the Legacy POS style to use for this POS workstation. This option becomes unavailable if the Advanced POS UI (HTML POS) is in use.
Enable this option to allow the workstation application to run in a window which can be resized.
Enable this option to display the mouse pointer while the workstation application is running. This allows a mouse to be used instead of a touch-screen. If this option is disabled, the mouse pointer is hidden.
Enable this option to use the floor plan as a screen saver on the workstation.
Enable this option to synchronize with the Magnetic Card Reader of a Posiflex J2 workstation running CE.NET. Disable this option on Windows workstations.
Enable this option to use the Advanced POS UI (HTML POS) in Dark Mode. This option is not available with the Legacy POS UI.
Related Topics
The Ports branch of the workstation options allows you to remap Maitre'D ports to custom Windows COM ports.
For each Maitre'D port, select the Windows COM port number to use.
This is especially useful in situations where Windows assigns the lower COM port numbers to internal system hardware, and the actual available COM ports are COM 5 through COM 8, for example.
Also, some USB-to-Serial adapter drivers will set the emulated COM port number to COM 9 or higher. This is another situation where port remapping would be required.
Related Topics
IMPORTANT! If you can't see the MaitreD shared folder through the network or if you are getting error messages, there is most likely something wrong with your network settings. Please review the Maitre'D Back-Office installation procedures and, more specifically, how to .
The following pre-requisites must be met before the Advanced POS User Interface can be used:
Maitre'D version 7.08.000.430 or later.
Valid Maitre'D Software-as-a-Service (SaaS) license with Embedded Maintenance Program (EMP).
See Hardware Requirements for Advanced POS User Interface.
Microsoft Windows 10 or later, both for the Maitre'D Back-Office and POS workstations.
Please consult Operating System Requirements for detailed patch level and supported editions.
The Maitre'D Advanced POS UI comes with a selection of generic, royalty-free images and graphics for your convenience. You can also use your own custom images in most common formats. If you wish to use custom-branded images, have them in-hand before configuring the Maitre'D Advanced POS UI.
The Maitre'D Advanced POS UI supports the following image formats:
Scalable Vector Graphics (*.svg)
Portable Network Graphic (*.png)
Joint Photographic Experts Group (*.jpg or *.jpeg)
Related Topics


The Maitre'D Advanced POS User Interface supports the most modern image formats in order to provide outstanding high-resolution image quality and color reproduction.
The Maitre'D Advanced POS UI supports the following image formats:
Scalable Vector Graphics (*.svg)
Portable Network Graphic (*.png)
Joint Photographic Experts Group (*.jpg or *.jpeg)
PayFacto does not provide any form of assistance or training in the creation or manipulation of graphics or image files. The information below is provided to give users a better understanding of each supported image format and the circumstances under which each format is better suited.
SVG images are defined in a vector graphics format and stored in XML text files. SVG images can thus be scaled in size without loss of quality, and SVG files can be searched, indexed, scripted, and compressed. The XML text files can be created and edited with text editors or vector graphics editors, and are rendered by the most-used web browsers.
File size
SVG files are typically very small, since they are defined in XML text files. Also, being infinitely scalable, the file size will not change regardless of the image's actual size on the screen.
Scalability
SVG files can be scaled (resized) without any loss in quality. Compared to PNG or JPG, the SVG will not get "blockyness" as it is scaled up.
Consider the images below as examples. Feel free to resize your browser window and zoom in and out to see the effects of scaling. Notice how the SVG image (on the right) borders remain sharp and well-defined regardless of its size on the screen. At the same time, see how the PNG (on the left) becomes "blocky" and blurred as its size increases.
PNG file
SVG file
Editing
Editing svg files requires specialized tools which are designed to work with vector graphics, such as Adobe Illustrator, Inkscape or GIMP. Text editors such as Notepad++ may aslo be used, but this requires deep knowledge specific to the XML syntax of SVG files. In general, working with vector graphics is very different than rasterized images, so there could be a significant learning curve depending on your current knowledge and skill level.
not very suitable for pictures
SVG files are typically used for simple 2d graphics, such as logos and text. While it is possible to convert a picture from a rasterized format (JPG or PNG), there are no real advantages in doing so. In fact, this often results in a loss of quality and artefacts in the converted image. Converted images may look "cartoon-ish" and in worst cases may become blurred beyond recognition.
JPG file (original)
SVG file (Converted from JPG)
The PNG file format is widely used on websites to display high-quality digital images. Created to exceed the performance of GIF files, PNGs offer not just lossless compression, but also a much broader and brighter color palette. It’s a particularly popular file type with web designers because it can handle graphics with transparent or semi-transparent backgrounds. The file format isn’t patented, so PNGs can be opened using any image editing software without the need for licensing.
Picture quality
PNG's are suitable for high-quality pictures, like photographs of food products or sales items available on the menu.
Transparency
PNG's support transparency, so they can be placed against any background without looking awkward.
To illustrate the difference, consider the examples below. Both images are identical sizes (640 x 464 pixels). Both images were placed against the same dark gray background which extends 10 pixels past the image's boundaries on all sides (660 x 484 pixels)
the hamburger in the PNG file (on the left) was created against a transparent background, which blends in with the dark gray background we placed behind the image. The same image was then converted in jpg format and is displayed on the right. Since the jpg format does not support transparency, the image's background is displayed as white space around the hamburger, which contrasts with the dark gray background bleeding on all sides.
PNG file with transparency
JPG file (does not support transparency)
Editing
PNG's can be edited with a wide variety of free image editors, including Microsoft Paint, Paint.NET, GIMP and many others. The manipulation of PNG files is generally straightforward and most of the required skills can be acquired through free online tutorials.
Lossless compression
PNG files can be opened, edited and saved as many times as necessary without losing quality due to successive compression.
Not scalable
A low-resolution PNG file will not scale very well. To display a PNG on a large portion of a screen, a larger image is needed, which will dramatically increase the file size.
File size
At the same resolution and comparable image quality, a PNG will produce a larger file size than JPG.
JPEG is a commonly used method of lossy compression for digital images, particularly for those images produced by digital photography. The degree of compression can be adjusted, allowing a selectable tradeoff between storage size and image quality.
Picture quality
JPG's are suitable for high-quality pictures, like photographs of food products or sales items available on the menu.
File size
At the same resolution and comparable image quality, a JPG will produce a smaller file size than PNG.
Editing
JPG's can be edited with a wide variety of free image editors, including Microsoft Paint, Paint.NET, GIMP and many others. The manipulation of JPG files is generally straightforward and most of the required skills can be acquired through free online tutorials.
Not scalable
A low-resolution JPG file will not scale very well. To display a JPG on a large portion of a screen, a larger, higher resolution image is needed, which will dramatically increase the file size.
Transparency
JPG's don't support transparency.
Compression
Understanding the effects of compression on JPG files can be quite daunting. Every time a JPG file is opened, modified and saved, the file is re-compressed, resulting in a compounded loss of quality compared to the original image.
Related Topics
Enabling the Advanced POS User Interface (UI) is pretty straightforward. This article describes the procedure in detail.
Before enabling the Advanced POS UI, make sure that all your POS workstations already work in Legacy mode.
Logon to the Maitre’D Back-Office with appropriate credentials. (Distributor or System Owner)
Start the Point of Sale Control module.
Click on the View menu and select the Options... option.
The Point of Sale Control module's options window opens on the Configuration branch.
Click on the POS sub-branch and enable the Use advanced POS UI option.
Click OK. You will be asked to create the workstation data. Click OK to proceed. The entire process could take from a few seconds to a few minutes, depending on your system's performance and the number of workstations on your Maitre'D license.
The options window will close, and you will be back to the Point of Sale Control module.
At this point, the POS workstations should automatically restart with the Advanced POS User Interface.
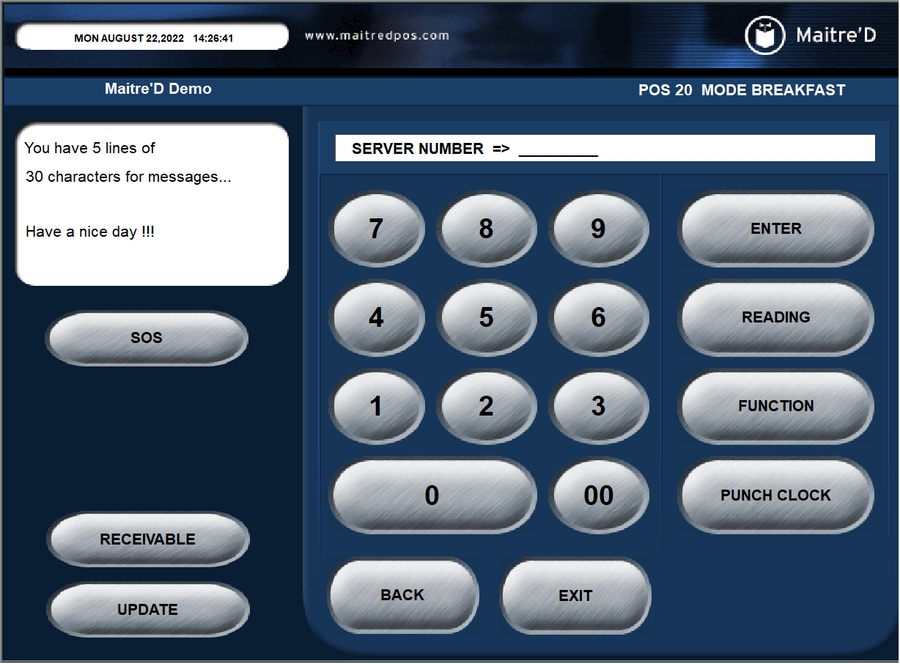
Legacy POS User Interface
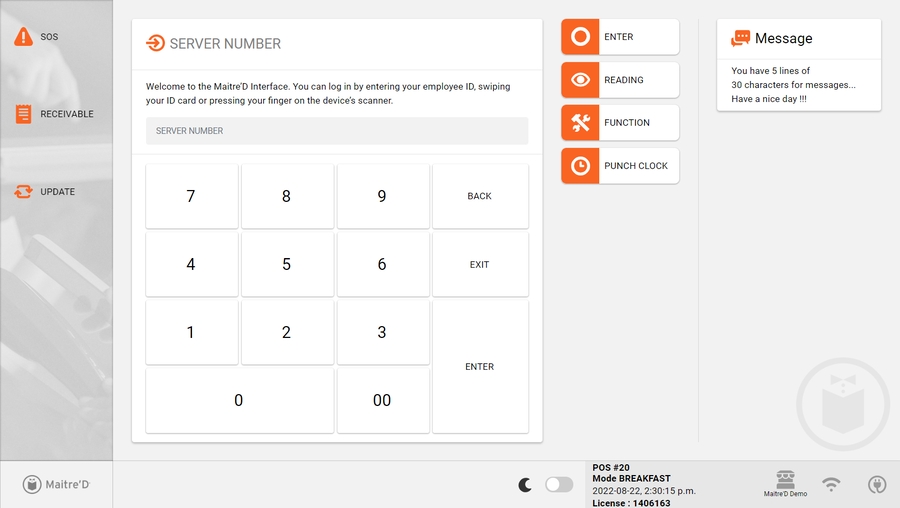
Advanced POS User Interface
Related Topics
This article describes how to use the Advanced POS User Interface in left-handed mode. This configuration is applied at the employee level, which means that every employee can use the POS in left-handed or right-handed mode, according to their personal preference.
By default, the POS User Interface is configured in right-handed mode, as approximately 90% of the world's population is right-handed. This procedure shows how to configure the POS User Interface to left-handed mode for a single employee. Repeat this procedure for every left-handed employee.
Logon to the Maitre’D Back-Office with appropriate credentials. (Distributor or System Owner)
Start the Point of Sale Control module.
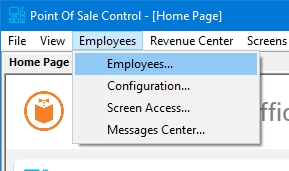
Click on the Employees menu and select the Employees... option.
The list of employees will be displayed. Select an employee from the list and click the Modify button.
The employee's properties will open on the Setup branch.
Click on the Option sub-branch, located under POS Operation. Enable the Left handed option and click OK to save changes and close this window.
You will be back at the employee's list. Repeat this process for all left-handed employees.
Close the list of employees when done. You may also close the Point of Sale Control Module and logout of the Maitre'D Back-Office.
The next time these employees use the POS, they will automatically be using the left-handed interface. The screenshots below illustrate the difference between right-handed and left-handed interfaces.
Right-Handed POS Interface (Default)
Left-Handed POS Interface
Related Topics
The Maitre’D Advanced POS User Interface (UI) elevates the merchant experience with Maitre’D by enhancing the look and feel of both the front and the Back-Office with a new intuitive and modernized interface. It not only offers a modernized menu and back-of-house editor experience, but new screens for all the Maitre'D features you love, like staff time and attendance and financial reporting.
The Maitre’D Advanced POS User Interface (UI) is designed to take advantage of modern POS hardware featuring high resolution displays and multi-touch capability. High graphic quality is achieved by improving the resolution of the POS user interface, and by enabling support for most modern image formats, including Scalable Vector Graphics (*.svg), which provides outstanding image quality at any resolution. It provides a visually appealing interface for order taking with light and dark mode and a modernized editor experience for Back-Office operators.
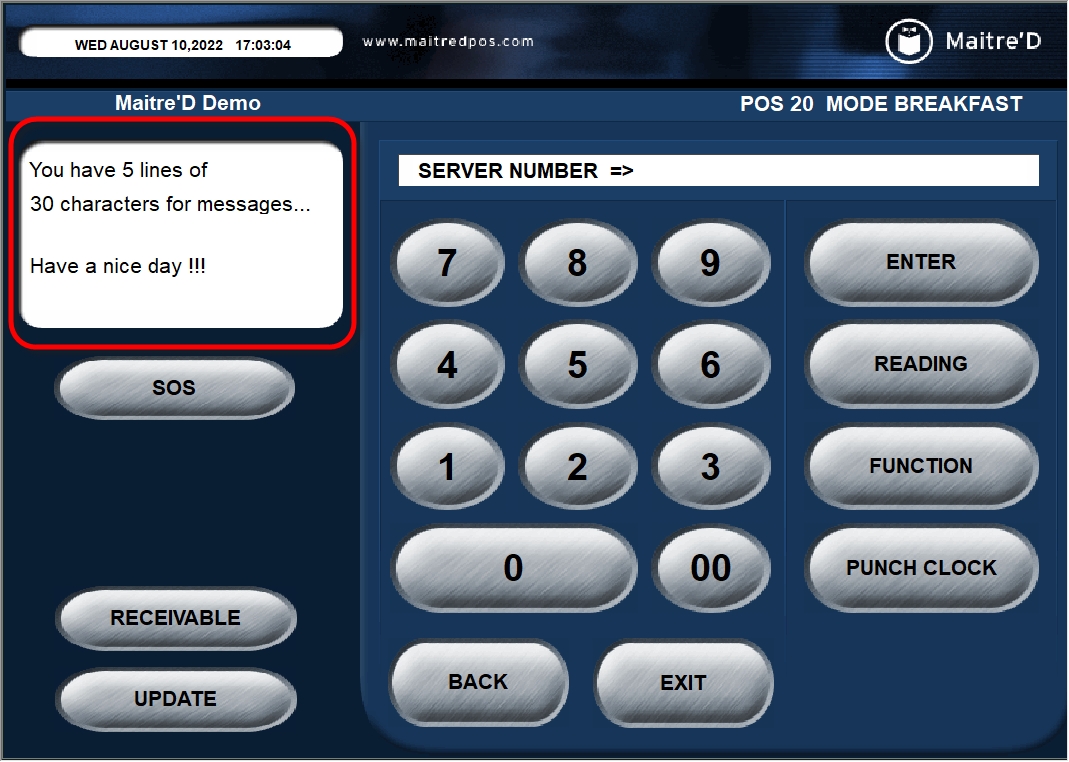
Compared to the Legacy Point of Sale Interface, the Advanced Point of Sale User Interface uses modern graphics and displays more information to the user.
Legacy POS
Advanced POS User Interface
The Advanced Point of Sale User Interface can be used in light mode for well-lit areas, or in Dark mode to reduce eye strain and provide better contrast.
Light mode
Dark mode
The Advanced POS User Interface comes with a matching Advanced Preferential Screen and Screen Layout Setup interface to improve the user-experience when setting up screens.
Legacy Preferential Screen Setup
Advanced Preferential Screen Setup
Buttons are easier and faster to configure with the Advanced preferential screen setup interface. Button properties are on the same screen as the screen layout or preferential screen, allowing changes to be seen in real time.
Legacy Button Properties
Advanced Button Properties
Related Topics
The Devices branch of the workstation options allows you to configure various devices to work with the workstation, such as printers, card readers, barcode scanners, payment terminals, etc.
This column lists the devices currently configured for this workstation.
This column lists the device's sub-type. For example, a device of type "Printer" could have a sub-type of Serial or Parallel, "Card Readers" can have sub-types of Serial, Keyboard or Device, etc.
This column lists the port to which the device is connected. This could be a COM port, and LPT port, TCP port, etc.
This column lists the type of driver used by the device.
Click the Add button to add a new device to this workstation.
Select an existing device from the list and click Remove to delete the device from the list.
Select an existing device from the list and click Properties to view or edit its current configuration.
Bar dispensers are also known as Liquor Control Devices. Maitre'D supports many models from Azbar, Berg and Auper.
Biometric readers include fingerprint reading devices. Maitre'D supports a few models manufactured by Digital Persona.
Card readers are used to read magnetic stripe cards, such as employee cards and gift cards. They can also be used to read credit cards with older, non-EMV Electronic Funds Transfer protocols like Datacap's DSIClientX.
Cash card readers are devices which can read smart cards used by various meal plan providers and college campuses.
Maitre'D supports up to 2 cash drawers per POS workstation. Cash drawers are used to store cash bills and coins.
Coin dispensers are devices which can dispense change automatically.
Kitchen displays are monitors which displays orders on a screen in various kitchen preparation areas. They can replace traditional kitchen printers.
Maitre'D supports Digital Video Recording and security camera equipment. An overlay is displayed over the security camera footage so managers can track what employees are doing when using POS workstations.
Maitre'D supports various types of fiscal printers and sales recording modules, such as the Québec Sales Recording Module and the Greek fiscal printer.
Line displays are small, customer-facing LCD displays which displays item names and running total during the ordering process.
Network printers are receipt or kitchen printers that can connect through an Ethernet interface instead of the traditional serial or LPT ports.
PIN Pads are in fact payment terminals used to process card payments with EMV-compliant payment solutions.
PIN Pad docking stations are used by some Electronic Funds Transfer protocols to transfer data from a delivery payment terminal to Maitre'D.
Maitre'D supports a wide variety of receipt and kitchen printers. Devices using the standard printer device type generally connect via a serial or parallel interface.
Scales can be connected to your POS to automatically register items sold by weight.
Bar code scanners can be used with Maitre'D to lookup PLU's as well as to facilitate recalling printed guest checks.
Related Topics
This article describes how to use the Dark Mode for the Advanced POS User Interface. By default, the Advanced POS User Interface uses Light Mode, which can be very bright in low-light conditions. The Dark Mode is available to reduce the amount of light emitted from the POS screen and reduce eye strain.
IMPORTANT! This feature is available in Maitre'D 7.08.000.440 or later.
By default, the Advanced POS User Interface uses Light Mode. This configuration is at the workstation level, therefore every workstation can be configured independently. Also, a manual override setting is available on the POS screen, allowing employees to toggle between Light and Dark modes on the fly.
Logon to the Maitre’D Back-Office with appropriate credentials. (Distributor or System Owner)
Start the Point of Sale Control module.
Click on the Workstation menu and select the Options... option.
The list of available workstations will be displayed. Select the workstation for which you wish to assign redirection tables and click the Modify button.
The workstation's properties open on the Workstation branch.
Click on the Advanced branch and enable the Dark Mode option.
IMPORTANT! This option determines the default behaviour of the workstation. With Dark Mode enabled, the workstation will always start in Dark Mode after a reboot or after recreating workstation data.
Users can always override this configuration by using the Light / Dark toggle switch as explained further below.
Click OK. The workstation options window will close and bring you back to the list of workstations.
Repeat this process as necessary for all workstations which needs to use Dark Mode by default.
Once all workstations have been configured, you may close the workstation's list, close the Point of Sale Control module, and logout of the Maitre'D Back-Office.
The workstations will automatically update to Dark Mode as configured:
Light mode
Dark mode
Changing to Dark Mode in the Maitre'D Back-Office determines the default behaviour of the workstation. However, it is always possible for the user to toggle between Light Mode and Dark mode based on personal preferences.
To toggle between Light and Dark modes, simply press and hold the toggle switch for 2 to 3 seconds. A circle animation will appear around the switch, and the display mode will change once the circle is completed.
Toggle in Light Mode
Press and hold
Toggle in Dark Mode
Related Topics
The following pre-requisites must be met before the Advanced POS User Interface can be used:
The Maitre'D Advanced POS User Interface supports the most modern image formats in order to provide outstanding high-resolution image quality and color reproduction.
The Maitre'D Advanced POS UI supports the following image formats:
Scalable Vector Graphics (*.svg)
Portable Network Graphic (*.png)
Joint Photographic Experts Group (*.jpg or *.jpeg)
Enabling the Advanced POS User Interface (UI) is pretty straightforward. This article describes the procedure in detail.
Before enabling the Advanced POS UI, make sure that all your POS workstations already work in Legacy mode.
This article describes how to use the Advanced POS User Interface in left-handed mode. This configuration is applied at the employee level, which means that every employee can use the POS in left-handed or right-handed mode, according to their personal preference.
This article describes how to use the Dark Mode for the Advanced POS User Interface. By default, the Advanced POS User Interface uses Light Mode, which can be very bright in low-light conditions. The Dark Mode is available to reduce the amount of light emitted from the POS screen and reduce eye strain.
IMPORTANT! This feature is available in Maitre'D 7.08.000.440 or later.
This article describes how to use the Hidden Screen Layout for the Advanced POS User Interface. By default, the Advanced POS User Interface uses a static screen layout which is always visible, similar to the one used with the Legacy POS User Interface. With the Hidden Screen Layout, the space normally taken by the screen layout can be used to accommodate larger preferential screen buttons.
This article describes how to enable the UI Debugger Tool for the Advanced POS User Interface. This tool is used internally by PayFacto when troubleshooting issues with the Advanced POS User Interface. In a nutshell, this allows a web browser to connect to the Workstation's interface to see error messages that the POS is normally unable to display by itself.
IMPORTANT! Use this functionality in a lab environment and for troubleshooting purposes only. Please contact PayFacto support for further assistance using this feature.
By default, the UI Debugger tool is disabled. This configuration is global, therefore it will apply to all the workstations on your Maitre'D POS system. Here is how to enable it:
Logon to the Maitre’D Back-Office with appropriate credentials. (Distributor or System Owner)
Start the Server Control module.
Click on the File menu and select the Stop Server option.
Once the server is stopped, close any open modules and logoff from the Maitre'D Back-Office.
Using FIle Explorer, browse to C:\POSERA\MaitreD\DATA and locate the BO.INI file.
Open the BO.INI file using any text editor, such as Notepad or Notepad++.
Locate the [Miscellaneous] Section. Then, add the following line under the [Miscellaneous] section:
HtmlUIDebugger=True
NOTE: Setting this value to "True" enables the UI Debugger. Setting it to "False" turns it off. Omitting the line altogether is the same as setting it to "False".
Save your changes to the BO.INI file and close it.
You may also close the File Explorer window.
Logon to the Maitre’D Back-Office with appropriate credentials. (Distributor or System Owner)
Start the Server Control module.
Click on the Make Workstation Data quick link.
Wait for the process to complete. The entire process could take from a few seconds to a few minutes, depending on your system's performance and the number of workstations on your Maitre'D license.
Click on the File menu and select the Start Server option.
Once the server is started, you may close any open modules and logoff from the Maitre'D Back-Office.
Start the POS Workstations. There is no visible difference to the Advanced POS User Interface when the UI Debugger is running.
Related Topics
This article describes how to use the Hidden Screen Layout for the Advanced POS User Interface. By default, the Advanced POS User Interface uses a static screen layout which is always visible, similar to the one used with the Legacy POS User Interface. With the Hidden Screen Layout, the space normally taken by the screen layout can be used to accommodate larger preferential screen buttons.
By default, the Advanced POS User Interface uses a static screen layout. This configuration is global, therefore it will apply to all the workstations on your Maitre'D POS system. Here is how to enable the Hidden Screen Layout:
Logon to the Maitre’D Back-Office with appropriate credentials. (Distributor or System Owner)
Start the Server Control module.
Click on the File menu and select the Stop Server option.
Once the server is stopped, close any open modules and logoff from the Maitre'D Back-Office.
Using FIle Explorer, browse to C:\POSERA\MaitreD\DATA and locate the BO.INI file.
Open the BO.INI file using any text editor, such as Notepad or Notepad++.
Locate the [Miscellaneous] Section. Then, add the following line under the [Miscellaneous] section:
HtmlUIOrderScreenLayoutV2=True
NOTE: Setting this value to "True" enables the Hidden Screen Layout. Setting it to "False" uses the default Static Screen Layout. Omitting the line altogether is the same as setting it to "False".
Save your changes to the BO.INI file and close it.
You may also close the File Explorer window.
Logon to the Maitre’D Back-Office with appropriate credentials. (Distributor or System Owner)
Start the Server Control module.
Click on the Make Workstation Data quick link.
Wait for the process to complete. The entire process could take from a few seconds to a few minutes, depending on your system's performance and the number of workstations on your Maitre'D license.
Click on the File menu and select the Start Server option.
Once the server is started, you may close any open modules and logoff from the Maitre'D Back-Office.
Start the POS Workstations. The screenshot below illustrate the difference between the Static and Hidden screen layout.
Advanced POS User Interface with Hidden Layout
To access the top or bottom layout buttons on the Hidden Screen Layout interface, touch either the top or bottom Option keys, respectively. Layout buttons will appear as an overlay on top of the preferential screen buttons.
Related Topics
The Maitre'D Communication Server Service is installed and activated by default on all Maitre'D installations using version 7.08.000.000 or later. The following explains how to verify that the Maitre'D Communication Server Service is up-and-running on your Windows 10 computer.
Right-click the Windows Start button and select the Run option.
The Run dialog box opens. Type services.msc and click OK.
The Windows Services window opens. Locate the Maitre'D 7 Communication Server service in the list.
Make sure that the service's status is Running, and that the Startup Type is Automatic.
This confirms that the Maitre'D 7 Communication Server service is installed and running properly.
Related Topics
Before using the Maitre'D Mobile POS, make sure that the Mobile POS option is activated on your Maitre'D license:
Logon to the Maitre’D Back-Office with appropriate credentials. (Distributor or System Owner)
On the Main Back-Office screen, click on the File menu and select the Licenses… option.
The Installed Licenses window will appear.
Make sure that the Mobile POS option is present. The number next to Mobile POS is the maximum number of mobile POSes that can be used at the same time on your Maitre'D POS System.
Click the Close button to close this window and return to the Maitre'D Back-Office.
If the Mobile POS option is missing, please contact your Maitre'D Sales Representative to purchase it, and then follow the procedure to activate your newly purchased option here:
Related Topics
The Maitre’D Mobile app allows merchants to take their POS directly to the table and place customer orders.
Orders are sent directly to the kitchen and servers can treat customers on the spot in real-time at the tableside.
MD Mobile keeps Maitre'D at the servers' fingertips using lightweight handheld tablets, no wasted time on taking notes and running back and forth to the POS frees up staff to focus on delivering faster, more accurate, and better customer service.
Related Topics
The following pre-requisites must be met before the Advanced POS User Interface can be used:
Maitre'D version 7.08.000.410 or later.
Valid Maitre'D Software-as-a-Service (SaaS) license with Embedded Maintenance Program (EMP).
License option for at least one Mobile POS. See .
Maitre'D POS Bridge (See )
Maitre'D Communication Server (See )
* While MPOS will continue to work on Android 10 for the time being, this operating system has reached its End-Of-Life and is no longer supported by Google. Before making a purchase decision, make sure that the operating system can be upgraded to a more recent version (Android 11 or later) that is supported by Google.
Any iPad Pro tablet.
Ipad Air 3 or later models.
Related Topics
See for .
Please consult for detailed patch level and supported editions.
Hardware
Minimum
Recommended
Operating System
iOS 14
iOS 14 or later
CPU
Apple A10X Fusion or better
Apple A12 Bionic or better
RAM
3Gb or more
3Gb or more
Storage
32Gb or more
64Gb or more
Screen Size
10'' or more
10'' or more
Screen Resolution
1080 x 1920 or better
1200 x 2000 or better
Hardware
Minimum
Recommended
Operating System
Android 10*
Android 11 or later
CPU
Samsung Exynos 9611 or better
Qualcomm Snapdragon 662 or better
Unisoc Tiger T618 or better
Samsung Exynos 990 or better
Qualcomm Snapdragon 865 or better
RAM
4Gb or more
6Gb or more
Storage
32Gb or more
64Gb or more
Screen Size
10'' or more
10'' or more
Screen Resolution
1080 x 1920 or better
1200 x 2000 or better


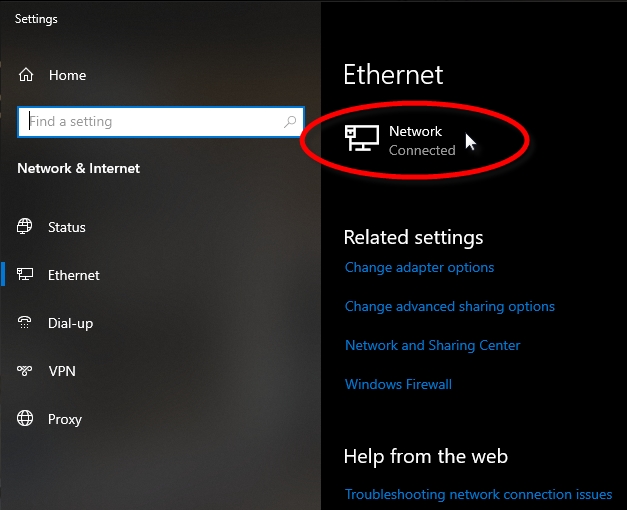
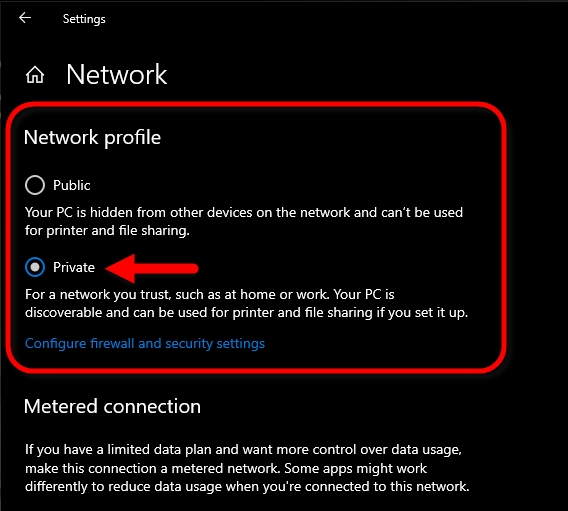


Hardware
Minimum
Recommended
Operating System
Android 10*
Android 11 or later
CPU (SoC)
Samsung Exynos 9611 or better
Qualcomm Snapdragon 662 or better
Unisoc Tiger T618 or better
Samsung Exynos 990 or better
Qualcomm Snapdragon 865 or better
RAM
4GB or more
6GB or more
Storage (Memory)
32GB or more
64GB or more
Screen Size
10'' or more
10'' or more
Screen Resolution
1080 x 1920 or better
1200 x 2000 or better
* While MPOS will continue to work on Android 10 for the time being, this operating system has reached its End-Of-Life and is no longer supported by Google. Before making a purchase decision, make sure that the operating system can be upgraded to a more recent version (Android 11 or later) that is supported by Google.
Samsung
Galaxy Tab A7
SM-T500
SM-T505 (LTE)
10.4''
Snapdragon 662
4GB
32GB
Samsung
Galaxy Tab A8
SM-X200
SM-X205 (LTE)
10.5''
Unisoc Tiger T618
4GB
32GB
Samsung
Galaxy Tab S6 Lite (2020)
SM-P610
SM-P615 (LTE)
10.4''
Exynos 9611
4GB
4GB
64GB
128GB
Samsung
Galaxy Tab S6 Lite (2022)
SM-P613
SM-P619 (LTE)
10.4''
Snapdragon 720G
4GB
4GB
64GB
128GB
Samsung
Galaxy Tab S7
SM-T870
SM-T875 (LTE)
SM-T876B (LTE/5G)
11''
Snapdragon 865 5G+
6GB
8GB
8GB
128GB
256GB
512GB
Samsung
Galaxy Tab S7+
SM-T970
SM-T976B (LTE/5G)
12.4''
Snapdragon 865 5G+
6GB
8GB
8GB
128GB
256GB
512GB
Samsung
Galaxy Tab S7 FE
SM-T730
SM-T733
SM-T736B (5G)
12.4''
Snapdragon 778G 5G
Snapdragon 778G 5G
Snapdragon 750G 5G
4GB
6GB
8GB
64GB
128GB
256GB
Samsung
Galaxy Tab S8
SM-X700
SM-X706 (5G)
11''
Snapdragon 8 Gen 1
8GB
8GB
12GB
128GB
256GB
256GB
Samsung
Galaxy Tab S8+
SM-X800
SM-X806 (5G)
12.4''
Snapdragon 8 Gen 1
8GB
8GB
12GB
128GB
256GB
256GB
Samsung
Galaxy Tab S8 Ultra
SM-X900
SM-X906 (5G)
14.6''
Snapdragon 8 Gen 1
8GB
8GB
12GB
16GB
12GB
16GB
128GB
256GB
256GB
256GB
512GB
512GB
Samsung
Galaxy Tab Active Pro
SM-T540
SM-T574 (LTE)
10.1''
Snapdragon 670
4GB
64GB
Related Topics

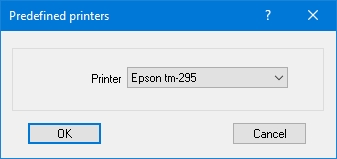
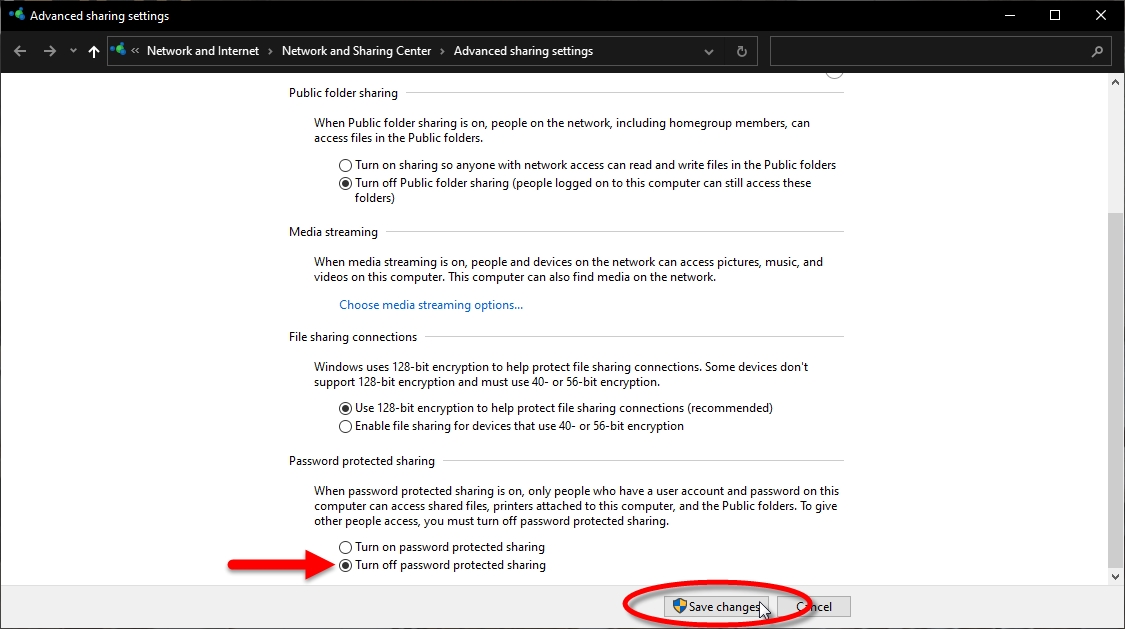
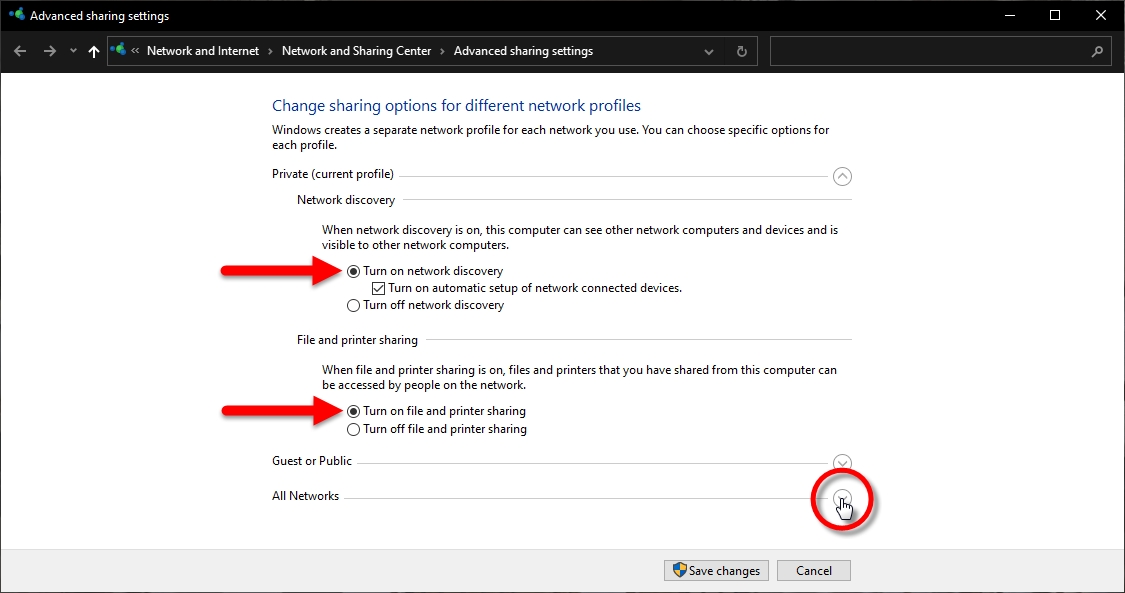
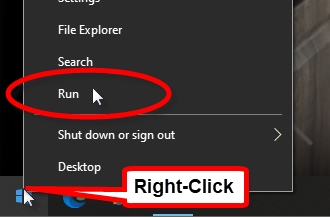


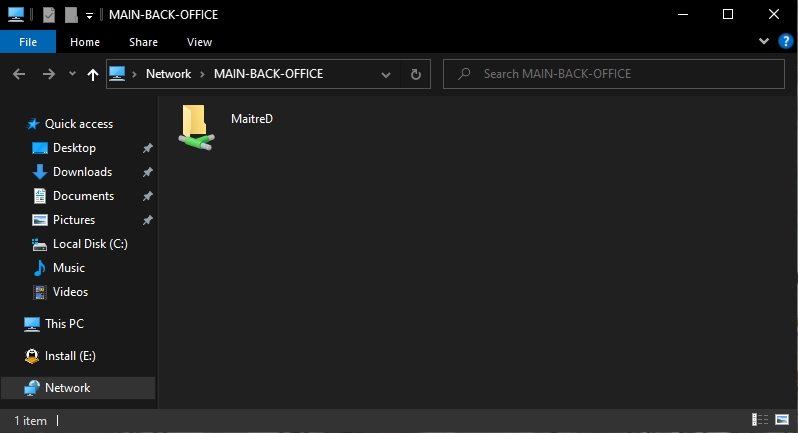
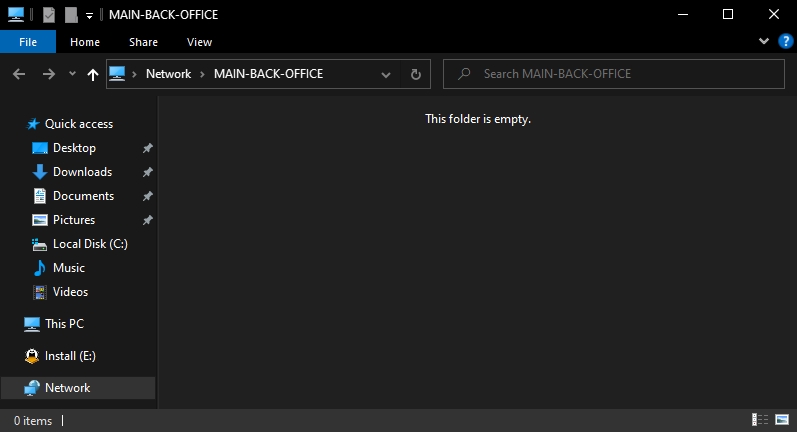

Typical Android or iOS tablets purchased in the general market don't have receipt printers. For this reason, Maitre'D has the ability to leverage the printing capabilities of other POS workstations for use by Mobile POS tablets.
Logon to the Maitre’D Back-Office with appropriate credentials. (Distributor or System Owner)
Start the Point of Sale Control module.
Click on the View menu and select the Options... option.
The Point of Sale Control module's options window opens on the Configuration branch.
Click on the Printing branch.
Configure these options from the Mobile Printing section:
From the drop-down list, select the workstation that is responsible for handling print jobs send by mobile devices. Select a fixed workstation equipped with a receipt printer.
NOTE: Make sure that the selected workstation is always "on", otherwise the print jobs sent by mobile devices will not be processed.
Also, the selected workstation and attached printer(s) should be readily accessible to employees, as this is where guest checks will be printed.
Set the polling interval (in seconds) at which the workstation will check for print jobs from mobile devices. The recommended value is 15 seconds.
NOTE: The recommended setting for the Polling Interval is 15 seconds. This value provides a good balance between printing delays and processing overhead. Lower values will make the printing delay shorter, but may hinder the workstation's overall performance for other tasks.
Click OK to save changes.
Related Topics
You can verify that the Maitre'D POS Bridge was installed properly by following this procedure:
Click on the Windows Start button and select Settings (by the cog wheel).
The Windows Settings screen will open. Click Apps - Uninstall, defaults, optional features.
The Apps & Features screen will be displayed. Scroll down the list of installed apps and look for Maitre'D POS Bridge.
The fact that the Maitre'D POS Bridge application is listed here means that it is installed. Clicking on it will reveal more details. Make sure that the installed version corresponds to your version of the Maitre'D Back-Office software.
Follow this procedure to make sure that the Maitre'D POS Bridge service is up-and-running. Also make sure that the service is configured to start automatically when Windows starts.
Right-click the Windows Start button and select the Run option.
The Run dialog box opens. Type services.msc and click OK.
The Windows Services window opens. Locate the Maitre'D POS Bridge service in the list.
Make sure that the service's status is Running, and that the Startup Type is Automatic.
The Maitre'D POS Bridge service is installed and running properly.
Related Topics
Before any Mobile POS can be used, the POS Bridge must be installed on the Maitre'D Back-Office PC:
Logout of the Maitre'D Back-Office. Close any open Maitre'D module(s).
Using File explorer, browse to C:\POSERA\MaitreD\PRG\Setup\. Locate the file called POSBridge.exe and double-click on it to launch the installer.
You may see a User Account Control (UAC) warning. Click Yes.
The InstallShield Wizard will start by checking for pre-requisites. If some required components are missing, you will be asked to install them. Click the Install button to proceed:
Missing components will be installed automatically.
The InstallShield Wizard will prepare the installation.
The InstallShield Wizard welcome screen will appear. Click Next >.
Read the License Agreement and click Yes to accept it. If you click No, the installation will be cancelled.
Select the install destination. By default, files will be installed to C:\POSERA\POS Bridge\. It is highliy recommended to use the default settings. Do not change this setting unless you know exactly what you are doing. Click Next > to proceed.
Files will be installed. This operation should take only a few seconds and is fully automated.
You will be prompted to restart your computer. Save your work and close any open files, then select Yes, I want to restart my computer now. Click Finish to restart your computer.
IMPORTANT! The computer must be restarted. This will ensure that the necessary services are started properly. If the computer is not restarted, POS Bridge will not work and your Mobile POS will not work either.
Related Topics
When the Maitre'D Back-Office software is updated to a new version, the POS Bridge Service may not get updated automatically. If this happens, the POS Bridge Service may be updated manually.
Logon to the Maitre’D Back-Office with appropriate credentials. (Distributor or System Owner)
On the Main Back-Office screen, click on the Help menu and select the About Maitre'D Back-Office… option.
The Maitre'D "About Back-Office" box will be displayed. Take note of the Maitre'D version number.
Click on the Windows Start button and select Settings (by the cog wheel).
The Windows Settings screen will open. Click Apps - Uninstall, defaults, optional features.
The Apps & Features screen will be displayed. Scroll down the list of installed apps and look for Maitre'D POS Bridge.
The fact that the Maitre'D POS Bridge application is listed here means that it is installed. Click on it once to reveal more details. Take note of the version number. It should correspond exactly to your current Maitre'D version number. If it doesn't, your POS Bridge Service needs to be updated.
The manual update process for POS Bridge is started the same way as the initial installation process:
Logout of the Maitre'D Back-Office. Close any open Maitre'D module(s).
Using File explorer, browse to C:\POSERA\MaitreD\PRG\Setup\. Locate the file called POSBridge.exe and double-click on it to launch the installer.
You may see a User Account Control (UAC) warning. Click Yes.
The InstallShield Wizard will start. The older version of POS Bridge will be detected, and you will be asked to update it. Click Yes to proceed.
The InstallShield wizard will prepare the installation.
Since the existing POS Bridge installation is being updated, only updated files will be copied. Click Next >.
Files will be updated. This process is fully automated and should only take a few seconds.
The InstallShield wizard will inform you that the update is complete. Click Finish.
Once the installation is completed, double-check that Maitre'D POS Bridge is installed properly by following the method explained below:
Verify POS Bridge Installation
NOTE: Following an update to the POS Bridge, the computer does not need to be restarted. A computer restart is only necessary after the initial installation.
Before starting the Maitre'D MPOS application, make sure that:
The Maitre'D Back-Office Server is up-and-running.
The Maitre'D 7 Communication Server service is running on the Maitre'D Back-Office. (See Maitre'D Communication Server)
The Maitre'D POS Bridge service is running on the Maitre'D Back-Office. (See Verify POS Bridge Installation)
Start the application using the MPOS icon on your Android or iOS device.
The first time the application is started, it will ask for the Maitre'D Back-Office DNS Name or IP address and the POS Number.
Type the DNS name of the PC where the Maitre'D Back-Office is installed, or its IP address.
Type the POS number you wish to use for this device. The corresponding POS must be configured as a mobile device in the Maitre'D Back-Office, under Point of Sale Control > Workstation > Options... > [POS #] > Advanced > Operating System.
Once the information is filled in, press the Enter button.
The application will connect to the Maitre'D Back-Office.
Once connected to the Maitre'D Back-Office, the POS Login screen will appear.
Related Topics
Downloading User Interface assets will force the Mobile POS application to download images and other graphical assets from the Maitre'D Back-Office to allow them to be displayed on the Mobile POS application.
If you choose not to download User Interface assets, the Mobile POS application will still be perfectly usable. However, buttons which normally have icons or images on a regular POS will simply not have images on the Mobile POS application.
Advanced POS UI
Mobile POS without assets
Start the Mobile POS application and let it connect to the Maitre'D Back-Office normally. Then, press the Workstation UI button.
The Android system will ask you to grant access to photos and medias to MPOS. Press Allow.
Assets will be downloaded. Depending on the WiFi speed and the amount of assets to be downloaded, this could take up to a minute.
Once the download is completed, the Mobile POS will be at the login screen.
Graphical assets are now included in the POS user interface.
Related Topics
This article describes the basic layout of the Maitre'D MPOS application.
Use the "9-dots" button to show or hide the side menu bar.
Use the Update button to force this POS to check the Maitre'D Back-Office for changes and download any updates.
Use the Workstation UI button to download User Interface (UI) assets from the Maitre'D Back-Office, such as images and graphics.
Use the Configuration button to change the IP address of the Maitre'D Back-Office or the POS number. This can also be used to desynchronize this POS from the Maitre'D Back-Office. This will free up a POS number for use by another tablet.
Use the keypad to enter employee numbers, table number or check numbers.
Use the Back button to correct mistakes.
Use the Exit button to return to the previous screen.
Use the Enter button to confirm the employee, table or check number after typing it in.
The Enter key on the right-hand side of the screen has the same function as the Enter key on the keypad.
Type an employee number followed by the Reading key to view that employee's open tables and financial report.
Related Topics
When preferential screens are created and later modified, it is possible to accidentally have buttons that expand beyond the screen boundaries. This wasn't much of an issue with the Legacy POS User Interface, but this can lead to random crashes or even the POS not starting at all with the Advanced POS UI.
Logon to the Maitre’D Back-Office with appropriate credentials. (Distributor or System Owner)
Start the Point of Sale Control module.
Click on the Screens menu and select Preferential Screen setup...
The list of available Preferential Screens is displayed.
Select an existing preferential screen and click the Modify button to edit its properties.
The Preferential Screen Editor will appear (Legacy UI mode).
On some occasions, it is possible to have buttons where the Right Expand or Bottom Expand options are enabled but grayed out because the button is on the edge of the screen.
This happens when copying or moving an already “expanded” button to the right or bottom edges of the screen. It can also happen if the screen's properties were changed. Here are a few tricks that can help in identifying problematic buttons:
If the screen has fewer than 50 buttons, increase the screen size to quickly spot expanded buttons and fix them before reverting to the original screen size.
Here is an example with “Screen 18” where everything looks normal:
Increasing the number of buttons by switching to “Screen 36” shows that some expanded buttons were actually hiding on the edge of the screen:
50 is the maximum number of buttons that can fit on one screen. To quickly spot problematic buttons in this case:
Make a mental note of the buttons that are on the rightmost column and on the bottom row.
Click on the Screen button and change the screen to a smaller button count, for instance “Screen 36”.
Use the Previous and Next buttons to navigate across multiple pages of buttons. Look for any button that looks awkward. The text and graphics on problematic buttons will appear truncated or strangely formatted.
Fix the buttons by disabling the appropriate expanded options.
Revert the screen to its original size. Click the Close button to save changes.
The same issue can occur on Screen Layouts. However, there are no fancy tricks to detect out-of-bounds buttons.
Logon to the Maitre’D Back-Office with appropriate credentials. (Distributor or System Owner)
Start the Point of Sale Control module.
Click on the Screens menu and select Screens layout setup...
The list of available screen layouts is displayed.
Select an existing screen layout and click the Modify button to edit its properties.
The Screen Layout Editor screen will appear.
Unfortunately, there are no fancy tricks to detect problematic buttons on Screen Layouts. You need to double-click on each button that is located near an edge and look for grayed-out expand options:
Next, you will need to move the button (drag & drop) to an empty space that will allow it to expand properly. Then, you will be able to disable the Expand options and move the button back to where it was.
This troubleshooting guide will be helpful if an existing Maitre'D database is upgraded to version 7.08.000.410 or later for use with the Advanced POS User Interface (HTML POS).
Legacy preferential screens and Sreen Layouts can have defects that would prevent the Advanced User Interface from working correctly. These defects may even prevent the Advanced POS from loading properly.
The POS will not start in Advanced POS UI mode, but does start in Legacy POS UI mode.
In advanced UI mode, the POS hangs, becomes unresponsive or crashes when specific screens are accessed.
In advanced UI mode, the POS hangs, becomes unresponsive or crashes when logging in with certain employees.
Some Preferential Screen or Screen Layout buttons look awkward, especially those located near the edges of the screen.
To resolve these issues, follow the steps below:
Temporarily revert to the Legacy POS User Interface. (See below)
.
.
.
Logon to the Maitre’D Back-Office with appropriate credentials. (Distributor or System Owner)
Start the Point of Sale Control module.
Click on the View menu and select the Options... option.
The Point of Sale Control module's options window opens on the Configuration branch.
Click on the POS sub-branch and disable the Use advanced POS UI option.
Click OK. You will be asked to create the workstation data. Click OK to proceed. The entire process could take from a few seconds to a few minutes, depending on your system's performance and the number of workstations on your Maitre'D license.
The options window will close, and you will be back to the Point of Sale Control module.
At this point, the POS workstations should automatically restart with the Legacy POS User Interface.
This article covers cases where the Maitre'D POS won't start and fails to display any meaningful error messages.
As the POS is rebooted and the user logs on to Windows, the POS appears as if it is going to start, but then nothing happens and you are left at the Windows desktop with no error message and no visible clue as to what could have happened.
The POS seems like it is going to start...
... But then nothing else happens and no POS in sight...
Attempting to start the POS using the Maitre'D POS shortcut or by manually running Starter.exe directly from the C:\WS folder produces the same result.
This type of behaviour is more common on brand new hardware that is being setup for the very first time, or refurbished hardware which was completely wiped and returned to its original factory configuration.
To get a better idea of what is going on, try the following steps:
Using Windows File Explorer, browse to C:\WS\.
If you see only about a dozen items in the WS folder, as in the screenshot above, this is already a sign that something is not right, but let's troubleshoot further. Locate the file called pos.exe. Double-click the file to execute it.
3. You may get various error messages at this point. The next steps to carry out will depend on which error message you get.
You may get either (or both) of the following error messages:
The code execution cannot proceed because libssl-1_1.dll was not found. Reinstalling the program may fix the problem.
The code execution cannot proceed because libcrypto-1_1.dll was not found. Reinstalling the program may fix the problem.
Both of these error messages mean that during the POS installation process, a special installer called Wsupd.exe did not run, was prevented from running, or crashed while it was running.
Run Wsupd.exe manually:
From the POS, at the Windows desktop, right-click the start button and select the Run option.
In the Run dialog box, type two back-slashes ( \\ ) followed by the host name of the PC where the Maitre'D Back-Office is installed, then click OK.
You may be asked to enter your credentials. Do so, and be sure to activate the Remember my credentials checkbox.
If your network is configured correctly, you will see the MaitreD shared folder through the network.
Browse to the MaitreD\PRG\Setup folder, and double-click the wsupd.exe installer.
You will see a UAC warning. Click Yes to proceed.
The InstallShield wizard will start and automatically install files.
Once the InstallShield Wizard finishes copying files, the PC will automatically be restarted. This is forced and cannot be prevented.
Logon to Windows and start the Maitre'D POS software again. This time, it should start just fine.
The code execution cannot proceed because libcef.dll was not found. Reinstalling the program may fix the problem
This error message occurs only in very specific circumstances, and only after dealing with the two other errors listed above. This is an issue with the Maitre'D POS application installer (WSsetup.exe) which only occurs while attempting to install the Maitre'D POS application on new hardware with the "Use advanced POS UI" option enabled. This is a known issue which is fixed in a later Maitre'D release.
Install the latest Maitre'D version.
If it is not possible to install the latest Maitre'D version, a workaround is available:
IMPORTANT! The workaround below is only a temporary fix. Please install the latest version of the Maitre'D Back-Office as soon as possible.
Logon to the Maitre’D Back-Office with appropriate credentials. (Distributor or System Owner)
Start the Point of Sale Control module.
Click on the View menu and select the Options... option.
The Point of Sale Control module's options window opens on the Configuration branch.
Click on the POS sub-branch:
Disable the Use Advanced POS UI option, then click OK to apply changes. You will see a prompt to create workstation data. Click OK to accept and create workstation data now
Workstation data is being created. Wait a few seconds for this process to complete.
Go back to the POS workstation.
From the POS, at the Windows desktop, right-click the start button and select the Run option.
In the Run dialog box, type two back-slashes ( \\ ) followed by the host name of the PC where the Maitre'D Back-Office is installed, then click OK.
You may be asked to enter your credentials. Do so, and be sure to activate the Remember my credentials checkbox.
If your network is configured correctly, you will see the MaitreD shared folder through the network.
Browse to the MaitreD\PRG\Setup folder, and double-click the wsupd.exe installer.
You will see a UAC warning. Click Yes to proceed.
The InstallShield wizard will start and automatically install files.
Once the InstallShield Wizard finishes copying files, the PC will automatically be restarted. This is forced and cannot be prevented.
Logon to Windows and start the Maitre'D POS software again. This time, the workstation will start, but will be in Legacy UI mode.
NOTE: While the Maitre'D POS application starts in Legacy UI mode, the libraries that were previously missing (and causing the errors) are being downloaded and installed. This is the workaround that will allow you to switch this POS to the Advanced POS UI afterwards.
In other words, the POS needs to start in Legacy mode at least once before you can use the Advanced POS UI.
If you wish to use the Advanced POS UI, re-enable the option in Point of Sale Control > View > Options > Configuration > POS, then click OK and be sure to create workstation data again.
The Maitre'D POS application will restart itself and reload with the Advanced UI (HTML POS).
If the proposed solutions did not fix the issues you are experiencing, please call the PayFacto helpdesk.
The Maitre'D Mobile POS (MPOS) application is available on Google Play.
From your Android device, you may search for the application manually on Google Play, or use the link or QR code provided below.
From the MPOS application page on Google Play, simply press the green Install button.
From the MPOS application page on Google Play, press the green Open button.
You may also use the icon in your installed apps:
Related Topics
IMPORTANT! If you can't see the MaitreD shared folder through the network or if you are getting error messages, there is most likely something wrong with your network settings. Please review the Maitre'D Back-Office installation procedures and, more specifically, how to .
IMPORTANT! If you can't see the MaitreD shared folder through the network or if you are getting error messages, there is most likely something wrong with your network settings. Please review the Maitre'D Back-Office installation procedures and, more specifically, how to .
Install POS Bridge
Verify POS Bridge Installation
Update POS Bridge
Setup Mobile Printing
Mobile Workstation Settings
Android
Initial Configuration
Basics
Download UI Assets
Advanced POS UI Screen Issue
Locate and Repair expanded buttons
Locate and Repair overlapping buttons
POS Failing to Start
Advanced POS UI Screen Issues


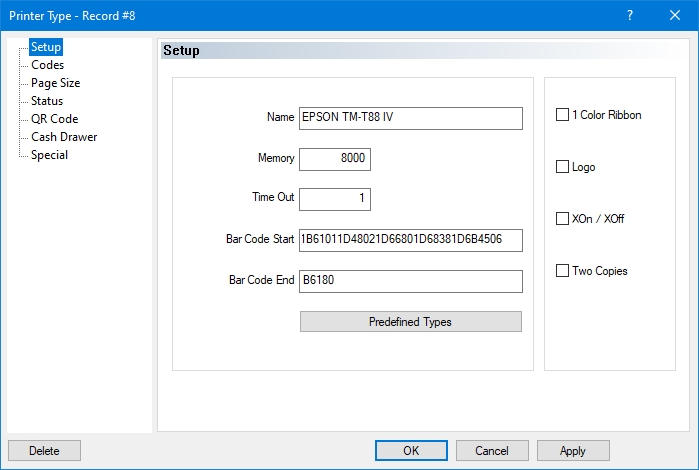


When preferential screens are created and later modified, it is possible to accidentally have buttons that overlap each other. This wasn't much of an issue with the Legacy POS User Interface, but this can lead to random crashes or even the POS not starting at all with the Advanced POS UI.
Logon to the Maitre’D Back-Office with appropriate credentials. (Distributor or System Owner)
Start the Point of Sale Control module.
Click on the Screens menu and select Preferential Screen setup...
The list of available Preferential Screens is displayed.
Select an existing preferential screen and click the Modify button to edit its properties.
The preferential Screen Editor will appear (Legacy UI mode).
Overlapping buttons can happen when enabling the Right Expand or Bottom Expand options next to existing buttons. Buttons to the right and below the expanded button still exists, but are now hidden by the expanded button. This will cause unexpected behaviour with the Advanced POS User Interface.
To fix the issue, you can disable the expand options and leave them disabled. You may also delete the hidden buttons before re-enabling the desired expand options.
Unfortunately, there is no easy way to spot overlapping buttons. The only way is to open the properties of each expanded button, disable the expand options and see if there were one or more buttons hiding behind it.
Overlapping buttons can also be found in Screen Layouts. The procedure to locate and fix them is exactly the same as for Preferential Screens.
Related Topics
